


首先来看官方文档对于picker组件mode = multiSelector(多选)的属性说明和代码
<template>
    <view>
        <view class="uni-title uni-common-pl">多列选择器</view>
		<view class="uni-list">
			<view class="uni-list-cell">
				<view class="uni-list-cell-left">
					当前选择
				</view>
				<view class="uni-list-cell-db">
					<picker mode="multiSelector" @columnchange="bindMultiPickerColumnChange" :value="multiIndex" :range="multiArray">
						<view class="uni-input">{{multiArray[0][multiIndex[0]]}},{{multiArray[1][multiIndex[1]]}},{{multiArray[2][multiIndex[2]]}}
                        </view>
					</picker>
				</view>
			</view>
		</view>
    </view>
</template>

<script>
	export default {
		data() {
			return {
				multiArray: [
					['亚洲', '欧洲'],
					['中国', '日本'],
					['北京', '上海', '广州']
				],
				multiIndex: [0, 0, 0],
			}
		},
		methods: {
			bindMultiPickerColumnChange: function(e) {
				console.log('修改的列为:' + e.detail.column + ',值为:' + e.detail.value)
				this.multiIndex[e.detail.column] = e.detail.value
				switch (e.detail.column) {
					case 0: //拖动第1列
						switch (this.multiIndex[0]) {
							case 0:
								this.multiArray[1] = ['中国', '日本']
								this.multiArray[2] = ['北京', '上海', '广州']
								break
							case 1:
								this.multiArray[1] = ['英国', '法国']
								this.multiArray[2] = ['伦敦', '曼彻斯特']
								break
						}
						this.multiIndex.splice(1, 1, 0)
						this.multiIndex.splice(2, 1, 0)
						break
					case 1: //拖动第2列
						switch (this.multiIndex[0]) { //判断第一列是什么
							case 0:
								switch (this.multiIndex[1]) {
									case 0:
										this.multiArray[2] = ['北京', '上海', '广州']
										break
									case 1:
										this.multiArray[2] = ['东京','北海道']
										break
								}
								break
							case 1:
								switch (this.multiIndex[1]) {
									case 0:
										this.multiArray[2] = ['伦敦', '曼彻斯特']
										break
									case 1:
										this.multiArray[2] = ['巴黎', '马赛']
										break
								}
								break
						}
						this.multiIndex.splice(2, 1, 0)
						break
				}
				this.$forceUpdate()
			},
</script>

<style>
</style>
演示出来的效果是这样的:
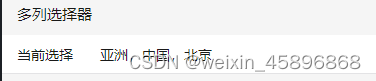
基于这个演示的效果我们可以很直观的知道各个属性的作用:range是我们选择的范围,range-key是要它显示的内容,value是每次选定的下标(类似[0,0,0]这样),@columnchange是滑动改变选择触发的方法。
可以看到官方演示是本身有一个静态数组并且给予了一个初始选择的值。
那么我们如果要从接口调取数据并动态的改变数组呢?
比如要实现一个省市区的选择,应该怎么实现呢?我们先照着官方的样例写出来:
<template>
	<view class="box" v-else-if="item.type === 4">
		<view class="title">
			{{ item.title }}:
		</view>
		<view class="btns">
			<view class="btn" v-if="!sheng[0]">
				无信息
			</view>
			<picker v-else mode="multiSelector" @columnchange="bindMultiPickerColumnChange" class="btn" :value="multiIndex" :range="multiAdress" range-key="Name">
				<view>{{multiAdress[0][multiIndex[0]]}} {{multiAdress[1][multiIndex[1]]}} {{multiAdress[2][multiIndex[2]]}}</view>
			</picker>
		</view>
	</view>
</template>

<script>
    export default {
        data() {
            return {
                shengshiqv: {
						    title: '地址',
						    placeholder: '选择省、市、区',
						    placeholderStyle: 'color: #626262;',
						    event: 'openAddress',
						    sheng: {},
						    shi: {},
						    qv: {},
						    msg: ''
                },
                multiAdress:[
					    [],
					    [],
					    []
				    ],
			    multiIndex: [0, 0, 0],
		    	sheng: [],
			    shi: [],
		    	qv: [],
            }
        },
        methods: {
            setQv(item) {
				console.log(item);
				this.form.shengshiqv.qv = item;
				if(this.SimCode == 2) {
					this.getSims();
				}
			},
			setShi(item) {
				console.log(item);
				if(this.SimCode == 2) {
					this.NumStatus = false;
					this.form.sim.inp = '';
				}
				this.form.shengshiqv.shi = item;
				this.form.shengshiqv.qv = {};
				this.qv = [];
				this.getAddress(2, item.Code);
			},
			setSheng(item) {
				console.log(item);
				if(this.SimCode == 2) {
					this.NumStatus = false;
					this.form.sim.inp = '';
				}
				this.form.shengshiqv.sheng = item;
				this.form.shengshiqv.shi = {};
				this.form.shengshiqv.qv = {};
				this.shi = [];
				this.qv = [];
				this.getAddress(1, item.Code)
			},
			getAddress(level, code) {
				this.$Req.get({
					url: this.$AppConfig.host + '&Code=' + code, // 请求地址
					success: resData => { // 请求成功回调函数
						// console.log(resData)
						if(resData.Code == 0) {
							if(level == 0) {
								this.sheng = resData.Data;
								this.multiAdress[0] = this.sheng
								this.getAddress(1,this.sheng[0].Code)
							}
							else if(level == 1) {
								this.shi = resData.Data;
								this.multiAdress[1] = this.shi
								this.getAddress(2,this.shi[0].Code)
							}
							else if(level == 2) {
								this.qv = resData.Data;
								this.multiAdress[2] = this.qv
							}
						}
						else {
							uni.showToast({
								title: resData.Msg,
								icon: 'none'
							});
						}
					}
				});
				this.$forceUpdate()
			},
            bindMultiPickerColumnChange: function(e) {
				this.tag = 1
				console.log('修改的列为:' + e.detail.column + ',值为:' + e.detail.value)
				this.multiIndex[e.detail.column] = e.detail.value
					switch (e.detail.column) {
						case 0: //拖动省
							this.setSheng(this.sheng[e.detail.value])
							this.multiIndex.splice(1, 1, 0)
							this.multiIndex.splice(2, 1, 0)
							break
						case 1: //拖动市
							this.setShi(this.shi[e.detail.value])
							this.multiIndex.splice(2, 1, 0)
							break
						case 2: //拖动区
							this.setQv(this.qv[e.detail.value])
							break
					}
				// this.$forceUpdate()
			},
        },

        onLoad(query) {
            this.getAddress(0, 0);
        }
    }
</script>

<style lang="less" scoped>
</style>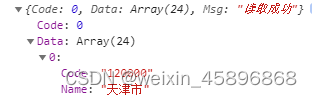
省市区的格式是这样的,Code可以不用管,这是我调用接口用的参数。
运行之后我们发现不太对劲,首先最大的问题是这个:
比如我想改变picker的选项,例如,一开始picker是空的,选择后,picker选项变成{1,2,3},再点击,picker选项变成{4,5,6},但是在上述代码运行过程中,当我们点击picker的时候,弹出的picker是空的,当我点击再点击的时候,弹出的picker选项变成了{1,2,3},再一次点击的时候,弹出的picker选项是{4,5,6},即我们每一次点击,弹出的picker选项是上一次点击的结果。
这是怎么回事呢?一开始我认为是同步的问题,就是接口的数据还没来及给multiAdress这个数组,picker就已经显示了,于是使用了promise来解决这个问题,但是没有作用,于是我又想了很久,终于在别人的博客中找到了答案,那就是使用$set来给数组赋值,大家可以看这篇博客vue中$set用法详细讲解_vue $set-CSDN博客
于是我对getAddress方法进行了改动:
getAddress(level, code) {
				let type = this.type;
				this.$Req.get({
					url: this.$AppConfig.host + code, // 请求地址
					success: resData => { // 请求成功回调函数
						// console.log(resData)
						if(resData.Code == 0) {
							if(level == 0) {
								this.sheng = resData.Data;
								this.$set(this.multiAdress,0,this.sheng)
								this.getAddress(1,this.sheng[0].Code)
							}
							else if(level == 1) {
								this.shi = resData.Data;
								this.$set(this.multiAdress,1,this.shi)
								this.getAddress(2,this.shi[0].Code)
							}
							else if(level == 2) {
								this.qv = resData.Data;
								this.$set(this.multiAdress,2,this.qv)
							}
						}
						else {
							uni.showToast({
								title: resData.Msg,
								icon: 'none'
							});
						}
					}
				});
				this.$forceUpdate()
			},
运行后结果正常。
但是经过一些测试后发现,我想加一些自己的想法,比如要怎么在选择之前给它的文本变成”请选择地区“呢?这还不简单?加个判断就行了:
<picker v-else mode="multiSelector" @columnchange="bindMultiPickerColumnChange" class="btn" :value="multiIndex" :range="multiAdress" range-key="Name">
	<view>{{item.sheng.Name ? item.sheng.Name : '选择省'}} {{item.shi.Name ? item.shi.Name : '选择市'}} {{item.qv.Name ? item.qv.Name : '选择区'}}</view>
</picker>然而又出现了新的问题,如果我打开picker但没有选择省市区直接确定,按道理应该默认选择第一个,但是不行,而且一定要滑动才能选中,什么概念呢?就是说如果我第一个省是天津市,他名下只有一个市叫天津市,这时候如果直接选择他后面的区会出现文本”选择省 选择市 {{选择的区}}“。
怎么搞定?简单!我给他的省市区来一个默认值,给一个tag,在@columnchange第一次发生前显示的是”请选择“,@columnchange发生后tag的值变化,可以显示出这个默认值。但是实际操作后发现还是不行,虽然滑动来选择区后可以显示出省市了,但是如果不滑动区呢?答案是显而易见的,不滑动的话@columnchange就没有发生,tag值也就不会发生改变,从而默认的省市区也不会显示出来。
这个就有点难搞了,除非我想要回到最初的显示模式,之后我又研究了好久,发现虽然官方的代码里面没用到,但是picker还有一个事件@change,于是我对picker进行了改动,添加了@change。事实证明,组件的每个属性都是有它独特的作用的,问题解决。
<picker v-else mode="multiSelector" @columnchange="bindMultiPickerColumnChange" @change="MultiPickerChange" class="btn" :value="multiIndex" :range="multiAdress" range-key="Name">
	<view>{{tag ? item.sheng.Name : '选择省'}} {{tag ? item.shi.Name : '选择市'}} {{tag ? item.qv.Name : '选择区'}}</view>
</picker>

tag = 0

MultiPickerChange: function(e) {
	this.tag = 1
	this.form.shengshiqv.sheng = this.sheng[e.detail.value[0]]
	this.form.shengshiqv.shi = this.shi[e.detail.value[1]]
	this.form.shengshiqv.qv = this.qv[e.detail.value[2]]
},
最后的代码是这样的:
<template>
<view class="box" v-else-if="item.type === 4">
<view class="title">
{{ item.title }}:
</view>
<view class="btns">
<view class="btn" v-if="!sheng[0]">
无信息
</view>
<picker v-else mode="multiSelector" @columnchange="bindMultiPickerColumnChange" @change="MultiPickerChange" class="btn" :value="multiIndex" :range="multiAdress" range-key="Name">
<view>{{tag ? item.sheng.Name : '选择省'}} {{tag ? item.shi.Name : '选择市'}} {{tag ? item.qv.Name : '选择区'}}</view>
</picker>
</view>
</view>
</template>
<script>
export default {
data() {
return {
shengshiqv: {
title: '地址',
placeholder: '选择省、市、区',
placeholderStyle: 'color: #626262;',
event: 'openAddress',
sheng: {},
shi: {},
qv: {},
msg: ''
},
multiAdress:[
[],
[],
[]
],
multiIndex: [0, 0, 0],
tag: 0,
sheng: [],
shi: [],
qv: [],
}
},
methods: {
setQv(item) {
console.log(item);
this.form.shengshiqv.qv = item;
if(this.SimCode == 2) {
this.getSims();
}
},
setShi(item) {
console.log(item);
if(this.SimCode == 2) {
this.NumStatus = false;
this.form.sim.inp = '';
}
this.form.shengshiqv.shi = item;
this.form.shengshiqv.qv = {};
this.qv = [];
this.getAddress(2, item.Code);
},
setSheng(item) {
console.log(item);
if(this.SimCode == 2) {
this.NumStatus = false;
this.form.sim.inp = '';
}
this.form.shengshiqv.sheng = item;
this.form.shengshiqv.shi = {};
this.form.shengshiqv.qv = {};
this.shi = [];
this.qv = [];
this.getAddress(1, item.Code)
},
getAddress(level, code) {
let type = this.type;
this.$Req.get({
url: this.$AppConfig.host + '&Code=' + code, // 请求地址
success: resData => { // 请求成功回调函数
// console.log(resData)
if(resData.Code == 0) {
if(level == 0) {
this.sheng = resData.Data;
this.$set(this.multiAdress,0,this.sheng)
this.getAddress(1,this.sheng[0].Code)
}
else if(level == 1) {
this.shi = resData.Data;
this.$set(this.multiAdress,1,this.shi)
this.getAddress(2,this.shi[0].Code)
}
else if(level == 2) {
this.qv = resData.Data;
this.$set(this.multiAdress,2,this.qv)
}
}
else {
uni.showToast({
title: resData.Msg,
icon: 'none'
});
}
}
});
this.$forceUpdate()
},
MultiPickerChange: function(e) {
this.tag = 1
this.form.shengshiqv.sheng = this.sheng[e.detail.value[0]]
this.form.shengshiqv.shi = this.shi[e.detail.value[1]]
this.form.shengshiqv.qv = this.qv[e.detail.value[2]]
},
bindMultiPickerColumnChange: function(e) {
this.tag = 1
console.log('修改的列为:' + e.detail.column + ',值为:' + e.detail.value)
this.multiIndex[e.detail.column] = e.detail.value
switch (e.detail.column) {
case 0: //拖动省
this.setSheng(this.sheng[e.detail.value])
this.multiIndex.splice(1, 1, 0)
this.multiIndex.splice(2, 1, 0)
break
case 1: //拖动市
this.setShi(this.shi[e.detail.value])
this.multiIndex.splice(2, 1, 0)
break
case 2: //拖动区
this.setQv(this.qv[e.detail.value])
break
}
// this.$forceUpdate()
},
},
onLoad(query) {
this.getAddress(0, 0);
}
}
</script>
<style lang="less" scoped>
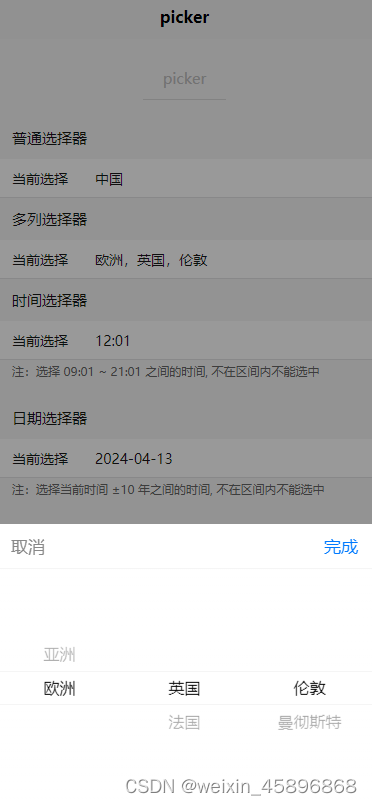
</style>效果是这样的 ,大功告成了!

其实这段程序还有很多地方可以改进,我感觉很多地方的操作都有点冗余了,但可惜我也只是一个前端菜鸟,如果大家觉得有哪里可以改进的地方,欢迎交流。


 7080
7080

 被折叠的 条评论
为什么被折叠?
被折叠的 条评论
为什么被折叠?
 到【灌水乐园】发言


