


记录一下Vue3的学习记录,相比起Vue2有什么区别
Vue3相比起Vue2的改变
-
Composition API(组合API)
- setup配置
- ref与reactive
- watch与watchEffect
- provide与inject
- …
-
新的内置组件
- Fragment
- Teleport
- Suspense
-
其他改变
- 新的生命周期钩子
- data 选项应始终被声明为一个函数
- 移除keyCode支持作为 v-on 的修饰符
- …
主要讨论
变化一、Setup
-
setup是所有Composition API(组合API)组件中所用到的:数据、方法等等,均要配置在setup中。
-
setup函数的两种返回值:
-
若返回一个对象,则对象中的属性、方法, 在模板中均可以直接使用。(重点关注!)
-
若返回一个渲染函数:则可以自定义渲染内容。(了解)
注意点
- 尽量不要与Vue2.x配置混用
- Vue2.x配置(data、methos、computed…)中可以访问到setup中的属性、方法。
- 但在setup中不能访问到Vue2.x配置(data、methos、computed…)。
- 如果有重名, setup优先。
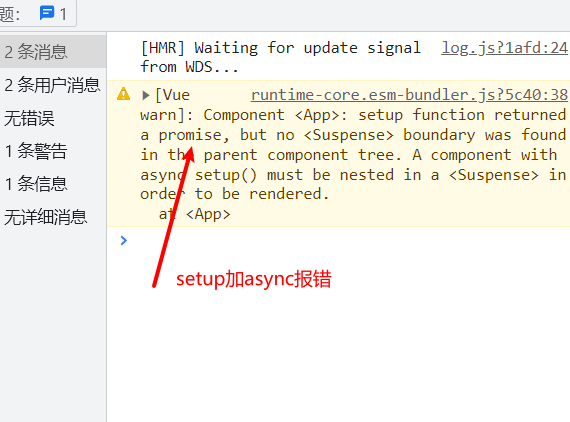
- setup不能是一个async函数,因为返回值不再是return的对象, 而是promise, 模板看不到return对象中的属性。(后期也可以返回一个Promise实例,但需要Suspense和异步组件的配合)
<template>
	<h1>一个人的信息</h1>
	<h2>姓名:{{name}}</h2>
	<h2>年龄:{{age}}</h2>
	<h2>性别:{{sex}}</h2>
	<h2>a的值是:{{a}}</h2>
	<button @click="sayHello">说话(Vue3所配置的——sayHello)</button>
	<br>
	<br>
	<button @click="sayWelcome">说话(Vue2所配置的——sayWelcome)</button>
	<br>
	<br>
	<button @click="test1">测试一下在Vue2的配置中去读取Vue3中的数据、方法</button>
	<br>
	<br>
	<button @click="test2">测试一下在Vue3的setup配置中去读取Vue2中的数据、方法</button>

</template>

<script>
	// import {h} from 'vue'
	export default {
		name: 'App',
		data() {
			return {
				sex:'男',
				a:100
			}
		},
		methods: {
			sayWelcome(){
				alert('欢迎来到尚硅谷学习')
			},
			test1(){
				console.log(this.sex)
				console.log(this.name)
				console.log(this.age)
				console.log(this.sayHello)
			}
		},
		//此处只是测试一下setup,暂时不考虑响应式的问题。
		async setup(){
			//数据
			let name = '张三'
			let age = 18
			let a = 200

			//方法
			function sayHello(){
				alert(`我叫${name},我${age}岁了,你好啊!`)
			}
			function test2(){
				console.log(name)
				console.log(age)
				console.log(sayHello)
				console.log(this.sex)
				console.log(this.sayWelcome)
			}

			//返回一个对象(常用)
			return {
				name,
				age,
				sayHello,
				test2,
				a
			}

			//返回一个函数(渲染函数)
			// return ()=> h('h1','尚硅谷')
		}
	}
</script>
变化二 ref和reactive函数
ref
- 作用: 定义一个响应式的数据
- 语法:
const xxx = ref(initValue)- 创建一个包含响应式数据的引用对象(reference对象,简称ref对象)。
- JS中操作数据:
xxx.value - 模板中读取数据: 不需要.value,直接:
<div>{{xxx}}</div>
- 备注:
- 接收的数据可以是:基本类型、也可以是对象类型。
- 基本类型的数据:响应式依然是靠
Object.defineProperty()的get与set完成的。 - 对象类型的数据:内部 “ 求助 ” 了Vue3.0中的一个新函数——
reactive函数。
<template>
   <h1>一个人的信息</h1>
   <h2>姓名:{{name}}</h2>
   <h2>年龄:{{age}}</h2>
   <h3>工作种类:{{job.type}}</h3>
   <h3>工作薪水:{{job.salary}}</h3>
   <button @click="sayHello">说话(Vue3所配置的——sayHello)</button>
   <br>

   <br>
   <button @click="test2">测试一下在Vue3的setup配置中去读取Vue2中的数据、方法</button>

</template>

<script>
   import {ref} from 'vue'
   export default {
   	name: 'App',

   	//此处只是测试一下setup,暂时不考虑响应式的问题。
   	 setup(){
   		//数据
   		//数据
   		let name = ref('张三')
   		let age = ref(18)
   		let job = ref({
   			type:'前端工程师',
   			salary:'30K'
   		})
   		//方法
   		function sayHello(){
   			alert(`我叫${name},我${age}岁了,你好啊!`)
   		}
   		function test2(){
         				name.value = '李四'
 				job.value.type = 'UI设计师'
         job.value.salary='5'

 }

   		//返回一个对象(常用)
   		return {
        	name,
   			age,
   			sayHello,
   			test2,
       job
   		}


   	}
   }
</script>
reactive函数
- 作用: 定义一个对象类型的响应式数据(基本类型不要用它,要用
ref函数) - 语法:
const 代理对象= reactive(源对象)接收一个对象(或数组),返回一个代理对象(Proxy的实例对象,简称proxy对象) - reactive定义的响应式数据是“深层次的”。
- 内部基于 ES6 的 Proxy 实现,通过代理对象操作源对象内部数据进行操作。
3、ref和reactive的区别
在数据类型方面:
ref用来定义:基本类型数据。
reactive用来定义:对象(或数组)类型数据。
- 备注:ref也可以用来定义对象(或数组)类型数据, 它内部会自动通过
reactive转为代理对象。
从原理角度对比:
-
ref通过
Object.defineProperty()的get与set来实现响应式(数据劫持)。 -
reactive通过使用Proxy来实现响应式(数据劫持), 并通过Reflect操作源对象内部的数据。
从使用角度对比: -
ref定义的数据:操作数据需要
.value,读取数据时模板中直接读取不需要.value。 -
reactive定义的数据:操作数据与读取数据:均不需要
.value。
4、setup的两个注意点
setup执行的时机 -
在beforeCreate之前执行一次,this是undefined。
4、setup的两个注意点
setup执行的时机
- 在beforeCreate之前执行一次,this是undefined。(不可能在之前拿到this)
	beforeCreate(){
			console.log('声明钩子');
		},
		setup(props,context){

			console.log(this);


		}

在之前执行
setup的参数
rops:值为对象,包含:组件外部传递过来,且组件内部声明接收了的属性。
context:上下文对象
- attrs: 值为对象,包含:组件外部传递过来,但没有在props配置中声明的属性, 相当于
this.$attrs。(也可以在props当中得到,但是也可以通过attras) - slots: 收到的插槽内容, 相当于
this.$slots。 - emit: 分发自定义事件的函数, 相当于
this.$emit。(通过emit触发)
props
父组件/App.vue,传入msg
	<Demo @hello="showHelloMsg" msg="你好啊" school="尚硅谷">
		<template v-slot:qwe>
			<span>尚硅谷</span>
		</template>
		<template v-slot:asd>
			<span>尚硅谷</span>
		</template>
	</Demo>
</template>

<script>
	import Demo from './components/Demo'
	export default {
		name: 'App',
		components:{Demo},
		setup(){
			function showHelloMsg(value){
				alert(`你好啊,你触发了hello事件,我收到的参数是:${value}!`)
			}
			return {
				showHelloMsg
			}
		}
	}
子组件,/DEMO通过props接受
<script>
	import {reactive} from 'vue'
	export default {
		name: 'Demo',
		props:['msg','school'],
		emits:['hello'],
		beforeCreate(){
			console.log('声明钩子');
		},
		setup(props,context){
			// console.log('---setup---',props)
			// console.log('---setup---',context)
			// console.log('---setup---',context.attrs) //相当与Vue2中的$attrs
			// console.log('---setup---',context.emit) //触发自定义事件的。
			// console.log('---setup---',context.slots) //插槽
			console.log(this);
			//数据
			let person = reactive({
				name:'张三',
				age:18
			})

			//方法
			function test(){
				context.emit('hello',666)
			}

			//返回一个对象(常用)
			return {
				person,
				test
			}
		}
	}
</script>
完整的代码
父组件
<template>
	<Demo @hello="showHelloMsg" msg="你好啊" school="尚硅谷">
		<template v-slot:qwe>
			<span>尚硅谷</span>
		</template>
		<template v-slot:asd>
			<span>尚硅谷</span>
		</template>
	</Demo>
</template>

<script>
	import Demo from './components/Demo'
	export default {
		name: 'App',
		components:{Demo},
		setup(){
			function showHelloMsg(value){
				alert(`你好啊,你触发了hello事件,我收到的参数是:${value}!`)
			}
			return {
				showHelloMsg
			}
		}
	}
</script>
/Demo.vue
	import {reactive} from 'vue'
	export default {
		name: 'Demo',
		props:['msg','school'],
		emits:['hello'],
		beforeCreate(){
			console.log('声明钩子');
		},
		setup(props,context){
			// console.log('---setup---',props)
			// console.log('---setup---',context)
			// console.log('---setup---',context.attrs) //相当与Vue2中的$attrs
			// console.log('---setup---',context.emit) //触发自定义事件的。
			// console.log('---setup---',context.slots) //插槽
			console.log(this);
			//数据
			let person = reactive({
				name:'张三',
				age:18
			})

			//方法
			function test(){
				context.emit('hello',666)
			}

			//返回一个对象(常用)
			return {
				person,
				test
			}
		}
	}
</script>


 392
392


 被折叠的 条评论
为什么被折叠?
被折叠的 条评论
为什么被折叠?
 到【灌水乐园】发言


