


 本文深入介绍了WPF中的Binding机制,包括Binding的基础概念,如何通过Path属性建立数据源与UI元素的连接,支持多级路径,使用集合类型的索引器,以及默认元素作为Path。文中还讨论了DataContext,DataTemplate,以及使用DataTable和XML数据作为Binding源的情况。此外,提到了使用LINQ检索结果作为Binding源和RelativeSource在不确定Source时的应用,以及MultiBinding的复合数据绑定功能。
深入浅出WPF之Binding
Binding
Binding基础
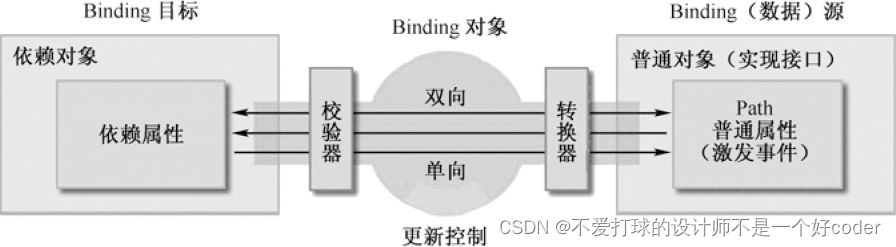
把Binding比作数据的桥梁,那么它的两端分别是Binding的源(Source)和目标(Target)。
首先,我们创建一个名为Student的类,这个类的实例将作为数据源来使用。
class Student
{
   private string name;
   public string Name
  {
      get{ return name;}
      set{ name = value;}
  }
}
再次,我们使用一个称为Binding的路径(Path)的属性来通过Binding送达UI元素。但光有属性还不行——Binding是一种自动机制,当值变化后属性要有能力通知Binding,让Binding把变化传递给UI元素。怎样才能让一个属性具备这种通知Binding值已经变化的能力呢?方法是在属性的set语句中激发一个PropertyChanged事件。这个事件不需要我们自己声明,我们要做的是让
作为数据源的类实现System.ComponentModel名称空间中的INotifyPropertyChanged接口。当为Binding设置了数据源后,Binding就会自动侦听来自这个接口的PropertyChanged事件。
class Student : INotifyPropertyChanged
{
    public event PropertyChangedEventHandler PropertyChanged;

    private string name;

    public string Name
    {
        get{return name;}
        set
        {
            name = value;
            // 激发事件
            if(this.PropertyChanged != null)
            {
                this.PropertyChanged.Invoke(this, new PropertyChangedEventArgs("Name"));
            }
        }
    }
}
经过这样一升级,当Name属性的值发生变化时PropertyChanged事件就会被激发,Binding接收到这个事件后发现事件的消息告诉它是名为Name的属性发生了值的改变,于是就会通知Binding目标端的UI元素显示新的值。
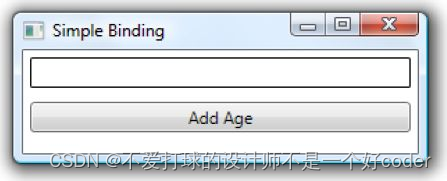
然后,我们在窗体上准备一个TextBox和一个Button。TextBox将作为Binding目标,我们还会在Button的Click事件发生时改变Student对象的Name属性值。
<StackPanel>
	<TextBox x:Name="textBoxName"  BorderBrush="Black"  Margin="5" />
	<Button Content="Add Age"  Margin="5"  Click="Button_Click" />
</StackPanel>
接下来,我们将进入最重要的一步——使用Binding把数据源和UI元素连接起来。C#代码如下:
 public partial class MainWindow : Window
    {
        Student stu;
        public MainWindow()
        {
            InitializeComponent();
            //准备数据源
            stu = new Student();
            //准备Binding
            Binding binding = new Binding();
            binding.Source = stu;
            binding.Path = new PropertyPath("Name");

            //使用Binding连接数据源与Binding目标
            BindingOperations.SetBinding(this.textBoxName, TextBox.TextProperty, binding);
        }

        private void Button_Click(object sender, RoutedEventArgs e)
        {
            stu.Name += "Name";
        }


    }
主要流程:
- 创建数据源
- 建立binding(binding实例,path)
- 将数据源与binding目标建立连接(BindingOperations.SetBinding()方法)
其中3中方法的3个参数是我们记忆的重点:
- 第一个参数用于指定Binding的目标,本例中是this.textBoxName。
- 与数据源的Path原理类似,第二个参数用于为Binding指明把数据送达目标的哪个属性。只是你会发现在这里用的不是对象的属性而是类的一个 静态只读(static readonly) 的DependencyProperty类型成员变量!这就是我们后面要详细讲述的与Binding息息相关的依赖属性。其实很好理解,这类属性的值可以通过Binding依赖在其他对象的属性值上,被其他对象的属性值所驱动。
- 第三个参数很明了,就是指定使用哪个Binding实例将数据源与目标关联起来。
实际工作中,实施Binding的代码可能与上面看到的不太一样,原因是TextBox这类UI元素的基类FrameworkElement对BindingOperations.SetBinding(…)方法进行了封装,封装的结果 也叫SetBinding,只是参数列表发生了变化。代码如下:
public BindingExpressionBase SetBinding(DependencyProperty dp, BindingBase binding)
	{
	return BindingOperations.SetBinding(this, dp, binding);
	}
同时,有经验的程序员还会借助Binding类的构造器及C# 3.0的对象初始化器语法来简化代码。这样一来,上面这段代码有可能成为这样:
public Window()
{
	InitializeComponent();

// 三合一操作

	this.textBoxName.SetBinding(TextBox.TextProperty, new Binding("Name")
	 { Source = stu  = new Student() });

}
Binding模型
把控件作为Binding源与Binding标记扩展
前面提过,大多数情况下Binding的源是逻辑层的对象,但有时候为了让UI元素产生一些联动效果也会使用Binding在控件间建立关联。下面的代码是把一个TextBox的Text属性关联在了Slider的Value属性上。
<Window x:Class="WpfApplication1.Window1"
        xmlns="http://schemas.microsoft.com/winfx/2006/xaml/presentation"
        xmlns:x="http://schemas.microsoft.com/winfx/2006/xaml"
        Title="Control as Source" Height="110" Width="300">
    <StackPanel>
        <TextBox Name="textBox1" Text="{Binding Path=Value,ElementName=slider1}" BorderBrush = "Black" Margin="5" />
        <Slider Name="slider1" Maximum= "100" Minimum = "0" Margin="5"/>
    </StackPanel>
</Window>
正如大家所见,除了可以在C#代码中建立Binding外在XAML代码里也可以方便地设置Binding。
值得注意的是,在C#代码中可以访问XAML代码中声明的变量但XAML代码中却无法访问C#代码中声明的变量,因此,要想在XAML中建立UI元素与逻辑层对象的Binding还要颇费些周折,把逻辑层对象声明为XAML代码中的资源(Resource)。
看这句XAML代码,它使用了Binding标记扩展语法:
<TextBox x:Name="textBox1" Text="{Binding Path=Value,ElementName=slider1}" BorderBrush = "Black" Margin="5" />
与之等价的C#代码是:
this.textBox1.SetBinding(TextBox.TextProperty, new Binding("Value"),{ElementName = "slider1"});
因为Binding类的构造器本身可以接收Path作为参数,所以也常写为:
<TextBox x:Name="textBox1" Text="{Binding Value,ElementName=slider1}" BorderBrush = "Black" Margin="5" />
注意
因为在C#代码中我们可以直接访问控件对象,所以一般也不会使用Binding的ElementName属性,而是直接把对象赋值给Binding的Source属性。
Binding的(Path)路径
Binding支持多级路径(一直“.”下去)
比如,如果我们想让一个TextBox显示另外一个TextBox的文本长度,我们可以写:
    <StackPanel>
        <TextBox x:Name="textBox1" BorderBrush= "Black" Margin="5" ></TextBox>
        <TextBox x:Name="textBox2" Text="{Binding Path=Text.Length, ElementName= textBox1, Mode=OneWay}" BorderBrush="Black" Margin="5"></TextBox>
    </StackPanel>
等效的C#代码是:
this.textBox2.SetBinding(TextBox.TextProperty, new Binding("Text.Length"), {Source = this.textBox1, Mode = BindingMode.OneWay});
集合类型的索引器作为Path来使用
比如我想让一个TextBox显示另一个TextBox文本的第四个字符,我们可以这样写:
    <StackPanel>
        <TextBox x:Name="textBox1" BorderBrush= "Black" Margin="5" ></TextBox>
        <TextBox x:Name="textBox2" Text="{Binding Path=Text.[3], ElementName= TextBox1, Mode=OneWay}" BorderBrush="Black" Margin="5"></TextBox>
    </StackPanel>
等效的C#代码是:
this.textBox2.SetBinding(TextBox.TextProperty, new Binding("Text.[3]"), {Source = this.textBox1, Mode = BindingMode.OneWay});
默认元素作为Path使用
当使用一个集合或者DataView作为Binding源时,如果我们想把它的默认元素当作Path使
用,则需要使用这样的语法:
List<string> list = new List<string> () {"Tim", "Tom", "Smith"}
this.textBox1.SetBinding(TextBox.TextProperty, new Binding("/"), {Source = list});
this.textBox2.SetBinding(TextBox.TextProperty, new Binding("/Length"), {Source = list, Mode = BindingMode.OneWay});
this.textBox3.SetBinding(TextBox.TextProperty, new Binding("/[2]"), {Source = list, Mode = BindingMode.OneWay});
如果集合元素的属性仍然还是一个集合,我们想把子级集合中的元素当作Path,则可以使
用多级斜线的语法(即一路“斜线”下去),例如:
     class City
     {
        public string Name { get; set; }
     }

    class Province
    {
        public string Name { set; get;  }

        public List<City> CityList = new List<City>  { get; set; }
    }

    class Nation
    {
        public string Name { set; get; }

        public List <Province> ProvList = new List <Province> { get; set; }
    }

    //Binding
    List<Nation> nationList = new List<Nation>() {/* 初始化... */ };

    this.textBox1.SetBinding(TextBox.TextProperty, new Binding("/Name"), { Source = nationList});
    this.textBox2.SetBinding(TextBox.TextProperty, new Binding("/ProvList.Name"), { Source = nationList });
    this.textBox2.SetBinding(TextBox.TextProperty, new Binding("/Provinces/CityList.Name"), { Source = nationList });
“没有Path”的Binding
Binding源本身就是数据且不需要Path来指明。典型的,string、int等基本类型就是这样,他们的实例本身就是数据,我们无法指出通过它的哪个属性来访问这个数据,这时我们只需将Path的值设置为“.” 就可以了。在XAML代码里这个“.”可以省略不写,但在C#代码里却不能省略。
DataContext
可以不用为Binding设置Source,而从xaml中创建context控件引用后台c#创建的类,通过设置Path的方式,让Binding自己去寻找类的属性。
DataTemplate
模板,可以作为资源,创建一些元素丰富的控件(例如图片)的实例。
注意
最后特别提醒大家一点:在使用集合类型作为列表控件的ItemsSource时一般会考虑使用
ObservableCollection 代 替 List, 因 为 ObservableCollection 类 实 现 了
INotifyCollectionChanged和INotifyPropertyChanged接口,能把集合的变化立刻通知显示它
的列表控件,改变会立刻显现出来。
DataTable
列表控件与DataTable之间直接建立Binding
XML数据作为Binding源
迄今为止,.NET Framework提供了两套处理XML数据的类库:
- 符合 DOM (Document Object Modle,文档对象模型)标准的类库:包括
XmlDocument、XmlElement、XmlNode、XmlAttribute等类。这套类库的特点是中规中矩、
功能强大,但也背负了太多XML的传统和复杂。 - 以 LINQ(Language- Integrated Query成查询)为基础的类库:包括XDocument、XElement、XNode、XAttribute等类。这套类库的特点是可以使用LINQ进行查询和操作,方便快捷。
XML文本是树形结构的,所以XML可以方便地用于表示线性集合(如Array、List等)和树形结构数据。
需要注意的是,当使用XML数据作为Binding的Source时我们将使用XPath属性而不是Path属
性来指定数据的来源。
使用LINQ检索结果作为Binding的源
使用LINQ,我们可以方便地操作集合对象、DataTable对象和XML对象而不必动辄
就把好几层foreach循环嵌套在一起却只是为了完成一个很简单的任务。
Binding的RelativeSource
当我们不知道准确的Source的名称时,我们可以使用RelativeSource类来获得控件之间相对位置和类型的源。
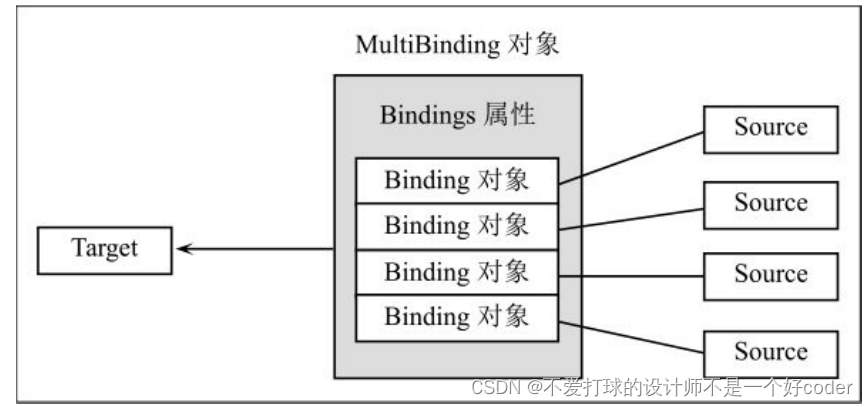
MultiBinding
具有一个名为Bindings的属性,其类型是Collection,通过这个属性MultiBinding把一组Binding对象聚合起来,处在这个集合中的Binding对象可以拥有自己的数据校验与转换机制,它们汇集起来的数据将共同决定传往MultiBinding目标的数据,如图所示。


 被折叠的 条评论
为什么被折叠?
被折叠的 条评论
为什么被折叠?
 到【灌水乐园】发言


