


目录
AOP面向切面编程
定义:
通过预编译方式,和运行期间的动态代理实现程序功能统一维护的一种技术,简单来说就是利用设置切面类的方式,各个部分进行想要的对程序隔离,完成逻辑功能以外的程序控制效果。
优点:
对业务逻辑各个部分进行隔离,使得各个部分的耦合度降低,有利于程序的维护,和重用性与可读性,提高开发效率。
主要应用场景:
AOP用来处理一些需要增强修改,或具有横切性质的系统及服务,如日志记录,性能统计,安全控制,事务处理,异常处理等。
AOP可以做到在程序运行期间,不修改源码,对已有的方法进行增强。将这些内容与代码业务逻辑中划分出来,对这些行为分离。
AOP实现原理:
- AOP底层是动态代理实现的。动态代理特点:随用随创建,随用随加载,可不修改源码而对原方法增强。
- AOP代理由Spring容器组成、管理,因此AOP代理可以直接使用容器中其他Bean实例作为目标类。
- SpringAOP默认由纯Java实现:JDK实现,使用Proxy类的newProxyInstance方法创建代理对象,被代理类至少实现一个接口,因此在所有Java环境或标准Javaweb容器上运行。
AOP动态代理:
一般在开发中不用这个方法,这个是用来学习了解动态代理切面编程原理的
例子
1、创建一个简单实体类Role
public class Role {
    private Long id;
    private String note;

    public Role() {}

    public Role(Long id,String note) {this.id = id;this.note = note;}

    public String getNote() { return note;}

    public void setNote(String note) { this.note = note;}

    public Long getId() { return id;}

    public void setId(Long id) {this.id = id;}
}
2、做一个Role的目标类(目标接口)和被代理类(实现类)
//这是目标类的目标接口,为Role的接口
public interface RoleDao {
    void PrintRole(Role role);

}
//这是接口的实现类
public class RoleDaoImpl implements RoleDao {
   public void PrintRole(Role role)
   {
       System.out.println("{ID = "+role.getId()+",Note = "+role.getId()+"}");
   }
}
3、设置一个切面接口与切面类
/*这是个切面类接口*/
public interface Aspect {
    void before ();//运行前方法
    void after ();//运行后方法
    void afterReturning ();
    void afterThrowing ();
}
/*切面接口实现类继承Aspect接口*/
public class AspectImpl implements Aspect {
public void before ()
{
System.out.println("准备打印角色信息");
}
public void after ()
{
System.out.println("完成打印角色信息的打印处理");
}
public void afterReturning ()
{
System.out.println("已经完成角色打印功能,一切正常");
}
public void afterThrowing ()
{
System.out.println("刚刚执行的打印角色功能执行异常!!!请检查");
}
}为实现将切面类切入正常程序流程中达到流程监控
4、创建一个工具类实现流程控制ProxyUtil
//使用Java动态代理实现在正常打印角色功能期间,流程提示,可以使用动态代理对目标类进行切面插入。避免复杂代码
public class ProxyUtil implements InvocationHandler {
    //创建目标类的对象
    private Object obj;
    //创建切面类对象,初始化要不为空
    private Aspect asp = null;

    //包装一下切面的接口
    public Object bind(Object obj, Aspect asp) {
        this.asp = asp;
        this.obj = obj;
        //类的加载器
        ClassLoader classLoader = ProxyUtil.class.getClassLoader();
        //被代理对象(目标类对象)实现的所有接口
        Class[] clazz = obj.getClass().getInterfaces();
        //使用代理类进行增强,返回代理后对象
        return Proxy.newProxyInstance(classLoader, clazz, this);

    }

    @Override
    public Object invoke(Object proxy, Method method, Object[] args) throws Throwable {
        Object retObj = null;
        boolean flag = false;
        //before方法
        asp.before(obj);
        try {
            retObj = method.invoke(obj, args);

        } catch (Exception ex) {
            flag = true;
        }finally {
            //after方法
            asp.after(obj);
        }
        if (flag)
        {
            //afterThrowing
            asp.afterThrowing(obj);

        }
        else
        {
            //atferReturning
            asp.afterReturning(obj);
        }
        return retObj;
    }
    }
5、测试类
public class AopTest {
    @Test
    public void testAop(){
        //创建目标类对象
        RoleDao dao = new RoleDaoImpl();
        //被切类对象
        Aspect as = (Aspect) new AspectImpl();
        //代理工具类对象
        ProxyUtil pr = new ProxyUtil();

        Role role = new Role(1L,"hello");

        System.out.println("不使用代理情况下");
        dao.PrintRole(role);

        System.out.println("使用代理类正常情况下");
        //创建RoleDao 的代理类并调用代理类中的bind(代理类对象初始化)方法
        RoleDao proxy = (RoleDao) pr.bind(dao,as);
        proxy.PrintRole(role);
        //
        System.out.println("使用动态代理异常情况下");
        role = null;
        proxy.PrintRole(role);

    }
}
动态代理实现AOP缺点:
实现过程很麻烦,特别是util类的编写。所以用Spring框架的AOP来代替这个方法实现,Spring框架可以隐藏实现细节,自动的实现动态代理。
Spring实现AOP
例子
1、创建一个简单实体类Role
public class Role {
    private Long id;
    private String note;

    public Role() {}

    public Role(Long id,String note) {this.id = id;this.note = note;}

    public String getNote() { return note;}

    public void setNote(String note) { this.note = note;}

    public Long getId() { return id;}

    public void setId(Long id) {this.id = id;}
}
2、做一个Role的目标类(目标接口)和被代理类(实现类)
//这是目标类的目标接口,为Role的接口
public interface RoleDao {
    void PrintRole(Role role);

}
//这是接口的实现类
public class RoleDaoImpl implements RoleDao {
   public void PrintRole(Role role)
   {
       System.out.println("{ID = "+role.getId()+",Note = "+role.getId()+"}");
   }
}
3、创建一个切面类(与动态实现AOP的例子不同的是此处不需要切面类接口,只需要实现类)
/*切面实现类Aspect*/
public class RoleAspect {
    public void before ()
    {
        System.out.println("准备打印角色信息");
    }
    public void after ()
    {
        System.out.println("完成打印角色信息的打印处理");
    }
    public void afterReturning ()
    {
        System.out.println("已经完成角色打印功能,一切正常");
    }
    public void afterThrowing ()
    {
        System.out.println("刚刚执行的打印角色功能执行异常!!!请检查");
    }

}
4、通过Spring配置文件(xml配置AOP)。将切面类编入流程中,用Spring去实现切面插入,是SpringAOP的核心思想。在resources文件夹中创建applicationContext.xml
<?xml version="1.0" encoding="UTF-8"?>
<beans xmlns="http://www.springframework.org/schema/beans"
       xmlns:xsi="http://www.w3.org/2001/XMLSchema-instance"
       xmlns:aop="http://www.springframework.org/schema/aop"
       xsi:schemaLocation="http://www.springframework.org/schema/beans
    https://www.springframework.org/schema/beans/spring-beans.xsd
http://www.springframework.org/schema/aop http://www.springframework.org/schema/aop/spring-aop.xsd">
<!--将目标类与切面类的实现类导入bean-->
   <bean id="AspectImpl" class="Service.Impl.AspectImpl"></bean>
    <bean id="RoleDaoImpl" class="Service.Impl.RoleDaoImpl"></bean>
   <!-- AOP配置-->
<aop:config>
 <!--   AOP断点设置 execution定义切入点表达式  execution(【修饰符】 返回值类型 包名.类名.方法名(参数) )-->
    <aop:pointcut id="cp" expression="execution(* Service.Impl.*.*(..))"/><!--定义一个切点-->
    <aop:aspect ref="RoleAspect"><!--定义一个切面-->
        <aop:before method="before" pointcut-ref="cp"></aop:before><!--定义一个前置通知-->
        <aop:after method="after" pointcut-ref="cp"></aop:after><!--定义一个后置通知-->
        <aop:after-returning method="afterReturning" pointcut-ref="cp"></aop:after-returning><!--定义返回通知-->
        <aop:after-throwing method="afterThrowing" pointcut-ref="cp"></aop:after-throwing><!--定义环绕通知-->

        <!--设置环绕,可手动控制增强方法何时执行或者是否执行
            <aop:around method="after" pointcut-ref="cp"></aop:around>-->
    </aop:aspect>
</aop:config>
</beans>
5、测试类
public class AopTest {
@Test
public void TestAop_2()//测试类方法
{
ApplicationContext app = new ClassPathXmlApplicationContext("applicationContext.xml");//Spring容器创建实例
RoleDao dao = app.getBean(RoleDao.class);//将Role用getBean方法写入Spring容器中
//Role role = app.getBean(Role.class);
Role role = new Role(1L,"hello");
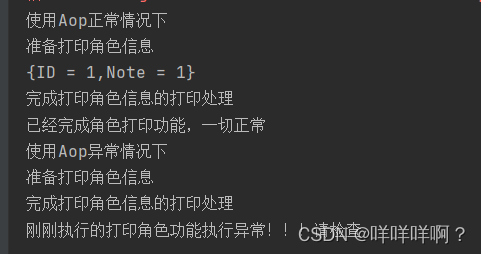
System.out.println("使用Aop正常情况下");
dao.PrintRole(role);
System.out.println("使用Aop异常情况下");
role = null;
dao.PrintRole(role);
}
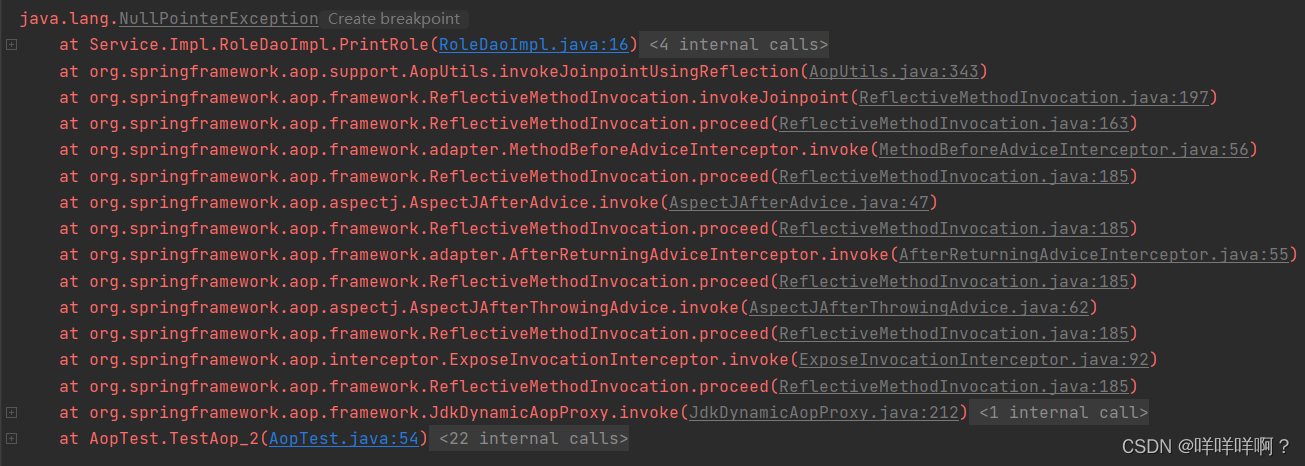
}结果如图:
顺便一提:
运行过程中发生了java.lang.NullPointerException这个错误
一般原因是某个对象为空,需要进行判空返回,才不会报这个错误。
五种通知类型及其作用:
- 前置通知:
在目标方法施行前实施,可以用于权限管理等功能,(编程过程中可以将此方法具体实现编程为权限管理或验证,将其切面插入流程,使其独立于业务)。
- 返回通知:
在目标方法施行后实施,可以应用于关闭流、上传文件、删除临时文件等功能。
- 异常通知:
在目标方法施行时抛出异常后实施,可以应用于处理异常记录日志等功能。
- 后置通知:
在目标方法正确执行或抛出异常后实施,可以应用于返回通知和异常通知均发生的情况下。
- 环绕通知:
在目标方法执行后实施,可以应用于日志、事务管理等功能。
AOP的xml配置:
<aop:config></aop:config>//顶层的AOP配置元素
<aop:aspect></aop:aspect>//定义一个切面
<aop:pointcut></aop:pointcut>//定义一个切点
<aop:before></aop:before>//定义前置通知
<aop:after></aop:after>//定义后置通知
<aop:around></aop:around>//定义环绕通知
<aop:after-returning></aop:after-returning>//定义返回通知
<aop:after-throwing></aop:after-throwing>//定义异常通知
注解配置AOP
与xml方法不同的是,注解方式将aop配置直接用@ 方法放到切面类中
其形式是
@Component
@Aspect
public class Aspect{//切面类

    //execution定义切入点表达式,这里面的包是切入点,即被切类
    @Before("execution((* Service.Impl.*.*(..)) )")
    public void defore(){System.out.println("前置通知打印")}
}
其余重要配置:
1、导入依赖
<dependency>
    <groupId>org.springframework</groupId>
    <artifactId>spring-context</artifactId>
    <version>${spring-version}</version>
</dependency>
<dependency>
    <groupId>org.springframework</groupId>
    <artifactId>spring-aspects</artifactId>
    <version>${spring-version}</version>
</dependency>
2、AOP配置文件:(使用注解需要配置进去)
<?xml version="1.0" encoding="UTF-8"?>
<beans xmlns="http://www.springframework.org/schema/beans"
       xmlns:xsi="http://www.w3.org/2001/XMLSchema-instance"
       xmlns:context="http://www.springframework.org/schema/context"
       xmlns:aop="http://www.springframework.org/schema/aop"
       xsi:schemaLocation="http://www.springframework.org/schema/beans
       http://www.springframework.org/schema/beans/spring-beans.xsd
        http://www.springframework.org/schema/context
        http://www.springframework.org/schema/context/spring-context.xsd
        http://www.springframework.org/schema/aop
        http://www.springframework.org/schema/aop/spring-aop.xsd">

    <context:annotation-config/><!--使用注解-->

    <context:component-scan base-package="com.mojingyi"/><!--声明注解扫描范围-->

    <aop:aspectj-autoproxy/><!--声明基于注解的aop代理配置-->

    <context:property-placeholder location="druid.properties"/><!--引入属性文件-->
</beans>
其他不变噢
如果用到Spring整合MyBatis,要记得Spring的两大重要思想IOC与AOP噢!
AOP还可以对MyBatis事务控制,可能以后的义后会用到吧


 被折叠的 条评论
为什么被折叠?
被折叠的 条评论
为什么被折叠?
 到【灌水乐园】发言


