


title: OpenCL并行编程框架【高性能计算导论课程作业】
date: 2022-01-19 16:58:31
tags: HPC
OpenCL环境安装配置
由于我使用的机器是MacBook Pro 2020,mac系统里面已经集成了OpenCL的SDK,所以不需要去另外下载,只需要在Xcode工程中将其加入进来就可以进行OpenCL的开发了。下面展示的是工程文件中配置OpenCL环境的过程。
(1)首先在Xcode工程文件的Build Phases下导入OpenCL的库文件。
(2)导入后,就可以看到在旁边的文件栏有OpenCL的.framework文件。
(3)然后就是在相应的cpp文件中写入对应的头文件即可。
这样OpenCL在Xcode工程文件内的编译环境就配置好了。
本机设备参数分析
这里方法是使用OpenCL的代码进行设备参数信息的输出。由于代码过长而且与并行计算相关性不大就不予展示。
所以下面就是对OpenCL代码的输出进行分析。
首先是本机OpenCL的版本,是OpenCL1.2。
然后下面可以看到本机的两个Device,一个是CPU,一个是GPU。
这里重点描述GPU的硬件设备参数,主要信息如下:
GPU型号: Intel® Iris™ Plus Graphics
最大计算单元个数(work group): 64
最大work item维度: 3
work item每个维度的容量: 256
work group容量: 256
该Device的id: 0x7fff0000
global的内存大小: 1610612736
device的缓存大小: 65536
device的local内存大小: 65536
向量运算代码分析与实验
代码如下
#include <stdio.h>
#include <stdlib.h>
#include <math.h>
#include <OpenCL/opencl.h>
#include <iostream>

using namespace std;
// OpenCL kernel. Each work item takes care of one element of c
#define KERNEL(...) #__VA_ARGS__

const char *kernelSource = KERNEL(
_Pragma ("OPENCL EXTENSION cl_khr_fp64:enable")
__kernel void vecAdd(  __global float *a,
                       __global float *b,
                       __global float *c,
                       const unsigned int n)
{
    //Get our global thread ID
    int id = get_global_id(0);

    //Make sure we do not go out of bounds
    if (id < n)
    {
        c[id] = a[id] + b[id];
    }
}
);
int main( int argc, char* argv[] )
{
    int i=0;
    size_t globalSize, localSize;
    cl_int err;
    cl_event event;
    float sum = 0.;

    // Length of vectors
    // unsigned int n = 100000;
    int n = 10000000;
    /*
    // Host input vectors
    double *h_a;
    double *h_b;
    // Host output vector
    double *h_c;
     */

    // Host input vectors
    float *h_a;
    float *h_b;
    // Host output vector
    float *h_c;

    // Device input buffers
    cl_mem d_a;
    cl_mem d_b;
    // Device output buffer
    cl_mem d_c;

    cl_platform_id platform;        // OpenCL platform
    cl_device_id device_id;           // device ID
    cl_context context;               // context
    cl_command_queue queue;           // command queue
    cl_program program;               // program
    cl_kernel kernel;                 // kernel

    // Size, in bytes, of each vector
    size_t bytes = n * sizeof(float);

    // Allocate memory for each vector on host
    h_a = (float*)malloc(bytes);
    h_b = (float*)malloc(bytes);
    h_c = (float*)malloc(bytes);
    // Initialize vectors on host

    for(  i = 0; i < n; i++ ){
        h_a[i] = sinf(i)*sinf(i);
        h_b[i] = cosf(i)*cosf(i);
    }
    // size_t globalSize, localSize;

    //cl_int err;

    // Number of work items in each local work group
    localSize = 64;

    // Number of total work items - localSize must be devisor
    globalSize =(size_t)ceil(n/(float)localSize)*localSize;

    // Bind to platform
    err = clGetPlatformIDs(1, &platform, NULL);

    // Get ID for the device
    err = clGetDeviceIDs(platform, CL_DEVICE_TYPE_GPU, 1, &device_id, NULL);

    // Create a context
    context = clCreateContext(0, 1, &device_id, NULL, NULL, &err);

    // Create a command queue
    //queue = clCreateCommandQueue(context, device_id, 0, &err);
    queue = clCreateCommandQueue(context, device_id, CL_QUEUE_PROFILING_ENABLE, &err);

    // Create the compute program from the source buffer
    program = clCreateProgramWithSource(context, 1,
                            (const char **) & kernelSource, NULL, &err);

    // Build the program executable
    clBuildProgram(program, 0, NULL, NULL, NULL, NULL);

    // Create the compute kernel in the program we wish to run
    kernel = clCreateKernel(program, "vecAdd", &err);

    // Create the input and output arrays in device memory for our calculation
    d_a = clCreateBuffer(context, CL_MEM_READ_ONLY, bytes, NULL, NULL);
    d_b = clCreateBuffer(context, CL_MEM_READ_ONLY, bytes, NULL, NULL);
    d_c = clCreateBuffer(context, CL_MEM_WRITE_ONLY, bytes, NULL, NULL);

    // Write our data set into the input array in device memory
    err = clEnqueueWriteBuffer(queue, d_a, CL_TRUE, 0,
                                   bytes, h_a, 0, NULL, NULL);
    err |= clEnqueueWriteBuffer(queue, d_b, CL_TRUE, 0,
                                   bytes, h_b, 0, NULL, NULL);

    // Set the arguments to our compute kernel
    err  = clSetKernelArg(kernel, 0, sizeof(cl_mem), &d_a);
    err |= clSetKernelArg(kernel, 1, sizeof(cl_mem), &d_b);
    err |= clSetKernelArg(kernel, 2, sizeof(cl_mem), &d_c);
    err |= clSetKernelArg(kernel, 3, sizeof(unsigned int), &n);

    // Execute the kernel over the entire range of the data set
    err = clEnqueueNDRangeKernel(queue, kernel, 1, NULL, &globalSize, &localSize,
                                                              0, NULL, &event);

    // Wait for the command queue to get serviced before reading back results
    clFinish(queue);
    cl_ulong time_start;
    cl_ulong time_end;

    clGetEventProfilingInfo(event, CL_PROFILING_COMMAND_START, sizeof(time_start), &time_start, NULL);
    clGetEventProfilingInfo(event, CL_PROFILING_COMMAND_END, sizeof(time_end), &time_end, NULL);

    double times = time_end - time_start;
    printf("OpenCL Kernel Execution time is: %0.4f\n", times / 1000000.0);

    // Read the results from the device
    clEnqueueReadBuffer(queue, d_c, CL_TRUE, 0, bytes, h_c, 0, NULL, NULL );

    //Sum up vector c and print result divided by n, this should equal 1 within error
    //double sum = 0;
    for(i=0; i<n; i++)
    {
        sum += h_c[i];
    }
    printf("final result: %lf\n", sum/n);

    // release OpenCL resources
    clReleaseMemObject(d_a);
    clReleaseMemObject(d_b);
    clReleaseMemObject(d_c);
    clReleaseProgram(program);
    clReleaseKernel(kernel);
    clReleaseCommandQueue(queue);
    clReleaseContext(context);

    //release host memory
    free(h_a);
    free(h_b);
    free(h_c);

    return 0;
}
这里进行代码的详细分析,后面的PI计算相似的内容就不再赘述了。
首先是一个可变长的宏,用来以参数的形式定义kernel函数。
#define KERNEL(...) #__VA_ARGS__
接下来用字符串的形式去定义kernel函数,这样它不会与host的代码一起编译,在调用时才会被编译。同时,为了OpenCL对64位浮点运算的支持,需要加一个如下的声明。
_Pragma ("OPENCL EXTENSION cl_khr_fp64:enable")
但是这里我们只用到了float,float类型的参数是不需要这样的声明的。
然后是对kernel内容的解释,首先要获取当前所在work item的global id,因为由上面的GPU信息可以知道,id可以有三个维度,但是我们做的是向量加法,所以只需要用到它的第一个维度,所以里面的参数为0。每个work item负责结果向量中一个位置的计算,对应如下代码。
//Get our global thread ID
    int id = get_global_id(0);

    //Make sure we do not go out of bounds
    if (id < n)
    {
        c[id] = a[id] + b[id];
    }
这样就定义好了kernel函数,也就是并行的部分。
下面开始为OpenCL在本机的运行做准备。
因为我们的向量加法,既要在host输入,也要在device中并行计算。所以要在host和device上分别开辟相应的空间。然后在host的变量内存空间对两个向量进行赋值,一个是cos2(x)一个是sin2(x),这样保证每个元素相加得到的结果为1。
    // Host input vectors
    float *h_a;
    float *h_b;
    // Host output vector
    float *h_c;

    // Device input buffers
    cl_mem d_a;
    cl_mem d_b;
    // Device output buffer
    cl_mem d_c;
下面开始设定并行计算的global size和local size,其中local size是指每个work group内的work item数目,其中global size是指所有work group内的work item数目之和,也就是所有参与并行计算的work item数目。
这里需要让每个work item负责输出向量一个位置的运算,所以global size不仅需要是local size的整数倍,而且还要大于等于向量的长度。
所以代码如下。
    // Number of work items in each local work group
    localSize = 64;

    // Number of total work items - localSize must be devisor
    globalSize =(size_t)ceil(n/(float)localSize)*localSize;
然后获取要使用的platform id,它可以看作是一个handel,用来获取相应的device id,也就是上面设备信息给出的0x7fff0000,然后再根据它来获取设备当前的运行状态或运行环境,从而创建命令队列。
// Bind to platform
    err = clGetPlatformIDs(1, &platform, NULL);

    // Get ID for the device
    err = clGetDeviceIDs(platform, CL_DEVICE_TYPE_GPU, 1, &device_id, NULL);

    // Create a context
    context = clCreateContext(0, 1, &device_id, NULL, NULL, &err);

    // Create a command queue
    //queue = clCreateCommandQueue(context, device_id, 0, &err);
    queue = clCreateCommandQueue(context, device_id, CL_QUEUE_PROFILING_ENABLE, &err);
这里注意到在创建命令队列时与源代码不同的是我加入了参数CL_QUEUE_PROFILING_ENABLE,用来获取kernel的运行时间。方便后面的实验。
然后就是将以变量形式声明的kernel进行实例化,代码运行至这里才会进行这个kernel函数的编译。
// Create the compute program from the source buffer
    program = clCreateProgramWithSource(context, 1,
                            (const char **) & kernelSource, NULL, &err);

    // Build the program executable
    clBuildProgram(program, 0, NULL, NULL, NULL, NULL);

    // Create the compute kernel in the program we wish to run
    kernel = clCreateKernel(program, "vecAdd", &err);
下面是在Device中为上面需要的内存开辟地址空间,并且从host的内存中写入Device的内存中。
// Create the input and output arrays in device memory for our calculation
    d_a = clCreateBuffer(context, CL_MEM_READ_ONLY, bytes, NULL, NULL);
    d_b = clCreateBuffer(context, CL_MEM_READ_ONLY, bytes, NULL, NULL);
    d_c = clCreateBuffer(context, CL_MEM_WRITE_ONLY, bytes, NULL, NULL);

    // Write our data set into the input array in device memory
    err = clEnqueueWriteBuffer(queue, d_a, CL_TRUE, 0,
                                   bytes, h_a, 0, NULL, NULL);
    err |= clEnqueueWriteBuffer(queue, d_b, CL_TRUE, 0,
                                   bytes, h_b, 0, NULL, NULL);
然后对kernel函数进行参数的传递,然后开始并行的运算。
    // Set the arguments to our compute kernel
    err  = clSetKernelArg(kernel, 0, sizeof(cl_mem), &d_a);
    err |= clSetKernelArg(kernel, 1, sizeof(cl_mem), &d_b);
    err |= clSetKernelArg(kernel, 2, sizeof(cl_mem), &d_c);
    err |= clSetKernelArg(kernel, 3, sizeof(unsigned int), &n);

    // Execute the kernel over the entire range of the data set
    err = clEnqueueNDRangeKernel(queue, kernel, 1, NULL, &globalSize, &localSize,
                                                              0, NULL, &event);
最后等待命令队列的相应,从而完成并行计算的部分,最后要对设备上的一些内存空间进行释放。
这里为了方便实验,进行了kernel代码运行时间的计算,使用的是OpenCL自带的函数,操作如下所示。
    // Wait for the command queue to get serviced before reading back results
    clFinish(queue);
    cl_ulong time_start;
    cl_ulong time_end;

    clGetEventProfilingInfo(event, CL_PROFILING_COMMAND_START, sizeof(time_start), &time_start, NULL);
    clGetEventProfilingInfo(event, CL_PROFILING_COMMAND_END, sizeof(time_end), &time_end, NULL);

    double times = time_end - time_start;
    printf("OpenCL Kernel Execution time is: %0.4f\n", times / 1000000.0);
实验
这里我们探究随着local size,也就是每个work group内的work item数目的变化,运行效率(计算时间)怎么变化。
为了对比明显,这里的数据规模令n = 10000000,然后在local size分别为1,2,4,8,16,32,64的情况下进行实验。
| 1 | 2 | 4 | 8 | 16 | 32 | 64 | |
|---|---|---|---|---|---|---|---|
| t/ms | 53.5526 | 25.3358 | 13.0841 | 7.8111 | 3.5446 | 2.9774 | 2.8876 |
可以发现随着Local Size数的增加,计算时间逐渐减小,计算效率逐渐增加,但是增加的幅度越来越小,越来越趋于平稳。
原因是,当Local Size比较小时,64个work group无法为所有的元素计算提供资源,只能串行地进行多次并行的计算,来达到完成计算任务的目的。所以也就增加了计算时间消耗。
下面探究在local size为64的情况下,随着数据规模的增加,计算效率的变化情况。这里的数据规模我们取10000、100000、1000000、10000000、100000000。
| 10000 | 100000 | 1000000 | 10000000 | 100000000 | |
|---|---|---|---|---|---|
| t/ms | 0.0264 | 0.0674 | 0.4833 | 2.8852 | 28.6238 |
可以发现随着数据规模的增加,一开始的时间消耗增长较慢,后来就几乎与数据规模的增长规模相同了。
原因就是当数据规模没那么大时,所有work group的所有work item资源没有被全部利用,当增加数据规模,可以使用更多的并行资源,从而与计算时间的增加进行平衡。但是当数据规模很大时,总共需要的work item数目超过了本机可以提供的数目(256 * 64),再增加数据规模,增加的时间就不是并行后的结果了,而是串行地等待前面的并行计算完,之后的再进行并行计算,所以时间的增量几乎就是数据规模的增量。
PI值运算代码分析与实验
代码如下
#include <stdio.h>
#include <stdlib.h>
#include <string.h>
#include <math.h>
#include <OpenCL/opencl.h>


// OpenCL kernel. many workGroups compute n iterations
#define KERNEL(...) #__VA_ARGS__
const char * kernelSource =  KERNEL(
__kernel void Pi(__global float *workGroupBuffer, // 0..NumWorkGroups-1
__local float *insideWorkGroup,  // 0..workGroupSize-1
const uint n,        // Total iterations
const uint chunk)        // Chunk size
{
const uint lid = get_local_id(0);
const uint gid = get_global_id(0);

const float step = (1.0/(float)n);
float partial_sum = 0.0;

// Each work-item computes chunk iterations
for(uint i=gid*chunk; i<(gid*chunk)+chunk; i++) {
    float x = step * ((float) i - 0.5);
    partial_sum += 4.0 / (1.0 + x * x);
}

// Each work-item stores its partial sum in the workgroup array
insideWorkGroup[lid] = partial_sum;

// Synchronize all threads within the workgroup
barrier(CLK_LOCAL_MEM_FENCE);

float local_pi = 0;

// Only work-item 0 of each workgroup perform the reduction
// of that workgroup
if(lid == 0) {
    const uint length = lid + get_local_size(0);
    for (uint i = lid; i<length; i++) {
        local_pi += insideWorkGroup[i];
    }
// It store the workgroup sum
// Final reduction, between block, is done out by CPU
    workGroupBuffer[get_group_id(0)] = local_pi;
}
}

);

int main( int argc, char* argv[] )
{
    int i=0;
    float pi;
    float *pi_partial;
    size_t maxWorkGroupSize;
    cl_int err;
    cl_mem memObjects;
    int niter, chunks, workGroups;
    size_t globalWorkSize;
    size_t localWorkSize;
    cl_event event;

    cl_platform_id platform;        // OpenCL platform
    cl_device_id device_id;           // device ID
    cl_context context;               // context
    cl_command_queue queue;           // command queue
    cl_program program;               // program
    cl_kernel kernel;                 // kernel

    niter = 262144;
    chunks=64;

    err = clGetPlatformIDs(1, &platform, NULL);

    // Get ID for the device
    err = clGetDeviceIDs(platform, CL_DEVICE_TYPE_GPU, 1, &device_id, NULL);
    clGetDeviceInfo(device_id, CL_DEVICE_MAX_WORK_GROUP_SIZE, sizeof(size_t),
                    &maxWorkGroupSize, NULL);
    workGroups = ceil((float)(niter/maxWorkGroupSize/chunks));

    pi_partial = (float*)malloc(sizeof(float)*workGroups);

    // Create a context
    context = clCreateContext(0, 1, &device_id, NULL, NULL, &err);

    // Create a command queue
    queue = clCreateCommandQueue(context, device_id, CL_QUEUE_PROFILING_ENABLE, &err);

    // Create the compute program from the source buffer

    program = clCreateProgramWithSource(context, 1,
                                        &kernelSource, NULL, &err);
    // Build the program executable
    err = clBuildProgram(program, 0, NULL, NULL, NULL, NULL);
    localWorkSize =  maxWorkGroupSize;
    globalWorkSize = niter / chunks;

    // Create the compute kernel in the program we wish to run
    kernel = clCreateKernel(program, "Pi", &err);

    // Create the input and output arrays in device memory for our calculation
    memObjects = clCreateBuffer(context, CL_MEM_READ_WRITE,
                                sizeof(float)*workGroups, NULL, &err);

    err |= clSetKernelArg(kernel, 0, sizeof(cl_mem), &memObjects);
    err  = clSetKernelArg(kernel, 1, sizeof(float)*maxWorkGroupSize, NULL);
    err |= clSetKernelArg(kernel, 2, sizeof(unsigned int), &niter);
    err |= clSetKernelArg(kernel, 3, sizeof(unsigned int), &chunks);

    err = clEnqueueNDRangeKernel(queue, kernel, 1, NULL, &globalWorkSize, &localWorkSize,
0, NULL, &event);
    clFinish(queue);
    cl_ulong time_start;
    cl_ulong time_end;

    clGetEventProfilingInfo(event, CL_PROFILING_COMMAND_START, sizeof(time_start), &time_start, NULL);
    clGetEventProfilingInfo(event, CL_PROFILING_COMMAND_END, sizeof(time_end), &time_end, NULL);

    double times = time_end - time_start;
    printf("OpenCL Kernel Execution time is: %0.4f\n", times / 1000000.0);
    err = clEnqueueReadBuffer(queue, memObjects, CL_TRUE, 0,
                              sizeof(float)*workGroups, pi_partial, 0, NULL, NULL);
    pi=0;

    for(i=0; i<workGroups; i++) {
        pi += pi_partial[i];
    }
    pi *= (1.0/(float)niter);
    printf("final result: %f\n", pi);

    // release OpenCL resources
    clReleaseMemObject(memObjects);
    clReleaseProgram(program);
    clReleaseKernel(kernel);
    clReleaseCommandQueue(queue);
    clReleaseContext(context);

    //release host memory
    free(pi_partial);
    return 0;
}
这里进行部分代码的分析,首先阐述chunk的概念,这里用如下的图进行表示。
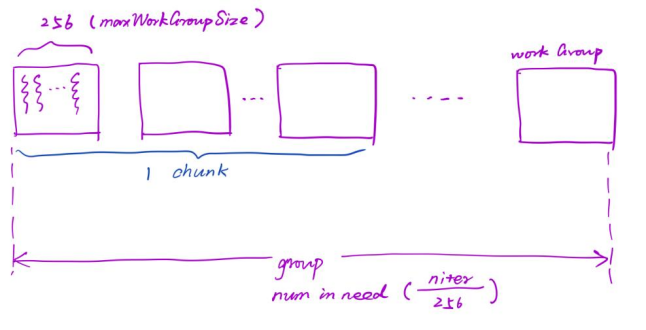
所以这里的chunk指的是多个work group组成的组合。因此work group的数量是由所规定的chunk大小以及数据规模决定的。
    workGroups = ceil((float)(niter/maxWorkGroupSize/chunks));

    pi_partial = (float*)malloc(sizeof(float)*workGroups);
再向下理解,这里的local work size还是每个work group内的work item数量,这里取的最大,也就是本机器的256。但是这里的global work size与global size不同,他是将一个chunk的所有work group作为一个global work group,那么global work size就是chunks的数目。
    localWorkSize =  maxWorkGroupSize;
    globalWorkSize = niter / chunks;
这样就可以去理解kernel函数的内容了,首先它是将数据niter分成了chunk份,这就是为什么niter必须是chunk的整数倍,然后每个chunk内work item的数目就是要并行计算的数目,也就是每个chunk内做并行。
for(uint i=gid*chunk; i<(gid*chunk)+chunk; i++) {
    float x = step * ((float) i - 0.5);
    partial_sum += 4.0 / (1.0 + x * x);
}
然后对每个chunk的计算结果进行保存,并在lid为0的work item中进行结果的归约,然后将归约的结果作为这个work group(其实是这个chunk)的运算结果,然后这些chunk的结果要在kernel函数外,也就是CPU当中进行归约,从而计算出最终的结果。对应代码如下。
// Each work-item stores its partial sum in the workgroup array
insideWorkGroup[lid] = partial_sum;

// Synchronize all threads within the workgroup
barrier(CLK_LOCAL_MEM_FENCE);

float local_pi = 0;

// Only work-item 0 of each workgroup perform the reduction
// of that workgroup
if(lid == 0) {
    const uint length = lid + get_local_size(0);
    for (uint i = lid; i<length; i++) {
        local_pi += insideWorkGroup[i];
    }
// It store the workgroup sum
// Final reduction, between block, is done out by CPU
    workGroupBuffer[get_group_id(0)] = local_pi;
}
这样就完成了PI计算的并行过程。
实验
由于这里的local size规定死了为最大的256,所以不宜做改变,所以这里我们更改chunks的数量。也就是修改在一个for内并行计算的部分,分别计算chunk数为1、2、4、8、16、32、64的时间消耗。这里的数据规模取26214400。
输出结果如下。
| 1 | 2 | 4 | 8 | 16 | 32 | 64 | |
|---|---|---|---|---|---|---|---|
| t/ms | 8.3137 | 5.2593 | 2.5912 | 1.6443 | 1.2119 | 1.0183 | 0.9311 |
可以看到,随着chunk数目的增加,计算的效率越来越高,计算的时间消耗越来越少,并且计算时间的优化效果越来越弱。这说明在同一个chunk内的并行数越多,计算效率越高。
下面选择在chunk为64的条件下进行计算效率随数据规模的变化情况,这里的数据规模我们选择131072、262144、2621440、26214400、262144000。
| 131072 | 262144 | 2621440 | 26214400 | 262144000 | |
|---|---|---|---|---|---|
| t/ms | 0.0324 | 0.0342 | 0.1155 | 0.9268 | 10.7321 |
可以看到,随着数据规模的增加,计算时间一开始增加缓慢,到后面也是以类似10倍的速率增长,原因与向量加法中的阐述相同。再增加数据规模,增加的时间就不是并行后的结果了,而是串行地等待前面的并行计算完,之后的再进行并行计算,所以时间的增量几乎就是数据规模的增量。
环境
macOS Big Sur Version 11.1


 1391
1391

 被折叠的 条评论
为什么被折叠?
被折叠的 条评论
为什么被折叠?
 到【灌水乐园】发言


