


定时任务是我们在项目中经常遇到的场景,也是进场需要使用的场景。比如说订单,没10分钟需要取消没有未支付的订单等等。
- Timer
Timer是 JDK 自带的定时执行的工具类,无需任何的处理就可以直接使用,使用起来特别的方便,但是使用该定时任务执行多个任务时,当前面的任务处理异常会影响到后面的任务。
public class Text {
    public static void main(String[] args) {
        TimerTask timerTask = new TimerTask() {
            @Override
            public void run() {
                // 需要执行的逻辑
            }
        };
        // 计时器
        Timer timer = new Timer();
        // 设置定时任务执行时间 延迟2s执行,每2s执行一次
        timer.schedule(timerTask, 2000, 2000);
    }
}- Spring Task
当我们在使用 Spring 或者 Spring Boot 框架的时候,可以使用 Spring Framework 自带的定时任务;而且我们可以很灵活的使用,比如每月,每周甚至是某一天执行都可以,使用cron表达式来指定。
在启动类中加入 @EnableScheduling 注解开启定时任务
@SpringBootApplication
@EnableScheduling
public class TextApplication {
    public static void main(String[] args) {
        SpringApplication.run(TextApplication.class, args);
    }

}
使用定时任务 加入@Scheduled
@Component
public class TestTask {
@Scheduled(cron = "0 0/5, *, *, *")
public void test(){
// 每5分钟执行一次
}
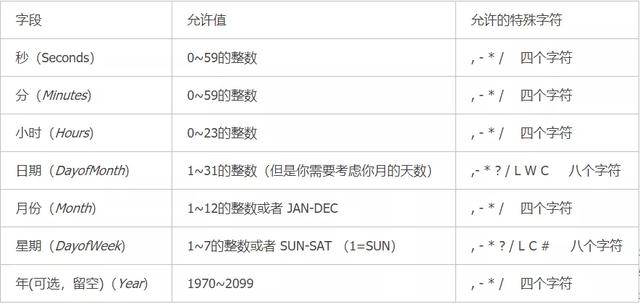
}cron表达式
由 6 位或者 7 位组成的(最后一位可以省略),每位之间以空格分隔,每位从左到右代表的含义如下:
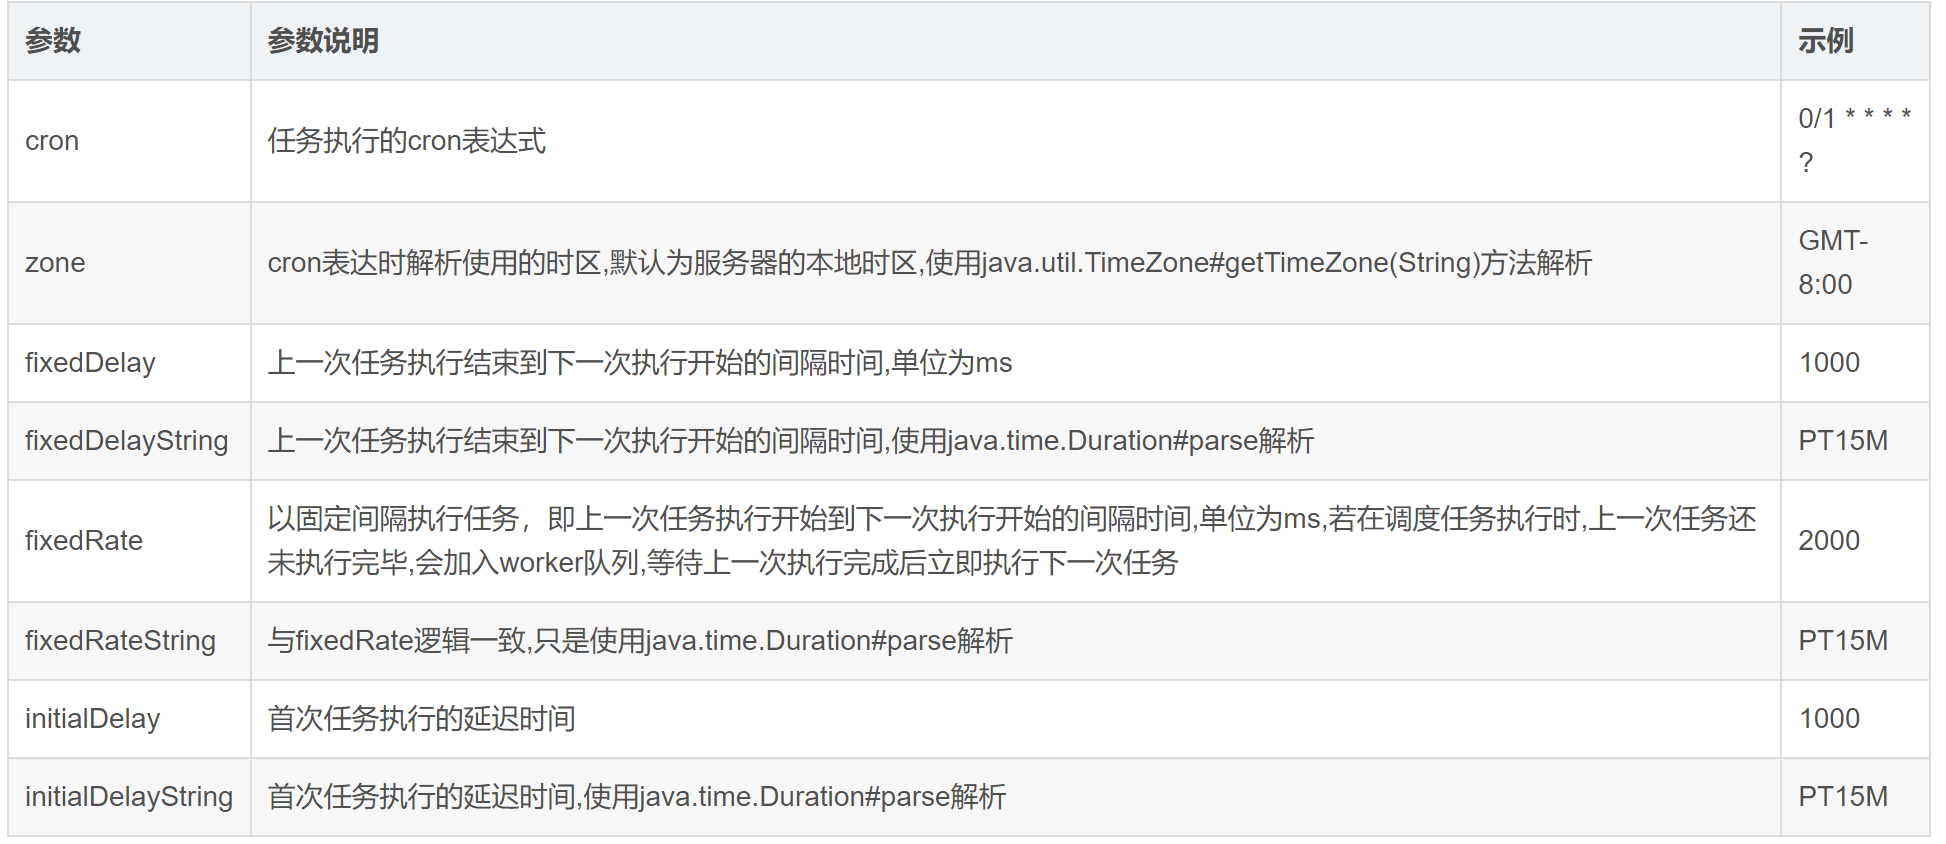
除了使用cron表达式外,还可以使用其它的参数来执行定时的时间
@Component
public class TestTask {
    @Scheduled(fixedDelay = 30000)
    public void test(){
        // 每30s执行一次
    }
}
问题 1:
在SpringBoot中执行定时任务使用的都是单线程的模式,如果执行多个定时任务,有一个定时任务被阻塞都会影响到其他的定时任务。可以使用多线程的形式解决该问题,让每个定时任务都在不同是线程上执行。
@Slf4j
@Component
public class TestTask {
@Scheduled(fixedDelay = 30000)
public void oneCronTable() throws InterruptedException {
log.info("oneCronTable --执行定时任务【每30s执行 oneCronTable】 Date:{}", LocalTime.now());
Thread.sleep(10000);
}
@Scheduled(fixedDelay = 10000)
public void twoCronTable(){
log.info("twoCronTable --执行定时任务【每10s执行 twoCronTable】 Date:{}", LocalTime.now());
}
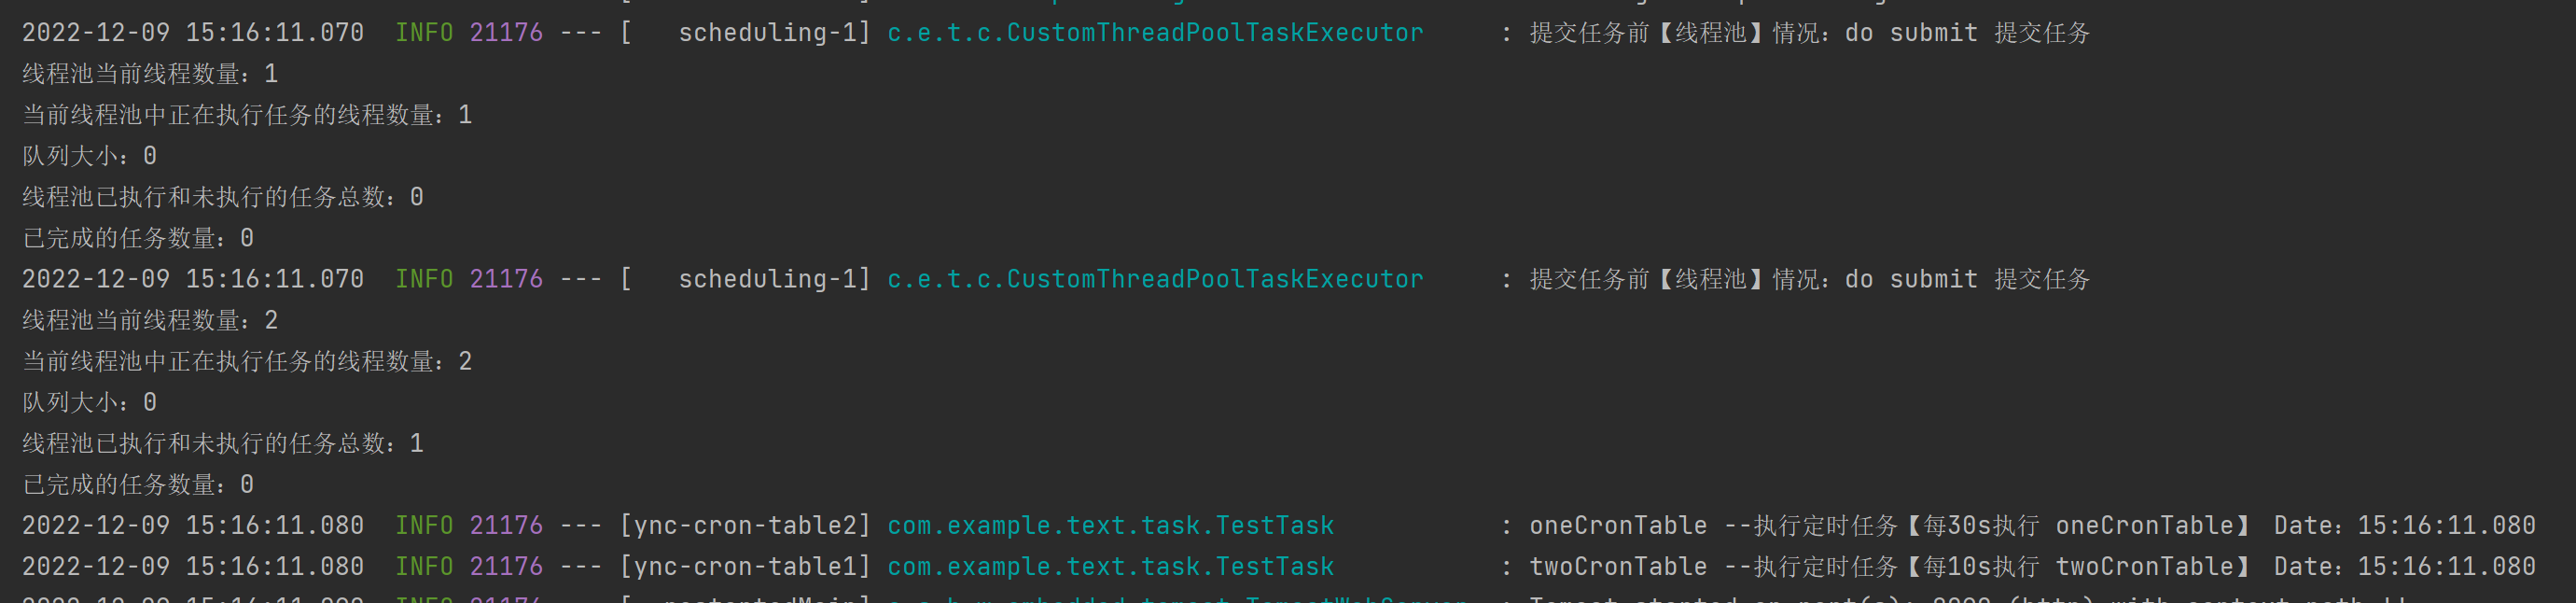
}下图:都是在【scheduling-1】这个线程中执行定时任务,在执行第一个定时任务的时候,阻塞了10s,才会去执行第二个定时任务。

多线程
在启动类上加上@EnableAsync,开启异步线程
@EnableAsync
@EnableScheduling
@SpringBootApplication
public class TextApplication {
    public static void main(String[] args) {
        SpringApplication.run(TextApplication.class, args);
    }
}
自定义线程池配置
@Configuration
public class ThreadPoolConfig {

    /**
     * 自定义线程池配置
     * @return
     */
    @Bean(name = "asyncServiceExecutor")
    public Executor asyncServiceExecutor() {
        ThreadPoolTaskExecutor executor = new ThreadPoolTaskExecutor();
        //配置核心线程数
        executor.setCorePoolSize(5);
        //配置最大线程数
        executor.setMaxPoolSize(10);
        //配置队列大小
        executor.setQueueCapacity(100);
        //配置线程池中的线程的名称前缀
        executor.setThreadNamePrefix("async-cron-table");
        executor.setRejectedExecutionHandler(new ThreadPoolExecutor.CallerRunsPolicy());
        executor.initialize();
        return executor;
    }

}
使用 @Async(value = "asyncServiceExecutor") 指定我们配置的线程池
@Slf4j
@Component
public class TestTask {
    @Scheduled(fixedDelay = 30000)
    @Async(value = "asyncServiceExecutor")
    public void oneCronTable() throws InterruptedException {
        log.info("oneCronTable --执行定时任务【每30s执行 oneCronTable】 Date:{}", LocalTime.now());
        Thread.sleep(10000);
    }

    @Scheduled(fixedDelay = 10000)
    @Async(value = "asyncServiceExecutor")
    public void twoCronTable(){
        log.info("twoCronTable --执行定时任务【每10s执行 twoCronTable】 Date:{}", LocalTime.now());
    }
}
每个定时任务都是由不同的线程执行的,这样就算是其中的定时任务阻塞了,也不会影响到其他定时任务。

配置线程池
CPU密集型:任务需要大量的运算,没有阻塞,CPU一直高速运转。
CPU核数+1个线程的线程池。
IO密集型:任务需要大量的IO,会出翔大量的阻塞。
CPU核数/(1-阻塞系数),阻塞系数在0.8~0.9之间
自定义 Executor
往线程池打印任务时,打印线程池线程使用情况。
/**
 * 自定义 ThreadPoolTaskExecutor
 */
@Slf4j
public class CustomThreadPoolTaskExecutor extends ThreadPoolTaskExecutor {

    private void showThreadPoolInfo(String method) {
        ThreadPoolExecutor threadPoolExecutor = getThreadPoolExecutor();

        if (null == threadPoolExecutor) {
            return;
        }

        log.info("提交任务前【线程池】情况:{} " +
                        "\n线程池当前线程数量:{} " +
                        "\n当前线程池中正在执行任务的线程数量:{} " +
                        "\n队列大小:{} " +
                        "\n线程池已执行和未执行的任务总数:{} " +
                        "\n已完成的任务数量:{}",
                method,
                threadPoolExecutor.getPoolSize()+1,
                threadPoolExecutor.getActiveCount()+1,
                threadPoolExecutor.getQueue().size(),
                threadPoolExecutor.getTaskCount(),
                threadPoolExecutor.getCompletedTaskCount());
    }

    @Override
    public void execute(Runnable task) {
        showThreadPoolInfo("do execute 提交任务");
        super.execute(task);
    }

    @Override
    public void execute(Runnable task, long startTimeout) {
        showThreadPoolInfo("do execute 提交任务");
        super.execute(task, startTimeout);
    }

    @Override
    public Future<?> submit(Runnable task) {
        showThreadPoolInfo("do submit 提交任务");
        return super.submit(task);
    }

    @Override
    public <T> Future<T> submit(Callable<T> task) {
        showThreadPoolInfo("do submit 提交任务");
        return super.submit(task);
    }

    @Override
    public ListenableFuture<?> submitListenable(Runnable task) {
        showThreadPoolInfo("do submitListenable 提交任务");
        return super.submitListenable(task);
    }

    @Override
    public <T> ListenableFuture<T> submitListenable(Callable<T> task) {
        showThreadPoolInfo("do submitListenable 提交任务");
        return super.submitListenable(task);
    }

}
配置线程池时使用我们自定义的 CustomThreadPoolTaskExecutor
@Configuration
public class ThreadPoolConfig {

    /**
     * 自定义线程池配置
     * @return
     */
    @Bean(name = "asyncServiceExecutor")
    public Executor asyncServiceExecutor() {
        ThreadPoolTaskExecutor executor = new CustomThreadPoolTaskExecutor();
        //配置核心线程数
        executor.setCorePoolSize(5);
        //配置最大线程数
        executor.setMaxPoolSize(10);
        //配置队列大小
        executor.setQueueCapacity(100);
        //配置线程池中的线程的名称前缀
        executor.setThreadNamePrefix("async-cron-table");
        executor.setRejectedExecutionHandler(new ThreadPoolExecutor.CallerRunsPolicy());
        executor.initialize();
        return executor;
    }

}
测试,每次提交任务线程到线程池时,都会打印线程池的情况。
问题 2:
如何在负载均衡的情况,保证定时任务不会出现同时执行同一个任务的问题。比如说我们有一个查询数据库id,然后进行添加订单的定时任务,如果两台服务的定时任务都在同一时间执行,就与可能查询到同一个id,这时就会添加两个一样的订单;
- Redis 分布式锁
经常使用的一种加锁的方式,这里不做描述。
- ShedLock
是一个在分布式环境中使用的定时任务框架,用于解决在分布式环境中的多个实例的相同定时任务在同一时间点重复执行的问题。
ShedLock本身只做一件事情:保证一个任务最多同时执行一次。所以如官网所说的,ShedLock不是一个分布式调度器,只是一个锁!
注意:ShedLock支持Mongo,Redis,Hazelcast,ZooKeeper以及任何带有JDBC驱动程序的东西。
依赖
<dependency>
  <groupId>net.javacrumbs.shedlock</groupId>
  <artifactId>shedlock-spring</artifactId>
  <version>4.20.0</version>
</dependency>
<dependency>
  <groupId>net.javacrumbs.shedlock</groupId>
  <artifactId>shedlock-provider-jdbc-template</artifactId>
  <version>4.20.0</version>
</dependency>
使用数据库的形式,需要创建表
CREATE TABLE `shedlock` (
  `name` varchar(64) CHARACTER SET utf8 COLLATE utf8_bin NOT NULL,
  `lock_until` timestamp(3) NOT NULL DEFAULT CURRENT_TIMESTAMP(3) ON UPDATE CURRENT_TIMESTAMP(3),
  `locked_at` timestamp(3) NOT NULL DEFAULT CURRENT_TIMESTAMP(3),
  `locked_by` varchar(255) CHARACTER SET utf8 COLLATE utf8_bin NOT NULL,
  PRIMARY KEY (`name`) USING BTREE
) ENGINE=InnoDB DEFAULT CHARSET=utf8 COLLATE=utf8_bin COMMENT='定时任务同步锁';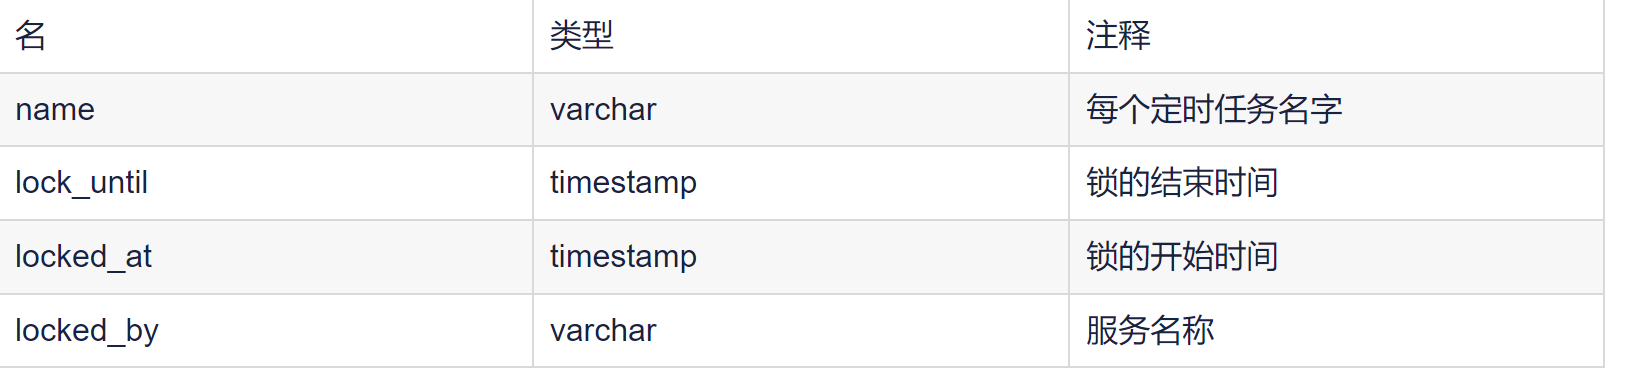

配置类
@Component
public class ShedLockConfig {

    @Resource
    private DataSource dataSource;

    @Bean
    private LockProvider lockProvider() {
        return new JdbcTemplateLockProvider(dataSource);
    }

}
启动类 @EnableSchedulerLock 开启定时任务锁
@SpringBootApplication
@EnableScheduling
@EnableSchedulerLock(defaultLockAtMostFor = "PT30S") //锁定时间不超过30s
public class TextApplication {
    public static void main(String[] args) {
        SpringApplication.run(TextApplication.class, args);
    }
}
使用 @SchedulerLock 加锁
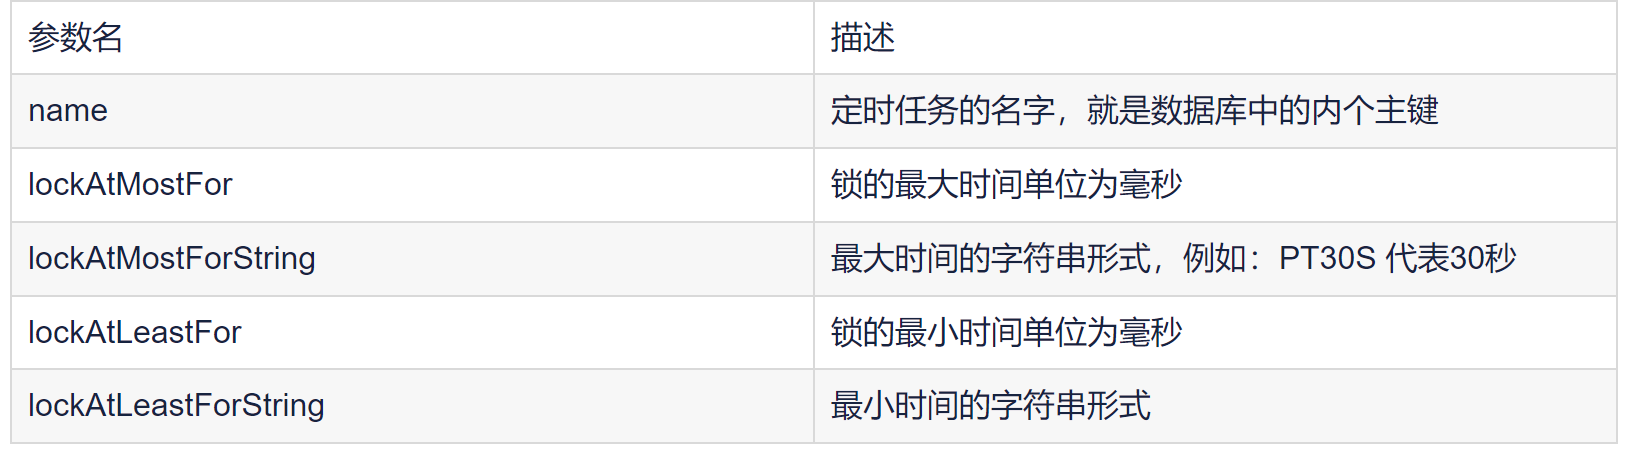
@Component
public class TestTask {
    @Scheduled(fixedDelay = 30000)
    @SchedulerLock(name = "test")
    public void test(){
        System.out.println("每30s执行一次");
    }
}


 1万+
1万+


 被折叠的 条评论
为什么被折叠?
被折叠的 条评论
为什么被折叠?
 到【灌水乐园】发言


