


Spring5自学笔记_Real006(事务操作)
一、事务的基本概念
1、什么是事务:
(1)事务时数据库操作的最基本单元,逻辑上的一组操作,要么都成功,有一组失败,所有的都会失败。
事务时一组操作的集合,他是一个不可分割的工作单位,是误会吧所有的操作作为一个整体一起向系统提交或插销操作请求,即这些操作要么同时成功,要门同时失败。
(2)典型场景:银行转账
甲转给乙100元,那么甲账户里面少100元,乙账户里面多100元,若再系统进行的时候,甲少100元,这时候出现意外情况,比如停电,乙没有多出100元,则会出现问题,所以必须保证甲少100元之后,乙必须多100元,要么就不变,要变必须两者都变。
(3)事务的特性:
1)原子性:事务是不可分割的最小操作单元,要么全部成功,要么全部失败;
2)一致性:事务完成的时候,必须让所有的数据都能够保持一致;
3)隔离性:数据库系统提供的隔离机制,保证事务在不受外部并发操作影响的独立环境下运行;
4)持久性:事务一旦提交或回滚,他对数据库中的数据的改变就是永久的。
(4)用到的函数:
@@autocommit表示是否自动提交,一般默认是1,自动提交,0为 关闭自动提交
commit函数是提交事务函数
start transaction表示开启事务
roolback表示万一发生异常,则进行回滚事务
(5)并发事务引发的问题:
1)脏读:一个事务读到了另一个事务还没有提交的数据;
2)不可重复读:一个事务先后读取同一条记录,但两次读到的数据不同;
3)幻读:一个事务按照条件查询数据的时候,没有对应的哦数据行,但是再插入数据的时候,又发现这行数据已经存在,好像出现了幻影。
(6)事务的隔离级别:
1)Read uncommitted:容易出现脏读、不可重复读、幻读三种问题,但是效率最高
2)Read committed(Orcale默认):解决了脏读的问题,但是会出现不可重复读、幻读两种问题
3)Repeatable read(MySQL默认):解决了脏读、不可重复读两种问题,会出现幻读问题
4)Serializable:将三种问题都解决了,但是效率最低
查看事务的隔离级别:
SELECT @@TRANSACTION_ISOLATION;
设置事务隔离级别:
SET [SESSION|GLOBAL] TRANSACTION ISOLATION LEVEL {READ UNCOMMITTED|READ COMMITTED|REPEATABLE READ|SERIALIZABLE}
二、事务操作的环境搭建
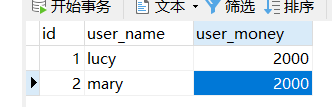
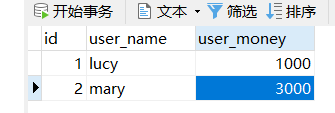
首先搭建银行转账的情景的基本代码:lucy给mary转账1000元
xml配置文件:
<?xml version="1.0" encoding="UTF-8"?>
<beans xmlns="http://www.springframework.org/schema/beans"
       xmlns:xsi="http://www.w3.org/2001/XMLSchema-instance"
       xmlns:context="http://www.springframework.org/schema/context"
       xsi:schemaLocation="http://www.springframework.org/schema/beans http://www.springframework.org/schema/beans/spring-beans.xsd
                            http://www.springframework.org/schema/context http://www.springframework.org/schema/context/spring-context.xsd">

    <!-- 开启组件扫面,利用注解注入属性 -->
    <context:component-scan base-package="com.SSMStudy.Spring5.SpringTransactionStudy"></context:component-scan>
    <!-- 直接配置连接池 -->
    <bean id="dataSource" class="com.alibaba.druid.pool.DruidDataSource">
        <property name="driverClassName" value="com.mysql.jdbc.Driver"></property>
        <property name="url" value="jdbc:mysql://127.0.0.1:3306/userdb"></property>
        <property name="username" value="root"></property>
        <property name="password" value="123456"></property>
    </bean>
    <!-- JdbcTemplate对象的创建 -->
    <bean id="jdbcTemplate" class="org.springframework.jdbc.core.JdbcTemplate">
        <!-- 注入dataSource -->
        <property name="dataSource" ref="dataSource"></property>
    </bean>
</beans>
java程序:
/**
* Dao接口
*/
import org.springframework.stereotype.Repository;

@Repository
public interface StudentDao {
    void addMoney();
    void reduceMoney();
}
/**
* dao实现类
*/
import org.springframework.beans.factory.annotation.Autowired;
import org.springframework.jdbc.core.JdbcTemplate;
import org.springframework.stereotype.Repository;
@Repository
public class StudentDaoImp implements StudentDao{
    @Autowired
    private JdbcTemplate jdbcTemplate;

    @Override
    public void addMoney() {
        String sql = "update account_list set user_money = user_money - ? where user_name = ?";
        jdbcTemplate.update(sql, 1000, "lucy");
    }

    @Override
    public void reduceMoney() {
        String sql = "update account_list set user_money = user_money + ? where user_name = ?";
        jdbcTemplate.update(sql, 1000, "mary");
    }
}
/**
* Service实现类
*/
import org.springframework.beans.factory.annotation.Autowired;
import org.springframework.stereotype.Service;

@Service
public class StudentService {
    @Autowired
    private StudentDao studentDao;

    public void accountMoney(){
        studentDao.addMoney();
        studentDao.reduceMoney();
    }
}
/**
* 测试类
*/
import org.junit.Test;
import org.springframework.context.ApplicationContext;
import org.springframework.context.support.ClassPathXmlApplicationContext;

public class TestService {
    @Test
    public void test01(){
        ApplicationContext context = new ClassPathXmlApplicationContext("bean7.xml");
        StudentService studentService = context.getBean("studentService", StudentService.class);
        studentService.accountMoney();
    }
}
测试结果:
程序运行前:
程序运行后:
三、事务的操作:(Spring事务管理)
1、一般都会将事务添加JavaEE三层结构里面的Service层(业务逻辑层)
2、在Spring进行事务管理操作:
(1)有两种方式:编程式事务管理和声明式事务管理(配置文件)
一般使用声明式事务管理方式
3、声明式事务管理方式:
(1)基于注解方式(经常使用)
(2)基于xml配置文件方式
4、在Spring进行声明式事务管理,底层使用到了AOP(面向切面编程)原理

四、Spring事务操作(基于注解方式)
1、在Spring配置文件中配置事务管理器对象
    <!-- 创建事务管理器对象 -->
    <bean id="transactionManager" class="org.springframework.jdbc.datasource.DataSourceTransactionManager">
        <!-- 诸如数据源 -->
        <property name="dataSource" ref="dataSource"></property>
    </bean>
2、在Spring配置文件中,开启事务注解
<?xml version="1.0" encoding="UTF-8"?>
<beans xmlns="http://www.springframework.org/schema/beans"
       xmlns:xsi="http://www.w3.org/2001/XMLSchema-instance"
       xmlns:context="http://www.springframework.org/schema/context"
       xmlns:tx="http://www.springframework.org/schema/tx"
       xmlns:aop="http://www.springframework.org/schema/aop"
       xsi:schemaLocation="http://www.springframework.org/schema/beans http://www.springframework.org/schema/beans/spring-beans.xsd
                            http://www.springframework.org/schema/context http://www.springframework.org/schema/context/spring-context.xsd
                            http://www.springframework.org/schema/tx http://www.springframework.org/schema/tx/spring-tx.xsd
                            http://www.springframework.org/schema/aop http://www.springframework.org/schema/aop/spring-aop.xsd">
3、开启事务的注解:
    <!-- 开启事务注解 -->
    <tx:annotation-driven transaction-manager="transactionManager"></tx:annotation-driven>
4、在service类上面(获取service类里面的方法上加上事务的注解)
@Transactional
这个注解可以加到类上面,也可以加到注解上面
添加到类上面:就是在类里面的所有方法都添加了事务注解,
只在一个方法上面加注解,则表示该方法添加了事务注解

五、Spring事务操作(基于注解方式:注解的参数设置)
在@Transactional注解里面可以添加参数:
一般需要进行以下几个参数的配置

(1)propagation:事务传播行为
多事务方法直接进行调用,这个过程中事务是如何进行管理的(也就是说,现在比如说有两个事务,一个事务调用另一个,那么如何调用另一个,另外,如果一个事务调用另一个没有事务注解的方法该怎么办)

(2)ioslation:事务隔离级别
为了解决脏读、不可重复读、幻读带来的问题

(3)timeout:超时时间
1)事务需要在一定时间内提交,如果超出timeout参数设置的哦时间还没有提交,则进行回滚操作;
2)默认值是-1,设置时间是以秒为单位的
(4)readOnly:是否只读
1)读:查询操作;写:添加修改删除操作
2)readOnly默认值是false,表示可以查询,也可以进行添加修改删除操作
3)设置readOnly为true,设置成truehi之后就只能进行查询操作
(5)rollbackFor:回滚
1)设置出现哪些异常就进行事务的回滚操作
(6)noRollbackFor:不回滚
1)设置出现哪些异常不进行回滚操作


 431
431


 被折叠的 条评论
为什么被折叠?
被折叠的 条评论
为什么被折叠?
 到【灌水乐园】发言


