


JUC自学笔记02_real(Callable接口、读写锁、阻塞队列、线程池、合并分支、异步回调)
一、Callable接口
(一)创建线程的方法
1、继承Thread类 2、实现Runnable接口 3、Callable接口 4、线程池方式
(二)Callable接口
import java.util.concurrent.Callable;
import java.util.concurrent.FutureTask;

//比较Runnable接口和Callable接口
//实现Runnable接口
class MyThread1 implements Runnable{
    @Override
    public void run() {

    }
}

class MyThread2 implements Callable {
    @Override
    public Integer call() throws Exception {
        return 200;
    }
}

public class Demo01 {
    public static void main(String[] args) {
        new Thread(new MyThread1(), "AA").start();

        //FutureTask
        //FutureTask<Integer> futureTask = new FutureTask<>(new MyThread2());

        //利用lam表达式来建立线程
        FutureTask<Integer> futureTask2 = new FutureTask<>(()->{
            return 1024;
        });

        /**
         *
         * FutureTask原理 未来任务
         * 1、老师上课,口渴了,去买水不合适,讲课线程继续
         * 2、开启单独的线程:让另一个同学去帮忙买水,买来之后,老师要喝水的时候就可以去喝水了
         */
    }

}
(三)Callable接口的使用
//比较Runnable接口和Callable接口
//实现Runnable接口
class MyThread1 implements Runnable{
    @Override
    public void run() {

    }
}

class MyThread2 implements Callable {
    @Override
    public Integer call() throws Exception {
        return 200;
    }
}

public class Demo01 {
    public static void main(String[] args) throws ExecutionException, InterruptedException {
        new Thread(new MyThread1(), "AA").start();

        //FutureTask
        //FutureTask<Integer> futureTask = new FutureTask<>(new MyThread2());

        //利用lam表达式来建立线程
        FutureTask<Integer> futureTask2 = new FutureTask<>(()->{
            System.out.println(Thread.currentThread().getName().toString()+" come in callable");
            return 1024;
        });

        new Thread(futureTask2, "lucy").start();

        while (!futureTask2.isDone()){ //isDone()方法判断改线程是否结束
            System.out.println("wait ... ...");
        }

        System.out.println(futureTask2.get().toString());

        System.out.println(Thread.currentThread().getName()+" come over");
    }

}
二、JUC线程辅助类
(一)CountDownLatch类
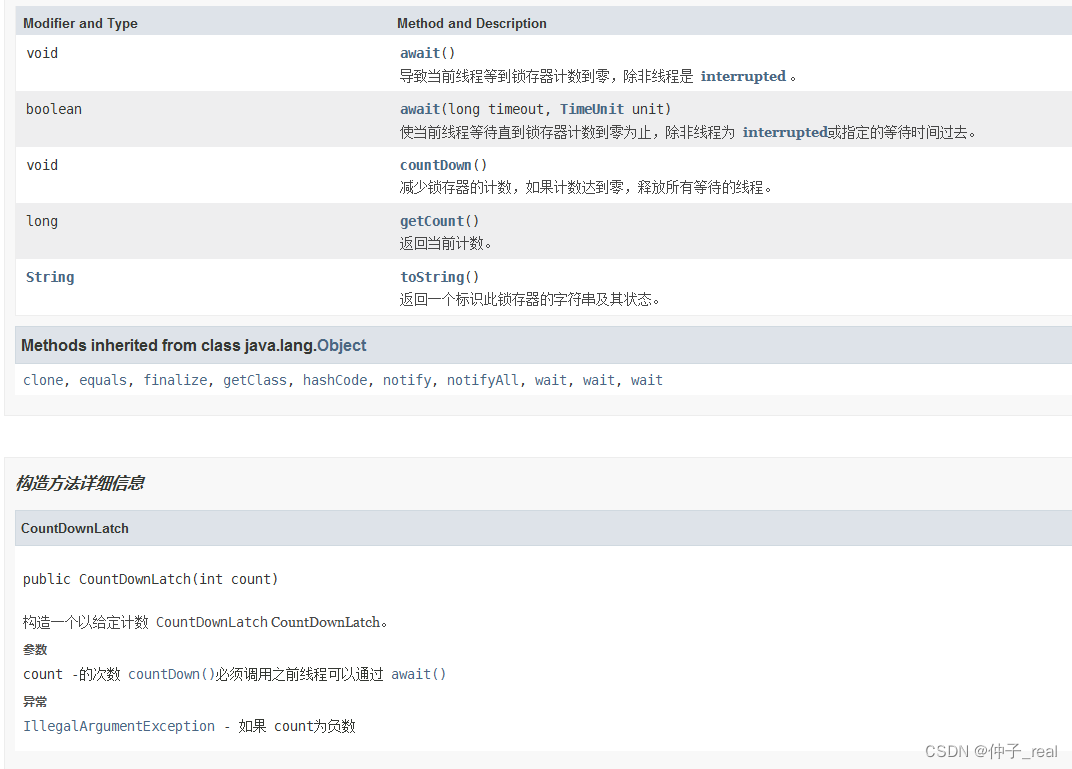
概述:
CountDownLatch类可以设置一个计数器,然后通过countDown方法来进行减1的操作,使用await()方法等待计数器不大于0,然后继续执行await()方法之后的语句。
countDownLatch主要有两个方法,当一个或多个线程调用await方法的时候,这些线程会阻塞。
特点:
- 其他线程调用countDown 方法会将计数器减1(调用CountDown方法的线程不会阻塞)。
- 当计数器的值变成0的时候,因为await()方法阻塞的线程就会被环型,继续执行。
案例:六个同学都离开教室,值班同学才能关闭教室的门。
import java.util.concurrent.CountDownLatch;

public class countDownDemo01 {
    public static void main(String[] args) throws InterruptedException {

        CountDownLatch countDownLatch = new CountDownLatch(6);

        for(int i = 0; i < 6; i++){
            new Thread(()->{
                //第i号同学离开教室
                System.out.println(Thread.currentThread().getName()+" 号同学离开了教室");

                //计数-1
                countDownLatch.countDown();
            }, String.valueOf(i)).start();
        }

        //等待
        countDownLatch.await();
        System.out.println(Thread.currentThread().getName().toString()+"班长锁门走人了");

    }
}
输出结果:
3 号同学离开了教室
2 号同学离开了教室
5 号同学离开了教室
4 号同学离开了教室
0 号同学离开了教室
1 号同学离开了教室
main班长锁门走人了
(二)循环栅栏CyclicBarrier
CyclicBarrier再使用中的构造方法第一个参数就是目标障碍数,每次执行CyclicBarrier一次障碍数就会加1,如果达到第一个参数即目标障碍数的值,才会执行构造函数的第二个参数代表的方法,或者是CyclicBarrier.await()方法之后的程序。

import java.util.concurrent.CyclicBarrier;

public class CyclicBarrierTest {

    private static final int NUMBER = 7;


    public static void main(String[] args) {

        //创建CyclicBarrier :设置固定值,当达到固定值的时候,就进行下面的程序
        CyclicBarrier cyclicBarrier = new CyclicBarrier(NUMBER, ()->{
            System.out.println("hello World");
        });

        //达到固定值的过程
        for(int i = 0; i <= 7; i++){
            new Thread(()->{
                try{
                    System.out.println(Thread.currentThread().getName());
                    //等待
                    cyclicBarrier.await();
                }catch (Exception e){
                    e.printStackTrace();
                }
            }, String.valueOf(i)).start();
        }

    }
}
输出结果:
0
5
3
2
1
4
7
6
hello World
(三)信号灯Semaphore

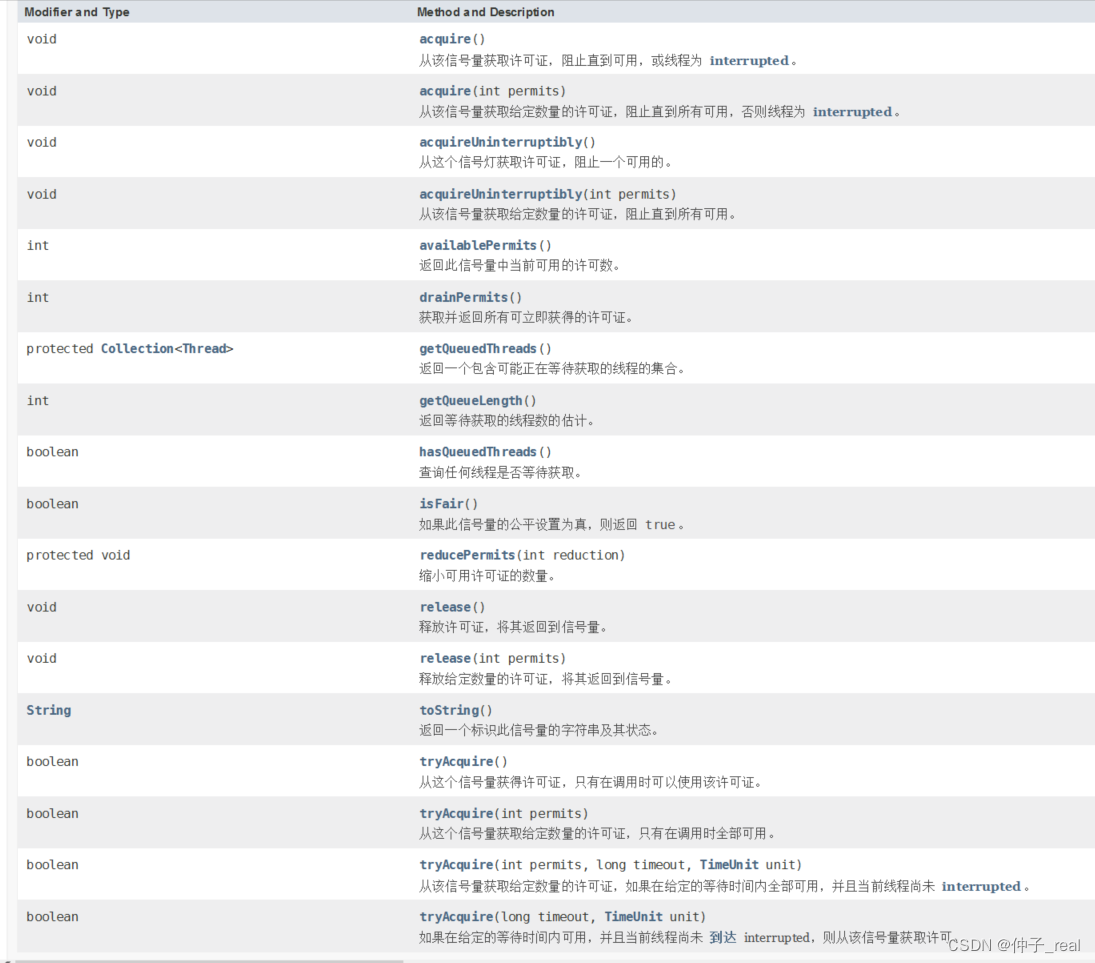
案例:6辆汽车,停三个车位
import java.util.Random;
import java.util.concurrent.Semaphore;
import java.util.concurrent.TimeUnit;

//6辆汽车,停三个车位
public class SemaphoreTest {

    private static final int NUMBER = 3;

    public static void main(String[] args) {
        //创建Semaphore 设置蓄客量为3
        Semaphore semaphore = new Semaphore(NUMBER);

        //模拟6辆车
        for (int i = 0; i < 6; i++){
            new Thread(()->{
                try{
                    //抢占
                    semaphore.acquire();
                    System.out.println(Thread.currentThread().getName()+"抢到了车位");
                    //设置随机停车时间
                    TimeUnit.SECONDS.sleep(new Random().nextInt(5));
                    //离开车位
                    System.out.println(Thread.currentThread().getName()+"离开===========");
                }catch (Exception e){
                    e.printStackTrace();
                }finally {
                    semaphore.release();
                }
            }, String.valueOf(i)).start();
        }
    }
}
三、读写锁
(一)锁的类型
1、悲观锁、乐观锁
2、表锁、行锁
3、读锁(共享锁)、写锁(独占锁)
读锁和写锁都会发生死锁:原因:
(二)使用读写锁之前
import java.util.HashMap;
import java.util.Map;
import java.util.concurrent.TimeUnit;

//资源类
class MyCache{
    //创建map集合
    private volatile Map<String, Object> map = new HashMap<>();

    //放数据
    public void put(String key, Object val) throws InterruptedException {
        System.out.println(Thread.currentThread().getName()+"这个线程正在进行写操作");

        //暂停一会
        try{
            TimeUnit.MICROSECONDS.sleep(300);
        }catch (InterruptedException e){
            e.printStackTrace();
        }

        //进行村方数据的操作
        map.put(key, val);
        System.out.println(Thread.currentThread().getName()+"写完了"+key);
    }

    //取数据
    public Object get(String key) throws InterruptedException {
        Object result = null;
        System.out.println(Thread.currentThread().getName()+"正在进行读取数据的操作"+key);

        //暂停一会
        try{
            TimeUnit.MICROSECONDS.sleep(300);
        }catch (InterruptedException e){
            e.printStackTrace();
        }

        result = map.get(key);
        System.out.println(Thread.currentThread().getName()+"取完数据了"+key);
        return result;
    }
}


public class ReadWriteLockTest {
    public static void main(String[] args) {
        MyCache myCache = new MyCache();
        //创建线程存放数据
        for(int i = 1; i <= 5; i++){
            final int num = i;
            new Thread(()->{
                try {
                    myCache.put(num+"", num+"");
                } catch (InterruptedException e) {
                    e.printStackTrace();
                }
            }, String.valueOf(i)).start();
        }

        //创建线程取数据
        for(int i = 1; i <= 5; i++){
            final int num = i;
            new Thread(()->{
                try {
                    myCache.get(num+"");
                } catch (InterruptedException e) {
                    e.printStackTrace();
                }
            }, String.valueOf(i)).start();
        }
    }
}
输出结果:
5这个线程正在进行写操作
2这个线程正在进行写操作
4这个线程正在进行写操作
1这个线程正在进行写操作
3这个线程正在进行写操作
3写完了3
5正在进行读取数据的操作5
3正在进行读取数据的操作3
1写完了1
5写完了5
4正在进行读取数据的操作4
4写完了4
2正在进行读取数据的操作2
2写完了2
1正在进行读取数据的操作1
5取完数据了5
3取完数据了3
4取完数据了4
2取完数据了2
1取完数据了1

Process finished with exit code 0
(三)使用读写锁之后
import java.util.HashMap;
import java.util.Map;
import java.util.concurrent.TimeUnit;
import java.util.concurrent.locks.ReadWriteLock;
import java.util.concurrent.locks.ReentrantReadWriteLock;

//资源类
class MyCache{
    //创建map集合
    private volatile Map<String, Object> map = new HashMap<>();

    //创建读写锁
    private ReadWriteLock rwLock = new ReentrantReadWriteLock();

    //放数据
    public void putKey(String key, Object val){
        rwLock.writeLock().lock(); //添加写锁
        try{
            System.out.println(Thread.currentThread().getName()+"这个线程正在进行写操作");
            //暂停一会

            TimeUnit.MICROSECONDS.sleep(300);
            //进行村方数据的操作
            map.put(key, val);
            System.out.println(Thread.currentThread().getName()+"写完了"+key);
        }catch (InterruptedException e){
            e.printStackTrace();
        }finally {
            rwLock.writeLock().unlock(); //释放写锁
        }
    }

    //取数据
    public Object getVal(String key) throws InterruptedException {

        rwLock.readLock().lock(); //添加读锁
        Object result = null;
        try{
            System.out.println(Thread.currentThread().getName()+"正在进行读取数据的操作"+key);
            //暂停一会
            TimeUnit.MICROSECONDS.sleep(300);
            result = map.get(key);
            System.out.println(Thread.currentThread().getName()+"取完数据了"+key);
        }catch (InterruptedException e){
            e.printStackTrace();
        }finally {
            rwLock.readLock().unlock(); //释放读锁
        }
        return result;
    }
}

public class ReadWriteLockTest {
    public static void main(String[] args) throws InterruptedException {
        MyCache myCache = new MyCache();
        //创建线程存放数据
        for(int i = 1; i <= 5; i++){
            final int num = i;
            new Thread(()->{
                try {
                    myCache.putKey(num+"", num+"");
                } catch (Exception e) {
                    e.printStackTrace();
                }
            }, String.valueOf(i)).start();
        }

        TimeUnit.SECONDS.sleep(3);

        //创建线程取数据
        for(int i = 1; i <= 5; i++){
            final int num = i;
            new Thread(()->{
                try {
                    myCache.getVal(num+"");
                } catch (Exception e) {
                    e.printStackTrace();
                }
            }, String.valueOf(i)).start();
        }
    }
}
输出结果:
5这个线程正在进行写操作
5写完了5
2这个线程正在进行写操作
2写完了2
1这个线程正在进行写操作
1写完了1
3这个线程正在进行写操作
3写完了3
4这个线程正在进行写操作
4写完了4
1正在进行读取数据的操作1
5正在进行读取数据的操作5
2正在进行读取数据的操作2
3正在进行读取数据的操作3
4正在进行读取数据的操作4
4取完数据了4
2取完数据了2
5取完数据了5
3取完数据了3
1取完数据了1

Process finished with exit code 0
结论:
读锁可以多个线程同时进行读取,但是添加写锁的时候不能多个线程同时进行写操作。
读写互斥、读读共享、写写互斥
(四)读写锁特点:
优点:
相比于Synchronized关键字,可以进行合多个读取数据的线程同时对数据进行读取操作,可以大大提高性能,同时多个线程可以进行读操作,但是写的操作与Synchronized关键字是一样的。
缺点:
(1)可能会造成锁饥饿,就是一直进行读操作,但是一致没有写操作。
(2)读的线程只能进行读操作,不能进行写操作,但是进行写的线程的时候,再写的i线程里可以进行读的操作。
(五)读写锁的降级
主要指的是:将写入的锁降级为读锁
锁降级是指把持住当前拥有的写锁的同时,再获取到读锁,随后释放写锁的过程。

以下是oracle官网的对于锁降级的示例代码:
 class CachedData {
   Object data;
   volatile boolean cacheValid;
   final ReentrantReadWriteLock rwl = new ReentrantReadWriteLock();

   void processCachedData() {
     rwl.readLock().lock();
     if (!cacheValid) {
        // Must release read lock before acquiring write lock
        rwl.readLock().unlock();
        rwl.writeLock().lock();
        try {
          // Recheck state because another thread might have
          // acquired write lock and changed state before we did.
          if (!cacheValid) {
            data = ...
            cacheValid = true;
          }
          // Downgrade by acquiring read lock before releasing write lock
          rwl.readLock().lock();
        } finally {
          rwl.writeLock().unlock(); // Unlock write, still hold read
        }
     }

     try {
       use(data);
     } finally {
       rwl.readLock().unlock();
     }
   }
 }
代码中声明了一个volatile类型的cacheValid变量,保证其可见性。首先获取读锁,如果cache不可用,则释放读锁,获取写锁,在更改数据之前,再检查一次cacheValid的值,然后修改数据,将cacheValid置为true,然后在释放写锁前获取读锁;此时,cache中数据可用,处理cache中数据,最后释放读锁。这个过程就是一个完整的锁降级的过程,目的是保证数据可见性,如果当前的线程C在修改完cache中的数据后,没有获取读锁而是直接释放了写锁,那么假设此时另一个线程T获取了写锁并修改了数据,那么C线程无法感知到数据已被修改,则数据出现错误。如果遵循锁降级的步骤,线程C在释放写锁之前获取读锁,那么线程T在获取写锁时将被阻塞,直到线程C完成数据处理过程,释放读锁。
四、BlockingQueue阻塞队列
(一)概述
阻塞队列:首先是一个队列,通过一个共享的队列,可以使得数据由队列的一端输入,另一端输出。

当队列是空的,从队列中获取元素的操作将会被阻塞;
当队列是满的,从队列中添加元素的操作将会被阻塞;
试图从空的队列中获取元素的线程将会被阻塞,直到其他线程往空的队列插入新的元素;
试图向已满的队列中添加新元素的线程将会被阻塞,直到其他线程从队列中移除一个或多个元素或者完全清空,使队列变得空闲起来并后续新增。
(二)阻塞队列的分类
https://www.yuque.com/racek/note.book/vbi67e?inner=ebDlc
(三)阻塞队列中常用的方法:


方法的代码演示
import java.util.concurrent.ArrayBlockingQueue;
import java.util.concurrent.BlockingQueue;
import java.util.concurrent.TimeUnit;

public class demo002 {
    public static void main(String[] args) throws InterruptedException {

        //创建一个阻塞队列
        BlockingQueue<String> blockingQueue = new ArrayBlockingQueue<>(3);

        //第一组方法的演示
        System.out.println(blockingQueue.add("a"));
        System.out.println(blockingQueue.add("b"));
        System.out.println(blockingQueue.add("c"));
        //System.out.println(blockingQueue.element());
        //System.out.println(blockingQueue.add(w)); //超过队列长度,会抛异常

        System.out.println(blockingQueue.remove());
        System.out.println(blockingQueue.remove());
        System.out.println(blockingQueue.remove());
        //System.out.println(blockingQueue.remove()); //队列已经是空的了,会抛异常

        //第二组方法的演示
        System.out.println(blockingQueue.offer("a"));
        System.out.println(blockingQueue.offer("b"));
        System.out.println(blockingQueue.offer("c"));
        System.out.println(blockingQueue.offer("ww"));

        System.out.println(blockingQueue.poll());
        System.out.println(blockingQueue.poll());
        System.out.println(blockingQueue.poll());
        System.out.println(blockingQueue.poll());

        //第三组方法的演示
        blockingQueue.put("a");
        blockingQueue.put("b");
        blockingQueue.put("c");
        //blockingQueue.put("www");

        System.out.println(blockingQueue.take());
        System.out.println(blockingQueue.take());
        System.out.println(blockingQueue.take());
        System.out.println(blockingQueue.take());

        //第四组方法的演示
        System.out.println(blockingQueue.offer("a"));
        System.out.println(blockingQueue.offer("b"));
        System.out.println(blockingQueue.offer("c"));
        System.out.println(blockingQueue.offer("www", 3L, TimeUnit.SECONDS));

    }
}
五、线程池
(一)基本概述
线程池(英语:thread pool ) :一种线程使用模式。线程过多会带来调度开销,进而影响缓存局部性和整体性能。而设置线程池,让线程池维护多个线程,等待着监督管理者分配可并发执行的任务。这避免了在处理短时间任务时创建与销毁线程的代价。线程池不仅能够保证内核的充分利用,还能防止过分调度。
线程池的优势︰
线程池做的工作只要是控制运行的线程数量,处理过程中将任务放入队列,然后在线程创建后启动这些任务,如果线程数量超过了最大数量,超出数量的线程排队等候,等其他线程执行完毕,再从队列中取出任务来执行。
线程池的特点:
- 降低资源消耗:通过重复利用已创建的线程降低线程创建和销毁造成的销耗。
- 提高响应速度:当任务到达时,任务可以不需要等待线程创建就能立即执行。
- 提高线程的可管理性:线程是稀缺资源,如果无限制的创建,不仅会销耗系统资源,还会降低系统的稳定性,使用线程池可以进行统一的分配,调优和监控。
- Java 中的线程池是通过Execu tor框架实现的,该框架中用到了Execu tor,Executors ,ExecutorService ,ThreadPooIExecu tor这几个类
(二)线程池的使用方式
1、Executors.newFixedThreadPool(int)这是一池多线程
2、Executors.newSingleThreadExecutors()这是一池一线程
3、Executors.newCachedThreadPool()这是根据实际需求进行线程的创建
import java.util.concurrent.Executor;
import java.util.concurrent.ExecutorService;
import java.util.concurrent.Executors;

//线程池的三种分类
public class ThreadPool {
    public static void main(String[] args) {
        //================一池多线程==================
        //一池5线程
        ExecutorService threadPool1 = Executors.newFixedThreadPool(5); //五个线程

        try{
            //10个线程需求
            for (int i = 0; i < 10; i++){
                //执行
                threadPool1.execute(()->{
                    System.out.println(Thread.currentThread().getName()+"正在使用线程");
                });
            }
        }catch (Exception e){
            e.printStackTrace();
        }finally {
            threadPool1.shutdown();
        }


        //======================一池一线程==========================
        //一池5线程
        ExecutorService threadPool2 = Executors.newSingleThreadExecutor();
        try{
            //10个线程需求
            for (int i = 0; i < 10; i++){
                //执行
                threadPool2.execute(()->{
                    System.out.println(Thread.currentThread().getName()+"正在使用线程");
                });
            }
        }catch (Exception e){
            e.printStackTrace();
        }finally {
            threadPool2.shutdown();
        }

        //=====================一池可扩容线程=================================
        ExecutorService threadPool3 = Executors.newCachedThreadPool();
        try{
            //10个线程需求
            for (int i = 0; i < 20; i++){
                //执行
                threadPool3.execute(()->{
                    System.out.println(Thread.currentThread().getName()+"正在使用线程");
                });
            }
        }catch (Exception e){
            e.printStackTrace();
        }finally {
            threadPool3.shutdown();
        }
    }
}
(三)他们的底层都是用到了同一个类:ThreadPoolExecutor
//=================一池多线程====================
public static ExecutorService newFixedThreadPool(int nThreads) {
        return new ThreadPoolExecutor(nThreads, nThreads,
                                      0L, TimeUnit.MILLISECONDS,
                                      new LinkedBlockingQueue<Runnable>());
    }
//======================一池一线程==========================
public static ExecutorService newSingleThreadExecutor() {
        return new FinalizableDelegatedExecutorService
            (new ThreadPoolExecutor(1, 1,
                                    0L, TimeUnit.MILLISECONDS,
                                    new LinkedBlockingQueue<Runnable>()));
    }
//===============一池可扩容线程================
public static ExecutorService newCachedThreadPool() {
        return new ThreadPoolExecutor(0, Integer.MAX_VALUE,
                                      60L, TimeUnit.SECONDS,
                                      new SynchronousQueue<Runnable>());
    }
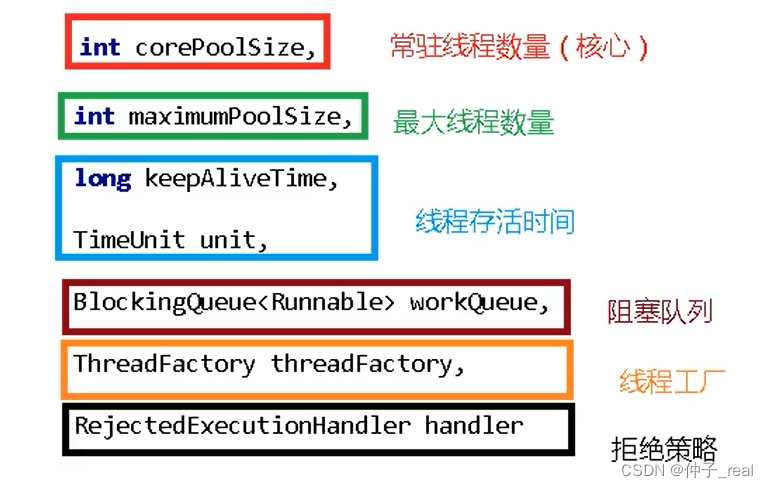
ThreadPoolExecutor类的构造器的的七个参数含义:
(四)线程池的工作流程
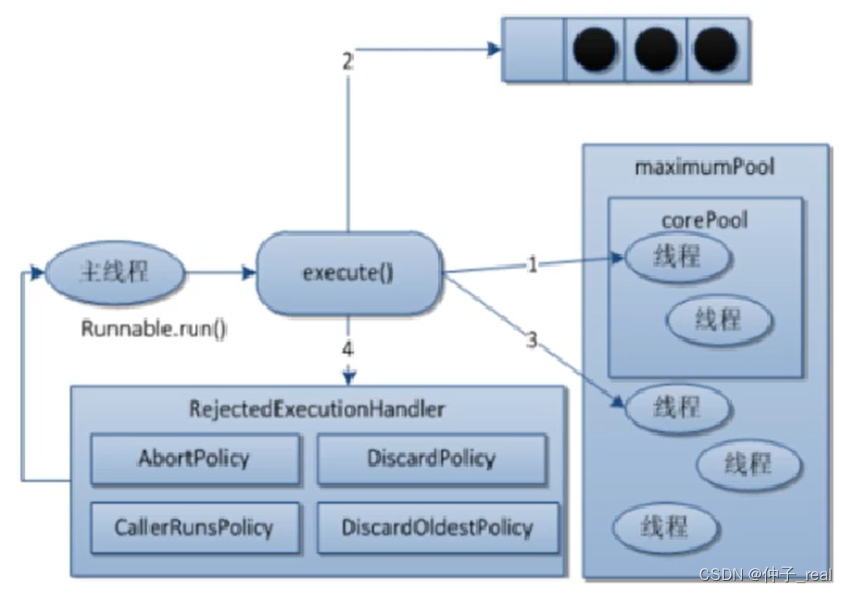
(五)线程池的拒绝策略
1、AbortPolicyt默认)∶直接抛出RejectedExecutionException异常阻止系统正常运行
2、CallerRunsPolicy:调用者运行 —种调节机制,该策略既不会抛弃任务,也不会抛出异常,而是将某些任务回退到调用者,从而降低新任务的流量。
3、DiscardoldestPolicy :抛弃队列中等待最久的任务,然后把当前任务加人队列中尝试再次提交当前任务。
4、DiscardPolicy :该策略默默地丢弃无法处理的任务,不予任何处理也不抛出异常。如果允许任务丢失,这是最好的—种策略。
(六)自定义线程池
一般在项目中三种线程池都不用,而是利用ThreadPoolExecutor类自定义线程池。
该类的构造方法:
public ThreadPoolExecutor(int corePoolSize,//常驻线程的数量
                              int maximumPoolSize, //最大线程数量
                              long keepAliveTime, //存活时间
                              TimeUnit unit, //存活时间的单位
                              BlockingQueue<Runnable> workQueue, //阻塞队列
                              ThreadFactory threadFactory, //线程工厂,主要用来创建线程
                              RejectedExecutionHandler handler) {//拒绝策略,四种
        if (corePoolSize < 0 ||
            maximumPoolSize <= 0 ||
            maximumPoolSize < corePoolSize ||
            keepAliveTime < 0)
            throw new IllegalArgumentException();
        if (workQueue == null || threadFactory == null || handler == null)
            throw new NullPointerException();
        this.corePoolSize = corePoolSize;
        this.maximumPoolSize = maximumPoolSize;
        this.workQueue = workQueue;
        this.keepAliveTime = unit.toNanos(keepAliveTime);
        this.threadFactory = threadFactory;
        this.handler = handler;
    }
自定义一个线程池,然后进行案例使用:
import java.util.concurrent.*;

public class ThreadDemo02 {
    public static void main(String[] args) {
        //===================自己定义一个线程池===============
        ExecutorService threadPool = new ThreadPoolExecutor(
                2,
                5,
                2L,
                TimeUnit.SECONDS,
                new ArrayBlockingQueue<>(3),
                Executors.defaultThreadFactory(),
                new ThreadPoolExecutor.AbortPolicy()
        );

        //===============使用线程池===============
        try{
            //10个线程需求
            for (int i = 0; i < 20; i++){
                //执行
                threadPool.execute(()->{
                    System.out.println(Thread.currentThread().getName()+"正在使用线程");
                });
            }
        }catch (Exception e){
            e.printStackTrace();
        }finally {
            threadPool.shutdown();
        }
    }
}
运行结果:
java.util.concurrent.RejectedExecutionException: Task com.atguigu.ThirdCap.ThreadDemo02$$Lambda$14/0x0000000800066840@67b64c45 rejected from java.util.concurrent.ThreadPoolExecutor@4411d970[Running, pool size = 5, active threads = 5, queued tasks = 3, completed tasks = 0]
	at java.base/java.util.concurrent.ThreadPoolExecutor$AbortPolicy.rejectedExecution(ThreadPoolExecutor.java:2055)
	at java.base/java.util.concurrent.ThreadPoolExecutor.reject(ThreadPoolExecutor.java:825)
	at java.base/java.util.concurrent.ThreadPoolExecutor.execute(ThreadPoolExecutor.java:1355)
	at com.atguigu.ThirdCap.ThreadDemo02.main(ThreadDemo02.java:23)
pool-1-thread-5正在使用线程
pool-1-thread-2正在使用线程
pool-1-thread-1正在使用线程
pool-1-thread-3正在使用线程
pool-1-thread-1正在使用线程
pool-1-thread-4正在使用线程
pool-1-thread-3正在使用线程
pool-1-thread-5正在使用线程
六、分支合并框架Fork/Join框架
(一)简介
Fork/join可以将一个大的任务拆分成多个子任务及逆行并行处理,最后将子任务结果合并成最后的计算结果,并进行输出。
Fork:把一个复杂任务进行拆分,大事化小;
Join:把拆分的任务的计过进行合并。
执行过程:
1、任务分割:首先Fork/Join框架需要把大的任务分割成足够小的子任务,如果子任务比较大的话,还要对子任务进行分割;
2、执行任务并合并结果:分割的子任务分别放到两端的队列里面,然后几个启动线程分别从双端队列里面获取任务执行,子任务执行完的结果存放到另一个队列中,启动一个线程从队列里面获取数据,然后合并这些数据。
(二)Fork/Join的使用
案例:利用分支合并框架进行0到100的相加,并且如果拆分的时候,两端数字的差值大于10,就必须继续及逆行拆分,知道两端 数字差值小于10,才能进行相加操作。
import java.util.concurrent.ExecutionException;
import java.util.concurrent.ForkJoinPool;
import java.util.concurrent.ForkJoinTask;
import java.util.concurrent.RecursiveTask;

class MyTask extends RecursiveTask<Integer>{

    //拆分的时候,差值不能超过10
    private static final int VALUE = 10;
    private int begin;
    private int end;
    private int result;

    public MyTask(int begin, int end) {
        this.begin = begin;
        this.end = end;
    }

    @Override
    protected Integer compute() {

        //判断相加的两个数值是否差值大于10
        if(end - begin <= 10){
            for(int i = begin; i <= end; i++){
                result += i;
            }
        }else {
            int middle = (end + begin) / 2;
            //下面进行递归
            MyTask task01 = new MyTask(begin, middle);
            MyTask task02 = new MyTask(middle+1, end);
            //拆分
            task01.fork();
            task02.fork();
            //合并
            result = task01.join() + task02.join();
        }

        return result;
    }
}

public class ForkJoinTest {

    public static void main(String[] args) throws ExecutionException, InterruptedException {

        MyTask myTask = new MyTask(0, 100);
        //创建分支合并池对象
        ForkJoinPool forkJoinPool = new ForkJoinPool();
        //从分支合并池里面创建分支合并对象
        ForkJoinTask<Integer> forkJoinTask = forkJoinPool.submit(myTask);
        //使用对象进行0到100的相加,并输出结果
        Integer result = forkJoinTask.get();
        System.out.println(result);
        //关闭分支合并池对象
        forkJoinPool.shutdown();
    }
}
七、异步回调CompletableFuture
import java.util.concurrent.CompletableFuture;
import java.util.concurrent.ExecutionException;

public class CompletableFutureTest {

    public static void main(String[] args) throws ExecutionException, InterruptedException {
        //异步调用,没有返回值
        CompletableFuture<Void> completableFuture1 = CompletableFuture.runAsync(()->{
            System.out.println(Thread.currentThread().getName()+"异步调用,无返回值");
        });
        completableFuture1.get();


        //异步调用,没有返回值
        CompletableFuture<Integer> completableFuture2 = CompletableFuture.supplyAsync(()->{
            System.out.println(Thread.currentThread().getName()+"异步调用,有返回值");
            return 1024;
        });

        completableFuture2.whenComplete((t, u)->{
            System.out.println("t= "+t); //返回值
            System.out.println("u= "+u); //输出的异常
        }).get();

    }

}
输出结果:
ForkJoinPool.commonPool-worker-3异步调用,无返回值
ForkJoinPool.commonPool-worker-3异步调用,有返回值
t= 1024
u= null


 被折叠的 条评论
为什么被折叠?
被折叠的 条评论
为什么被折叠?
 到【灌水乐园】发言


