


1、Spring简介
Spring框架是由于软件开发的复杂性而创建的。Spring使用的是基本的JavaBean来完成以前只可能由EJB完成的事情。然而,Spring的用途不仅仅限于服务器端的开发。从简单性、可测试性和松耦合性角度而言,绝大部分Java应用都可以从Spring中受益。
目的:解决企业级的开发复杂性问题。
功能:使用的是基本的JavaBean来完成以前只可能由EJB(sun公司提出的 JAVAEE解决方案)完成的事情,Spring 提供了更多的功能。
范围:任何的JAVA 应用
官网:Spring | Home
2、Spring 组成

IOC:Inversion of Control,控制反转。依赖注入(DI)。将对象的创建权交给了Spring。
正常的操作:是通过new创建对象,然后对象之间互相调用。
反转:是将创建对象交给Spring容器,组件化的思想,使用接口,不再关注实现。
3、IOC的实现
IOC通过spring有二种实现方式:(1)Xml配置 (2)注解
方式一(XML配置):
步骤1:在resource文件,创建一个spring的配置文件


步骤二:创建实体类,spring是通过无参构造创建对象,set方式注入
Student类:
package com.fan.pojo;

public class Student {
    private String name;
    private int age;
    private  School school;
    public Student() {
        System.out.println("Student无参数构造!");
    }

    public String getName() {
        return name;
    }

    public void setName(String name) {
        this.name = name;
    }

    public int getAge() {
        return age;
    }

    public void setAge(int age) {
        this.age = age;
    }

    public School getSchool() {
        return school;
    }

    public void setSchool(School school) {
        this.school = school;
    }

    @Override
    public String toString() {
        return "Student{" +
                "name='" + name + '\'' +
                ", age=" + age +
                ", school=" + school +
                '}';
    }
}
School类:
package com.fan.pojo;

public class School {
    private String name;
    private String address;

    public School() {
        System.out.println("school的无参构造!");
    }

    public String getName() {
        return name;
    }

    public void setName(String name) {
        this.name = name;
    }

    public String getAddress() {
        return address;
    }

    public void setAddress(String address) {
        this.address = address;
    }

    @Override
    public String toString() {
        return "School{" +
                "name='" + name + '\'' +
                ", address='" + address + '\'' +
                '}';
    }
}
引用类型的属性,需要ref属性,其中xml配置文件如下:
<?xml version="1.0" encoding="UTF-8"?>
<beans xmlns="http://www.springframework.org/schema/beans"
       xmlns:xsi="http://www.w3.org/2001/XMLSchema-instance"
       xsi:schemaLocation="http://www.springframework.org/schema/beans http://www.springframework.org/schema/beans/spring-beans.xsd http://www.springframework.org/schema/context https://www.springframework.org/schema/context/spring-context.xsd">

    <bean id="myStudent" class="com.fan.pojo.Student">
         <property name="name" value="李四"/>
         <property name="age" value="18"/>
         <property name="school" ref="mySchool"/>
    </bean>
    <bean id="mySchool" class="com.fan.pojo.School">
        <property name="name" value="航空大学"/>
        <property name="address" value="北京海淀区"/>
    </bean>

</beans>
测试类:
package com.fan;

import com.fan.pojo.Student;
import org.junit.Test;
import org.springframework.context.ApplicationContext;
import org.springframework.context.support.ClassPathXmlApplicationContext;

public class MyTest {
    @Test
    public void test01(){
        String config="applicationContext.xml";
        ApplicationContext ctx = new ClassPathXmlApplicationContext(config);
        Student student = (Student) ctx.getBean("myStudent");
        System.out.println(student);
    }
}
结果显示:

方式二(注解):
Student类:
package com.fan.pojo;

import org.springframework.beans.factory.annotation.Autowired;
import org.springframework.beans.factory.annotation.Qualifier;
import org.springframework.beans.factory.annotation.Value;
import org.springframework.stereotype.Component;

import javax.annotation.Resource;

/*
@Component:表示创建对象,对象放在容器中。作用是<bean>
     value:类似于bean的id属性值
       位置:在类的上面,表示创建此类的对象
 */
@Component("myStudent2")
public class Student {
    @Value("${myName}")
    private String name;
    @Value("${myAge}")
    private int age;
    /*引用类型   @Autowired 自动注入原理 支持byName、byType 默认是byTpye
    采用byName
    @Autowired
    @Qualifier(value = "mySchool123")*/
    /*
      @Resource 来自jdk中,给引用类型赋值,支持byName、byType 默认是byName
      spring支持这个注解
       位置:属性定义上面,无需set方法,推荐使用
            在set方法的上面
     */
    //先使用byName赋值,如果赋值失败,则用byType
   @Resource(name = "mySchool")
    private  School school;
    public Student() {
        System.out.println("无参数构造!");
    }


    @Override
    public String toString() {
        return "Student{" +
                "name='" + name + '\'' +
                ", age=" + age +
                ", school=" + school +
                '}';
    }
}
school类:
package com.fan.pojo;

import org.springframework.beans.factory.annotation.Value;
import org.springframework.stereotype.Component;

@Component("mySchool")
public class School {
    @Value("asa航空大学")
    private String name;
    @Value("北京海淀区")
    private String address;

    @Override
    public String toString() {
        return "School{" +
                "name='" + name + '\'' +
                ", address='" + address + '\'' +
                '}';
    }
}
properties:

xml配置文件:
<?xml version="1.0" encoding="UTF-8"?>
<beans xmlns="http://www.springframework.org/schema/beans"
       xmlns:xsi="http://www.w3.org/2001/XMLSchema-instance"
       xmlns:context="http://www.springframework.org/schema/context"
       xsi:schemaLocation="http://www.springframework.org/schema/beans http://www.springframework.org/schema/beans/spring-beans.xsd http://www.springframework.org/schema/context https://www.springframework.org/schema/context/spring-context.xsd">
   <!--声明组件扫描器:使用注解必须加入这个语句
         component-scan:翻译过来是组件扫描器,组件是java对象
         属性:base-package注解在你的项目中的包名
   -->
    <context:component-scan base-package="com.fan.*"/>
    <!--读取外部的属性配置文件
    property-placeholder:读取properties这样的文件
    -->
    <context:property-placeholder location="classpath:/myconf.properties" file-encoding="utf-8"/>
</beans>
测试类:
package com.fan;

import com.fan.pojo.Student;
import org.junit.Test;
import org.springframework.context.ApplicationContext;
import org.springframework.context.support.ClassPathXmlApplicationContext;

public class MyTest {
    @Test
    public void test01(){
        String config="applicationContext.xml";
        ApplicationContext ctx= new ClassPathXmlApplicationContext(config);
        Student student = (Student) ctx.getBean("myStudent2");
        System.out.println(student);
    }
}
结果图:

4、总结
(1)包含关系的配置文件:
多个配置文件中有一个总文件,总配置文件将各其它子文件通过
<import/>
引入。在
Java
代码中只需要使用总配置文件对容器进行初始化即可。
(2)其他注解:
@Repository 用于对Dao实现类进行注解
@Service 用于对service实现类进行注解
@Controller 用于对Controller实现类进行注解
这三个注解与
@Component
都可以创建对象,但这三个注解还有其他的含义,
@Service
创建业务层对象,业务层对象可以加入
事务功能
,
@Controller
注解创建的对象可以作为处
理器
接收用户的请求
。
在引用属性上使用注解
@Autowired
,该注解默认使用
按类型自动装配
Bean
的方式 ,这个是spring里面的,
默认是通过byType
。
若用@Autowired,指定通过byName的话,需要配合@Qualifier一起使用。里面的
value值为bean的id
@Autowired
还有一个属性
required
,
默认值为 true
,表示当匹配失败后,会终止程序运
行。
若将其值设置为 false,则匹配失败,将被忽略,未匹配的属性值为 null
。

Spring
提供了对
jdk
中
@Resource
注解的支持。
@Resource
注解既可以按名称匹配
Bean
,
也可以按类型匹配
Bean
。
默认是按名称注入
。使用该注解,要求
JDK
必须是
6
及以上版本。
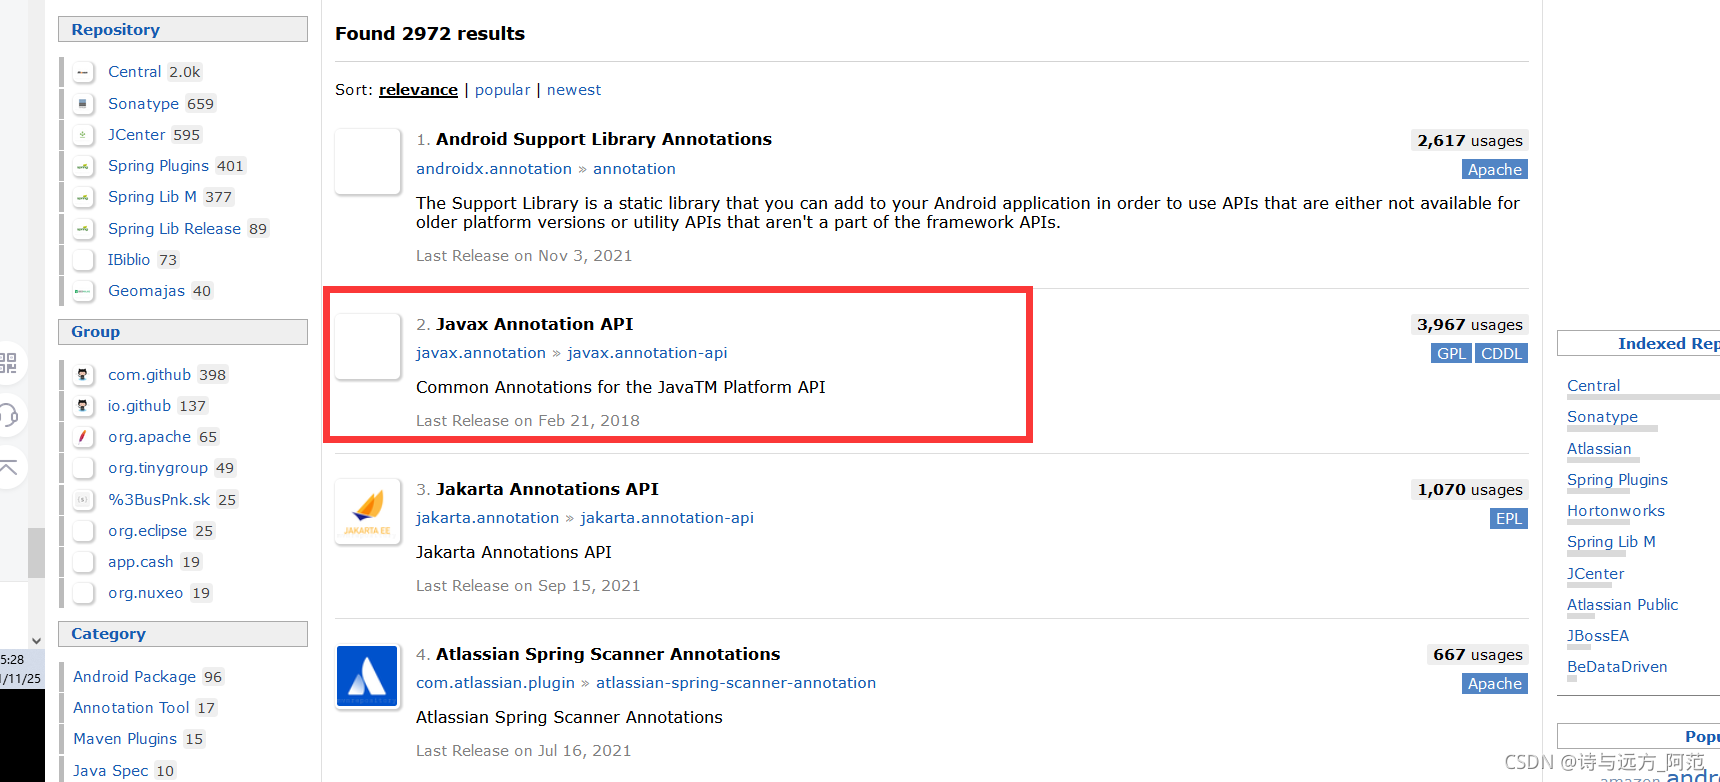
@Resource
可在属性上,也可在
set
方法上。而jdk超过1.8以上需要导入jar(如下图,选择使用人数较多的)。
注解优点是:
方便
直观
高效(代码少,没有配置文件的书写那么复杂)。
其弊端也显而易见:以硬编码的方式写入到
Java
代码中,修改是需要重新编译代码的。
XML
方式优点是:
配置和代码是分离的
在 xml 中做修改,无需编译代码,只需重启服务器即可将新的配置加载。
xml 的缺点是:编写麻烦,效率低,大型项目过于复杂
。


 238
238


 被折叠的 条评论
为什么被折叠?
被折叠的 条评论
为什么被折叠?
 到【灌水乐园】发言


