


提示:文章写完后,目录可以自动生成,如何生成可参考右边的帮助文档
文章目录
前言
提示:事件介绍 :
1, 事件的概念
日常生活中事件: 发生并得到处理的操作(即事情来了, 然后处理)
比如:
1, 电话铃声响起(事件发生) — 需要接电话(处理)
2, 学生举手请教问题(有事了) — 需要解答(处理)
3, 咱们班有个同学被欺负了(出事了) — 去给他报仇(处理)
在JS中的事件是: 用户在页面上操作, 然后我们要调用函数来处理.
比如:
    1, 点击了登录按钮, 调用登录函数执行登录操作
    2, 鼠标拖拽, 调用函数实现拖拽
事件触发:
用户在页面上操作(如点击按钮, 鼠标滑过, 鼠标点击, 鼠标松开, 文本框获得焦点, 失去焦点等), 就是事件触发.
2, 事件的模式
JavaScript有两种事件实现模式: 内联模式, 脚本模式.
内联模式 :
直接在HTML标签中添加事件. 这种模型是最传统简单的一种处理事件的方法。但是这种模式中事件和HTML是混写的, 并没有将JS与HTML分离, 当代码量多了以后,对后期代码维护和扩展很不利.
例如:
<input type="button" value="按钮" onclick="alert('hello');" />
注意: 单双引号
//执行自定义的JS函数
<input type="button"value="按钮" onclick="btnClick();" />
注意: 内联模式调用的函数不能放到window.onload里面, 否则会找不到该函数.
脚本模式:
  脚本模式能将JS代码和HTML代码分离, 符合代码规范.
  使用脚本模式我们需要先获取到元素节点对象, 再针对该节点对象添加事件; 如我们可以采用三种方式来获得节点对象: getElementById(), getElementsByTagName(), getElementsByName()
例如:
var box = document.getElementById('box');
添加事件方式一 :  通过匿名函数,可以直接触发对应的代码 (推荐)
box.onclick = function() {  //给box节点对象添加点击事件onclick
         console.log('Hello world!');
};
添加事件方式二 : 通过指定的函数名赋值的方式 来执行函数
box.onclick = func;    //注意这里不能写成func()
function func() {        //给box节点对象添加点击事件onclick
         console.log('Hello world!');
};
事件处理由三个部分组成:
1, 触发事件的元素节点对象
2, 事件处理函数
3, 事件执行函数
例如:单击文档任意处。
document.onclick = function(){
        console.log('单击了文档页面的某一个地方');
};
在上面的程序中:
document : 是触发事件的对象, 表示触发事件的元素所在区域;
onclick : 表示一个事件处理函数(on+事件类型click)
function(){} : 匿名函数是被执行的函数, 用于触发事件后执行;
所有的事件处理函数都会都有两个部分组成,on+事件类型;
例如 : onclick事件处理函数就是由on加上click;
注意: 事件处理函数一般都是小写字母
提示:以下是本篇文章正文内容,下面案例可供参考
一、事件的分类
事件的分类
JavaScript 可以处理的事件种类有三种:鼠标事件, 键盘事件和 HTML事件.
1, 鼠标事件
鼠标事件,页面所有元素都可触发鼠标事件;
click: //当单击鼠标按钮并在松开时触发
onclick = function() {
        console.log('单击了鼠标');
};
//dblclick: 当双击鼠标按钮时触发。
ondblclick = function() {
        console.log('双击了鼠标');
};
//mousedown:当按下了鼠标还未松开时触发。
onmousedown = function() {
        console.log('按下鼠标');
};
//mouseup: 释放鼠标按钮时触发。
onmouseup = function() {
        console.log('松开了鼠标');
};
//mouseover:当鼠标移入某个元素的那一刻触发。
onmouseover = function() {
        console.log('鼠标移入了');
};
//mouseout:当鼠标刚移出某个元素的那一刻触发。
onmouseout = function() {
        console.log('鼠标移出了');
};
//mousemove:当鼠标指针在某个元素上移动时触发。
onmousemove = function() {
        console.log('鼠标移动了');
};

//mouseenter:当鼠标移入某个元素的那一刻触发。
onmouseenter = function() {
        console.log('鼠标移入了');
};
//mouseleave:当鼠标刚移出某个元素的那一刻触发。
onmouseleave = function() {
        console.log('鼠标移出了');
};


//mouseover和 mouseenter的区别是:
//mouseover: 元素的子元素移入也会触发事件
//mouseenter : 元素的子元素移入不会触发事件
2. 键盘事件
键盘事件,在键盘上按下键时触发的事件;
(一般由window对象或者document对象调用)
//keydown:当用户按下键盘上某个键触发,如果按住不放,会重复触发。
window.onkeydown = function() {
        console.log(按下了键盘上的某个键);
};

//keypress:当用户按下键盘上的字符键触发,如果按住不放,会重复触发
window.onkeypress = function() {
        console.log('按下了键盘上的字符键');
};

//keyup:当用户释放键盘上的某个键触发。
window.onkeyup = function() {
        console.log(松开键盘上的某个键);
};
3. HTML事件
HTML事件,跟HTML页面相关的事件;
//load:当页面完全加载后触发
window.onload = function() {
        console.log('页面已经加载完毕');
};
//unload:当页面完全卸载后触发
window.onunload = function() {
        console.log('页面已经卸载完毕');
};
//select:当用户选择文本框(input 或 textarea)中的内容触发。
input.onselect = function() {
        console.log('选择了文本框中的内容');
};
//change:当文本框(input 或 textarea)内容改变且失去焦点后触发。
input.onchange = function() {
        console.log('文本框中内容改变了');
};
//focus:当页面或者元素获得焦点时触发。
input.onfocus = function() {
        console.log('文本框获得焦点');
};
//blur:当页面或元素失去焦点时触发。
input.onblur = function() {
        console.log('文本框失去焦点');
};
//submit:当用户点击提交按钮在<form>元素节点上触发。
form.onsubmit = function() {
        console.log(‘提交form表单’);
};
//reset:当用户点击重置按钮在<form>元素节点上触发。
form.onreset = function() {
        console.log('重置form表单');
};
//scroll:当用户滚动带滚动条的元素时触发。
window.onscroll= function() {
        console.log('滚动了滚动条了');
};
二、事件对象Event
1, 事件对象(event对象) 是什么?
event对象是在触发事件时, 浏览器会通过函数把事件对象作为参数传递过来, 在事件触发执行函数时一般会得到一个隐藏的参数, 该参数也是放在arguments数组中
//普通函数的arguments
function func() {
    console.log(arguments.length); //1, 得到一个传递的参数
}
func(“hello”);

//事件绑定的执行函数
box.onclick = function(){
     console.log(arguments.length); //1, 得到一个隐藏参数
};
通过上面两组函数中, 我们发现, 通过事件绑定的执行函数是可以得到一个隐藏参数的. 说明浏览器会自动分配一个参数,这个隐藏参数其实就是event对象(事件对象).
2, 获取事件对象
box.onclick = function() {
      console.log(arguments[0]); //获得该事件对象([object MouseEvent])
};
我们还可以使用更简单的获取事件对象的方式: 通过给函数添加一个参数
//接受事件对象, 名称不一定非要evt(这里的evt是形参,也可以自己给定其他名称)
box.onclick = function(evt){
     console.log(evt);   //[object MouseEvent]
};
通过事件的执行函数传入的event对象(事件对象) 不是在所有浏览器都有值, 在IE浏览器上event对象并没有传过来, 这里我们要用window.event来获取, 而在火狐浏览器上window.event无法获取, 而谷歌浏览器支持event事件传参和window.event两种, 为了兼容所有浏览器, 我们使用以下方式来得到event事件对象:
box.onclick = function(evt){
     var e= evt || window.event; //获取到event对象(事件对象)
     console.log(e);
};

//其中window.event中的window可以省略, 最终我们可以写成:
box.onclick = function(evt){
     var e= evt || event; //获取到event对象(事件对象)
     console.log(e);
};
注意: evt||event不要倒过来写
3, 事件对象的属性
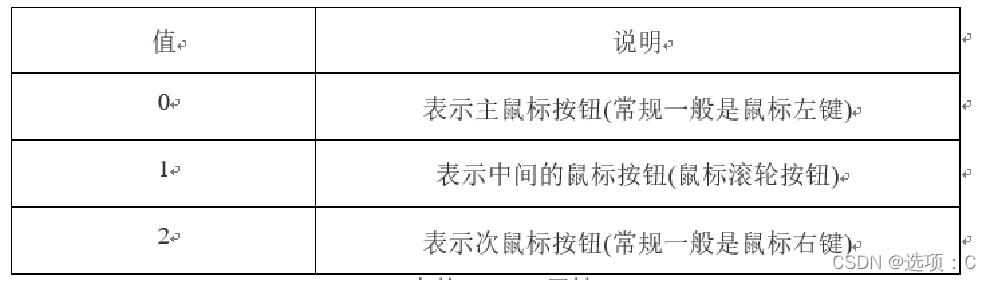
button: 鼠标按下了哪个键
例如:
document.onclick = function(evt) {
        var e = evt || event;
        console.log(e.button);
};
clientX: //浏览器可视区域的x坐标
clientY: //浏览器可视区域的y坐标
pageX: //浏览器内容区域的x坐标
pageY: //浏览器内容区域的y坐标
screenX: //显示器屏幕的x坐标
screenY: //显示器屏幕的y坐标
offsetX: //鼠标点击的元素位置距离元素左边界的x坐标
offsetY: //鼠标点击的元素位置距离元素上边界的y坐标
例如:
document.onmousedown= function(evt) {
       var e = evt || event;
       console.log(e.clientX + ',' + e.clientY);
       console.log(e.screenX + ',' + e.screenY);
       console.log(e.pageX + “,” + e.pageY);
};
target: 目标对象,存放绑定事件的元素节点对象
document.onclick = function(evt) {
     var e = evt || event;
     console.log("document: " + e.target);
}
box.onclick = function(evt) {
     var e = evt || event;
     console.log("box: " + e.target);
}
oInput.onclick = function(evt) {
     var e = evt || event;
     console.log("input: " + e.target);
}
总结
提示:这里对文章进行总结:
例如:以上就是今天要讲的内容,本文仅仅简单介绍了事件的分类和 事件对象Event,而 下面是今天的代码:
1. 事件
<!DOCTYPE html>
<html lang="en">
<head>
    <meta charset="UTF-8">
    <meta http-equiv="X-UA-Compatible" content="IE=edge">
    <meta name="viewport" content="width=device-width, initial-scale=1.0">
    <title>Document</title>
    <style>
        #box{
            width: 100px;
            height: 100px;
            background-color: red;
        }
    </style>
</head>
<body>
    <div id="box"></div>
    <form action="#" id="form">
        <input type="submit">
        <button type="submit">提交</button>
    </form>
    <input type="text" id="input">

    <script>
        //事件分为三类 鼠标事件 键盘事件 html事件
        //鼠标事件 鼠标的要求操作都是鼠标事件
        //点击 移动 滚轮
        var box = document.getElementById("box")
        //点击相关 点击 click和双击 dblclick
        box.onclick = function(){
            console.log("点击了");
        }
        box.ondblclick = function(){
            console.log("双点击了");
        }

        //移动相关 事件名以mouse开头 鼠标按下 onmousedown 鼠标弹起 onmouseup
        //鼠标移除 onmouseout 鼠标移进 onmouseover 鼠标移动 onmousemovemove
        //鼠标悬停 onmouseenter 鼠标取消悬停 onmouseleave
        box.onmousedown = function(){
            console.log("鼠标按下了");
        }
        box.onmouseup = function(){
            console.log("鼠标弹起了");
        }
        box.onmouseout = function(){
            console.log("鼠标移出了");
        }
        box.onmouseover = function(){
            console.log("鼠标移进了");
        }
        box.onmousemovev = function(){
            console.log("鼠标移动了");
        }
        box.onmouseleave = function(){
            console.log("鼠标取消悬停了");
        }
        box.onmouseenter = function(){
            console.log("鼠标悬停了");
        }
        //mouseover 和 mouseenter的区别是:
        //mouseover:元素的子元素移入也会触发事件(子元素第二次)
        //mouseenter:元素的子元素移入不会触发事件(子元素不会触发)


        //键盘事件 一般操作给整体加 onkeydown键盘按下 onkeyup键盘弹起 onkeypress按下之后弹起之前
        window.onkeydown = function(){
            console.log("键盘按下");
        }
        window.onkeyup = function(){
            console.log("键盘弹起");
        }
        window.onkeypress = function(){
            console.log("按下之后弹起之前");
        }

        //html的事件
        //页面加载数组 默认触发的执行一次
        window.onload = function(){
            console.log("页面加载了");
        }
        //onsubmit事件 提交按钮触发的事件 一般触发的元素是表单form
        document.getElementById("form").onsubmit = function(){
            console.log("提交了");
        }
        //失去了焦点 onblur 获取焦点 onfocus (常用于input)
        document.getElementById("input").onfocus = function(){
            console.log("获取焦点");
        }
        document.getElementById("input").onblur = function(){
            console.log("失去了焦点");
        }
    </script>
</body>
</html>
2. html事件补充
<!DOCTYPE html>
<html lang="en">
<head>
    <meta charset="UTF-8">
    <meta http-equiv="X-UA-Compatible" content="IE=edge">
    <meta name="viewport" content="width=device-width, initial-scale=1.0">
    <title>Document</title>
</head>
<body>
    <input id="text" type="text">
    <textarea id="textarea" style="width: 50px;height: 50px;">个体户空空荡荡</textarea>
    <form action = "#">
        <input type="reset">
    </form>
    <div style="height: 3000px;"></div>


    <script>
        //html事件补充
        var text = document.getElementById("text")
        //重点 onchange 修改 当里面的值value发生变化以后 失去焦点的时候触发 加给表单元素
        text.onchange = function(){
            console.log("修改事件");
        }
        //onscroll 滚动栏滚动 重点
        window.onscroll = function(){
            var scroll = document.documentElement.scrollTop || document.body.scrollTop
            console.log(scroll);
        }

        //onselect 选择 (一般用于复制粘贴 input textarea)
        var textarea = document.getElementById("textarea")
        textarea.onselect = function(){
            alert("您没有权限复制")
        }


        //unload 卸载 页面被卸载的时候 组件被卸载
        window.unload = function(){
            console.log("页面被卸载了");
        }

        //reset 重置的时候 加给form
        document.getElementsByTagName("form")[0].onreset = function(){
            console.log("重置");
        }

    </script>
</body>
</html>
3. 事件源对象
<!DOCTYPE html>
<html lang="en">
<head>
    <meta charset="UTF-8">
    <meta http-equiv="X-UA-Compatible" content="IE=edge">
    <meta name="viewport" content="width=device-width, initial-scale=1.0">
    <title>Document</title>
</head>
<body>
    <button>点击</button>
    <script>
        document.getElementsByTagName("button")[0].onclick = function(){
            //获取参数 发现对应的arguments里面只有一个参数 这个参数类型为 pointerEvent
            //这个pointerEvent是什么? 坐标事件源
            // console.log(arguments);
            console.log(arguments[0]); // 获取一个pointerEvent 可以获取坐标 x y 是我们的鼠标坐标
            //鼠标事件
            console.log(arguments[0].x);//x坐标
            console.log(arguments[0].y); //y坐标
            console.log(arguments[0].target); //获取触发的元素
            console.log(arguments[0].type); //触发的事件

            //加在键盘事件
            console.log(arguments[0].altKey);//是否按了alt建 是返回true 不是返回false
            console.log(arguments[0].shiftKey);
            console.log(arguments[0].ctrlKey);
            //鼠标按下的是那边的 0 左 1 滑轮 2双击
            console.log(arguments[0].button);


            //这个arguments[0]其实是拿到了我们对于的事件源对象
            //但是像什么这样写太长了 所以我们有了内置事件源对象 window.event
        }

        //KeyboardEvent的事件源对象 键盘事件源 他是个event
        window.onkeyup = function(e){//e是形参
            // e相当于arguments[0]//获取第一个参数
            console.log(e);
            console.log(window.event);//window.even的对象相当于这个e
            e = e || window.event //window.event写在后面 拿到的就是事件源对象 (常用写法)
            console.log(e.code);//获取你按下的键
            console.log(e.key);//获取你按下键的值
            console.log(e.keyCode);//获取按下键的ASCII码
            console.log(e.altkey);//是否按下的是alt键 (不常用)
        }
    </script>
</body>
</html>
4. event相关属性
<!DOCTYPE html>
<html lang="en">
<head>
    <meta charset="UTF-8">
    <meta http-equiv="X-UA-Compatible" content="IE=edge">
    <meta name="viewport" content="width=device-width, initial-scale=1.0">
    <title>Document</title>
</head>
<style>
    *{margin: 0;padding: 0;}
    div{
        width: 300px;
        height: 300px;
        background: greenyellow;
        margin: 10px;
        padding: 10px;
    }
</style>
<body>
    <div>
    </div>

    <script>
 // event的相关属性
        var div  = document.getElementsByTagName("div")[0]
        //鼠标的事件源对象
        div.onmousedown = function(e){
            e = e || window.event//e表示事件源对象
            //鼠标点击的键 button 0 表示左键 1 表示滚轮 2 表示右键
            console.log(e.button);
            console.log(e.target);//目标元素 显示是div
            console.log(e.type);//事件类型
            console.log(e.x);//获取鼠标x坐标 基于可视区域
            console.log(e.y);//获取鼠标y坐标 基于可视区域
            console.log(e.pageX);获取鼠标X坐标 基于页面的可视区域
            console.log(e.pageY);获取鼠标Y坐标 基于页面的可视区域
            console.log(e.offsetX);获取鼠标X坐标 基于div偏移的x 离div这个盒子的左上角顶点
            console.log(e.offsetY);获取鼠标Y坐标 基于div偏移的y 离div这个盒子的左上角顶点
            console.log(e.screenX);//screen获取屏幕信息 在屏幕上的x
            console.log(e.screenY);//screen获取屏幕信息 在屏幕上的y\
            console.log(e.path);//元素路径
            console.log(e.ctrlKey);//判断是否按着为true 没有为 false
            console.log(e.shiftKey);
        }

        //键盘的事件源对象
        window.onkeydown = function(e){
            e = e || window.event
            console.log(e.key);//获取按键的值
            console.log(e.code);//获取按键
            console.log(e.keyCode);//获取按键的ASCII码 不区分大小写(只返回大写)
            console.log(e.ctrlKey);//判断是否按着为true 没有为 false
            console.log(e.charCode);//字符编码 只有在按字符的时候才有 一般加给keypress事件
            console.log(e.target); //目标元素
            console.log(e.type);//事件类型 keyDown

        }
        //在弹起之前按下之后 针对字符按键 a-z以及0-9 charCode只在这里有效(其他按键不会执行)
        window.onkeypress = function(e){
            console.log("调用了");
            console.log(e.charCode);//返回对应的字符编码 ASCII码 区分大小写
        }

    </script>
</body>
</html>
5. 练习1
<!DOCTYPE html>
<html lang="en">
<head>
    <meta charset="UTF-8">
    <meta http-equiv="X-UA-Compatible" content="IE=edge">
    <meta name="viewport" content="width=device-width, initial-scale=1.0">
    <title>Document</title>
    <style>
        *{
            margin: 0;
            padding: 0;
        }
        #box1{
            width: 800px;
            height: 500px;
            margin: 50px;
            background: #080F29
            /* background: #080F29 url(images/img1.png)  no-repeat left 0px top 53px / 100px 100px; */
        }
        #img1{
            width: 100px;
            height: 100px;
            position: absolute;
        }

    </style>
</head>
<body>

    <div id="box1">
        <img id="img1" src="images/img1.png">
    </div>


    <script>
//示例:
// 1, 鼠标点击某处, 让精灵移动到该处 (如下图)
        var box1 = document.getElementById("box1")
        var img1 = document.getElementById("img1")
        box1.onclick = function(e){
            e = e || window.event
            var x = e.pageX
             var y =  e.pageY
             console.log(x);
             console.log(y);
             img1.style.left  =  x + "px"
             img1.style.top = y + "px"

        }
// 2, 鼠标移动时, 让精灵跟随鼠标移动
        box1.onmousemove = function(e){
            e = e || window.event
            //为了取中间点
            var x = e.offsetX - 100 + "px"
            var y = e.offsetX - 100 + "px"
            img1.style.left = x
            img1.style.top = y
        }

    </script>
</body>
</html>
6. 练习2
<!DOCTYPE html>
<html lang="en">
<head>
    <meta charset="UTF-8">
    <meta http-equiv="X-UA-Compatible" content="IE=edge">
    <meta name="viewport" content="width=device-width, initial-scale=1.0">
    <title>Document</title>
    <style>
        #box{
            width: 100px;
            height: 100px;
            background-color: red;


        }
    </style>
</head>
<body>
    <div id = "box" style="position: absolute; left: 0;top: 0;"></div>

    <script>

        // 有一个红色的div块
    var box = document.getElementById("box")
// 1, 如果我按下ctrl+c变换颜色
    window.onkeydown = function(e){
        e = e || window.event//获取事件源
        if(e.ctrlKey){//如果按下了ctrl
            if(e.key == "c"){//按c
                box.style.backgroundColor = "yellow"
            }


// 2, 如果我按下ctrl + shift + r 重置颜色,恢复初始颜色
            if(e.shiftKey){
                if(e.key == "r"){
                    box.style.backgroundColor = "red"
                }
            }


// 4, 如果我按下ctrl + 上下左右,走的步数变大
            if(e.keyCode>=37 && e.keyCode<=40){
                move(e.keyCode-36,100)
            }
        } else{
            //如果按的是上下左右
            if(e.keyCode>=37 && e.keyCode<=40){
                move(e.keyCode-36,20)
            }
        }

    }
    // 3, 如果我按下向上箭头,向上移动, 同理还可以向下,左,右移动
    function move(d,n){
        var x = parseInt(box.style.left)
        var y = parseInt(box.style.top)
        if(d==1){//左
            box.style.left = x-n+"px"
        }else if(d==2){//上
            //top值减小
            box.style.top = y-n+"px"
        }else if(d==3){//右
            box.style.left = x+n+"px"
        }else if(d=4){//下
            box.style.top = y+n+"px"
        }
    }

    </script>
</body>
</html>


 2154
2154


 被折叠的 条评论
为什么被折叠?
被折叠的 条评论
为什么被折叠?
 到【灌水乐园】发言


