


微服务网关聚合Swagger
本文目录
1、Zuul网关中的配置
1、导入依赖
<!-- swagger2 依赖 -->
<dependency>
    <groupId>io.springfox</groupId>
    <artifactId>springfox-swagger2</artifactId>
    <version>2.6.1</version>
</dependency>
<!-- Swagger第三方ui依赖 -->
<dependency>
    <groupId>com.github.xiaoymin</groupId>
    <artifactId>swagger-bootstrap-ui</artifactId>
    <version>1.9.6</version>
</dependency>
2、application.yml添加配置
注意swagger.servers.location中的路径与zuul网关路由转发的路径匹配重点
zuul:
  routes:
    CHAOSHAN-AUTH:
     path: /auth/**
    demo:
     path: /demo/**

swagger:
  servers:
    - {name: demo,location: /demo/v2/api-docs, version: 2.0}
    - {name: auth,location: /auth/v2/api-docs, version: 2.0}
绑定配置文件中的自定义数据
@Configuration
@ConfigurationProperties(prefix = "swagger")
public class SwaggerServers {
  private static List<Server> servers = new ArrayList<>();

  public static List<Server> getServers(){
    return servers;
  }

  public void setServers(List<Server> servers){
    this.servers = servers;
  }
}
3、配置扫描微服务swagger文档
@Component
@Primary
class DocumentationConfig implements SwaggerResourcesProvider {

    @Override
    public List<SwaggerResource> get() {
        List resources = new ArrayList();
        for (Server server : SwaggerServers.getServers()) {
         // 添加application.yml中的微服务资源
         resources.add(swaggerResource
                       (server.getName(),server.getLocation(),server.getVersion()));
        }
        return resources;
    }

    private SwaggerResource swaggerResource(String name, String location, String version) {
        SwaggerResource swaggerResource = new SwaggerResource();
        swaggerResource.setName(name);
        swaggerResource.setLocation(location);
        swaggerResource.setSwaggerVersion(version);
        return swaggerResource;
    }
}
4、配置Swagger
配置Swagger自动转配,以及基础信息
@Configuration
@EnableSwagger2
public class SwaggerConfig {
  @Bean
  public Docket createRestApi() {
    return new Docket(DocumentationType.SWAGGER_2)
            .enable(true)
            .apiInfo(apiInfo());
  }

  private ApiInfo apiInfo() {
    return new ApiInfoBuilder()
            .title("Api接口测试文档")
            .description("Api接口文档说明")
            .termsOfServiceUrl("http://localhost:8001")
            .contact(new Contact("xxx", "https://xxx", "xxx@qq.com"))
            .version("1.0")
            .build();
  }

  @Bean
  UiConfiguration uiConfig() {
    return new UiConfiguration(null, "list", "alpha", "schema",
            UiConfiguration.Constants.DEFAULT_SUBMIT_METHODS, false, true, 60000L);
  }
2、微服务中的配置
1、导入依赖
<!-- swagger2 依赖 -->
<dependency>
    <groupId>io.springfox</groupId>
    <artifactId>springfox-swagger2</artifactId>
    <version>2.6.1</version>
</dependency>
<!-- Swagger第三方ui依赖 -->
<dependency>
    <groupId>com.github.xiaoymin</groupId>
    <artifactId>swagger-bootstrap-ui</artifactId>
    <version>1.9.6</version>
</dependency>
2、配置Swagger
@Configuration
@EnableSwagger2
public class SwaggerConfig {
  @Bean
  public Docket createRestApi() {
    //添加head参数配置start
    return new Docket(DocumentationType.SWAGGER_2)

            .apiInfo(apiInfo())
            .select()
        	// 配置包扫描
            .apis(RequestHandlerSelectors.basePackage("com.xxx"))
            .build();
  }

  private ApiInfo apiInfo() {
    return new ApiInfoBuilder()
            .title("demo模块")
            .description("demo模块接口API文档")
            .contact(new Contact("xxx", "https://xxx", "xxx@qq.com"))
            .version("2.0")
            .build();
  }
}
3、SpringSecurity环境放行Swagger
@Configuration
@EnableGlobalMethodSecurity(securedEnabled = true,prePostEnabled = true)
public class WebSecurityConfig extends WebSecurityConfigurerAdapter {

  @Bean
  public PasswordEncoder passwordEncoder() {
    return new BCryptPasswordEncoder();
  }

  @Override
  protected void configure(HttpSecurity http) throws Exception {
    http.csrf().disable()
            .authorizeRequests()
            .anyRequest().authenticated()
            .and()
            .formLogin();
  }

  @Override
  public void configure(WebSecurity web) throws Exception {
    web.ignoring().antMatchers("login","/logout",
            "/css/xx",
            "/js/xx",
            "/index.html",
            "favicon.ico",
            "/doc.html",
            "/webjars/**","/demo/v2/api-docs",//swagger api json
            "/swagger-resources/configuration/ui",//用来获取支持的动作
            "/swagger-resources",//用来获取api-docs的URI
            "/swagger-resources/configuration/security",//安全选项
            "/swagger-ui.html", "/doc.html");
  }
}
4、Oauth2环境放行Swagger
在资源服务器中进行放行,授权服务器如果也聚合了Swagger需要放行 WebSecurityConfigurerAdapter的权限,和上边一样
@Configuration
@EnableResourceServer
public class ResouceServerConfig extends ResourceServerConfigurerAdapter {

......

  @Override
  public void configure(HttpSecurity http) throws Exception {

    http
            .authorizeRequests()
            .antMatchers("/v2/**",//swagger api json
                    "/css/**", "/js/**", "/images/**", "/webjars/**", "**/favicon.ico", "/index",
                    "/swagger-resources/configuration/ui",//用来获取支持的动作
                    "/swagger-resources",//用来获取api-docs的URI
                    "/swagger-resources/configuration/security",//安全选项
                    "/swagger-ui.html", "/doc.html").permitAll()
            .antMatchers("/**").access("#oauth2.hasScope('ROLE_ADMIN')")
            .and().csrf().disable()
            // 基于token,所以要关闭session
            .sessionManagement().sessionCreationPolicy(SessionCreationPolicy.STATELESS);
  }

}
5、效果展示
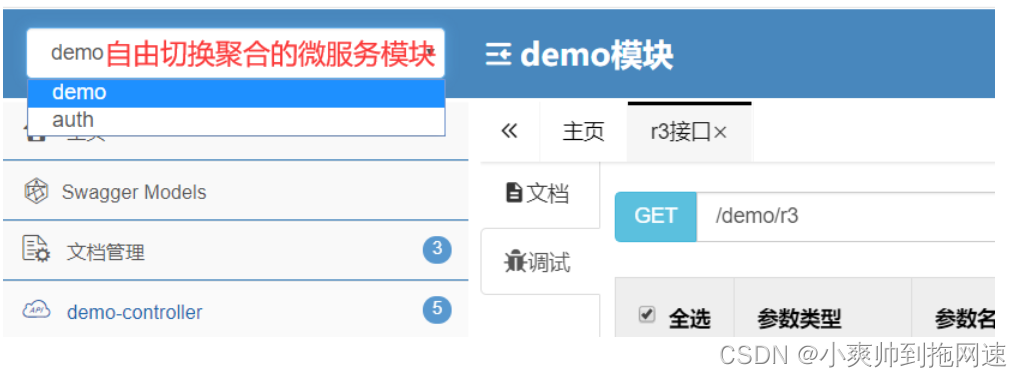
3、Swagger实战场景
1、自定义注解实现接口跳过Swagger扫描
自定义注解
@Target(value = {ElementType.METHOD, ElementType.TYPE})
@Retention(RetentionPolicy.RUNTIME) // 运行时有效
public @interface MyAnnotationSwagger {
  String value() default "";
}
添加配置
@Bean
public Docket createRestApi() {
  return new Docket(DocumentationType.SWAGGER_2)
          // .enable(true)
          .apiInfo(apiInfo())
          .select()
          .apis(RequestHandlerSelectors.basePackage("com.chaoshan"))
          .apis(Predicates.not( // 取反
              // 当方法上有MyAnnotationSwagger注解时,返回true
                  RequestHandlerSelectors.withMethodAnnotation(
                          MyAnnotationSwagger.class)))
          .build();
}


// 添加该注解后,此接口不会展示在接口文档上
  @MyAnnotationSwagger
  @ApiOperation(value = "r1接口", notes = "测试接口r1")
  @GetMapping(value = "/r1")
  public String r1( String a) {
    return a + "资源访问1";
  }
2、Swagger注解的使用
注意只有在接口中返回了该实体后,才会在接口文档上显示该实体信息
@ApiModel 标注在实体类上,不是Controller
@ApiModelProperties 标注在属性上
@Data
@ApiModel(value = "自定义实体user",description = "存储用户数据")
public class User {
  /**
   * 主键
   */
  @ApiModelProperty(name = "主键(id)",value = "主键",required = false,example = "111",hidden = false)
  private Long id;
}
![[外链图片转存失败,源站可能有防盗链机制,建议将图片保存下来直接上传(img-VSIc8nx0-1651762484224)(使用攻略.assets/image-20220505224510754.png)]](https://img-blog.csdnimg.cn/0c4302865b6e41528baf34270a0579b0.png)
@Api 标注在Controller上
@ApiOperation 标注在方法上
@ApiParam 标注在方法的参数上,或者说添加在参数前面
@ApiImplicitParam 标注在方法上,同样描述的是方法的参数,与@ApiParam的区别在于,@ApiParam是放在参数旁,而@ApiImplicitParam是放在方法上的,不过需要绑定参数名
@ApiImplicitParams 标注在方法上,如果方法有多个参数,需要使用这个值是数组类型的@ApiImplicitParam
@GetMapping(value = "/r3")
@ApiOperation(value = "r3接口")
@ApiImplicitParam(name = "m", value = "参数描述m", required = false, paramType = "String1")
public String r3(@ApiParam(value = "m1") String m) {
    return "r3";
}

@GetMapping(value = "/r4")
@ApiOperation(value = "r4接口")
@ApiImplicitParams(
    value = { @ApiImplicitParam(name = "m", value = "参数m描述", required = false, paramType = "Integer"),
             @ApiImplicitParam(name = "n", value = "参数n描述", required = true, paramType = "String(字符串)")}
)
public String r4(String m, String n) {
    return "r4";
}
![[外链图片转存失败,源站可能有防盗链机制,建议将图片保存下来直接上传(img-GzlBqCfJ-1651762484224)(使用攻略.assets/image-20220505225258936.png)]](https://img-blog.csdnimg.cn/87bf690da5e94afe8445cc301fd254ab.png)
![[外链图片转存失败,源站可能有防盗链机制,建议将图片保存下来直接上传(img-MRXIKetq-1651762484225)(使用攻略.assets/image-20220505225325643.png)]](https://img-blog.csdnimg.cn/d8b37b22eda144d9a1a7639d16a8e1f3.png)
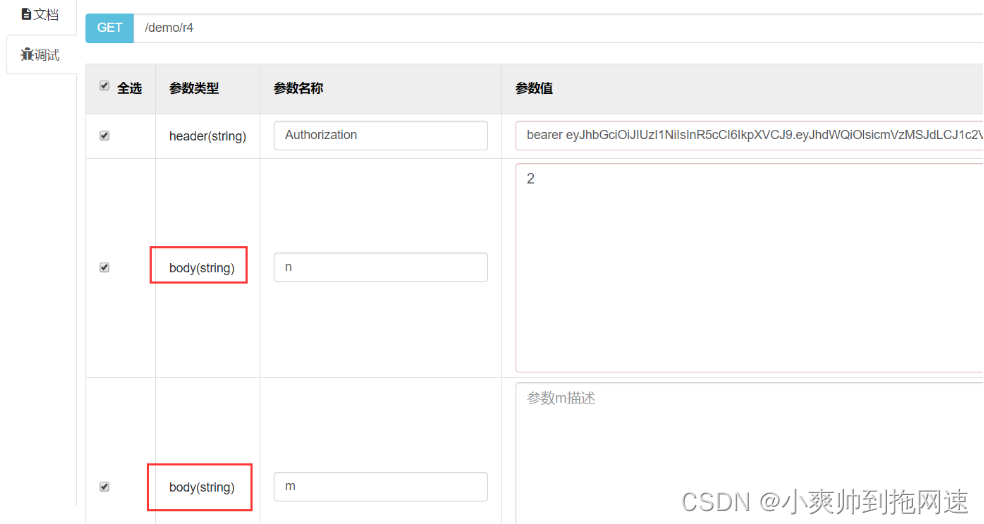
3、使用Swagger参数注解出现的问题
如果使用了@ApiImplicitParams 或者@ApiImplicitParam注解,就会在swagger改变原来的参数请求方式,不管你是query,form,还是pathvariable通过改成body的形式传递参数
@GetMapping(value = "/r4")
@ApiOperation(value = "r4接口")
@ApiImplicitParams(
    value = { @ApiImplicitParam(name = "m", value = "参数m描述", required = false),
             @ApiImplicitParam(name = "n", value = "参数n描述", required = true)}
)
public String r4(@RequestParam String m,@RequestParam String n) {
    return "r4";
}
可以发现如果使用了@ApiImplicitParams对参数声明到swagger的注解,就会出现swagger传递方式绑定为body的情况,这个时候就需要在@ApiImplicitParam中声明参数传递类型
参数请求类型
![[外链图片转存失败,源站可能有防盗链机制,建议将图片保存下来直接上传(img-uqoaXEv2-1651807297634)(使用攻略.assets/image-20220506105846574.png)]](https://img-blog.csdnimg.cn/2fbb8b55300d42ef8f3fdaa91ffaaba7.png)
@GetMapping(value = "/r4")
@ApiOperation(value = "r4接口")
@ApiImplicitParams(
    value = { @ApiImplicitParam(name = "m", value = "参数m描述", required = false,paramType = "query"),
             @ApiImplicitParam(name = "n", value = "参数n描述", required = true,paramType = "query")}
)
public String r4(@RequestParam String m,@RequestParam String n) {
    return "r4";
}
![[外链图片转存失败,源站可能有防盗链机制,建议将图片保存下来直接上传(img-MFfwl9yJ-1651807297635)(使用攻略.assets/image-20220506105741315.png)]](https://img-blog.csdnimg.cn/aeaf740a739541fe930042b3ae4e83e6.png)
Post请求中参数请求类型Body问题
如果是Post请求中携带参数@RequestBody实体不建议使用@ApiParam和@ApiImplicitParam,为什么呢?
举个例子大家就明白了!
@PostMapping("/user")
@ApiImplicitParam(name = "user",paramType = "body")
public User getUser(@RequestBody User user){
    User user1 = new User();
    return user1;
}
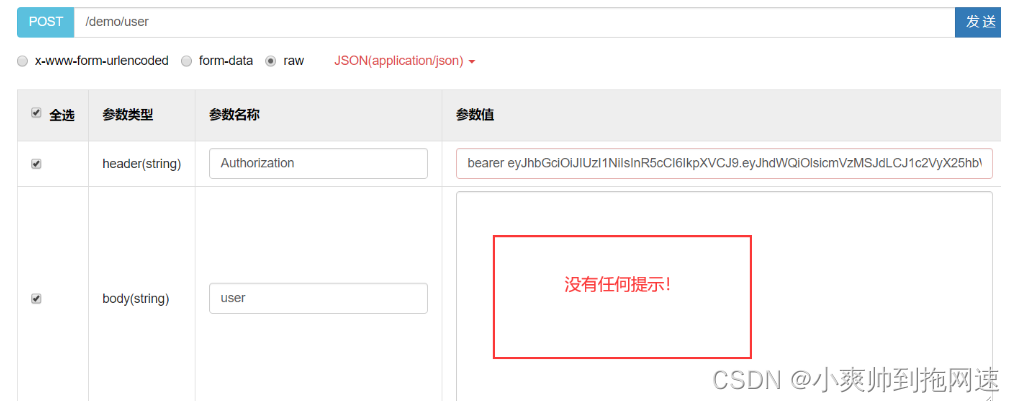
我把@ApiImplicitParam注释后
@PostMapping("/user")
// @ApiImplicitParam(name = "user",paramType = "body")
public User getUser(@RequestBody User user){
  User user1 = new User();
  return user1;
}
![[外链图片转存失败,源站可能有防盗链机制,建议将图片保存下来直接上传(img-OrmVh2db-1651807297636)(使用攻略.assets/image-20220506110503246.png)]](https://img-blog.csdnimg.cn/0e74ac503e4241ad980b45f505997c7f.png)
总结
总结一下,为了加快前后端的开发速度,我们使用Swagger的接口测试文档,对于接口中参数的类型不能光凭前端人员去猜测,我们后端开发人员应该给出明确的提示
所以为了规范化,会在接口中的参数添加@ApiParam注解,但是这个注解是需要写在方法参数的左侧,如果说这个参数需要做一定约束的话,需要添加@RequestParam、@RequestBody、@PathVariable等,最后就是下面这种代码
@GetMapping("/")
public String test(@ApiParam(name="",value="",require="") @RequestParam String a){}
看起来很乱,而且这仅仅是一个参数而已,并且@ApiParam的参数还不够丰富,所以开发中我们更推荐使用@ApiImplicitParam,如果方法中只有一个参数则使用它,如果是2个参数以上,需要使用@ApiImplicitParams,传入数组类型的@ApiImplicitParam,演示如下
@GetMapping("/")
@ApiImplicitParams({
    @ApiImplicitParam(name="a",value="",required=false,paramType="query"),
    @ApiImplicitParam(name="b",value="",required=false,paramType="query")
})
public String test(@RequestParam String a,@RequestParam String b){}
这样看起来是不是简洁许多,减少了些许代码冗余,并且还能够指定swagger参数请求类型
如果你对本文的内容有疑问或者其他方面的见解,欢迎到评论区里留言


 1697
1697


 被折叠的 条评论
为什么被折叠?
被折叠的 条评论
为什么被折叠?
 到【灌水乐园】发言


