


为什么要使用缓存?当我们需要与数据库交互,并且有时候会用到大量重复的数据,如果每一次都要去查询数据库就浪费大量的时间在与数据库的交互上,因此使用缓存技术。
JSR-107
首先我们使用缓存前,要明白的是,java其实也有对缓存技术的规范的,所谓的JSR-107就是为Java Caching定义的一套规范,他一共定义了五个核心的接口,分别是:
- CachingProvider
- CacheManager
- Cache
- Entry
- Expiry
- CachingProvider定义了创建、配置、获取、管理和控制的多个CacheManager,一个应用可以在运行期间,访问多个CachingProvider
- CacheManager定义了创建、配置、获取、管理和控制的多个唯一命名的Cache,这些Cache存在于CacheManager的上下文中,一个CacheManager仅被一个CachingProvider所拥有.
- Cache是一个类型Map的数据结构,并且临时存储以key为索引的值,一个Cache仅被一个CacheManager所拥有.
- Entry是一个存储在Cache中的key-value对.
- Expiry:每一个存在Entry中的条目有一个有效期,一旦超过这个时间,条目就会变成过期的状态,过期以后的条目不可访问,更新,删除,缓存的有效期可以通过ExpiryPolicy来设置.
不得不说,使用java原生的缓存规范来实现我们的需求是很麻烦的,所以spring对JSR-107进行了抽象,简化为Cache和CacheManager来帮助我们开发。
springboot缓存支持
spring定义了CacheManager和Cache接口用来统一不同的缓存技术,其中CacheManager是各种缓存技术的抽象接口,Cache是用来操作缓存的接口。
使用缓存
spring提供了几个注解:
| 注解 | 释义 |
|---|---|
| @Cacheable | 在方法执行前,spring会先检查缓存中是否有数据,如果有,就直接返回数据;如果没有则调用方法,并将方法的返回值放进缓存 |
| @CachePut | 该注解会保证方法被执行,其返回值会被放进缓存中,它的属性和@CacheEnable一样 |
| @CacheEvict | 清除缓存,可以清除指定key的缓存,也可以清除全部缓存 |
| @Caching | 可以通过@Caching注解组合多个缓存策略在一个方法上 |
| @CacheConfig | 可以抽取公共的配置,标注在类上 |
| @EnableCaching | 开启基于注解的缓存 |
通过小例子学会使用:
通过springboot+mybatis+cache实现
步骤:
- 创建工程,导入对应依赖
创建工程,添加cache依赖,web依赖,mybatis依赖及mysql驱动,完成后pom文件如下:
<?xml version="1.0" encoding="UTF-8"?>
<project xmlns="http://maven.apache.org/POM/4.0.0" xmlns:xsi="http://www.w3.org/2001/XMLSchema-instance"
	xsi:schemaLocation="http://maven.apache.org/POM/4.0.0 https://maven.apache.org/xsd/maven-4.0.0.xsd">
	<modelVersion>4.0.0</modelVersion>
	<parent>
		<groupId>org.springframework.boot</groupId>
		<artifactId>spring-boot-starter-parent</artifactId>
		<version>2.2.6.RELEASE</version>
		<relativePath/> <!-- lookup parent from repository -->
	</parent>
	<groupId>com.xsw</groupId>
	<artifactId>springboot-cache</artifactId>
	<version>0.0.1-SNAPSHOT</version>
	<name>springboot-cache</name>
	<description>Demo project for Spring Boot</description>

	<properties>
		<java.version>1.8</java.version>
	</properties>

	<dependencies>
		<dependency>
			<groupId>org.springframework.boot</groupId>
			<artifactId>spring-boot-starter-cache</artifactId>
		</dependency>
		<dependency>
			<groupId>org.springframework.boot</groupId>
			<artifactId>spring-boot-starter-web</artifactId>
		</dependency>
		<dependency>
			<groupId>org.mybatis.spring.boot</groupId>
			<artifactId>mybatis-spring-boot-starter</artifactId>
			<version>2.1.2</version>
		</dependency>

		<dependency>
			<groupId>mysql</groupId>
			<artifactId>mysql-connector-java</artifactId>
			<version>8.0.19</version>
			<scope>runtime</scope>
		</dependency>
		<dependency>
			<groupId>org.springframework.boot</groupId>
			<artifactId>spring-boot-starter-test</artifactId>
			<scope>test</scope>
			<exclusions>
				<exclusion>
					<groupId>org.junit.vintage</groupId>
					<artifactId>junit-vintage-engine</artifactId>
				</exclusion>
			</exclusions>
		</dependency>
	</dependencies>

	<build>
		<plugins>
			<plugin>
				<groupId>org.springframework.boot</groupId>
				<artifactId>spring-boot-maven-plugin</artifactId>
			</plugin>
		</plugins>
	</build>

</project>
- 配置数据库,创建对应的表及bean
在application.properties中配置信息:
spring.datasource.url=jdbc:mysql:///spring_cache?useUnicode=true&charaterEncoding=UTF-8&serverTimezone=UTC
spring.datasource.username=root
spring.datasource.password=admin
spring.datasource.driver-class-name=com.mysql.cj.jdbc.Driver
创建user表及对应实体User类
public class User {
    private int id ;
    private String name ;
    private String email ;
    public User(){}

    public User(int id, String name, String email) {
        this.id = id;
        this.name = name;
        this.email = email;
    }

    public int getId() {
        return id;
    }
    public void setId(int id) {
        this.id = id;
    }
    public String getName() {
        return name;
    }
    public void setName(String name) {
        this.name = name;
    }
    public String getEmail() {
        return email;
    }
    public void setEmail(String email) {
        this.email = email;
    }
}
- 编写mapper
编写UserMapper接口,定义对user表的CRUD操作
@Mapper
public interface UserMapper {
	//查询所有
    @Select("select * from user")
    public List<User> findAll();
	//根据id查user
    @Select("select * from user where id=#{id}")
    public User findById(Integer id);
	//添加用户
    @Options(useGeneratedKeys = true,keyProperty = "id")
    @Insert("insert into user(name,email) values(#{name},#{email})")
    public void add(User user);
	//修改user
    @Update("update user set name=#{name},email=#{email} where id=#{id}")
    public void update(User user);
	//删除
    @Delete("delete from user where id=#{id}")
    public void delete(Integer id);
}
- 编写service层(重点,在这里加缓存规则)
这里就不创建service层接口了
@Service
public class Userservice {

    @Autowired()
    UserMapper userMapper;

    public void add(User user){
        userMapper.add(user);
    }

    @Cacheable(cacheNames = "user",key = "#id")
    public User findById(Integer id){
        System.out.println("查询"+id+"号用户"+“;已加入到缓存中”);
        return userMapper.findById(id);
    }

    //@CachePut作用是在执行了更新操作后同步更新缓存的数据
    @CachePut(key = "#result.id",cacheNames = "user")
    public User update(User user){
         userMapper.update(user);
         return user;
    }

    @CacheEvict(value = "user",key = "#id")
    public void delete(Integer id){
        System.out.println("删除了"+id+"号用户");
        //userMapper.delete(id);
    }

    public List<User> findAll(){
        return userMapper.findAll();
    }
}
@Cacheable注解:
运行流程:
-
方法运行之前,先去查询Cache(缓存组件),按照cacheNames指定的名字获取;如果没有找到就创建一个cache组件,这里的获取是由CacheManager来完成的.
-
在找到的cache组件中,使用一个参数key来获取缓存的内容,默认是按照@Cacheable注解所在的方法的参数,key是按照一定的keyGenerator生成的,默认使用SimpleKeyGenerator生成的
SimpleKeyGenerator生成key的规则:
如果没有参数, key = new SimoleKey()
如果有一个参数, key=参数的值,也就是方法形参的值
如果有多个参数,key = new SimpleKey(params). -
如果没有查到缓存数据,开始调用目标方法获取.
-
将目标方法得到的数据保存到缓存中.
几个属性:
-
cacheNames/value : 指定缓存组件的名字,将方法的返回值存放在哪个缓存中,是数组的方式,可以指定多个缓存.
-
key : 缓存数据时使用的key,可以用这个属性来指定,默认使用方法参数的值.可以使用SqEL表达式来指定,
-
keyGenerator : key的生成器,可以自己指定key的生成组件的id,也就是说,如果key不想使用key属性来指定,就可以用这个参数来自定义生成规则,key和keyGenerator二选一即可
-
CacheManager : 指定缓存管理器,或者用CacheResolver来指定获取解析器.
-
condition : 在符合该条件的情况下才缓存数据.如:condition = "#id>0"代表参数id必须大于0才缓存
-
unless : 否定缓存,当unless指定的条件为true,方法的返回值就不会被缓存;可以获取到结果进行判断,如
-
unless = "#result == null"或者unless = “#a0==2”:如果第一个参数的值是2,结果不缓存;
sync : 是否使用异步模式,默认为false,需要注意的是,如果开启异步,unless属性就不支持了.
- 编写controller
@RestController
public class UserController {

    @Autowired
    Userservice userservice;

    @RequestMapping("/findAll")
    public List<User> findAll(){
        return userservice.findAll();
    }

    @RequestMapping("/findById")
    public User findById(Integer id){
        return userservice.findById(id);
    }

    @RequestMapping("/delete")
    public String delete(Integer id){
        userservice.delete(id);
        return "删除成功";
    }

    @RequestMapping("/add")
    public String add(User user){
        return "添加成功";
    }

    @RequestMapping("/update")
    public User update(User user){
        userservice.update(user);
        return user;
    }
}
- 启动cache
记得在启动类中开启缓存,只要在启动类上添加@EnableCaching注解
@EnableCaching
@MapperScan("com.xsw.springbootcache.mapper" )
@SpringBootApplication
public class SpringbootCacheApplication {

	public static void main(String[] args) {
		SpringApplication.run(SpringbootCacheApplication.class, args);
	}

}
- 测试
启动主程序,在浏览器访问:http://localhost:8080/findById?id=1(提前在user表中插入几条数据)

控制台输出:

此时再次查询id=1,发现控制台没有调用该方法,也就是说没有查询数据库就查到了信息,证明id=1的user加入到缓存中。
此时,修改id=1的用户信息,访问http://localhost:8080/update?id=1&name=狗蛋&email=111@狗蛋.com,
再次查询id=1的user,访问http://localhost:8080/findById?id=1,
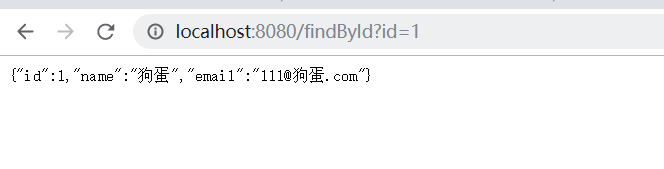
发现查询到的用户变成了name=狗蛋,而控制台也没有调用查询数据库的方法,证明@CachePut注解起作用了,在修改user时也更新了key=1的缓存。
此时,再访问http://localhost:8080/delete?id=1,删除缓存,再次查询id=1时,就会到数据库中查询。


 1840
1840


 被折叠的 条评论
为什么被折叠?
被折叠的 条评论
为什么被折叠?
 到【灌水乐园】发言


