


Requests-HTML模块
Requests-HTML模块与requests模块为同一开发者所开发。是requests模块的增强版。不仅支持requests模块的所有功能,还增加了对JavaScript的支持、数据提取以及模拟真实浏览器等功能。
>>> # 安装Requests-HTML模块
>>> pip install requests-html
>>> # 检查模块是否安装成功
>>> import requests_html
>>> requests_cache.__version__
'0.5.2'

# get请求,通过会话实例进行网络请求的发送
>>> from requests_html import HTMLSession
>>> session = HTMLSession() # 创建HTML会话对象
>>> url = 'http://httpbin.org/get'
>>> res = session.get(url)
>>> print(res.html) # 打印网络请求的URL地址
<HTML url='http://httpbin.org/get'>

# post请求,需要单独设置表单参数data,并通过会话实例进行网络请求的发送
>>> data = {'user': '云朵', 'password': 'studio'}
>>> url = 'http://httpbin.org/post'
>>> res2 = session.post(url, data=data)
>>> if res2.status_code == 200:
...    print(res2.text)
# 返回结果与requests模块相比的一点改进,请求时使用的是一个真实的浏览器请求头信息。

请求头信息
前面已经介绍了,Requests-HTML模块会模拟真实浏览器向URL发送网络请求,虽然Requests-HTML模块已经设置了默认的请求头"User-Agent"信息,必要时可以对其进行修改。
>>> header = {"User-Agent": "这里填写需要修改的User-Agent"}
>>> res3 = session.post(url, data=data, headers=header)
也可以运用Requests-HTML模块中的User-Agent类,随机生成请求头信息。
>>> from requests_html import HTMLSession, UserAgent
>>> session = HTMLSession()   #创建HTML会话对象
>>> user_agent = UserAgent().random  #创建随机请求头
>>> header = {"User-Agent": user_agent}
>>> print(f'The randomly generated request headers is {user_agent}')

# The randomly generated request headers is Mozilla/5.0 (Windows NT 6.1;
# WOW64) AppleWebKit/537.36 (KHTML, like Gecko) Chrome/29.0.1547.62 Safari/537.36

# The randomly generated request headers is Mozilla/5.0 (Windows NT 6.1;
# rv:6.0) Gecko/20100101 Firefox/19.0

>>> res = session.get('http://httpbin.org/get', headers=header)
>>> if res.status_code == 200:
...    print(res.text)
数据提取
Requests-HTML模块直接提供了支持CSS选择器及XPath的节点提取方式。而requests需要配合HTML解析器。
CSS选择器
>>> from requests_html import HTMLSession, UserAgent
>>> session = HTMLSession()   #创建HTML会话对象
>>> user_agent = UserAgent().random  #创建随机请求头
>>> res = session.get(url, headers={"User-Agent": user_agent})
>>> res.endoding='gb2312'
>>> if res.status_code == 200:
...    tip_all = res.html.find('定位网页元素',containing='指定文本获取网页元素')
...   ...
此处使用了通过HTML调用find()方法。
res.html.find(
    selector: str = '*',
    *,
    containing: Union[str, List[str]] = None,
    clean: bool = False,
    first: bool = False,
    _encoding: str = None,
) -> Union[List[ForwardRef('Element')], ForwardRef('Element')]
selector: 使用CSS选择器定位网页元素。
containing: 如果指定,则只返回包含所指定文本的网页元素。
clean: 是否清除HTML中的
<script>和<style>标签,默认不清除。first: 是否只返回网页中第一元素,默认返回全部内容
_encoding: 编码格式
XPath选择器
XPath 是一门路径提取语言,常用于从 html/xml 文件中提取信息。它的基规则如下
| 表达式 | 描述 |
|---|---|
| nodename | 选取此节点的所有子节点 |
| / | 从根节点选取 |
| // | 从匹配选择的当前节点选择文档中的节点,而不考虑他们的位置 |
| . | 选取当前节点 |
| .. | 选取当前节点的父节点 |
| @ | 选取属性 |
>>> from requests_html import HTMLSession, UserAgent
>>> session = HTMLSession()   #创建HTML会话对象
>>> user_agent = UserAgent().random  #创建随机请求头
>>> res = session.get(url, headers={"User-Agent": user_agent})
>>> res.endoding='gb2312'
>>> if res.status_code == 200:
...    tip_all = res.html.xpath('定位网页元素')
...   for tip in tip_all:
...      ...
同样需要通过HTML调用xpath()
res.html.xpath(
    selector: str,
    *,
    clean: bool = False,
    first: bool = False,
    _encoding: str = None,
) -> Union[List[str], List[ForwardRef('Element')], str, ForwardRef('Element')]
selector: 使用xpath选择器定位网页元素。
clean: 是否清除HTML中的
<script>和<style>标签,默认不清除。first: 是否只返回网页中第一元素,默认返回全部内容
_encoding: 编码格式
search()与search_all()方法
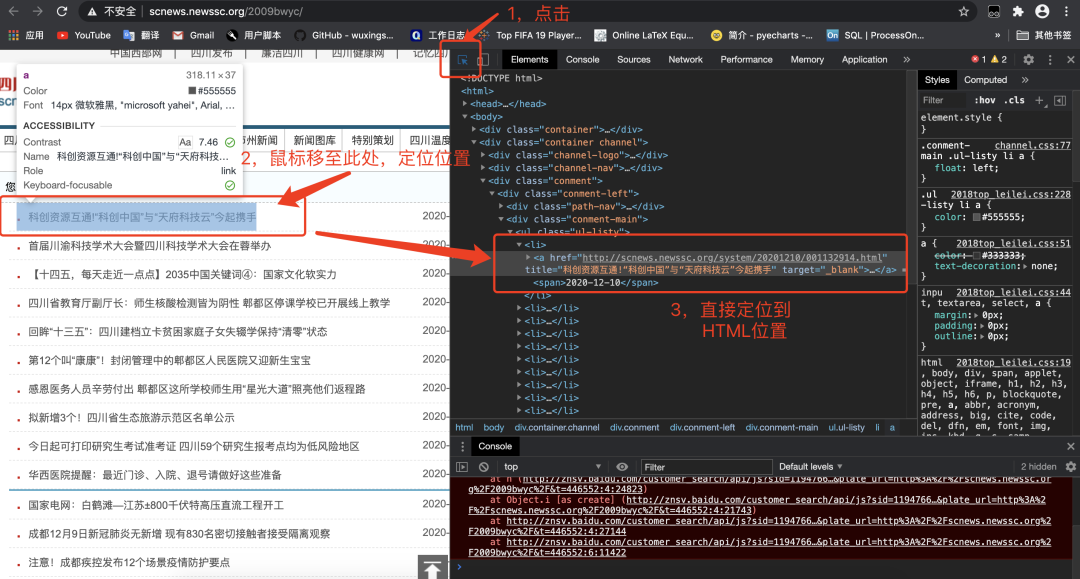
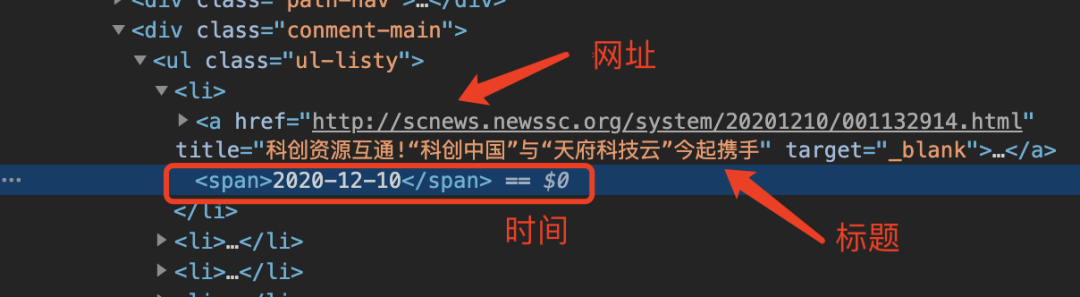
仔细研究新闻在HTML的位置:
# search()
>>> from requests_html import HTMLSession, UserAgent
>>> session = HTMLSession()   #创建HTML会话对象
>>> user_agent = UserAgent().random  #创建随机请求头
>>> url = 'http://scnews.newssc.org/2009bwyc/'
>>> res = session.get(url, headers={"User-Agent": user_agent})
>>> res.endoding='gb2312'
>>> if res.status_code == 200:
...    tip_all = res.html.find('li',containing='成都')
...   for tip in tip_all:
...       a = tip.search('<a href="{}" title="{}"{}</a>')
...         # 上面获取<li>标签中<a>标签内的地址与内容
...        news_title = html.unescape(a[1])
...         # 上面NCR字符编码(形如&#xxx)转换为汉字
...         news_href = a[0]
...         news_time = tip.search('<span> {}</span>')
...         print(f'news_title is: {news_title}')
...         print(f'news_href is: {news_href}')
...         print(f'news_time is: {news_time}')
# 方法中"{}"表示获取一个内容
部分结果如下:
news_title is: 现场直击|成都郫都区岷阳实验外国语学校全面启动网上授课
news_href is: http://scnews.newssc.org/system/20201209/001132542.html
news_time is: 2020-12-09
news_title is: 围墙拆了绿植鲜花多了 成都“两拆一增”让市民直呼“惊喜”
news_href is: http://scnews.newssc.org/system/20201209/001132562.html
news_time is: 2020-12-09
news_title is: 布局康养、创新孵化等多业态 成都成华又一总部项目开工
news_href is: http://scnews.newssc.org/system/20201209/001132617.html
news_time is: 2020-12-09
news_title is: 华西专家梁宗安:成都新发疫情为聚集性发病 未发生社区传播
news_href is: http://scnews.newssc.org/system/20201209/001132621.html
news_time is: 2020-12-09
search_all()方法需要与正则表达式一起使用。
>>> from requests_html import HTMLSession, UserAgent
>>> import re
>>> session = HTMLSession()   #创建HTML会话对象
>>> user_agent = UserAgent().random  #创建随机请求头
>>> res = session.get(url, headers={"User-Agent": user_agent})
>>> res.endoding='gb2312'
>>> if res.status_code == 200:
...    class_ul_listy = res.html.xpath('.//ul[@class="ul-listy"]')
...   tip_all = class_ul_listy[0].search_all('<li>{}</li>')
...   for tip in tip_all:
...        if '四川' in li[0]:
...         a = re.findall('<a href="(.*?)" title="(.*?)" .*?</a><span>(.*?)</span>',tip[0])
...             # 获取<li>标签中<a>标签内的地址与内容
...             news_title = html.unescape(a[0][1])
...             # 上面NCR字符编码(形如&#xxx)转换为汉字
...             news_href = a[0][0]
...             news_time = a[0][2]
...             print(f'news_title is: {news_title}')
...             print(f'news_href is: {news_href}')
...             print(f'news_time is: {news_time}')
获取动态加载数据
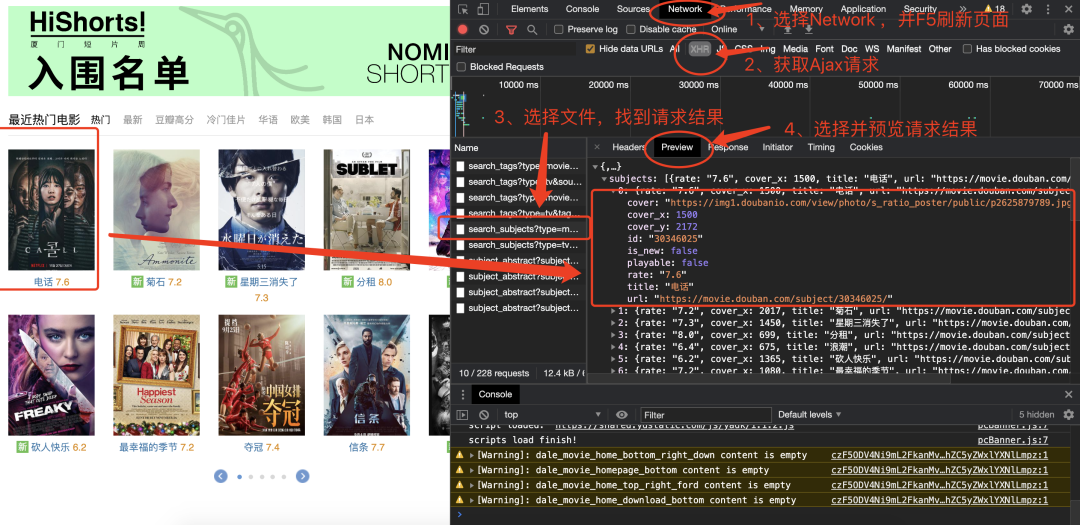
获取豆瓣电影https://movie.douban.com/,直接对网址发送请求时,返回内容不包括需要的数据。这是因为网页数据使用了Ajax请求并由JavaScript渲染到页面中。
下图显示通过浏览器开发中工具获取Ajax请求后到信息。
Requests-HTML模块提供了render()方法来解决此类问题。
>>> from requests_html import HTMLSession, UserAgent
>>> session = HTMLSession()
>>> user_agent = UserAgent().random
>>> header={"User-Agent": user_agent}
>>> url = 'https://movie.douban.com/explore#!type=movie&tag=%E7%83%AD%E9%97%A8&sort=recommend&page_limit=20&page_start=0'
>>> res = session.get(url,headers=header)
>>> res.endoding='gb2312'
>>> if res.status_code == 200:
res.html.render() # 第一次调用render(),会自动下载Chromium浏览器
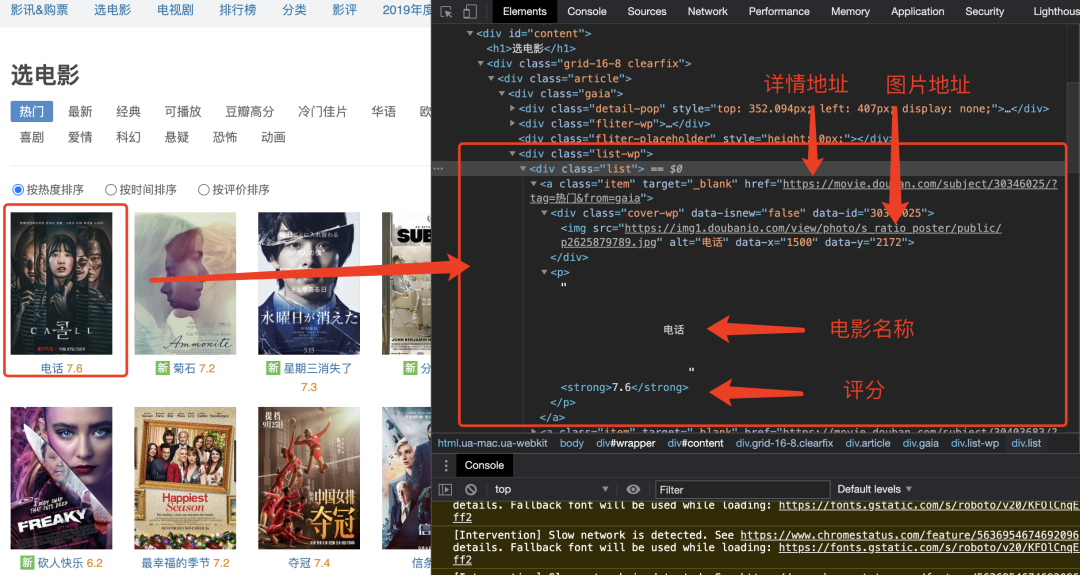
>>> class_list = res.html.xpath('.//div[@class="list"]/a')
>>> for item in class_list:
... title = item.find('p')[0].text
... rate = item.find('p strong')[0].text
... detail_url = item.attrs.get('href')
... img_url = item.find('img')[0].attrs.get('src')
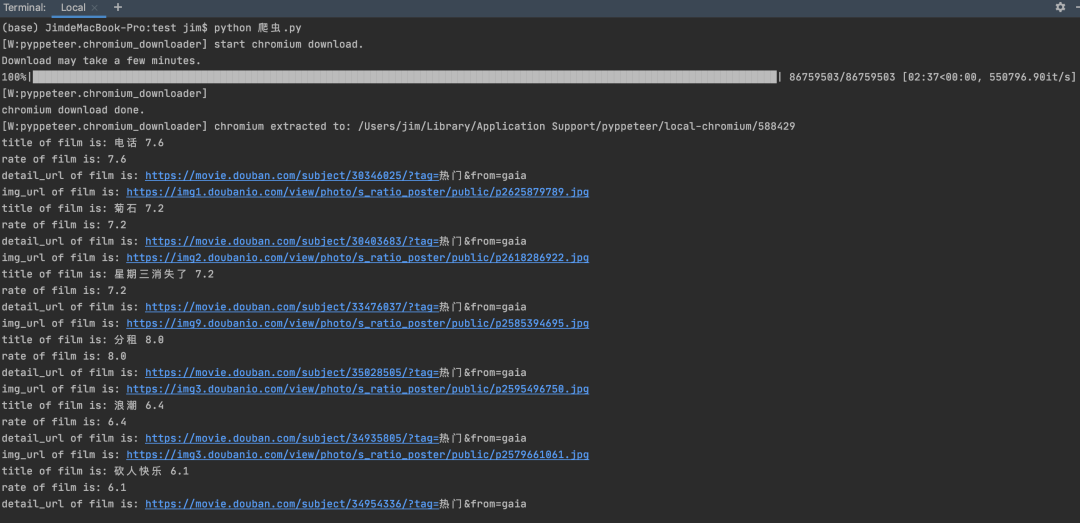
... print(f'title of film is: {title}')
... print(f'rate of film is: {rate}')
... print(f'detail_url of film is: {detail_url}')
... print(f'img_url of film is: {img_url}')
如果出现报错信息为
"Cannot use HTMLSession within an existing event loop. Use AsyncHTMLSession instead.", 这是由于jupyter notebook造成的, 只需要不使用jupyter notebook即可.
因此选用PyCharm运行上述程序,得到结果如下。第一次调用render(),会自动下载Chromium。
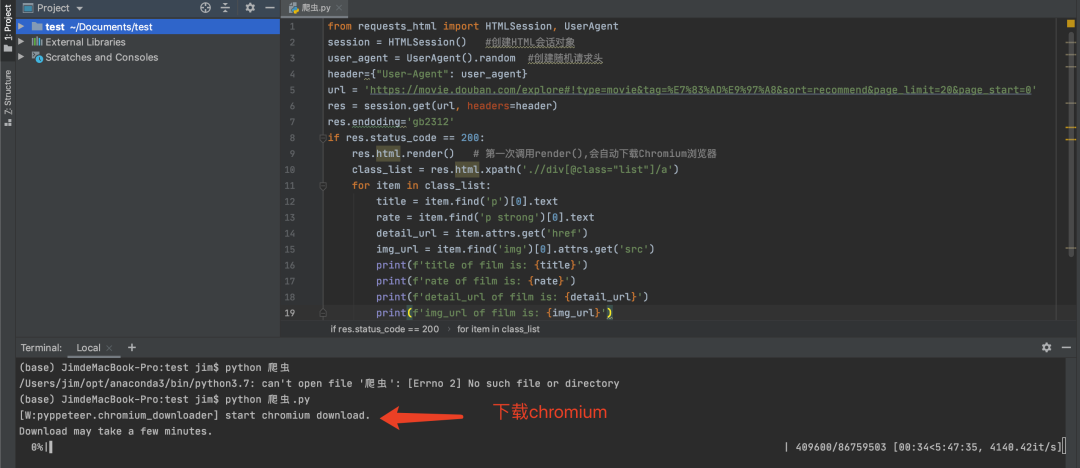
下载完毕后会直接输出结果,如下图。
print(bs.a.attrs)表示把a标签的所有属性打印输出了出来,得到的类型是一个字典。
推荐阅读


 2206
2206


 被折叠的 条评论
为什么被折叠?
被折叠的 条评论
为什么被折叠?
 到【灌水乐园】发言


