


Controller配置详解
1.实现Controller接口
Controller为一个接口,在org.springframework.web.servlet.mvc包,只有一个方法:
//实现该接口的类获得控制器功能
public interface Controller {
   //处理请求且返回一个模型与视图对象
   ModelAndView handleRequest(HttpServletRequest var1, HttpServletResponse var2) throws Exception;
}
测试
1.新建一个moudle,配置好各个文件(注意mvc配置文件下只留下视图解析器)
2.编写一个ControllerTest01类,实现了Controller接口
//只要实现了Controller,就说明这个类是一个控制器!
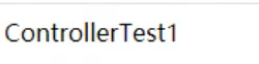
public class ControllerTest1 implements Controller {
@Override
public ModelAndView handleRequest(HttpServletRequest httpServletRequest, HttpServletResponse httpServletResponse) throws Exception {
ModelAndView mv = new ModelAndView();
mv.addObject("msg","controllerTest1");
mv.setViewName("test");
return mv;
}
}
3.编写完毕后,在Spring配置文件中注册请求的bean:
name对应请求路径,class对应处理请求的类
<bean name="/t1" class="com.hui.controller.ControllerTest1"/>
4.编写test.jsp
<%@ page contentType="text/html;charset=UTF-8" language="java" %>
<html>
<head>
    <title>test</title>
</head>
<body>

${msg}

</body>
</html>
5.运行Tomcat测试
注:
- 实现接口Controller定义控制器是比较老的方法
- 缺点:一个控制器只有一个方法,如果需要多个方法需要定义多个类。
2.使用注解@Controller
- @Controller注解类型用于声明Spring类的实例是一个控制器(在学习IOC时还提到了另外3个注解)
- Spring可以使用扫描机制来找到应用程序中所有基于注解的控制器类,为了保证Spring能找到你的控制器,需要在配置文件中声明组件扫描。
<!-- 自动扫描指定的包,下面所有注解类交给IOC容器管理 -->
<context:component-scan base-package="com.hui.controller"/>
1.编写一个ControllerTest02类,使用注解实现:
/*
代表这个类会被Spring托管
如果这个类中的方法,返回值类型为String,并且有具体的页面可以跳转,那么就会被视图解析器解析
*/
@Controller
public class ControllerTest02 {
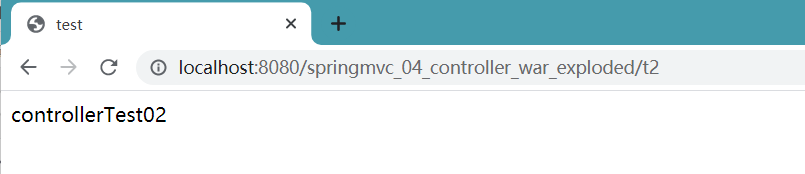
@RequestMapping("/t2")
public String test02(Model model){
model.addAttribute("msg","controllerTest02");
return "test";
}
}
2.运行Tomcat测试
RequestMapping说明
- @RequestMapping注解用于映射url到控制器类或一个特定的处理程序方法。可用于类或方法上。用于类上,表示类中的所有响应请求的方法都是以该地址作为父路径。
1.只注解在方法上
@Controller
public class ControllerTest02 {

    @RequestMapping("/t2")
    public String test02(Model model){

        model.addAttribute("msg","controllerTest02");

        return "test";
    }
}
访问路径:http://localhost:8080 / 项目名 / t2
2.同时注解类和方法
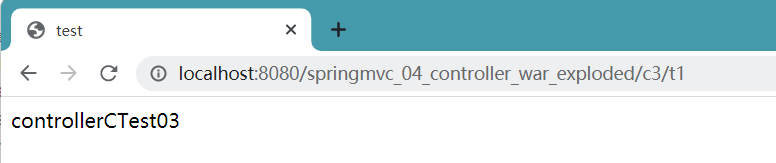
@Controller
@RequestMapping("/c3")
public class ControllerTest03 {
    @RequestMapping("/t1")
    public String test1(Model model){
        model.addAttribute("msg","controllerCTest03");
        return "test";
    }
}
访问路径:http://localhost:8080 / 项目名/ c3 /t1 , 需要先指定类的路径再指定方法的路径


 370
370


 被折叠的 条评论
为什么被折叠?
被折叠的 条评论
为什么被折叠?
 到【灌水乐园】发言


