


docker容器网络配置
Linux内核实训名称空间的创建
ip netns命令
可以使用 ip netns 命令来完成对 Network Namespace 的各种操作。ipnetns 命令来自于 iproute,一般系统会默认,如果没有的话,请自行安装安装。
注意:ip netns命令修改网络配置时需要sudo权限。
可以通过 ip netns 命令完成对 Network Namespace 的相关操作,可以通过 ip netns help 查看命令帮助信息:
[root@localhost ~]# ip netns  help
Usage:	ip netns list
	ip netns add NAME
	ip netns attach NAME PID
	ip netns set NAME NETNSID
	ip [-all] netns delete [NAME]
	ip netns identify [PID]
	ip netns pids NAME
	ip [-all] netns exec [NAME] cmd ...
	ip netns monitor
	ip netns list-id [target-nsid POSITIVE-INT] [nsid POSITIVE-INT]
NETNSID := auto | POSITIVE-INT
在这种情况下,Linux 系统中是没有任何网络命名空间的,所以 ip netns list 命令不会默认返回任何信息。
创建网络命名空间
通过命令创建一个名为ns0的命名空间:
[root@localhost ~]# ip netns list
[root@localhost ~]# ip netns add nn0
[root@localhost ~]# ip netns list nn0
nn0
新创建的网络命名空间会出现在/var/run/netns/下。如果名字相同的命名空间已经存在,命令报Cannot create namespace file “/var/run/netns/ns0”: File exists的错误。
[root@localhost ~]# ls /var/run/netns
nn0
[root@localhost ~]# ip netns add nn0
Cannot create namespace file "/var/run/netns/nn0": File exists
对于每个 Network Namespace 而言,它都有自己独立的网卡、路由表、ARP 表、iptables 等和网络相关的资源。
网络操作网络命名空间
ip命令提供了ip netns exec子命令可以在网络命名空间中执行命令。
查看新创建 Network Namespace 的网卡信息
[root@localhost ~]# ip netns exec nn0 ip a
1: lo: <LOOPBACK> mtu 65536 qdisc noop state DOWN group default qlen 1000
    link/loopback 00:00:00:00:00:00 brd 00:00:00:00:00:00
可以看到,创建命名空间中会默认创建一个卡,此时网卡环回网访问网卡环网关闭状态。此时,新尝试会提示网络无法访问
[root@localhost ~]# ip netns exec nn0 ping 127.0.0.1
connect: Network is unreachable
通过下面的命令启用lo回环网卡:
[root@localhost ~]# ip netns exec nn0 ip link set lo up
[root@localhost ~]# ip netns exec nn0 ip a
1: lo: <LOOPBACK,UP,LOWER_UP> mtu 65536 qdisc noqueue state UNKNOWN group default qlen 1000
    link/loopback 00:00:00:00:00:00 brd 00:00:00:00:00:00
    inet 127.0.0.1/8 scope host lo
       valid_lft forever preferred_lft forever
    inet6 ::1/128 scope host
       valid_lft forever preferred_lft forever
[root@localhost ~]# ip netns exec nn0 ping 127.0.0.1
PING 127.0.0.1 (127.0.0.1) 56(84) bytes of data.
64 bytes from 127.0.0.1: icmp_seq=1 ttl=64 time=0.066 ms
64 bytes from 127.0.0.1: icmp_seq=2 ttl=64 time=0.074 ms
64 bytes from 127.0.0.1: icmp_seq=3 ttl=64 time=0.038 ms
64 bytes from 127.0.0.1: icmp_seq=4 ttl=64 time=0.042 ms
64 bytes from 127.0.0.1: icmp_seq=5 ttl=64 time=0.037 ms
64 bytes from 127.0.0.1: icmp_seq=6 ttl=64 time=0.044 ms
64 bytes from 127.0.0.1: icmp_seq=7 ttl=64 time=0.036 ms
64 bytes from 127.0.0.1: icmp_seq=8 ttl=64 time=0.035 ms
64 bytes from 127.0.0.1: icmp_seq=9 ttl=64 time=0.039 ms
^C
--- 127.0.0.1 ping statistics ---
9 packets transmitted, 9 received, 0% packet loss, time 8184ms
rtt min/avg/max/mdev = 0.035/0.045/0.074/0.015 ms
转移设备
我们可以在不同的网络命名空间之间转移设备(如veth)。由于一个设备只能属于一个网络命名空间,所以之后在这个网络命名空间内就看不到这个设备了。
其中,veth设备属于可转移设备,而很多其他设备(如lo、vxlan、ppp、bridge等)是不可以转移的。
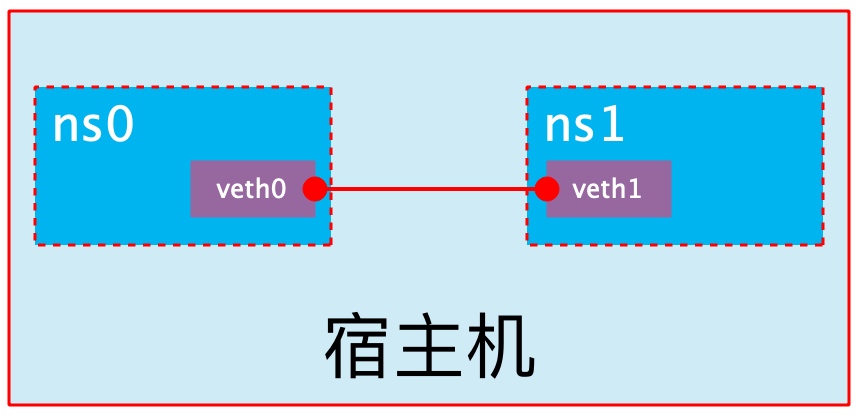
veth 对
veth pair是Virtual Ethernet Pair,是一个成对的所有端口,所有从这对一个端口进入的数据包都指向另一端,另一端出来的另一端的数据包都直接呼叫另一个端口
。 ,利用它可以直接将两个 Network Namespace 连接起来。
创建第 veth 对
[root@localhost ~]# ip link add type veth
[root@localhost ~]# ip a
5: veth0@veth1: <BROADCAST,MULTICAST,M-DOWN> mtu 1500 qdisc noop state DOWN group default qlen 1000
    link/ether 9a:4a:a7:db:34:20 brd ff:ff:ff:ff:ff:ff
6: veth1@veth0: <BROADCAST,MULTICAST,M-DOWN> mtu 1500 qdisc noop state DOWN group default qlen 1000
    link/ether 02:30:3e:4e:30:b4 brd ff:ff:ff:ff:ff:ff
看到,此时系统中新增了两个 veth pair,将 veth0 和 veth1 两个虚拟机连接起来,此时 veth pair 可以对“未启用”状态。
Network Namespace间通信实现
下面利用第 veth 对的两个不同的 Network Namespace 之间的通信。刚才我们已经实现了一个名为我们 ns0 的 Network Namespace,下面再创建一个信息 Network Namespace,命名为 ns1
[root@localhost ~]# ip netns add ns1
[root@localhost ~]# ip netns list
ns1
nn0
然后我们将 veth0 加入到 ns0,将 veth1 加入到 ns1
[root@localhost ~]# ip link set veth0 netns nn0
[root@localhost ~]# ip link set veth1 netns ns1
然后我们分别为这对配置上的ip地址,并启用了它们
[root@localhost ~]# ip netns exec ns0 ip link set veth0 up
[root@localhost ~]# ip netns exec ns0 ip addr add 10.0.0.1/24 dev veth0
[root@localhost ~]#  ip netns exec ns1 ip link set lo up
[root@localhost ~]# ip netns exec ns1 ip link set veth1 up
[root@localhost ~]# ip netns exec ns1 ip addr add 10.0.0.2/24 dev veth1
查看这对veth对的状态
[root@localhost ~]# ip netns exec ns0 ip a
5: veth0@if6: <BROADCAST,MULTICAST,UP,LOWER_UP> mtu 1500 qdisc noqueue state UP group default qlen 1000
    link/ether 72:bf:69:5a:d3:65 brd ff:ff:ff:ff:ff:ff link-netns ns1
    inet 10.0.0.1/24 scope global veth0
       valid_lft forever preferred_lft forever
    inet6 fe80::70bf:69ff:fe5a:d365/64 scope link
       valid_lft forever preferred_lft forever
[root@localhost ~]# ip netns exec ns1 ip a
6: veth1@if5: <BROADCAST,MULTICAST,UP,LOWER_UP> mtu 1500 qdisc noqueue state UP group default qlen 1000
    link/ether ae:b1:b8:29:e2:96 brd ff:ff:ff:ff:ff:ff link-netns ns0
    inet 10.0.0.2/24 scope global veth1
       valid_lft forever preferred_lft forever
    inet6 fe80::acb1:b8ff:fe29:e296/64 scope link
       valid_lft forever preferred_lft forever
从上面可以,我们已经成功启用了这个 veth 对,并为每个 veth 设备配置了 IP 地址。我们尝试在 ns1 中访问 ns0 中的 ip 地址:
[root@localhost ~]# ip netns exec ns1 ping 10.0.0.1
PING 10.0.0.1 (10.0.0.1) 56(84) bytes of data.
64 bytes from 10.0.0.1: icmp_seq=1 ttl=64 time=20.8 ms
64 bytes from 10.0.0.1: icmp_seq=2 ttl=64 time=105 ms
64 bytes from 10.0.0.1: icmp_seq=3 ttl=64 time=0.043 ms
64 bytes from 10.0.0.1: icmp_seq=4 ttl=64 time=0.062 ms
64 bytes from 10.0.0.1: icmp_seq=5 ttl=64 time=0.053 ms
^X64 bytes from 10.0.0.1: icmp_seq=6 ttl=64 time=0.051 ms
64 bytes from 10.0.0.1: icmp_seq=7 ttl=64 time=0.053 ms
64 bytes from 10.0.0.1: icmp_seq=8 ttl=64 time=0.050 ms
^C
--- 10.0.0.1 ping statistics ---
8 packets transmitted, 8 received, 0% packet loss, time 7120ms
rtt min/avg/max/mdev = 0.043/15.742/104.790/34.337 ms
veth设备重命名
[root@localhost ~]# [root@localhost ~]# ip netns exec ns0 ip link set eth0 up
[root@localhost ~]# ip netns exec ns0 ip link set veth0 down
[root@localhost ~]# ip netns exec ns0 ip link set dev veth0 name eth0
[root@localhost ~]# ip netns exec ns0 ifconfig -a
eth0: flags=4098<BROADCAST,MULTICAST>  mtu 1500
        inet 10.0.0.1  netmask 255.255.255.0  broadcast 0.0.0.0
        ether 72:bf:69:5a:d3:65  txqueuelen 1000  (Ethernet)
        RX packets 24  bytes 1944 (1.8 KiB)
        RX errors 0  dropped 0  overruns 0  frame 0
        TX packets 24  bytes 1944 (1.8 KiB)
        TX errors 0  dropped 0 overruns 0  carrier 0  collisions 0

lo: flags=73<UP,LOOPBACK,RUNNING>  mtu 65536
        inet 127.0.0.1  netmask 255.0.0.0
        inet6 ::1  prefixlen 128  scopeid 0x10<host>
        loop  txqueuelen 1000  (Local Loopback)
        RX packets 22  bytes 1848 (1.8 KiB)
        RX errors 0  dropped 0  overruns 0  frame 0
        TX packets 22  bytes 1848 (1.8 KiB)
        TX errors 0  dropped 0 overruns 0  carrier 0  collisions 0
四种网络模式配置
桥接模式配置
[root@localhost ~]#  docker run -it --name t1 --rm busybox
Unable to find image 'busybox:latest' locally
latest: Pulling from library/busybox
5cc84ad355aa: Pull complete
Digest: sha256:5acba83a746c7608ed544dc1533b87c737a0b0fb730301639a0179f9344b1678
Status: Downloaded newer image for busybox:latest
/ # ifconfig
eth0      Link encap:Ethernet  HWaddr 02:42:AC:11:00:02
          inet addr:172.17.0.2  Bcast:172.17.255.255  Mask:255.255.0.0
          UP BROADCAST RUNNING MULTICAST  MTU:1500  Metric:1
          RX packets:15 errors:0 dropped:0 overruns:0 frame:0
          TX packets:0 errors:0 dropped:0 overruns:0 carrier:0
          collisions:0 txqueuelen:0
          RX bytes:1242 (1.2 KiB)  TX bytes:0 (0.0 B)

lo        Link encap:Local Loopback
          inet addr:127.0.0.1  Mask:255.0.0.0
          UP LOOPBACK RUNNING  MTU:65536  Metric:1
          RX packets:0 errors:0 dropped:0 overruns:0 frame:0
          TX packets:0 errors:0 dropped:0 overruns:0 carrier:0
          collisions:0 txqueuelen:1000
          RX bytes:0 (0.0 B)  TX bytes:0 (0.0 B)

/ # ip a
1: lo: <LOOPBACK,UP,LOWER_UP> mtu 65536 qdisc noqueue qlen 1000
    link/loopback 00:00:00:00:00:00 brd 00:00:00:00:00:00
    inet 127.0.0.1/8 scope host lo
       valid_lft forev
最低0.47元/天 解锁文章


 1117
1117


 被折叠的 条评论
为什么被折叠?
被折叠的 条评论
为什么被折叠?
 到【灌水乐园】发言


