


一.mybatis的特点
1.ORM(Object Relational Mapping)
对象关系映射:java中每一个类对应着数据库中的每一个表
Object : Jvm中的java对象
Relational : 关系型数据库
Mapping : 映射mybatis:是一个半自动化的ORM,因为sql语句是需要程序员自己写的,是xml+代理模式+反射机制
Hibernate:是一个全自动化的ORM
2.看看
1.resources目录:一般将资源文件和配置文件放在该目录,放在此目录的资源,等同于放到了类的根路径下
2.打包方式:jar和war,一般是要打包到tomcat服务器才用war包,springboot自带封装了tomcat,所以不需要打成war包,打成jar包就行了
3.mybatis-config.xml:是核心配置文件,主要配置连接数据库的信息(配置文件名不是必须的)
4.在mybatis中,负责执行sql语句的对象是SqlSession,是java程序和数据库之间的一次会话(底层进行了与数据库连接,和PrepareStatement方法的封装)。
PreparedStatement updateSales = con.prepareStatement("UPDATE COFFEES SET SALES = ? WHERE COF_NAME LIKE ? ");
updateSales.setInt(1, 75);
updateSales.setString(2, "Colombian");
updateSales.executeUpdate();
想要获取一个SqlSession对象需要先获取SqlSessionFactory对象,通过SqlSessionFactory工厂来生产SqlSession对象,还得通过SqlSessionFactoryBuilder对象的build方法来获取一个SqlSessionFactory对象
mybatis的核心对象包括:
SqlSessionFactoryBuilder
SqlSessionFactory 一般情况下,一个数据库对应的一个SqlSessionFactory对象
SqlSession
5.Resources.getResourceAsStream("SqlMapConfig.xml"):以流的形式获取一个配置文件,也是从类的根路径下获取资源,底层是:
ClassLoader.getSystemClassLoader().getResourceAsStream(),DButils.class.getResourceAsStream("db.properties"),所以它们是一样的
6.事务管理机制:<transactionManager type="JDBC"/>
一共有两种事务管理机制:jdbc和managed
JDBC事务管理器:
mybatis框架自己管理事务,自己采用原生的JDBC代码管理事务
conn.setAutoCommit(false);开启事务时,不自动提交
conn.commit();手动提交
//下面的意思是,不需要事务机制,可以自动提交
SqlSession sqlSession = sessionfactory.openSession(true);
MANAGED事务管理器:
mybatis不在负责事务的管理了,事务管理交给其它容器去负责。例如spring,
没有事务也能提交,只是没有事务的机制
7.断言进行测试(Junit)
Assert.assertEquals(期望值,测试值)
Assertions.assertEquals(期望值,测试值)
8.mybatis的setting会改变mybatis的运行时行为,是Mybatis中极为重要的调整设置,在xml文件中设置
注意:如果mybatis的核心配置文件属性排序有误,可以参照dtd文件进行查阅
补充:1.mybatis中常见的集成日志组件:
SLF4J(沙拉风):是一个日志标准,其中有一个框架logback实现了SLF4J规范(日志门面,日志标准)如果想要的是slf4j那么就要引入logback依赖,还得配置xml文件(该文件的名字logback.xml或者logback-test.xml,还得放在resources根路径下,必须的)
LOG4J
LOG4J2
STDOUT_LOGGING是标准日志,mybatis已经实现了这种日志标准,只要开启一下就好了
日志输出级别:trace->debug->info->warn->error
<settings>
<setting name="logImpl" value="STDOUT_LOGGING"/>
</settings>
9.crun
c:creat(增)
r:retrieve(查,检索)
u:update(改)
d:delete(删)
10.开启全部懒加载
只对association和collection起作用
<settings>
<setting name="lazyLoadingEnabled" value="true"/>
</settings>局部懒加载:fetchType="lazy"是在第二条语句时使用,(具体可以看高级映射中的分步查询)
实际开发的模式,把全局的延迟加载打开,如果局部不想用延迟加载就fetchType="eager"
二.创建一个Mybatis项目
1.导入依赖
<dependencies>
        <dependency>
            <groupId>org.mybatis</groupId>
            <artifactId>mybatis</artifactId>
            <version>3.5.10</version>
        </dependency>
        <dependency>
            <groupId>mysql</groupId>
            <artifactId>mysql-connector-java</artifactId>
            <version>8.0.30</version>
        </dependency>

    <dependency>
            <groupId>log4j</groupId>
            <artifactId>log4j</artifactId>
            <version>1.2.12</version>
        </dependency>
        <dependency>
            <groupId>junit</groupId>
            <artifactId>junit</artifactId>
            <version>4.10</version>
        </dependency>
        <dependency>
            <groupId>org.projectlombok</groupId>
            <artifactId>lombok</artifactId>
            <version>1.18.12</version>
            <scope>provided</scope>
        </dependency>
        <dependency>
            <groupId>com.alibaba</groupId>
            <artifactId>druid</artifactId>
            <version>1.1.16</version>
        </dependency>
</dependencies>
2.在pom.xml中添加静态资源xml文件的路径
<!--添加资源文件的指定-->
  <build>
    <resources>
      <resource>
        <directory>src/main/java</directory>
        <includes>
          <include>**/*.xml</include>
          <include>**/*.properties</include>
        </includes>
      </resource>

      <resource>
        <directory>src/main/resources</directory>
        <includes>
          <include>**/*.xml</include>
          <include>**/*.properties</include>
        </includes>
      </resource>
    </resources>
  </build>
    或者
    <!--    当xml配置文件和UserMapper接口都放在Dao层时,编译器是自动忽略xml配置文件的,
        因为maven希望你将xml配置文件放在静态文件夹里
        配置Maven工程的resources目录,如果不配置,默认在项目的resources中
        -->

    <build>
        <resources>
            <resource>
<!--                意思是在java文件下xml文件都是资源-->
                <directory>src/main/java</directory>
                <includes>
                    <include>**/*.xml</include>
                </includes>
            </resource>
            <resource>
                <directory>src/main/resources</directory>
            </resource>
        </resources>
    </build>
3.添加db.properties
db.driverClassName=com.mysql.jdbc.Driver
db.username=root
db.password=123456
db.url=jdbc:mysql:///student02?serverTimezone=Asia/Shanghai&characterEncoding=utf8
db.maxWait=60000
db.initialSize=100
db.maxActive=200
db.minIdle=10
4.添加mybatis-config.xml,mybatis的核心配置文件
<configuration>
<!--    将db.properties加载,该文件保存了数据库的连接信息-->
    <properties resource="db.properties"/>

<typeAliases>
<!--    为具体的类指定别名-->
    <typeAlias type="com.pan.model.User" alias="User"/>

<!--    为这个路径下的所有类都指定别名,默认别名就是类名-->
    <package name="com.pan.model"/>
</typeAliases>

<!--    这里可以配置多个environment,一个environment代表一种配置环境,例如:dev,prod,test
        每一个environment都有一个id,然后在environment中通过default属性中指定使用哪一个environment-->
    <environments default="dev">
        <environment id="dev">
<!--            配置数据库事务管理器-->
            <transactionManager type="JDBC"/>
<!--            配置数据库连接池-->
            <dataSource type="POOLED">
                <property name="driver" value="${db.driverClassName}"/>
                <property name="url" value="${db.url}"/>
                <property name="username" value="${db.username}"/>
                <property name="password" value="${db.password}"/>
            </dataSource>
        </environment>
    </environments>

    <mappers>
        <!--执行该xml文件的路径 -->
        <mapper resource="UserMapper.xml"/>
<!--        指定Mapper所在的包,配置完成后,会自动找到Mapper接口,然后根据接口名称找到对应的xml文件-->
<!--        <package name="com.pan.dao"/>-->
    </mappers>
5.创建一个JavaBean
public class User {
    private String username;
    private Double money;

    public String getUsername() {
        return username;
    }

    public void setUsername(String username) {
        this.username = username;
    }

    public Double getMoney() {
        return money;
    }

    public void setMoney(Double money) {
        this.money = money;
    }

    @Override
    public String toString() {
        return "User{" +
                "username='" + username + '\'' +
                ", money=" + money +
                '}';
    }
}
6.创建一个mapper接口和mapper的配置文件
public interface UserMapper {
    int addUser(User user);

    int deleteUserByUsername(String username);

    int updateUser(User user);
    List<User> getAllUser();
}
<!--namespace主要是为了确保多个不同的Mapper之间的方法互不冲突-->
<mapper namespace="com.pan.dao.UserMapper">
<!-- 用来插入语句,这个id是这条sql语句的唯一标识-->
<insert id="addUser">
insert into user(username,money) values (#{username},#{money});
</insert>
<delete id="deleteUserByUsername">
delete from user where username=#{username}
</delete>
<update id="updateUser">
update user set username=#{username},money=#{money} where username=#{username}
</update>
<select id="getAllUser" resultType="com.pan.model.User">
select * from user
</select>
</mapper>7.执行mapper.xml文件的路径
<mappers>
        <!--执行该xml文件的路径 ,resource属性会自动从类的根路径下寻找-->
        <mapper resource="UserMapper.xml"/>
<!--        指定Mapper所在的包,配置完成后,会自动找到Mapper接口,然后根据接口名称找到对应的xml文件-->
<!--        <package name="com.pan.dao"/>-->
    </mappers>
8.Test
public class MyTest {
    @Test
    public void testA() throws IOException {
        //使用文件流读取核心配置文件SqlMapConfig.xml
        InputStream in = Resources.getResourceAsStream("SqlMapConfig.xml");
        //通过SqlSessionFactoryBuilder创建SqlSessionFactory工厂
        SqlSessionFactory factory = new SqlSessionFactoryBuilder().build(in);
        //获取sqlSession的对象
        SqlSession sqlSession = factory.openSession();//如果用到是jdbc事务管理器,底层用的是														conn.setAutoCommit(false)
        //获取mapper类,会去mybatis-config.xml中的设置中寻找该类,然后在该类中获取它的方法
        userMapper = sqlSession.getMapper(UserMapper.class);
        List<User> allUser = userMapper.getAllUser();
        System.out.println(allUser);
        //除了查询不需要提交,其他的都需要提交,是因为sqlSesion不支持自动提交
        sqlSession.commit();//底层:conn.commit();
        //关闭sqlSession
        sqlSession.close();
        }
    }
三.mybatis中mapper.xml中传值
1.java程序中,可以通过map给sql语句传值,sql语句可以通过map.get()获取map中value属性
下面username,money就是map中key的属性
	<insert id="addUser">
        insert into user(username,money) values (#{username},#{money});
    </insert>
2.通过model类对象中的属性来给sql语句中赋值,其实不是属性名,而是getXXX()方法去掉get
3.除了select需要返回一个结果集对象之外,其余的都不需要。在返回结果对象时,数据库中的属性和返回结果集对象的属性要一致,如果不一致,需要在sql语句中取别名(as)
resultType="com.pan.model.User"
四.mybatis核心配置文件的属性
1.一个environment对应一个数据库,
多个环境连接多个数据库,一个数据库对应一个sqlsessionFactory对象
2..事务管理机制:
<transactionManager type="JDBC"/>
一共有两种事务管理机制:jdbc和managed
JDBC事务管理器:
mybatis框架自己管理事务,自己采用原生的JDBC代码管理事务
conn.setAutoCommit(false);开启事务时,不自动提交
conn.commit();手动提交
//下面的意思是,不需要事务机制,可以自动提交
SqlSession sqlSession = factory.openSession(true);
mybatis默认不自动提交,有事务机制才好,只能委屈程序员自己手动提交了
MANAGED事务管理器:
mybatis不在负责事务的管理了,事务管理交给其它容器去负责。例如spring,
没有事务也能提交,只是没有事务的机制
3.dataSource数据源:
作用时为程序员提供connection对象(凡是提供给程序员connection对象的,都叫数据源)
当用户不想用默认的数据源的时候可以这么做:
SqlSessionFactory factory = new SqlSessionFactoryBuilder().build(in,“想要的数据源id”);<!-- 这里可以配置多个environment,一个environment代表一种配置环境,例如:dev,prod,test
每一个environment都有一个id,然后在environment中通过default属性中指定使用哪一个environment-->
<environments default="dev">
<environment id="dev">
<!-- 配置数据库事务管理器-->
<transactionManager type="JDBC"/>
<!-- 配置数据库连接池-->
<dataSource type="POOLED">
<property name="driver" value="${db.driverClassName}"/>
<property name="url" value="${db.url}"/>
<property name="username" value="${db.username}"/>
<property name="password" value="${db.password}"/>
</dataSource>
</environment>
</environments>
poolMaximumActiveConnections – 在任意时间可存在的活动(正在使用)连接数量,默认值:10
poolMaximumIdleConnections – 任意时间可能存在的空闲连接数。
poolMaximumCheckoutTime – 在被强制返回之前,池中连接被检出(checked out)时间,默认值:20000 毫秒(即 20 秒)
poolTimeToWait – 这是一个底层设置,如果获取连接花费了相当长的时间,连接池会打印状态日志并重新尝试获取一个连接(避免在误配置的情况下一直失败且不打印日志),默认值:20000 毫秒(即 20 秒)。4.properties属性配置
<!--    将db.properties加载,该文件保存了数据库的连接信息,一定是从根路径下开始查找资源-->
    <properties resource="db.properties"/>
5.别名typeAliases属性
注意:别名不区分大小写,这个只是返回结果集(resultType)的类名取得别名,另外namespace没有别名这说法
<typeAliases>
<!--    为具体的类指定别名,alias可以省略的,直接是类的简名-->
    <typeAlias type="com.pan.model.User" alias="User"/>

<!--    为这个路径下的所有类都指定别名,默认别名就是类名-->
    <package name="com.pan.model"/>
</typeAliases>
6.mapper属性
<mappers>
        <!--执行该xml文件的路径 不推荐-->
        <mapper resource="UserMapper.xml"/>
<!--        指定Mapper所在的包,配置完成后,会自动找到Mapper接口,然后根据接口名称找到对应的xml文件,推荐使用,但是前提条件是接口和xml文件要放在同一个目录包下-->
		<package name="com.pan.dao"
</mappers>
提醒:在idea的resources目录下(类的根目录),新建多重目录的时候是这样形式:com/pan/mapper
五.mybatis中mapper.xml文件
1.sqlSession.getmapper(接口类):
面向接口获取接口的代理对象,在底层动态生成了一个实现类,实现了该接口
2.#{}和${}的区别:
#{}:底层使用PreparedStatement。特点:先给sql语句编译,然后在给sql语句中的占位符?传值都是字符串的形式('值'),使用一般是传的是值
${}:底层使用了Statement。特点:先进行sql语句的拼接,在对sql语句进行编译。存在sql注入的风险(因为都是直接进行拼接的,没有多余的标点符号),传的一般都是关键字
例如:在我们需要进行升序或者倒叙的时候我们需要在后头写上desc/asc,用#的话,就会出现'desc',这是会出现sql语句的写错异常
当进行模糊查询的时候:like '%${参数}%'=like concat('%',#{参数},'%')=like concat('%',${'参数'},'%')=like ‘%’#{值}‘%’
(因为模糊查询中'%%',一定要在单引号里面,注意,在单引号里面不能写#{},因为单引号里面会将占位符当成一个字符串)
3.在插入时获取主键自动生成的id
//useGeneratedKeys="true":表示使用自动生成的主键值
//keyProperty="id":表示主键值赋值给对象的哪个属性,这个就表示将主键值赋值给该类的id属性
//因为当数据库自动生成id的时候,我们后端是不需要手动写id的值的,然后每次调用,虽然数据库中的id有属性值,但是后端的id是null,这样可以获得主键值
<insert id="ok" useGeneratedKeys="true" keyProperty="id">

    </insert>
4.当条件参数有多个
mybatis的底层是会自动创建一个map集合,因为map集合是可以通过key键来获取value的值
map.put("arg0",name)
map.put("arg1",age)
或者
map.put("param1",name)
map.put("param2",age)
开发中使用的是:@Param(value="name")
//    如果方法中,有多个参数的话,默认情况下参数名称有两种
//    1.arg0,arg1
//    2.param1,param2
    List<Teacher> getTeacherByGenderAndTid01(@Param("gender") String gender,@Param("tid") Integer tid);
5.查询返回结果集的类型
1.类名:当返回单条数据
2.List<类名>:当返回多条数据时
3.Map<String,Object>:当只返回一条数据并且没有合适的类对应数据库表数据的时候,那就使用map集合返回结果集
4.List<Map<String,Object>>:当返回多条数据且没有合适的类对应数据库表属性的时候,但是这样的返回值,查找起来很不方便,因为还得在list集合中在查找map对应的key,所以使用下列方法
5.Map<Long,Map<String,Object>>
//将查询结果的id值作为整个大Map的Key
@Mapkey("id")
Map<Long,Map<String,Object>> selectAllMap;
6.java类与数据库的对应
我们平时为了让java代码中的类对象的属性名和数据库中的表中的属性名能够符合,通常使用以下方法
1.在sql语句中取别名:as
2.resultMap
<resultMap id="" type=""></resultMap>
id:表示的是resultMap的唯一标识
type:表示的是java类的类名
<!--    查询结果映射,就是为了避免java属性名和数据库名不相同的情况下,虽然可以利用数据库的别名,但这也是一种方法-->
    <resultMap id="BaseUser" type="User">
    <!--
        配置主键
        column:查询出来列的名字,也就是数据库的列名
        property:java属性的名字
        javaType:java类型
        jdbcType:jdbc类型
        typeHandler:对应的类型转换器(类型处理器)

        一般来说只需要配置前两个属性
    -->
        <id column="id" property="id" javaType="Integer"/>

<!--        配置一般属性-->
        <result column="name" property="name"/>
        <result column="favorites" property="favorites"/>
    </resultMap>

<!--    避免了sql语句的别名,注意不是resultType-->
    <select id="getAllUser" resultMap="BaseUser">
        select * from user;
    </select>
注意:1.设置id主键的时候,最好用<id column="" property="">,提高mybatis的效率
2.当一般属性中的column和property属性名相同情况下可以省略不写
3.开启驼峰命名自动映射
java命名规范为:首字母小写,后面每一个单词首字母大写
sql命名规范:全部小写,在单词间下划线分割(_)
//需要在核心配置文件中设置
<settings>
<setting name="mapUnderscoreToCamelCase" value="true"/>
</settings>
7.主键回填
第一种:添加后,将id返回到数据
<insert id="insertUser">
	<selectKey keyProperty="id" resultType="int" keyColumn="id" order="AFTER">
    	select last_insert_id()
	</selectKey>
    insert into user(name,password) values (#{name},#{password})
</insert>
@Test
public void test01(){
User user = new User();
user.setName("潘权荣12");
user.setPassword("1234");
UserMapper mapper = sqlSession.getMapper(UserMapper.class);
int insert = mapper.insertUser(user);
System.out.println(insert);
System.out.println("主键回填:"+user.getId());
sqlSession.commit();
}第二种:在添加前,将id字符串改一下,只能是String类型的
<insert id="insertStu">
	<selectKey order="BEFORE" keyColumn="id" resultType="String" keyProperty="id">
    	select replace(UUID(),"-","")
	</selectKey>
    insert into stu(id,name) values (#{id},#{name})
</insert>
@Test
public void insertStu(){
Stu stu = new Stu();
stu.setId(UUID.randomUUID().toString());
stu.setName("pan");
StuMapper mapper = sqlSession.getMapper(StuMapper.class);
int i = mapper.insertStu(stu);
System.out.println(i);
System.out.println("id:"+stu.getId());
}8.sql片段
<sql id="selectUser">id,name</sql>
    <select id="selectAll" resultType="com.pan.entity.User">
        select <include refid="selectUser"/> from user
    </select>
六.动态sql
1.if
<!--1.if标签中的test属性是必须的
	2.test属性的表达式的值是false或者true
    3.如果test是true,则if标签中的sql语句就会执行拼接
	4.test属性中可以使用的是:
		1.当接口中使用了@Param注解,那么test中要输写的是@Param注解指定的参数名。
		例如:@Param("brand")那么test="brand"
		2.当没有使用@Parma注解,那么test输写的是param1,param2
		3.当使用的是POJO,那么使用类名.属性名
	5.在mybatis动态sql中,不能使用&&,只能使用and
-->
select * from car where 1=1
<if test="brand!=null and brand!=''">
	and brand like "%"#{brand}"%"
</if>
2.where
where标签是专门负责where子句动态生成的,可以智能的将前面的and/or去除,后面的无法办到
select * from car
<where>
    <if test="brand!=null and brand!=''">
        and brand like "%"#{brand}"%"
    </if>
</where>
3.trim
prefix:在trim中内容之前加前缀
suffix:在trim中内容之后加后缀
prefixOverrides:删除前缀
suffixOverrides:删除后缀
and|or:表示and或者or
<trim prefix="where" suffix="" prefixOverrides="" suffixOverrides="">

例如:
    select * from car
<trim prefix="where" suffixOverrides="and|or">
 	<if test="brand!=null and brand!=''">
        brand like "%"#{brand}"%" and
    </if>
</trim>
4.set
set标签可以将后面的逗号,智能去除
update car
<set>
    <if test="brand!=null and brand!=''">
        brand=#{brand},
    </if>
</set>
where id=#{id}
<update id="updateActorByAid">
update actor
<set>
<if test="aname!=null and aname!=''">
aname=#{aname},
</if>
<if test="asex!=null and asex!=''">
asex=#{asex},
</if>
<if test="abirthday!=null and abirthday!=''">
abirthday=#{abirthday},
</if>
<if test="adesc!=null and adesc!=''">
adesc=#{adesc}
</if>
</set>
<where>
aid=#{aid}
</where>
</update>5.choose,when,otherwise
等同于if(){}else if(){}else{}
从上往下,满足条件就执行条件里的,不然就执行otherwise
select * from car
<where>
	<choose>
        <when test="brand!=null and brand!=''">
            and brand like "%"#{brand}"%"
        </when>
        <otherwise>

        </otherwise>
    </choose>
</where>
6.foreach
1.批量删除
colletction:指定数组或者集合
item:代表数组或者集合中的元素
separator:循环之间的分隔符
open和close写的话就不用在in()自己手动写
delete from car where id in
	<foreach collection="array" item="ss" separator="," open="(" close=")">
		#{ss}
	</foreach>
<delete id="deleteAll">
delete from actor where aid in
<foreach collection="list" separator="," item="ok" open="(" close=")">
#{ok}
</foreach>
</delete>2.批量插入
要将()放在foreach里面,因为open和close是在foreach最前和最后加上的
insert into car values
<foreach collection="list" item="ss" separator="," >
		(#{ss.name},#{ss.date})
	</foreach>
<insert id="insertAll">
insert into actor(aname,asex,abirthday,adesc) values
<foreach collection="list" separator="," item="ok">
(#{ok.aname},#{ok.asex},#{ok.abirthday},#{ok.adesc})
</foreach>
</insert>7.sql
增加代码的复用性
<!--声明sql片段-->
<sql id="ok">
	id,
    name,
    age
</sql>

select <include refid="ok"/>
from user
七.高级映射
1.多对一
第一种:级联映射(一条sql)
第二种:association(一条sql)
翻译为:关联,一个Student对象关联一个Clazz对象
第一种形式
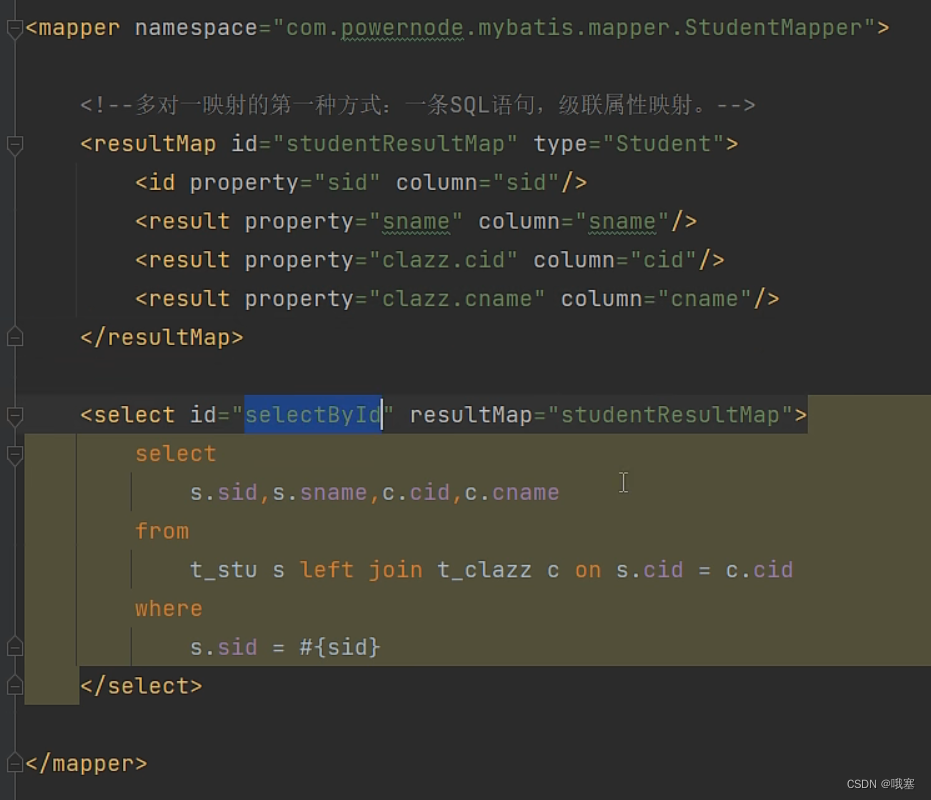
<resultMap id="studentandclazz" type="Student">
    <id property="sid" column="sid"/>
    <result property="sname" column="sname"/>
<!--  	association:这个标签用来配置一对一,但是前提是,Student类有一个Clazz类的属性
		property:提供要映射的Student类中的属性名
		javaType:用来指定要映射的java类型
-->
        <association property="clazz" javaType="Clazz">
            <id column="cid" property="cid"/>
            <result column="cname" property="cname"/>

        </association>
    </resultMap>
第二种形式
写一个单表的参数resultMap,通过extends在次基本上写入与另一个表的关联关系
<resultMap id="BaseClazz" type="Clazz">
        <id column="cid" property="cid"/>
        <result column="clazzName" property="clazzName"/>
</resultMap>
<!--    方式一:-->
    <resultMap id="ClazzAndGrade" type="Clazz" extends="BaseClazz">
<!--        association:这个标签用来配置多对一,但是前提是,Clazz类有一个Grade类的属性-->
        <association property="grade" javaType="Grade">
            <id column="gid" property="gid"/>
            <result column="gradeName" property="gradeName"/>
        </association>
    </resultMap>
 <select id="getAllClazzAndGrade" resultMap="ClazzAndGrade">
        select c.*,g.gradeName from clazz as c left join grade as g on c.gid=g.gid
 </select>
第三种形式
多个mapper.xml之间的调用,通过association标签中的resultMap属性
<mapper namespace="com.pan.mapper.GradeMapper">
    <resultMap id="Basegrade" type="Grade">
        <id column="gid" property="gid"/>
        <result column="gradeName" property="gradeName"/>
    </resultMap>
</mapper>
<resultMap id="BaseClazz" type="Clazz">
<id column="cid" property="cid"/>
<result column="clazzName" property="clazzName"/>
</resultMap>
<!-- 方式二-->
<resultMap id="ClazzAndGrade" type="Clazz" extends="BaseClazz">
<!-- association:这个标签用来配置一对一,但是前提是,Clazz类有一个Grade类的属性
下面的resultMap可以直接从com.pan.mapper.GradeMapper中获取Basegrade来直接引用该参数
在一对一映射时,可以引用一个外部的ResultMap
-->
<association property="grade" javaType="Grade" resultMap="com.pan.mapper.GradeMapper.Basegrade">
</association>
</resultMap>
<select id="getAllClazzAndGrade" resultMap="ClazzAndGrade">
select c.*,g.gradeName from clazz as c left join grade as g on c.gid=g.gid
</select>第三种:分步查询(两条sql)
先查一条sql,当需要获取另一条sql信息才调用
<mapper namespace="com.pan.mapper.GradeMapper">
    <resultMap id="Basegrade" type="Grade">
        <id column="gid" property="gid"/>
        <result column="gradeName" property="gradeName"/>
    </resultMap>


    <select id="getGradeByById" resultMap="Basegrade">
        select * from grade where gid=#{gid};
    </select>
</mapper>
<resultMap id="BaseClazz" type="Clazz">
<id column="cid" property="cid"/>
<result column="clazzName" property="clazzName"/>
</resultMap>
<!-- 懒加载:就是在获取Clazz查询时,要等我想要Grade的信息才给我显示出来-->
<resultMap id="ClazzAndGrade2" type="Clazz" extends="BaseClazz">
<!-- select属性表示这个grade的值是从哪个方法中获取-->
<!-- column是想通过gid来调用GradeMapper.getGradeById方法,传递参数,grade表中含有gid,Clazz类中又 含有Grade类,所以可以调用。先从column中获取gid才执行select语句
fetchType="lazy":开启懒加载
-->
<association property="grade" javaType="Grade" select="com.pan.mapper.GradeMapper.getGradeByById" column="gid" fetchType="lazy"/>
</resultMap>
<select id="getAllClazzAndGrade" resultMap="ClazzAndGrade2">
select * from clazz
</select>注意:实际开发的模式,把全局的延迟加载打开,如果局部不想用延迟加载就fetchType="eager"
2.一对多
1.collection(一条sql)
<resultMap id="BaseClazz" type="Clazz">
        <id column="cid" property="cid"/>
        <result column="clazzName" property="clazzName"/>
    </resultMap>
<mapper namespace="com.pan.mapper.GradeMapper">
<resultMap id="Basegrade" type="Grade">
<id column="gid" property="gid"/>
<result column="gradeName" property="gradeName"/>
</resultMap>
<resultMap id="GradeWithClazz" type="Grade" extends="Basegrade">
<!--
一对多
ofType:指的是List集合里的泛型类型-->
<collection property="clazz" ofType="Clazz" resultMap="com.pan.mapper.ClazzMapper.BaseClazz">
</collection>
</resultMap>
<select id="getAll" resultMap="GradeWithClazz">
select g.*,c.* from grade g left join clazz c on g.gid=c.gid;
</select>2.分布查询
和多对一的分页查询的属性都是一样的,都是用过column="cid"进行传参
八.mybatis的缓存
1.了解缓存
1.cache:缓存。作用:减少IO的方式,来提高程序的执行效率
2.mybatis的缓存是:将select语句的查询结果放在缓冲中,下一次查询同样sql语句时,就直接在缓冲中获取,不在通过IO的方式,提高效率(只针对DQL语句,也就是select语句)
面试使用场景:
1.数据量比较小
2.数据需要经常使用 不会经常发生改变
3.数据不是特别准确的时候
2.一级缓存
重点:存储的是对象
sqlSession:当是同一个sqlSession对象的时候,sql语句也相同,那么就走缓存机制
1.什么时候不走缓存?
sqlSession对象不是同一个的时候;查询条件不一样
2.什么时候一级缓存失效?
第一次DQL和第二次DQL之间你做了以下两件事中的任意一件:
1.执行了sqlSession的clearCache()方法,手动清空缓存了
2.执行了INSERT或DELECT或UPDATE语句
3.事务提交了,就会自动清除缓存
4.sqlSession对象不是同一个
3.二级缓存
重点:存储的是具体的数据
二级缓存的范围:SqlSessionFactory
第一步:需要设置全局配置<setting name="cacheEnabled" value="true">,默认是true,可以不用设置
第二步:需要在使用二级缓存的Mapper.xml文件中配置<cache/>,可以在想要得sql语句中加入useCache="true"
<cache eviction="LRU"/>:指定从缓存中移除某个对象的淘汰算法。默认LPU
LRU:最近最少使用,优先淘汰在间隔时间内使用频率最低的对象(还有一种LFU,最不常用会被淘汰)
FIFO:最先进二级缓存的最先淘汰
SOFT:软引用
WEAk:弱引用第三步:使用二级缓存的实体类对象必须是可序列化的,需要实现Serializable接口
第四步:当一级缓存关闭后,就会将缓存存入二级缓存
以上都配置了,什么时候可以使二级缓存失效?
1.执行增删改操作的时候
4.ehcache二级缓存(了解)
第三方的
九.延迟加载(懒加载)
1.不是立即加载,使用的时候才加载 单例设置模式
2.场景:当使用用户表和订单表的时候,我们不需要查询订单表的信息,就用懒加载,先用用户表的信息,等用到订单表的时候在进行查询订单表的数据
3.一般使用全局加载,然后如果需要单个sql语句立即加载用fetchType="eager"
<settings>
<setting name="lazyLoadingEnabled" value="true"/>
</settings>
step01-mapper.xml文件中写fetchType="lazy"
	<select id="selectCardByUid" resultType="com.pan.model.Card">
        select * from card where uid=#{uid}
    </select>
<resultMap id="UserBase" type="user">
<id property="id" column="id"/>
<result property="birthday" column="birthday"/>
<result property="address" column="address"/>
<result property="sex" column="sex"/>
<result property="username" column="username"/>
</resultMap>
<resultMap id="UserAndCardQian" type="user" extends="UserBase">
<association property="card" column="id" javaType="card" select="com.pan.mapper.CardMapper.selectCardByUid" fetchType="lazy">
<id property="cid" column="cid"/>
<result property="cnumid" column="cnumid"/>
<result property="uid" column="uid"/>
</association>
</resultMap>
<select id="selectUserAndCardQian" resultMap="UserAndCardQian">
select * from user
</select>step02-测试:用的时候才查询
	@Test
    public void selectUserAndCardQian(){
        UserMapper userMapper = sqlSession.getMapper(UserMapper.class);
        List<User> users = userMapper.selectUserAndCardQian();
        for (User user : users) {
            System.out.println(user.getUsername());
            if(user.getCard()!=null){
                System.out.println(user.getCard().getCnumid());
            }

        }
    }
十.mybatis的PageHelper
step01-依赖
		<dependency>
            <groupId>com.github.pagehelper</groupId>
            <artifactId>pagehelper</artifactId>
            <version>5.1.10</version>
        </dependency>
step02-在核心配置文件中加上插件
	<plugins>
        <!-- com.github.pagehelper为PageHelper类所在包名 -->
        <plugin interceptor="com.github.pagehelper.PageInterceptor"></plugin>
    </plugins>
step03-测试
	@Test
    public void Page(){
        UserMapper userMapper = sqlSession.getMapper(UserMapper.class);
        //在查询sql之前写
        //第一个参数表示的是当前页
        //第二个参数表示的是页量
        PageHelper.startPage(1, 2);
        List<User> users = userMapper.selectUserAndCard();
        //实例化PageInfo:PageInfo对象中包含了分页操作中的所有相关数据。
        PageInfo<User> pageInfo = new PageInfo<>(users);
        System.out.println(pageInfo.toString());
    }
PageInfo类里面的所有参数,直接帮我们封装了分页功能

十一.注解式开发
就可以不用写mapper.xml文件
@Insert
 @Insert("insert into user values(#{username},#{age})")

int insert(User user);
@Delete
@Delete("delete from user where id=#{id}")

int deleteById(Long id);
@Update
@Update("update user set username=#{username},age=#{age} where id=#{id}")
int updateById(User user)
@Select
@Results和@Result
@Select("select * from user")
@Results({
    @Result(property="",column="")
})
List<User> selectAll()
注意:当没有开启驼峰命名规则时<setting name="mapUnderscoreToCamelCase" value="true"/>,要配置数据库字段和类的属性名
十二.Druid连接池
1.引入依赖
<!-- https://mvnrepository.com/artifact/com.alibaba/druid -->
<dependency>
<groupId>com.alibaba</groupId>
<artifactId>druid</artifactId>
<version>1.1.16</version>
</dependency>2.创建DruidDataSourceFactory
MyDruidDataSourceFactory并继承PooledDataSourceFactory,并替换数据源。
public class MyDruidDataSourceFactory extends PooledDataSourceFactory {
	public MyDruidDataSourceFactory() {
    	this.dataSource = new DruidDataSource();//替换数据源
    }
}3.修改修改**mybatis-config.xml**
<environments default="dev">
        <environment id="dev">
            <transactionManager type="JDBC"/>
            <dataSource type="com.pan.utils.MyDruidDataSourceFactory">
                <property name="driverClass" value="${db.driverClassName}"/>
                <property name="jdbcUrl" value="${db.url}"/>
                <property name="username" value="${db.username}"/>
                <property name="password" value="${db.password}"/>
            </dataSource>
        </environment>
    </environments>
十三.mybatis逆向工程
数据库表通过mybatis逆向工程插件生成类,mapper接口,mapper.xml文件


 447
447


 被折叠的 条评论
为什么被折叠?
被折叠的 条评论
为什么被折叠?
 到【灌水乐园】发言


