


使用
定义组件
新建components文件夹,新建About、News、Home组件
Home组件
<template>
    <div class="home">
      <img src="http://www.atguigu.com/images/index_new/logo.png" alt="">
    </div>
  </template>

  <script setup lang="ts" name="Home">

  </script>

  <style scoped>
    .home {
      display: flex;
      justify-content: center;
      align-items: center;
      height: 100%;
    }
  </style>
News组件
<template>
    <div class="news">
      <!-- 导航区 -->
      <ul>
        <li v-for="news in newsList" :key="news.id">
          <RouterLink to="/news/detail">{{news.title}}</RouterLink>
        </li>
      </ul>
      <!-- 展示区 -->
      <div class="news-content">
        <RouterView></RouterView>
      </div>
    </div>
  </template>

  <script setup lang="ts" name="News">
    import {reactive} from 'vue'
    import {RouterView,RouterLink} from 'vue-router'

    const newsList = reactive([
      {id:'asfdtrfay01',title:'很好的抗癌食物',content:'西蓝花'},
      {id:'asfdtrfay02',title:'如何一夜暴富',content:'学IT'},
      {id:'asfdtrfay03',title:'震惊,万万没想到',content:'明天是周一'},
      {id:'asfdtrfay04',title:'好消息!好消息!',content:'快过年了'}
    ])

  </script>

  <style scoped>
  /* 新闻 */
  .news {
    padding: 0 20px;
    display: flex;
    justify-content: space-between;
    height: 100%;
  }
  .news ul {
    margin-top: 30px;
    list-style: none;
    padding-left: 10px;
  }
  .news li>a {
    font-size: 18px;
    line-height: 40px;
    text-decoration: none;
    color: #64967E;
    text-shadow: 0 0 1px rgb(0, 84, 0);
  }
  .news-content {
    width: 70%;
    height: 90%;
    border: 1px solid;
    margin-top: 20px;
    border-radius: 10px;
  }
  </style>
About组件
<template>
    <div class="about">
      <h2>大家好,欢迎来到尚硅谷直播间</h2>
    </div>
  </template>

  <script setup lang="ts" name="About">
    import {onMounted,onUnmounted} from 'vue'

    onMounted(()=>{
      console.log('About组件挂载了')
    })
    onUnmounted(()=>{
      console.log('About组件卸载了')
    })
  </script>

  <style scoped>
  .about {
    display: flex;
    justify-content: center;
    align-items: center;
    height: 100%;
    color: rgb(85, 84, 84);
    font-size: 18px;
  }
  </style>
Detail.vue
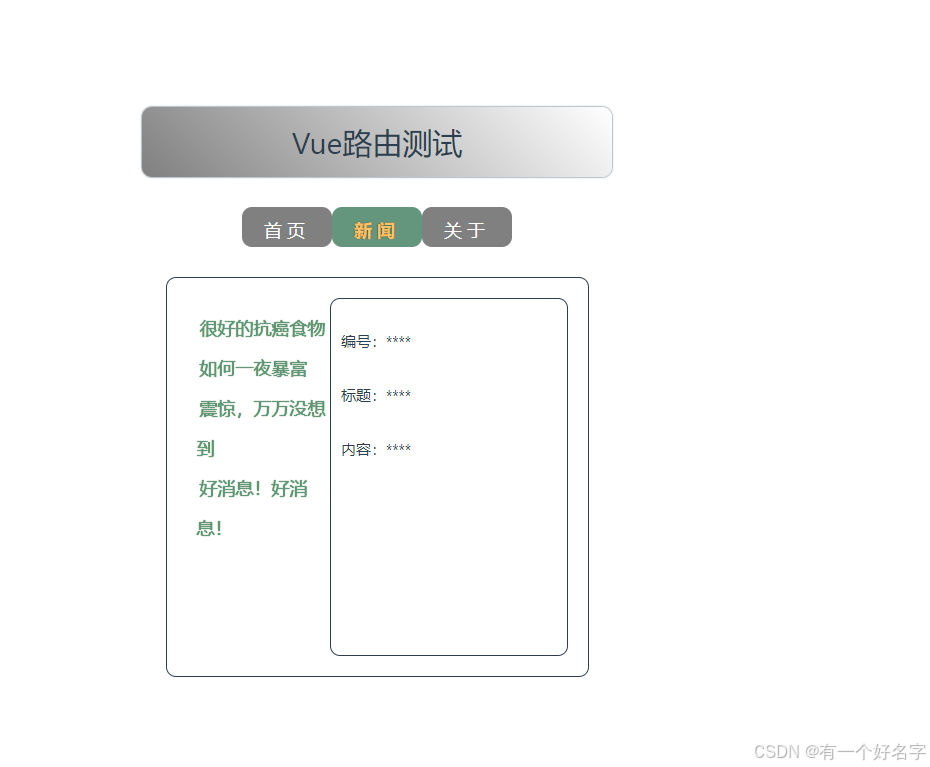
<template>
    <ul class="news-list">
        <li> 编号:****</li>
        <li> 标题:****</li>
        <li> 内容:****</li>
    </ul>
</template>

<script setup lang="ts" name="Header">

</script>

<style scoped>
    .news-list {
        list-style:none;
        padding-left: 20px;
    }
    .news-list li {
        margin-bottom: 30px;
    }
</style>
定义路由规则
新建router文件夹,编写index.ts文件
// 第一步:引入createRouter、createWebHashHistory
import { createRouter, createWebHistory } from 'vue-router'

// 第二步:引入组件
import About from '@/components/About.vue'
import Home from '@/components/Home.vue'
import News from '@/components/News.vue'
import Detail from '@/components/Detail.vue'

// 第三步:创建路由实例
const router = createRouter({
    history: createWebHistory(),
    routes:[
        {
            path:'/home',
            component:Home
        },
        {
            path:'/news',
            component:News,
            children:[
                {
                    path:'detail',
                    component: Detail
                }
            ]
        },
        {
            path:'/about',
            component:About
        }
    ]
})

// 第四步:导出路由实例
export default router
修改main.ts
import './assets/main.css'

import { createApp } from 'vue'
import App from './App.vue'
import router from './router'

const app = createApp(App)
// 使用路由器
app.use(router)
// 挂载到 #app
app.mount('#app')
使用路由
<template>
  <div class="app">
    <Header />
    <!-- 导航区 -->
    <div class="navigate">
      <RouterLink to="/home" active-class="active">首页</RouterLink>
      <RouterLink to="/news" active-class="active">新闻</RouterLink>
      <RouterLink to="/about" active-class="active">关于</RouterLink>
    </div>
    <!-- 展示区 -->
    <div class="main-content">
      <RouterView></RouterView>
    </div>
  </div>
</template>

<script lang="ts" setup name="App">
  import {RouterView,RouterLink} from 'vue-router'
  import Header from './components/Header.vue'

</script>

<style>
    /* App */
  .navigate {
    display: flex;
    justify-content: space-around;
    margin: 0 100px;
  }
  .navigate a {
    display: block;
    text-align: center;
    width: 90px;
    height: 40px;
    line-height: 40px;
    border-radius: 10px;
    background-color: gray;
    text-decoration: none;
    color: white;
    font-size: 18px;
    letter-spacing: 5px;
  }
  .navigate a.active {
    background-color: #64967E;
    color: #ffc268;
    font-weight: 900;
    text-shadow: 0 0 1px black;
    font-family: 微软雅黑;
  }
  .main-content {
    margin: 0 auto;
    margin-top: 30px;
    border-radius: 10px;
    width: 90%;
    height: 400px;
    border: 1px solid;
  }
</style>
实现效果
query参数
上述实现是将新闻内容写死,要想实现点击不同新闻连接可以显示不同内容,就要使用query传值方式。重新修改News.vue和Detail.vue。
News.vue
<template>
    <div class="news">
      <!-- 导航区 -->
      <ul>
        <li v-for="news in newsList" :key="news.id">
        <!-- 第一种写法 -->
        <!-- <RouterLink :to="`/news/detail?id=${news.id}&title=${news.title}&content=${news.content}`">{{news.title}}</RouterLink> -->
        <!-- 使用query传参 -->
          <RouterLink
            :to="{
              path: '/news/detail',
              query: {
                id: news.id,
                title: news.title,
                content: news.content
              }
            }"
            >
            {{news.title}}
          </RouterLink>
        </li>
      </ul>
      <!-- 展示区 -->
      <div class="news-content">
        <RouterView></RouterView>
      </div>
    </div>
  </template>

  <script setup lang="ts" name="News">
    import type { idText } from 'typescript';
import {reactive} from 'vue'
    import {RouterView,RouterLink} from 'vue-router'

    const newsList = reactive([
      {id:'asfdtrfay01',title:'很好的抗癌食物',content:'西蓝花'},
      {id:'asfdtrfay02',title:'如何一夜暴富',content:'学IT'},
      {id:'asfdtrfay03',title:'震惊,万万没想到',content:'明天是周一'},
      {id:'asfdtrfay04',title:'好消息!好消息!',content:'快过年了'}
    ])

  </script>

  <style scoped>
  /* 新闻 */
  .news {
    padding: 0 20px;
    display: flex;
    justify-content: space-between;
    height: 100%;
  }
  .news ul {
    margin-top: 30px;
    /* list-style: none; */
    padding-left: 10px;
  }
  .news li::marker {
    color: #64967E;
    font-size: 18px;
    text-shadow: 0 0 1px rgb(0, 84, 0);
  }
  .news li>a {
    font-size: 18px;
    line-height: 40px;
    text-decoration: none;
    color: #64967E;
    text-shadow: 0 0 1px rgb(0, 84, 0);
  }
  .news-content {
    width: 70%;
    height: 90%;
    border: 1px solid;
    margin-top: 20px;
    border-radius: 10px;
  }
  </style>
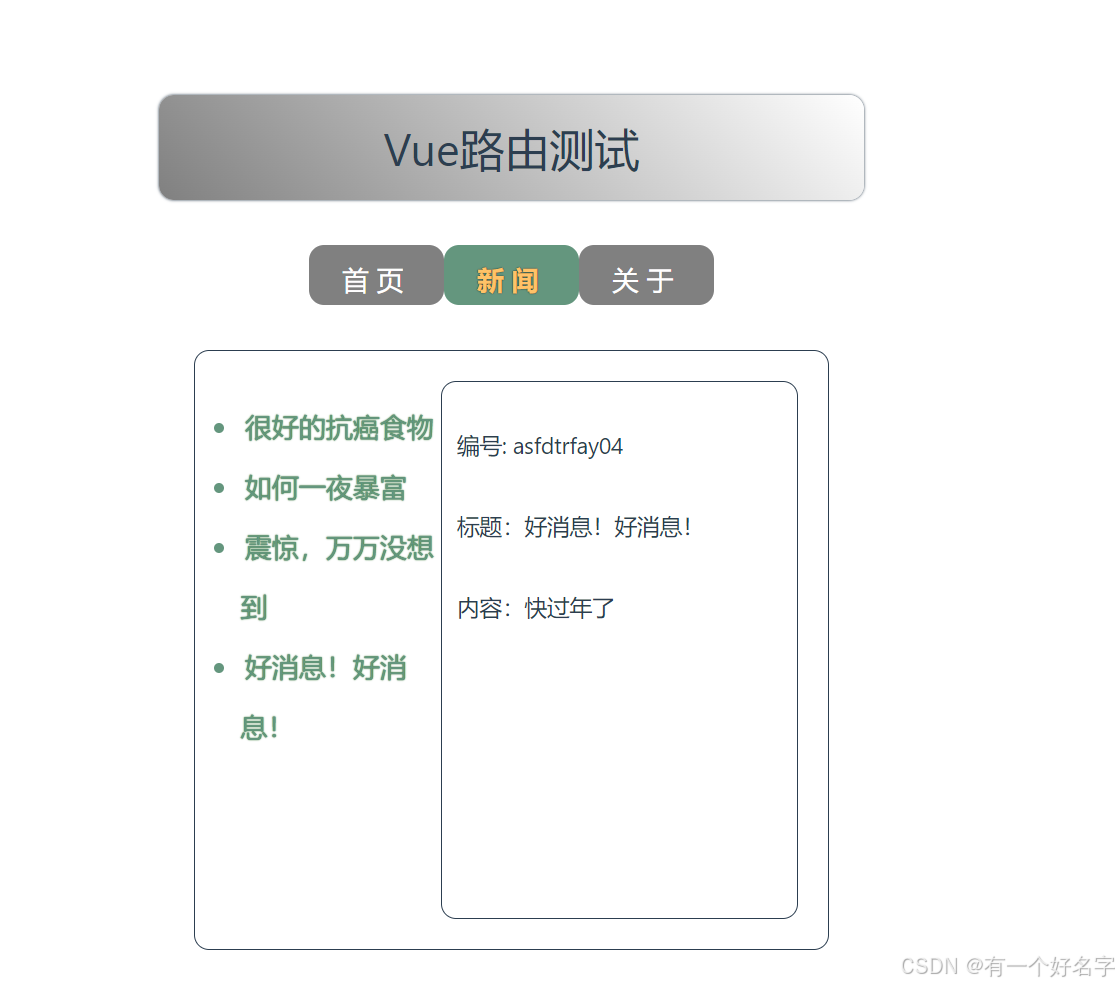
Detail.vue
<template>
    <ul class="news-list">
        <li> 编号: {{ query.id }} </li>
        <li> 标题:{{ query.title }} </li>
        <li> 内容:{{ query.content }} </li>
    </ul>
</template>

<script setup lang="ts" name="Header">
    import { toRef, toRefs } from 'vue';
import { useRoute } from 'vue-router';

    let route = useRoute();
    // 不用 toRefs 不会是响应式
    let {query} = toRefs(route);
</script>

<style scoped>
    .news-list {
        list-style:none;
        padding-left: 20px;
    }
    .news-list li {
        margin-bottom: 30px;
    }
</style>
实现效果
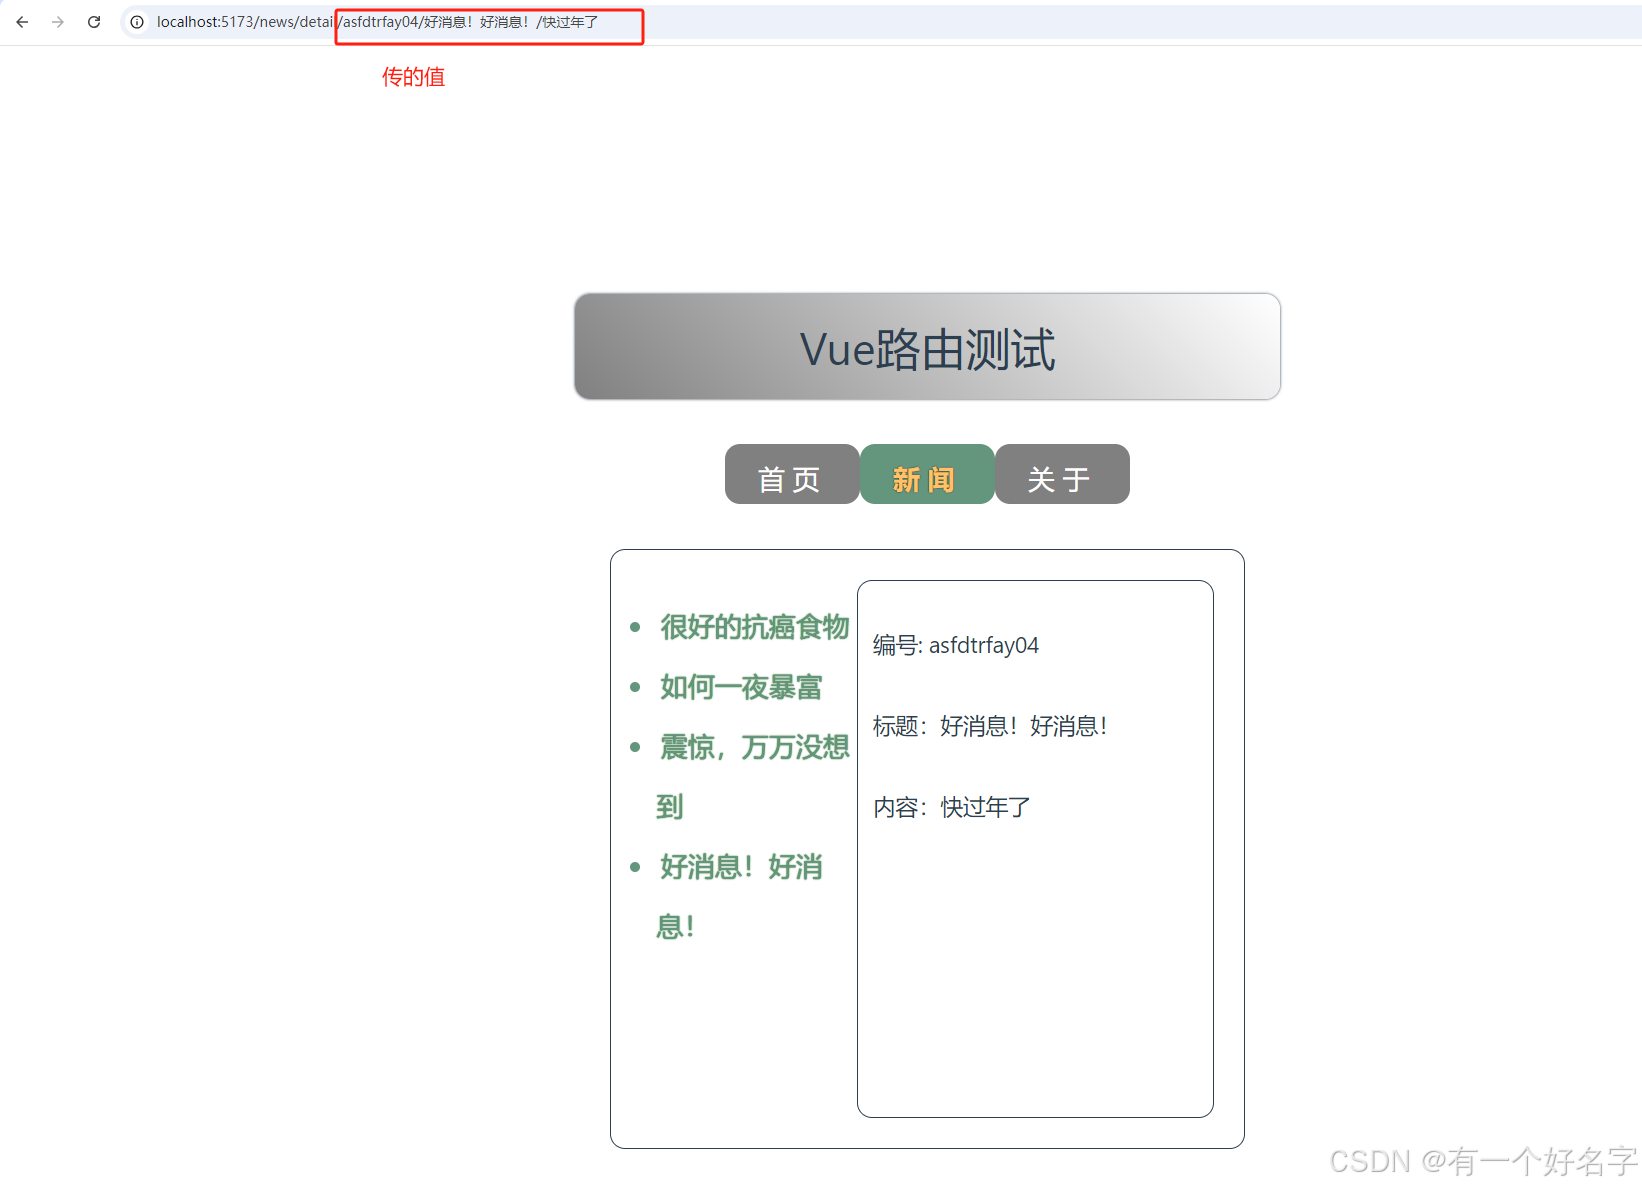
params参数
也可使用params传值方式。
index.ts
使用params传值方式时需要首先在对应路由路径中占位
// 第一步:引入createRouter、createWebHashHistory
import { createRouter, createWebHistory } from 'vue-router'

// 第二步:引入组件
import About from '@/components/About.vue'
import Home from '@/components/Home.vue'
import News from '@/components/News.vue'
import Detail from '@/components/Detail.vue'

// 第三步:创建路由实例
const router = createRouter({
    history: createWebHistory(),
    routes:[
        {
            path:'/home',
            component:Home
        },
        {
            path:'/news',
            component:News,
            children:[
                {
                    name:'xijie',
                    // 使用pathParams来接收参数需要给参数定位符
                    path:'detail/:id/:title/:content?',
                    component: Detail
                }
            ]
        },
        {
            path:'/about',
            component:About
        }
    ]
})

// 第四步:导出路由实例
export default router
News.vue
在中只能使用name属性来定义路由要跳转位置
<template>
    <div class="news">
      <!-- 导航区 -->
      <ul>
        <li v-for="news in newsList" :key="news.id">
          <!-- 使用query传参 -->
          <!-- <RouterLink
            :to="{
              path: '/news/detail',
              query: {
                id: news.id,
                title: news.title,
                content: news.content
              }
            }"
            >
            {{news.title}}
          </RouterLink>-->
          <!-- 使用params传参 -->
          <RouterLink :to="{
            name: 'xijie',
            params: {
              id: news.id,
              title: news.title,
              content: news.content
            }
          }">
            {{news.title}}
          </RouterLink>
        </li>
      </ul>
      <!-- 展示区 -->
      <div class="news-content">
        <RouterView></RouterView>
      </div>
    </div>
  </template>

  <script setup lang="ts" name="News">
    import type { idText } from 'typescript';
	import {reactive} from 'vue'
    import {RouterView,RouterLink} from 'vue-router'

    const newsList = reactive([
      {id:'asfdtrfay01',title:'很好的抗癌食物',content:'西蓝花'},
      {id:'asfdtrfay02',title:'如何一夜暴富',content:'学IT'},
      {id:'asfdtrfay03',title:'震惊,万万没想到',content:'明天是周一'},
      {id:'asfdtrfay04',title:'好消息!好消息!',content:'快过年了'}
    ])

  </script>

  <style scoped>
  /* 新闻 */
  .news {
    padding: 0 20px;
    display: flex;
    justify-content: space-between;
    height: 100%;
  }
  .news ul {
    margin-top: 30px;
    /* list-style: none; */
    padding-left: 10px;
  }
  .news li::marker {
    color: #64967E;
    font-size: 18px;
    text-shadow: 0 0 1px rgb(0, 84, 0);
  }
  .news li>a {
    font-size: 18px;
    line-height: 40px;
    text-decoration: none;
    color: #64967E;
    text-shadow: 0 0 1px rgb(0, 84, 0);
  }
  .news-content {
    width: 70%;
    height: 90%;
    border: 1px solid;
    margin-top: 20px;
    border-radius: 10px;
  }
  </style>
Detail.vue
<template>
    <ul class="news-list">
        <li> 编号: {{ params.id }} </li>
        <li> 标题:{{ params.title }} </li>
        <li> 内容:{{ params.content }} </li>
    </ul>
</template>

<script setup lang="ts" name="Header">
    import { toRefs } from 'vue';
import { useRoute } from 'vue-router';

    let route = useRoute();
    // 不用 toRefs 不会是响应式
    let { params } = toRefs(route);
</script>

<style scoped>
    .news-list {
        list-style:none;
        padding-left: 20px;
    }
    .news-list li {
        margin-bottom: 30px;
    }
</style>
实现效果
props配置
在Detail.vue中,每个变量都是params.**太啰嗦,可以通过props配置省略params. ,直接用id,title,content字段。

index.ts
// 第一步:引入createRouter、createWebHashHistory
import { createRouter, createWebHistory } from 'vue-router'

// 第二步:引入组件
import About from '@/components/About.vue'
import Home from '@/components/Home.vue'
import News from '@/components/News.vue'
import Detail from '@/components/Detail.vue'

// 第三步:创建路由实例
const router = createRouter({
    history: createWebHistory(),
    routes:[
        {
            path:'/home',
            component:Home
        },
        {
            path:'/news',
            component:News,
            children:[
                {
                    name:'xijie',
                    // 使用query来接收参数
                    path:'detail',
                    // 使用pathParams来接收参数需要给参数定位符
                    // path:'detail/:id/:title/:content?',
                    component: Detail,
                    // 第一种写法:将路由收到的所有params参数作为props传给路由组件
                    // props:true,

                    // 第二种写法:用query时候,函数写法,可以自己决定将什么作为props给路由组件
                    props(route){
                        return route.query
                    }
                    // 第三种写法(不常用):对象写法,可以自己决定将什么作为props给路由组件()
                    /* props:{
                        a:100,
                        b:200,
                        c:300
                    } */
                }
            ]
        },
        {
            path:'/about',
            component:About
        }
    ]
})

// 第四步:导出路由实例
export default router
Detail.vue
<template>
    <ul class="news-list">
        <li> 编号: {{ id }} </li>
        <li> 标题:{{ title }} </li>
        <li> 内容:{{ content }} </li>
    </ul>
</template>

<script setup lang="ts" name="Header">
    import { toRefs } from 'vue';
import { useRoute } from 'vue-router';

    let route = useRoute();
    // 不用 toRefs 不会是响应式
    let { params } = toRefs(route);
    // 接收到路由参数
    defineProps(['id', 'title', 'content'])
</script>

<style scoped>
    .news-list {
        list-style:none;
        padding-left: 20px;
    }
    .news-list li {
        margin-bottom: 30px;
    }
</style>


 3830
3830

 被折叠的 条评论
为什么被折叠?
被折叠的 条评论
为什么被折叠?
 到【灌水乐园】发言


