


slot插槽
vue提供了一种将父组件的内容和子组件模板整合的方法,内容分发
如果想在组件内部添加内容的话,就在组件模板内部对应的位置添加slot标签,而且添加上name属性,指明与外部的标签相通,如果不写name属性的话,将外面所有未命名的标签添加到该位置上
<div id="app">
    <father>
        <p slot="zha">我叫渣渣辉</p>
    </father>
    <hr>
    <father></father>
    <hr>
    <father>
        <p slot="hi">他叫XXX</p>
        <p slot="she">她叫ZZZ</p>
        <p slot="you">你叫CCC</p>
    </father>
</div>
<template id="add">
    <div>
        <slot name="zha"></slot>
        <slot name="hi"></slot>
        <p>我叫Gordon-Liu</p>
        <slot name="hui"></slot>
        <slot name="she"></slot>
        <slot name="you"></slot>
    </div>
</template>
<script>
    Vue.component("father",{
        template:"#add"
    })
    new Vue({
        el:"#app"
    })
</script>
第二种方法:
v-slot必须在组件或template标签中使用,v-slot:p1就相当于上面的意思,给他后面附一个值,
先在组件内拿取属性的属性值,然后上面赋的值就可以用
<div id="app">
    <hello>
        <template v-slot:p1="info">我叫... {{info.msg}} / {{info.arr}}</template>
    </hello>
</div>

<template id="add">
    <div>
        <slot name="p1" :msg="msg" :arr="arr"></slot>
    </div>
</template>
<script>
    Vue.component("hello",{
        template:"#add",
        data(){
            return {
                msg:"qwe",
                arr:[1,2,3,4]
            }
        }
    })
    new Vue({
        el:"#app"
    })
</script>
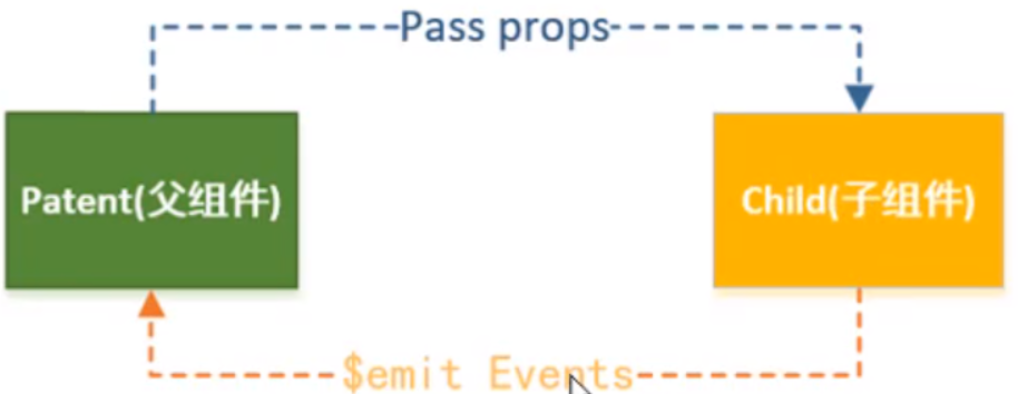
组件之间通信方式
1、父子组件传值
<div id="app">
    <father></father>
</div>

<template id="father">
    <div>
        <p>这是父组件...{{Msg}}</p>
        <hr>
        <son :change="chan"></son>
        <!-- 2、该方式也可以获取整个函数(不加括号) -->
    </div>
</template>
<template id="son">
    <div>
        <p>这是子组件...{{msg}}</p>
        <p><button @click="change(msg)">对父组件说的话</button></p>
        <!-- 4、最后点击调用此方法 -->
    </div>
</template>
<script>
    Vue.component("father",{
        template:"#father",
        data(){
            return {
                Msg:""
            }
        },
        methods:{       //1、整一个方法,子组件的值改变的时候,父组件的内容也随着变动
            chan(val){
                this.Msg=val
            }
        }
    })
    Vue.component("son",{
        template:"#son",
        props:["change"],       //3、将其变为父组件方法内的函数
        data(){
            return{
                msg:"今天下雨"
            }
        }
    })
    new Vue({
        el:"#app"
    })
</script>
第二种方法:自定义事件和$emit必须一起使用
<div id="app">
    <father></father>
</div>
<template id="father">
    <div>
        <p>这是父组件....{{Msg}}</p>
        <hr>
        <!--@change自定义事件与下面的$emit同时用 -->
        <son @change="chan"></son>
    </div>
</template>
<template id="son">
    <div>
        <p>这是子组件...{{msg}}</p>
        <p><button @click="cha">对父组件说的话</button></p>
    </div>
</template>
<script>
    Vue.component("father",{
        template:"#father",
        data(){
            return{
                Msg:""
            }
        },
        methods:{
            chan(val){
                this.Msg=val
            }
        }
    })
    Vue.component("son",{
        template:"#son",
        data(){
            return {
                msg:"今天有雨"
            }
        },
        //$emit相当于导火索,调用此方法的话,就会触发该事件,
        // 将第二个参数的内容传到上面自定义事件中的函数
        methods:{
            cha(){
                this.$emit("change",this.msg)
            }
        }
    })

    new Vue({
        el:"#app"
    })
</script>
2、ref
this.$refs.child
可以直接在方法内调用此方法

    <template id="father">
        <div>
            <button ref="btn" @click="che">get</button>
            <son ref="son"></son>
        </div>
    </template>
 Vue.component("father",{
        template:"#father",
        methods:{
            che(){
                this.$refs.son.msg = "aaa";
                this.$refs.btn.style.background = "skyblue"
            }
        }
    })
3、 事件总线
mounted生命周期中进行监听
<template id="father">
    <div>
        <p>我是爹</p>
        <p @click="chen">打儿子</p>
        <!-- 4、点击该触发事件 -->
    </div>
</template>
<template id="son">
    <div>
        <p>我是儿子</p>
        <p v-show="crying">呜呜呜呜呜~~~</p>
    </div>
</template>
<script>
    let att = new Vue()     //1、声明一个新对象
    Vue.component("father",{
        template:"#father",
        methods:{
            chen(){
                att.$emit("hiter")      //3、与自定义事件连在一起
            }
        }
    })
    Vue.component("son",{
        template:"#son",
        data(){
            return {
                crying:false
            }
        },
        methods:{
            hit(){
                this.crying=true
            }
        },
        mounted(){      //2、在对象中添加自定义事件,第二个参数是用方法中的函数
            att.$on("hiter",this.hit)
        }
    })
    new Vue({
        el:"#app"
    })
</script>
4、属性验证
props:{name:Number} 可以设置数据类型限制
Number,String,Boolean,Array,Object,Function,null(不限制类型)
拓展:
v-once 用在组件上有什么用?
v-once直接放在标签内用,且只能用一次,用完就失效
只渲染元素和组件一次。随后的重新渲染,元素/组件及其所有的子节点将被视为静态内容并跳过。这可以用于优化更新性能。
<!-- 单个元素 -->
<span v-once>This will never change: {{msg}}</span>

<!-- 有子元素 -->
<div v-once>
  <h1>comment</h1>
  <p>{{msg}}</p>
</div>

<!-- 组件 -->
<my-component v-once :comment="msg"></my-component>

<!-- `v-for` 指令-->
<ul>
  <li v-for="i in list" v-once>{{i}}</li>
</ul>
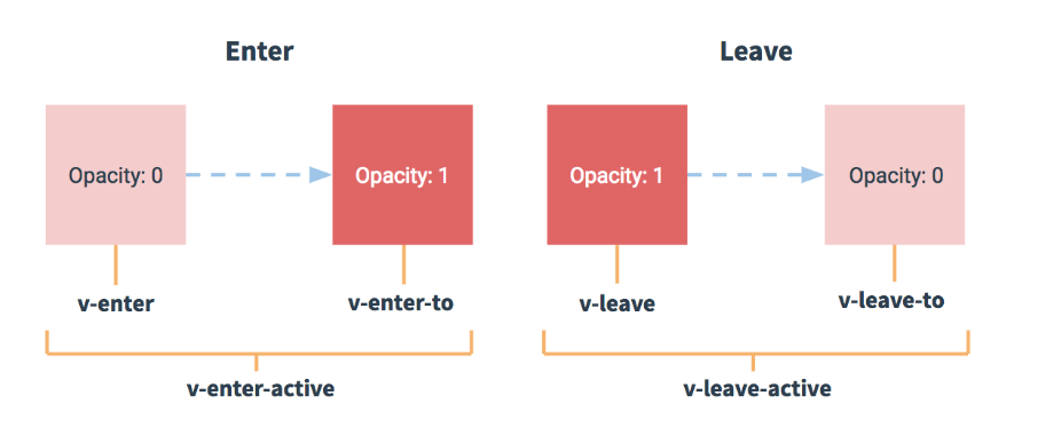
transition过渡:
 多个元素过渡:
用transition-group的时候,外面都会自带一个span标签,所以必须要加个tag=“div”,将外面自带的标签变为div,name属性是与上面的样式相对应,key值是必须加:是虚拟dom原理,给每一个元素都加上唯一的值
<transition-group tag="div" name="a">
            <p v-show="show" key="1">Gordon-Liu</p>
            <p v-show="show" key="2">Gordon-Liu</p>
            <p v-show="show" key="3">Gordon-Liu</p>
            <p v-show="show" key="4">Gordon-Liu</p>
        </transition-group>
<style>
    p{
        width:200px;
        height:200px;
        background:skyblue;
        color:purple;
        font-size:20px;
        margin:50px;
        display:inline-block
    }
    .a-enter{
        transform:scale(1.5);
        opacity:0
    }
    .a-enter-to{
        transform:scale(1);
        opacity:1
    }
    .a-leave{
        transform:scale(1);
        opacity:1
    }
    .a-leave-to{
        transform:scale(1.5);
        opacity:0
    }
    .a-enter-active,.a-leave-active{
        transition:all 2s;
    }
</style>
<script>
    Vue.component("aaa",{
        template:"#aaa",
        data(){
            return{
                show:true
            }
        }
    })
    new Vue({
        el:"#app"
    })
</script>
结合css动画库
apper是初始化的意思,页面刚进入执行一次此效果
<div id="app">
    <button @click="type = type == 'aaa' ? 'bbb' : 'aaa'">toggle</button>
    <transition
        appear
        enter-active-class="animated zoomInDown"
        leave-active-class="animated zoomOutDown"
        mode="out-in"
    >
        <component :is="type"></component>
    </transition>
</div>
<script>
// in-out:新元素先进行过渡,完成之后当前元素过渡离开。
// out-in:当前元素先进行过渡,完成之后新元素过渡进入。
     new Vue({
         el:"#app",
         data:{
             type:"aaa"
         },
         components:{
             "aaa":{
                 template:"<h1>AAAAAAAAAAAAA</h1>"
             },
             "bbb":{
                 template:"<h1>BBBBBBBBBBBBBB</h1>"
             }
         }
     })
</script>
生命周期
<div id="app">
    <my-component></my-component>
</div>

<!--定义组件的模板-->
<template id="my-component">
    <div>
        <h1 id="title">我是h1 -- {{msg}}</h1>
        <input type="text" v-model="msg">
        <button @click="destroy">销毁组件</button>
    </div>
</template>
   <script>
        /*
            组件从创建到销毁的一系列过程叫做组件的声明周期。
            vue在整个生命周期里面提供了一些函数,可以在内部实现一些业务逻辑,
            并且这些函数会在一些特定的场合下去执行。(在生命周期的某一个时刻进行触发)

            组件的生命周期大体可以分为三个阶段: 初始化、运行中、销毁
            初始化阶段:beforeCreate created beforeMount (render) mounted
            运行中阶段:beforeUpdate updated
            销毁阶段:  beforeDestroy destroyed
        */
        //初始化阶段
        //1.一个组件或者实例的生命周期都是从new开始的
        //2.实例化之后,内部会做一些初始化的事件与生命周期相关的配置
        Vue.component("my-component",{
            template:"#my-component",
            data(){
                return {
                    msg:"hello"
                }
            },
            methods:{
                destroy(){
                    this.$destroy() //组件销毁方法
                }
            },
            //3.beforeCreate这个钩子函数初始化的时候就会执行
            //但是数据是获取不到的,并且真实dom元素也是没有渲染出来的
            beforeCreate(){
                console.log("beforeCreate...")
                console.log(this.msg,document.getElementById("title"))
            },
            //4.created钩子函数内部可以访问到数据了,但是页面当中真实dom节点还是没有渲染出来
            //在这个钩子函数里面,可以进行相关初始化事件的绑定、发送ajax操作
            //当组件还没有挂载完毕之前,更改数据的话,是不会触发运行时钩子函数的执行!
            created(){
                console.log("created...")
                this.timer = setInterval(()=>{
                    console.log("定时器开着哦...")
                    this.msg = this.msg+"!"
                },2000)
                // this.msg = 11111111111
                console.log(this.msg,document.getElementById("title"))
            },
            //5.接下来的过程,就是组件或者实例去查找各自的模板结构,然后将其编译成虚拟dom
            //6.beforeMount代表dom马上就要被渲染出来了,但是却还没有真正的渲染出来
            //这个钩子函数与created钩子函数用法基本一致,可以进行相关初始化事件的绑定、发送ajax操作
            beforeMount(){
                console.log("beforeMount...")
                console.log(this.msg,document.getElementById("title"))
            },
            //生成好虚拟dom,然后内部通过render函数将对应的el进行替换,做一个初始化的虚拟dom渲染真实dom过程
            // render(){
            //     console.log("render....")
            // }
            //7.mounted钩子函数是挂载阶段的最后一个钩子函数
            //数据挂载完毕,真实dom元素也已经渲染完成了
            //这个钩子函数内部可以做一些实例化相关的操作   拖拽
            mounted(){
                console.log("mounted...")
                console.log(this.msg,document.getElementById("title"))
            },
            //8.这个钩子函数初始化的不会执行
            //当组件挂载完毕的时候,并且当数据改变的时候,才会立马执行
            //这个钩子函数获取dom的内容是更新之前的内容
            beforeUpdate(){
                console.log("beforeUpdate...",this.msg ,document.getElementById("title").innerHTML)
            },
            //9.这个钩子函数获取dom的内容是更新之后的内容
            //生成新的虚拟dom,新的虚拟dom与之前的虚拟dom进行比对,差异之后,就会进行真实dom渲染。
            //在updated钩子函数里面就可以获取到因diff算法比较差异得出来的真实dom渲染了。
            updated(){
                console.log("updated....", this.msg,document.getElementById("title").innerHTML)
            },
            //10.当组件销毁的时候,就会触发
            //这个钩子函数代表销毁之前,可以做一些善后操作
            //可以清除一些初始化事件、定时器相关的东西。
            beforeDestroy(){
                console.log("beforeDestory....")
                clearInterval(this.timer)
            },
            //11.组件销毁的时候执行
            //watch/数据劫持等功能已经完全丧失
            destroyed(){
                console.log("destroyed...")
            }
        })
        new Vue().$mount("#app");
    </script>


 2212
2212


 被折叠的 条评论
为什么被折叠?
被折叠的 条评论
为什么被折叠?
 到【灌水乐园】发言


