


下面先来总结一下软件的基本目录结构,这一般是开发的关键,只有明白了软件的目录结构,才能更加可灵活的设计软件。关注过我的人应该都知道,我主要是走的前端方向,然后摸一摸基础的后端,盘一盘网安,偶尔为自己的软件接口抓个包什么的。因此下面的介绍会通过与前端的对比来总结。
1.软件整体结构

(1)权限设置:
<uses-permission android:name="android.permission.INTERNET" />
<uses-permission android:name="android.permission.READ_EXTERNAL_STORAGE" />
<uses-permission android:name="android.permission.WRITE_EXTERNAL_STORAGE" />
最常规的比如上面的网络权限设置和文件读写权限等,具体需要的权限可以根据实际开发需要去查找就行;
(2)软件基本配置:
 <application
        android:allowBackup="true"
        android:icon="@drawable/campus_notice"
        android:label="@string/app_name"
        android:networkSecurityConfig="@xml/network_security_config"
        android:requestLegacyExternalStorage="true"
        android:roundIcon="@drawable/campus_notice"
        android:supportsRtl="true"
        android:theme="@style/Theme.MqttLedMenu">
 </application>
解释:上面的@引入的资源其实就在drawable和values目录下,

说明一下network_security_config,因为Android默认只能使用https访问,但是由于项目调试以及部分接口不是安全协议,因此可能需要用到。具体内容如下(通过xml引入),详细了解可以浏览(Android网络安全之NetworkSecurityConfig):
<?xml version="1.0" encoding="utf-8"?>
<network-security-config xmlns:android="http://schemas.android.com/apk/res/android">
    <base-config cleartextTrafficPermitted="true" />
</network-security-config>
2.具体的页面书写
接下来以MainActivity页面为例,注意这里的名字是默认的,也建议采用这个,类似于微信小程序里面的index,不叫index也可以,只是大家习惯这么命名。
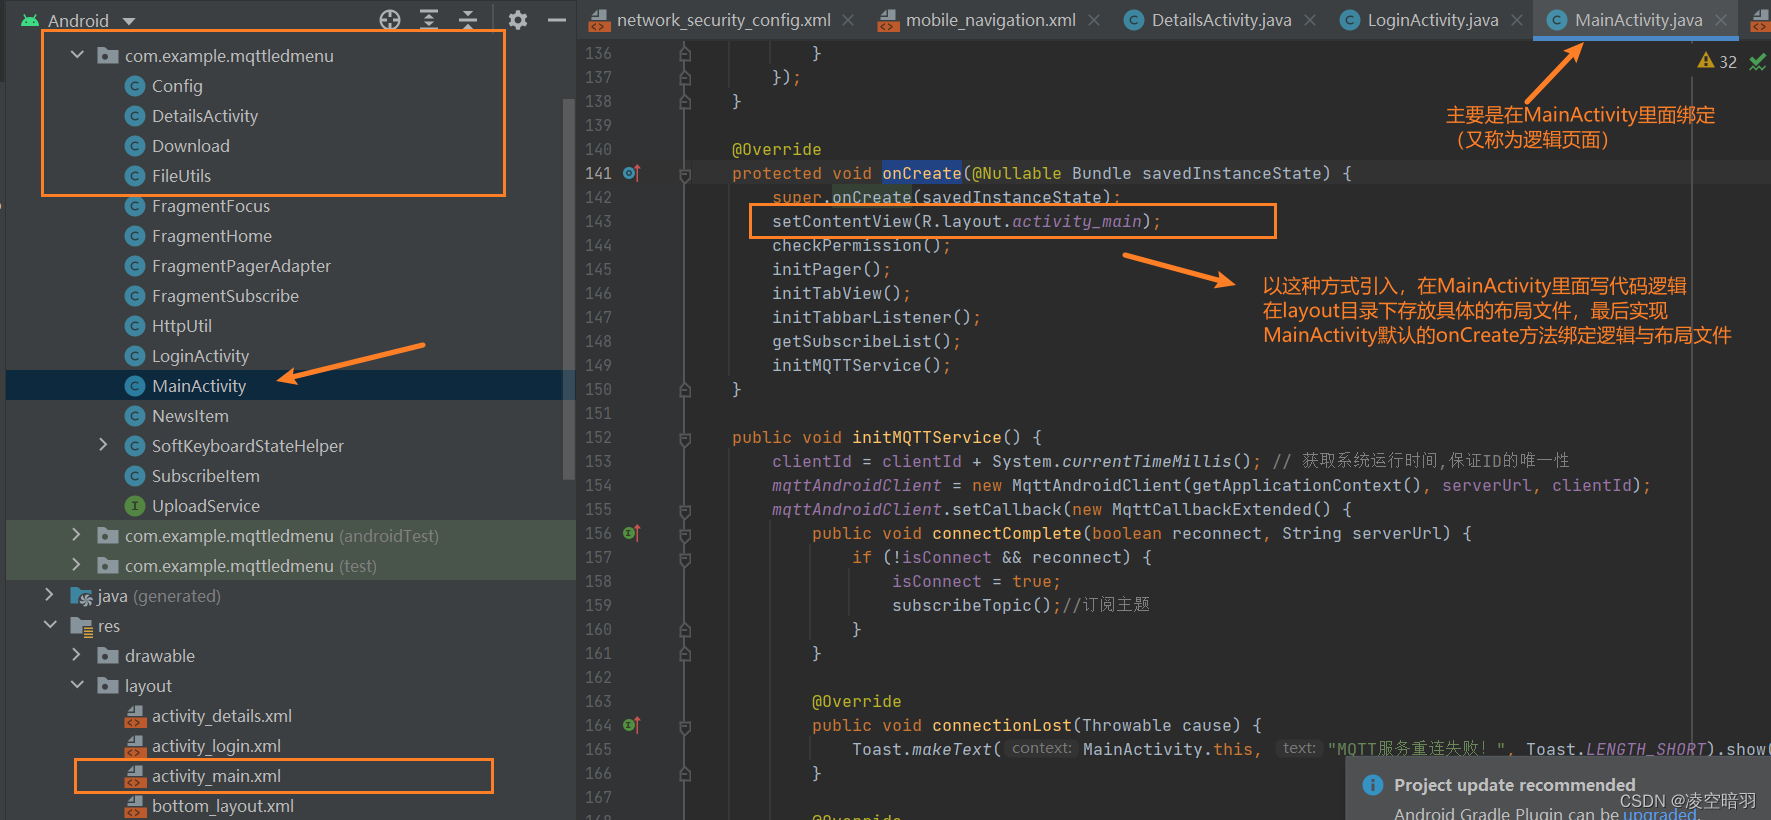
对于页面的XML文件的功能按钮做一下说明:

3.实例分析
以登录页面的为例,补充,写入了LoginActivity页面,要想在页面中具体使用,需要在AndroidManifest.xml中做如下注册:
<activity
   	android:name=".LoginActivity"
    android:exported="true">
    <intent-filter>
        <action android:name="android.intent.action.MAIN" />
        <category android:name="android.intent.category.LAUNCHER" />
    </intent-filter>
    <!--intent-filter部分其实就表示默认展示页面-->
</activity>
分析如下:
<?xml version="1.0" encoding="utf-8"?>
<LinearLayout xmlns:android="http://schemas.android.com/apk/res/android"
    xmlns:app="http://schemas.android.com/apk/res-auto"
    xmlns:tools="http://schemas.android.com/tools"
    android:layout_width="match_parent"
    android:layout_height="match_parent"
    android:background="@drawable/background"
    android:orientation="vertical"
    android:padding="30dp"
    tools:context=".LoginActivity">

    <LinearLayout
        android:layout_width="match_parent"
        android:layout_height="wrap_content"
        android:layout_marginTop="160dp"
        android:orientation="vertical">

        <TextView
            android:layout_width="60dp"
            android:layout_height="wrap_content"
            android:text="用户名:"
            android:textFontWeight="@integer/material_motion_duration_long_2" />

        <EditText
            android:id="@+id/username"
            android:layout_width="match_parent"
            android:layout_height="wrap_content"
            android:hint="请输入用户名~"
            android:textFontWeight="@integer/material_motion_duration_medium_1" />
    </LinearLayout>

    <LinearLayout
        android:layout_width="match_parent"
        android:layout_height="wrap_content"
        android:orientation="vertical">

        <TextView
            android:layout_width="wrap_content"
            android:layout_height="wrap_content"
            android:text="密码:"
            android:textFontWeight="@integer/material_motion_duration_long_2" />

        <EditText
            android:id="@+id/password"
            android:layout_width="823dp"
            android:layout_height="wrap_content"
            android:hint="请输入登录密码~"
            android:password="true"
            <!--开启密码显示-->
            android:textFontWeight="@integer/material_motion_duration_medium_1"
            tools:ignore="Deprecated" />
    </LinearLayout>

    <LinearLayout
    <!--emm,这里的布局被误调了,尴尬,不建议这么书写-->
        android:layout_width="800dp"
        android:layout_height="88dp"
        android:orientation="horizontal">

        <CheckBox
            android:id="@+id/isRemember"
            android:layout_width="wrap_content"
            android:layout_height="wrap_content"
            android:text="记住密码">

        </CheckBox>

        <TextView
            android:id="@+id/isForget"
            android:layout_width="wrap_content"
            android:layout_height="wrap_content"
            android:layout_marginLeft="40dp"
            android:text="忘记密码?" />
    </LinearLayout>

    <LinearLayout
        android:layout_width="match_parent"
        android:layout_height="wrap_content"
        android:padding="30dp">

        <Button
            android:id="@+id/login"
            android:layout_width="100dp"
            android:layout_height="wrap_content"
            android:layout_weight="1"
            android:background="@color/btn"
            android:padding="10dp"
            android:text="登录" />
    </LinearLayout>

</LinearLayout>
对应的逻辑代码如下:
package com.example.mqttledmenu;
//导入部分我给省了,如果报错就直接alt+enter导入就行
public class LoginActivity extends AppCompatActivity implements View.OnClickListener {
    private EditText username;
    private EditText password;
    private CheckBox isRemember;
    private TextView isForget;
    private Button login;
    private SharedPreferences sp;
    //利用SharedPreferences存储用户密码实现自动登录功能
    @Override
    protected void onCreate(Bundle savedInstanceState) {
   		 //初始化UI绑定,相当于html最原始的document的getElementById
        super.onCreate(savedInstanceState);
        setContentView(R.layout.activity_login);
        username = findViewById(R.id.username);
        password = findViewById(R.id.password);
        login = findViewById(R.id.login);
        isRemember = findViewById(R.id.isRemember);
        isForget = findViewById(R.id.isForget);
        //绑定点击事件,这里因为implements(实现)了View.OnClickListener接口,因此
        //可以实现对绑定时间的集体封装,最后利用switch case便于统一管理点击事件。
        login.setOnClickListener(this);
        isRemember.setOnClickListener(this);
        isForget.setOnClickListener(this);

        //检测密码信息
        sp = getSharedPreferences("config", Context.MODE_PRIVATE);
        Boolean autoLogin = sp.getBoolean("remember", false);
        if (autoLogin) {
            username.setText(sp.getString("username", ""));
            password.setText(sp.getString("password", ""));
            isRemember.setChecked(true);
        } else {
            isRemember.setChecked(false);
        }
    }
	//集中管理点击事件
    @Override
    public void onClick(View view) {
        switch (view.getId()) {
            case R.id.login:
                String usernameStr = username.getText().toString();
                String passwordStr = password.getText().toString();
                if (usernameStr.equals("") || passwordStr.equals("")) {
                    Toast.makeText(this, "用户名和密码不能为空!", Toast.LENGTH_SHORT).show();
                } else {
                //登录请求的逻辑,稍后新开一个文章详细解释,基础不好的先可以跳过
                    Retrofit retrofit = new Retrofit.Builder().baseUrl(Config.serverUrl).build();
                    UploadService uploadService = retrofit.create(UploadService.class);
                    Call<ResponseBody> call = uploadService.login(usernameStr, passwordStr);
                    call.enqueue(new Callback<ResponseBody>() {
                        @Override
                        public void onResponse(Call<ResponseBody> call, Response<ResponseBody> response) {
                            String result = null;
                            try {
                                result = response.body().string();
                                JsonObject returnData = new JsonParser().parse(result).getAsJsonObject();
                                if (!returnData.get("code").toString().equals("200")) {
                                    Toast.makeText(LoginActivity.this, "用户名或密码错误~", Toast.LENGTH_SHORT).show();
                                    return;
                                }
                                JsonObject temp = new JsonParser().parse(returnData.get("data").toString()).getAsJsonObject();
                                Config.getInstance().setUserId(temp.get("userId").toString());//存储用户的id
                                Config.getInstance().setUserAvatar(temp.get("userAvatar").toString());//存储用户的头像
                                if (isRemember.isChecked()) {
                                    //存储用户用户名和密码
                                    SharedPreferences.Editor edit = sp.edit();
                                    edit.putString("username", usernameStr);
                                    edit.putString("password", passwordStr);
                                    edit.putBoolean("remember", true);
                                    edit.apply();
                                }
								//页面跳转逻辑
                                Intent intent = new Intent();
                                //设置不能返回上一页,其实就是清空(clear)了页面栈
                                intent.setFlags(Intent.FLAG_ACTIVITY_CLEAR_TASK | Intent.FLAG_ACTIVITY_NEW_TASK);
                                //第一个参数:当前页面(getApplicationContext能够自动获取当前页面)
                                //第二个参数:想要跳转的页面
                                intent.setClass(getApplicationContext(), MainActivity.class);
                                startActivity(intent);
                            } catch (IOException e) {
                                Toast.makeText(LoginActivity.this, "服务端异常~", Toast.LENGTH_SHORT).show();
                                e.printStackTrace();
                            }
                        }

                        @Override
                        public void onFailure(Call<ResponseBody> call, Throwable t) {

                        }
                    });
                }
                break;
            case R.id.isForget:
                Toast.makeText(this, "请联系辅导员重置密码哦!", Toast.LENGTH_SHORT).show();
                break;
        }
    }
}
4.后续
由于时间比较紧,可能写的相对粗糙,如果有什么不懂的可以在评论区提出来,我会根据时间尽快安排新的文章,喜欢的话可以点个赞支持一下呀!。


 459
459


 被折叠的 条评论
为什么被折叠?
被折叠的 条评论
为什么被折叠?
 到【灌水乐园】发言


