


如果觉得感兴趣,可以关注博主,后续更新能够继续看到哦~
尝试做一个微信公众号系列目录
第一章 内网穿透环境准备
第二章 对关注公众号的用户说句欢迎光临
第三章 基础消息能力扩展
文章目录
前言
本章节开始正式对接微信公众号了,为了更加便于我们调试微信公众号的诸多功能,我们可以申请一个测试号,在微信官方文档的开始开发 /接口测试号申请章节,我们先申请测试号。
一、微信公众账号测试号申请
为了更加便于我们调试微信公众号的诸多功能,我们可以申请一个测试号,在微信官方文档的开始开发 /接口测试号申请章节,我们先申请测试号。
完成测试账号申请后,我们进入测试号页面可以得到我们对应的appID和appsecret信息,这些信息将是我们后续公众号对接的凭证。

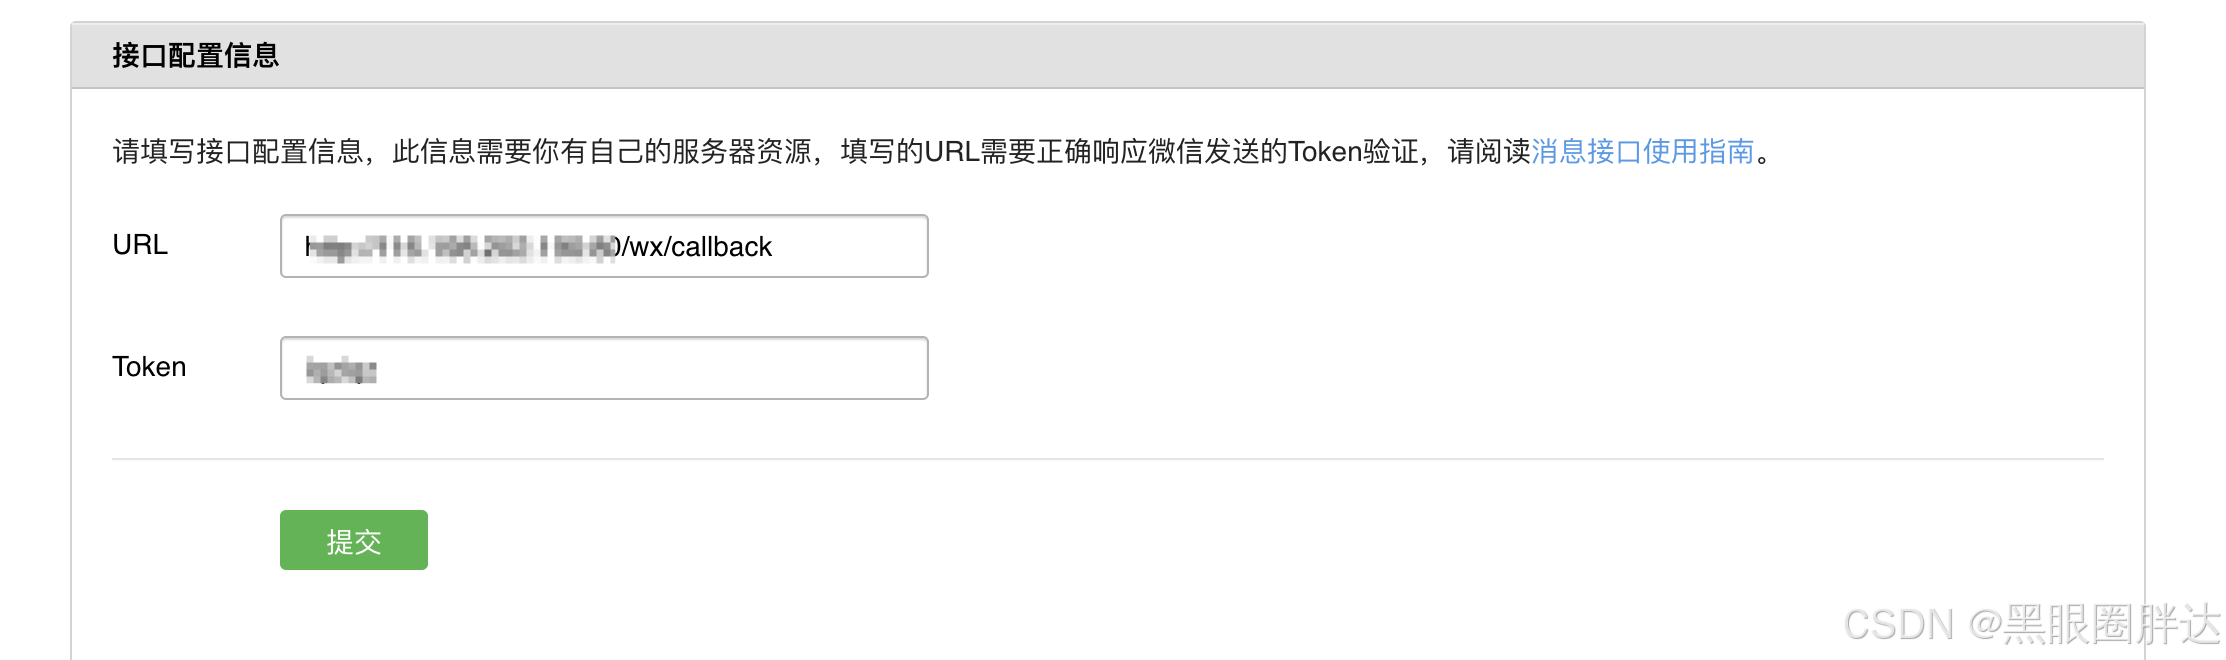
二、完成测试号接口配置信息填写。

如上图,在测试号的页面需要我们补充接口配置信息,这部分具体的内容我们也可在微信官方文档的开始开发 /接入指南章节找到。
提示:这里并不是随便填写地址就行,而是要真正的开发好对应的接口,能正常响应微信的请求才行!
1、借助java框架WxJava用于处理与微信公众号的交互
提示:刚开始,我们可以尝试使用最简单的示例用于我们的测试,而后才能循序渐进。
1、引入库
pom.xml中添加如下代码
 <!--引入微信公众号相关的jar包-->
 <dependency>
 	<groupId>com.github.binarywang</groupId>
    <artifactId>weixin-java-mp</artifactId>
    <version>4.7.0</version>
 </dependency>
2、编写微信公众号相关内容配置类
新建配置类WxMpConfig.java
package com.demo.demo.config;

import me.chanjar.weixin.mp.api.WxMpService;
import me.chanjar.weixin.mp.api.impl.WxMpServiceImpl;
import me.chanjar.weixin.mp.config.impl.WxMpDefaultConfigImpl;
import org.springframework.beans.factory.annotation.Value;
import org.springframework.context.annotation.Bean;
import org.springframework.context.annotation.Configuration;

/**
 *  创建配置类,用于加载相关的配置
 */
@Configuration
public class WxMpConfig {

    /**
     * 微信公众号appId
     */
    @Value("${wx.appId}")
    private String appId;

    /**
     * 微信公众号appSecret
     */
    @Value("${wx.appSecret}")
    private String appSecret;

    /**
     * 微信公众号token 对应测试号接口配置信息那里填写的token
     */
    @Value("${wx.token}")
    private String token;

    /**
     * 构造WxMapService实例,这里我们暂时先使用默认实现,即基于内存的微信配置,
     * @return WxMapService实例
     */
    @Bean
    public WxMpService wxMpService() {
        WxMpService wxMpService = new WxMpServiceImpl();
        WxMpDefaultConfigImpl configStorage = new WxMpDefaultConfigImpl();
        configStorage.setAppId(appId);
        configStorage.setSecret(appSecret);
        configStorage.setToken(token);
        wxMpService.setWxMpConfigStorage(configStorage);
        return wxMpService;
    }
}
对应需要读取的变量配置在application.yml中
wx:
  appId: "你的appId"
  appSecret: "appSecret"
  token: "你的测试号接口配置信息那里填写的token"
3、编写接口用于完成接口配置信息填写
按照微信官方文档的开始开发 /接入指南进行我们的开发,借助于我们前面引入的WxJava会更加简单。
新建WxController用于对接微信的请求
package com.demo.demo.controller;

import me.chanjar.weixin.mp.api.WxMpService;
import org.apache.commons.lang3.StringUtils;
import org.springframework.beans.factory.annotation.Autowired;
import org.springframework.web.bind.annotation.GetMapping;
import org.springframework.web.bind.annotation.RequestMapping;
import org.springframework.web.bind.annotation.RequestParam;
import org.springframework.web.bind.annotation.RestController;

@RestController
@RequestMapping("/wx/callback")
public class WxController {

    @Autowired
    private WxMpService wxMpService;
    /**
     * 用于供微信验证服务器地址的有效性
     * @param signature 微信加密签名,signature结合了开发者填写的token参数和请求中的timestamp参数、nonce参数。
     * @param timestamp 时间戳
     * @param nonce 随机数
     * @param echostr 随机字符串
     * @return 若验证成功,则返回上送的随机字符串echostr
     */
    @GetMapping(produces = "text/plain;charset=utf-8")
    public String auth(@RequestParam(name = "signature", required = false) String signature,
                       @RequestParam(name = "timestamp", required = false) String timestamp,
                       @RequestParam(name = "nonce", required = false) String nonce,
                       @RequestParam(name = "echostr", required = false) String echostr) {
        if (StringUtils.isAnyBlank(signature, timestamp, nonce, echostr)) {
            return "请求参数非法";
        }
        // 验证消息的确来自微信服务器
        if (wxMpService.checkSignature(timestamp, nonce, signature)) {
            return echostr;
        }
        return "非法请求";
    }
}
完成代码编写之后,启动项目,将项目对应的地址(这里要填写外网服务器的地址)填写在下方,注意token要与yml中填写一致!
若代码没有问题,正常响应,测试号页面会正常展示配置成功!

2、编写微信公众号回调消息处理器
此时我们应该回想我们本章节的最终目标,也就是对关注公众号的用户说句欢迎光临,接下来我们逐步完善微信回调处理相关内容。
可以先看下微信官方文档的基础消息能力 /接收事件推送章节对基本的消息处理能力有一个简单的了解。
接下来我们依旧借助WxJava完善我们的微信公众号配置类WxMpConfig.java
package com.demo.demo.config;

import me.chanjar.weixin.mp.api.WxMpMessageRouter;
import me.chanjar.weixin.mp.api.WxMpService;
import me.chanjar.weixin.mp.api.impl.WxMpServiceImpl;
import me.chanjar.weixin.mp.bean.message.WxMpXmlOutMessage;
import me.chanjar.weixin.mp.config.impl.WxMpDefaultConfigImpl;
import org.springframework.beans.factory.annotation.Value;
import org.springframework.context.annotation.Bean;
import org.springframework.context.annotation.Configuration;


/**
 *  创建配置类,用于加载相关的配置
 */
@Configuration
public class WxMpConfig {

    /**
     * 微信公众号appId
     */
    @Value("${wx.appId}")
    private String appId;

    /**
     * 微信公众号appSecret
     */
    @Value("${wx.appSecret}")
    private String appSecret;

    /**
     * 微信公众号token 对应测试号接口配置信息那里填写的token
     */
    @Value("${wx.token}")
    private String token;

    /**
     * 构造WxMapService实例,这里我们暂时先使用默认实现,即基于内存的微信配置,
     * @return WxMapService实例
     */
    @Bean
    public WxMpService wxMpService() {
        WxMpService wxMpService = new WxMpServiceImpl();
        WxMpDefaultConfigImpl configStorage = new WxMpDefaultConfigImpl();
        configStorage.setAppId(appId);
        configStorage.setSecret(appSecret);
        configStorage.setToken(token);
        wxMpService.setWxMpConfigStorage(configStorage);
        return wxMpService;
    }

    /**
     * 消息路由配置,用于处理不同类型的消息,我们目前仅处理订阅事件
     * @param wxMpService WxMapService实例
     * @return WxMpMessageRouter 实例
     */
    @Bean
    public WxMpMessageRouter wxMpMessageRouter(WxMpService wxMpService) {
        WxMpMessageRouter router = new WxMpMessageRouter(wxMpService);
        // 处理关注消息
        router.rule()
                .async(false)
                .msgType("event")
                .event("subscribe")
                // 进行处理
                .handler((wxMpXmlMessage, context, wxMpService1, sessionManager) -> WxMpXmlOutMessage.TEXT().content("感谢关注!").fromUser(wxMpXmlMessage.getToUser()).toUser(wxMpXmlMessage.getFromUser()).build())
                .end();
        return router;
    }
}
仅设置好消息处理器配置,目前还未有人调用,我们接着完善我们提供给微信的回调接口WxController.java,用于WxMpMessageRouter的加载
package com.demo.demo.controller;

import me.chanjar.weixin.mp.api.WxMpMessageRouter;
import me.chanjar.weixin.mp.api.WxMpService;
import me.chanjar.weixin.mp.bean.message.WxMpXmlMessage;
import me.chanjar.weixin.mp.bean.message.WxMpXmlOutMessage;
import org.apache.commons.lang3.StringUtils;
import org.springframework.beans.factory.annotation.Autowired;
import org.springframework.web.bind.annotation.*;

@RestController
@RequestMapping("/wx/callback")
public class WxController {

    @Autowired
    private WxMpService wxMpService;

    @Autowired
    private WxMpMessageRouter wxMpMessageRouter;
    /**
     * 用于供微信验证服务器地址的有效性
     * @param signature 微信加密签名,signature结合了开发者填写的token参数和请求中的timestamp参数、nonce参数。
     * @param timestamp 时间戳
     * @param nonce 随机数
     * @param echostr 随机字符串
     * @return 若验证成功,则返回上送的随机字符串echostr
     */
    @GetMapping(produces = "text/plain;charset=utf-8")
    public String auth(@RequestParam(name = "signature", required = false) String signature,
                       @RequestParam(name = "timestamp", required = false) String timestamp,
                       @RequestParam(name = "nonce", required = false) String nonce,
                       @RequestParam(name = "echostr", required = false) String echostr) {
        if (StringUtils.isAnyBlank(signature, timestamp, nonce, echostr)) {
            return "请求参数非法";
        }
        // 验证消息的确来自微信服务器
        if (wxMpService.checkSignature(timestamp, nonce, signature)) {
            return echostr;
        }
        return "非法请求";
    }

    /**
     * 处理微信消息
     * @param requestBody 消息请求内容
     * @param signature 微信加密签名,signature结合了开发者填写的token参数和请求中的timestamp参数、nonce参数。
     * @param timestamp 时间戳
     * @param nonce 随机数
     * @param encType
     * @param msgSignature
     * @return
     */
    @PostMapping(produces = "application/xml; charset=UTF-8")
    public String post(@RequestBody String requestBody,
                       @RequestParam("signature") String signature,
                       @RequestParam("timestamp") String timestamp,
                       @RequestParam("nonce") String nonce,
                       @RequestParam(name = "encrypt_type", required = false) String encType,
                       @RequestParam(name = "msg_signature", required = false) String msgSignature){

        if (!wxMpService.checkSignature(timestamp, nonce, signature)) {
            return "";
        }
        // 处理消息
        WxMpXmlMessage inMessage = WxMpXmlMessage.fromXml(requestBody);
        WxMpXmlOutMessage outMessage = wxMpMessageRouter.route(inMessage);
        if (outMessage != null) {
            return outMessage.toXml();
        }
        return "";
    }
}
启动项目后,打开微信公众号测试号界面,扫描我们测试号的二维码关注后,如果没有问题,公众号会给我们答复,欢迎光临,这是我的测试号。


总结
以上就是本章节对应的内容,通过本章节的实战,我们成功的对关注公众号的用户说了句话,算是迈出了第一步,希望能够持续坚持下去,一起加油。


 被折叠的 条评论
为什么被折叠?
被折叠的 条评论
为什么被折叠?
 到【灌水乐园】发言


