


目录
3. application-prod.properties 配置
一、前提说明
在配置好Docker和Docker Compose之后,部署一个JavaWeb项目。
使用到 spingboot+mysql+redis
二、简单的Docker容器部署案例
1. Dockerfile 配置
# 基于那个镜像使用 java
# FROM openjdk:8-oracle
FROM java:8

# 作者
MAINTAINER cj

# 在主机 /var/lib/docker 目录下创建一个临时文件,并链接到容器的 /tmp
VOLUME /tmp

# 将jar包添加到容器中,并命名为 deploy-docker.jar
ADD deploy-docker-1.0-SNAPSHOT.jar /deploy-docker.jar

# 运行jar包
RUN bash -c 'touch /deploy-docker.jar'
# 使用 ENTRYPOINT 设置容器启动时执行的命令,并指定 Spring profile 为 prod
ENTRYPOINT ["java", "-jar", "/deploy-docker.jar", "--spring.profiles.active=prod"]

# SpringBoot 项目配置的端口号为 1931,需要将 1931 暴露出去
EXPOSE 1931
2. docker-compose.yml 配置
# docker-compose文件版本号
version: "3"

# 定义自定义网络 springboot_network_1
networks:
  springboot_network_1:

# 配置各个容器服务
services:
  # 定义名为 microService 的服务
  microService:
    # 使用 deploy-docker:1.1 镜像作为容器
    image: deploy-docker:1.1
    # 设置容器的名称为 ms01
    container_name: ms01  # 容器名称,如果不指定,会生成一个服务名加上前缀的容器名
    # 将容器内部端口 1931 映射到宿主机端口 1931
    ports:
      - "1931:1931"
    # 挂载宿主机的 /app/microService 目录到容器内的 /data 目录
    volumes:
      - /app/microService:/data
    # 连接到名为 springboot_network_1 的自定义网络
    networks:
      - springboot_network_1
    # 定义 microService 服务依赖的其他服务
    depends_on:
      - redis
      - mysql

  # 定义名为 redis 的服务
  redis:
    # 使用 redis:6.0.8 镜像作为容器
    image: redis:6.0.8
    # 主机端口:容器内部端口
    ports:
      - "6379:6379"
    # 挂载宿主机的 redis 配置文件和数据目录到容器内
    volumes:
      - /app/redis/redis.conf:/etc/redis/redis.conf
      - /app/redis/data:/data
    # 连接到名为 springboot_network_1 的自定义网络
    networks:
      - springboot_network_1
    # 指定容器启动命令为 redis-server /etc/redis/redis.conf
    command: redis-server /etc/redis/redis.conf

  # 定义名为 mysql 的服务
  mysql:
    # 使用 mysql:8.3 镜像作为容器
    image: mysql:8.3
    # 设置 MySQL 的环境变量
    environment:
      MYSQL_ROOT_PASSWORD: '123456'
      MYSQL_ALLOW_EMPTY_PASSWORD: 'no'
      MYSQL_DATABASE: 'deploy-docker'
      MYSQL_USER: 'cj'
      MYSQL_PASSWORD: '123456'
    # 主机端口(3306):容器内部端口(3306)
    ports:
      - "3306:3306"
    # 挂载宿主机的 MySQL 数据库文件、配置文件和初始化脚本到容器内
    volumes:
      - /app/mysql/db:/var/lib/mysql
      - /app/mysql/conf/my.cnf:/etc/my.cnf
      - /app/mysql/init:/docker-entrypoint-initdb.d
    # 连接到名为 springboot_network_1 的自定义网络
    networks:
      - springboot_network_1
    # 指定容器启动命令为 --default-authentication-plugin=mysql_native_password
    command: --default-authentication-plugin=mysql_native_password # 解决外部无法访问
3. application-prod.properties 配置
# 服务器端口号
server.port=1931
server.servlet.context-path=/
# ======================== Alibaba Druid 数据源配置 ======================
# 配置使用 Alibaba Druid 数据源
spring.datasource.type=com.alibaba.druid.pool.DruidDataSource
# 数据库驱动类名
spring.datasource.driver-class-name=com.mysql.cj.jdbc.Driver
# 数据库连接 URL
#spring.datasource.url=jdbc:mysql://192.168.153.133:3306/deploy_docker?serverTimezone=GMT%2B8&useSSL=false&characterEncoding=utf-8&allowPublicKeyRetrieval=true
# 使用容器内部服务名进行连接
spring.datasource.url=jdbc:mysql://mysql:3306/deploy_docker?serverTimezone=GMT%2B8&useSSL=false&characterEncoding=utf-8&allowPublicKeyRetrieval=true
# 数据库用户名
spring.datasource.username=root
# 数据库密码
spring.datasource.password=123456
# 配置 Druid 连接池,禁用空闲时检测
spring.datasource.druid.test-while-idle=false
# ======================== Redis 缓存配置 ======================
# Redis 数据库索引
spring.redis.database=0
# 使用 IP 地址进行连接
#spring.redis.host=192.168.153.133
# 使用容器内部服务名进行连接
spring.redis.host=redis
# Redis 端口号
spring.redis.port=6379
# Redis 密码
spring.redis.password=123456
# 配置 Lettuce 连接池参数
spring.redis.lettuce.pool.max-active=8
spring.redis.lettuce.pool.max-wait=-1ms
spring.redis.lettuce.pool.max-idle=8
spring.redis.lettuce.pool.min-idle=0
# ======================== MyBatis 配置 ====================
# MyBatis Mapper 文件路径
mybatis.mapper-locations=classpath:mapper/*.xml
# MyBatis 实体类包路径
mybatis.type-aliases-package=org.example.entities
# ======================== Swagger 配置 ======================
# 启用 Swagger2 API 文档
spring.swagger2.enabled=true
4. pom.xml 配置
<?xml version="1.0" encoding="UTF-8"?>
<project xmlns="http://maven.apache.org/POM/4.0.0"
         xmlns:xsi="http://www.w3.org/2001/XMLSchema-instance"
         xsi:schemaLocation="http://maven.apache.org/POM/4.0.0 http://maven.apache.org/xsd/maven-4.0.0.xsd">
    <modelVersion>4.0.0</modelVersion>

    <parent>
        <groupId>org.springframework.boot</groupId>
        <artifactId>spring-boot-starter-parent</artifactId>
        <version>2.5.6</version>
        <relativePath/> <!-- 从仓库中查找父项目 -->
    </parent>

    <groupId>org.study</groupId>
    <artifactId>deploy-docker</artifactId>
    <packaging>jar</packaging>
    <version>1.0-SNAPSHOT</version>

    <!-- 定义项目使用的属性,如编码、编译版本等 -->
    <properties>
        <project.build.sourceEncoding>UTF-8</project.build.sourceEncoding>
        <maven.compiler.source>1.8</maven.compiler.source>
        <maven.compiler.target>1.8</maven.compiler.target>
        <!-- 定义各个依赖版本 -->
        <junit.version>4.12</junit.version>
        <log4j.version>1.2.17</log4j.version>
        <lombok.version>1.16.18</lombok.version>
        <mysql.version>8.0.30</mysql.version>
        <druid.version>1.1.17</druid.version>
        <mapper.version>4.1.5</mapper.version>
        <mybatis.spring.boot.version>1.3.0</mybatis.spring.boot.version>
        <swagger.version>2.9.2</swagger.version>
    </properties>

    <!--配置不同的profile,对应不同的生产环境-->
    <profiles>
        <profile>
            <!--开发-->
            <id>dev</id>
            <activation>
                <!--默认开发环境-->
                <activeByDefault>true</activeByDefault>
            </activation>
            <properties>
                <activatedProperties>dev</activatedProperties>
            </properties>
        </profile>
        <profile>
            <id>prod</id>
            <properties>
                <activatedProperties>prod</activatedProperties>
            </properties>
        </profile>
        <profile>
            <id>test</id>
            <properties>
                <activatedProperties>test</activatedProperties>
            </properties>
        </profile>
    </profiles>

    <!-- 项目依赖配置 -->
    <dependencies>
        <!-- Guava:Google开源的Guava中自带的布隆过滤器 -->
        <dependency>
            <groupId>com.google.guava</groupId>
            <artifactId>guava</artifactId>
            <version>23.0</version>
        </dependency>
        <!-- Redisson:Redis Java客户端库 -->
        <dependency>
            <groupId>org.redisson</groupId>
            <artifactId>redisson</artifactId>
            <version>3.13.4</version>
        </dependency>
        <!-- Spring Boot Starter Web:Spring Boot的Web起步依赖 -->
        <dependency>
            <groupId>org.springframework.boot</groupId>
            <artifactId>spring-boot-starter-web</artifactId>
        </dependency>
        <!-- Spring Boot Starter Actuator:Spring Boot的监控与管理依赖 -->
        <dependency>
            <groupId>org.springframework.boot</groupId>
            <artifactId>spring-boot-starter-actuator</artifactId>
        </dependency>
        <!-- Swagger2:API文档生成工具 -->
        <dependency>
            <groupId>io.springfox</groupId>
            <artifactId>springfox-swagger2</artifactId>
            <version>${swagger.version}</version>
        </dependency>
        <dependency>
            <groupId>io.springfox</groupId>
            <artifactId>springfox-swagger-ui</artifactId>
            <version>${swagger.version}</version>
        </dependency>
        <!-- Spring Boot Starter Data Redis:Spring Boot集成Redis依赖 -->
        <dependency>
            <groupId>org.springframework.boot</groupId>
            <artifactId>spring-boot-starter-data-redis</artifactId>
        </dependency>
        <!-- Spring Boot Starter Cache:Spring Boot缓存起步依赖 -->
        <dependency>
            <groupId>org.springframework.boot</groupId>
            <artifactId>spring-boot-starter-cache</artifactId>
        </dependency>
        <!-- Apache Commons Pool2:通用对象池 -->
        <dependency>
            <groupId>org.apache.commons</groupId>
            <artifactId>commons-pool2</artifactId>
        </dependency>
        <!-- Jedis:Redis的Java客户端库 -->
        <dependency>
            <groupId>redis.clients</groupId>
            <artifactId>jedis</artifactId>
            <version>3.1.0</version>
        </dependency>
        <!-- MySQL Connector Java:MySQL数据库驱动 -->
        <dependency>
            <groupId>mysql</groupId>
            <artifactId>mysql-connector-java</artifactId>
            <version>${mysql.version}</version>
        </dependency>
        <!-- Druid Spring Boot Starter:Spring Boot集成Druid连接池 -->
        <dependency>
            <groupId>com.alibaba</groupId>
            <artifactId>druid-spring-boot-starter</artifactId>
            <version>${druid.version}</version>
        </dependency>
        <dependency>
            <groupId>com.alibaba</groupId>
            <artifactId>druid</artifactId>
            <version>${druid.version}</version>
        </dependency>
        <!-- MyBatis Spring Boot Starter:Spring Boot集成MyBatis依赖 -->
        <dependency>
            <groupId>org.mybatis.spring.boot</groupId>
            <artifactId>mybatis-spring-boot-starter</artifactId>
            <version>${mybatis.spring.boot.version}</version>
        </dependency>
        <!-- Apache Commons Codec:通用编解码库 -->
        <dependency>
            <groupId>commons-codec</groupId>
            <artifactId>commons-codec</artifactId>
            <version>1.10</version>
        </dependency>
        <!-- Hutool:Java工具类库 -->
        <dependency>
            <groupId>cn.hutool</groupId>
            <artifactId>hutool-all</artifactId>
            <version>5.2.3</version>
        </dependency>
        <!-- JUnit:Java单元测试框架 -->
        <dependency>
            <groupId>junit</groupId>
            <artifactId>junit</artifactId>
            <version>${junit.version}</version>
        </dependency>
        <!-- Spring Boot DevTools:Spring Boot开发工具,用于热部署等 -->
        <dependency>
            <groupId>org.springframework.boot</groupId>
            <artifactId>spring-boot-devtools</artifactId>
            <scope>runtime</scope>
            <optional>true</optional>
        </dependency>
        <!-- Spring Boot Starter Test:Spring Boot测试起步依赖 -->
        <dependency>
            <groupId>org.springframework.boot</groupId>
            <artifactId>spring-boot-starter-test</artifactId>
            <scope>test</scope>
        </dependency>
        <!-- Log4j:Java日志框架 -->
        <dependency>
            <groupId>log4j</groupId>
            <artifactId>log4j</artifactId>
            <version>${log4j.version}</version>
        </dependency>
        <!-- Lombok:Java简化代码库 -->
        <dependency>
            <groupId>org.projectlombok</groupId>
            <artifactId>lombok</artifactId>
            <version>${lombok.version}</version>
            <optional>true</optional>
        </dependency>
        <!-- Javax Persistence API:Java持久化API -->
        <dependency>
            <groupId>javax.persistence</groupId>
            <artifactId>persistence-api</artifactId>
            <version>1.0.2</version>
        </dependency>
        <!-- 通用Mapper:MyBatis通用Mapper -->
        <dependency>
            <groupId>tk.mybatis</groupId>
            <artifactId>mapper</artifactId>
            <version>${mapper.version}</version>
        </dependency>
    </dependencies>


    <!-- 项目构建配置 -->
    <build>
        <!-- 配置资源处理 -->
        <resources>
            <!-- 第一个资源配置 -->
            <resource>
                <!-- 指定资源目录 -->
                <directory>src/main/resources</directory>
                <!-- 是否进行资源过滤 -->
                <filtering>true</filtering>
            </resource>
            <!-- 第二个资源配置 -->
            <resource>
                <!-- 指定资源目录 -->
                <directory>src/main/resources</directory>
                <!-- 是否进行资源过滤 -->
                <filtering>false</filtering>
                <!-- 包含的文件列表 -->
                <includes>
                    <!-- 包含所有的 .xml 文件 -->
                    <include>**/*.xml</include>
                    <include>application.properties</include>
                    <!-- 包含根据 activatedProperties 动态生成的
                    application-${activatedProperties}.properties 文件 -->
                    <include>application-${activatedProperties}.properties</include>
                    <!-- 包含所有的 .properties 文件 -->
                    <include>**/*.properties</include>
                    <include>logback.xml</include>
                </includes>
            </resource>
        </resources>

        <!-- 配置 Maven 插件 -->
        <plugins>
            <!-- Spring Boot Maven Plugin:用于打包Spring Boot应用 -->
            <plugin>
                <!-- 插件组ID -->
                <groupId>org.springframework.boot</groupId>
                <!-- 插件ID -->
                <artifactId>spring-boot-maven-plugin</artifactId>
            </plugin>
            <!-- Maven Resources Plugin:Maven资源处理插件 -->
            <plugin>
                <!-- 插件组ID -->
                <groupId>org.apache.maven.plugins</groupId>
                <!-- 插件ID -->
                <artifactId>maven-resources-plugin</artifactId>
                <!-- 插件版本 -->
                <version>3.1.0</version>
            </plugin>
        </plugins>
    </build>


</project>
5. 上传文件
上传文件到CentOS中,创建一个mydocker的文件夹,将打包的jar、Dockerfile、docker-compose.yml放在同一级目录中。如同:
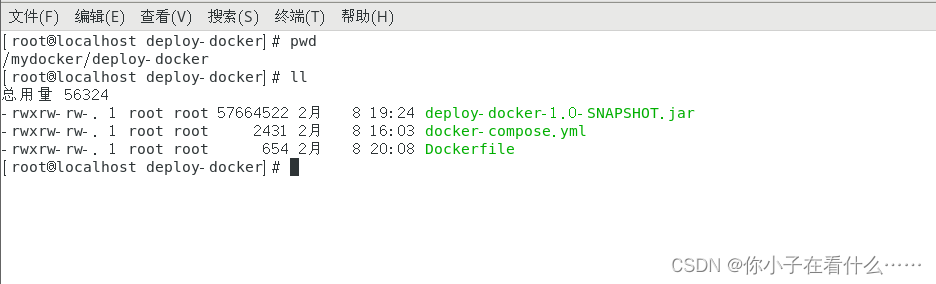
ps:以下命令需要在包含jar包、Dockerfile、docker-compose.yml目录下进行,不然可能会出现找不到文件的错误
6. 创建基础Docker镜像
docker build -t deploy-docker:1.1 .7. docker-compose.yml编排
编写完成docker-compose.yml后,进行语法检查
# 进行语法检查
docker-compose config -q
如果语法检查没有任何问题,进行创建、启动
docker-compose up -d8. 停止并删除容器编排
docker-compose down三、案例地址
放在gitee上,有需要的可以获取,如果有帮助记得★starhttps://gitee.com/CJ_HGX/deploy-docker https://gitee.com/CJ_HGX/deploy-docker


 6万+
6万+

 被折叠的 条评论
为什么被折叠?
被折叠的 条评论
为什么被折叠?
 到【灌水乐园】发言


