


eclipse 开发spring集成环境配置 spring基本介绍 控制反转(IOC)
前言 spring开发环境的引入(eclipse插件或者STS IDE)
一、Ioc (Inversion of Control) 控制反转介绍
二、spring使用方式(eclipse中实现简单属性注入)
前言 spring开发环境的引入(eclipse插件或者STS IDE)
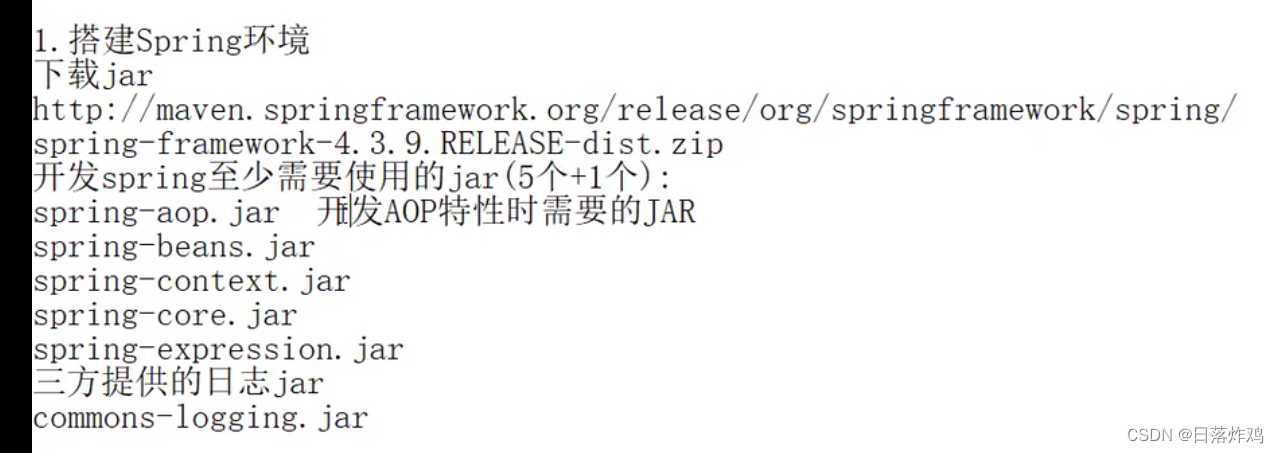
spring(Spring 官⽅⽹址:http://spring.io/)起源于2002年前后, IoC 和 AOP 为内核,是一个轻量框架,可以整合mybatis等优秀框架,使用 Spring 可以让 Java Bean 之间进行有效的解
耦。
spring是主要包含 core context bean AOP jar包,再加上一个日志依赖jar包,就构成了spring基础的功能。IOC+AOP+事务+JdbcTemplate需要重点掌握。
提示:我使用的IDE 一开始选择了 STS 工具(集成过Spring Tool Suite插件的eclipse) 版本信息为:Spring Tool Suite 4 Version: 4.3.1.RELEASE ;之后发现STS4.0的版本无法新建Spring Bean Configuration File,网上搜索了一些信息,要安装sts3.0的插件,而且要和当前的版本匹配。安装之后搞了好长时间都没成功,于是有了两个解决办法:
1.直接下载 STS3.0版本
2.在eclipse安装STS3.0的插件
方式1没什么好讲的,安装过程和eclipse基本一样,但是由于官方不提供3.0的版本,得自己找。
方式2安装插件有一些值得注意的地方,虽然官方提供了下载插件的地址,但实际上,地址是不能直接用的,使用地址直接下载的压缩包无法成功安装到eclipse中。
在 官网STS3.0插件下载地址 中找到eclipse版本号(help->about)对应的插件版本下载地址:
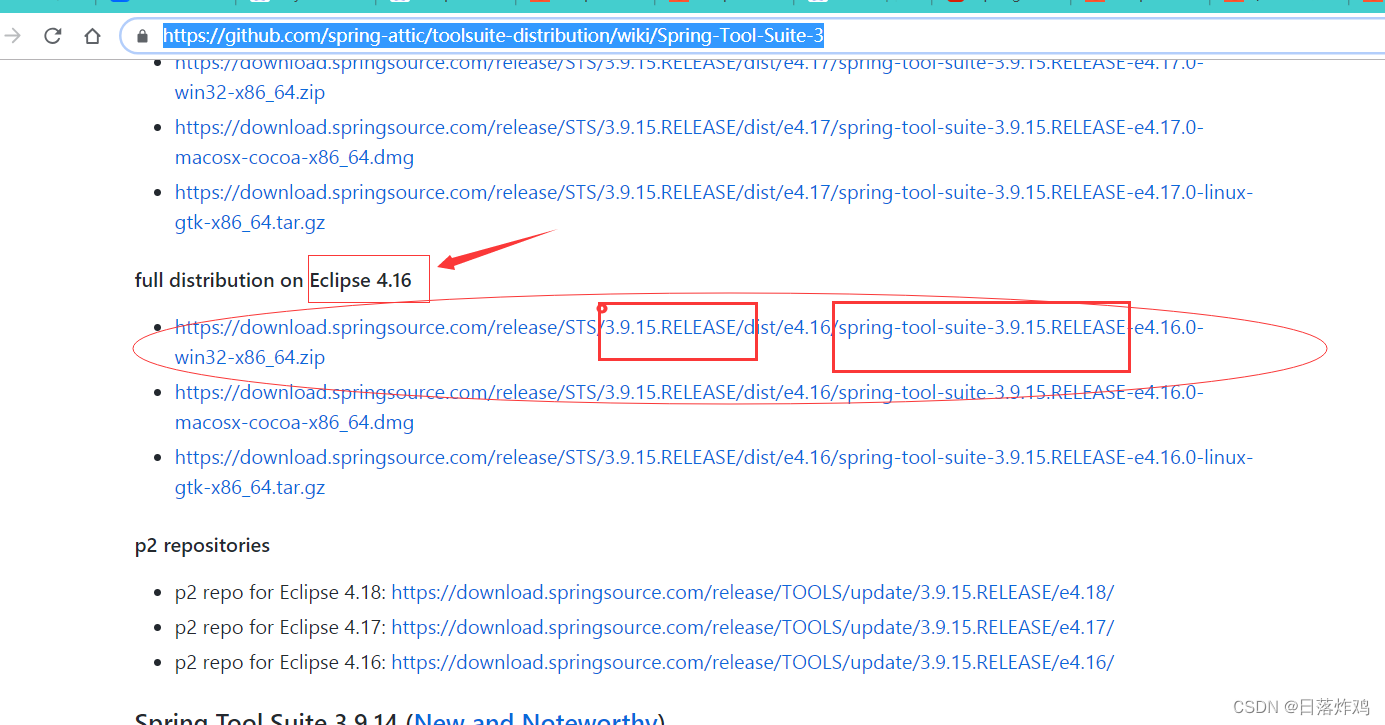
我的eclipse是4.16.0版本,对应的地址上就是 3.9.15.REALEASE,记住这个“3.9.15” 。实际上我要下载的插件 下载地址为:
这样下载下来的插件才能引入到eclipse中。引入过程参考 这篇博客。但是eclipse引入相关插件后的坑实在是太多了,这里我使用STS3.0进行开发练习。
另:附带STS3.0 IDE 下载地址。(JDK 版本对应为1.8)
一、Ioc (Inversion of Control) 控制反转介绍
Ioc (Inversion of Control),中文控制反转,也称为 DI(依赖注入)。
JavaSE中,创建对象直接使用 new 的方式,有我们自己创建所有Java类(包括JavaBean)。
在spring中,则通过使用IOC容器,想要对象直接调用该容器的方法获取一个对象,创建,管理对象的权利由操作者翻转为IOC容器。只需要向容器发出请求,就可以得到相关的对象(Bean)。
对于对象的初始值,可以将包括对象类型在内的信息直接注入到IOC生成的对象(Bean)中,即是 依赖注入 Dependancy Injection(DI),OI&IOC本质是描述一个东西, 都是为实现松耦合进行代码组织的方式的描述。
AOP面向切面编程是spring另一个重要的思想,以后补充。
二、spring使用方式(eclipse中实现简单属性注入)
1.引入依赖并测试set方法注入
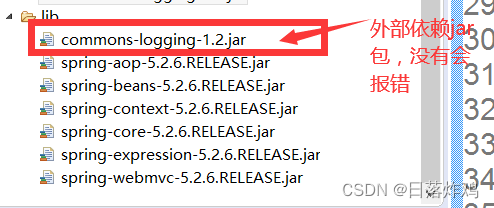
依赖包版本为5.2.6
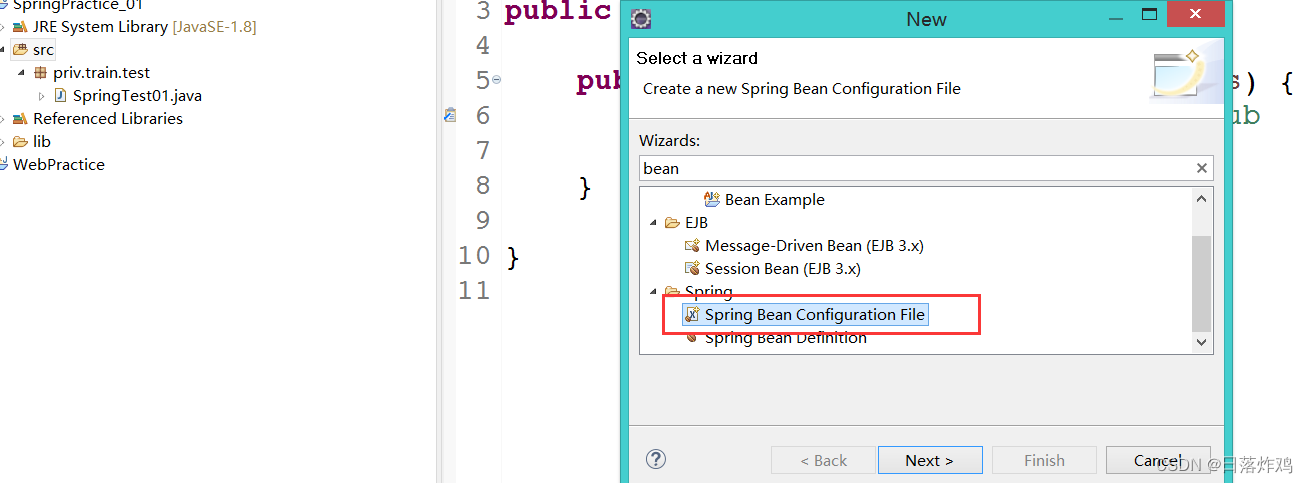
新建bean文件(applicationContext.xml)
打开该xml文件
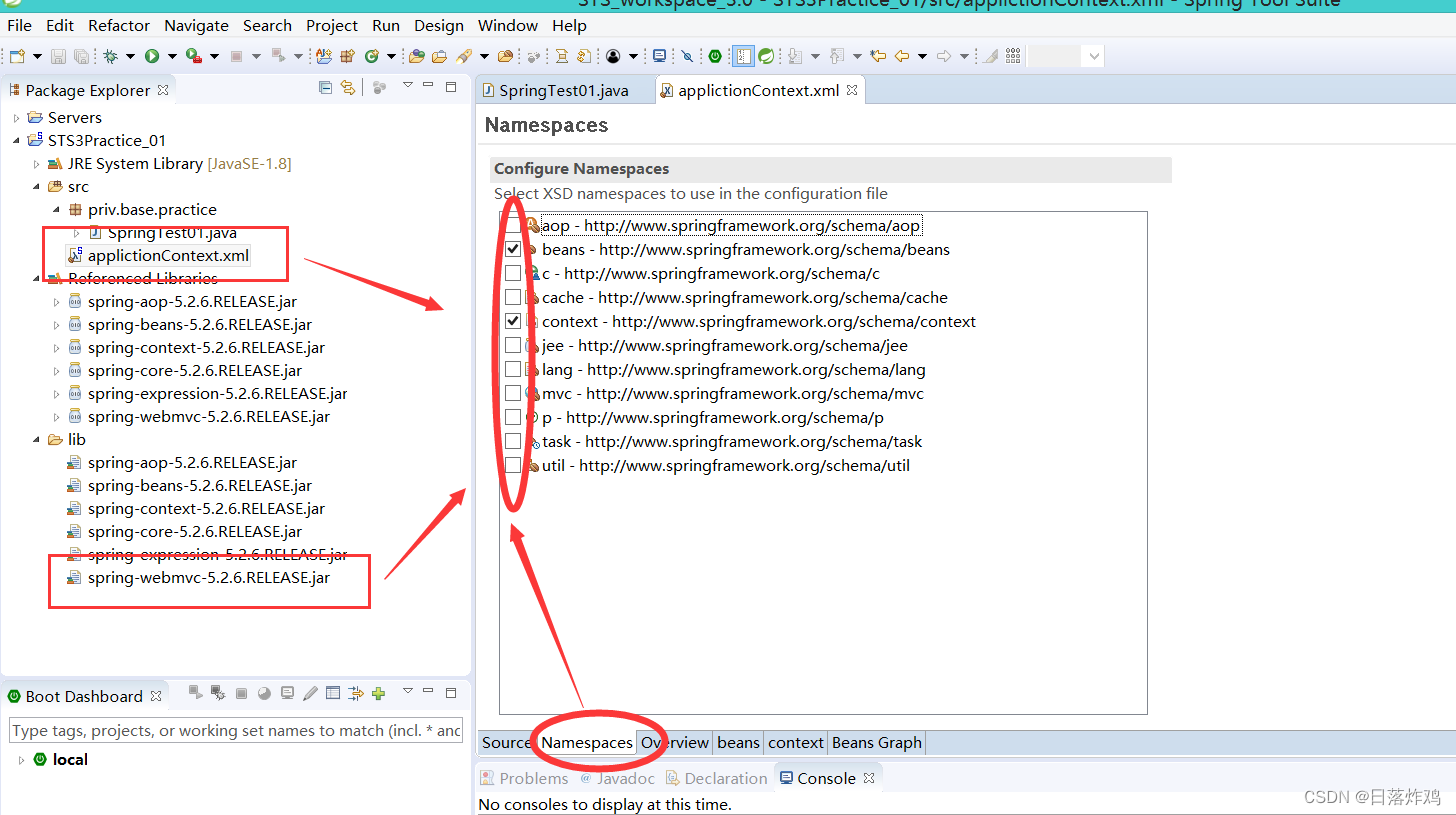
没有webmvc依赖可能会导致namespace中的选项只有一个,引入该依赖后就会正常了。
一般spring项目的Spring Bean configer File 形式的xml文件命名都是 applicationContext.xml 文件,不要用其他的名字。
先配置applicationContext.xml ,信息如下:
<?xml version="1.0" encoding="UTF-8"?>
<beans xmlns="http://www.springframework.org/schema/beans"
xmlns:xsi="http://www.w3.org/2001/XMLSchema-instance"
xmlns:context="http://www.springframework.org/schema/context"
xsi:schemaLocation="http://www.springframework.org/schema/beans http://www.springframework.org/schema/beans/spring-beans.xsd
http://www.springframework.org/schema/context http://www.springframework.org/schema/context/spring-context-4.3.xsd">
<bean id="userBeanId01" class="priv.base.practice.User">
<property name="userId" value="01"></property>
<property name="userName" value="scott"></property>
<property name="userPwd" value="tiger"></property>
<property name="cat" ref="catBeanId01"></property>
</bean>
<bean id="catBeanId01" class="priv.base.practice.Cat">
<property name="catName" value="tom"></property>
<property name="catColor" value="white"></property>
</bean>
</beans>
在bean标签中实现注入,新建相关的bean类:
package priv.base.practice;

public class User {

	private int userId;
	private String userName;
	private String userPwd;
	private Cat cat;

	public User(int userId, String userName, String userPwd, Cat cat) {

		super();

		this.userId = userId;
		this.userName = userName;
		this.userPwd = userPwd;
		this.cat = cat;
	}

	public User() {}

	public Cat getCat() {
		return cat;
	}


	public void setCat(Cat cat) {
		this.cat = cat;
	}


	public int getUserId() {
		return userId;
	}


	public void setUserId(int userId) {
		this.userId = userId;
	}


	public String getUserName() {
		return userName;
	}


	public void setUserName(String userName) {
		this.userName = userName;
	}


	public String getUserPwd() {
		return userPwd;
	}


	public void setUserPwd(String userPwd) {
		this.userPwd = userPwd;
	}

}
类的属性注入不仅支持基本类型注入,也支持对象注入,但name对应的是ref对应的对象的bean的ID
<property name="userPwd" value="tiger"></property>
<property name="cat" ref="catBeanId01"></property>
代码如下(示例):
package priv.base.practice;

import org.springframework.context.support.ClassPathXmlApplicationContext;

public class SpringTest01 {

	public static void iocTest01() {
		ClassPathXmlApplicationContext    ctx 	= new  ClassPathXmlApplicationContext("applictionContext.xml")	 ;

		User user01 = (User) ctx.getBean("userBeanId01");
		String name01 = user01.getUserName();

		String catColor = user01.getCat().getCatColor();
		System.out.println("name 01: "+name01+"`s catColor : "+catColor);

	}

	public static void main(String[] args) {
		iocTest01();

	}

}
出现报错:
java.lang.NoClassDefFoundError: org/apache/commons/logging/LogFactory
说明少导包了,导入jar包:commons-logging-1.2.jar就可以了。 显示结果如下:

还有p空间注入,本质和set方法注入一样,但是很少使用,此处不再赘述。

2. 构造方法注入
xml文件配置如下
<bean id="userBeanId02" class="priv.base.practice.User">
<constructor-arg name="userId" value="02"/>
<constructor-arg name = "userName" value="phoebe"/>
<constructor-arg name = "userPwd" value="chinese satelite"/>
<constructor-arg name="cat" ref="catBeanId02"/>
</bean><bean id="catBeanId02" class="priv.base.practice.Cat">
<property name="catName" value="linu"></property>
<property name="catColor" value="black"></property>
写constructor-arg 标签时会报错,但是所有的配置都写好后,保存好后报错的信息就会消失 。
代码如下(示例):
public static void iocTest02() {
		ClassPathXmlApplicationContext    ctx 	= new  ClassPathXmlApplicationContext("applictionContext.xml")	 ;

		User user02 = (User) ctx.getBean("userBeanId02");
		String name02 = user02.getUserName();

		String catColor = user02.getCat().getCatColor();
		System.out.println("name 02: "+name02+" hava a  cat, Color is : "+catColor);

	}
结果如下:

constructor-arg name = "userName" value="phoebe"/
也可以替换为
constructor-arg index= "0" value="phoebe"/ ,但是也很少使用。
三、 复杂属性注入
对象注入上文已经提到,现在主要写的是 数组注入 和 Map注入。
新建一个collection的bean,配置 applicationContext.xml
package priv.base.practice;

import java.util.*;


public class CollectionDemo {
	private Integer id;
	private String name;
	private Integer age;
	private Cat cat;

	private String[] arrayDS;

	private List<Cat> Listcats;
	private Map<String,Object> mapDS;
	private Properties infoDS;

	public Integer getId() {
		return id;
	}


	public void setId(Integer id) {
		this.id = id;
	}
	public String getName() {
		return name;
	}
	public void setName(String name) {
		this.name = name;
	}
	public Integer getAge() {
		return age;
	}
	public void setAge(Integer age) {
		this.age = age;
	}
	public Cat getCat() {
		return cat;
	}
	public void setCat(Cat cat) {
		this.cat = cat;
	}
	public String[] getArrayDS() {
		return arrayDS;
	}
	public void setArrayDS(String[] arrayDS) {
		this.arrayDS = arrayDS;
	}
	public List<Cat> getListcats() {
		return Listcats;
	}
	public void setListcats(List<Cat> listcats) {
		Listcats = listcats;
	}
	public Map<String, Object> getMapDS() {
		return mapDS;
	}
	public void setMapDS(Map<String, Object> mapDS) {
		this.mapDS = mapDS;
	}
	public Properties getInfoDS() {
		return infoDS;
	}
	public void setInfoDS(Properties infoDS) {
		this.infoDS = infoDS;
	}

	@Override
	public String toString() {

		String baseInfor="baseInfor:"+name+",age:"+age+", cat:"+cat;
		 String array="";
		 for(String s :arrayDS) {
			 array+=s;
		 }

		return "baseInfor--"+baseInfor+"\narray"+array +"\n map"+mapDS;
	}
}
applicationContext.xml 部分:
......................
<bean id="catBeanId02" class="priv.base.practice.Cat">
<property name="catName" value="linu"></property>
<property name="catColor" value="black"></property></bean>
<bean id="collectionBeanId" class="priv.base.practice.CollectionDemo">
<property name="id" value="01"></property>
<property name="name" value="collectionTest"></property>
<property name="age" value="99" ></property>
<property name="cat" ref="catBeanId02"></property><property name="arrayDS">
<array>
<value>dsArray_c++</value>
<value>dsArray_java</value>
<value>dsArray_python</value>
</array>
</property><property name="mapDS">
<map>
<entry>
<key>
<value>map_key_lanuage01</value>
</key>
<value>c++_mapV</value>
</entry>
<entry>
<key>
<value>map_key_lanuage02</value>
</key>
<value>java_mapV</value>
</entry>
<entry>
<key>
<value>map_key_lanuage03</value>
</key>
<value>python_mapV</value>
</entry>
</map>
</property></bean>
........
引用代码:
public static void collectionDITest() {
          ClassPathXmlApplicationContext ctx = new ClassPathXmlApplicationContext("applictionContext.xml");
          CollectionDemo  collection =   (CollectionDemo)ctx.getBean("collectionBeanId");
        String infor =collection.toString();
        System.out.println("infor: "+ infor);
    }
效果打印:
infor: baseInfor--baseInfor:collectionTest,age:99, cat:catName: linu ;catColor: black
arraydsArray_c++dsArray_javadsArray_python
map{map_key_lanuage01=c++_mapV, map_key_lanuage02=java_mapV, map_key_lanuage03=python_mapV}


 901
901


 被折叠的 条评论
为什么被折叠?
被折叠的 条评论
为什么被折叠?
 到【灌水乐园】发言


