


1:添加pom依赖
<!-- Spring Boot Redis依赖 -->
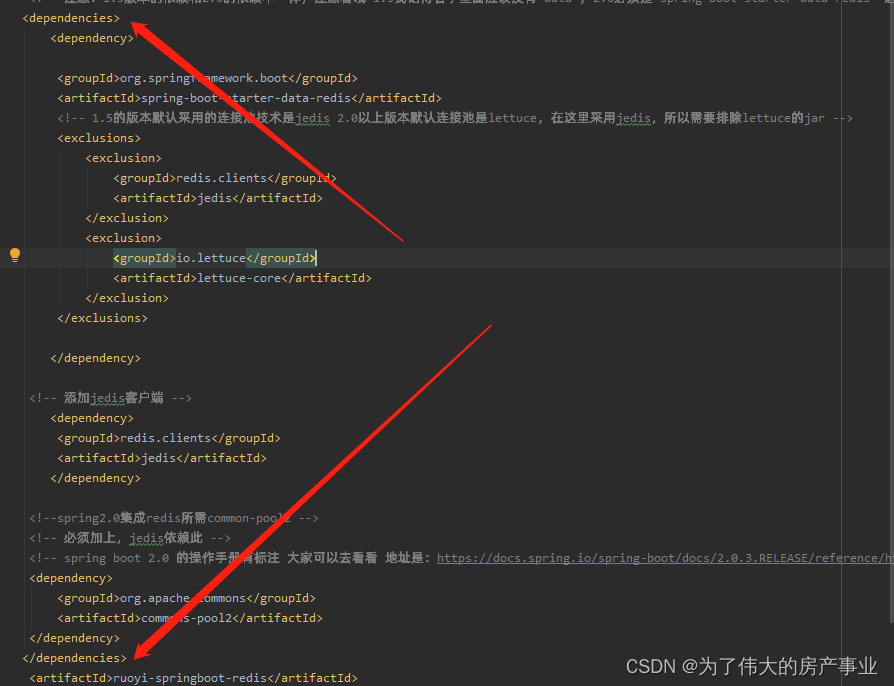
<!-- 注意:1.5版本的依赖和2.0的依赖不一样,注意看哦 1.5我记得名字里面应该没有“data”, 2.0必须是“spring-boot-starter-data-redis” 这个才行 -->
<dependency>
<groupId>org.springframework.boot</groupId>
<artifactId>spring-boot-starter-data-redis</artifactId>
<!-- 1.5的版本默认采用的连接池技术是jedis 2.0以上版本默认连接池是lettuce, 在这里采用jedis,所以需要排除lettuce的jar -->
<exclusions>
<exclusion>
<groupId>redis.clients</groupId>
<artifactId>jedis</artifactId>
</exclusion>
<exclusion>
<groupId>io.lettuce</groupId>
<artifactId>lettuce-core</artifactId>
</exclusion>
</exclusions>
</dependency>
<!-- 添加jedis客户端 -->
<dependency>
<groupId>redis.clients</groupId>
<artifactId>jedis</artifactId>
</dependency>
<!--spring2.0集成redis所需common-pool2 -->
<!-- 必须加上,jedis依赖此 -->
<!-- spring boot 2.0 的操作手册有标注 大家可以去看看 地址是:https://docs.spring.io/spring-boot/docs/2.0.3.RELEASE/reference/htmlsingle/ -->
<dependency>
<groupId>org.apache.commons</groupId>
<artifactId>commons-pool2</artifactId>
</dependency> 注意,如果其中的<dependency></dependency>报错,那么就在前面和后面加上</dependencies>如图
2:配置application.properties文件
#redis
spring.jpa.database=0
spring.redis.host=127.0.0.1
spring.redis.password=
spring.redis.port=6379
# 数据库连接超时时间,2.0 中该参数的类型为Duration,这里在配置的时候需要指明单位
spring.redis.timeout=10000

# 连接池配置,2.0中直接使用jedis或者lettuce配置连接池
# 最大活跃连接数,负数为不限制
spring.redis.jedis.pool.max-active=8
# 等待可用连接的最大时间,负数为不限制
spring.redis.jedis.pool.max-wait=-1
# 最大空闲连接数
spring.redis.jedis.pool.max-idle=8
# 最小空闲连接数
spring.redis.jedis.pool.min-idle=0
3:RedisConfiguration配置文件
package com.sjx.config;

import com.fasterxml.jackson.annotation.JsonAutoDetect;
import com.fasterxml.jackson.annotation.PropertyAccessor;
import com.fasterxml.jackson.databind.ObjectMapper;
import org.slf4j.Logger;
import org.slf4j.LoggerFactory;
import org.springframework.beans.factory.annotation.Autowired;
import org.springframework.beans.factory.annotation.Value;
import org.springframework.boot.context.properties.ConfigurationProperties;
import org.springframework.cache.Cache;
import org.springframework.cache.CacheManager;
import org.springframework.cache.annotation.CachingConfigurerSupport;
import org.springframework.cache.annotation.EnableCaching;
import org.springframework.cache.interceptor.CacheErrorHandler;
import org.springframework.cache.interceptor.KeyGenerator;
import org.springframework.context.annotation.Bean;
import org.springframework.context.annotation.Configuration;
import org.springframework.data.redis.cache.RedisCacheManager;
import org.springframework.data.redis.connection.jedis.JedisConnectionFactory;
import org.springframework.data.redis.core.RedisTemplate;
import org.springframework.data.redis.serializer.Jackson2JsonRedisSerializer;
import org.springframework.data.redis.serializer.RedisSerializer;
import org.springframework.data.redis.serializer.StringRedisSerializer;
import redis.clients.jedis.JedisPool;
import redis.clients.jedis.JedisPoolConfig;

/**
 * @ClassName: RedisConfiguration
 * @Description:TODO(这里用一句话描述这个类的作用)
 * @author: 沈均晓
 * @date: 2018年9月19日 上午11:18:33
 */
@Configuration
// 必须加,使配置生效
@EnableCaching
public class RedisConfiguration extends CachingConfigurerSupport {

	/**
	 * Logger
	 */
	private static final Logger logger = LoggerFactory.getLogger(RedisConfiguration.class);

	@Autowired
	private JedisConnectionFactory jedisConnectionFactory;

	@Bean
	public KeyGenerator keyGenerator() {
		// 设置自动key的生成规则,配置spring boot的注解,进行方法级别的缓存
		// 使用:进行分割,可以很多显示出层级关系
		// 这里其实就是new了一个KeyGenerator对象,只是这是lambda表达式的写法,我感觉很好用,大家感兴趣可以去了解下
		return (target, method, params) -> {
			StringBuilder sb = new StringBuilder();
			sb.append(target.getClass().getName());
			sb.append(":");
			sb.append(method.getName());
			for (Object obj : params) {
				sb.append(":" + String.valueOf(obj));
			}
			String rsToUse = String.valueOf(sb);
			logger.info("自动生成Redis Key -> [{}]", rsToUse);
			return rsToUse;
		};
	}

	@Bean
	public CacheManager cacheManager() {
		// 初始化缓存管理器,在这里我们可以缓存的整体过期时间什么的,我这里默认没有配置
		logger.info("初始化 -> [{}]", "CacheManager RedisCacheManager Start");
		RedisCacheManager.RedisCacheManagerBuilder builder = RedisCacheManager.RedisCacheManagerBuilder
				.fromConnectionFactory(jedisConnectionFactory);
		return builder.build();
	}

	@Bean
	public RedisTemplate<String, Object> redisTemplate(JedisConnectionFactory jedisConnectionFactory) {
		// 设置序列化
		Jackson2JsonRedisSerializer jackson2JsonRedisSerializer = new Jackson2JsonRedisSerializer(Object.class);
		ObjectMapper om = new ObjectMapper();
		om.setVisibility(PropertyAccessor.ALL, JsonAutoDetect.Visibility.ANY);
		om.enableDefaultTyping(ObjectMapper.DefaultTyping.NON_FINAL);
		jackson2JsonRedisSerializer.setObjectMapper(om);
		// 配置redisTemplate
		RedisTemplate<String, Object> redisTemplate = new RedisTemplate<String, Object>();
		redisTemplate.setConnectionFactory(jedisConnectionFactory);
		RedisSerializer stringSerializer = new StringRedisSerializer();
		redisTemplate.setKeySerializer(stringSerializer); // key序列化
		redisTemplate.setValueSerializer(jackson2JsonRedisSerializer); // value序列化
		redisTemplate.setHashKeySerializer(stringSerializer); // Hash key序列化
		redisTemplate.setHashValueSerializer(jackson2JsonRedisSerializer); // Hash value序列化
		redisTemplate.afterPropertiesSet();
		return redisTemplate;
	}

	@Override
	@Bean
	public CacheErrorHandler errorHandler() {
		// 异常处理,当Redis发生异常时,打印日志,但是程序正常走
		logger.info("初始化 -> [{}]", "Redis CacheErrorHandler");
		CacheErrorHandler cacheErrorHandler = new CacheErrorHandler() {
			@Override
			public void handleCacheGetError(RuntimeException e, Cache cache, Object key) {
				logger.error("Redis occur handleCacheGetError:key -> [{}]", key, e);
			}

			@Override
			public void handleCachePutError(RuntimeException e, Cache cache, Object key, Object value) {
				logger.error("Redis occur handleCachePutError:key -> [{}];value -> [{}]", key, value, e);
			}

			@Override
			public void handleCacheEvictError(RuntimeException e, Cache cache, Object key) {
				logger.error("Redis occur handleCacheEvictError:key -> [{}]", key, e);
			}

			@Override
			public void handleCacheClearError(RuntimeException e, Cache cache) {
				logger.error("Redis occur handleCacheClearError:", e);
			}
		};
		return cacheErrorHandler;
	}

	/**
	 * 此内部类就是把yml的配置数据,进行读取,创建JedisConnectionFactory和JedisPool,以供外部类初始化缓存管理器使用
	 * 不了解的同学可以去看@ConfigurationProperties和@Value的作用
	 *
	 */
	@ConfigurationProperties
	class DataJedisProperties {
		@Value("${spring.redis.host}")
		private String host;
		@Value("${spring.redis.password}")
		private String password;
		@Value("${spring.redis.port}")
		private int port;
		@Value("${spring.redis.timeout}")
		private int timeout;
		@Value("${spring.redis.jedis.pool.max-idle}")
		private int maxIdle;
		@Value("${spring.redis.jedis.pool.max-wait}")
		private long maxWaitMillis;

		@Bean
		JedisConnectionFactory jedisConnectionFactory() {
			logger.info("Create JedisConnectionFactory successful");
			JedisConnectionFactory factory = new JedisConnectionFactory();
			factory.setHostName(host);
			factory.setPort(port);
			factory.setTimeout(timeout);
			factory.setPassword(password);
			return factory;
		}

		@Bean
		public JedisPool redisPoolFactory() {
			logger.info("JedisPool init successful,host -> [{}];port -> [{}]", host, port);
			JedisPoolConfig jedisPoolConfig = new JedisPoolConfig();
			jedisPoolConfig.setMaxIdle(maxIdle);
			jedisPoolConfig.setMaxWaitMillis(maxWaitMillis);

			JedisPool jedisPool = new JedisPool(jedisPoolConfig, host, port, timeout, password);
			return jedisPool;
		}
	}

}
4、在实现类中使用
package com.sjx.service.impl;

import java.util.List;

import javax.annotation.Resource;

import org.springframework.beans.factory.annotation.Autowired;
import org.springframework.cache.annotation.Cacheable;
import org.springframework.data.redis.core.StringRedisTemplate;
import org.springframework.stereotype.Service;

import com.alibaba.fastjson.JSON;
import com.sjx.dao.AttachmentDao;
import com.sjx.entity.Attachment;
import com.sjx.service.AttachmentService;
import com.sjx.util.ResultMap;

@Service
public class AttachmentServiceImpl implements AttachmentService {

	@Resource
	private AttachmentDao attachmentdao;

	@Autowired
	StringRedisTemplate stringRedisTemplate;

	@Override
	public ResultMap insertSelective(Attachment attachment) {
		// TODO Auto-generated method stub
		int insert = attachmentdao.insert(attachment);
		if (insert < 0) {
			return ResultMap.error("添加失败");
		}
		return ResultMap.ok("添加成功");
	}

	@Override
	public ResultMap deleteByPrimaryKey(Long id) {
		// TODO Auto-generated method stub
		int deleteByPrimaryKey = attachmentdao.deleteByPrimaryKey(id);
		if (deleteByPrimaryKey < 0) {
			return ResultMap.error("删除失败");
		}
		return ResultMap.ok("删除成功");
	}

	@Override
	public ResultMap selectByPrimaryKey(Long id) {
		Attachment selectByPrimaryKey = attachmentdao.selectByPrimaryKey(id);
		stringRedisTemplate.opsForValue().append("attachment",JSON.toJSONString(selectByPrimaryKey));
		ResultMap resultMap = new ResultMap();
		resultMap.put("Attachment", selectByPrimaryKey);
		return resultMap;
	}

	@Override
	public ResultMap SelectiveSelectByAttachment(Attachment attachment) {
		List<Attachment> selectiveSelectByAttachment = attachmentdao.SelectiveSelectByAttachment(attachment);
		stringRedisTemplate.opsForList().leftPush("attachmentList", JSON.toJSONString(selectiveSelectByAttachment));
		ResultMap resultMap = new ResultMap();
		resultMap.put("Attachment", selectiveSelectByAttachment);
		return resultMap;
	}

	@Override
	public ResultMap updateByPrimaryKeySelective(Attachment attachment) {
		int updateByPrimaryKeySelective = attachmentdao.updateByPrimaryKeySelective(attachment);
		if (updateByPrimaryKeySelective < 0) {
			return ResultMap.error("更新失败");
		}
		return ResultMap.ok("更新成功");
	}

}
此篇文章借鉴CSDN博主:Shen_Junxiao
具体操作可以去他的文章查看,谢谢。(19条消息) SpringBoot使用redis详尽教程_springboot 默认关闭redis_Shen_Junxiao的博客-CSDN博客


 4532
4532


 被折叠的 条评论
为什么被折叠?
被折叠的 条评论
为什么被折叠?
 到【灌水乐园】发言


