SpringBoot中MybatisX插件的简单使用教程(超详细!!)

本文介绍了MybatisX,一款基于IDEA的插件,旨在简化Mybatis和Mybatis-Plus的开发流程。通过创建数据库和Springboot工程,引入Mybatis-Plus依赖,并配置MybatisX,可以快速生成持久层代码。此外,文章还展示了如何使用Mybatis-Plus的条件构造器进行查询,以及配置数据库连接。整个过程大大提高了开发效率。

摘要生成于 C知道 ,由 DeepSeek-R1 满血版支持, 前往体验 >

1.什么是MybatisX?

    MybatisX 是一款基于 IDEA 的快速开发插件,方便在使用mybatis以及mybatis-plus开始时简化繁琐的重复操作,提高开发速率。


2.使用MybatisX的好处

  • 节省大量持久层代码开发时间

  • 强大的功能为业务编写提供各类支持

  • 配置简单,告别各类复杂的配置文件 

3.如何使用MybatisX?

     1.创建一个简单的数据库

    2.创建一个简单的Springboot工程


3.在pom.xml文件中引入mybatis-plus依赖

pom.xml

        <!--mybatisPlus-->
        <dependency>
            <groupId>com.baomidou</groupId>
            <artifactId>mybatis-plus-boot-starter</artifactId>
            <version>3.5.1</version>
        </dependency>


4.在File->Settings->Plugins下载MybatiX插件 


 5.两下SHIFT键搜索database进入数据库

6.新建Mysql连接 


 输入用户、密码及数据库名


 当Test Connection时会提示这么一段话:这是时区未设置问题


 根据提示来到Advanced,找到severTimezone,将其设置为GMT(Greenwich Mean Time 格林尼治标准时间)


此时再测试连接会发现已经成功

 这时候我们就可以看见我们想要连接的数据库和其对应的表等信息了 
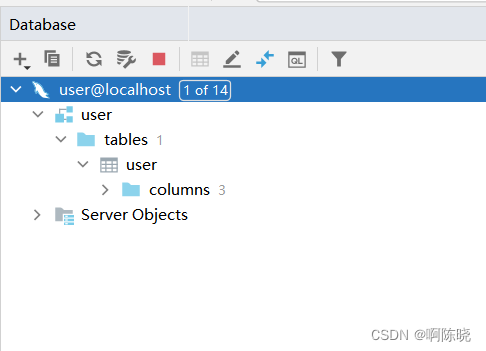
     右键对应的表,我们可以看到MybatiX-Generator


   点击后我们会看到这样一个页面,我们可以在这个页面中设置需要消除的前后缀、文件存放目录等...


点击Next,在下面是一些配置,我们勾选Mybatis-Plus的最新版本Mybatix-Plus 3 和 简化开发的Lombok 


  点击Finish,我们可以看到MybatisX为我们自动生成了该表对应的实体类、Mapper文件、Service和相对应的接口


在yaml中对数据库进行配置:

application.yaml

spring:
  datasource:
    driver-class-name: com.mysql.cj.jdbc.Driver
    url: jdbc:mysql://localhost:3306/user?characterEncoding=utf-8&useSSL=false&serverTimezone=GMT
    username: root
    password: password

控制层编写方法,使用到Mybatis-Plus中的条件构造器:

package com.example.mybatixtest.controller;

import com.baomidou.mybatisplus.core.conditions.query.QueryWrapper;
import com.example.mybatixtest.pojo.User;
import com.example.mybatixtest.service.UserService;
import org.springframework.beans.factory.annotation.Autowired;
import org.springframework.web.bind.annotation.GetMapping;
import org.springframework.web.bind.annotation.RestController;

@RestController
public class TestController {

    @Autowired
    UserService userService;

    @GetMapping("/test")
    public User test(){
        QueryWrapper<User> userQueryWrapper = new QueryWrapper<>();
        userQueryWrapper.eq("user_id",1);
        User user = userService.getOne(userQueryWrapper);
        return user;
    }


}


访问成功 


至此,MybatiX整合springboot的简单配置结束!!

希望我的文章能给大家带来一些收获~感谢阅读!

MybatisPlus 是 Mybatis 的增强工具,可以简化 Mybatis 的开发。MybatisX 是一款 Mybatis 开发插件,可以提高 Mybatis 的开发效率。下面是 MybatisPlus+SpringBoot+MybatisX 的联合步骤: 1. 在 pom.xml 文件中添加 MybatisPlus 和 MybatisX 的依赖。 ```xml <!-- MybatisPlus --> <dependency> <groupId>com.baomidou</groupId> <artifactId>mybatis-plus-boot-starter</artifactId> <version>3.4.3.1</version> </dependency> <!-- MybatisX --> <dependency> <groupId>io.github.mybatisx</groupId> <artifactId>mybatisx-boot-starter</artifactId> <version>2.1.0</version> </dependency> ``` 2. 配置 MybatisPlus 和 MybatisX。 ```java @Configuration public class MybatisConfig { @Bean public PaginationInterceptor paginationInterceptor() { return new PaginationInterceptor(); } @Bean public MybatisXConfigurer mybatisXConfigurer() { return new MybatisXConfigurer(); } } ``` 3. 编写实体类和 Mapper 接口,使用 MybatisPlus 提供的注解。 ```java @Data @TableName("user") public class User { @TableId(type = IdType.AUTO) private Long id; private String username; private String password; } public interface UserMapper extends BaseMapper<User> { } ``` 4. 在 application.yml 中配置数据库连接信息和 MybatisPlus 的相关信息。 ```yaml spring: datasource: driver-class-name: com.mysql.cj.jdbc.Driver url: jdbc:mysql://localhost:3306/test?useUnicode=true&characterEncoding=utf-8&serverTimezone=GMT%2B8 username: root password: root mybatis-plus: mapper-locations: classpath:/mapper/*Mapper.xml type-aliases-package: com.example.demo.entity global-config: db-config: id-type: auto field-strategy: not_null logic-delete-value: 1 logic-not-delete-value: 0 configuration: map-underscore-to-camel-case: true cache-enabled: false mybatisx: enabled: true ``` 5. 在 Controller 中使用 Mapper 接口进行数据库操作。 ```java @RestController public class UserController { @Autowired private UserMapper userMapper; @GetMapping("/user/{id}") public User getUser(@PathVariable("id") Long id) { return userMapper.selectById(id); } @PostMapping("/user") public boolean addUser(@RequestBody User user) { return userMapper.insert(user) > 0; } @PutMapping("/user") public boolean updateUser(@RequestBody User user) { return userMapper.updateById(user) > 0; } @DeleteMapping("/user/{id}") public boolean deleteUser(@PathVariable("id") Long id) { return userMapper.deleteById(id) > 0; } } ``` 这样,就完成了 MybatisPlus+SpringBoot+MybatisX 的整合。在 Controller 中,可以直接注入 Mapper 接口进行数据库操作。
评论 20
添加红包

请填写红包祝福语或标题

红包个数最小为10个

红包金额最低5元

当前余额3.43前往充值 >
需支付:10.00
成就一亿技术人!
领取后你会自动成为博主和红包主的粉丝 规则
hope_wisdom
发出的红包

打赏作者

啊陈晓

你的鼓励将是我创作的最大动力

¥1 ¥2 ¥4 ¥6 ¥10 ¥20
扫码支付:¥1
获取中
扫码支付

您的余额不足,请更换扫码支付或充值

打赏作者

实付
使用余额支付
点击重新获取
扫码支付
钱包余额 0

抵扣说明:

1.余额是钱包充值的虚拟货币,按照1:1的比例进行支付金额的抵扣。
2.余额无法直接购买下载,可以购买VIP、付费专栏及课程。

余额充值