


7.1 CI/CD 持续集成/持续交付_Git分布式版本控制系统
7.2 CI/CD 持续集成/持续交付_GitLab代码仓库
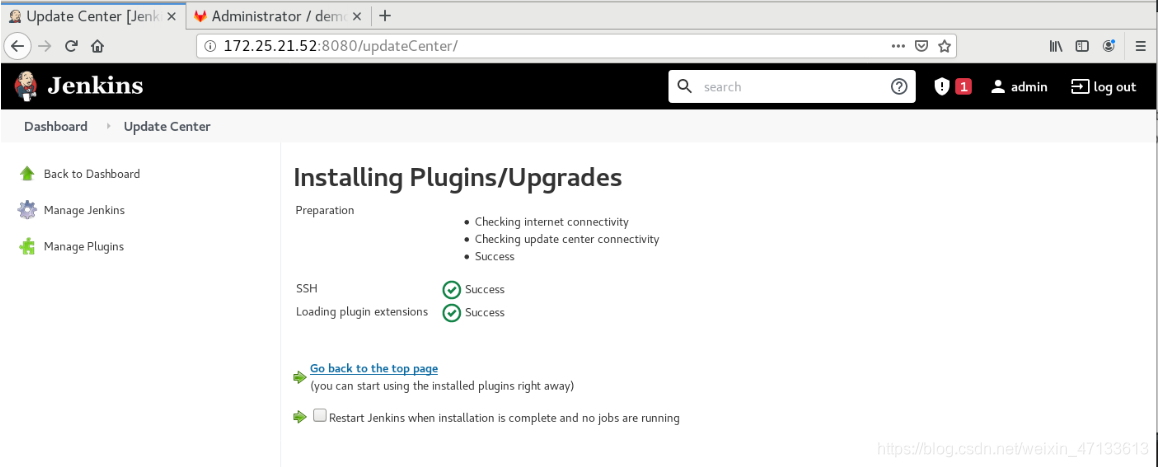
7.3 CI/CD 持续集成/持续交付_Jenkins整合Git 容器镜像
7.4 CI/CD 持续集成/持续交付_Jenkins部署远程仓库和企业级仓库 Jenkins实现参数化构建
1. 上传容器镜像到仓库
- 先确定服务是否正常
- GitLab正常
[root@server51 ~]# gitlab-ctl status
run: alertmanager: (pid 3562) 165s; run: log: (pid 3561) 165s
run: gitaly: (pid 3546) 165s; run: log: (pid 3545) 165s
run: gitlab-exporter: (pid 3574) 165s; run: log: (pid 3571) 165s
run: gitlab-workhorse: (pid 3555) 165s; run: log: (pid 3554) 165s
run: grafana: (pid 3587) 165s; run: log: (pid 3585) 165s
run: logrotate: (pid 3569) 165s; run: log: (pid 3568) 165s
run: nginx: (pid 3548) 165s; run: log: (pid 3547) 165s
run: node-exporter: (pid 3560) 165s; run: log: (pid 3559) 165s
run: postgres-exporter: (pid 3586) 165s; run: log: (pid 3584) 165s
run: postgresql: (pid 3550) 165s; run: log: (pid 3549) 165s
run: prometheus: (pid 3566) 165s; run: log: (pid 3565) 165s
run: puma: (pid 3572) 165s; run: log: (pid 3567) 165s
run: redis: (pid 3540) 165s; run: log: (pid 3538) 165s
run: redis-exporter: (pid 3564) 165s; run: log: (pid 3563) 165s
run: sidekiq: (pid 3573) 165s; run: log: (pid 3570) 165s
- 删除之前的demo镜像
[root@server52 ~]# docker images
REPOSITORY                 TAG                 IMAGE ID            CREATED             SIZE
localhost:5000/webserver   7                   35ec4ba474e8        9 hours ago         133MB
localhost:5000/webserver   8                   35ec4ba474e8        9 hours ago         133MB
localhost:5000/webserver   latest              35ec4ba474e8        9 hours ago         133MB
localhost:5000/webserver   5                   9d8f2817c33a        9 hours ago         133MB
localhost:5000/webserver   6                   9d8f2817c33a        9 hours ago         133MB
nginx                      latest              f0b8a9a54136        3 days ago          133MB
[root@server52 ~]# docker ps -a
CONTAINER ID        IMAGE               COMMAND                  CREATED             STATUS                   PORTS               NAMES
a13c63227ff5        9d8f2817c33a        "/docker-entrypoint.…"   9 hours ago         Exited (0) 9 hours ago                       demo
[root@server52 ~]# docker rm -f demo
demo
[root@server52 ~]# docker ps -a
CONTAINER ID        IMAGE               COMMAND             CREATED             STATUS              PORTS               NAMES
- 虚拟机正常上网,可以拉取镜像
[root@server52 ~]# ping 14.215.177.38
PING 14.215.177.38 (14.215.177.38) 56(84) bytes of data.
64 bytes from 14.215.177.38: icmp_seq=1 ttl=52 time=268 ms
64 bytes from 14.215.177.38: icmp_seq=2 ttl=52 time=105 ms
64 bytes from 14.215.177.38: icmp_seq=3 ttl=52 time=314 ms
- 拉取registry镜像
注意registry的挂载点/var/lib/registry
[root@server52 ~]# docker pull registry
Using default tag: latest
latest: Pulling from library/registry
ddad3d7c1e96: Pull complete
6eda6749503f: Pull complete
363ab70c2143: Pull complete
5b94580856e6: Pull complete
12008541203a: Pull complete
Digest: sha256:bac2d7050dc4826516650267fe7dc6627e9e11ad653daca0641437abdf18df27
Status: Downloaded newer image for registry:latest
docker.io/library/registry:latest
[root@server52 ~]# docker history registry:latest
IMAGE               CREATED             CREATED BY                                      SIZE                COMMENT
1fd8e1b0bb7e        4 weeks ago         /bin/sh -c #(nop)  CMD ["/etc/docker/registr…   0B
<missing>           4 weeks ago         /bin/sh -c #(nop)  ENTRYPOINT ["/entrypoint.…   0B
<missing>           4 weeks ago         /bin/sh -c #(nop) COPY file:507caa54f88c1f38…   155B
<missing>           4 weeks ago         /bin/sh -c #(nop)  EXPOSE 5000                  0B
<missing>           4 weeks ago         /bin/sh -c #(nop)  VOLUME [/var/lib/registry]   0B
<missing>           4 weeks ago         /bin/sh -c #(nop) COPY file:4544cc1555469403…   295B
<missing>           4 weeks ago         /bin/sh -c #(nop) COPY file:21256ff7df5369f7…   20.1MB
<missing>           4 weeks ago         /bin/sh -c set -ex     && apk add --no-cache…   549kB
<missing>           4 weeks ago         /bin/sh -c #(nop)  CMD ["/bin/sh"]              0B
<missing>           4 weeks ago         /bin/sh -c #(nop) ADD file:282b9d56236cae296…   5.62MB
- registry仓库搭建完成
-v:挂载位置
-p:端口映射5000:5000
[root@server52 ~]# docker run -d --name registry -v /opt/registry:/var/lib/registry -p 5000:5000 registry
9dbc5071a78ef20a0ccb4b45e8dbe4df3bb39e7c08da6cd4e9bb4a285283e993
- 查看运行的镜像
注意镜像的名字:仓库的地址+镜像的名称=镜像名称
[root@server52 ~]# docker ps
CONTAINER ID        IMAGE               COMMAND                  CREATED             STATUS              PORTS                    NAMES
9dbc5071a78e        registry            "/entrypoint.sh /etc…"   20 seconds ago      Up 18 seconds       0.0.0.0:5000->5000/tcp   registry
[root@server52 ~]# docker images
REPOSITORY                 TAG                 IMAGE ID            CREATED             SIZE
localhost:5000/webserver   7                   35ec4ba474e8        9 hours ago         133MB
localhost:5000/webserver   8                   35ec4ba474e8        9 hours ago         133MB
localhost:5000/webserver   latest              35ec4ba474e8        9 hours ago         133MB
localhost:5000/webserver   5                   9d8f2817c33a        10 hours ago        133MB
localhost:5000/webserver   6                   9d8f2817c33a        10 hours ago        133MB
nginx                      latest              f0b8a9a54136        3 days ago          133MB
registry                   latest              1fd8e1b0bb7e        4 weeks ago         26.2MB
- 编辑test项目
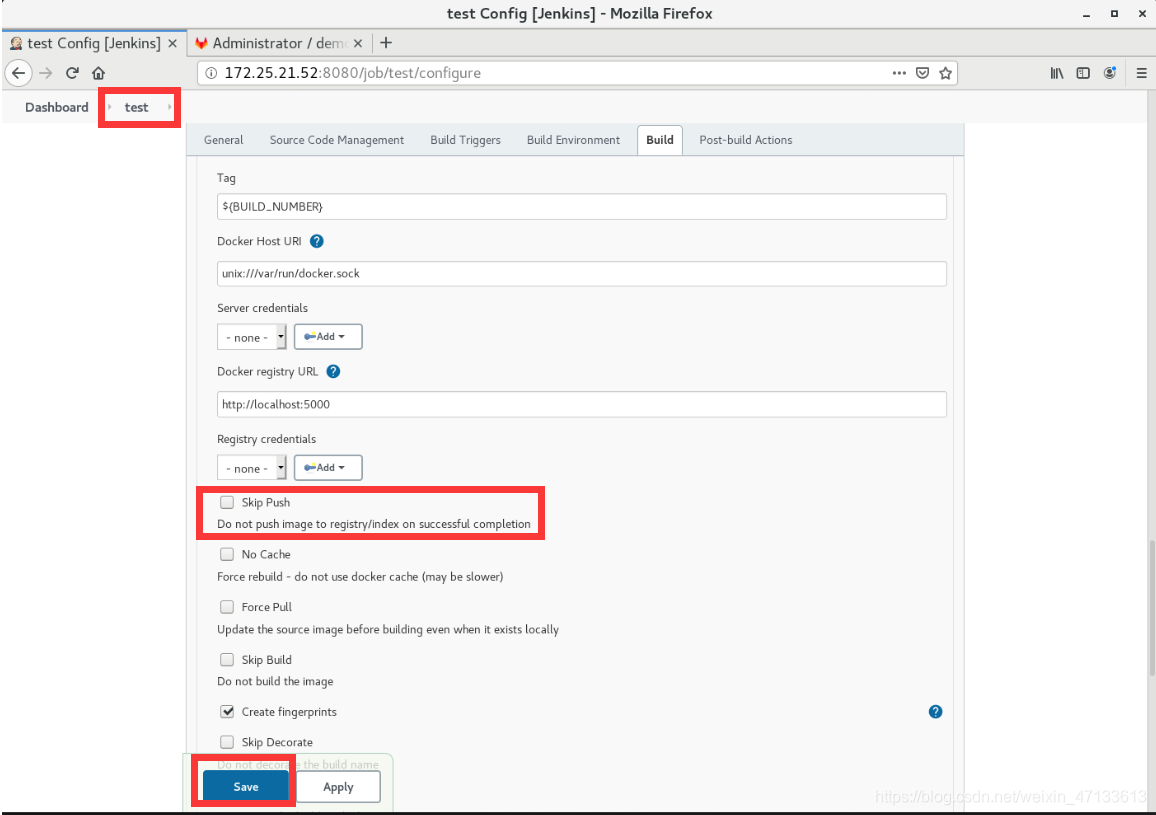
- 测试:手动触发
注意:这里有可能出现报错
docker重启之后,docker引擎的权限会变化
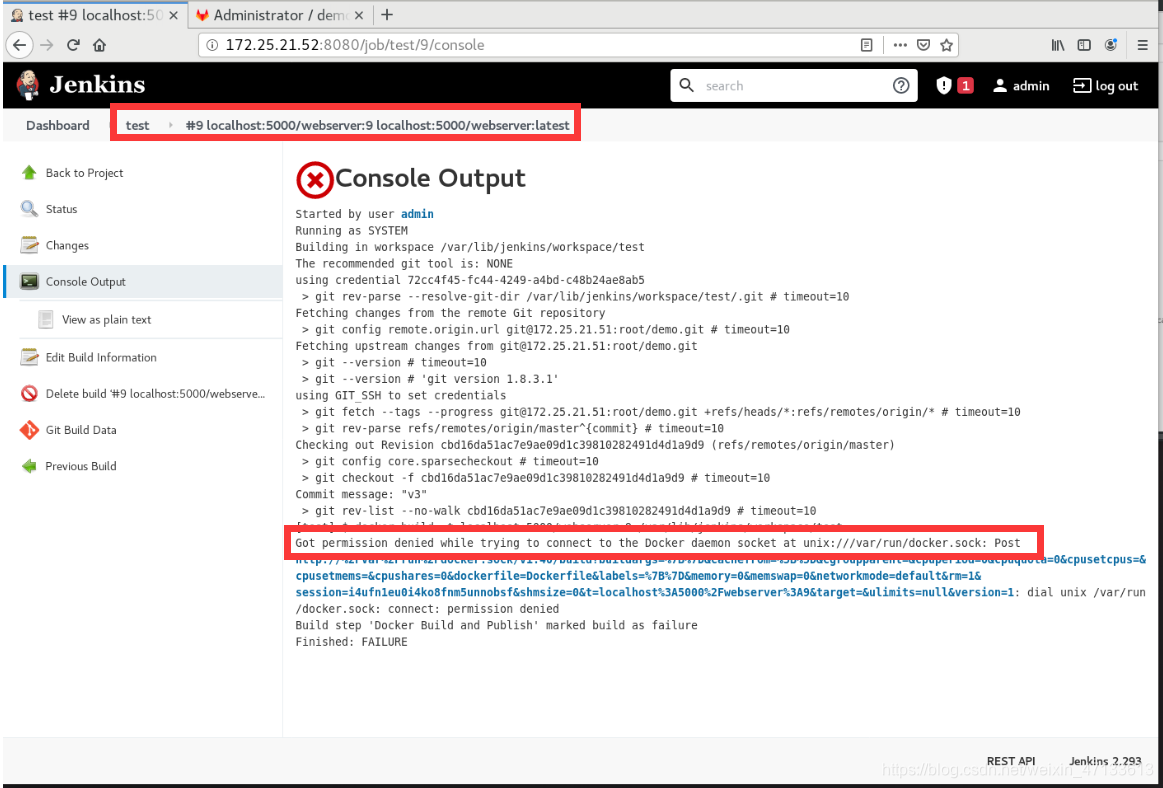 解决方法:改权限
[root@server52 ~]# ll /var/run/docker.sock
srw-rw---- 1 root docker 0 May 16 09:39 /var/run/docker.sock
[root@server52 ~]# usermod -G docker jenkins
[root@server52 ~]# chmod 777 /var/run/docker.sock
[root@server52 ~]# ll /var/run/docker.sock
srwxrwxrwx 1 root docker 0 May 16 09:39 /var/run/docker.sock
此时再去手动触发,就会成功

查看运行的镜像,发现这3个镜像都指向同一个标签。因为,镜像没有什么变化。在抓取数据时,使用的是Cache
[root@server52 ~]# docker images
REPOSITORY                 TAG                 IMAGE ID            CREATED             SIZE
localhost:5000/webserver   10                  35ec4ba474e8        10 hours ago        133MB
localhost:5000/webserver   7                   35ec4ba474e8        10 hours ago        133MB
localhost:5000/webserver   8                   35ec4ba474e8        10 hours ago        133MB
localhost:5000/webserver   latest              35ec4ba474e8        10 hours ago        133MB
localhost:5000/webserver   5                   9d8f2817c33a        10 hours ago        133MB
localhost:5000/webserver   6                   9d8f2817c33a        10 hours ago        133MB
nginx                      latest              f0b8a9a54136        3 days ago          133MB
registry                   latest              1fd8e1b0bb7e        4 weeks ago         26.2MB
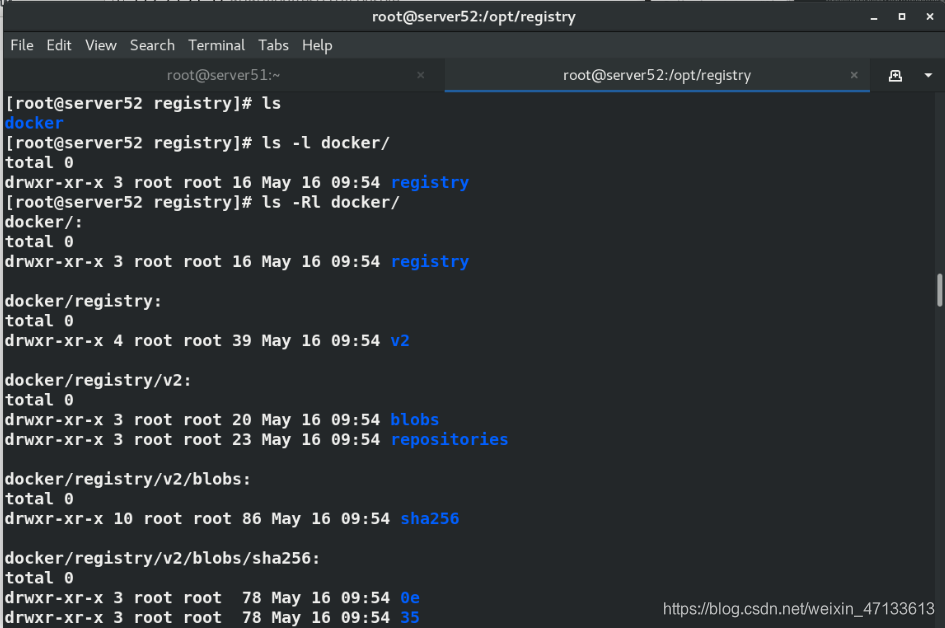
进入镜像的搭载点,也能看到对应的目录
[root@server52 ~]# cd /opt/registry/
[root@server52 registry]# ls
docker
[root@server52 registry]# ls -l docker/
total 0
drwxr-xr-x 3 root root 16 May 16 09:54 registry
[root@server52 registry]# ls -Rl docker/
docker/:
total 0
drwxr-xr-x 3 root root 16 May 16 09:54 registry

docker/registry:
total 0
drwxr-xr-x 4 root root 39 May 16 09:54 v2

docker/registry/v2:
total 0
drwxr-xr-x 3 root root 20 May 16 09:54 blobs
drwxr-xr-x 3 root root 23 May 16 09:54 repositories
......
- 测试:自动触发
当前docker项目会一直关注test项目。
如果test项目正常触发,那么docker项目才会触发
- 先在本地测试一下,看Jenkins用户是否可以执行
注意:docker的权限是不允许普通用户直接使用docker。但是,之前已经将Jenkins用户加入到docker组里面了,所以,这里不需要担心这个问题 - 修改Jenkins的shell,并测试Jenkins用户是否可以使用docker
[root@server52 registry]# cat /etc/passwd | grep jenkins
jenkins:x:998:996:Jenkins Automation Server:/var/lib/jenkins:/bin/false
[root@server52 registry]# usermod -s /bin/bash jenkins
[root@server52 registry]# su - jenkins
-bash-4.2$ id
uid=998(jenkins) gid=996(jenkins) groups=996(jenkins),994(docker)
-bash-4.2$ docker images
REPOSITORY                 TAG                 IMAGE ID            CREATED             SIZE
localhost:5000/webserver   10                  35ec4ba474e8        10 hours ago        133MB
localhost:5000/webserver   7                   35ec4ba474e8        10 hours ago        133MB
localhost:5000/webserver   8                   35ec4ba474e8        10 hours ago        133MB
localhost:5000/webserver   latest              35ec4ba474e8        10 hours ago        133MB
localhost:5000/webserver   5                   9d8f2817c33a        10 hours ago        133MB
localhost:5000/webserver   6                   9d8f2817c33a        10 hours ago        133MB
nginx                      latest              f0b8a9a54136        3 days ago          133MB
registry                   latest              1fd8e1b0bb7e        4 weeks ago         26.2MB
-bash-4.2$ docker run -d --name demo -p 80:80 localhost:5000/webserver
662d2aea648c6d5f982145322351259aab00f4023bbc06590a478f38fbf7c3c0
-bash-4.2$ docker ps
CONTAINER ID        IMAGE                      COMMAND                  CREATED             STATUS              PORTS                    NAMES
662d2aea648c        localhost:5000/webserver   "/docker-entrypoint.…"   37 seconds ago      Up 23 seconds       0.0.0.0:80->80/tcp       demo
9dbc5071a78e        registry                   "/entrypoint.sh /etc…"   11 minutes ago      Up 11 minutes       0.0.0.0:5000->5000/tcp   registry
-bash-4.2$ curl localhost
www.westos.org
www.westos.org
www.westos.org
www.westos.org
www.westos.org
www.westos.org
-bash-4.2$ docker rm -f demo
demo
-bash-4.2$ docker ps
CONTAINER ID        IMAGE               COMMAND                  CREATED             STATUS              PORTS                    NAMES
9dbc5071a78e        registry            "/entrypoint.sh /etc…"   11 minutes ago      Up 11 minutes       0.0.0.0:5000->5000/tcp   registry
-
测试完成之后,新建任务
-
新建任务docker(自由风格)
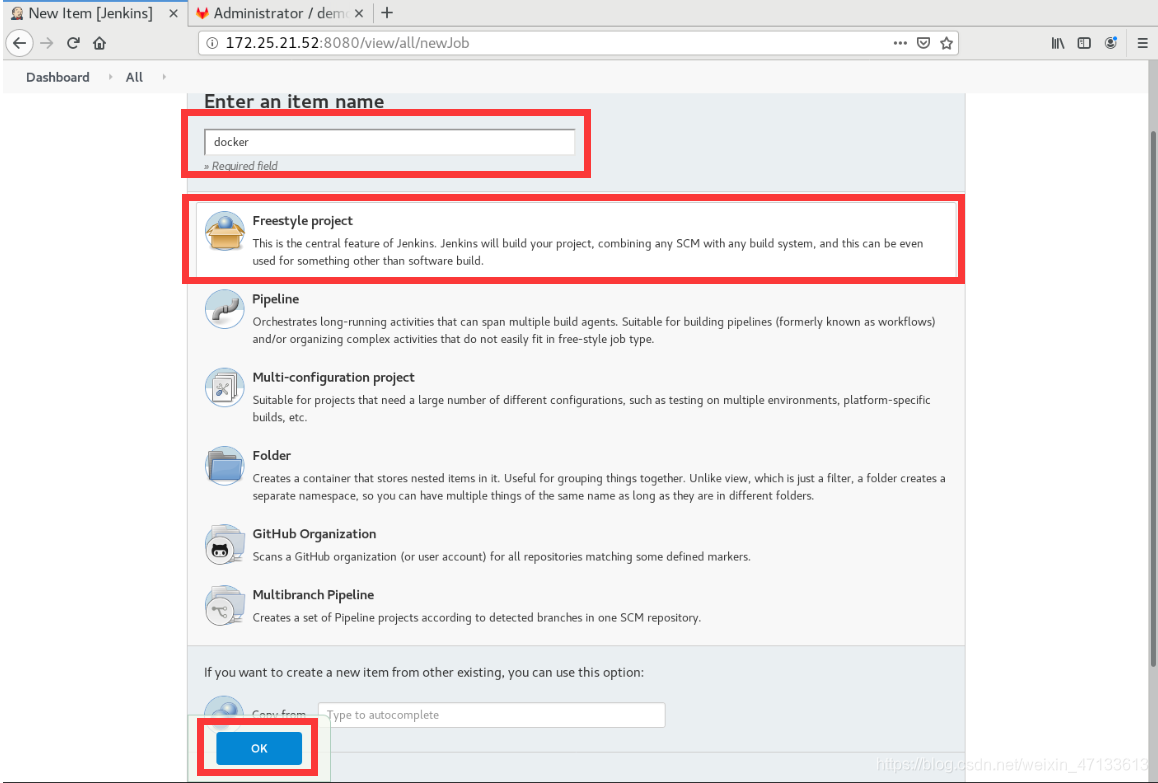
-
- 不需要Git
-
- 构建触发器(其他工程构建后触发)
关注test项目,只有test构建成功时,才会触发事件
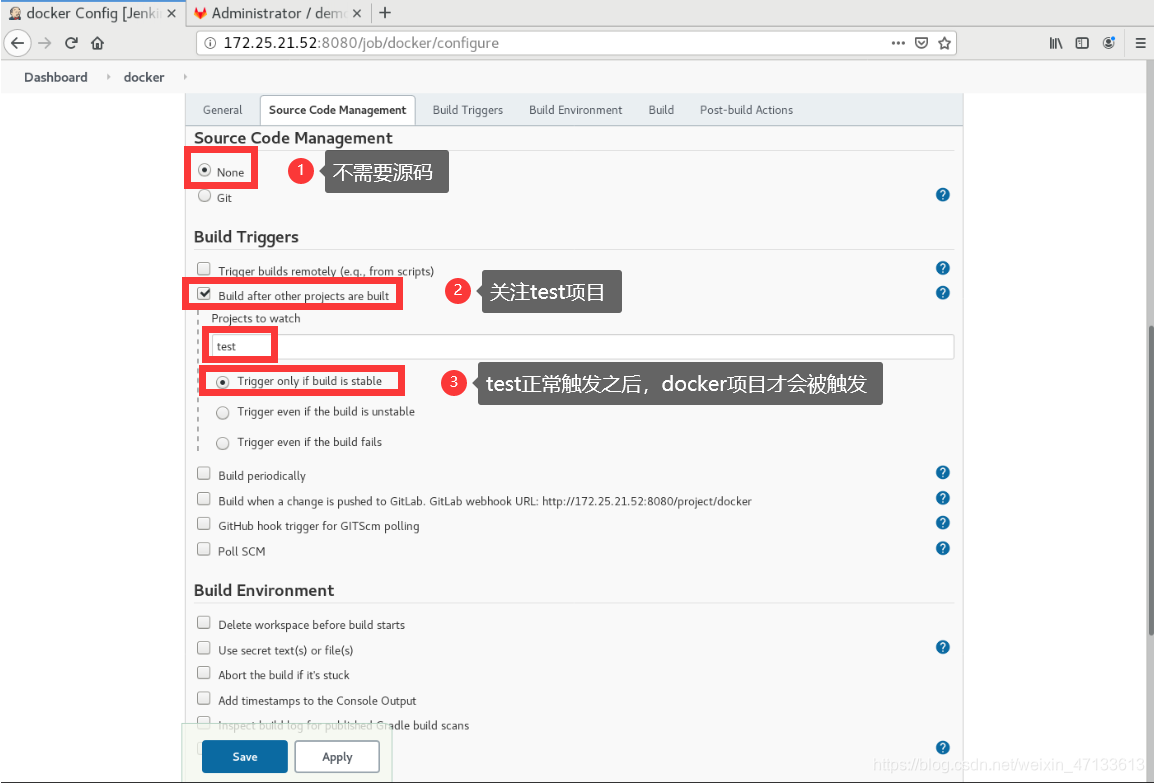
- 构建触发器(其他工程构建后触发)
-
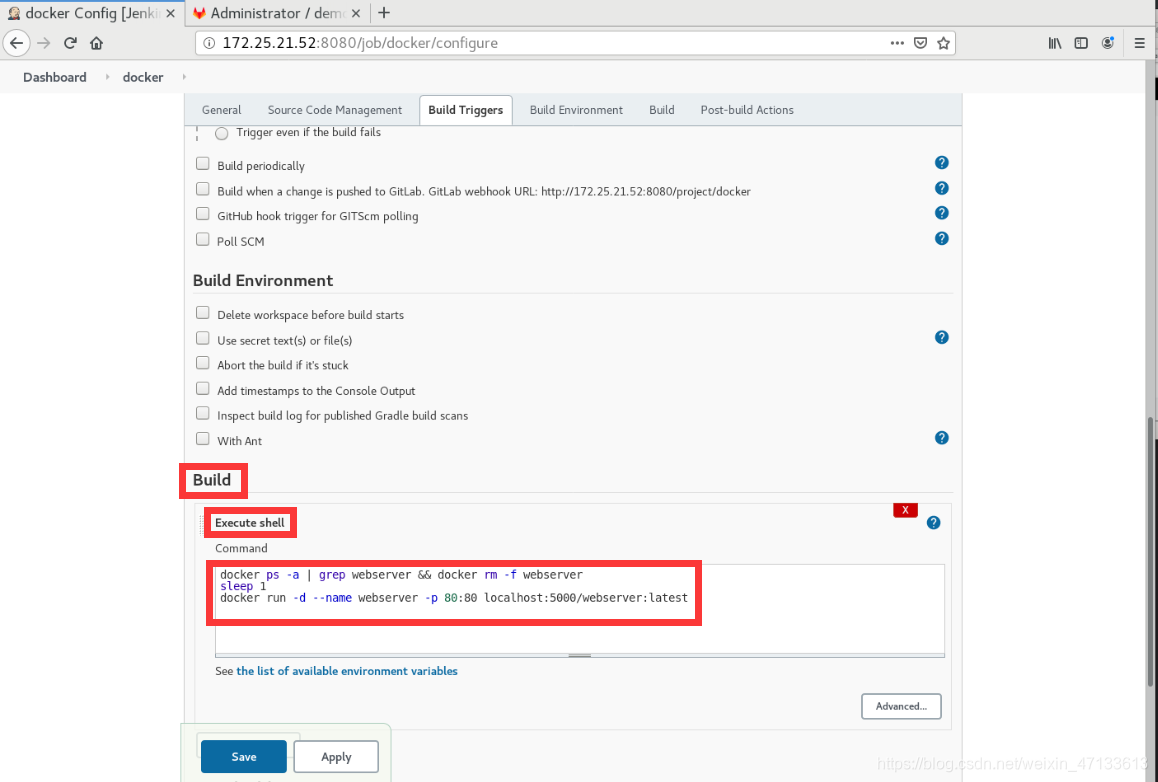
- 构建(shell)
先过滤一下,如果webserver这个进程存在,则删除
休眠1秒
之后,再建立一个新的容器镜像
Q:为什么要有删除的操作
A:因为shell脚本中定义的容器名字必须唯一。
- 构建(shell)
docker ps -a | grep webserver && docker rm -f webserver
sleep 1
docker run -d --name webserver -p 80:80 localhost:5000/webserver:latest
- 检测docker项目,手动触发
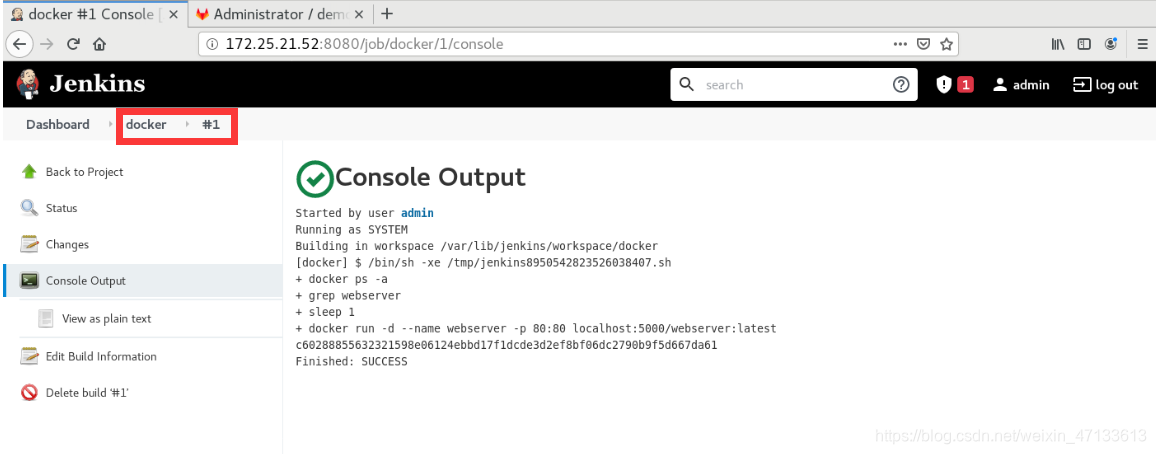
【test运行成功,上传镜像到仓库,docker测试镜像是否OK,并运行】
[root@server52 registry]# docker ps
CONTAINER ID        IMAGE                             COMMAND                  CREATED              STATUS              PORTS                    NAMES
c60288855632        localhost:5000/webserver:latest   "/docker-entrypoint.…"   About a minute ago   Up About a minute   0.0.0.0:80->80/tcp       webserver
9dbc5071a78e        registry                          "/entrypoint.sh /etc…"   17 minutes ago       Up 16 minutes       0.0.0.0:5000->5000/tcp   registry
[root@server52 registry]# curl localhost
www.westos.org
www.westos.org
www.westos.org
www.westos.org
www.westos.org
www.westos.org
用户通过git版本控制系统,把代码push到gitlab中,gitlab触发Jenkins Jenkins首先触发test项目(从dockerfile文件中构建image镜像,并push镜像到registry) 完成之后,去触发docker项目,运行容器
2. 部署远程仓库
第3台虚拟机server53,作为生产环境
在server53上去做远程部署
- server53的docker环境部署
安装dcoker-ce
- 将server52上docker的yum源拷贝到server53上
[root@server52 registry]# cd /etc/yum.repos.d/
[root@server52 yum.repos.d]# ls
docker.repo  redhat.repo  rhel7.repo
[root@server52 yum.repos.d]# scp docker.repo root@172.25.21.53:/etc/yum.repos.d/
[root@server53 ~]# yum install -y docker-ce
- server52上
/etc/sysctl.d/docker.conf发送到server53上
[root@server52 sysctl.d]# scp docker.conf root@172.25.21.53:/etc/sysctl.d/
- server53激活服务
[root@server53 ~]# sysctl --system
* Applying /usr/lib/sysctl.d/00-system.conf ...
* Applying /usr/lib/sysctl.d/10-default-yama-scope.conf ...
kernel.yama.ptrace_scope = 0
* Applying /usr/lib/sysctl.d/50-default.conf ...
kernel.sysrq = 16
kernel.core_uses_pid = 1
net.ipv4.conf.default.rp_filter = 1
net.ipv4.conf.all.rp_filter = 1
net.ipv4.conf.default.accept_source_route = 0
net.ipv4.conf.all.accept_source_route = 0
net.ipv4.conf.default.promote_secondaries = 1
net.ipv4.conf.all.promote_secondaries = 1
fs.protected_hardlinks = 1
fs.protected_symlinks = 1
* Applying /etc/sysctl.d/99-sysctl.conf ...
* Applying /etc/sysctl.d/docker.conf ...
* Applying /etc/sysctl.conf ...
- 开机自启docker
[root@server53 ~]# systemctl enable --now docker
Created symlink from /etc/systemd/system/multi-user.target.wants/docker.service to /usr/lib/systemd/system/docker.service.
[root@server53 ~]# docker info
Client:
 Debug Mode: false

Server:
 Containers: 0
  Running: 0
  Paused: 0
  Stopped: 0
 Images: 0
 Server Version: 19.03.15
 Storage Driver: overlay2
  Backing Filesystem: xfs
  Supports d_type: true
  Native Overlay Diff: true
 Logging Driver: json-file
 Cgroup Driver: cgroupfs
 Plugins:
  Volume: local
  Network: bridge host ipvlan macvlan null overlay
  Log: awslogs fluentd gcplogs gelf journald json-file local logentries splunk syslog
 Swarm: inactive
 Runtimes: runc
 Default Runtime: runc
 Init Binary: docker-init
 containerd version: 05f951a3781f4f2c1911b05e61c160e9c30eaa8e
 runc version: 12644e614e25b05da6fd08a38ffa0cfe1903fdec
 init version: fec3683
 Security Options:
  seccomp
   Profile: default
 Kernel Version: 3.10.0-957.el7.x86_64
 Operating System: Red Hat Enterprise Linux Server 7.6 (Maipo)
 OSType: linux
 Architecture: x86_64
 CPUs: 2
 Total Memory: 991MiB
 Name: server53
 ID: V7A2:C2XE:VT46:FWHN:5PZ2:GUBD:74N2:T6HG:BBT4:CF3O:7XFN:WNTI
 Docker Root Dir: /var/lib/docker
 Debug Mode: false
 Registry: https://index.docker.io/v1/
 Labels:
 Experimental: false
 Insecure Registries:
  127.0.0.0/8
 Live Restore Enabled: false
- 删除之前server52上的webserver镜像
[root@server52 sysctl.d]# docker ps
CONTAINER ID        IMAGE                             COMMAND                  CREATED             STATUS              PORTS                    NAMES
c60288855632        localhost:5000/webserver:latest   "/docker-entrypoint.…"   About an hour ago   Up About an hour    0.0.0.0:80->80/tcp       webserver
9dbc5071a78e        registry                          "/entrypoint.sh /etc…"   About an hour ago   Up About an hour    0.0.0.0:5000->5000/tcp   registry
[root@server52 sysctl.d]# docker rm -f webserver
webserver
- 手动执行:server53到server52上拉取镜像
-
注意:
现在仓库在server52上,server53要去server52上拉取。
直接拉取会被拒绝,因为默认拉取路径走的是443端口(https)
但是,因为当前实验环境是内网,所以,我们可以设定就走80端口(http) -
告诉docker可以走非安全端口去拉取数据
[root@server53 ~]# vim /etc/docker/daemon.json
{
        "insecure-registries": ["172.25.21.52:5000"]
}
- reload之后docker info 可以查看到设定被加载
[root@server53 ~]# systemctl reload docker.service
[root@server53 ~]# docker info
Client:
 Debug Mode: false

Server:
 Containers: 0
  Running: 0
  Paused: 0
  Stopped: 0
 Images: 0
 Server Version: 19.03.15
 Storage Driver: overlay2
  Backing Filesystem: xfs
  Supports d_type: true
  Native Overlay Diff: true
 Logging Driver: json-file
 Cgroup Driver: cgroupfs
 Plugins:
  Volume: local
  Network: bridge host ipvlan macvlan null overlay
  Log: awslogs fluentd gcplogs gelf journald json-file local logentries splunk syslog
 Swarm: inactive
 Runtimes: runc
 Default Runtime: runc
 Init Binary: docker-init
 containerd version: 05f951a3781f4f2c1911b05e61c160e9c30eaa8e
 runc version: 12644e614e25b05da6fd08a38ffa0cfe1903fdec
 init version: fec3683
 Security Options:
  seccomp
   Profile: default
 Kernel Version: 3.10.0-957.el7.x86_64
 Operating System: Red Hat Enterprise Linux Server 7.6 (Maipo)
 OSType: linux
 Architecture: x86_64
 CPUs: 2
 Total Memory: 991MiB
 Name: server53
 ID: V7A2:C2XE:VT46:FWHN:5PZ2:GUBD:74N2:T6HG:BBT4:CF3O:7XFN:WNTI
 Docker Root Dir: /var/lib/docker
 Debug Mode: false
 Registry: https://index.docker.io/v1/
 Labels:
 Experimental: false
 Insecure Registries:
  172.25.21.52:5000				//设定成功
  127.0.0.0/8
 Live Restore Enabled: false
- 到server52上拉取最新的webserver镜像(拉取成功)
[root@server53 ~]# docker pull 172.25.21.52:5000/webserver:latest
latest: Pulling from webserver
69692152171a: Pull complete
49f7d34d62c1: Pull complete
5f97dc5d71ab: Pull complete
cfcd0711b93a: Pull complete
be6172d7651b: Pull complete
de9813870342: Pull complete
cf95e669b696: Pull complete
Digest: sha256:0ed15e7ef742ad598ae3ddb950125bab848b5992e138cc1af4effd3456b5cf2b
Status: Downloaded newer image for 172.25.21.52:5000/webserver:latest
172.25.21.52:5000/webserver:latest
- 自动化执行:server53到server52上拉取镜像
-
现在需要server53自动拉取镜像,而不是像我们现在这样手动拉取
-
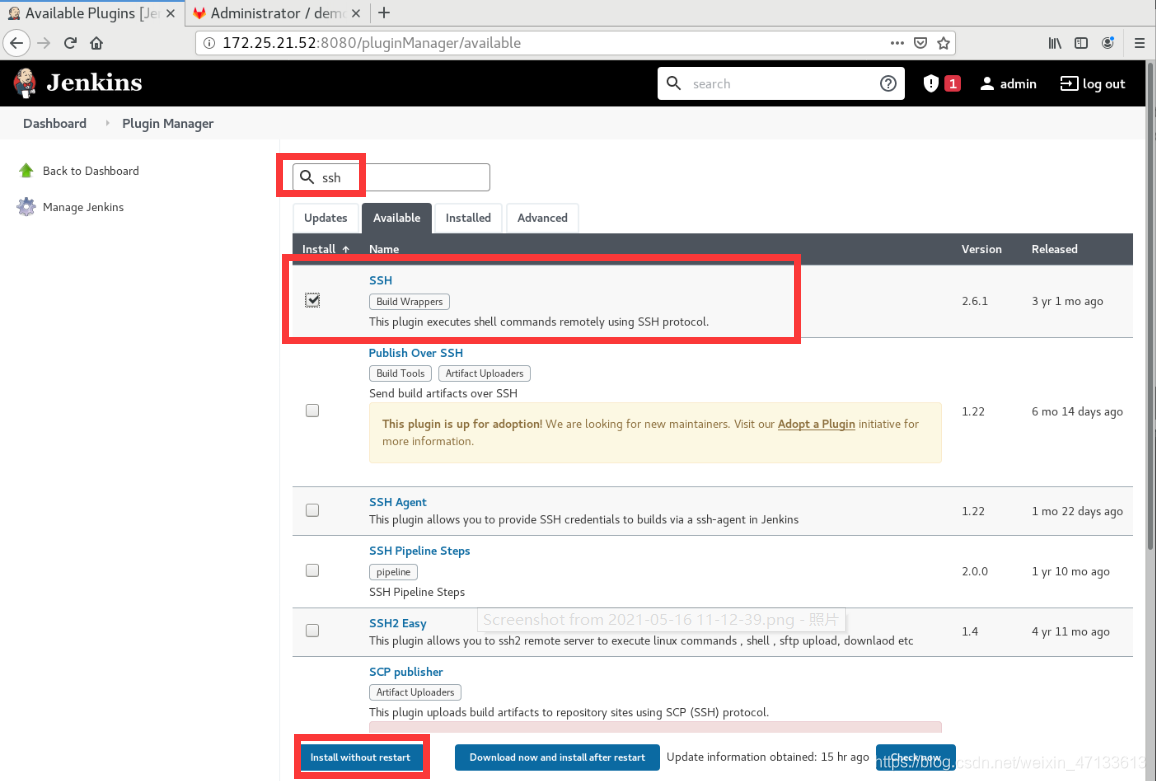
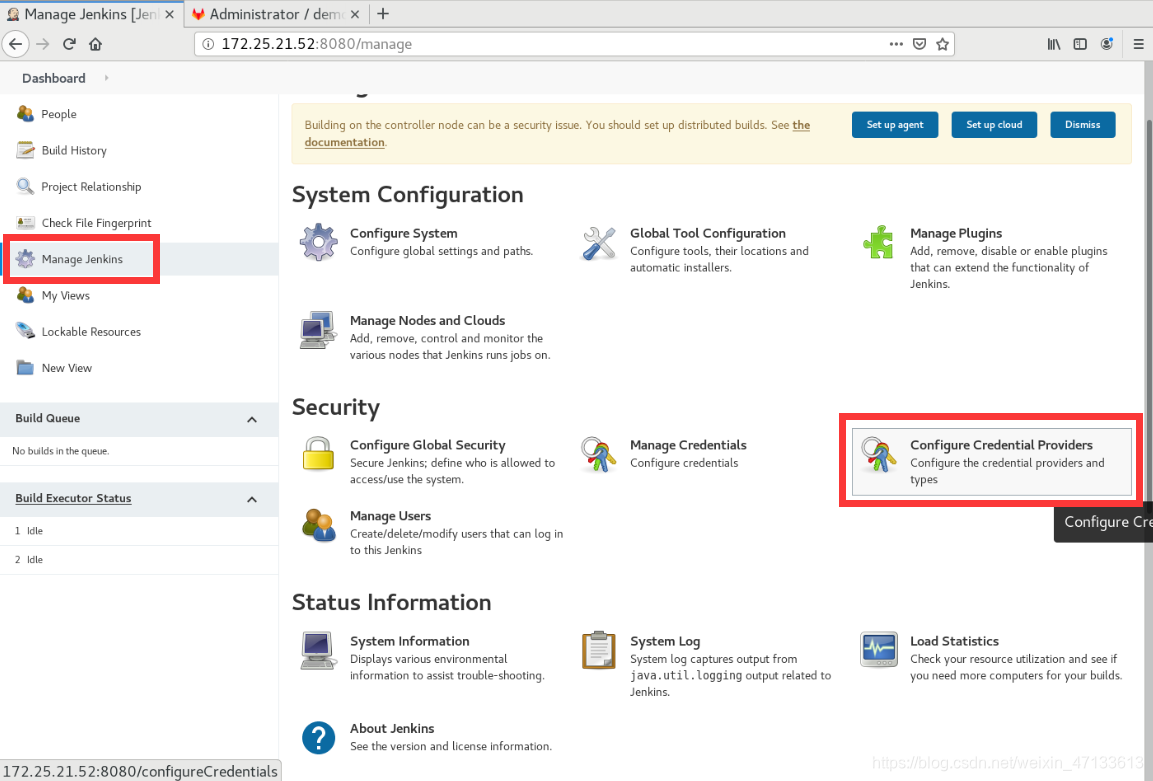
安装SSH插件
-
修改docker项目
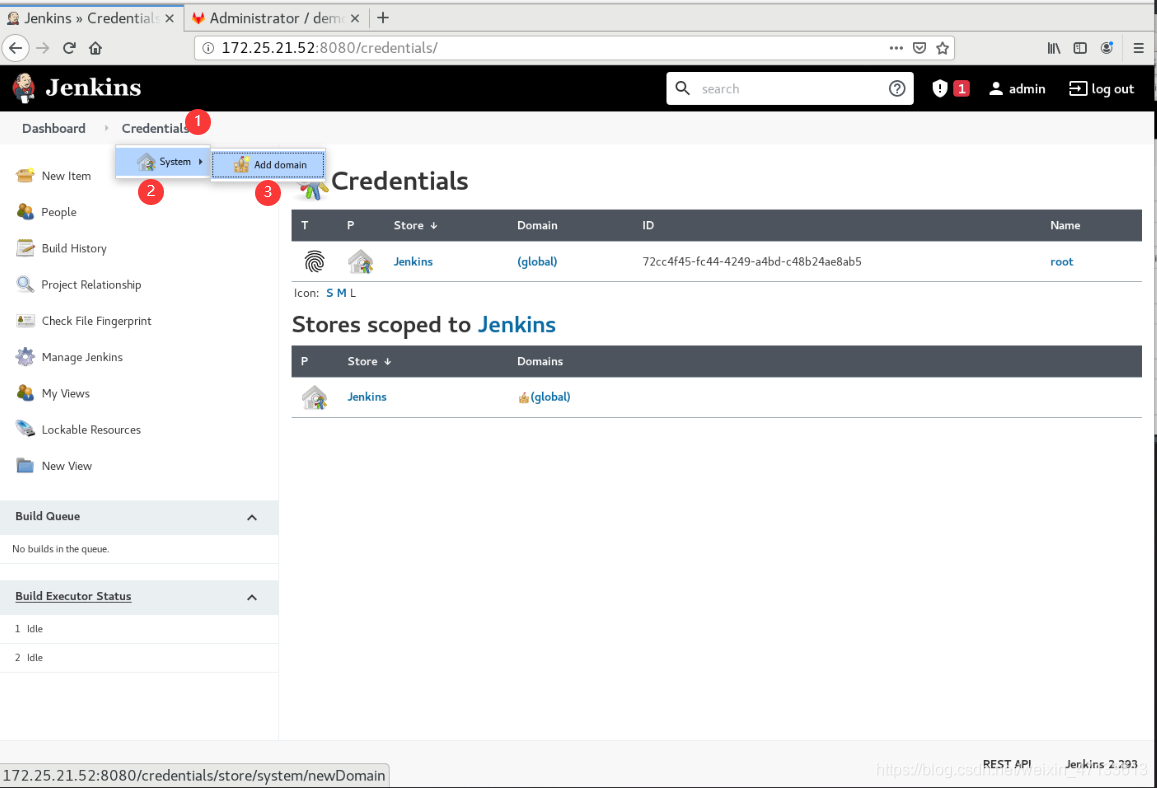
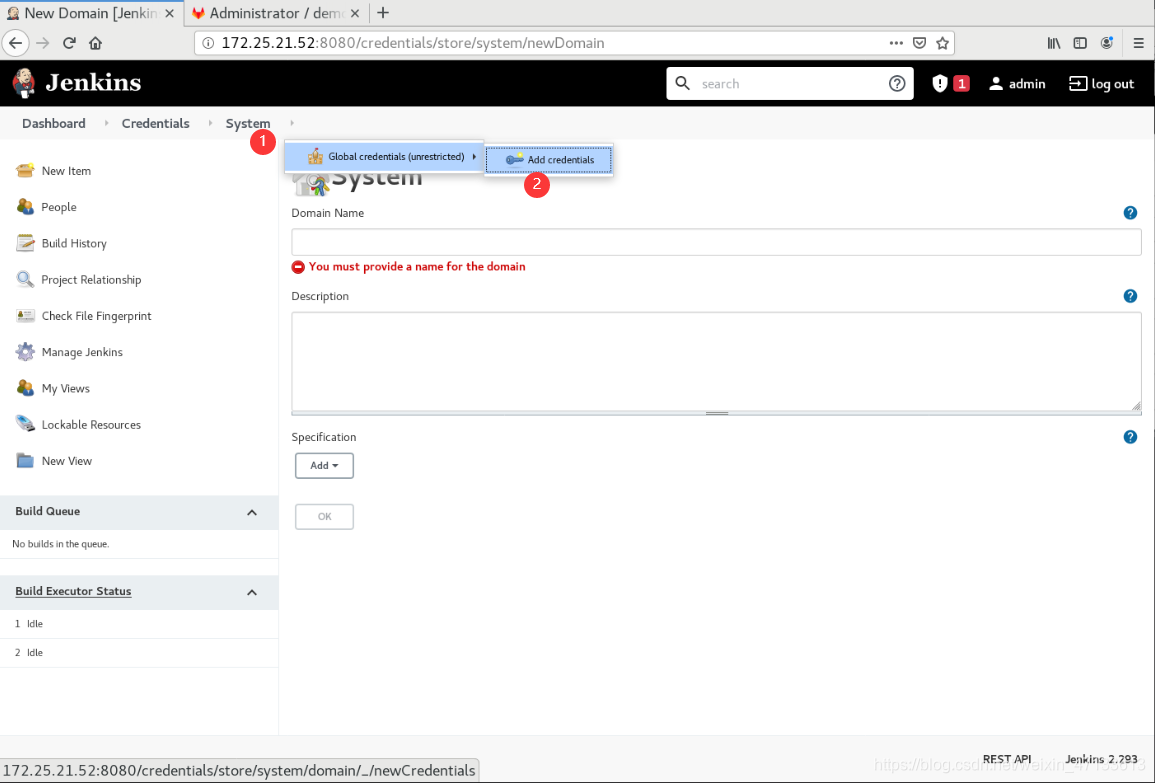
添加全局凭证(用户名密码认证)
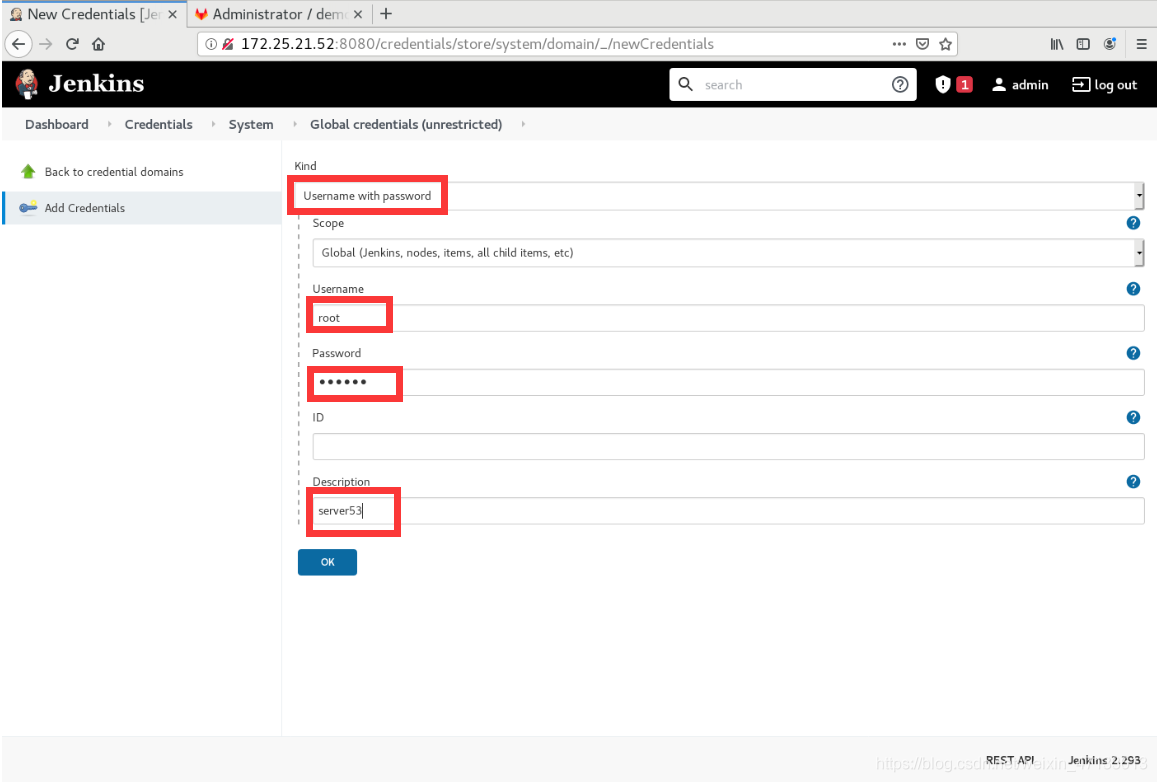
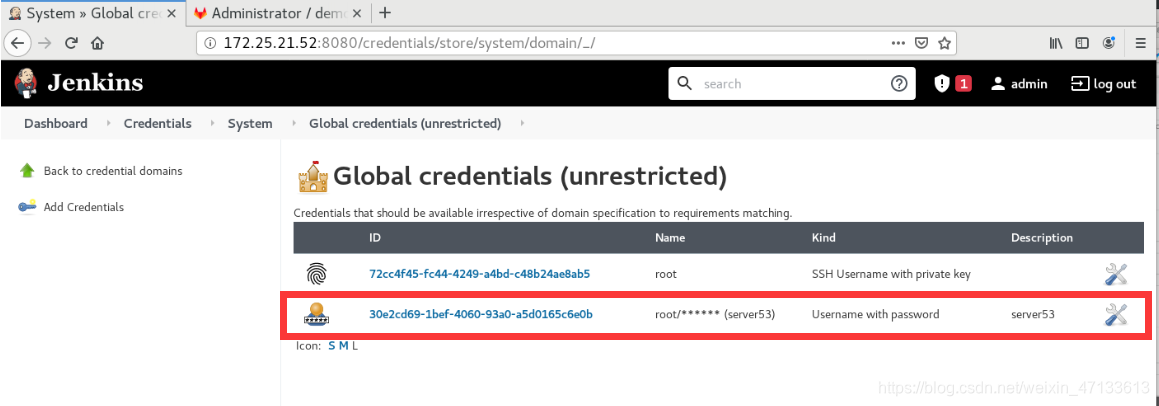
-
系统配置
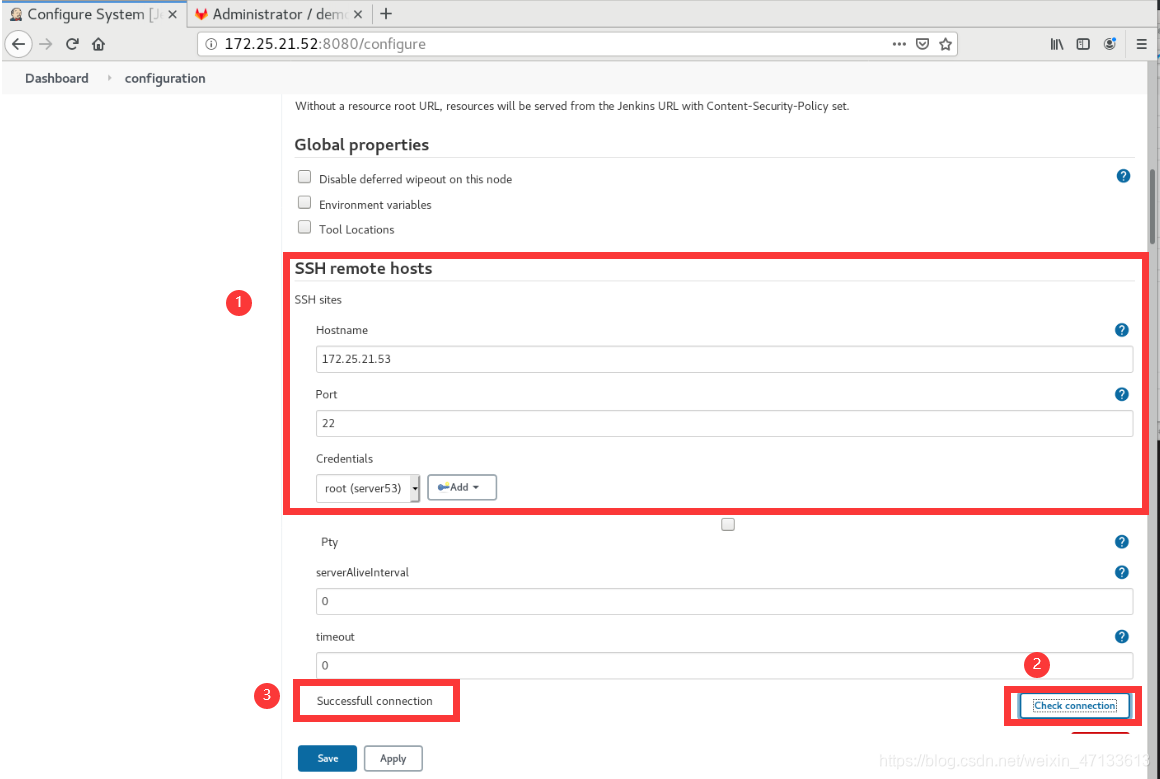
-
docek项目配置
构建
通过ssh连接远程主机,执行shell脚本
shell:从172.25.21.52的5000端口仓库下载镜像

-
手动触发,检查是否自动到server52的仓库中拉取镜像

server53上运行着镜像,拉取成功
[root@server53 ~]# docker ps
CONTAINER ID        IMAGE                                COMMAND                  CREATED             STATUS              PORTS                NAMES
f24aebec1b0c        172.25.21.52:5000/webserver:latest   "/docker-entrypoint.…"   31 seconds ago      Up 27 seconds       0.0.0.0:80->80/tcp   webserver
3. 整体推送:开发到上线
- 推动index.html文件到gitlab中
[root@server51 ~]# cd demo/
[root@server51 demo]# vim index.html
www.redhat.org
www.redhat.org
www.redhat.org
www.redhat.org
www.redhat.org
www.redhat.org
[root@server51 demo]# git commit -a -m "v4"
[master 177db88] v4
 1 file changed, 6 insertions(+), 6 deletions(-)
[root@server51 demo]# git push -u origin master
Counting objects: 5, done.
Delta compression using up to 2 threads.
Compressing objects: 100% (3/3), done.
Writing objects: 100% (3/3), 251 bytes | 0 bytes/s, done.
Total 3 (delta 1), reused 0 (delta 0)
To git@172.25.21.51:root/demo.git
   cbd16da..177db88  master -> master
Branch master set up to track remote branch master from origin.
- test项目中会有新的构建
(自动生成镜像,推送到仓库)
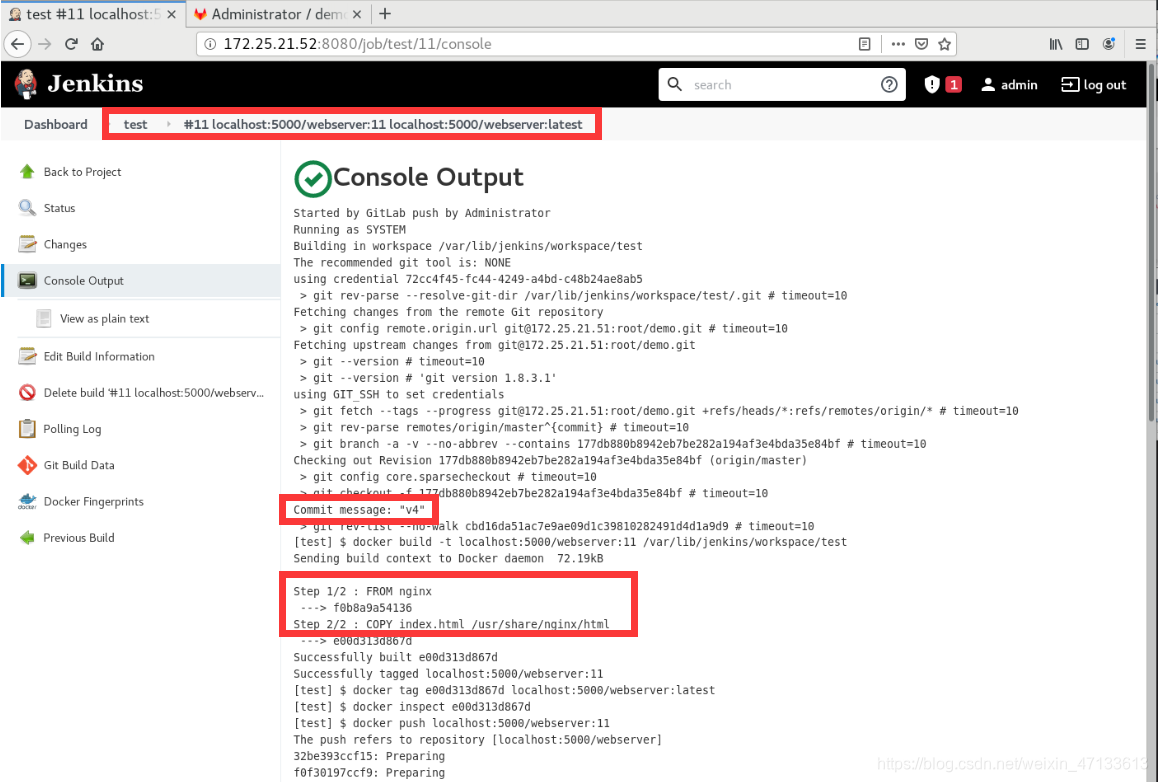
[root@server52 sysctl.d]# docker images
REPOSITORY                 TAG                 IMAGE ID            CREATED              SIZE
localhost:5000/webserver   11                  e00d313d867d        About a minute ago   133MB
localhost:5000/webserver   latest              e00d313d867d        About a minute ago   133MB
localhost:5000/webserver   10                  35ec4ba474e8        11 hours ago         133MB
localhost:5000/webserver   7                   35ec4ba474e8        11 hours ago         133MB
localhost:5000/webserver   8                   35ec4ba474e8        11 hours ago         133MB
localhost:5000/webserver   5                   9d8f2817c33a        11 hours ago         133MB
localhost:5000/webserver   6                   9d8f2817c33a        11 hours ago         133MB
nginx                      latest              f0b8a9a54136        3 days ago           133MB
registry                   latest              1fd8e1b0bb7e        4 weeks ago          26.2MB
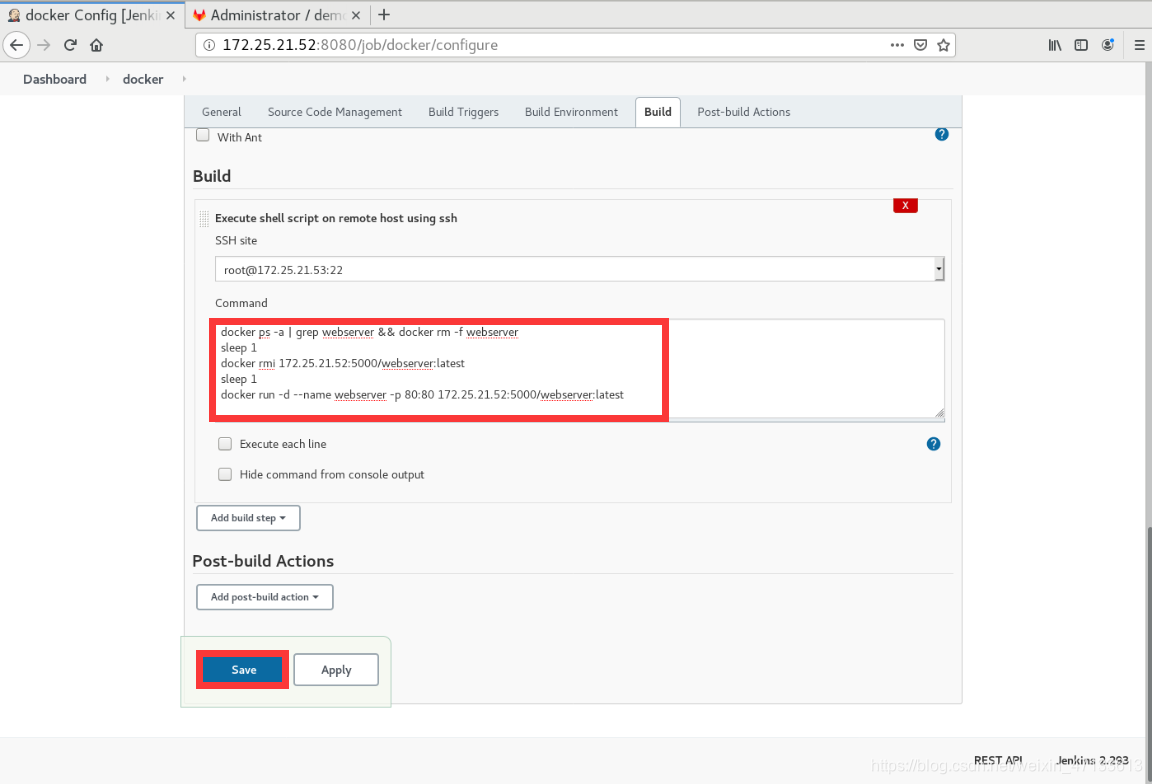
- 修改docker项目
- docker项目的shell脚本需要修改一下,删除之前的镜像
否则,之后创建容器都使用的是之前的镜像
(先删除容器,释放容器,再删镜像)
docker ps -a | grep webserver && docker rm -f webserver
sleep 1
docker rmi 172.25.21.52:5000/webserver:latest
sleep 1
docker run -d --name webserver -p 80:80 172.25.21.52:5000/webserver:latest
- 测试成功
[root@server53 ~]# curl localhost
www.redhat.org
www.redhat.org
www.redhat.org
www.redhat.org
www.redhat.org
www.redhat.org
- 汇总:第二次完整推送(重复上面的操作)
[root@server51 demo]# vim index.html
www.linux.org
www.linux.org
www.linux.org
www.linux.org
www.linux.org
www.linux.org
[root@server51 demo]# git commit -a -m "v5"
[master bc036d6] v5
 1 file changed, 6 insertions(+), 6 deletions(-)
[root@server51 demo]# git push -u origin master
Counting objects: 5, done.
Delta compression using up to 2 threads.
Compressing objects: 100% (3/3), done.
Writing objects: 100% (3/3), 249 bytes | 0 bytes/s, done.
Total 3 (delta 1), reused 0 (delta 0)
To git@172.25.21.51:root/demo.git
   177db88..bc036d6  master -> master
Branch master set up to track remote branch master from origin.
- test项目生成镜像
[root@server52 sysctl.d]# docker images
REPOSITORY                 TAG                 IMAGE ID            CREATED             SIZE
localhost:5000/webserver   12                  b92fb520afb0        34 seconds ago      133MB
localhost:5000/webserver   latest              b92fb520afb0        34 seconds ago      133MB
localhost:5000/webserver   11                  e00d313d867d        8 minutes ago       133MB
localhost:5000/webserver   10                  35ec4ba474e8        11 hours ago        133MB
localhost:5000/webserver   7                   35ec4ba474e8        11 hours ago        133MB
localhost:5000/webserver   8                   35ec4ba474e8        11 hours ago        133MB
localhost:5000/webserver   5                   9d8f2817c33a        11 hours ago        133MB
localhost:5000/webserver   6                   9d8f2817c33a        11 hours ago        133MB
nginx                      latest              f0b8a9a54136        3 days ago          133MB
registry                   latest              1fd8e1b0bb7e        4 weeks ago         26.2MB
- server53上查看本地服务,测试成功
[root@server53 ~]# curl localhost
www.linux.org
www.linux.org
www.linux.org
www.linux.org
www.linux.org
www.linux.org
4. 参数化构建(Jenkins结合ansible)
由用户来选择生产环境
- 安装ansible
- 复制宿主主机上的ansible依赖性安装包到 发布目录下
[root@foundation21 docs]# cp -r ansible/ /var/www/html/
- 准备好yum源
[root@server52 yum.repos.d]# pwd
/etc/yum.repos.d
[root@server52 yum.repos.d]# vim ansible.repo
[ansible]
name=ansible 2.8
baseurl=http://172.25.21.250/ansible
gpgcheck=0
[root@server52 yum.repos.d]# yum repolist
Loaded plugins: product-id, search-disabled-repos, subscription-manager
This system is not registered with an entitlement server. You can use subscription-manager to register.
ansible                                                                | 3.0 kB  00:00:00
docker                                                                 | 3.0 kB  00:00:00
rhel7.6                                                                | 4.3 kB  00:00:00
ansible/primary_db                                                     | 7.9 kB  00:00:00
repo id                                   repo name                                     status
ansible                                   ansible 2.8                                      10
docker                                    docker-ce                                        20
rhel7.6                                   rhel7.6                                       5,152
repolist: 5,182
- 安装
[root@server52 yum.repos.d]# yum install -y ansible
- Jenkins用户
[root@server52 yum.repos.d]# su - jenkins
Last login: Sun May 16 10:00:03 CST 2021 on pts/0
-bash-4.2$
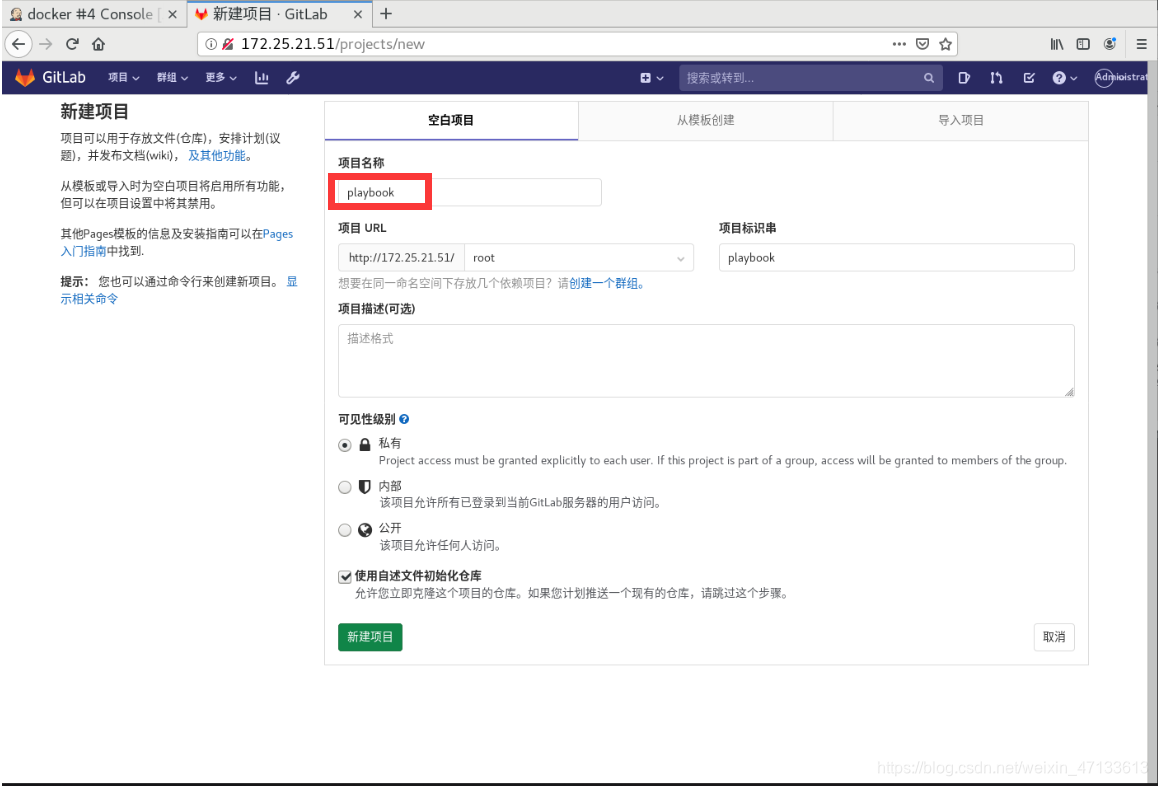
-
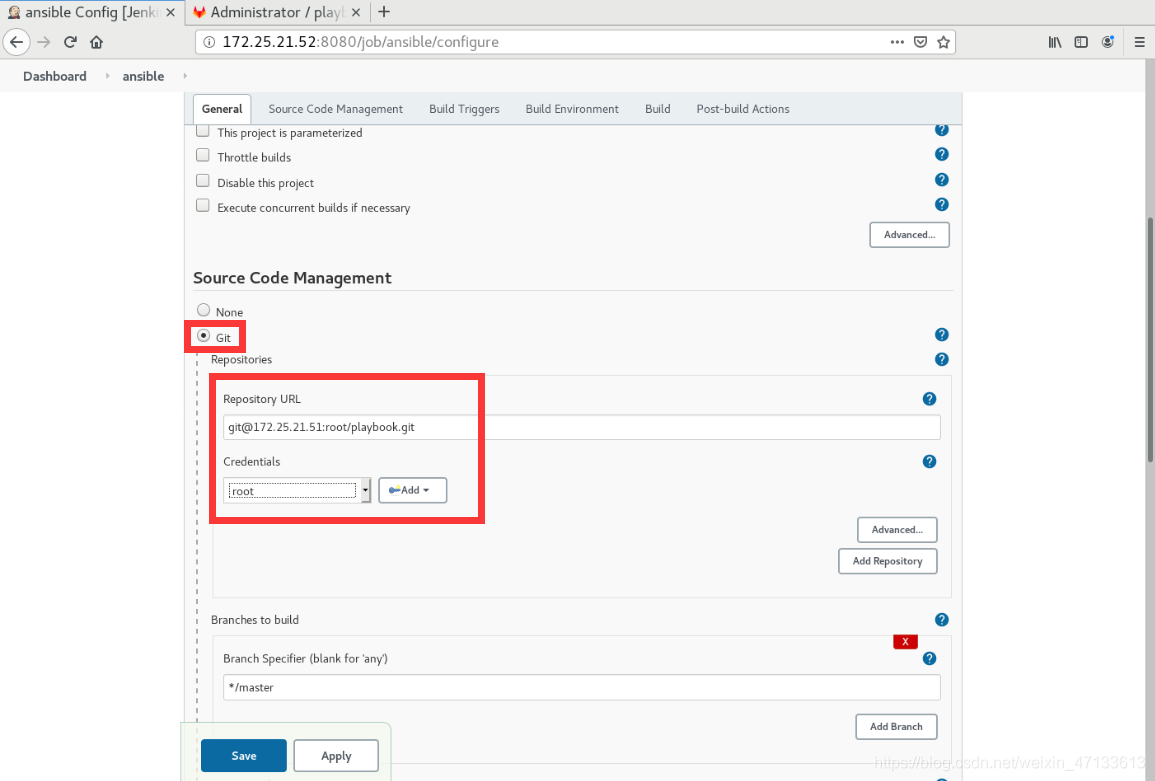
在GitLab上创建一个playbook项目
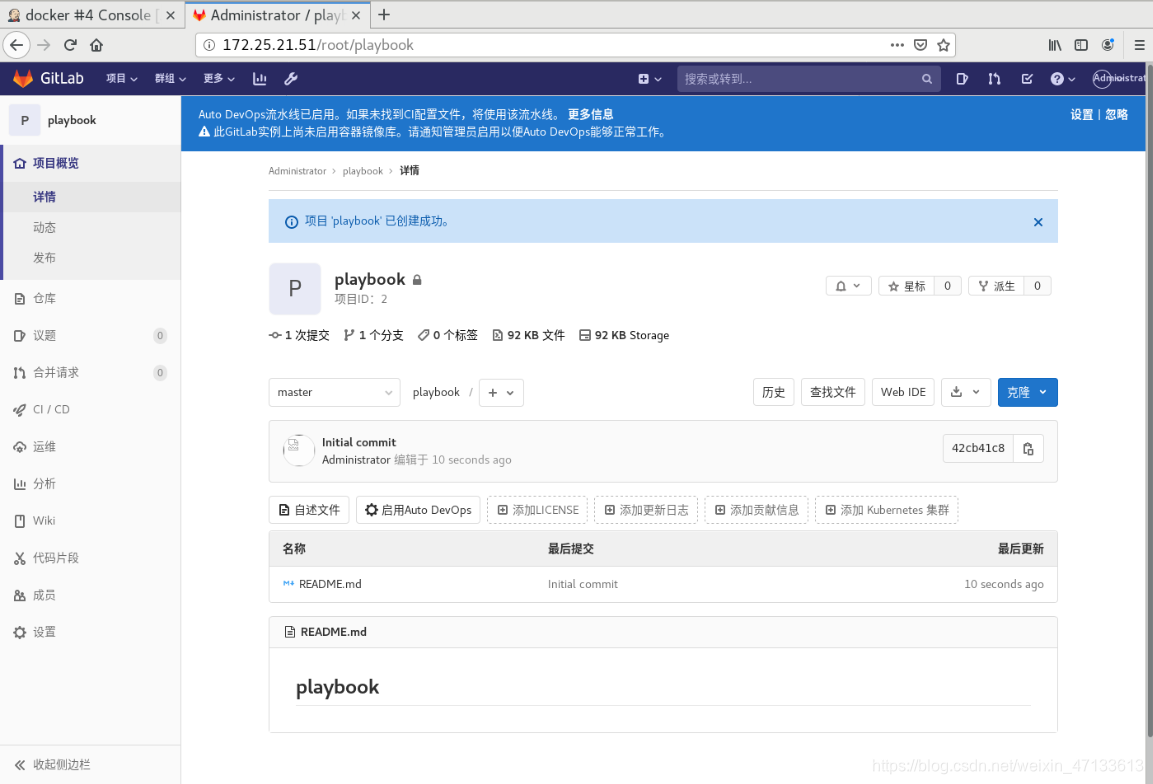
-
克隆playbook到本地
[root@server51 ~]# git clone git@172.25.21.51:root/playbook.git
Cloning into 'playbook'...
remote: Enumerating objects: 3, done.
remote: Counting objects: 100% (3/3), done.
remote: Total 3 (delta 0), reused 0 (delta 0), pack-reused 0
Receiving objects: 100% (3/3), done.
[root@server51 ~]# ls
demo  gitlab-ce-13.2.2-ce.0.el7.x86_64.rpm  playbook
[root@server51 ~]# cd playbook/
[root@server51 playbook]# ls
README.md
- 删除server53之前的容器,因为它占用着80端口
[root@server53 ~]# docker ps
CONTAINER ID        IMAGE                                COMMAND                  CREATED             STATUS              PORTS                NAMES
0831dda1358a        172.25.21.52:5000/webserver:latest   "/docker-entrypoint.…"   2 hours ago         Up 2 hours          0.0.0.0:80->80/tcp   webserver
[root@server53 ~]# docker rm -f webserver
webserver
[root@server53 ~]# docker ps
CONTAINER ID        IMAGE               COMMAND             CREATED             STATUS              PORTS               NAMES
- 在server53上创建devops用户
[root@server53 ~]# useradd devops
[root@server53 ~]# id devops
uid=1000(devops) gid=1000(devops) groups=1000(devops)
[root@server53 ~]# echo westos | passwd --stdin devops
Changing password for user devops.
passwd: all authentication tokens updated successfully.
[root@server53 ~]# su - devops
[devops@server53 ~]$ whoami
devops
- 免密
server52上的Jenkins生成公私钥。将公钥发送给server53的devops用户
[root@server52 yum.repos.d]# su - jenkins
Last login: Sun May 16 10:00:03 CST 2021 on pts/0
-bash-4.2$ whoami
jenkins
-bash-4.2$ ssh-keygen
Generating public/private rsa key pair.
Enter file in which to save the key (/var/lib/jenkins/.ssh/id_rsa):
Enter passphrase (empty for no passphrase):
Enter same passphrase again:
Your identification has been saved in /var/lib/jenkins/.ssh/id_rsa.
Your public key has been saved in /var/lib/jenkins/.ssh/id_rsa.pub.
The key fingerprint is:
SHA256:3wgWmEsF4Io7ybx+V7ElnHJzsTcsivPovgBRAQ/4bhE jenkins@server52
The key's randomart image is:
+---[RSA 2048]----+
|.o.oo....        |
|. E.   + .       |
| o o. = o +      |
| .+. o O * +     |
|.o..  = S o .    |
|oo+  o = o o     |
|++ .  =   o .    |
| ....o .         |
|.o. ++.          |
+----[SHA256]-----+
-bash-4.2$ ssh-copy-id devops@172.25.21.53
/bin/ssh-copy-id: INFO: Source of key(s) to be installed: "/var/lib/jenkins/.ssh/id_rsa.pub"
The authenticity of host '172.25.21.53 (172.25.21.53)' can't be established.
ECDSA key fingerprint is SHA256:pDVMlne1o6BzdQs4hHFSykp2uF5AikPpjxB9HjgwoS4.
ECDSA key fingerprint is MD5:43:77:e7:0f:9f:5f:c8:d7:42:8b:9e:db:6c:46:ed:5a.
Are you sure you want to continue connecting (yes/no)? yes
/bin/ssh-copy-id: INFO: attempting to log in with the new key(s), to filter out any that are already installed
/bin/ssh-copy-id: INFO: 1 key(s) remain to be installed -- if you are prompted now it is to install the new keys
devops@172.25.21.53's password:

Number of key(s) added: 1

Now try logging into the machine, with:   "ssh 'devops@172.25.21.53'"
and check to make sure that only the key(s) you wanted were added.
- 权力下放
远程登陆的是普通用户(server52的Jenkins),权限不足
因此要实现权力下放
给devops授权
[root@server53 ~]# visudo
devops  ALL=(ALL)       NOPASSWD: ALL
- server51——远程控制节点
注意:server51上还有别的服务,因此,要注意服务之间不要冲突
- server51写ansible的主配置文件
远端访问用户改成devops
[root@server51 playbook]# vim ansible.cfg
[defaults]
command_warnings=False
remote_user=devops

[privilege_escalation]
become=True
become_method=sudo
become_user=root
become_ask_pass=False
- server51编写部署服务的配置文件
[root@server51 playbook]# ls
ansible.cfg  README.md
[root@server51 playbook]# vim playbook.yml
---
- hosts: all
  tasks:
  - name: install apache
    yum:
      name: httpd
      state: present
  - name: config apache
    template:
      src: httpd.conf.j2
      dest: /etc/httpd/conf/httpd.conf
    notify: restart apache
  - name: enable apache
    service:
      name: httpd
      state: started
      enabled: yes
  handlers:
  - name: restart apache
    service:
      name: httpd
      state: restarted
- 注意,因为ansible部署服务的配置文件中设定要使用apache的配置文件,所以,作为生产环境的server53需要安装apache
将server53上的apache配置文件scp到server51
[root@server53 ~]# yum install -y httpd
[root@server53 ~]# cd /etc/httpd/conf
[root@server53 conf]# ls
httpd.conf  magic
[root@server53 conf]# scp httpd.conf root@172.25.21.51:/root/playbook
- server51创建模板文件
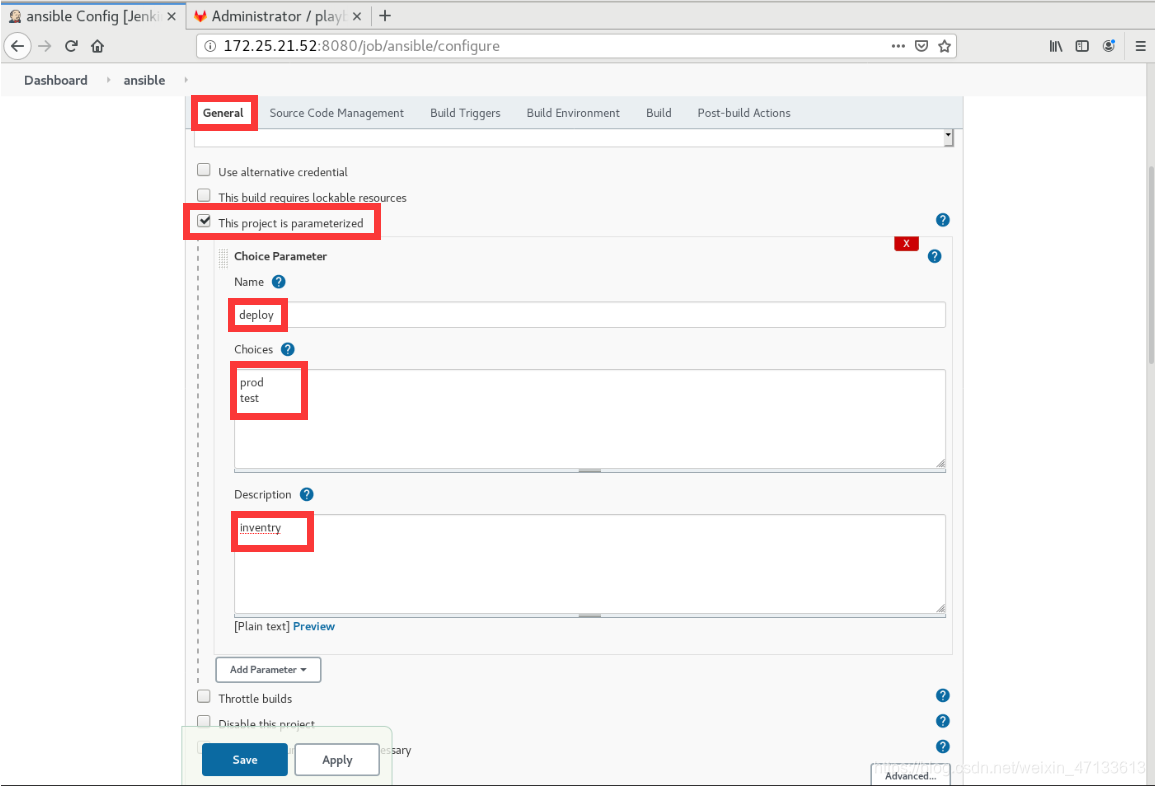
- 创建清单inventry,在其中书写2个文件,分别包含生产环境的路径和测试环境的路径
(注意端口不要冲突)
[root@server51 playbook]# ls
ansible.cfg  httpd.conf  playbook.yml  README.md
[root@server51 playbook]# mv httpd.conf httpd.conf.j2
[root@server51 playbook]# vim httpd.conf.j2
#Listen 12.34.56.78:80
Listen {{ http_port }}
[root@server51 playbook]# mkdir inventry
[root@server51 playbook]# cd inventry/
[root@server51 inventry]# vim prod
[prod]
172.25.21.53 http_port=80

[root@server51 inventry]# vim test
[test]
172.25.21.51 http_port=8000
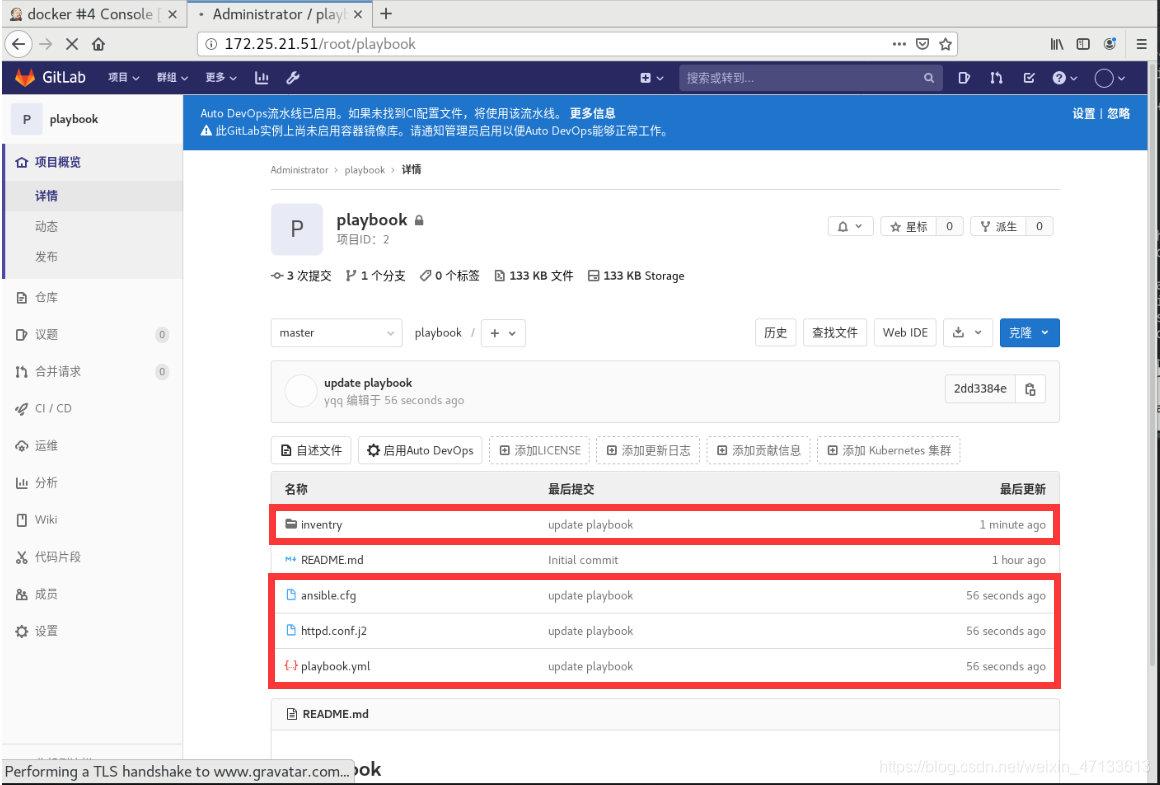
- 上传
[root@server51 inventry]# git add .
[root@server51 inventry]# git status -s
A  prod
A  test
?? ../ansible.cfg
?? ../httpd.conf.j2
?? ../playbook.yml
[root@server51 inventry]# git commit -m "update playbook"
[master bc03547] update playbook
 2 files changed, 4 insertions(+)
 create mode 100644 inventry/prod
 create mode 100644 inventry/test
[root@server51 inventry]# git status -s
?? ../ansible.cfg
?? ../httpd.conf.j2
?? ../playbook.yml
[root@server51 inventry]# cd ..
[root@server51 playbook]# git add .
[root@server51 playbook]# git status -s
A  ansible.cfg
A  httpd.conf.j2
A  playbook.yml
[root@server51 playbook]# git commit -m "update playbook"
[master 2dd3384] update playbook
 3 files changed, 384 insertions(+)
 create mode 100644 ansible.cfg
 create mode 100644 httpd.conf.j2
 create mode 100644 playbook.yml
[root@server51 playbook]# git status -s
[root@server51 playbook]# git push -u origin master
Counting objects: 11, done.
Delta compression using up to 2 threads.
Compressing objects: 100% (8/8), done.
Writing objects: 100% (10/10), 5.48 KiB | 0 bytes/s, done.
Total 10 (delta 0), reused 0 (delta 0)
To git@172.25.21.51:root/playbook.git
   42cb41c..2dd3384  master -> master
Branch master set up to track remote branch master from origin.
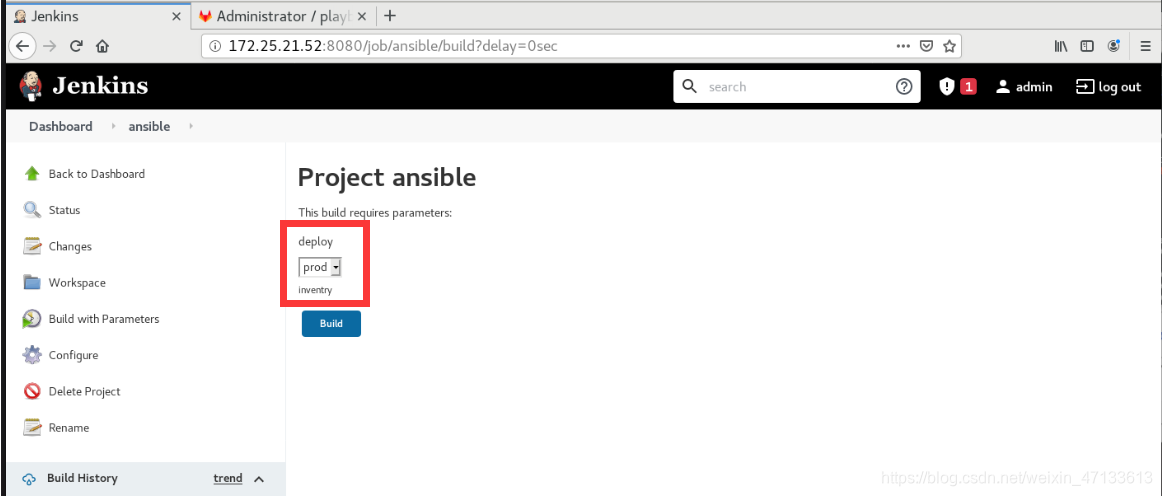
- Jenkins新建ansible任务
-
新建任务
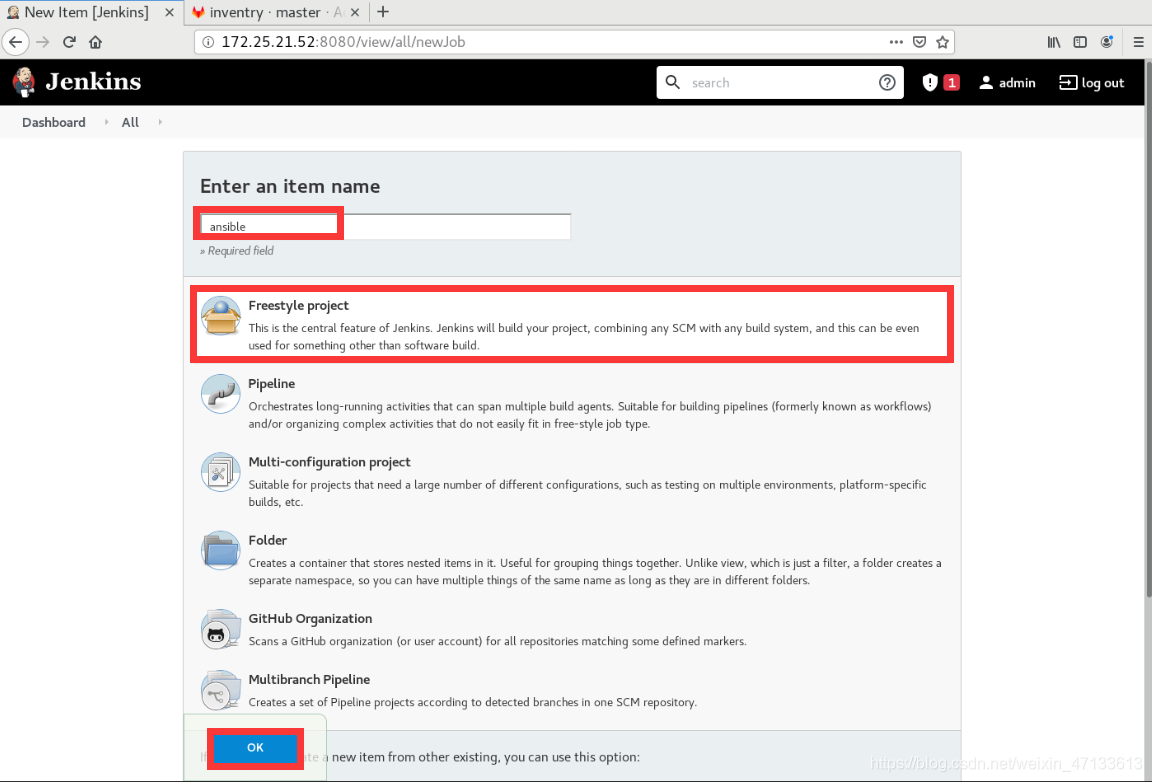
-
源码管理

-
General——参数化构建
参数选项是上面设定的2个环境
-
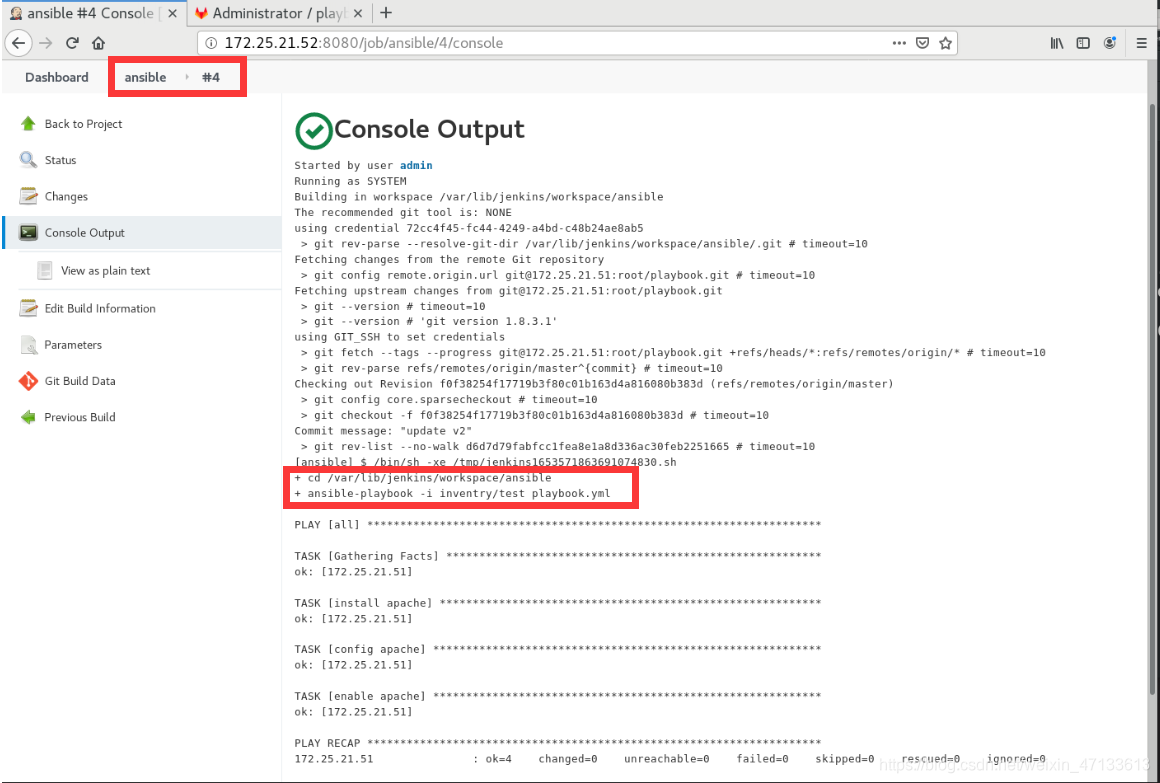
构建
执行shell
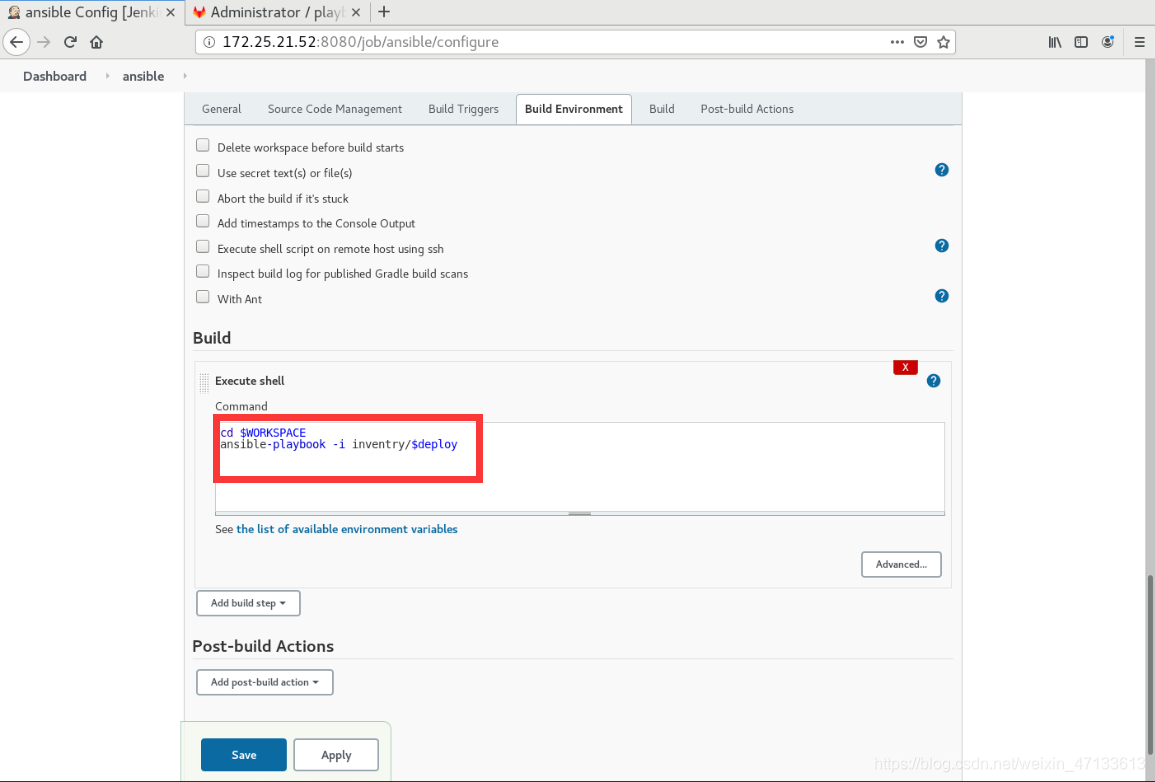
cd $WORKSPACE
ansible-playbook -i inventry/$deploy  playbook.yml
-i:指定inventry下的定义的部署变量(prod和test)
注意,shell脚本中的workspace是server52上的/var/lib/jenkins/workspace
(每个项目都有对应的工作区,比如docker的工作区是/var/lib/jenkins/workspace/docker
- server51创建一个新的用户devops
[root@server51 playbook]# useradd devops
[root@server51 playbook]# echo westos | passwd --stdin devops
Changing password for user devops.
passwd: all authentication tokens updated successfully.
- 免密
server52上的Jenkins将公钥发送给server51的devops
-bash-4.2$ pwd
/var/lib/jenkins
-bash-4.2$ whoami
jenkins
-bash-4.2$ ssh-copy-id devops@172.25.21.51
/bin/ssh-copy-id: INFO: Source of key(s) to be installed: "/var/lib/jenkins/.ssh/id_rsa.pub"
/bin/ssh-copy-id: INFO: attempting to log in with the new key(s), to filter out any that are already installed
/bin/ssh-copy-id: INFO: 1 key(s) remain to be installed -- if you are prompted now it is to install the new keys
devops@172.25.21.51's password:

Number of key(s) added: 1

Now try logging into the machine, with:   "ssh 'devops@172.25.21.51'"
and check to make sure that only the key(s) you wanted were added.

-bash-4.2$ ssh devops@172.25.21.51
[devops@server51 ~]$ pwd
/home/devops
- server51权力下方
[root@server51 playbook]# visudo
devops  ALL=(ALL)       NOPASSWD: ALL
- 选择test环境,手动执行
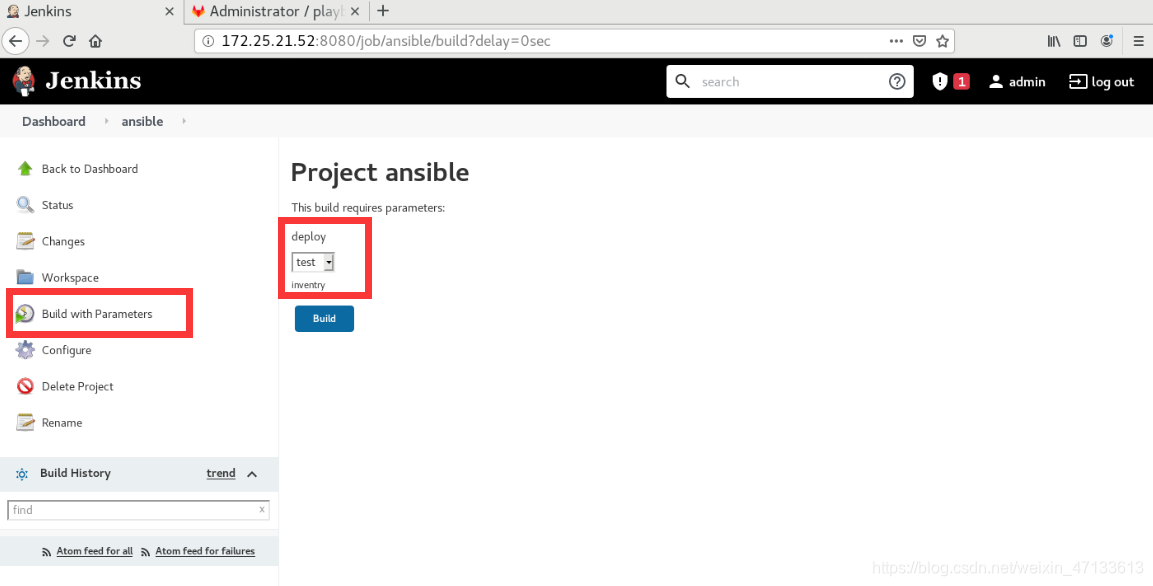
- web界面
(如果有报错,就检查文件写的是否正确,然后记得git push)
成功
[root@server51 playbook]# curl localhost:8000
<!DOCTYPE html PUBLIC "-//W3C//DTD XHTML 1.1//EN" "http://www.w3.org/TR/xhtml11/DTD/xhtml11.dtd">

<html xmlns="http://www.w3.org/1999/xhtml" xml:lang="en">
	<head>
		<title>Test Page for the Apache HTTP Server on Red Hat Enterprise Linux</title>
		<meta http-equiv="Content-Type" content="text/html; charset=UTF-8" />
		<style type="text/css">
			/*<![CDATA[*/
			body {
				background-color: #fff;
				color: #000;
				font-size: 0.9em;
				font-family: sans-serif,helvetica;
				margin: 0;
				padding: 0;
			}
			:link {
				color: #c00;
			}
			:visited {
				color: #c00;
			}
			a:hover {
				color: #f50;
			}
			h1 {
				text-align: center;
				margin: 0;
				padding: 0.6em 2em 0.4em;
				background-color: #900;
				color: #fff;
				font-weight: normal;
				font-size: 1.75em;
				border-bottom: 2px solid #000;
			}
			h1 strong {
				font-weight: bold;
			}
			h2 {
				font-size: 1.1em;
				font-weight: bold;
			}
			hr {
				display: none;
			}
			.content {
				padding: 1em 5em;
			}
			.content-columns {
				/* Setting relative positioning allows for
				absolute positioning for sub-classes */
				position: relative;
				padding-top: 1em;
			}
			.content-column-left {
				/* Value for IE/Win; will be overwritten for other browsers */
				width: 47%;
				padding-right: 3%;
				float: left;
				padding-bottom: 2em;
			}
			.content-column-left hr {
				display: none;
			}
			.content-column-right {
				/* Values for IE/Win; will be overwritten for other browsers */
				width: 47%;
				padding-left: 3%;
				float: left;
				padding-bottom: 2em;
			}
			.content-columns>.content-column-left, .content-columns>.content-column-right {
				/* Non-IE/Win */
			}
			img {
				border: 2px solid #fff;
				padding: 2px;
				margin: 2px;
			}
			a:hover img {
				border: 2px solid #f50;
			}
			/*]]>*/
		</style>
	</head>

	<body>
		<h1>Red Hat Enterprise Linux <strong>Test Page</strong></h1>

		<div class="content">
			<div class="content-middle">
				<p>This page is used to test the proper operation of the Apache HTTP server after it has been installed. If you can read this page, it means that the Apache HTTP server installed at this site is working properly.</p>
			</div>
			<hr />

			<div class="content-columns">
				<div class="content-column-left">
					<h2>If you are a member of the general public:</h2>

					<p>The fact that you are seeing this page indicates that the website you just visited is either experiencing problems, or is undergoing routine maintenance.</p>

					<p>If you would like to let the administrators of this website know that you've seen this page instead of the page you expected, you should send them e-mail. In general, mail sent to the name "webmaster" and directed to the website's domain should reach the appropriate person.</p>

					<p>For example, if you experienced problems while visiting www.example.com, you should send e-mail to "webmaster@example.com".</p>

					<p>For information on Red Hat Enterprise Linux, please visit the <a href="http://www.redhat.com/">Red Hat, Inc. website</a>. The documentation for Red Hat Enterprise Linux is <a href="http://www.redhat.com/docs/manuals/enterprise/">available on the Red Hat, Inc. website</a>.</p>
					<hr />
				</div>

				<div class="content-column-right">
					<h2>If you are the website administrator:</h2>

					<p>You may now add content to the directory <tt>/var/www/html/</tt>. Note that until you do so, people visiting your website will see this page, and not your content. To prevent this page from ever being used, follow the instructions in the file <tt>/etc/httpd/conf.d/welcome.conf</tt>.</p>

                                        <p>You are free to use the image below on web sites powered by the Apache HTTP Server:</p>

                                        <p align="center"><a href="http://httpd.apache.org/"><img src="/icons/apache_pb2.gif" alt="[ Powered by Apache ]"/></a></p>

				</div>
			</div>
		</div>
	</body>
</html>
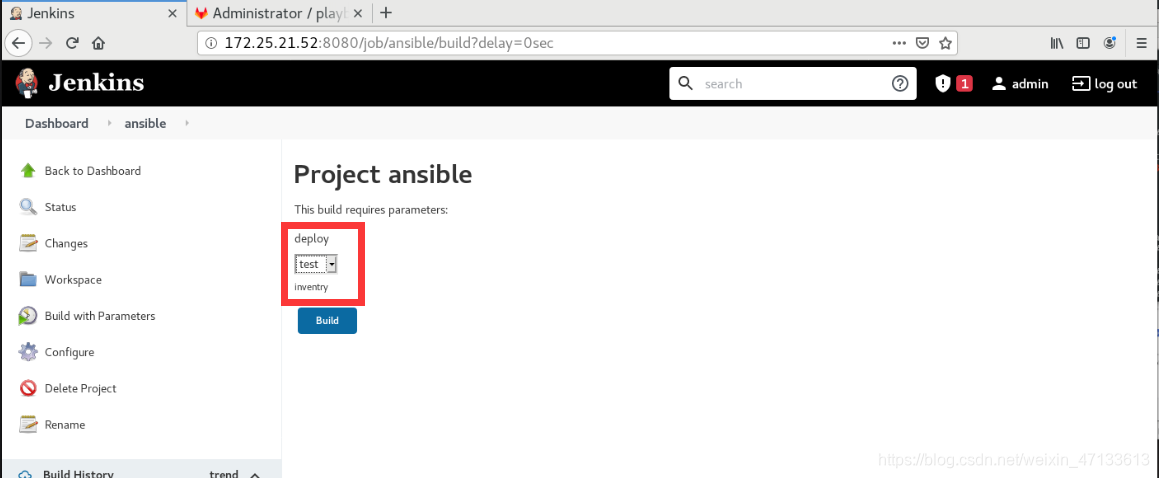
- 完善ansible,要求自动生成apache页面
- 创建一个首页
- 修改ansible的执行文件
[root@server51 playbook]# ls
ansible.cfg  httpd.conf.j2  inventry  playbook.yml  README.md
[root@server51 playbook]# vim playbook.yml
---
- hosts: all
  tasks:
  - name: install apache
    yum:
      name: httpd
      state: present
  - name: config apache
    template:
      src: httpd.conf.j2
      dest: /etc/httpd/conf/httpd.conf
    notify: restart apache
  - name: enable apache
    service:
      name: httpd
      state: started
      enabled: yes
  - name: create index.html			//创建新的发布页面
    lineinfile:
      path: /var/www/html/index.html
      create: yes
      line: "{{ ansible_hostname }}"
  handlers:
  - name: restart apache
    service:
      name: httpd
      state: restarted
[root@server51 playbook]# git commit -a -m "update playbook.yml"
[master 6e80765] update playbook.yml
 1 file changed, 5 insertions(+)
[root@server51 playbook]# git push -u origin master
Counting objects: 5, done.
Delta compression using up to 2 threads.
Compressing objects: 100% (3/3), done.
Writing objects: 100% (3/3), 383 bytes | 0 bytes/s, done.
Total 3 (delta 2), reused 0 (delta 0)
To git@172.25.21.51:root/playbook.git
   f0f3825..6e80765  master -> master
Branch master set up to track remote branch master from origin.
- 手动执行:test环境
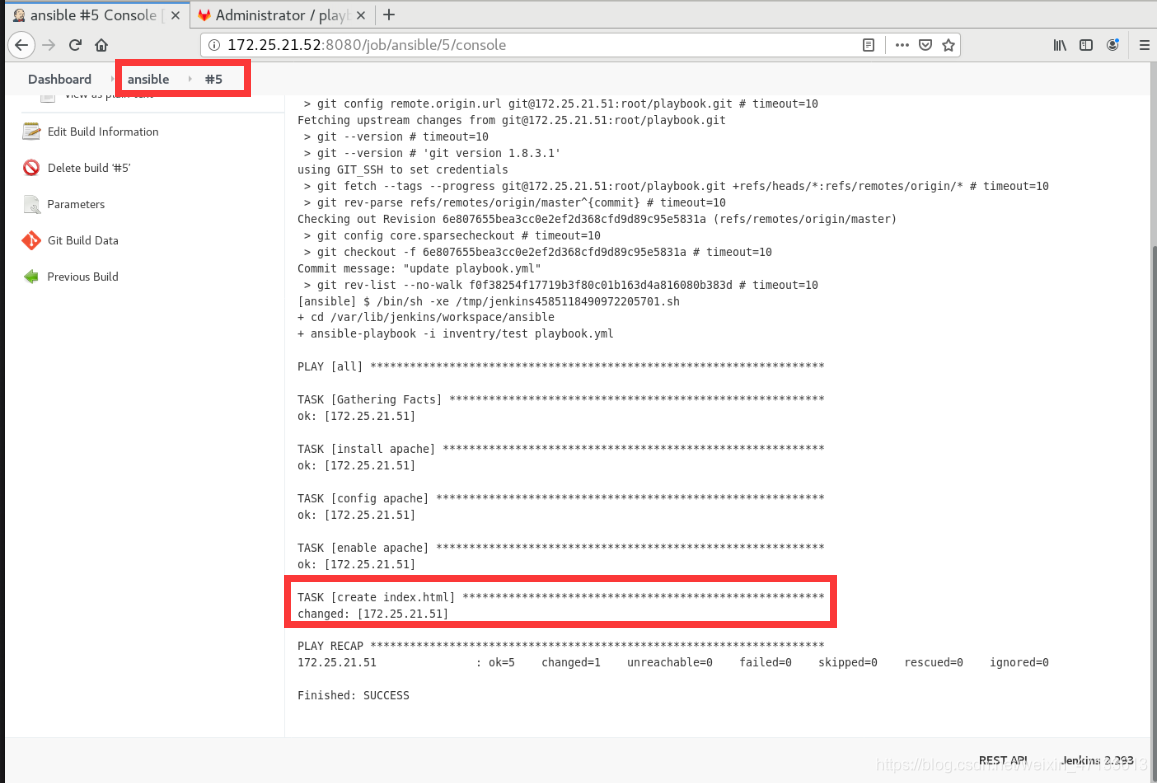
- curl命令查看
[root@server51 playbook]# curl localhost:8000
server51
- 生产环境prod
为什么要使用server53上主机的apache主配置文件,因为server53要作为生产环境
根据就是之前编写的环境文件里写的是172.25.21.53:80
- web界面
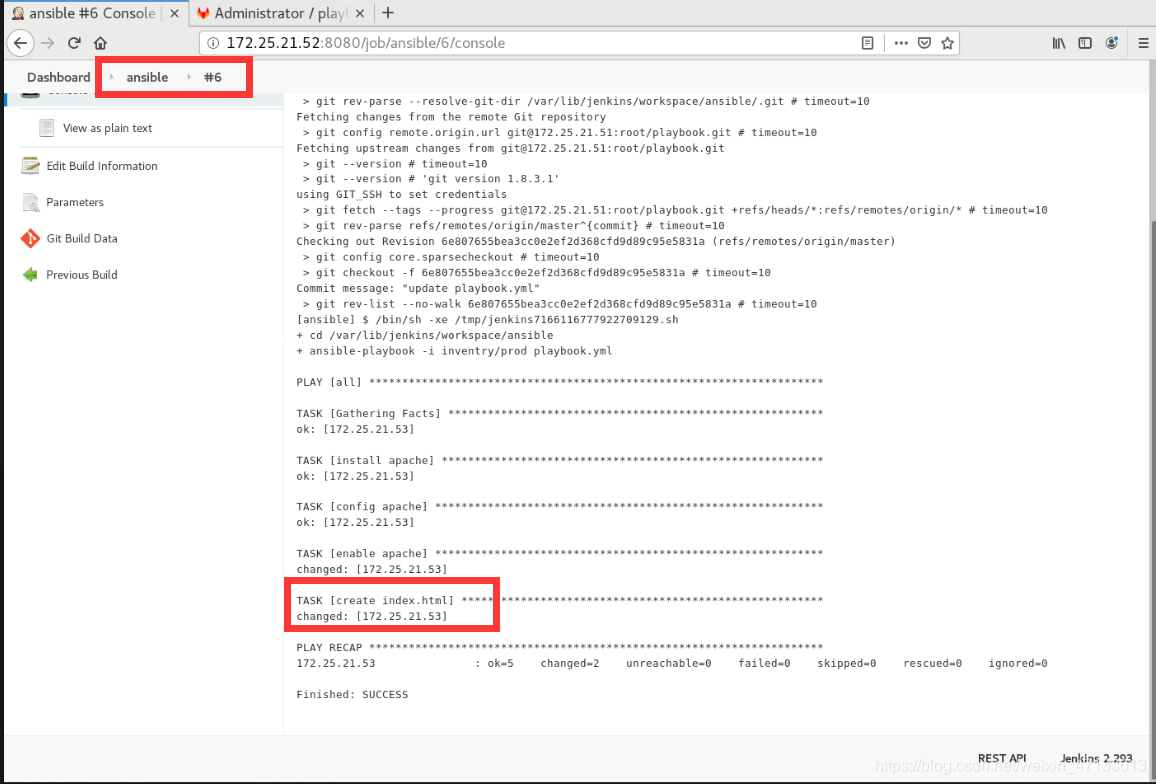
- curl命令查看
[root@server51 playbook]# curl 172.25.21.53
server53
5. 部署企业级的仓库(Jenkins结合harbor)
企业级的仓库:有加密,有认证,之前的仓库都没有
server53作为仓库
- 部署环境
[root@server53 ~]# ls
docker-compose-Linux-x86_64-1.27.0  harbor-offline-installer-v1.10.1.tgz
[root@server53 ~]# mv docker-compose-Linux-x86_64-1.27.0 /usr/local/bin/docker-compose
[root@server53 ~]# chmod +x /usr/local/bin/docker-compose
[root@server53 ~]# tar zxf harbor-offline-installer-v1.10.1.tgz
- 激活证书
- 进入harbor目录,编辑主配置文件
保证证书位置一致
[root@server53 ~]# ls
harbor  harbor-offline-installer-v1.10.1.tgz
[root@server53 ~]# cd harbor/
[root@server53 harbor]# ls
common.sh  harbor.v1.10.1.tar.gz  harbor.yml  install.sh  LICENSE  prepare
[root@server53 harbor]# vim harbor.yml
hostname: reg.westos.org

# http related config
http:
  # port for http, default is 80. If https enabled, this port will redirect to https port
  port: 80

# https related config
https:
  # https port for harbor, default is 443
  port: 443
  # The path of cert and key files for nginx
  certificate: /data/certs/westos.org.crt
  private_key: /data/certs/westos.org.key
harbor_admin_password: westos
- 创建证书
[root@server53 harbor]# cd /data/
[root@server53 data]# mkdir certs
[root@server53 data]# openssl req -newkey rsa:4096 -nodes -sha256 -keyout certs/westos.org.key -x509 -days 365 -out certs/westos.org.crt
Generating a 4096 bit RSA private key
...................................................................................................................................................................................................++
..........................................................................................................................................................................++
writing new private key to 'certs/westos.org.key'
-----
You are about to be asked to enter information that will be incorporated
into your certificate request.
What you are about to enter is what is called a Distinguished Name or a DN.
There are quite a few fields but you can leave some blank
For some fields there will be a default value,
If you enter '.', the field will be left blank.
-----
Country Name (2 letter code) [XX]:cn
State or Province Name (full name) []:shaanxi
Locality Name (eg, city) [Default City]:xi'an
Organization Name (eg, company) [Default Company Ltd]:westos
Organizational Unit Name (eg, section) []:linux
Common Name (eg, your name or your server's hostname) []:reg.westos.org
Email Address []:root@westos.org
[root@server53 data]# cd certs/
[root@server53 certs]# ls
westos.org.crt  westos.org.key
- 因为之前做参数化构建实验,server53上运行着apache服务,占用了80端口。所以,记得关闭apache,为了避免端口冲突。部署harbor需要用到80端口
[root@server53 certs]# systemctl disable --now httpd.service
Removed symlink /etc/systemd/system/multi-user.target.wants/httpd.service.
- 部署harbor仓库
[root@server53 ~]# cd harbor/
[root@server53 harbor]# ls
common.sh  harbor.v1.10.1.tar.gz  harbor.yml  install.sh  LICENSE  prepare
[root@server53 harbor]# ./install.sh
[Step 5]: starting Harbor ...
Creating network "harbor_harbor" with the default driver
Creating harbor-log ... done
Creating harbor-db     ... done
Creating harbor-portal ... done
Creating redis         ... done
Creating registry      ... done
Creating registryctl   ... done
Creating harbor-core   ... done
Creating nginx             ... done
Creating harbor-jobservice ... done
✔ ----Harbor has been installed and started successfully.----
- 删除不需要的镜像
[root@server52 yum.repos.d]# docker ps -a
CONTAINER ID        IMAGE               COMMAND                  CREATED             STATUS              PORTS                    NAMES
9dbc5071a78e        registry            "/entrypoint.sh /etc…"   6 hours ago         Up 6 hours          0.0.0.0:5000->5000/tcp   registry
[root@server52 yum.repos.d]# docker rm -f registry
registry
- 查看各模块的状态。要求都是UP的状态
[root@server53 harbor]# docker-compose ps
      Name                    Command                 State                  Ports
----------------------------------------------------------------------------------------------
harbor-core         /harbor/harbor_core            Up (healthy)
harbor-db           /docker-entrypoint.sh          Up (healthy)   5432/tcp
harbor-jobservice   /harbor/harbor_jobservice      Up (healthy)
                    ...
harbor-log          /bin/sh -c /usr/local/bin/     Up (healthy)   127.0.0.1:1514->10514/tcp
                    ...
harbor-portal       nginx -g daemon off;           Up (healthy)   8080/tcp
nginx               nginx -g daemon off;           Up (healthy)   0.0.0.0:80->8080/tcp,
                                                                  0.0.0.0:443->8443/tcp
redis               redis-server /etc/redis.conf   Up (healthy)   6379/tcp
registry            /home/harbor/entrypoint.sh     Up (healthy)   5000/tcp
registryctl         /home/harbor/start.sh          Up (healthy)
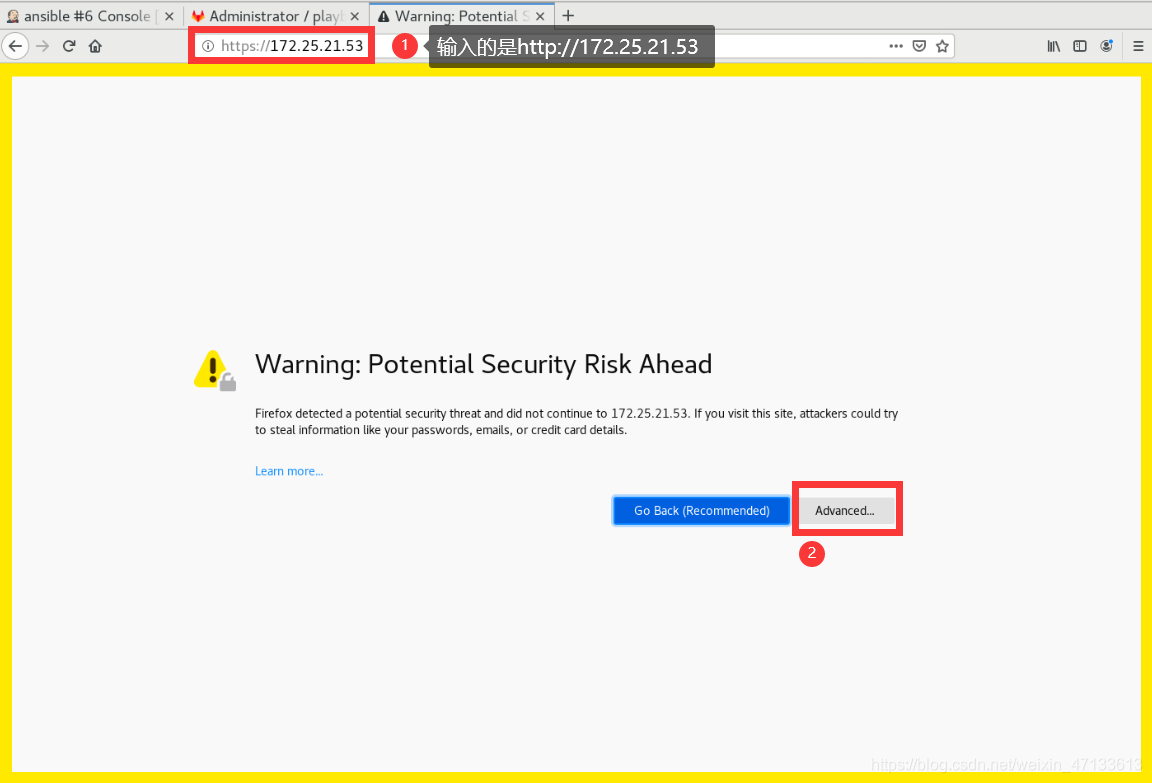
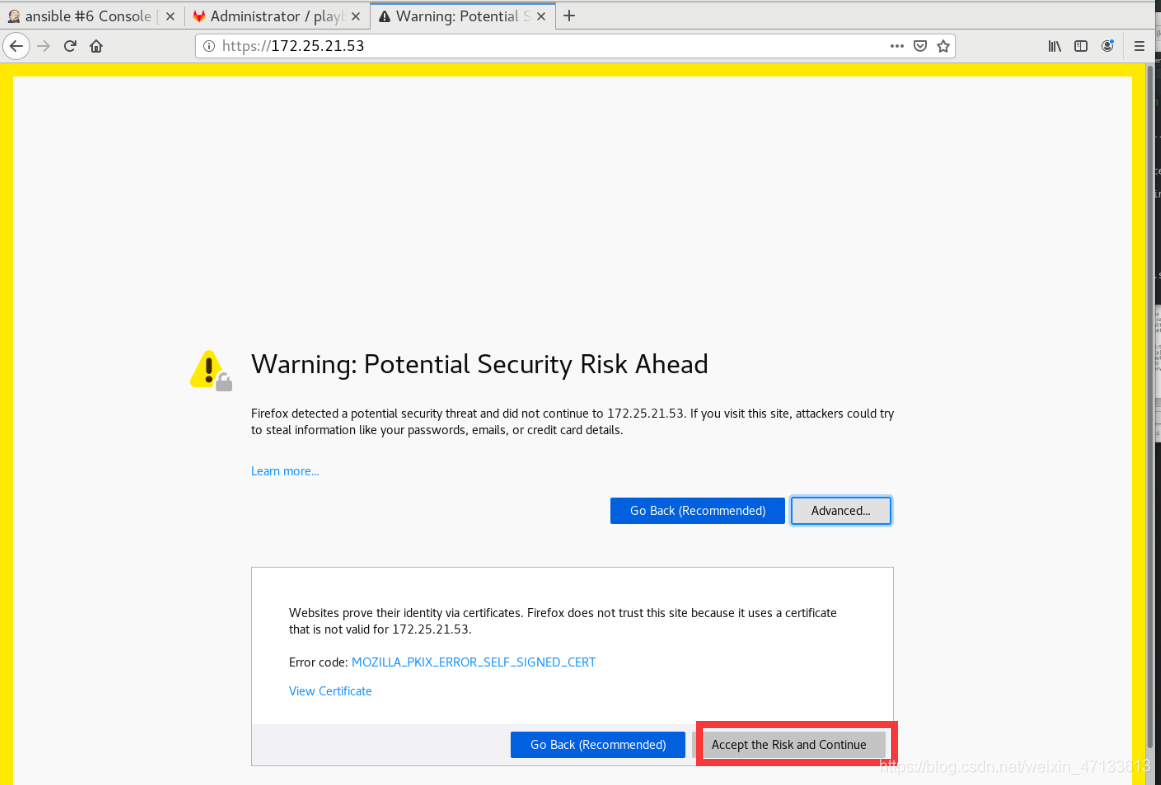
-
web界面测试:访问53的80端口,会重定向到443端口
企业级仓库部署完毕

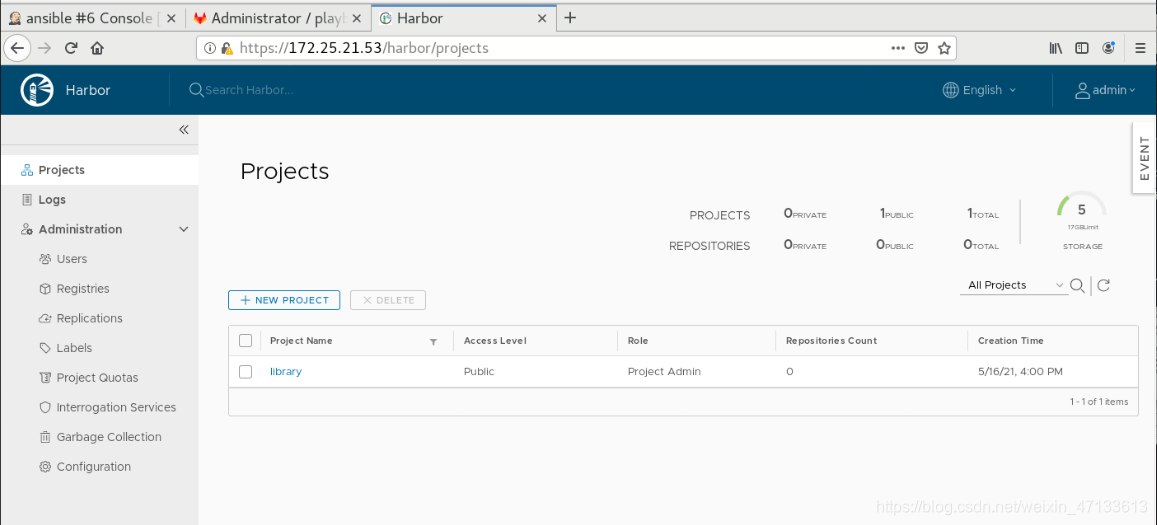
-
如何在harbor仓库中放入镜像
- 下载镜像到docker主机
[root@foundation21 images]# scp game2048.tar root@172.25.21.52:
- 导入docker引擎
[root@server52 ~]# ls
game2048.tar  index.html  jdk-8u171-linux-x64.rpm  jenkins-2.293-1.1.noarch.rpm
[root@server52 ~]# docker load -i game2048.tar
011b303988d2: Loading layer   5.05MB/5.05MB
36e9226e74f8: Loading layer  51.46MB/51.46MB
192e9fad2abc: Loading layer  3.584kB/3.584kB
6d7504772167: Loading layer  4.608kB/4.608kB
88fca8ae768a: Loading layer  629.8kB/629.8kB
Loaded image: game2048:latest
[root@server52 ~]# docker images | grep game
game2048                   latest              19299002fdbe        4 years ago         55.5MB
- 写好解析
[root@server52 ~]# vim /etc/hosts
172.25.21.53    server53        reg.westos.org
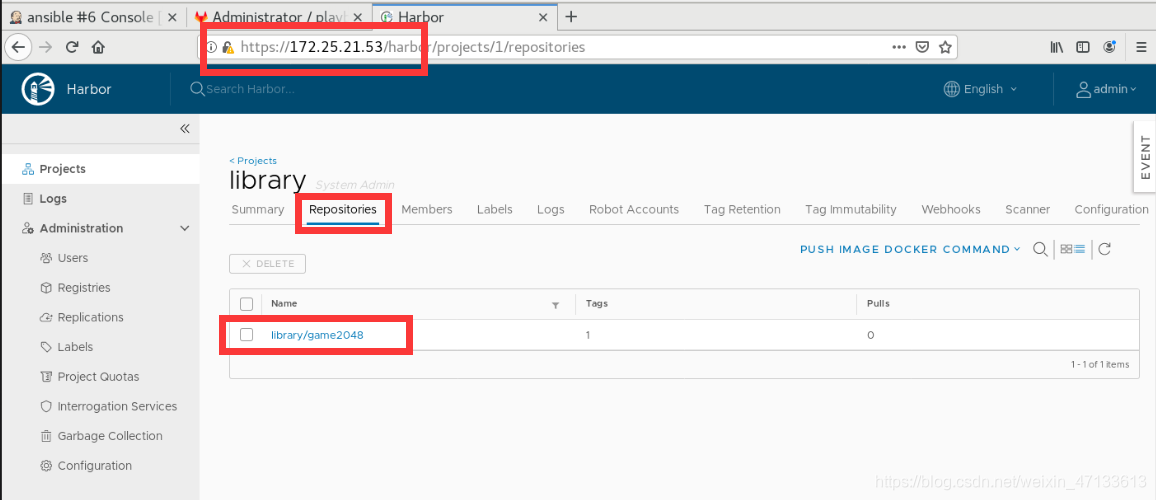
- 把这个镜像推送到这个仓库reg.westos.org的library项目中
[root@server52 ~]# docker images game2048
REPOSITORY          TAG                 IMAGE ID            CREATED             SIZE
game2048            latest              19299002fdbe        4 years ago         55.5MB
[root@server52 ~]# docker tag game2048:latest reg.westos.org/library/game2048:latest
- 上传,
出现第一个报错:访问harbor是需要一个证书的,因为当前走的是443端口
[root@server52 ~]# docker push reg.westos.org/library/game2048:latest
The push refers to repository [reg.westos.org/library/game2048]
Get https://reg.westos.org/v2/: x509: certificate signed by unknown authority
解决方法:获取证书
创建一个/etc/docker/certs.d的目录,在其中创建reg的目录,用来存放该仓库的证书
[root@server52 ~]# cd /etc/docker/
[root@server52 docker]# ls
key.json
[root@server52 docker]# mkdir certs.d
[root@server52 docker]# cd certs.d/
[root@server52 certs.d]# mkdir reg.westos.org
[root@server52 certs.d]# cd reg.westos.org/
将harbor主机的证书发送给docker主机
[root@server53 harbor]# cd /data/
[root@server53 data]# ls
ca_download  certs  database  job_logs  psc  redis  registry  secret
[root@server53 data]# cd certs/
[root@server53 certs]# ls
westos.org.crt  westos.org.key
[root@server53 certs]# scp westos.org.crt server52:/etc/docker/certs.d/reg.westos.org/ca.crt
The authenticity of host 'server52 (172.25.21.52)' can't be established.
ECDSA key fingerprint is SHA256:5MeIHED928GSroSsK9KPHYQnw6xIzXiwAsOpWvGjlQQ.
ECDSA key fingerprint is MD5:ed:12:13:da:9c:47:75:73:ac:42:cf:7c:a4:8b:52:3d.
Are you sure you want to continue connecting (yes/no)? yes
Warning: Permanently added 'server52,172.25.21.52' (ECDSA) to the list of known hosts.
root@server52's password:
westos.org.crt                                              100% 2106     3.0MB/s   00:00
- 上传,
出现第二个报错:没有权限访问
[root@server52 reg.westos.org]# ls
ca.crt
[root@server52 reg.westos.org]# docker push reg.westos.org/library/game2048:latest
The push refers to repository [reg.westos.org/library/game2048]
88fca8ae768a: Preparing
6d7504772167: Preparing
192e9fad2abc: Preparing
36e9226e74f8: Preparing
011b303988d2: Preparing
denied: requested access to the resource is denied
解决方法:授权登录
[root@server52 reg.westos.org]# docker login reg.westos.org
Username: admin
Password:
WARNING! Your password will be stored unencrypted in /root/.docker/config.json.
Configure a credential helper to remove this warning. See
https://docs.docker.com/engine/reference/commandline/login/#credentials-store

Login Succeeded
-
总结:先认证,再授权
-
上传成功
(此时,还没有和Jenkins结合)
5.1 Jenkins和harbor仓库结合
- 拉取镜像
- 先做好解析
[root@server53 harbor]# vim /etc/hosts
172.25.21.53    server53        reg.westos.org
- 证书
[root@server53 harbor]# cd /etc/docker/
[root@server53 docker]# ls
daemon.json  key.json
[root@server53 docker]# mkdir certs.d
[root@server53 docker]# cd certs.d/
[root@server53 certs.d]# mkdir reg.westos.org
[root@server53 certs.d]# cd reg.westos.org/
[root@server53 reg.westos.org]# cp /data/certs/westos.org.crt ca.crt
[root@server53 reg.westos.org]# ls
ca.crt
- 拉取
[root@server53 reg.westos.org]# cd
[root@server53 ~]# docker pull reg.westos.org/library/game2048:latest
latest: Pulling from library/game2048
534e72e7cedc: Pull complete
f62e2f6dfeef: Pull complete
fe7db6293242: Pull complete
3f120f6a2bf8: Pull complete
4ba4e6930ea5: Pull complete
Digest: sha256:8a34fb9cb168c420604b6e5d32ca6d412cb0d533a826b313b190535c03fe9390
Status: Downloaded newer image for reg.westos.org/library/game2048:latest
reg.westos.org/library/game2048:latest
- 运行2048的镜像
[root@server53 ~]# docker run -d --name game2048 -p 8080:80 reg.westos.org/library/game2048
d12fef277b0ab12668ea6104cc996643e3d359eef4d4e71de5b74b7a9ca4a087
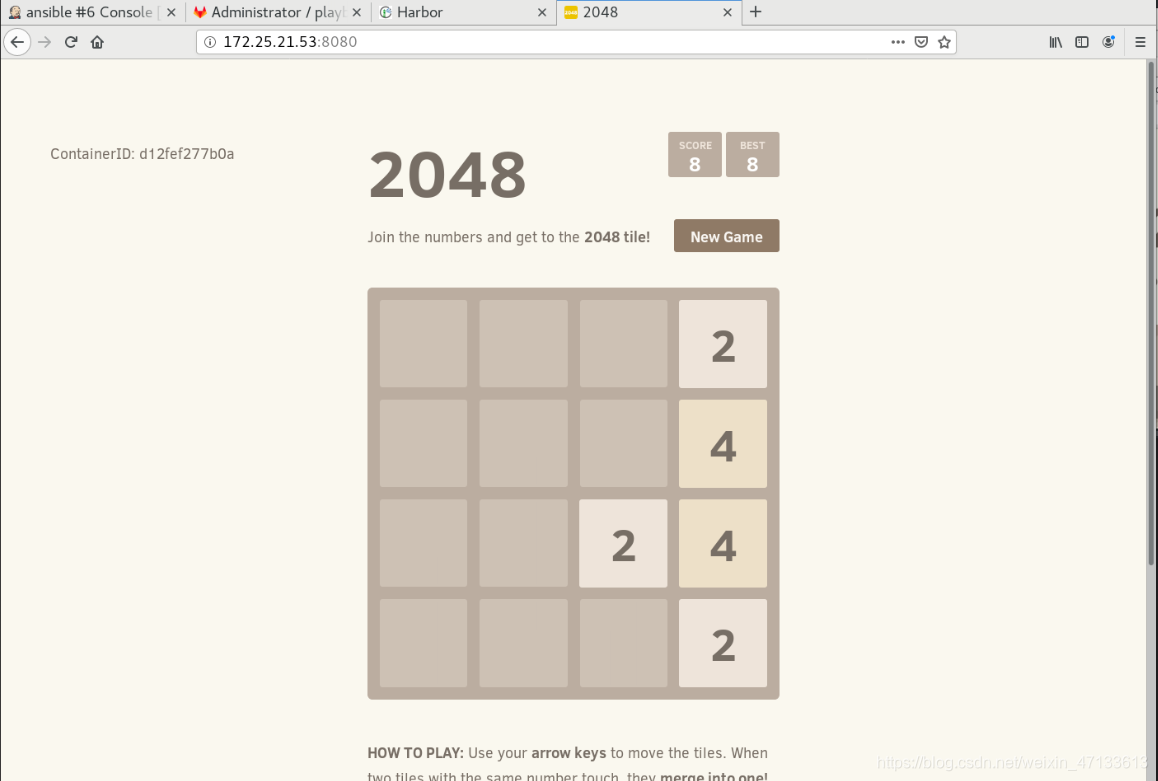 成功之后,删除该镜像
[root@server53 ~]# docker rm -f game2048
game2048
【以上是手动部署harbor仓库】
5.2 Jenkins自动化构建harbor仓库
- test项目负责镜像构建
推送镜像到远端,要求仓库加密
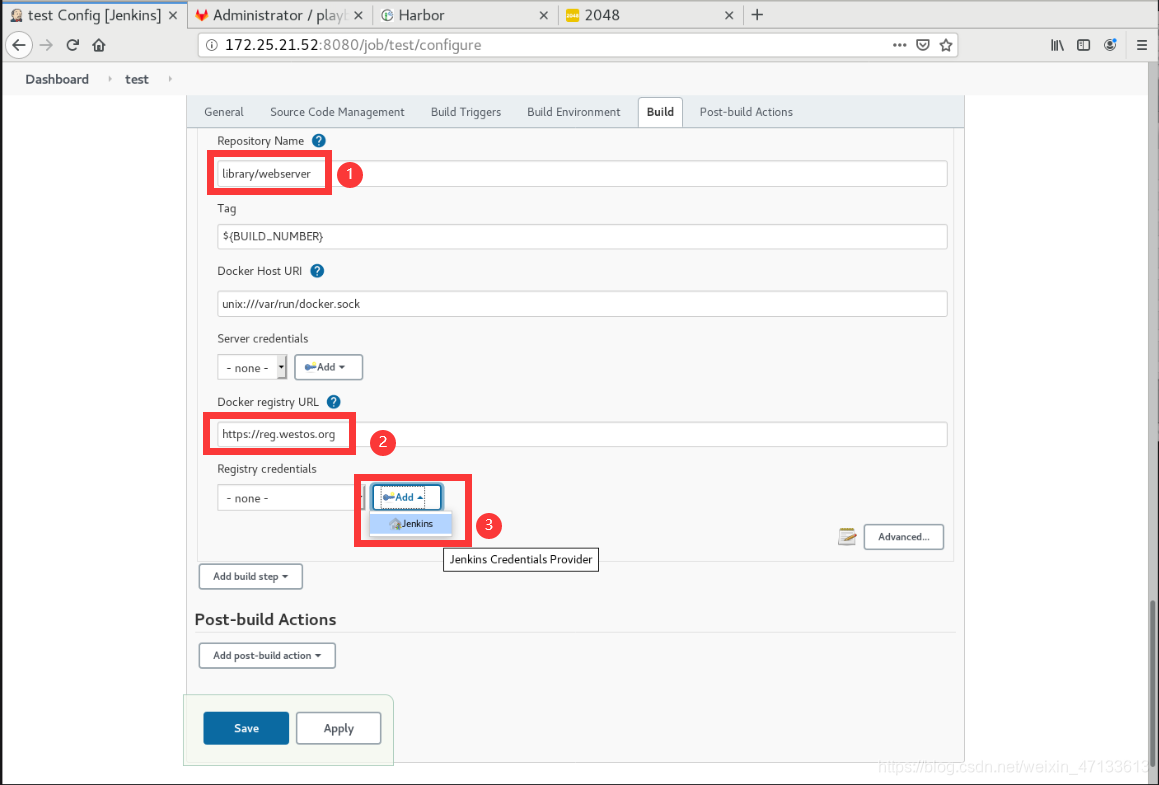
- 添加凭据
使用用户名和密码
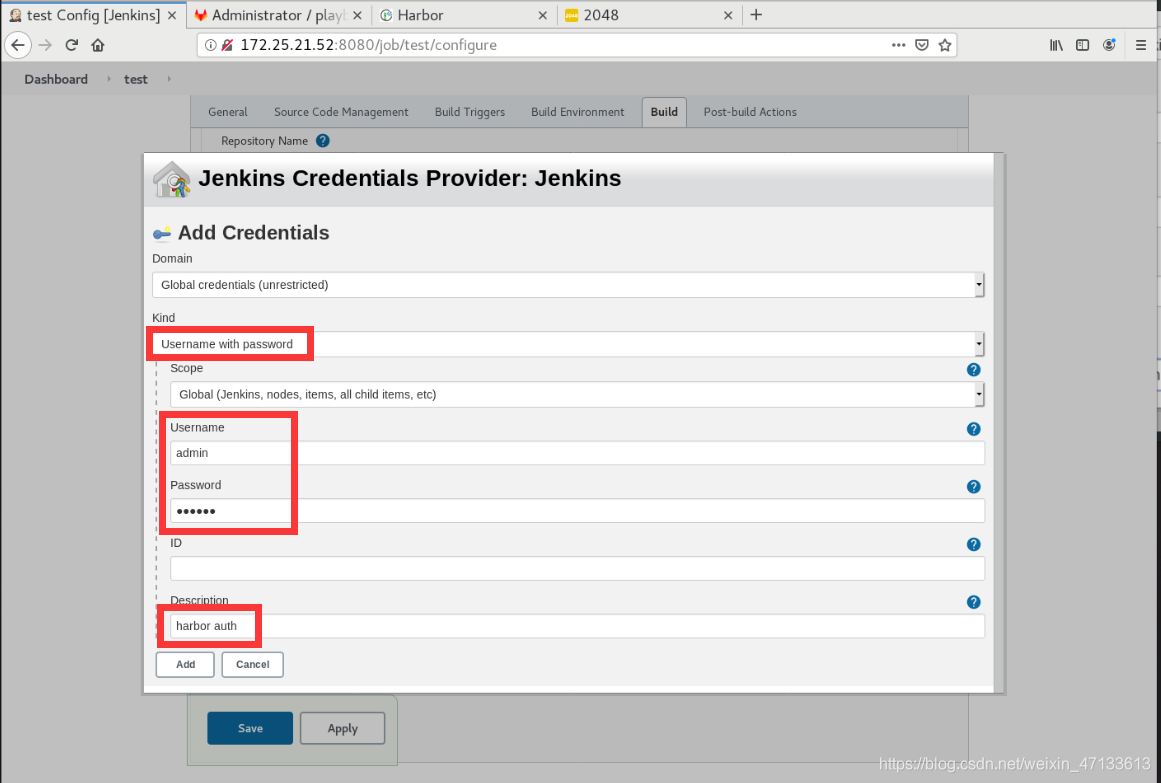
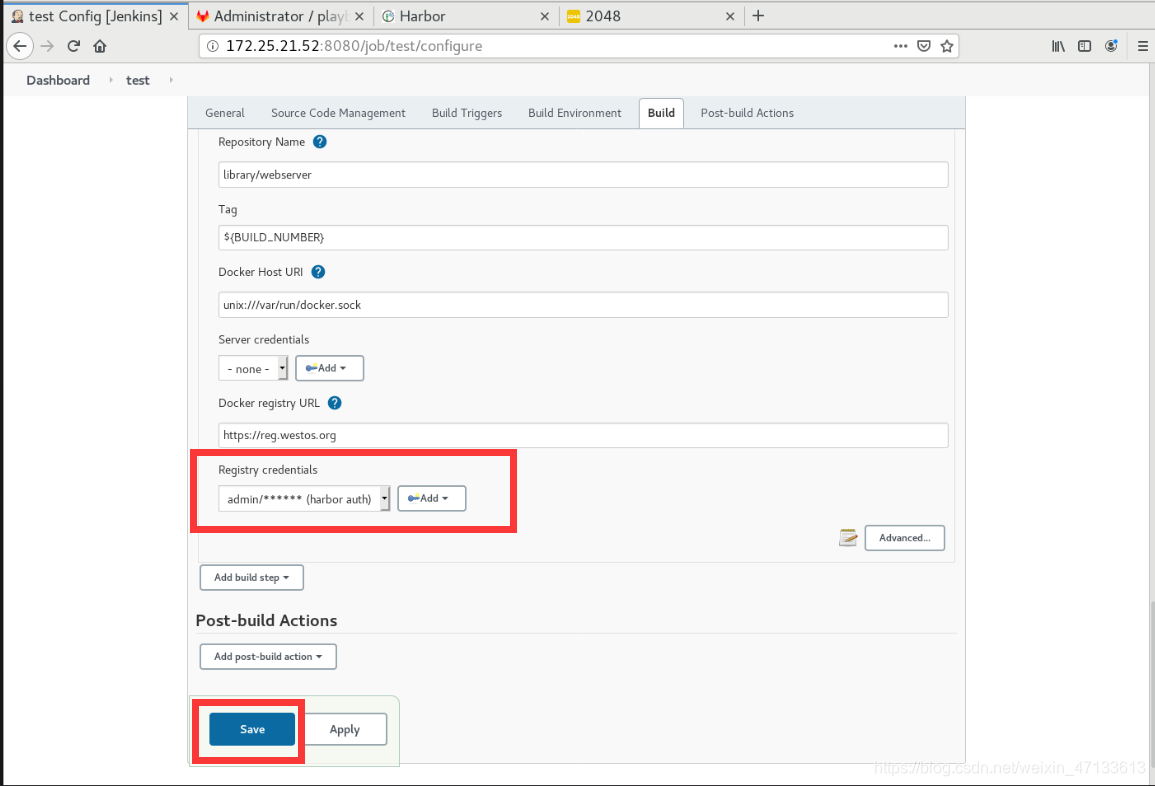
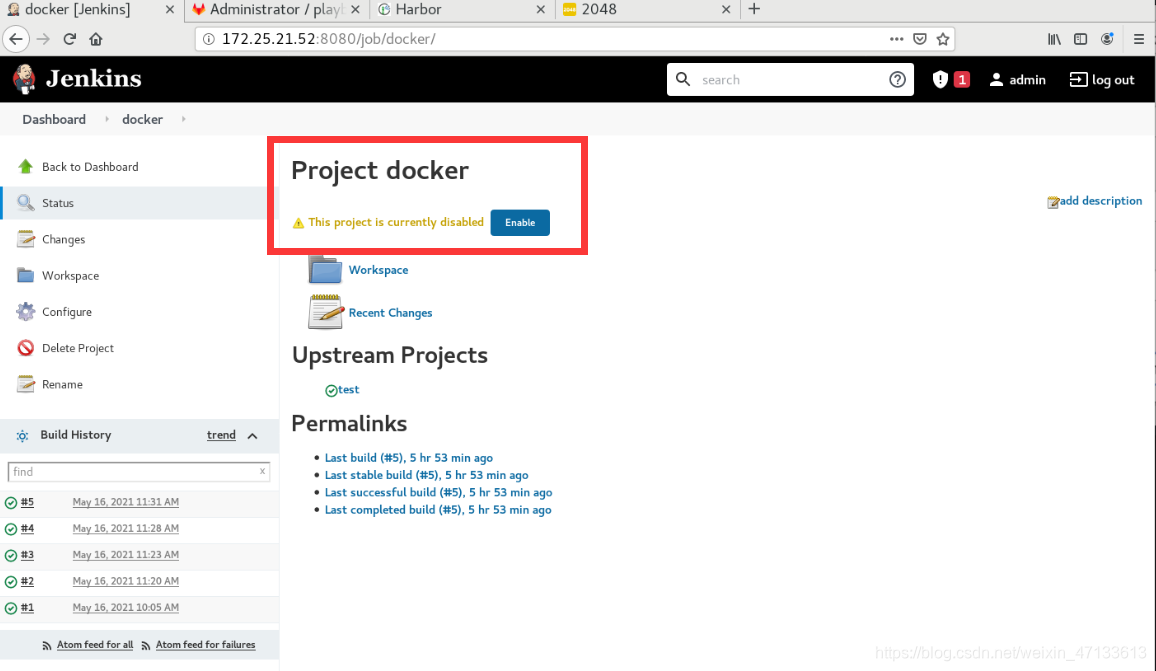
因为test运行,docker就会被触发。所以,先禁用docker项目
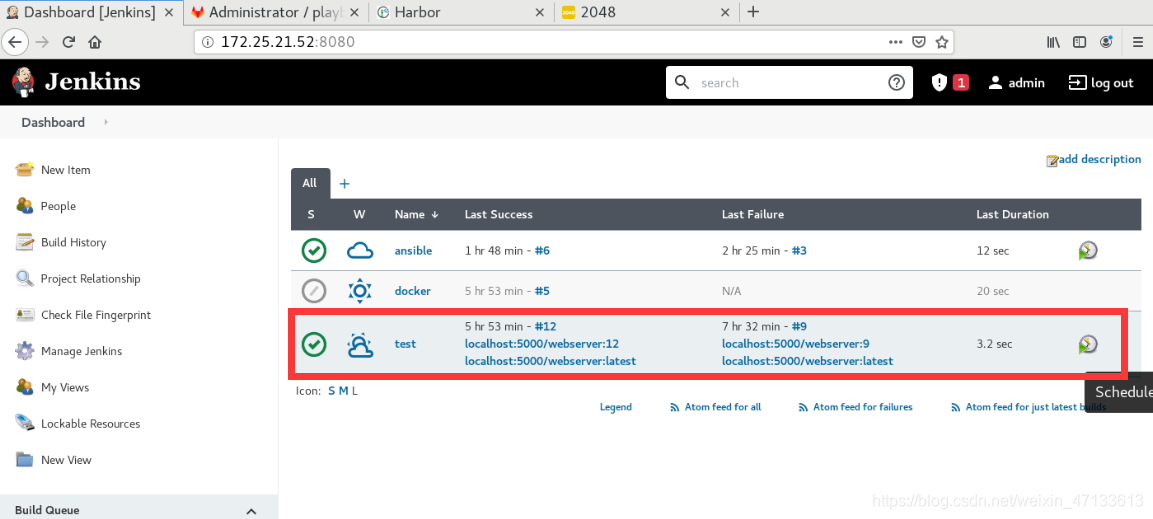
- 触发test项目
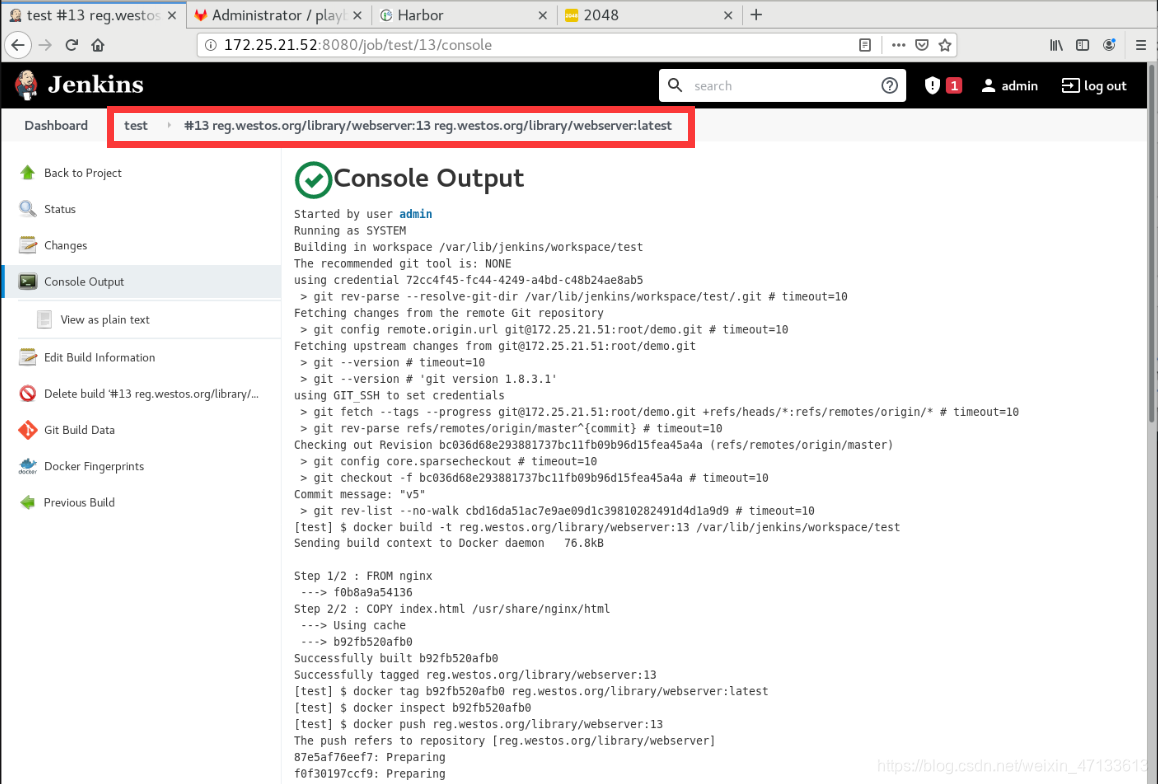
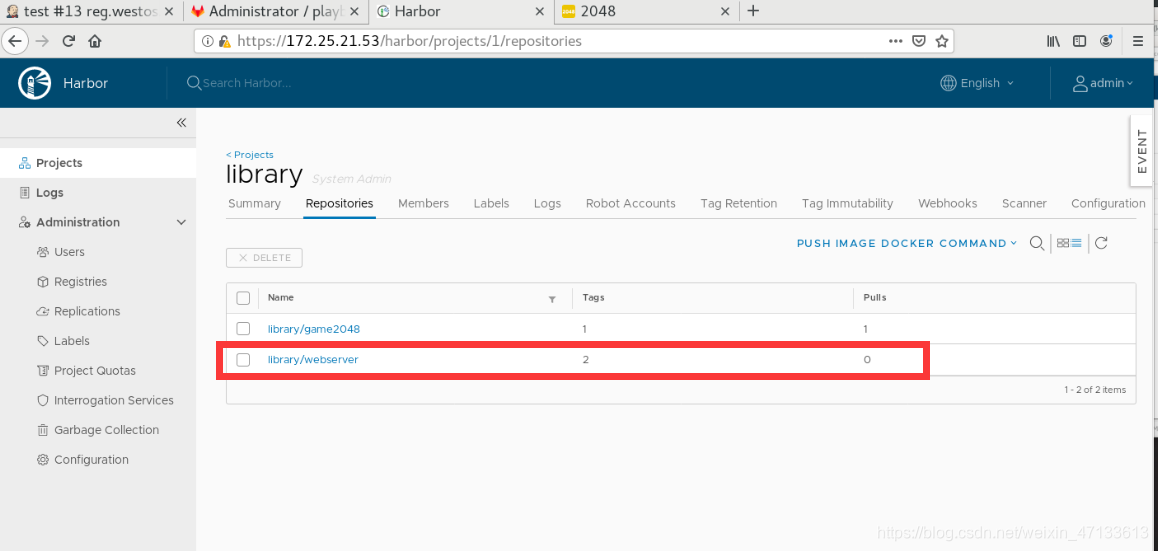
- harbor的web界面
- 启用docker
- 修改
/etc/dacker/daemon.json文件。docker访问的是reg.westos.org这个仓库
[root@server53 ~]# cd -
/etc/docker
[root@server53 docker]# vim daemon.json
{
        "registry-mirrors": ["https://reg.westos.org"]
}

[root@server53 docker]# systemctl reload docker.service
[root@server53 docker]# docker info
Client:
 Debug Mode: false

Server:
 Containers: 9
  Running: 9
  Paused: 0
  Stopped: 0
 Images: 18
 Server Version: 19.03.15
 Storage Driver: overlay2
  Backing Filesystem: xfs
  Supports d_type: true
  Native Overlay Diff: true
 Logging Driver: json-file
 Cgroup Driver: cgroupfs
 Plugins:
  Volume: local
  Network: bridge host ipvlan macvlan null overlay
  Log: awslogs fluentd gcplogs gelf journald json-file local logentries splunk syslog
 Swarm: inactive
 Runtimes: runc
 Default Runtime: runc
 Init Binary: docker-init
 containerd version: 05f951a3781f4f2c1911b05e61c160e9c30eaa8e
 runc version: 12644e614e25b05da6fd08a38ffa0cfe1903fdec
 init version: fec3683
 Security Options:
  seccomp
   Profile: default
 Kernel Version: 3.10.0-957.el7.x86_64
 Operating System: Red Hat Enterprise Linux Server 7.6 (Maipo)
 OSType: linux
 Architecture: x86_64
 CPUs: 2
 Total Memory: 991MiB
 Name: server53
 ID: V7A2:C2XE:VT46:FWHN:5PZ2:GUBD:74N2:T6HG:BBT4:CF3O:7XFN:WNTI
 Docker Root Dir: /var/lib/docker
 Debug Mode: false
 Registry: https://index.docker.io/v1/
 Labels:
 Experimental: false
 Insecure Registries:
  172.25.21.52:5000
  127.0.0.0/8
 Registry Mirrors:
  https://reg.westos.org/
 Live Restore Enabled: false
- 确保没有webserver镜像,才可以拉取webserver
[root@server53 docker]# docker images | grep webserver
172.25.21.52:5000/webserver       latest                           b92fb520afb0        6 hours ago         133MB
[root@server53 docker]# docker rmi 172.25.21.52:5000/webserver:latest
Untagged: 172.25.21.52:5000/webserver:latest
Untagged: 172.25.21.52:5000/webserver@sha256:2b8eea0aa6aa7d15ed382ed583a80e65f94f96c7193a46cfcae940d9e4b3907a
Deleted: sha256:b92fb520afb0a6fe3bac4a3715c6eea3011a87e9402a50b0c9ea3cfa8a56db70
Deleted: sha256:2604841ece4e84311aa5f11b798901049493801af924c2005d3e4893817f4da7
Deleted: sha256:60f61ee7da08c2a5c5f6a76c1f2926f50ba1d01d8ec4af9afb8fdcd3d97ef6f9
Deleted: sha256:affa58c5a9d1d907c11d8589d4e08d2dc8e4e6b71b141269405a2e67d0a8b011
Deleted: sha256:6b1533d42f38a9c55cad97d4e01c03756ab82b61798b6c4f4bc9122093bb6ebd
Deleted: sha256:5c3e94c8305f2a4158258725fe33d2451842c13a97c76f02042a7a7e0aa3799a
Deleted: sha256:adda6567aeaa86913f56f0e4647032e1d9347bd63ed98a320f904c71df2637c1
Deleted: sha256:02c055ef67f5904019f43a41ea5f099996d8e7633749b6e606c400526b2c4b33
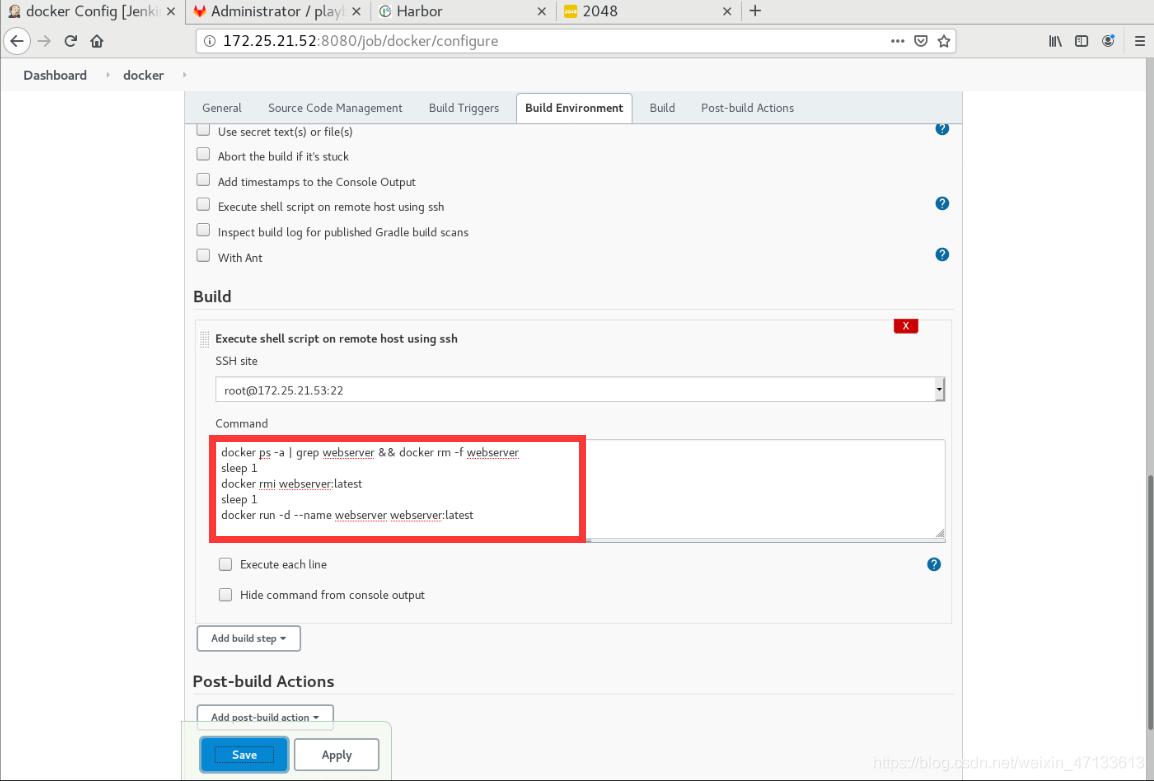
- 修改docker项目的shell脚本
docker ps -a | grep webserver && docker rm -f webserver
sleep 1
docker rmi webserver:latest
sleep 1
docker run -d --name webserver webserver:latest
- 触发docker
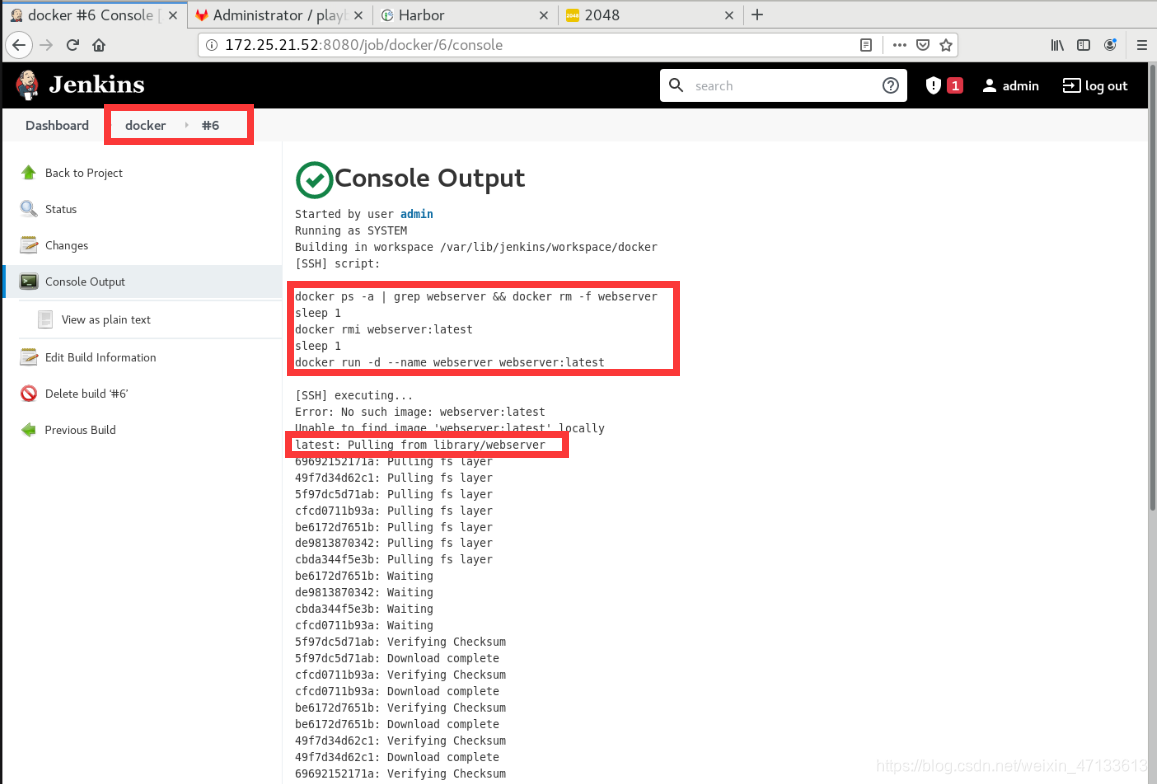 部署成功
部署成功
[root@server53 docker]# docker images | grep webserver
webserver                         latest                           b92fb520afb0        6 hours ago         133MB
[root@server53 docker]# ip addr show docker0
3: docker0: <BROADCAST,MULTICAST,UP,LOWER_UP> mtu 1500 qdisc noqueue state UP group default
    link/ether 02:42:4a:25:dc:d6 brd ff:ff:ff:ff:ff:ff
    inet 172.17.0.1/16 brd 172.17.255.255 scope global docker0
       valid_lft forever preferred_lft forever
    inet6 fe80::42:4aff:fe25:dcd6/64 scope link
       valid_lft forever preferred_lft forever
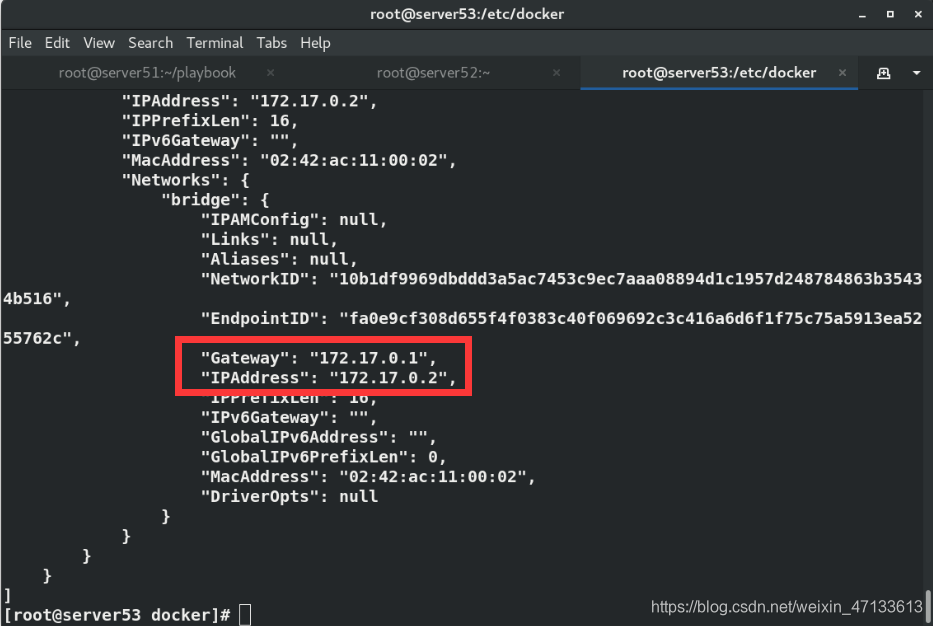
[root@server53 docker]# docker inspect webserver
                   "Gateway": "172.17.0.1",
                    "IPAddress": "172.17.0.2",
                    "IPPrefixLen": 16,
                    "IPv6Gateway": "",
                    "GlobalIPv6Address": "",
                    "GlobalIPv6PrefixLen": 0,
                    "MacAddress": "02:42:ac:11:00:02",
                    "DriverOpts": null
[root@server53 docker]# curl 172.17.0.2
www.linux.org
www.linux.org
www.linux.org
www.linux.org
www.linux.org
www.linux.org


 被折叠的 条评论
为什么被折叠?
被折叠的 条评论
为什么被折叠?
 到【灌水乐园】发言


