


一、概述
1、SpringBoot 的优、缺点
优点:
- 创建独立的 Spring 应用
- 内嵌 Web 服务器
- 自动 starter 依赖,简化配置
- 自动配置 Spring 和 第三方功能
- 提供生产级别的监控、健康检查及外部化配置
- 无代码生成、无需编写XML
- SpringBoot是整合 Spring 技术栈的一站式框架
- SpringBoot是简化 Spring 技术栈的快速开发脚手架
缺点:
- 人称版本帝,迭代快,需要时刻关注变化
- 封装太深,内部原理复杂,不容易精通
2、SpringBoot 入门
2.1 环境要求
- Java 8 及以上
- Maven 3.3 及以上
- Intelli IDEA 2019.1.2 及以上
2.2 搭建 SpringBoot 应用
- 新建一个普通的 maven 工程
- 引入依赖
<parent> <groupId>org.springframework.boot</groupId> <artifactId>spring-boot-starter-parent</artifactId> <version>2.6.7</version> </parent> <dependencies> <dependency> <groupId>org.springframework.boot</groupId> <artifactId>spring-boot-starter-web</artifactId> </dependency> </dependencies> - 创建主程序
@SpringBootApplication public class MainApplication { public static void main(String[] args) { SpringApplication.run(MainApplication.class, args); } } - 编写业务代码
@RestController public class HelloController { @RequestMapping("/hello") public String handle01(){ return "Hello, Spring Boot!"; } } - 运行&测试
① 运行MainApplication类
② 浏览器访问http://localhost:8888/hello,页面输出Hello, Spring Boot!
OK,大功告成!
二、深入学习 SpringBoot
1、依赖管理
- 父项目做依赖管理
在 pom.xml 中引入了如下父项目:
上面的父项目又引入了如下父项目,在该项目中声明了几乎所有开发中常用依赖的版本号,所以在引入依赖时不必再声明版本号:<parent> <groupId>org.springframework.boot</groupId> <artifactId>spring-boot-starter-parent</artifactId> <version>2.3.4.RELEASE</version> </parent><parent> <groupId>org.springframework.boot</groupId> <artifactId>spring-boot-dependencies</artifactId> <version>2.3.4.RELEASE</version> </parent> - 场景启动器(starter)
在 pom.xml 中引入了 web 场景启动器:
在开发中,只要引入了某个场景的 starter,则该场景需要的所有常规依赖都会自动引入。<dependencies> <dependency> <groupId>org.springframework.boot</groupId> <artifactId>spring-boot-starter-web</artifactId> </dependency> </dependencies>
spring-boot-starter-* :表示Spring官方的场景启动器。
*-spring-boot-starter : 表示第三方场景启动器。 - 修改依赖默认版本号
在最底层父项目 spring-boot-dependencies 中,可以查看当前依赖版本用的 key。若要修改,可在当前项目的 pom.xml 中添加以下内容:<!-- 举例 --> <properties> <java.version>11</java.version> <jedis.version>3.8.0</jedis.version> </properties>
2、自动配置
- 自动配好 Tomcat 服务器
- 自动配好 SpringMVC
- 自动配好 Web 常见功能(如字符编码问题)
- 自动开启组件扫描:
① 默认扫描主程序所在包及其下面的所有子包
② 自定义包扫描路径:@SpringBootApplication(scanBasePackages=“com.xxx”) - 自动配置默认值:
① 默认配置最终都是映射到某个类上,如DataSourceProperties
② xxxProperties 自动绑定配置文件中配置的值(在 SpringBoot 中,只需在 resource 目录下创建一个 application.properties 配置文件,即可完成所有的配置) - 按需加载所有的配置项:
① 引入了哪个场景的 starter,这个场景的自动配置才会开启
② 可在 spring-boot-autoconfigure 包里查看所有的自动配置功能
3、底层注解
3.1 @Configuration
- 作用:表示当前类是一个配置类,会自动注册到 Ioc 容器中。
- 举例:
@Configuration
public class MyConfig {
    @Bean
    public User user(){
        User user= new User("Tom", 18);
        return user;
    }
}
@Bean 注解:表示当前方法的返回值会被注册到 Ioc 容器中,方法名作为组件 id,且如果该方法有形参,会自动从 Ioc 容器中找到对应的实例注入。
- proxyBeanMethods:代理 Bean 方法
- @Configuration 注解可通过设置 proxyBeanMethods 的值,控制被 @Bean 标注的方法返回的是单实例还是多实例。
- @Configuration(proxyBeanMethods = true):默认值,表示开启代理 Bean 方法,此时 @Bean 方法每次返回的都是同一个实例,该模式称为 Full 模式。
- @Configuration(proxyBeanMethods = false):表示不开启代理 Bean 方法,此时 @Bean 方法每次返回的都是一个新的实例,该模式称为 Lite 模式。
如何选用:
① 配置类组件之间无依赖关系时,用 Lite 模式可以加速容器启动过程
② 配置类组件之间有依赖关系时,用 Full 模式
3.2 @Import
- 举例:@Import({User.class, DBHelper.class})
- 作用:在 Ioc 容器中自动创建出这两个类型的组件,默认组件的名字就是全类名
3.3 @Conditional
- 标注范围:类、方法
- 作用:条件装配,当满足条件时,类或方法才生效
3.3 @ImportResource
- 作用:将原 Spring 配置文件 bean.xml 中配置的 bean 注册到 Ioc 容器中
- 举例:
bean.xml
导入:<?xml version="1.0" encoding="UTF-8"?> <beans ..."> <bean id="tom" class="com.boot.bean.User"> <property name="name" value="Tom"></property> <property name="age" value="18"></property> </bean> </beans>@ImportResource("classpath:beans.xml") public class MyConfig { ... }
3.4 @ConfigurationProperties
- 作用:将自定义 bean 类与 application.properties 绑定,实现通过配置文件配置该 bean 类的相关属性。
- 举例:
在 application.properties 中就可以配置相关属性值:@Component // 需要把该类注册到 Ioc 容器中 @ConfigurationProperties(prefix = "mycar") //设置该类在配置文件中的前缀 public class Car { private String brand; private Integer price; }mycar.brand = BYD mycar.price = 100000另一种配置绑定方式:@ConfigurationProperties + @EnableConfigurationProperties
@ConfigurationProperties(prefix = "mycar") //设置该类在配置文件中的前缀 public class Car { private String brand; private Integer price; }@EnableConfigurationProperties(Car.class) public class MyConfig { ... }
3.5 @SpringBootApplication
@Target(ElementType.TYPE)
@Retention(RetentionPolicy.RUNTIME)
@Documented
@Inherited
@SpringBootConfiguration
@EnableAutoConfiguration
@ComponentScan(
    excludeFilters = {@Filter(
    type = FilterType.CUSTOM,
    classes = {TypeExcludeFilter.class}
), @Filter(
    type = FilterType.CUSTOM,
    classes = {AutoConfigurationExcludeFilter.class}
)}
)
public @interface SpringBootApplication {
    ...
}
标志当前类是 SpringBoot 启动类,重点关注其中的 @SpringBootConfiguration、@EnableAutoConfiguration、@ComponentScan。
- @SpringBootConfiguration:标识当前类是 SpringBoot 配置类。
- @ComponentScan:开启组件扫描。
- @EnableAutoConfiguration:开启自动配置,重点关注其中的
@AutoConfigurationPackage、@Import(AutoConfigurationImportSelector.class)。@Target(ElementType.TYPE) @Retention(RetentionPolicy.RUNTIME) @Documented @Inherited @AutoConfigurationPackage @Import(AutoConfigurationImportSelector.class) public @interface EnableAutoConfiguration { String ENABLED_OVERRIDE_PROPERTY = "spring.boot.enableautoconfiguration"; Class<?>[] exclude() default {}; String[] excludeName() default {}; }
3.5.1 @AutoConfigurationPackage
@Target(ElementType.TYPE)
@Retention(RetentionPolicy.RUNTIME)
@Documented
@Inherited
@Import(AutoConfigurationPackages.Registrar.class)//给容器中导入一个组件
public @interface AutoConfigurationPackage {
    String[] basePackages() default {};
    Class<?>[] basePackageClasses() default {};
}
该注解直译为:自动配置包,指定了默认的包规则,利用 Registrar 将组件注册到 Ioc 容器中。
3.5.2 @Import(AutoConfigurationImportSelector.class)
AutoConfigurationImportSelector:自动配置导入选择器,将需要的自动配置类注册到 Ioc 容器中。
当工程启动时,默认会加载全部 127 个场景的所有自动配置类,但由于自动配置类上有条件注解@Conditional,只有满足条件的自动配置类才会生效,才能被注册到 Ioc 容器中。
如AopAutoConfiguration类:
@Configuration(
    proxyBeanMethods = false
)
@ConditionalOnProperty(
    prefix = "spring.aop",
    name = "auto",
    havingValue = "true",
    matchIfMissing = true
)
public class AopAutoConfiguration {
	...
}
4、自动配置的流程
- 工程启动时,SpringBoot 会自动加载所有的自动配置类 xxxAutoConfiguration;
- 每个自动配置类按照条件进行生效,默认都会绑定配置文件中指定的值(每个自动配置类里都会导入对应的 xxxProperties 类,该类与配置文件进行了绑定,可以从配置文件中获取所需值);
- 生效的自动配置类向容器中注册相应的组件。
- 定制化配置:
① 通过 @Bean 直接替换默认组件;
② 通过 xxxProperties 类查看该组件在配置文件中的 key,修改即可。
5、简化开发
5.1 Lombok
IDEA 2020 版本及以后,默认集成了 Lombok 插件,只需引入其依赖即可。
<dependency>
    <groupId>org.projectlombok</groupId>
    <artifactId>lombok</artifactId>
</dependency>
作用一:简化 bean 类的代码。
@Data //自动生成当前类所有属性的get、set、toString、equals、hashCode等方法
public class User {
    private Integer uid;
    private String uname;
}
作用二:简化日志开发。
@Slf4j
@RestController
public class HelloController {
    @RequestMapping("/hello")
    public String handle01(@RequestParam("name") String name){
        log.info("请求进来了....");
        return "Hello, Spring Boot 2!"+"你好:"+name;
    }
}
6、Spring Initializr
Spring Initializr 是创建 SpringBoot 工程的向导。
创建步骤:在 IDEA 中,菜单栏New -> Project -> Spring Initializr。
7、配置文件 - yaml
application.yaml 可以替代 application.proterties,作为工程的配置文件。
7.1 语法
- key: value (冒号和value之间有空格)
- 大小写敏感
- 使用缩进表示层级关系
- 缩进不允许使用 tab,只允许空格
- 缩进的空格数不重要,只要相同层级的元素左对齐即可
- ‘#’ 表示注释
- 字符串无需加引号,如果要加,单引号’’、双引号""表示字符串内容会 转义、不转义
7.2 数据类型
- 字面量:单个的、不可再分的值。date、boolean、string、number、null
age: 18 - 对象:键值对的集合。map、hash、set、object
# 行内写法 k: {k1:v1,k2:v2,k3:v3} # 或 k: k1: v1 k2: v2 k3: v3 - 数组:一组按次序排列的值。array、list、queue
# 行内写法:
k: [v1,v2,v3]

# 或
k:
 - v1
 - v2
 - v3
8、自定义类绑定的配置提示
当我们在配置文件中设置自定义类的属性值时,一般都没有提示。若需要提示,则在 pom.xml 中引入如下依赖:
<dependency>
    <groupId>org.springframework.boot</groupId>
    <artifactId>spring-boot-configuration-processor</artifactId>
    <optional>true</optional>
</dependency>

<!-- 下面插件作用是工程打包时,不将spring-boot-configuration-processor打进包内,让其只在编码的时候有用 -->
<build>
    <plugins>
        <plugin>
            <groupId>org.springframework.boot</groupId>
            <artifactId>spring-boot-maven-plugin</artifactId>
            <configuration>
                <excludes>
                    <exclude>
                        <groupId>org.springframework.boot</groupId>
                        <artifactId>spring-boot-configuration-processor</artifactId>
                    </exclude>
                </excludes>
            </configuration>
        </plugin>
    </plugins>
</build>
9、Web 场景
9.1 静态资源规则与定制化
- 静态资源的默认存放目录:
classpath:/META-INF/resources/
classpath:/resources/
classpath:/static/
classpath:/public/
classpath:映射为 maven 工程下的 /resources/ 目录。
- 静态资源的默认访问路径:
localhost:port/静态资源名,会自动到默认存放目录寻找静态资源,因为内部的映射规则为/**,/表示 resources 目录。 - 修改自定义存放目录,则默认目录会失效:
spring: web: resources: static-locations: [classpath:/haha/] - 修改静态资源的访问前缀:
此时的访问路径:spring: mvc: static-path-pattern: /res/**localhost:port/res/静态资源名。 - welcome page:欢迎页。在静态资源存放目录下放 index.html,则访问
localhost:port/时,会自动加载 index.html。(如果设置了静态资源访问前缀,则该功能失效) - Favicon:网页标签上的小图标。在静态资源存放目录下放 favicon.ico,则访问该工程时,网页标签会自动加载该小图标。(文件名不能变,不能设置静态资源访问前缀)
9.2 Rest 映射
-
rest 风格的请求:请求路径中只包含操作对象,要执行的操作通过请求方法表示。
-
举例:假设请求路径是
/user,则请求方法不同,执行的操作也不同。- get:获取用户
- post:添加用户
- delete:删除用户
- put:修改用户
-
SpringBoot 默认关闭 rest 风格,若要开启表单的 rest 功能,需添加以下配置:
spring: mvc: hiddenmethod: filter: enabled: true -
其内部是通过
HiddenHttpMethodFilter实现的。
9.2.1 Rest 实现原理
- 首先表单的请求方法必须是
post; - 其次表单必须携带参数名为
_method的隐藏域:<input type="hidden" name="_method" value="delete"> 或 <input type="hidden" name="_method" value="put"> - 请求过来会先被
HiddenHttpMethodFilter拦截,该过滤器判断请求是否正常以及请求方法是否是post; - 判断成功,会先获取
_method的值,然后判断该值是否在预设的请求方法集合内; - 判断成功,会将
_method的值传给一个 request 包装类HttpMethodRequestWrapper,该包装类重写了getMethod()方法; - 在接下来的过滤器链放行时,用的是该 request 包装类,所以之后调用
getMethod()时调用的都是HttpMethodRequestWrapper的。
HiddenHttpMethodFilter源码:
public class HiddenHttpMethodFilter extends OncePerRequestFilter {
	...
	public static final String DEFAULT_METHOD_PARAM = "_method";
	...

	@Override
	protected void doFilterInternal(HttpServletRequest request, HttpServletResponse response, FilterChain filterChain)
			throws ServletException, IOException {

		HttpServletRequest requestToUse = request;

		if ("POST".equals(request.getMethod()) && request.getAttribute(WebUtils.ERROR_EXCEPTION_ATTRIBUTE) == null) {
			String paramValue = request.getParameter(this.methodParam);
			if (StringUtils.hasLength(paramValue)) {
				String method = paramValue.toUpperCase(Locale.ENGLISH);
				if (ALLOWED_METHODS.contains(method)) {
					requestToUse = new HttpMethodRequestWrapper(request, method);
				}
			}
		}

		filterChain.doFilter(requestToUse, response);
	}

	private static class HttpMethodRequestWrapper extends HttpServletRequestWrapper {
		...

		@Override
		public String getMethod() {
			return this.method;
		}
	}
}
9.2.2 修改默认参数名_method
WebMvcAutoConfiguration源码:
public class WebMvcAutoConfiguration {
    ...

    @Bean
    @ConditionalOnMissingBean(HiddenHttpMethodFilter.class)
    @ConditionalOnProperty(prefix = "spring.mvc.hiddenmethod.filter", name = "enabled", matchIfMissing = false)
    public OrderedHiddenHttpMethodFilter hiddenHttpMethodFilter() {
        return new OrderedHiddenHttpMethodFilter();
    }

    ...
}
分析源码可知,当 Ioc 容器内没有 HiddenHttpMethodFilter 组件时,hiddenHttpMethodFilter()方法才生效,所以我们可以自定义一个 HiddenHttpMethodFilter 作为 Ioc 容器中的组件,代码如下:
@Configuration(proxyBeanMethods = false)
public class WebConfig{
    //自定义filter
    @Bean
    public HiddenHttpMethodFilter hiddenHttpMethodFilter(){
        HiddenHttpMethodFilter methodFilter = new HiddenHttpMethodFilter();
        methodFilter.setMethodParam("_m");
        return methodFilter;
    }
}
10、请求映射原理
DispatcherServlet:所有的请求都是通过 DispatcherServlet 的doDispatch()方法进行处理的 。
请求映射原理:遍历所有的HandlerMapping,找到能够处理当前请求的Handler。
protected void doDispatch(HttpServletRequest request, HttpServletResponse response) throws Exception {
	...
       // 找到当前请求使用哪个Handler(Controller的方法)处理
       mappedHandler = getHandler(processedRequest);
    ...
}
@Nullable
protected HandlerExecutionChain getHandler(HttpServletRequest request) throws Exception {
    if (this.handlerMappings != null) {
        for (HandlerMapping mapping : this.handlerMappings) {
            HandlerExecutionChain handler = mapping.getHandler(request);
            if (handler != null) {
                return handler;
            }
        }
    }
    return null;
}
this.handlerMappings 中包含以下几个 HandlerMapping:
- RequestMappingHandlerMapping:表示 @RequestMapping 注解对应的处理器映射器;
- WelcomePageHandlerMapping:欢迎页请求对应的处理器映射器;
- BeanNameUrlHandlerMapping:
- RouterFunctionHandlerMapping:
- SimpleUrlHandlerMapping:
RequestMappingHandlerMapping 中保存了所有@RequestMapping和handler的映射规则。
11、请求处理-常用参数注解
- @PathVariable:该注解标注的形参会从请求路径中获取对应的实参
- @RequestHeader:该注解标注的形参会从请求头中获取对应的实参
- @RequestParam:该注解标注的形参会从请求参数中获取对应的实参
- @CookieValue:该注解标注的形参会从Cookie中获取对应的实参
@RestController public class ParameterTestController { // car/2/owner/zhangsan?age=18&hobby=run&hobby=sing @GetMapping("/car/{id}/owner/{username}") public Map<String,Object> getCar(@PathVariable("id") Integer id, @PathVariable("username") String name, @PathVariable Map<String,String> pv, @RequestHeader("User-Agent") String userAgent, @RequestHeader Map<String,String> header, @RequestParam("age") Integer age, @RequestParam("hobby") List<String> hobby, @RequestParam Map<String,String> params, @CookieValue("_ga") String _ga, @CookieValue("_ga") Cookie cookie){ Map<String,Object> map = new HashMap<>(); ... return map; } } - @RequestAttribute:该注解标注的形参会从请求域中获取对应的实参
@Controller public class RequestController { @GetMapping("/test") public String test(Map<String,Object> map, Model model, HttpServletRequest request){ //无论map还是model,最终都会调用request.setAttribute()将其里边的内容放到请求域 map.put("map","map666"); model.addAttribute("model","model666"); request.setAttribute("request","request666"); return "forward:/success"; } @ResponseBody @GetMapping("/success") public String success(@RequestAttribute(value = "map",required = false) String s1, @RequestAttribute(value = "model",required = false) String s2, @RequestAttribute(value = "request",required = false) String s3){ System.out.println(s1); // map666 System.out.println(s1); // model666 System.out.println(s1); // request666 return "success"; } } - @RequestBody:该注解标注的形参会将请求体作为实参(必须是 post 请求)
@RestController public class ParameterTestController { @PostMapping("/save") public String postMethod(@RequestBody String content){ return content; } } - @MatrixVariable:矩阵变量。
SpringBoot 默认是关闭矩阵变量功能的,可通过自定义WebMvcConfigurer组件来开启:
@MatrixVariable 使用示例:@Configuration(proxyBeanMethods = false) public class WebConfig{ @Bean // 关于 MVC 的定制化,都可以通过重写 WebMvcConfigurer 里的相应方法来实现 public WebMvcConfigurer webMvcConfigurer(){ return new WebMvcConfigurer() { @Override public void configurePathMatch(PathMatchConfigurer configurer) { UrlPathHelper urlPathHelper = new UrlPathHelper(); urlPathHelper.setRemoveSemicolonContent(false); configurer.setUrlPathHelper(urlPathHelper); } } } }@RestController public class ParameterTestController { // 请求路径:/cars/sell;price=9999;brand=byd,audi @GetMapping("/cars/{path}") public String carsSell(@MatrixVariable("price") Integer price, @MatrixVariable("brand") List<String> brand, @PathVariable("path") String path){ System.out.println(price); // 9999 System.out.println(brand); // ["byd","audi"] System.out.println(path); // sell return "hello"; } }
12、请求处理-参数解析原理
- 先通过遍历所有的
HandlerMapping,找到能够处理当前请求的Handler; - 为当前
Handler找一个HandlerAdapter,用的最多的是RequestMappingHandlerAdapter;在 DispatcherServlet 内部,默认加载了所有的 HandlerAdapter:
- RequestMappingHandlerAdapter:支持 @RequestMapping 注解的
- HandlerFunctionAdapter:支持函数式编程的
- HttpRequestHandlerAdapter:
- SimpleControllerHandlerAdapter
- 调用当前
HandlerAdapter的handle()方法,完成请求处理。RequestMappingHandlerAdapter 内部初始化了许多
HandlerMethodArgumentResolver(参数解析器),handle()方法执行时会遍历所有的参数解析器,寻找一个匹配的完成参数解析。
12.1 Servlet API参数解析器
WebRequest、ServletRequest、MultipartRequest、HttpSession、javax.servlet.http.PushBuilder、Principal、InputStream、Reader、HttpMethod、Locale、TimeZone、ZoneId。
以上类型的参数都是由ServletRequestMethodArgumentResolver解析的。
举例:
@RestController
public class RequestController {
    @GetMapping("/goto")
    public String goToPage(HttpServletRequest request){

        request.setAttribute("msg","成功了...");
        return "success";
    }
}
12.2 Model、Map参数解析器
- Model:使用
ModelMethodProcessor进行处理; - Map:使用
MapMethodProcessor进行处理;
以上两种解析器在解析参数时,最终都会调用mavContainer.getModel(),而且返回的是同一个BindingAwareModelMap对象。
12.3 自定义类型参数解析器
举例:
@RestController
public class ParameterTestController {

    @PostMapping("/saveuser")
    public Person saveuser(Person person){
        return person;
    }
}
自定义类型参数使用ServletModelAttributeMethodProcessor进行处理。在该解析器中,利用WebDataBinder将请求参数与自定义参数进行绑定。
绑定过程:对于每一个请求参数,WebDataBinder都会遍历其内部的所有Converter,找到可以将该请求参数转换到指定类型的Converter,然后将请求数据转成指定的数据类型并封装到JavaBean中。
ServletModelAttributeMethodProcessor->WebDataBinder->Converter
12.3.1 自定义 Converter
可以通过自定义WebMvcConfigurer组件,来定制化 SpringMVC 的功能。
举例:将请求参数Tom,3转换成Pet对象。
@Configuration(proxyBeanMethods = false)
public class WebConfig{

    @Bean
    public WebMvcConfigurer webMvcConfigurer(){
        return new WebMvcConfigurer() {

            @Override
            public void addFormatters(FormatterRegistry registry) {
                registry.addConverter(new Converter<String, Pet>() {

                    @Override
                    public Pet convert(String source) {
                        if(!StringUtils.isEmpty(source)){
                            Pet pet = new Pet();
                            String[] split = source.split(",");
                            pet.setName(split[0]);
                            pet.setAge(Integer.parseInt(split[1]));
                            return pet;
                        }
                        return null;
                    }
                });
            }
        };
    }
}
13、请求处理-返回值处理器
返回值的处理也是在当前HandlerAdapter的handle()方法内进行处理的。
RequestMappingHandlerAdapter 内部初始化了许多
HandlerMethodReturnValueHandler(返回值处理器),handle()方法执行时会遍历所有的返回值处理器,寻找一个匹配的完成返回值处理,在处理过程中会使用MessageConverters(消息转换器)进行写出操作。
13.1 HTTPMessageConverter
ReturnValueHandler的工作流程:
- 遍历所有的返回值处理器,找到支持处理这种类型返回值的处理器(
supportsReturnType); - 调用该返回值处理器的
handleReturnValue()进行处理; - 以
RequestResponseBodyMethodProcessor为例,该处理器可以处理标注了@ResponseBody注解的方法。
13.1.1 内容协商
返回值处理器以内容协商的形式进行返回值的处理。
- 浏览器默认会以请求头的方式告诉服务器,自己能接受哪些类型的数据(请求头中的
accept字段); - 服务器根据自身能力决定能生产出哪些类型的数据;
- 找出最佳匹配的媒体类型(
MediaType); - 遍历所有的
HttpMessageConverter,找到可以将返回值以上述MediaType类型写出的消息转换器; - 利用上面找到的消息转换器进行写出。
13.1.2 基于请求参数的内容协商
在获取客户端可以接受的媒体类型时,会先通过内容协商管理器(ContentNegotiationManager)判断使用哪种内容协商策略,如果请求地址中有format这个请求参数,则会启用基于请求参数的内容协商策略。不过 SpringBoot 中需要手动开启基于请求参数的内容协商功能:
spring:
  mvc:
    contentnegotiation:
      favor-parameter: true  #开启请求参数内容协商模式
举例:
- 在浏览器输入
http://localhost:8080/test/person?format=json,返回 json 格式的数据; - 在浏览器输入
http://localhost:8080/test/person?format=xml,返回 xml 格式的数据。
13.2 自定义 MessageConverter
自定义MessageConverter:
public class GuiguMessageConverter implements HttpMessageConverter<Person> {

    @Override
    public boolean canWrite(Class<?> clazz, MediaType mediaType) {
        return clazz.isAssignableFrom(Person.class); //假设要转换 Person 类型的返回值
    }

    @Override
    public List<MediaType> getSupportedMediaTypes() {
        return MediaType.parseMediaTypes("application/x-guigu"); // 假设请求头中的 accept 字段是:application/x-guigu
    }

    @Override
    public void write(Person person, MediaType contentType, HttpOutputMessage outputMessage) throws IOException, HttpMessageNotWritableException {
        //自定义协议数据的写出
        String data = person.getUserName()+";"+person.getAge()+";"+person.getBirth();

        //写出去
        OutputStream body = outputMessage.getBody();
        body.write(data.getBytes());
    }
}
通过对WebMvcConfigurer组件的定制化,将自定义MessageConverter添加到 Ioc 容器中:
@Configuration(proxyBeanMethods = false)
public class WebConfig {
    @Bean
    public WebMvcConfigurer webMvcConfigurer(){
        return new WebMvcConfigurer() {

            @Override
            public void extendMessageConverters(List<HttpMessageConverter<?>> converters) {
                converters.add(new GuiguMessageConverter());
            }
        }
    }
}
使用 Postman 模拟发送请求(请求头Accept:application/x-guigu),返回值处理器遍历所有的消息转换器,发现 GuiguMessageConverter 可以将返回值以 x-guigu 媒体类型写出。
13.3 使自定义的 MessageConverter 支持基于请求参数的内容协商
上面定义的 GuiguMessageConverter 目前只能支持基于请求头的内容协商,因为基于请求参数的协商策略中只定义了format=json、format=xml两种请求参数,所以我们需要自定义基于请求参数的内容协商策略,来支持自定义请求参数可以调用自定义 MessageConverter。
@Configuration(proxyBeanMethods = false)
public class WebConfig /*implements WebMvcConfigurer*/ {

    @Bean
    public WebMvcConfigurer webMvcConfigurer(){
        return new WebMvcConfigurer() {

            @Override
            public void configureContentNegotiation(ContentNegotiationConfigurer configurer) {
                //用于存放请求参数与媒体类型的映射关系
                Map<String, MediaType> mediaTypes = new HashMap<>();
                mediaTypes.put("json",MediaType.APPLICATION_JSON);
                mediaTypes.put("xml",MediaType.APPLICATION_XML);
                //自定义媒体类型
                mediaTypes.put("gg",MediaType.parseMediaType("application/x-guigu"));

                //创建基于请求参数的内容协商策略
                ParameterContentNegotiationStrategy parameterStrategy = new ParameterContentNegotiationStrategy(mediaTypes);

                //还需添加请求头处理策略,否则基于请求头的内容协商策略会失效
                HeaderContentNegotiationStrategy headeStrategy = new HeaderContentNegotiationStrategy();

                configurer.strategies(Arrays.asList(parameterStrategy, headeStrategy));
            }
        }
    }
}
在浏览器输入http://localhost:8080/test/person?format=gg,返回值处理器会先选择内容协商策略(由于请求地址中包含format请求参数,会选用基于请求参数的内容协商策略),该策略通过解析format=gg判断客户端要接收的媒体类型是application/x-guigu,然后找到匹配的消息转换器将返回值写出(即 GuiguMessageConverter)。
注意:当我们自定义组件时,可能会覆盖很多默认的功能,导致一些默认功能失效。
三、Thymeleaf
Thymeleaf 是适用于 web 和 独立环境 的现代服务器端Java模板引擎。Thymeleaf 官网
Thymeleaf 的优点:
- 动静分离: Thymeleaf 选用 html 作为模板页,使用html通过一些特定标签语法代表其含义,但并未破坏html结构,即使无网络、不通过后端渲染也能在浏览器成功打开,大大方便界面的测试和修改。
- 开箱即用: Thymeleaf 提供标准和Spring标准两种方言,可以直接套用模板实现JSTL、 OGNL表达式效果,避免每天套模板、改JSTL、改标签的困扰。同时开发人员也可以扩展和创建自定义的方言。
- Springboot官方支持:Springboot官方对 Thymeleaf 做了很多默认配置,开发者只需编写对应html即可,大大减轻了上手难度和配置复杂度。
1、基本语法
1.1 表达式
| 表达式名字 | 语法 | 用途 |
|---|---|---|
| 变量取值 | ${…} | 获取请求域、session域、对象等值 |
| 选择变量 | *{…} | 获取上下文对象值 |
| 消息 | #{…} | 获取国际化等值 |
| 链接 | @{…} | 生成链接 |
| 片段表达式 | ~{…} | jsp:include 作用,引入公共页面片段 |
1.2 字面量
| 类型 | 示例 |
|---|---|
| 文本值 | ‘one text’ , ‘Another one!’ ,… |
| 数字 | 0, 5, 2.3, … |
| 布尔值 | true, false |
| 空值 | null |
| 变量 | one,two,… (变量不能有空格) |
1.3 文本操作
- 字符串拼接:+
- 变量替换:|The name is ${name}|
1.4 数学运算
- 运算符:+,-,*,/,%
1.5 布尔运算
- 运算符:and,or
- 一元运算:!,not
1.6 比较运算
- 比较: >,>=,<,<= (gt,lt,ge,le)
- 等式:==,!= (eq,ne)
1.7 条件运算
- If-then:(if) ? (then)
- If-then-else:(if) ? (then) : (else)
- Default:(value) ?: (defaultvalue)
1.8 设置属性值
- 设置单个值
<form action="subscribe.html" th:attr="action=@{/subscribe}"> <fieldset> <input type="text" name="email" /> <input type="submit" value="Subscribe!" th:attr="value=#{subscribe.submit}"/> </fieldset> </form> - 设置多个值
<img src="../../images/gtvglogo.png"
     th:attr="src=@{/images/gtvglogo.png},title=#{logo},alt=#{logo}" />
1.9 遍历
<tr th:each="prod : ${prods}">
    <td th:text="${prod.name}">Onions</td>
    <td th:text="${prod.price}">2.41</td>
    <td th:text="${prod.inStock}? #{true} : #{false}">yes</td>
</tr>
1.9 条件运算
- th:if
<a href="comments.html" th:if="${not #lists.isEmpty(prod.comments)}">view</a> - th:switch
<div th:switch="${user.role}">
      <p th:case="'admin'">User is an administrator</p>
      <p th:case="#{roles.manager}">User is a manager</p>
      <p th:case="*">User is some other thing</p>
</div>
1.10 属性优先级
| Order | Feature | Attributes |
|---|---|---|
| 1 | Fragment inclusion | th:insert、th:replace |
| 2 | Fragment iteration | th:each |
| 3 | Conditional evaluation | th:if、th:unless、th:switch、th:case |
| 4 | Local variable definition | th:object、th:with |
| 5 | General attribute modification | th:attr、th:attrprepend、th:attrappend |
| 6 | Specific attribute modification | th:value、th:href、th:src、... |
| 7 | Text (tag body modification) | th:text、th:utext |
| 8 | Fragment specification | th:fragment |
| 9 | Fragment removal | th:remove |
2、进阶使用
2.1 Thymeleaf 内联写法
<p>Hello, [[${session.user.name}]]!</p>
上述写法可动态修改标签的文本内容。
2.2 页面引用
| 引用方式 | 效果 |
|---|---|
| th:include | 替换当前标签内的所有内容 |
| th:insert | 插入当前标签 |
| th:replace | 替换当前标签 |
假设有公共页面 common.html:
<div th:fragment="test0" id="test1">
	假设当前标签内有许多内容
</div>
在 test.html 中引用:
<div th:include="common :: test0"> 通过片段名进行引用 </div>
<div th:replace="common :: #test1"> 通过id进行引用 </div>
四、再探源码
1、视图解析
视图解析流程(DispatcherServlet):
- 在
HandlerAdapter执行完handle()方法后,会返回一个ModelAndView对象; - 接下来调用
processDispatchResult()方法处理派发结果:该方法内部调用render(mv, request, response)方法进行页面渲染;- 通过
ModelAndView对象获取视图名称; - 遍历所有的
ViewResolver视图解析器,找到可以解析当前视图名称的视图解析器,并将其解析为View对象; view.render(mv.getModelInternal(), request, response),视图对象调用自己的render()方法进行最终的页面渲染。
- 通过
2、拦截器
2.1 拦截器添加步骤
- 编写一个类实现
HandlerInterceptor接口public class LoginInterceptor implements HandlerInterceptor { //目标方法执行之前 @Override public boolean preHandle(HttpServletRequest request, HttpServletResponse response, Object handler) throws Exception { //登录检查逻辑:登录了直接放行,未登录跳转到登录页面 HttpSession session = request.getSession(); Object loginUser = session.getAttribute("loginUser"); if(loginUser != null){ return true; } request.getRequestDispatcher("/").forward(request,response); return false; } //目标方法执行之后 @Override public void postHandle(HttpServletRequest request, HttpServletResponse response, Object handler, ModelAndView modelAndView) throws Exception { log.info("postHandle执行{}",modelAndView); } //页面渲染之后 @Override public void afterCompletion(HttpServletRequest request, HttpServletResponse response, Object handler, Exception ex) throws Exception { log.info("afterCompletion执行异常{}",ex); } } - 把自定义拦截器注册到 Ioc 容器中
@Configuration
public class WebConfig implements WebMvcConfigurer{
    @Override
    public void addInterceptors(InterceptorRegistry registry) {

        registry.addInterceptor(new LoginInterceptor())
                .addPathPatterns("/**")  //拦截所有请求,包括静态资源
                .excludePathPatterns("/","/login","/css/**","/fonts/**","/images/**","/js/**"); //放行的请求
}
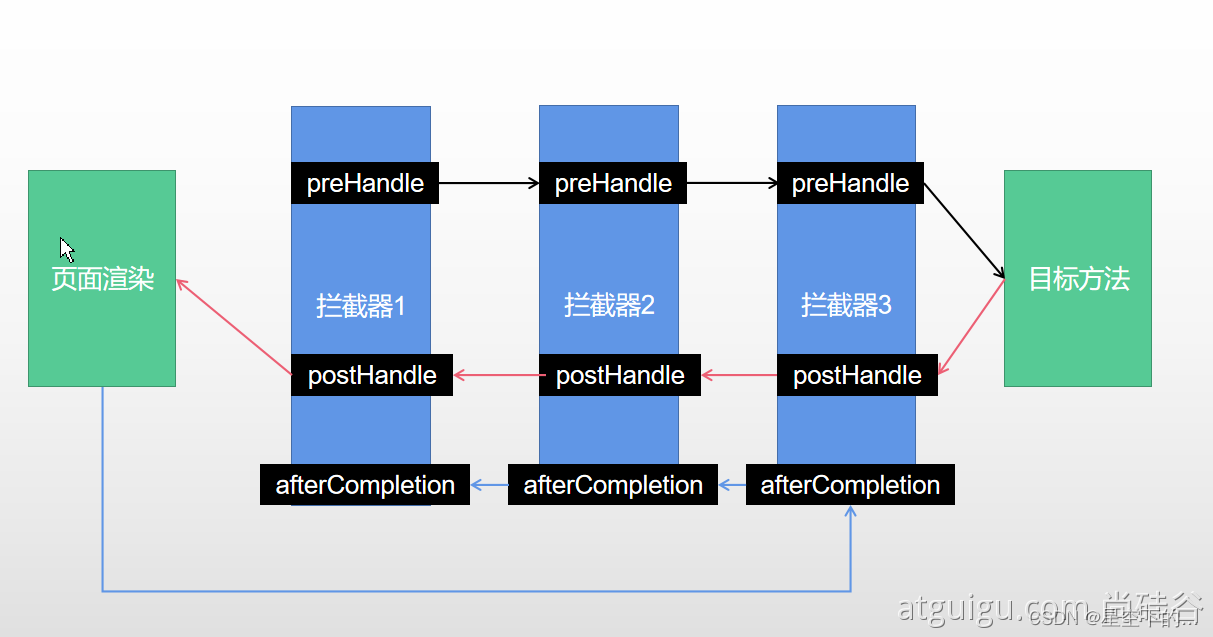
2.2 拦截器原理
- 根据当前请求,找到一个
HandlerExecutionChain;HandlerExecutionChain:处理器执行链,内部包含了可以处理当前请求的 handler 以及所有拦截器)
- 顺序执行所有拦截器的
preHandle()方法;① 如果当前拦截器的 preHandle() 返回 true,则执行下一个拦截器的preHandle();
② 如果当前拦截器的 preHandle() 返回 false,则从当前拦截器开始,倒序执行所有已经执行了的拦截器的 afterCompletion() 方法; - 任何一个拦截器的
preHandle()方法返回 false,都直接跳出DispatcherServlet,不再执行目标方法; - 当所有拦截器的
preHandle()方法都返回 true 时,执行目标方法; - 目标方法执行后,倒序执行所有拦截器的
postHandle()方法; - 以上步骤任何一步出现了异常,都会直接倒序触发
afterCompletion(); - 页面渲染完成以后,也会倒序触发
afterCompletion()。
3、文件上传
3.1 单文件上传
- html 页面
<input type="file" name="headImg"> - 服务器端代码
@PostMapping("/upload")
public String upload(@RequestPart("headImg") MultipartFile headImg){
	...
}
3.2 多文件上传
- html 页面
<input type="file" name="photos" multiple> - 服务器端代码
@PostMapping("/upload")
public String upload(@RequestPart("photos") MultipartFile[] photos){
	...
}
3.3 文件上传相关配置
- 相关配置类:
org.springframework.boot.autoconfigure.web.servlet.MultipartAutoConfigurationorg.springframework.boot.autoconfigure.web.servlet.MultipartProperties - 举例:修改上传文件的大小
spring:
  servlet:
    multipart:
      max-file-size: 1MB # 修改单个文件的上传大小
      max-request-size: 10MB # 修改一次请求可以上传的文件大小
3.4 文件上传解析器
MultipartAutoConfiguration类中配置好了文件上传解析器:StandardServletMultipartResolver。
解析流程:
- 首先判断当前请求是否是文件上传请求;
//StandardServletMultipartResolver 重写了 isMultipart() 方法 @Override public boolean isMultipart(HttpServletRequest request) { return StringUtils.startsWithIgnoreCase(request.getContentType(), "multipart/"); } - 如果是,就对当前请求进行包装,以后用到的请求都是该包装类对象;
//StandardServletMultipartResolver 重写了 resolveMultipart() 方法 @Override public MultipartHttpServletRequest resolveMultipart(HttpServletRequest request) throws MultipartException { return new StandardMultipartHttpServletRequest(request, this.resolveLazily); } - 在执行到
mv = ha.handle(processedRequest, response, mappedHandler.getHandler())时,内部会找出能够处理当前请求的参数解析器RequestPartMethodArgumentResolver,然后该解析器进行参数解析,解析过程中会将请求参数封装为MultipartFile类的对象作参数。public class RequestPartMethodArgumentResolver extends AbstractMessageConverterMethodArgumentResolver { @Override public boolean supportsParameter(MethodParameter parameter) { if (parameter.hasParameterAnnotation(RequestPart.class)) { return true; } else { if (parameter.hasParameterAnnotation(RequestParam.class)) { return false; } return MultipartResolutionDelegate.isMultipartArgument(parameter.nestedIfOptional()); } } @Override @Nullable public Object resolveArgument(MethodParameter parameter, @Nullable ModelAndViewContainer mavContainer, NativeWebRequest request, @Nullable WebDataBinderFactory binderFactory) throws Exception { HttpServletRequest servletRequest = request.getNativeRequest(HttpServletRequest.class); Assert.state(servletRequest != null, "No HttpServletRequest"); RequestPart requestPart = parameter.getParameterAnnotation(RequestPart.class); boolean isRequired = ((requestPart == null || requestPart.required()) && !parameter.isOptional()); String name = getPartName(parameter, requestPart); parameter = parameter.nestedIfOptional(); Object arg = null; //封装成MultipartFile类型的对象作参数 Object mpArg = MultipartResolutionDelegate.resolveMultipartArgument(name, parameter, servletRequest); if (mpArg != MultipartResolutionDelegate.UNRESOLVABLE) { arg = mpArg; } ... return adaptArgumentIfNecessary(arg, parameter); } }
4、错误处理
4.1 默认规则
- 对于浏览器客户端,出现错误默认返回一个白页错误视图;
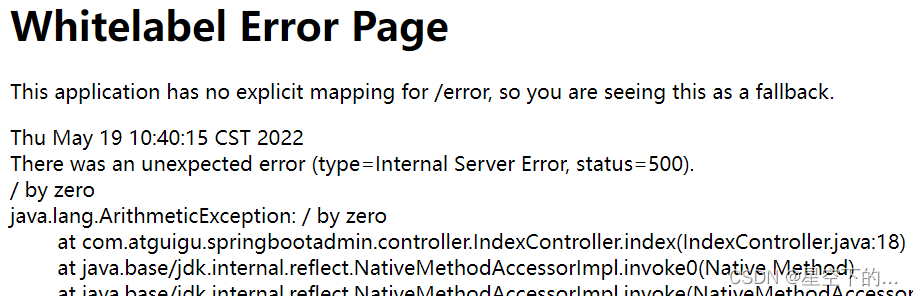
- 对于机器客户端,出现错误默认生成一个 json 响应,其中包含错误、HTTP状态和异常消息的详细信息;
{ "timestamp": "2020-11-22T05:53:28.416+00:00", "status": 404, "error": "Not Found", "message": "No message available", "path": "/asadada" } - 如果
/templates/error/目录下有4xx.html、5xx.html等错误页面,则出现错误时会自动替换默认的错误页面。
4.2 错误处理相关组件
DefaultErrorAttributes:在容器中的 id 为errorAttributes,用于定义错误页面中可以包含哪些数据(异常明细,堆栈信息等);public class DefaultErrorAttributes implements ErrorAttributes, HandlerExceptionResolver{ ... }BasicErrorController:在容器中的 id 为basicErrorController,默认的错误处理控制器,处理/error请求(json+白页 适配响应);@Controller @RequestMapping({"${server.error.path:${error.path:/error}}"}) public class BasicErrorController extends AbstractErrorController { ... @RequestMapping(produces = {"text/html"}) public ModelAndView errorHtml(HttpServletRequest request, HttpServletResponse response) { HttpStatus status = this.getStatus(request); Map<String, Object> model = Collections.unmodifiableMap(this.getErrorAttributes(request, this.getErrorAttributeOptions(request, MediaType.TEXT_HTML))); response.setStatus(status.value()); ModelAndView modelAndView = this.resolveErrorView(request, response, status, model); return modelAndView != null ? modelAndView : new ModelAndView("error", model); } @RequestMapping public ResponseEntity<Map<String, Object>> error(HttpServletRequest request) { HttpStatus status = this.getStatus(request); if (status == HttpStatus.NO_CONTENT) { return new ResponseEntity(status); } else { Map<String, Object> body = this.getErrorAttributes(request, this.getErrorAttributeOptions(request, MediaType.ALL)); return new ResponseEntity(body, status); } } ... }DefaultErrorViewResolver:在容器中的 id 为conventionErrorViewResolver,默认的错误视图解析器,会将HTTP状态码作为视图名称viewName,并最终将/error/viewName封装为ModelAndView的视图名。public class DefaultErrorViewResolver implements ErrorViewResolver, Ordered { ... public ModelAndView resolveErrorView(HttpServletRequest request, HttpStatus status, Map<String, Object> model) { ModelAndView modelAndView = this.resolve(String.valueOf(status.value()), model); if (modelAndView == null && SERIES_VIEWS.containsKey(status.series())) { modelAndView = this.resolve((String)SERIES_VIEWS.get(status.series()), model); } return modelAndView; } private ModelAndView resolve(String viewName, Map<String, Object> model) { String errorViewName = "error/" + viewName; TemplateAvailabilityProvider provider = this.templateAvailabilityProviders.getProvider(errorViewName, this.applicationContext); return provider != null ? new ModelAndView(errorViewName, model) : this.resolveResource(errorViewName, model); } ... }
4.3 错误处理流程
- 执行目标方法:目标方法执行期间出现任何异常,都会被 catch 到并封装为
dispatchException,并且标志当前请求结束; - 执行视图解析流程:遍历所有的处理器异常解析器,寻找匹配的进行解析,如果都没法解析,则把异常抛出;
系统默认的处理器异常解析器:
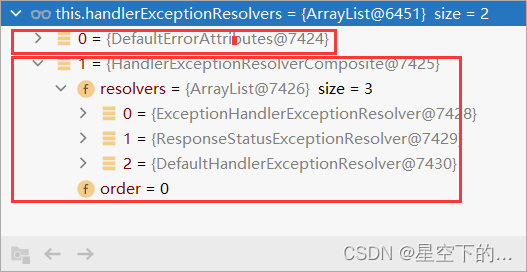
DefaultErrorAttributes:把异常信息保存到 request 域,并且返回 null;
ExceptionHandlerExceptionResolver:处理 @ExceptionHandler 注解;
ResponseStatusExceptionResolver:处理 @ResponseStatus 注解;
DefaultHandlerExceptionResolver:处理常见的 web 异常; - 由于无法处理当前异常,框架底层就会发送
/error请求,/error请求会被BasicErrorController接收处理; BasicErrorController内部遍历所有的错误视图解析器,看哪个可以解析;
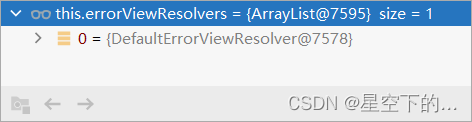
DefaultErrorViewResolver默认错误页的视图名是:error/500;- 模板引擎最终响应这个页面:
/templates/error/500.html。
4.4 自定义异常处理
- 方式1:
@ControllerAdvice+@ExceptionHandler@ControllerAdvice public class MyExceptionHandler { // 可以处理哪些异常 @ExceptionHandler({ArithmeticException.class,NullPointerException.class}) public String handleArithException(Exception e){ return "login"; //视图地址 } } - 方式2:
@ResponseStatus+自定义异常@ResponseStatus(value= HttpStatus.FORBIDDEN,reason = "用户数量太多") public class UserTooManyException extends RuntimeException { public UserTooManyException(){ } public UserTooManyException(String message){ super(message); } }说明:
① 当目标方法执行期间抛出UserTooManyException异常时,由于该异常类标注了@ResponseStatus注解,会被ResponseStatusExceptionResolver处理。
② 该解析器内部最终会调用response.sendError(statusCode, resolvedReason),即让 Tomcat 服务器发送/error请求。 - 方式3:自定义异常解析器,可以作为默认的全局异常处理规则
@Order(value= Ordered.HIGHEST_PRECEDENCE)  //优先级:数字越小优先级越高
@Component
public class CustomerHandlerExceptionResolver implements HandlerExceptionResolver {
    @Override
    public ModelAndView resolveException(HttpServletRequest request, HttpServletResponse response, Object handler, Exception ex) {

        try {
            response.sendError(511,"我喜欢的错误");
        } catch (IOException e) {
            e.printStackTrace();
        }
        return new ModelAndView();
    }
}
5、原生 web 组件注入
将原生的 Servlet、Filer、Listener 注入 Ioc 容器。
5.1 使用原生注解注入
- 首先必须在主程序类开启 Servlet 组件扫描:
@ServletComponentScan(basePackages = "com.springbootadmin") @SpringBootApplication public class SpringbootAdminApplication { public static void main(String[] args) { SpringApplication.run(SpringbootAdminApplication.class, args); } } - 自定义原生组件:
@WebServlet:注入原生 Servlet。@WebServlet(urlPatterns = "/my") public class MyServlet extends HttpServlet { @Override protected void doGet(HttpServletRequest req, HttpServletResponse resp) throws ServletException, IOException { resp.getWriter().write("66666"); } }@WebFilter:注入原生 Filter。@Slf4j @WebFilter(urlPatterns={"/css/*","/images/*"}) public class MyFilter implements Filter { @Override public void init(FilterConfig filterConfig) throws ServletException { log.info("MyFilter初始化完成"); } @Override public void doFilter(ServletRequest request, ServletResponse response, FilterChain chain) throws IOException, ServletException { log.info("MyFilter工作"); chain.doFilter(request,response); } @Override public void destroy() { log.info("MyFilter销毁"); } }@WebListener:注入原生 Listener。@Slf4j @WebListener public class MyListener implements ServletContextListener { @Override public void contextInitialized(ServletContextEvent sce) { log.info("MyListener监听到项目初始化完成"); } @Override public void contextDestroyed(ServletContextEvent sce) { log.info("MyListener监听到项目销毁"); } }
5.2 采用 Spring 方式注入
Spring 提供的3个类:ServletRegistrationBean、FilterRegistrationBean、ServletListenerRegistrationBean。(将自定义的三大 Web 组件类标注为普通类)
@Configuration(proxyBeanMethods = true)
public class MyRegistConfig {

    @Bean
    public ServletRegistrationBean myServlet(){
        MyServlet myServlet = new MyServlet();
        return new ServletRegistrationBean(myServlet,"/my","/my02");
    }

    @Bean
    public FilterRegistrationBean myFilter(){
        MyFilter myFilter = new MyFilter();
        FilterRegistrationBean filterRegistrationBean = new FilterRegistrationBean(myFilter);
        filterRegistrationBean.setUrlPatterns(Arrays.asList("/my","/css/*"));
        return filterRegistrationBean;
    }

    @Bean
    public ServletListenerRegistrationBean myListener(){
        MyListener myListener = new MyListener();
        return new ServletListenerRegistrationBean(myListener);
    }
}
6、嵌入式 Servlet 容器
6.1 简介
SpringBoot 默认支持以下3种 Web Server:Tomcat、Jetty、Undertow。
SpringBoot 默认使用 Tomcat 服务器,若要更改为其他服务器,则修改 pom.xml:
<dependency>
    <groupId>org.springframework.boot</groupId>
    <artifactId>spring-boot-starter-web</artifactId>
    <exclusions>
        <exclusion>
            <groupId>org.springframework.boot</groupId>
            <artifactId>spring-boot-starter-tomcat</artifactId>
        </exclusion>
    </exclusions>
</dependency>

<dependency>
    <groupId>org.springframework.boot</groupId>
    <artifactId>spring-boot-starter-jetty</artifactId>
</dependency>
6.2 定制 Servlet 容器
- 方式1:修改配置文件
server.xxx - 方式2:创建
WebServerFactoryCustomizer<ConfigurableServletWebServerFactory>接口的实现类,重写customize()方法。@Component public class CustomizationBean implements WebServerFactoryCustomizer<ConfigurableServletWebServerFactory> { @Override public void customize(ConfigurableServletWebServerFactory server) { server.setPort(9000); } } - 方式3:定制
ConfigurableServletWebServerFactory组件。
7、数据库整合
7.1 基本流程
-
导入 JDBC 场景依赖
<dependency> <groupId>org.springframework.boot</groupId> <artifactId>spring-boot-starter-data-jdbc</artifactId> </dependency> -
导入数据库驱动
以 MySQL 为例:SpringBoot 默认对 MySQL 的驱动版本进行了仲裁
<mysql.version>8.0.28</mysql.version>,为了与本机的 MySQL 版本匹配,需要手动指明版本号。<!-- 方式1 --> <dependency> <groupId>mysql</groupId> <artifactId>mysql-connector-java</artifactId> <version>8.0.21</version> </dependency><!-- 方式2 --> <properties> <java.version>11</java.version> <mysql.version>8.0.21</mysql.version> </properties> -
相关配置类
DataSourceAutoConfiguration:数据源自动配置类,默认配置HikariDataSource数据源。
DataSourceTransactionManagerAutoConfiguration:事务管理自动配置类。
JdbcTemplateAutoConfiguration:JdbcTemplate 自动配置类。
JndiDataSourceAutoConfiguration:Jndi 自动配置类。
XADataSourceAutoConfiguration:分布式事务相关的自动配置类。 -
填写配置文件
spring: datasource: url: jdbc:mysql://localhost:3306/test?serverTimezone=Asia/Shanghai driver-class-name: com.mysql.cj.jdbc.Driver username: root password: 123456 -
单元测试
@Slf4j
@SpringBootTest
class SpringbootAdminApplicationTests {

    @Autowired
    JdbcTemplate jdbcTemplate;

    @Test
    void contextLoads() {
        Long count = jdbcTemplate.queryForObject("select count(*) from user", Long.class);
        log.info("总记录数:{}", count);
    }
}
7.2 整合 Druid 数据源
7.2.1 自定义方式
- 引入 Druid 依赖
<dependency> <groupId>com.alibaba</groupId> <artifactId>druid</artifactId> <version>1.2.8</version> </dependency> - 配置Druid数据源
@Configuration public class MyDataSourceConfig { @ConfigurationProperties("spring.datasource") //复用配置文件中的数据源配置 @Bean public DataSource dataSource() throws SQLException { DruidDataSource druidDataSource = new DruidDataSource(); return druidDataSource; } } - 配置额外功能(按需配置)
StatViewServlet:Druid 内置的一个 Servlet,用于配置监控页。主要作用是提供监控信息展示的html页面、提供监控信息的JSON API。
WebStatFilter:用于采集 web-jdbc 关联监控的数据,如SQL监控、URI监控。
WallFilter:防火墙,基于SQL语义分析来实现防御SQL注入攻击。@Configuration public class MyDataSourceConfig { /** * 配置 Druid 数据源 * @return */ @ConfigurationProperties("spring.datasource") @Bean public DataSource dataSource() throws SQLException { DruidDataSource druidDataSource = new DruidDataSource(); //开启监控页和防火墙功能 druidDataSource.setFilters("stat,wall"); return druidDataSource; } /** * 配置 Druid 的监控页功能 * @return */ @Bean public ServletRegistrationBean statViewServlet(){ StatViewServlet statViewServlet = new StatViewServlet(); ServletRegistrationBean<StatViewServlet> servletRegistrationBean = new ServletRegistrationBean<>(statViewServlet,"/druid/*"); return servletRegistrationBean; } /** * 用于采集web-jdbc关联监控的数据 * @return */ @Bean public FilterRegistrationBean webStatFilter(){ WebStatFilter webStatFilter = new WebStatFilter(); FilterRegistrationBean<WebStatFilter> filterRegistrationBean = new FilterRegistrationBean<>(webStatFilter); //设置拦截路径 filterRegistrationBean.setUrlPatterns(Arrays.asList("/*")); //设置放行路径 filterRegistrationBean.addInitParameter("exclusions","*.js,*.gif,*.jpg,*.png,*.css,*.ico,/druid/*"); return filterRegistrationBean; } }
7.2.2 官方 starter 方式
- 引入 Druid 的 starter
<dependency> <groupId>com.alibaba</groupId> <artifactId>druid-spring-boot-starter</artifactId> <version>1.2.6</version> </dependency> - 分析自动配置
基本配置项:spring.datasource,配置基本的数据库连接信息。
扩展配置项:spring.datasource.druid,配置 Druid 的特色功能。 - 配置举例
spring:
  datasource:
    url: jdbc:mysql://localhost:3306/test?serverTimezone=Asia/Shanghai
    driver-class-name: com.mysql.cj.jdbc.Driver
    username: root
    password: 123456

    druid:
      filters: stat,wall  #开启相关功能:stat(SQL监控),wall(防火墙)

      stat-view-servlet: #配置监控页功能
        enabled: true
        login-username: admin
        login-password: 123456

      web-stat-filter: #监控web
        enabled: true
        url-pattern: /*
        exclusions: '*.js,*.gif,*.jpg,*.png,*.css,*.ico,/druid/*'

      filter: #配置具体的某个 filter
        stat:
          enabled: true
          slow-sql-millis: 1000
          log-slow-sql: true
        wall:
          enabled: true
          config:
            drop-table-allow: false
8、整合 MyBatis
8.1 通过配置文件整合
- 导入 MyBatis 官方 starter:
<dependency> <groupId>org.mybatis.spring.boot</groupId> <artifactId>mybatis-spring-boot-starter</artifactId> <version>2.1.3</version> </dependency> - 编写 Mapper 接口,需标注 @Mapper 注解:
@Mapper public interface UserMapper { User getUser(Integer id); } - 编写 sql 映射文件,并绑定 Mapper 接口:
目录结构如下:
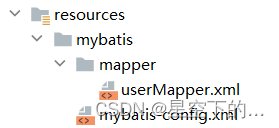
userMapper.xml如下:<?xml version="1.0" encoding="UTF-8" ?> <!DOCTYPE mapper PUBLIC "-//mybatis.org//DTD Mapper 3.0//EN" "http://mybatis.org/dtd/mybatis-3-mapper.dtd"> <mapper namespace="com.springboot.admin.mapper.UserMapper"> <select id="getUser" resultType="com.springboot.admin.bean.User"> select * from user where id=#{id} </select> </mapper> - 在 application.yaml 中填写 mybatis 相关配置信息:
不推荐使用全局配置文件,推荐直接在 application.yaml 中设置 MyBatis 的全局配置信息,所有在mybatis-config.xml 中配置的信息,都可以直接在spring: datasource: url: jdbc:mysql://localhost:3306/test?serverTimezone=Asia/Shanghai driver-class-name: com.mysql.cj.jdbc.Driver username: root password: 123456 mybatis: config-location: classpath:mybatis/mybatis-config.xml #全局配置文件的路径 mapper-locations: classpath:mybatis/mapper/*.xml #sql映射文件的路径mybatis.configuration下配置:spring: datasource: url: jdbc:mysql://localhost:3306/test?serverTimezone=Asia/Shanghai driver-class-name: com.mysql.cj.jdbc.Driver username: root password: 123456 mybatis: mapper-locations: classpath:mybatis/mapper/*.xml #sql映射文件的路径 configuration: map-underscore-to-camel-case: true #开启下划线转驼峰命名规则
8.2 通过注解整合
- 导入 MyBatis 官方 starter;
- 编写 Mapper 接口,需标注 @Mapper 注解;
@Mapper public interface RoleMapper { @Select("select * from role where id=#{id}") Role getRole(Integer id); }注意:简单的 CURD 语句可以通过注解编写,复杂的还是要通过 mapper 配置文件进行编写。
8.3 最佳实战:注解+配置文件
- 导入 MyBatis 官方 starter;
- 编写 Mapper 接口,并标注 @Mapper 注解;
在主程序类上标注 @MapperScan 注解,则 Mapper 接口上就无需再标注 @Mapper 注解。
@Mapper public interface RoleMapper { // 简单的 CURD 语句直接通过注解编写 @Select("select * from role where id=#{id}") Role getRole(Integer id); //复杂的 CURD 语句通过 mapper 文件编写 Role getRole2(Integer id); } - 编写 mapper 文件,并绑定 Mapper 接口;
<?xml version="1.0" encoding="UTF-8" ?> <!DOCTYPE mapper PUBLIC "-//mybatis.org//DTD Mapper 3.0//EN" "http://mybatis.org/dtd/mybatis-3-mapper.dtd"> <mapper namespace="com.springboot.admin.mapper.RoleMapper"> <select id="getRole2" resultType="com.springboot.admin.bean.Role"> select * from role where id = #{id} </select> </mapper> - 在 application.yaml 中填写 mybatis 相关配置信息;
spring:
  datasource:
    url: jdbc:mysql://localhost:3306/test?serverTimezone=Asia/Shanghai
    driver-class-name: com.mysql.cj.jdbc.Driver
    username: root
    password: 123456

mybatis:
  mapper-locations: classpath:mybatis/mapper/*.xml  #sql映射文件的路径
  configuration:
    map-underscore-to-camel-case: true #开启下划线转驼峰命名规则
9、整合 MyBatis Plus
MyBatis Plus 的 GitHub 仓库
MyBatis Plus:简称 MP,是一个 MyBatis 的增强工具,在 MyBatis 的基础上只做增强不做改变,为简化开发、提高效率而生。
- 自动配置了
mapperLocations:classpath*:/mapper/**/*.xml,类路径下 /mapper 目录及其子目录下的所有 .xml 文件。
9.1 基本使用
- 引入 MyBatis Plus 的官方 starter:
<dependency> <groupId>com.baomidou</groupId> <artifactId>mybatis-plus-boot-starter</artifactId> <version>3.5.1</version> </dependency> - 编写 Mapper 接口,并继承
BaseMapper类:public interface UserMapper2 extends BaseMapper<User> { }怎样确定 User 类对应数据库中的哪张表?
① 默认寻找类名首字母小写对应的表,即 user 表;
② 手动指明:在 User 类上面标注@TableName("user")注解; - 测试 Mapper 的 CURD 功能:
@SpringBootTest
class SpringbootAdminApplicationTests {

    @Autowired
    UserMapper2 userMapper;

    @Test
    void testUserMapper2(){
        User user = userMapper.selectById(1);
        System.out.println(user);
    }
}
9.2 高级使用
9.2.1 简化 service 层开发
- 创建 Service 接口,并继承
IService接口:public interface UserService2 extends IService<User> { } - 创建 Service 接口实现类,并继承
ServiceImpl类:@Service public class UserService2Impl extends ServiceImpl<UserMapper2, User> implements UserService2 { } - 测试 Service 的 CURD 功能:
@SpringBootTest
class SpringbootAdminApplicationTests {

    @Autowired
	UserService2 userService;

    @Test
    void testUserService2(){
        User user = userService.getById(1);
        System.out.println(user);
    }
}
9.2.2 简化分页
- 配置分页插件:
@Configuration public class MyBatisPlusConfig { @Bean public MybatisPlusInterceptor mybatisPlusInterceptor(){ //分页拦截器 PaginationInnerInterceptor paginationInnerInterceptor = new PaginationInnerInterceptor(); // mybatisPlus 拦截器 MybatisPlusInterceptor mybatisPlusInterceptor = new MybatisPlusInterceptor(); mybatisPlusInterceptor.addInnerInterceptor(paginationInnerInterceptor); return mybatisPlusInterceptor; } } - 测试分页功能:
@SpringBootTest
class SpringbootAdminApplicationTests {

    @Autowired
   	UserService2 userService;

    @Test
    void testPage(){
        Page<User> page = new Page<>(1, 2); //获取第1页,每页2条记录
        Page<User> userPage = userService.page(page);
        System.out.println("当前页数:" + userPage.getCurrent());
        System.out.println("每页显示条数:" + userPage.getSize());
        System.out.println("总页数:" + userPage.getPages());
        System.out.println("总记录数:" + userPage.getTotal());
        System.out.println("当前页数据:" + userPage.getRecords());
    }
}
10、整合 Redis
ubuntu 18.04 下 安装 redis
Redis 学习笔记
- 引入 Redis 的 starter:
<dependency> <groupId>org.springframework.boot</groupId> <artifactId>spring-boot-starter-data-redis</artifactId> </dependency> - 分析自动配置:
① 自动配置了 Redis 连接工厂:LettuceConnectionConfiguration、JedisConnectionConfiguration
③ SpringBoot 默认引入的是 Lettuce 客户端,所以JedisConnectionConfiguration不生效;
④ 自动配置了StringRedisTemplate、RedisTemplate; - 配置 Redis 相关属性
spring: redis: host: ip port: 6379 password: username:password - 测试:
@SpringBootTest
class SpringbootAdminApplicationTests {

    @Autowired
    RedisTemplate redisTemplate;

    @Test
    void testRedis(){
        ValueOperations ops = redisTemplate.opsForValue();
        ops.set("hello","world");
        Object hello = ops.get("hello");
        System.out.println(hello);
    }
}
11、JUnit 5
11.1 简介
- SpringBoot 2.2.0 版本开始引入 JUnit 5 作为默认的单元测试框架。
<dependency> <groupId>org.springframework.boot</groupId> <artifactId>spring-boot-starter-test</artifactId> <scope>test</scope> </dependency> - JUnit 5 由三个模块组成:JUnit Platform、JUnit Jupiter、JUnit Vintage。
JUnit Platform: Junit Platform是在 JVM 上启动测试框架的基础,不仅支持 Junit 自制的测试引擎,其他测试引擎也都可以接入。
JUnit Jupiter: JUnit Jupiter提供了 JUnit 5 的新的编程模型,是JUnit5新特性的核心。内部包含了一个测试引擎,用于在Junit Platform上运行。
JUnit Vintage: 由于JUint 已经发展多年,为了照顾老的项目,JUnit Vintage 提供了兼容 JUnit4.x,JUnit3.x 的测试引擎。 - SpringBoot 2.4 以上版本移除了默认对 Vintage 的依赖,如果需要兼容JUnit4 需要自行引入。
- JUnit 5 已经将 Vintage 从spring-boot-starter-test 中移除。如果需要继续兼容 JUnit4 需要自行引入Vintage 依赖。
<dependency>
    <groupId>org.junit.vintage</groupId>
    <artifactId>junit-vintage-engine</artifactId>
    <scope>test</scope>
    <exclusions>
        <exclusion>
            <groupId>org.hamcrest</groupId>
            <artifactId>hamcrest-core</artifactId>
        </exclusion>
    </exclusions>
</dependency>
11.2 常用测试注解
- @Test:表示当前方法是测试方法。
- @DisplayName:为测试类或测试方法设置展示名称。
@DisplayName("JUnit5 测试类")
@SpringBootTest
public class JUnit5Test {

    @DisplayName("JUnit5 测试方法")
    @Test
    void testDisplayName(){
        System.out.println("测试 @DisplayName 注解");
    }
}
- @ParameterizedTest:表示当前方法是参数化测试。
@DisplayName("JUnit5 测试类")
@SpringBootTest
public class JUnit5Test {

    @ParameterizedTest
    @ValueSource(ints = {1,2,3})
    void testParameterizedTest(int i){
        System.out.println("测试 @ParameterizedTest 注解" + i);
    }
}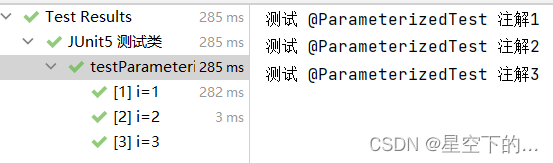
- @RepeatedTest:表示当前方法可重复执行。
@DisplayName("JUnit5 测试类")
@SpringBootTest
public class JUnit5Test {

    @RepeatedTest(3)
    void testRepeatedTest(){
        System.out.println("测试 @RepeatedTest 注解");
    }
}
- @BeforeEach:表示在每个测试方法之前执行。
- @AfterEach:表示在每个测试方法之后执行。
- @BeforeAll:表示在所有测试方法之前执行,该注解标注的方法必须是 static 的。
- @AfterAll:表示在所有测试方法之后执行,该注解标注的方法必须是 static 的。
- @Tag:表示单元测试类别,类似于JUnit4中的@Categories。
- @Disabled:表示当前测试类或当前测试方法不执行,类似于JUnit4中的@Ignore。
- @Timeout:如果当前测试方法运行超时了指定时间,将会返回错误。
@DisplayName("JUnit5 测试类")
@SpringBootTest
public class JUnit5Test {

    @Timeout(value = 500, unit = TimeUnit.MILLISECONDS)
    @Test
    void testTimeout() throws InterruptedException {
        System.out.println("测试 @Timeout 注解");
        Thread.sleep(600);
    }
}
- @ExtendWith:为测试类或测试方法提供扩展类引用。
11.3 断言机制
断言(Assertion)是测试方法中的核心部分,用来对测试需要满足的条件进行验证。这些断言方法都是 org.junit.jupiter.api.Assertions 的静态方法。检查业务逻辑返回的数据是否合理。所有的测试运行结束以后,会有一个详细的测试报告。
11.3.1 简单断言
| 方法 | 说明 |
|---|---|
| assertEquals() | 判断两个对象或两个原始类型是否相等 |
| assertNotEquals() | 判断两个对象或两个原始类型是否不相等 |
| assertSame() | 判断两个对象引用是否指向同一个对象 |
| assertNotSame() | 判断两个对象引用是否指向不同的对象 |
| assertTrue() | 判断给定的布尔值是否为 true |
| assertFalse() | 判断给定的布尔值是否为 false |
| assertNull() | 判断给定的对象引用是否为 null |
| assertNotNull() | 判断给定的对象引用是否不为 null |
@DisplayName("JUnit5 测试类")
@SpringBootTest
public class JUnit5Test {

    @Test
    void testSimpleAssert(){
        Assertions.assertEquals(1,2,"1不等于2");

        Assertions.assertSame(new Object(), new Object(), "你这是两个对象");

        Assertions.assertTrue(1 > 2, "1不大于2");

        Assertions.assertNull(new Object(), "不为 null");
    }
}
当某个断言失败后,则该断言下面的代码就不再执行。
11.3.2 数组断言
assertArrayEquals():判断两个数组对应位置处的元素是否相等。
@DisplayName("JUnit5 测试类")
@SpringBootTest
public class JUnit5Test {

    @Test
    void testArrayAssert(){
        Assertions.assertArrayEquals(new int[]{1,2}, new int[]{2,1});
    }
}
11.3.3 组合断言
assertAll():该方法接受多个 org.junit.jupiter.api.Executable 函数式接口的实例作为要验证的断言,可以通过 lambda 表达式很容易的提供这些断言。
@DisplayName("JUnit5 测试类")
@SpringBootTest
public class JUnit5Test {

    @Test
    void testAssertAll(){
        Assertions.assertAll(
                () -> Assertions.assertEquals(2, 2),
                () -> Assertions.assertTrue(1 > 0)
        );
    }
}
当组合断言中的某个断言失败时,该断言下面的代码不再执行。
11.3.4 异常断言
assertThrows():断言是否会抛出指定异常,配合函数式编程使用。
@DisplayName("JUnit5 测试类")
@SpringBootTest
public class JUnit5Test {

    @Test
    void testException(){
        //断言会出现数学运算异常,如果不抛出数学运算异常,则断言失败
        ArithmeticException arithmeticException = Assertions.assertThrows(ArithmeticException.class, () -> System.out.println(1 / 0));
        System.out.println(arithmeticException);
    }
}
11.3.5 超时断言
assertTimeout():断言程序运行时间不会超过指定超时时间,配好函数式编程使用。
@DisplayName("JUnit5 测试类")
@SpringBootTest
public class JUnit5Test {

    @Test
    void testTime(){
        //断言程序运行时间不会超过500毫秒,如果超过500毫秒,则断言失败
        Assertions.assertTimeout(Duration.ofMillis(500), ()->Thread.sleep(600));
    }
}
11.3.6 快速失败
fail():使当前断言直接失败。
@DisplayName("JUnit5 测试类")
@SpringBootTest
public class JUnit5Test {

    @Test
    void testFail(){
    	System.out.println("测试 fail() 方法");
        Assertions.fail("断言失败");
    }
}
11.4 前置条件
Assumption(假设),类似于断言,不同之处在于不满足的断言会使得测试方法失败,而不满足的前置条件只会使得测试方法终止执行。可以把 Assumption 看作是方法的执行前提,不满足该前提,则方法也就不用再执行了。
@DisplayName("JUnit5 测试类")
@SpringBootTest
public class JUnit5Test {

    @Test
    void testAssumption(){
        Assumptions.assumeTrue(1 == 1);
        Assumptions.assumeFalse(1 > 2);
        Assumptions.assumingThat(1 == 1, ()-> System.out.println(666));
    }
}
assumingThat():第1个参数是布尔型,第2个参数是 Executable 接口的实现对象。当第1个参数为 true 时,后面的 Executable 对象才会执行。
11.5 嵌套测试
JUnit 5 可以通过 Java 中的内部类和 @Nested 注解实现嵌套测试。
- 示例1:
@DisplayName("JUnit5 测试类")
@SpringBootTest
public class JUnit5Test {

    List<Integer> list;

    @BeforeEach
    void createNewList(){
        list = new ArrayList<>();
    }

    @Nested
    class NestedTest{

        @Test
        void isNull(){
            Assertions.assertNull(list);
        }
    }
}
运行 isNull() 方法,断言失败。表示内部类的测试方法可以驱动外部类的 @BeforeEach、@AfterEach、@BeforeAll、@AfterAll 注解标注的方法。
- 示例2:
@DisplayName("JUnit5 测试类")
@SpringBootTest
public class JUnit5Test {

    List<Integer> list;

    @Test
    void isNull(){
        Assertions.assertNull(list);
    }

    @Nested
    class NestedTest{

    	@BeforeEach
	    void createNewList(){
	        list = new ArrayList<>();
	    }
    }
}
运行 isNull() 方法,断言成功。表示外部类的测试方法不可以驱动内部类的 @BeforeEach、@AfterEach 注解标注的方法。(jdk 11 以后,内部类不允许定义静态成员)
11.6 参数化测试
参数化测试是 JUnit5 很重要的一个新特性,它使得用不同的参数多次运行测试成为了可能,也为我们的单元测试带来许多便利。
利用 @ValueSource 等注解,指定入参来源,我们将可以使用不同的参数进行多次单元测试,而不需要每新增一个参数就新增一个单元测试,省去了很多冗余代码。
| 注解 | 说明 |
|---|---|
| @ValueSource | 为参数化测试指定入参来源,支持八大基础类以及String类型,Class类型 |
| @NullSource | 表示为参数化测试提供一个null的入参 |
| @EnumSource | 表示为参数化测试提供一个枚举入参 |
| @CsvFileSource | 表示读取指定CSV文件内容作为参数化测试入参 |
| @MethodSource | 表示读取指定静态方法的返回值作为参数化测试入参(注意方法返回的需要是一个流) |
@DisplayName("JUnit5 测试类")
@SpringBootTest
public class JUnit5Test {

    @MethodSource("test") //指定方法名
    @ParameterizedTest
    void testMethodSource(String s){
        System.out.println(s);
    }

    static Stream<String> test(){
        return Stream.of("hello","world");
    }
}
11.7 迁移指南
从 JUnit 4 迁移到 JUnit 5 需注意如下事项:
- 相关注解在
org.junit.jupiter.api包中,断言在org.junit.jupiter.api.Assertions类中,假设在org.junit.jupiter.api.Assumptions类中。 @Before -> @BeforeEach;@After -> @AfterEach@BeforeClass -> @BeforeAll;@AfterClass -> @AfterAll@Ignore -> @Disabled@Category -> @Tag@RunWith + @Rule + @ClassRule -> @ExtendWith
12、指标监控
12.1 简介
SpringBoot Actuator 官方文档
SpringBoot Actuator:未来每一个微服务在云上部署以后,我们都需要对其进行监控、追踪、审计、控制等,SpringBoot 就抽取了 Actuator 场景,使得我们每个微服务快速引用即可获得生产级别的应用监控、审计等功能。
12.2 基本使用
- 引入 actuator 的 starter
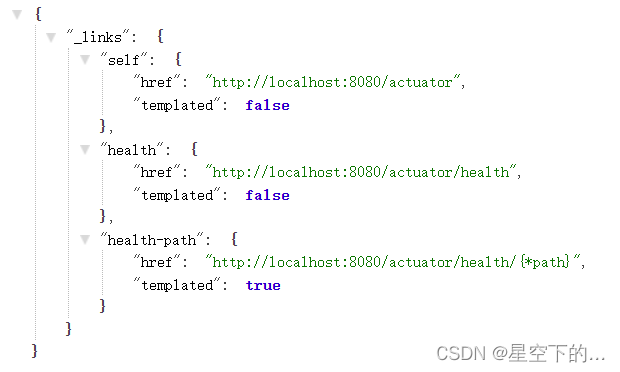
<dependency> <groupId>org.springframework.boot</groupId> <artifactId>spring-boot-starter-actuator</artifactId> </dependency> - 访问
http://localhost:8080/actuator - 页面结果
12.3 actuator 详解
12.3.1 常用端点(endpoint)
| ID | 描述 |
|---|---|
| health | 显示应用程序运行状况信息 |
| metrics | 显示当前应用程序的“指标”信息 |
| loggers | 显示和修改应用程序中日志的配置 |
| info | 显示应用程序信息 |
| auditevents | 暴露当前应用程序的审核事件信息,需要一个 AuditEventRepository 组件 |
| beans | 显示应用程序中所有 Spring Bean 的完整列表 |
| caches | 暴露可用的缓存 |
| conditions | 显示自动配置的所有条件信息,包括匹配或不匹配的原因 |
| configprops | 显示所有 @ConfigurationProperties |
| env | 暴露Spring的属性ConfigurableEnvironment |
| flyway | 显示已应用的所有 Flyway 数据库迁移,需要一个或多个 Flyway 组件 |
| httptrace | 显示HTTP跟踪信息(默认情况下,最近100个HTTP请求-响应),需要一个HttpTraceRepository组件 |
| integrationgraph | 显示 Spring integrationgraph,需要依赖 spring-integration-core |
| liquibase | 显示已应用的所有 Liquibase 数据库迁移,需要一个或多个 Liquibase 组件 |
| mappings | 显示所有 @RequestMapping 路径列表 |
| scheduledtasks | 显示应用程序中的计划任务 |
| sessions | 允许从 Spring Session 支持的会话存储中检索和删除用户会话,需要使用 Spring Session 的基于 Servlet 的 Web 应用程序 |
| shutdown | 使应用程序正常关闭,默认禁用 |
| startup | 显示由 ApplicationStartup 收集的启动步骤数据,需要使用 SpringApplication 进行配置BufferingApplicationStartup |
| threaddump | 执行线程转储 |
如果是Web应用程序(Spring MVC、Spring WebFlux 或 Jersey),则可以使用以下附加端点:
| ID | 描述 |
|---|---|
| heapdump | 返回hprof堆转储文件 |
| jolokia | 通过 HTTP 暴露 JMX bean(需要引入Jolokia,不适用于WebFlux),需要引入依赖 jolokia-core |
| logfile | 返回日志文件的内容(如果已设置 logging.file.name 或 logging.file.path 属性),支持使用 HTTPRange 标头来检索部分日志文件的内容 |
| prometheus | 以 Prometheus 服务器可以抓取的格式公开指标,需要依赖 micrometer-registry-prometheus |
端点的开启与禁用:除了 shutdown 之外的所有端点,默认都是开启的。
- 手动控制某个端点的开启与禁用:
management: endpoint: beans: enabled: false - 禁用所有端点,然后手动指定要开启的端点:
management:
  endpoints:
    enabled-by-default: false
  endpoint:
    beans:
      enabled: true
    health:
      enabled: true
端点暴露:只有暴露的端点,才可以被访问。
actuator 支持两种暴露方式:HTTP(默认只暴露 health)、JMX(默认暴露所有的 Endpoint)。
若要修改默认暴露的 Endpoint,请配置以下的包含和排除属性:
| Property | Default |
|---|---|
| management.endpoints.jmx.exposure.exclude | |
| management.endpoints.jmx.exposure.include | * |
| management.endpoints.web.exposure.exclude | |
| management.endpoints.web.exposure.include | health、info |
12.3.2 health Endpoint
可以在配置文件中设置端点显示详细信息:
management:
    health:
      enabled: true
      show-details: always #总是显示详细信息。可显示每个模块的状态信息
给 health 端点新增自定义的检查信息:
- 创建自己的
HealthIndicator,并且继承AbstractHealthIndicator - 类名必须以 “HealthIndicator” 结尾
@Component
public class MyComHealthIndicator extends AbstractHealthIndicator {

    @Override
    protected void doHealthCheck(Health.Builder builder) throws Exception {
    	...
		//自定义检查逻辑
		...

		//检查完成,定制显示信息
        Map<String,Object> map = new HashMap<>();
        if(1 == 1){ //如果健康
            //builder.up();
            builder.status(Status.UP);
            map.put("count",1);
            map.put("ms",100);
        }else { //如果不健康
            //builder.down();
            builder.status(Status.OUT_OF_SERVICE);
            map.put("err","连接超时");
            map.put("ms",3000);
        }

        builder.withDetail("code",100)
                .withDetails(map);
    }
}
12.3.3 info Endpoint
info 端点默认显示为空,自定义 info 端点显示信息:
-
方法1:通过配置文件
info: appName: boot-admin version: 2.0.1 mavenProjectName: @project.artifactId@ #使用@@可以获取pom文件值、系统环境变量... mavenProjectVersion: @project.version@ -
方法2:创建自定义类实现
InfoContributor接口@Component public class MyInfoContributor implements InfoContributor { @Override public void contribute(Info.Builder builder) { builder.withDetail("hello","你好") .withDetail(Collections.singletonMap("key", "value")); } }
12.3.3 metrics Endpoint
给 metrics 端点新增自定义的指标信息:
- 通过
MeterRegistry注册监控指标:假设监控 hello() 方法的执行次数@Service public class MyService { Counter counter; public MyService(MeterRegistry registry){ counter = registry.counter("myservice.hello.count"); } public double hello(){ counter.increment(); double count = counter.count(); return count; } }@Controller public class IndexController { @ResponseBody @GetMapping("/hello") public double count(){ return myService.hello(); } }
12.3.4 新增自定义监控端点
@Component
@Endpoint(id = "container") //id 即为端点名
public class DockerEndpoint {

    @ReadOperation //读方法,返回当我们访问 /actuator/container 时的页面信息
    public Map getDockerInfo(){
        return Collections.singletonMap("info","docker started...");
    }

    @WriteOperation //写方法,可以通过 JMX 调用
    private void restartDocker(){
        System.out.println("docker restarted....");
    }
}
12.4 指标监控可视化
spring-boot-admin 官方文档
Spring Boot Admin Server:codecentric 发起的一个开源项目,将上面的指标监控进行可视化展示。
12.4.1 创建 Admin Server
- 新建一个 spring-web 工程;
- 引入 Admin Server 的 starter:
记得与自己工程中引入的 actuator 依赖版本对应。
<dependency> <groupId>de.codecentric</groupId> <artifactId>spring-boot-admin-starter-server</artifactId> <version>2.6.7</version> </dependency> - 在主程序类标注
@EnableAdminServer注解:@EnableAdminServer @SpringBootApplication public class SpringbootAdminServerApplication { public static void main(String[] args) { SpringApplication.run(SpringbootAdminServerApplication.class, args); } } - 为了防止端口冲突,修改端口号:
server: port: 8081 - 访问
http://localhost:8081,即可看到可视化界面。
12.4.2 创建 Admin Client
- 在我们的工程中引入 Admin Client 的 starter:
记得与自己工程中引入的 actuator 依赖版本对应。
<dependency> <groupId>de.codecentric</groupId> <artifactId>spring-boot-admin-starter-client</artifactId> <version>2.3.1</version> </dependency> - 在 application.yaml 中进行以下配置:
spring:
  application:
    name: MyAdminClient # 设置自己的工程名

  boot:
    admin:
      client:
        url: http://localhost:8081 # 设置 admin server 的地址

management:
  endpoints:
    enabled-by-default: true # 设置启用所有端点
    web:
      exposure:
        include: '*' # 设置以 web 模式暴露所有端点
13、Profile 环境切换
实际开发中,测试环境与生产环境用的配置文件不同,为了方便多环境适配,SpringBoot 简化了 profile 功能。
13.1 简单使用
- 创建测试类:
public interface Person { String getName(); Integer getAge(); }@Profile:该注解即可以标注在类上,又可以标注在方法上。@Profile("test") //表示当加载 application-test.yaml 时,该类生效 @Component @ConfigurationProperties("person") @Data public class Worker implements Person { private String name; private Integer age; }@Profile(value = {"prod","default"}) //表示当加载 application-prod.yaml 时,该类生效 @Component @ConfigurationProperties("person") @Data public class Boss implements Person { private String name; private Integer age; }@Controller public class IndexController { @Autowired private Person person; @GetMapping("/person") public String person(){ //激活了prod,则返回Boss;激活了test,则返回Worker return person.getClass().toString(); } } - 创建不同环境的配置文件:
① 测试环境的配置文件 application-test.yaml:
② 生成环境的配置文件 application-prod.yaml:person: name: test-张三 server: port: 7000person: name: prod-张三 server: port: 8000 - 在 application.yaml 中指定使用哪个配置文件
spring: profiles: active: prod - 启动工程,访问
http://localhost:8080/person,结果是 “Boss”。
13.2 配置加载优先级
配置文件查找路径:
- classpath 根路径;
- classpath 根路径下的 /config 目录;
- jar包所在目录;
- jar包所在目录下的 /config 目录;
- jar包所在目录下的 /config 目录的直接子目录;(该条仅在 linux 系统生效)
配置文件加载顺序:
- 当前 jar 包内部的 application.properties 和 application.yml;
- 当前 jar 包内部的 application-{profile}.properties 和 application-{profile}.yml
- 当前 jar 包外部的 application.properties 和 application.yml
- 当前 jar 包外部的 application-{profile}.properties 和 application-{profile}.yml
- 命令行运行 jar 包时,仍然可以指定参数
总结:指定环境优先,外部优先,后面的可以覆盖前面的同名配置项。
14、自定义 starter
目标:创建HelloService的 starter。
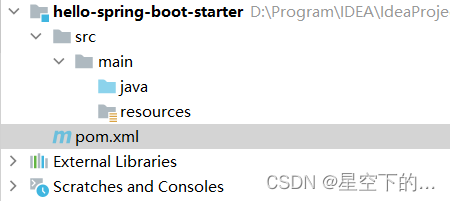
- 创建一个普通的 spring 工程:
hello-spring-boot-starter-autoconfigure

pom.xml:<?xml version="1.0" encoding="UTF-8"?> <project xmlns="http://maven.apache.org/POM/4.0.0" xmlns:xsi="http://www.w3.org/2001/XMLSchema-instance" xsi:schemaLocation="http://maven.apache.org/POM/4.0.0 https://maven.apache.org/xsd/maven-4.0.0.xsd"> <modelVersion>4.0.0</modelVersion> <parent> <groupId>org.springframework.boot</groupId> <artifactId>spring-boot-starter-parent</artifactId> <version>2.7.0</version> <relativePath/> <!-- lookup parent from repository --> </parent> <groupId>com.atguigu</groupId> <artifactId>hello-spring-boot-starter-autoconfig</artifactId> <version>0.0.1-SNAPSHOT</version> <name>hello-spring-boot-starter-autoconfig</name> <description>hello-spring-boot-starter-autoconfig</description> <properties> <java.version>11</java.version> </properties> <dependencies> <dependency> <groupId>org.springframework.boot</groupId> <artifactId>spring-boot-starter</artifactId> </dependency> </dependencies> </project>HelloServiceAutoConfiguration.java:@Configuration @EnableConfigurationProperties(HelloProperties.class) //开启属性与配置文件的绑定 public class HelloServiceAutoConfiguration { @Bean @ConditionalOnMissingBean(HelloService.class) //配置当容器中没有 HelloService 组件时,我们再往容器中放该组件 public HelloService helloService(){ return new HelloService(); } }HelloProperties.java:@ConfigurationProperties("hello") //与配置文件进行属性绑定,绑定前缀为 hello public class HelloProperties { private String prefix; private String suffix; public String getPrefix() { return prefix; } public void setPrefix(String prefix) { this.prefix = prefix; } public String getSuffix() { return suffix; } public void setSuffix(String suffix) { this.suffix = suffix; } }HelloService.java:/** * 默认不要放在容器中,让用户按需配置 */ public class HelloService { @Autowired private HelloProperties helloProperties; public String sayHello(String username){ return helloProperties.getPrefix() + "##" + username + "##" + helloProperties.getSuffix(); } }spring.factories:在 SpringBoot 中注册我们自己的自动配置类。org.springframework.boot.autoconfigure.EnableAutoConfiguration=\ com.atguigu.hello.auto.HelloServiceAutoConfiguration工程创建完成,使用 maven 插件 install 到本地。
- 创建一个普通的 maven 工程:
hello-spring-boot-starter
该工程无需编写任何代码,只需引入hello-spring-boot-starter-autoconfig依赖。
pom.xml:<?xml version="1.0" encoding="UTF-8"?> <project xmlns="http://maven.apache.org/POM/4.0.0" xmlns:xsi="http://www.w3.org/2001/XMLSchema-instance" xsi:schemaLocation="http://maven.apache.org/POM/4.0.0 http://maven.apache.org/xsd/maven-4.0.0.xsd"> <modelVersion>4.0.0</modelVersion> <groupId>org.atguigu</groupId> <artifactId>hello-spring-boot-starter</artifactId> <version>1.0-SNAPSHOT</version> <properties> <maven.compiler.source>11</maven.compiler.source> <maven.compiler.target>11</maven.compiler.target> </properties> <dependencies> <dependency> <groupId>com.atguigu</groupId> <artifactId>hello-spring-boot-starter-autoconfig</artifactId> <version>0.0.1-SNAPSHOT</version> </dependency> </dependencies> </project>工程创建完成,使用 maven 插件 install 到本地。
- 创建一个 spring-web 工程用于测试:
hello-spring-boot-starter-test
引入hello-spring-boot-starter的依赖:<dependency> <groupId>org.atguigu</groupId> <artifactId>hello-spring-boot-starter</artifactId> <version>1.0-SNAPSHOT</version> </dependency>application.properties:hello.prefix=aaaa hello.suffix=bbbbHelloController.java:@RestController public class HelloController { @Autowired private HelloService helloService; @GetMapping("/hello") public String hello(){ return helloService.sayHello("张三"); } } - 测试
访问http://localhost:8080/hello,浏览器返回aaaa##张三##bbbb。


 319
319


 被折叠的 条评论
为什么被折叠?
被折叠的 条评论
为什么被折叠?
 到【灌水乐园】发言


