


SpringBoot邮件发送
邮件发送是一个很常见的功能,注册身份认证,找回密码等场景都会用到邮件发送。Spring Boot提供了MailSenderAutoConfiguration 对邮件的发送做了进一步简化。
发送前的准备:先开通邮箱的POP3/SMTP服务
文章采用qq邮箱的方式(其他邮箱步骤相同)
申请开通POP3/SMTP服务
打开邮箱,点设置》》账号
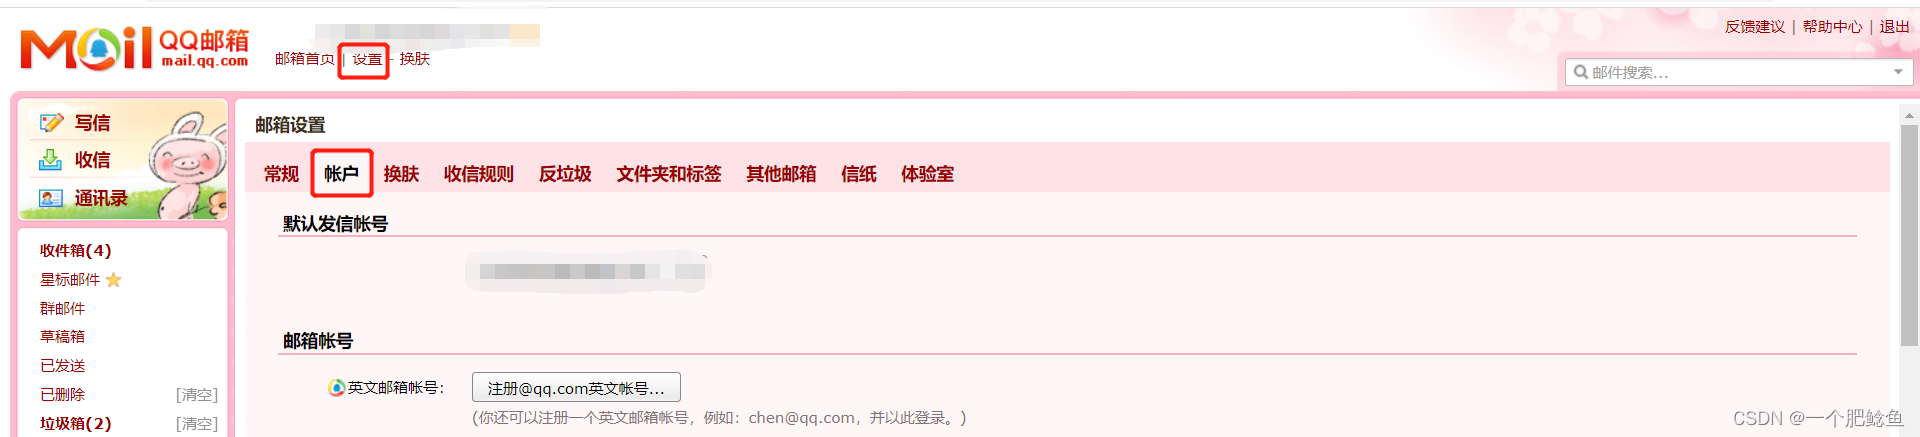
往下滑,找到POP3/IMAP/SMTP/Exchange/CardDAV/CalDAV服务
打开POP3/SMTP服务,开启服务后一定要保存好授权码

环境搭建
        <!-- Spring Mail依赖(发送邮件) -->
        <dependency>
            <groupId>org.springframework.boot</groupId>
            <artifactId>spring-boot-starter-mail</artifactId>
        </dependency>
server:
  port: 8080
spring:
  mail:
    # 配置 SMTP 服务器地址
    host: smtp.qq.com
    # 发送者邮箱,已开通POP3/SMTP服务的邮箱,也就是你自己的
    username: xxxxx@qq.com
    # 配置密码,注意不是真正的密码,而是刚刚申请到的授权码
    password: 123456
    # 端口号465或587(QQ邮箱发送邮件仅支持587端口协议)
    port: 587
    # 默认的邮件编码为UTF-8
    default-encoding: UTF-8
    # 配置SSL 加密工厂
    properties:
      mail:
        smtp:
          socketFactoryClass: javax.net.ssl.SSLSocketFactory
        #表示开启 DEBUG 模式,这样,邮件发送过程的日志会在控制台打印出来,方便排查错误
        debug: true
简单邮件小栗子
@RestController
public class MailController {

    @Autowired
    private JavaMailSender javaMailSender;

    // 获取yml配置的发送者邮箱
    @Value("${spring.mail.username}")
    private String mainUserName;

    /**
     * 简单邮件
     *
     * @param mailAccount 收件人
     */
    @RequestMapping(value = "/sendSimpleMail", method = RequestMethod.POST)
    public void sendSimpleMail(String mailAccount) {
        // 构建一个邮件对象
        SimpleMailMessage message = new SimpleMailMessage();
        // 设置邮件发送者
        message.setFrom(mainUserName);
        // 设置邮件接收者
        message.setTo(mailAccount);
        // 设置邮件的主题
        message.setSubject("验证码");
        // 设置邮件的正文
        String text = "您的验证码为:" + randomCode() + "请勿泄露给他人。";
        message.setText(text);
        // 发送邮件
        javaMailSender.send(message);
    }

    /**
     * 六位随机验证码
     *
     * @return
     */
    public static String randomCode() {
        Random random = new Random();
        StringBuilder code = new StringBuilder();
        for (int i = 0; i < 6; i++) {
            int r = random.nextInt(10);
            code.append(r);
        }
        return code.toString();
    }

}
通过FreeMarker模板发送邮件
对于格式复杂的邮件,使用HTML模板可以很好地解决这一问题。使用FreeMarker构建邮件模板,首先加入FreeMarker依赖
        <dependency>
            <groupId>org.springframework.boot</groupId>
            <artifactId>spring-boot-starter</artifactId>
        </dependency>
        <!-- FreeMarker模板 -->
        <dependency>
            <groupId>org.springframework.boot</groupId>
            <artifactId>spring-boot-starter-freemarker</artifactId>
        </dependency>
定义模板文件
在resources目录创建templates文件,把模板保存在templates下

<!DOCTYPE html>
<html lang="en">
<head>
    <meta charset="UTF-8">
    <meta http-equiv="X-UA-Compatible" content="IE=edge">
    <meta name="viewport" content="width=device-width, initial-scale=1.0">
    <meta charset="utf-8">
    <title>${title}</title>
    <style>
        .hello {
            display: flex !important;
            justify-content: center !important;
        }

        .areaBox {
            width: 500px;
            /*border: 1px solid red;*/
            /* padding: 80px 0 80px 8%; */
            /* margin: 100px; */
            box-sizing: border-box;
        }

        .areaBox > .title {
            font-size: 2em;
        }

        .box {
            /*width: 80%;*/
            text-align: center;
            margin: 20px 0;
        }

        .text {
            margin-bottom: 20px;
        }

        button {
            padding: 6px 15px;
            border-radius: 8px;
            border: 1px solid #767676;
            background: linear-gradient(to top, #E1E1E1, #fff);
        }

        a {
            color: #536AD8;
            text-decoration: none !important;
        }

        .boxbottom {
            margin-top: 20px;
            font-size: 15px;
        }

        .boxbottom p {
            margin-bottom: 6px;
        }

        .bottom {
            margin-top: 20px;
            color: #817c78;
            text-align: center;
        }

        .bottom p {
            margin-top: 60px;
        }

        .bottom .p {
            font-size: 14px;
        }
    </style>
</head>
<body>
<div class="hello">
    <div class="areaBox">
        <p class="title">${title}</p>
        <p class="text">验证码:${captcha}</p>
        <p>此验证码有限期至${curDate}(有效时间为10分钟),验证码失效后需要重新发送邮件获取验证码。</p>
        <div class="boxbottom">
            <p style="text-align: right;color: #817c78;">一个肥鲶鱼</p>
        </div>
    </div>
</div>
</body>
</html>
通过FreeMarker模版渲染出邮件正文内容(代码)
    /**
     * FreeMarker模板邮件
     *
     * @param mailAccount
     */
    @RequestMapping(value = "/sendFreeMarkerMail", method = RequestMethod.POST)
    public void sendFreeMarkerMail(String mailAccount)
            throws IOException, TemplateException, MessagingException {
        // 首先配置 FreeMarker 模版位置
        Configuration configuration = new Configuration(Configuration.VERSION_2_3_0);
        // DemoMailApplication是启动类类名
        ClassLoader loader = DemoMailApplication.class.getClassLoader();
        configuration.setClassLoaderForTemplateLoading(loader, "templates");
        // 配置模版文件
        Template template = configuration.getTemplate("mailtemplate.ftl");
        // 渲染模版
        StringWriter mail = new StringWriter();
        HashMap<String, Object> map = new HashMap<>();
        map.put("title", "注册账号");
        map.put("captcha", randomCode());
        map.put("curDate", "2022-11-06");
        template.process(map, mail);

        // 构建一个邮件对象
        MimeMessage message = javaMailSender.createMimeMessage();
        MimeMessageHelper helper = new MimeMessageHelper(message, true);
        // 设置邮件发送者
        helper.setFrom(mainUserName);
        // 设置邮件接收者
        helper.setTo(mailAccount);
        // 设置邮件的主题
        message.setSubject("验证码");
        // 设置邮件的正文
        helper.setText(mail.toString(), true);
        // 发送邮件
        javaMailSender.send(message);
    }

    /**
     * 六位随机验证码
     *
     * @return
     */
    public static String randomCode() {
        Random random = new Random();
        StringBuilder code = new StringBuilder();
        for (int i = 0; i < 6; i++) {
            int r = random.nextInt(10);
            code.append(r);
        }
        return code.toString();
    }


 3716
3716


 被折叠的 条评论
为什么被折叠?
被折叠的 条评论
为什么被折叠?
 到【灌水乐园】发言


