


Spring框架是在项目中常用的一种。
Spring里面有两大核心,一个是IOC(控制反转),一个是AOP(面向切面编程)。
一:Spring由什么组成。
1.IOC是一种思想,IOC用两个词概括,一个是控制,一个是反转。
控制谁?控制什么?
在传统的JAVASE中,我们通过new对象进行对象的创建,是主动创建依赖对象。而Ioc是有自己的容器来控制创建这些对象,只要放在Ioc容器中,就不需要一个一个的去new创建对象了。
反转:
过去我们主动的new对象,这个属于正转,现在我们通过容器给依赖对象,对象被迫的接受,我们理解为反转。
有了这些关系,Ioc可以给程序解耦,耦合性降低,不至于牵一发动全身。
2.Aop也是一种思想,是一种面向切面编程的思想。
举一个例子,有很对人想要租房子住,有很多人想要把房子租出去,他们相互沟通比较麻烦,这个时候就会有一个房屋中介,房东把房子交给中介,需要房子的人来找中介,中介把两个的需求一匹配,给出最优方案。此处的中介就是属于aop的思想,对租户和房东遇见的共同问题统一解决,面向他们的切面编程。
AOP的底层是代理模式,动态代理的底层是反射机制!
二。
使用Spring框架之前,需要导入一些东西。
导入Spring依赖
<!-- https://mvnrepository.com/artifact/org.springframework/spring-web -->
<dependency>
    <groupId>org.springframework</groupId>
    <artifactId>spring-web</artifactId>
    <version>5.3.9</version>
</dependency>
在src的main目录下,创建一个resources目录,目录下,创建xml文件。xml文件中写入需要的依赖。
<?xml version="1.0" encoding="UTF-8"?>
<beans xmlns="http://www.springframework.org/schema/beans"
       xmlns:xsi="http://www.w3.org/2001/XMLSchema-instance"
       xsi:schemaLocation="http://www.springframework.org/schema/beans
        https://www.springframework.org/schema/beans/spring-beans.xsd">


</beans>
这样,Spirng就基本搭建结束。接下来,我们创建实体类,进行操作。
首先创建一个实体类,可以给实体类定义一个属性。
public class User {

    private String name;
    public User(String name){
    this.name=name;
    }


    public String getName() {
        return name;
    }

    public void setName(String name) {
        this.name = name;
    }
    public void show(){
        System.out.println("name"+name);
    }
}
通过xml注册。
通过Bean注册有很多种方法。
注册成功后,可以通过实体类中的方法,打印出来。
1.
  <!--无参构造方法
<bean id="user" class="com.lixiaobin.pojo.User">
    <property name="name" value="李晓彬"/>
</bean>
-->
需要在实体类中创建无参构造。
此处的user是实体类的类型,规范用小写的。 class后面为这个实体类的路径。后面的方法都一样。
<!--有参方法 第一种,下标赋值
<bean id="user" class="com.lixiaobin.pojo.User">
    <constructor-arg index="0" value="李晓彬学Java"/>
</bean>
-->
若实实体类中有很多方法,可以通过下标进行赋值,实体类第一个属性的下标为0.
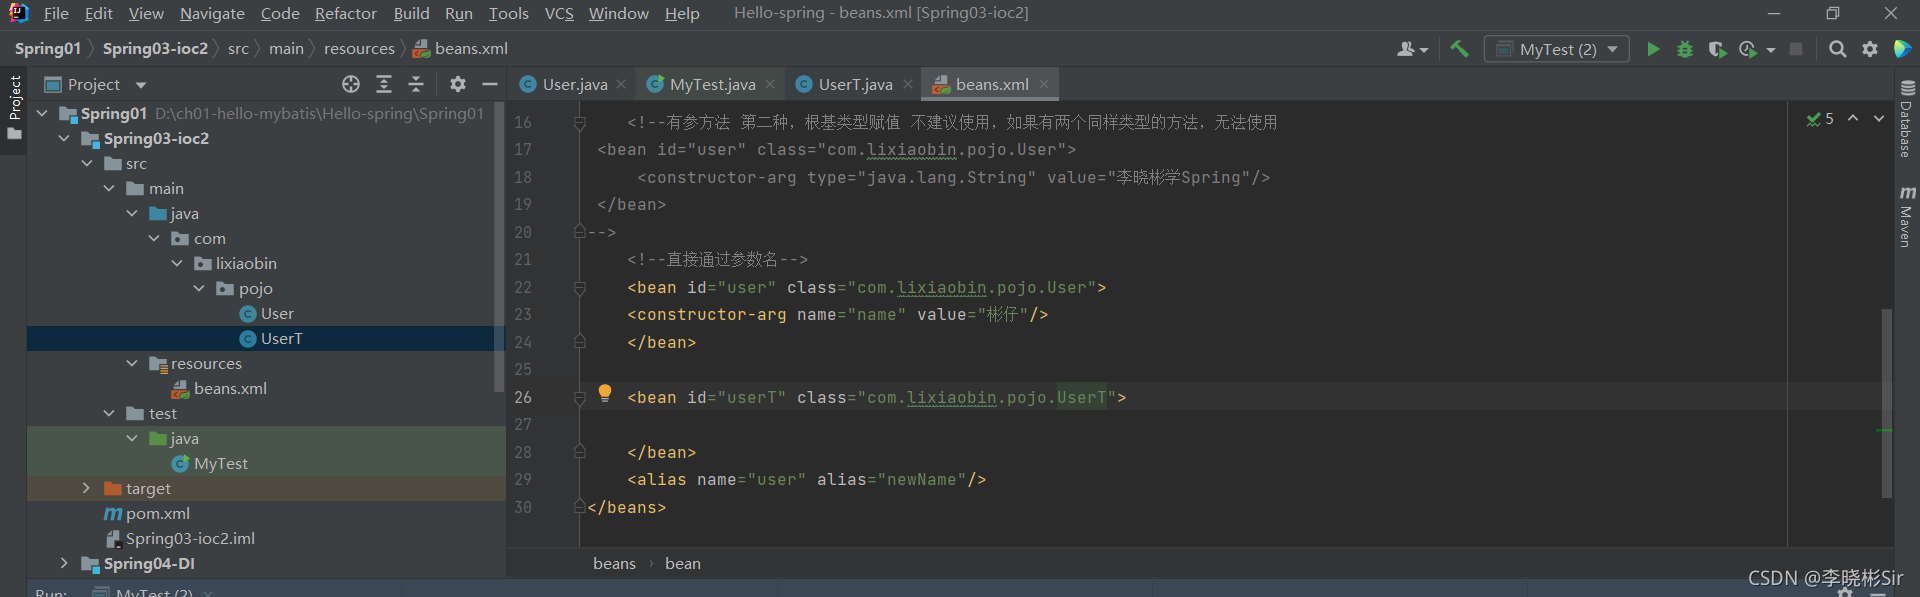
   <!--有参方法 第二种,根基类型赋值 不建议使用,如果有两个同样类型的方法,无法使用
 <bean id="user" class="com.lixiaobin.pojo.User">
     <constructor-arg type="java.lang.String" value="李晓彬学Spring"/>
 </bean>
-->
通过定义的属性类型赋值,如果两个属性一致,无法使用
<!--直接通过参数名-->
<bean id="user" class="com.lixiaobin.pojo.User">
<constructor-arg name="name" value="彬仔"/>
</bean>
如果参数名一样,无法使用。
<alias name="user" alias="newName"/><alias 方法可以起别名。
实体类写好了,bean.xml注册完毕了,可以创建测试类测试了。
在src的test包下,创建测试类测试。
public class MyTest {
public static void main(String[] args) {
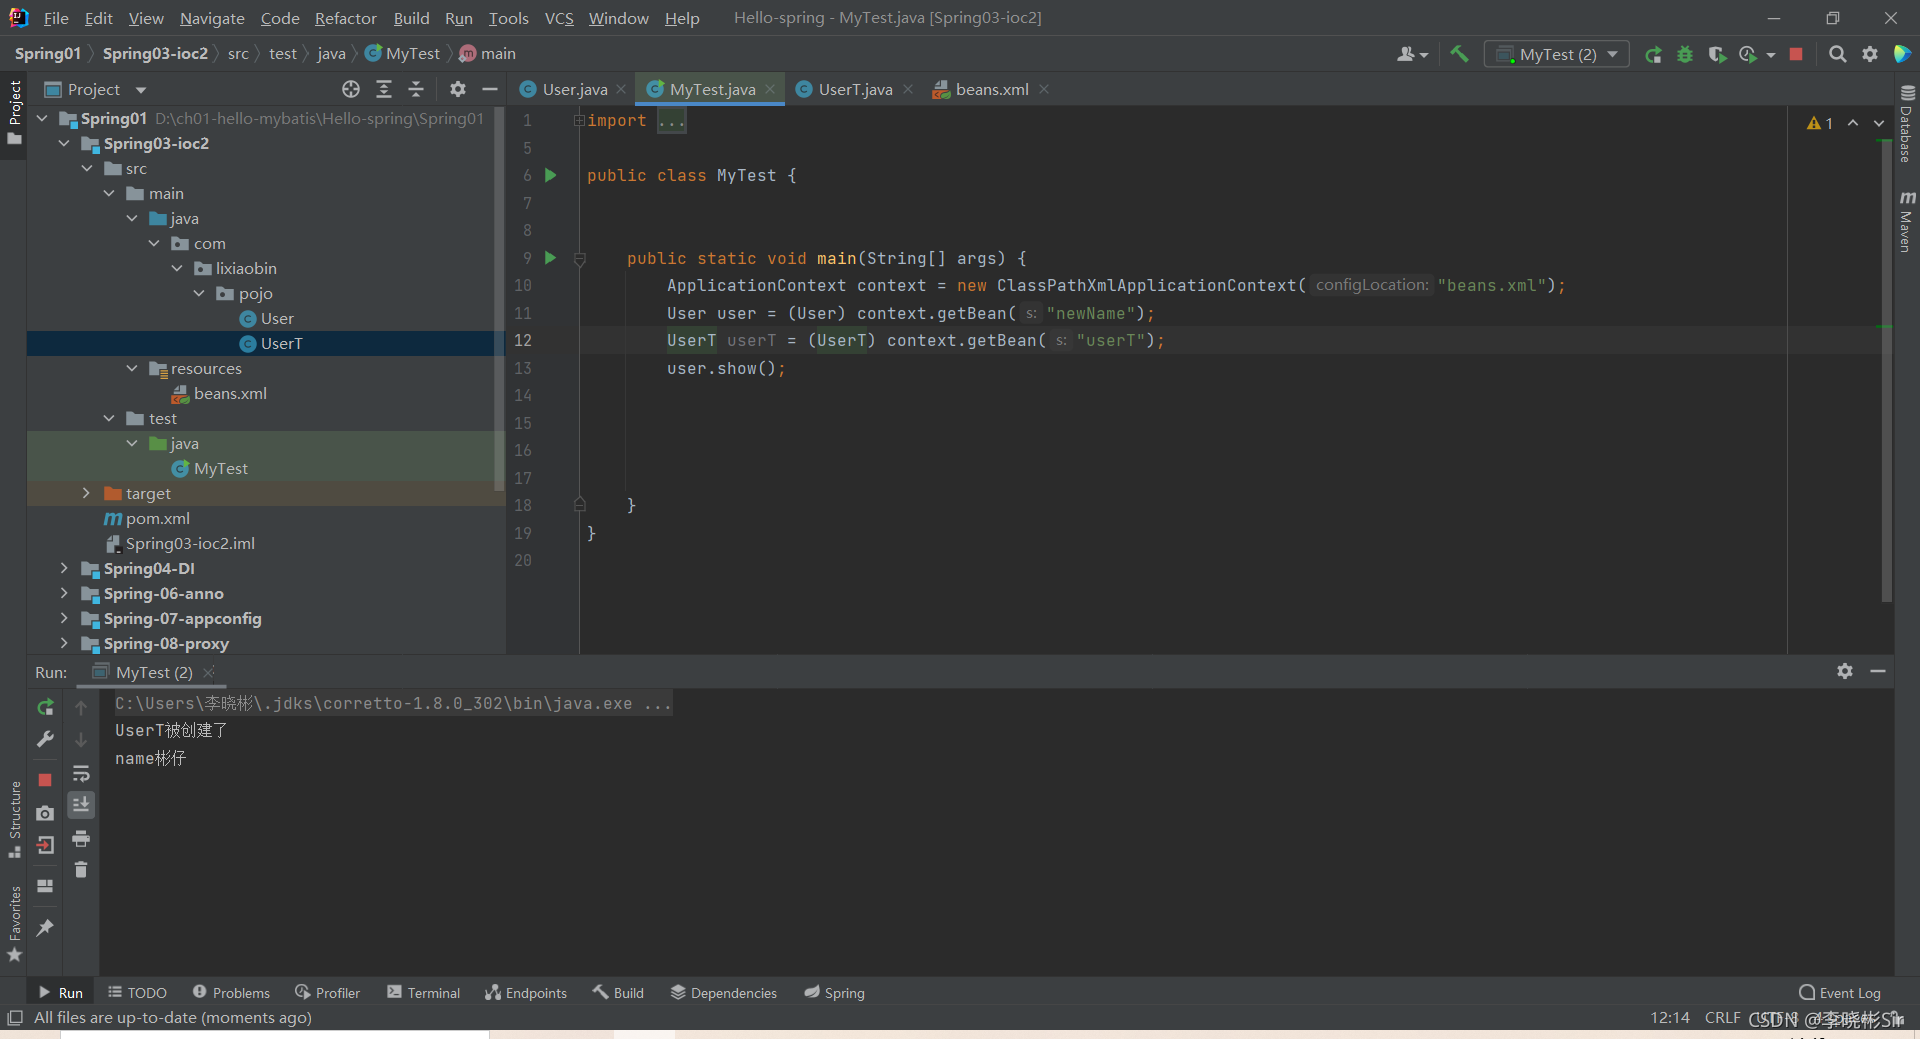
ApplicationContext context = new ClassPathXmlApplicationContext("beans.xml");
User user = (User) context.getBean("newName");
user.show();
}
}
此处的beans.xml是注册文件,通过
ApplicationContext context = new ClassPathXmlApplicationContext("");获取beans.xml
context.getBean 获取文件中的对象。 此处的newName为user的别名。
注意:如果bean.xml文件中,注册了一个以上的类,先输入类中的无参方法。

DI依赖注入
DI是基于Ioc的基础上实现的。Ioc是一种思想,DI是具体的操作。
给实体类一些属性,并且提供Set Get toString方法。
public class Student {
    private String name;
    private Address address;
    private String[] books;
    private List<String> hobbys;
    private Map<String,String> card;
    private Set<String> games;
    private String wife;
    private Properties info;

    public String getName() {
        return name;
    }

    public void setName(String name) {
        this.name = name;
    }

    public Address getAddress() {
        return address;
    }

    public void setAddress(Address address) {
        this.address = address;
    }

    public String[] getBooks() {
        return books;
    }

    public void setBooks(String[] books) {
        this.books = books;
    }

    public List<String> getHobbys() {
        return hobbys;
    }

    public void setHobbys(List<String> hobbys) {
        this.hobbys = hobbys;
    }

    public Map<String, String> getCard() {
        return card;
    }

    public void setCard(Map<String, String> card) {
        this.card = card;
    }

    public Set<String> getGames() {
        return games;
    }

    public void setGames(Set<String> games) {
        this.games = games;
    }

    public String getWife() {
        return wife;
    }

    public void setWife(String wife) {
        this.wife = wife;
    }

    public Properties getInfo() {
        return info;
    }

    public void setInfo(Properties info) {
        this.info = info;
    }

    @Override
    public String toString() {
        return "Student{" +
                "name='" + name + '\'' +
                ", address=" + address.toString() +
                ", books=" + Arrays.toString(books) +
                ", hobbys=" + hobbys +
                ", card=" + card +
                ", games=" + games +
                ", wife='" + wife + '\'' +
                ", info=" + info +
                '}';
    }
}
通过xml文件进行注入。
<?xml version="1.0" encoding="UTF-8"?>
<beans xmlns="http://www.springframework.org/schema/beans"
       xmlns:xsi="http://www.w3.org/2001/XMLSchema-instance"
       xsi:schemaLocation="http://www.springframework.org/schema/beans
        https://www.springframework.org/schema/beans/spring-beans.xsd">

    <bean id="address" class="com.lixiaobin.pojo.Address">
        <property name="address" value="哈尔滨"/>
    </bean>

    <bean id="student" class="com.lixiaobin.pojo.Student">
        <!--第一种,普通值注入,直接使用value-->
        <property name="name" value="李晓彬"/>
        <!--第二种,Bean注入,使用ref注入 自己的理解(因为注入的是一个实体类)-->
        <property name="address" ref="address"/>

        <!--数组注入-->
        <property name="books">
            <array>
                <value>三国演义</value>
                <value>水浒传</value>
                <value>西游记</value>
                <value>红楼梦</value>
            </array>

        </property>
        <!--List注入-->
        <property name="hobbys">
            <list>
                <value>学Java</value>
                <value>学MyBatis</value>
                <value>学Spring</value>
            </list>
        </property>
        <!--Map注入-->
        <property name="card">
            <map>
              <entry key="身份证" value="123456"/>
                <entry key="身份证" value="666666"/>
                <entry key="身份证" value="19990522"/>

            </map>
        </property>
        <!--Set注入-->
        <property name="games">
            <set>
                <value>LoL</value>
                <value>DNF</value>
                <value>NBA2K</value>
            </set>
        </property>
        <!--null注入-->
        <property name="wife">
            <null/>
        </property>
        <property name="info">
           <props>
               <prop key="学号">20181159</prop>
               <prop key="性别">男</prop>
               <prop key="username">root</prop>
               <prop key="password">123456</prop>
           </props>
        </property>
    </bean>
</beans>
p命名空间注入和c命名空间注入。
使用时同样需要导入对应的约束。
public class User {
    private String name;
    private int age;

    public User() {
    }

    public User(String name, int age) {
        this.name = name;
        this.age = age;
    }

    public String getName() {
        return name;
    }

    public void setName(String name) {
        this.name = name;
    }

    public int getAge() {
        return age;
    }

    public void setAge(int age) {
        this.age = age;
    }

    @Override
    public String toString() {
        return "User{" +
                "name='" + name + '\'' +
                ", age=" + age +
                '}';
    }
}
<?xml version="1.0" encoding="UTF-8"?>
<beans xmlns="http://www.springframework.org/schema/beans"
       xmlns:xsi="http://www.w3.org/2001/XMLSchema-instance"
       xmlns:p="http://www.springframework.org/schema/p"
       xmlns:c="http://www.springframework.org/schema/c"
       xsi:schemaLocation="http://www.springframework.org/schema/beans

        https://www.springframework.org/schema/beans/spring-beans.xsd">
<!--P命名空间注入,可以直接注入属性的值。 property-->
    <bean id="user" class="com.lixiaobin.pojo.User" p:name="李晓彬" p:age="22"/>
<!--通过c命名注入,通过构造器constructs-args-->
    <bean id="user2" class="com.lixiaobin.pojo.User" c:age="21" c:name="刘蕊"/>


</beans>
注解
注解可以简化我们的开发。
使用注解的时候,我们需要在beans.xml文件中开启注解支持。
<?xml version="1.0" encoding="UTF-8" ?>

<beans xmlns="http://www.springframework.org/schema/beans"

       xmlns:xsi="http://www.w3.org/2001/XMLSchema-instance"
       xmlns:context="http://www.springframework.org/schema/context"
       xsi:schemaLocation="http://www.springframework.org/schema/beans
        http://www.springframework.org/schema/beans/spring-beans-3.0.xsd
         http://www.springframework.org/schema/context
          http://www.springframework.org/schema/context/spring-context-3.0.xsd">
    <!--开启注解支持-->

    <!--扫描包-->
    <context:component-scan base-package="com.lixiaobin.pojo"/>


</beans>
扫描需要使用注解的包
package com.lixiaobin.pojo;

import org.springframework.beans.factory.annotation.Value;
import org.springframework.stereotype.Component;

@Component //等价于 <bean id="user" class="com.lixiaobin.pojo.User"/>
public class User {
    @Value("李晓彬")/*
    相当于
    <bean id="user" class="com.lixiaobin.pojo.User">
        <property name="name" value="李晓彬";
    */
    public String name;
}
@Component 等价于不使用注解时候的 <bean id="user" class="com.lixiaobin.pojo.User"/>。
帮助我们注册。
@Value 等价不使用注解时候的
<bean id="user" class="com.lixiaobin.pojo.User">
<property name="name" value="李晓彬";
帮助我们赋值。
@Autowired注解 自动装配
不用在xml文件中配置Bean
Aop的底层是动态代理模式,动态代理模式的底层是反射机制!
浅谈动态代理:
场景:有房东要把房子出租,有人想要租房子,房东和租户互相找不到,通过中介完成交易!
首先创建一个接口,里面写租房子的方法
//租房的接口
public interface Rent {
  public void rent();
}
创建一个租户,实现接口
//房东
public class Host implements Rent {
  public void rent(){
      System.out.println("房东要出租房子");
  }
}
创建代理类,实现InvocationHandler接口。
public class Poxy implements InvocationHandler {


    private Rent rent;
    //被代理的接口
    public void setRent(Rent rent) {
        this.rent = rent;
    }
    //生成得到代理类
    public Object getProxy(){
         return  Proxy.newProxyInstance(this.getClass().getClassLoader(), rent.getClass().getInterfaces(), this);
    }
    //处理代理实例,并且返回结果
    public Object invoke(Object proxy, Method method, Object[] args) throws Throwable {
        //动态代理的本质就是反射机制的实现
        Object invoke = method.invoke(rent, args);
        return null;
    }
}
创建租户,实现类
public class Client {
    public static void main(String[] args) {
        //真实角色
        Host host=new Host();
        //代理角色: 现在没有
        Poxy pih = new Poxy();
        //通过调用程序处理角色来处理我们要调用的接口对象
        pih.setRent(host);
        Rent proxy = (Rent) pih.getProxy();
        proxy.rent();
    }
}
AOP:是一种思想,并不是某种操作就是aop。
第一种实现Aop的方式 使用原生态<Spring API>实现
创建一个接口,接口里面写上方法。
public interface UserService {
  void add();
    void delete();
   void update();
   void select();
}
创建一个实体类,实现接口中的方法
public class MyTest {
    public static void main(String[] args) {
       ApplicationContext Context = new ClassPathXmlApplicationContext("Context.xml");
        //动态代理代理的是接口
        UserService userService = (UserService) Context.getBean("userServiceImpl");


        userService.add();
        userService.delete();
        userService.update();
        userService.select();
    }
}
创建环绕(这个不是一定的,但是必须有类似的东西,如果没有,就不是面向三个类的切面编程了,就不能表达AOP的思想)
创建两个环绕,方法执行前环绕,方法执行后环绕
方法执行前环绕,要实现 MethodBeforeAdvice 接口并且实现接口的方法,这个是JAVA自带的接口!
前环绕
public class Log implements MethodBeforeAdvice {
    //method:要执行的目标对象方法
    //objects:参数
    //o:目标对象
    public void before(Method method, Object[] objects, Object o) throws Throwable {
        System.out.println(o.getClass().getName()+"的"+method.getName()+"被执行了");
    }
}
方法中, method为要执行的目标对象方法,method.getName为要执行方法的名字。 objects为参数。 o代表目标对象,o.getClass().getName为目标对象的全路径类名。
后环绕
public class AfterLog implements AfterReturningAdvice {
    //o为返回值
    public void afterReturning(Object o, Method method, Object[] objects, Object o1) throws Throwable {
        System.out.println("执行了"+method.getName()+"方法,返回值为"+o);
    }
}
在resources下创建xml。写上使用aop需要的约束
注册bean。注意:需要使用什么类,就注册什么Bean,不然容易报错,也是一种习惯。
<?xml version="1.0" encoding="UTF-8"?>
<beans xmlns="http://www.springframework.org/schema/beans"
       xmlns:xsi="http://www.w3.org/2001/XMLSchema-instance"
       xmlns:aop="http://www.springframework.org/schema/aop"
       xsi:schemaLocation="http://www.springframework.org/schema/beans
         https://www.springframework.org/schema/beans/spring-beans.xsd
           http://www.springframework.org/schema/aop
            http://www.springframework.org/schema/aop/spring-aop.xsd">
<!--注册bean-->
    <bean id="userServiceImpl" class="com.lixiaobin.service.UserServiceImpl"/>
    <bean id="afterLog" class="com.lixiaobin.log.AfterLog"/>
    <bean id="log" class="com.lixiaobin.log.Log"/>
    <!--使用原生态Spring API接口-->
    <!--配置aop约束-->

    <aop:config>
        <!--切入点expression,表达式execution(* com.lixiaobin.service.UserServiceImpl.*(..))
        要执行哪个类,括号里面写哪个类的路径-->
        <aop:pointcut id="pointcut" expression="execution(* com.lixiaobin.service.UserServiceImpl.*(..))" />
        <!--执行环绕-->
        <!--把log这个类切入到上面代码中(pointcut)-->
        <aop:advisor advice-ref="log" pointcut-ref="pointcut"/>
        <aop:advisor advice-ref="afterLog" pointcut-ref="pointcut"/>
 </aop:config>
</beans>
要在<aop:config>中写aop的语句
测试类
public class MyTest {
public static void main(String[] args) {
ApplicationContext Context = new ClassPathXmlApplicationContext("Context.xml");
//动态代理代理的是接口
UserService userService = (UserService) Context.getBean("userServiceImpl");
userService.add();
userService.delete();
userService.update();
userService.select();
}
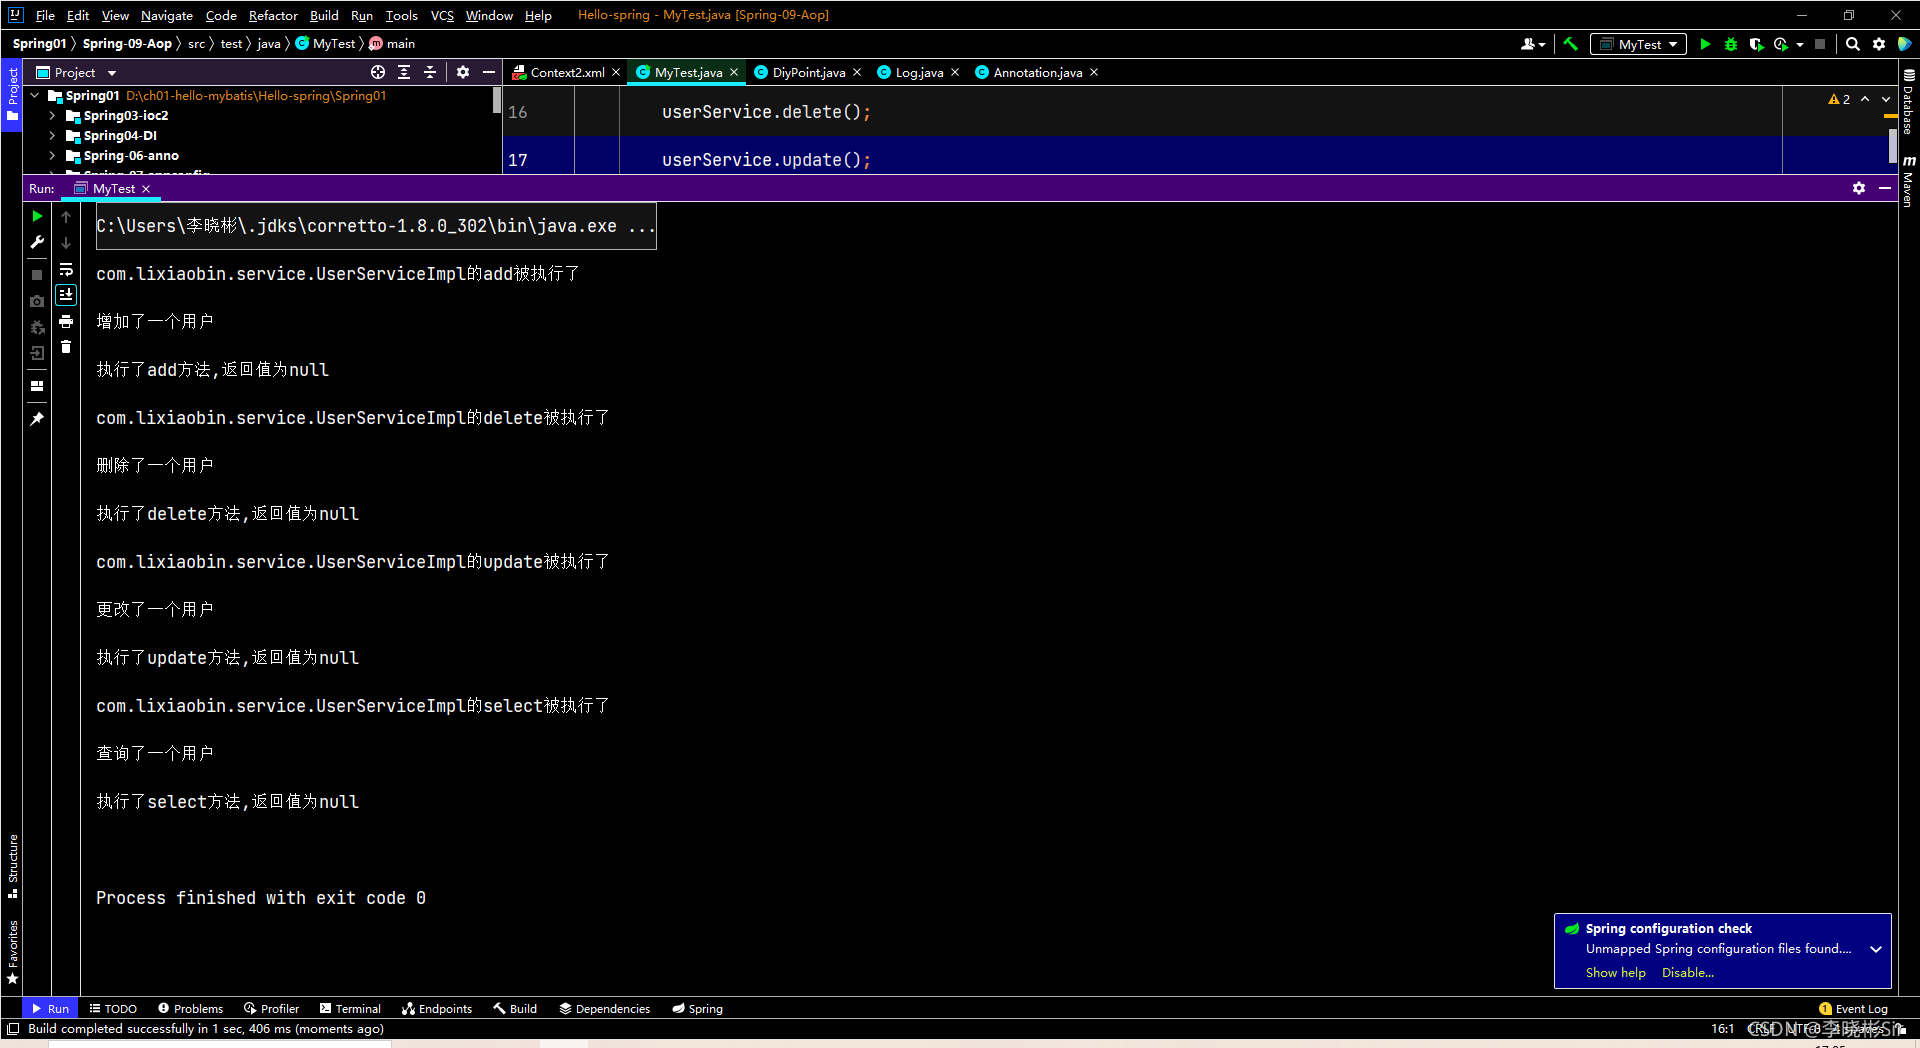
}这里要强调的是,动态代理代理的是接口,紫色! 但是,获取的是要输出的实体类,橙色!
运行结果:
UserService userService = (UserService) Context.getBean("userServiceImpl");
第二种方式:
自己创建环绕类,不需要实现JAVA本身的MethodBeforeAdvice 接口
public class DiyPoint {
public void before(){
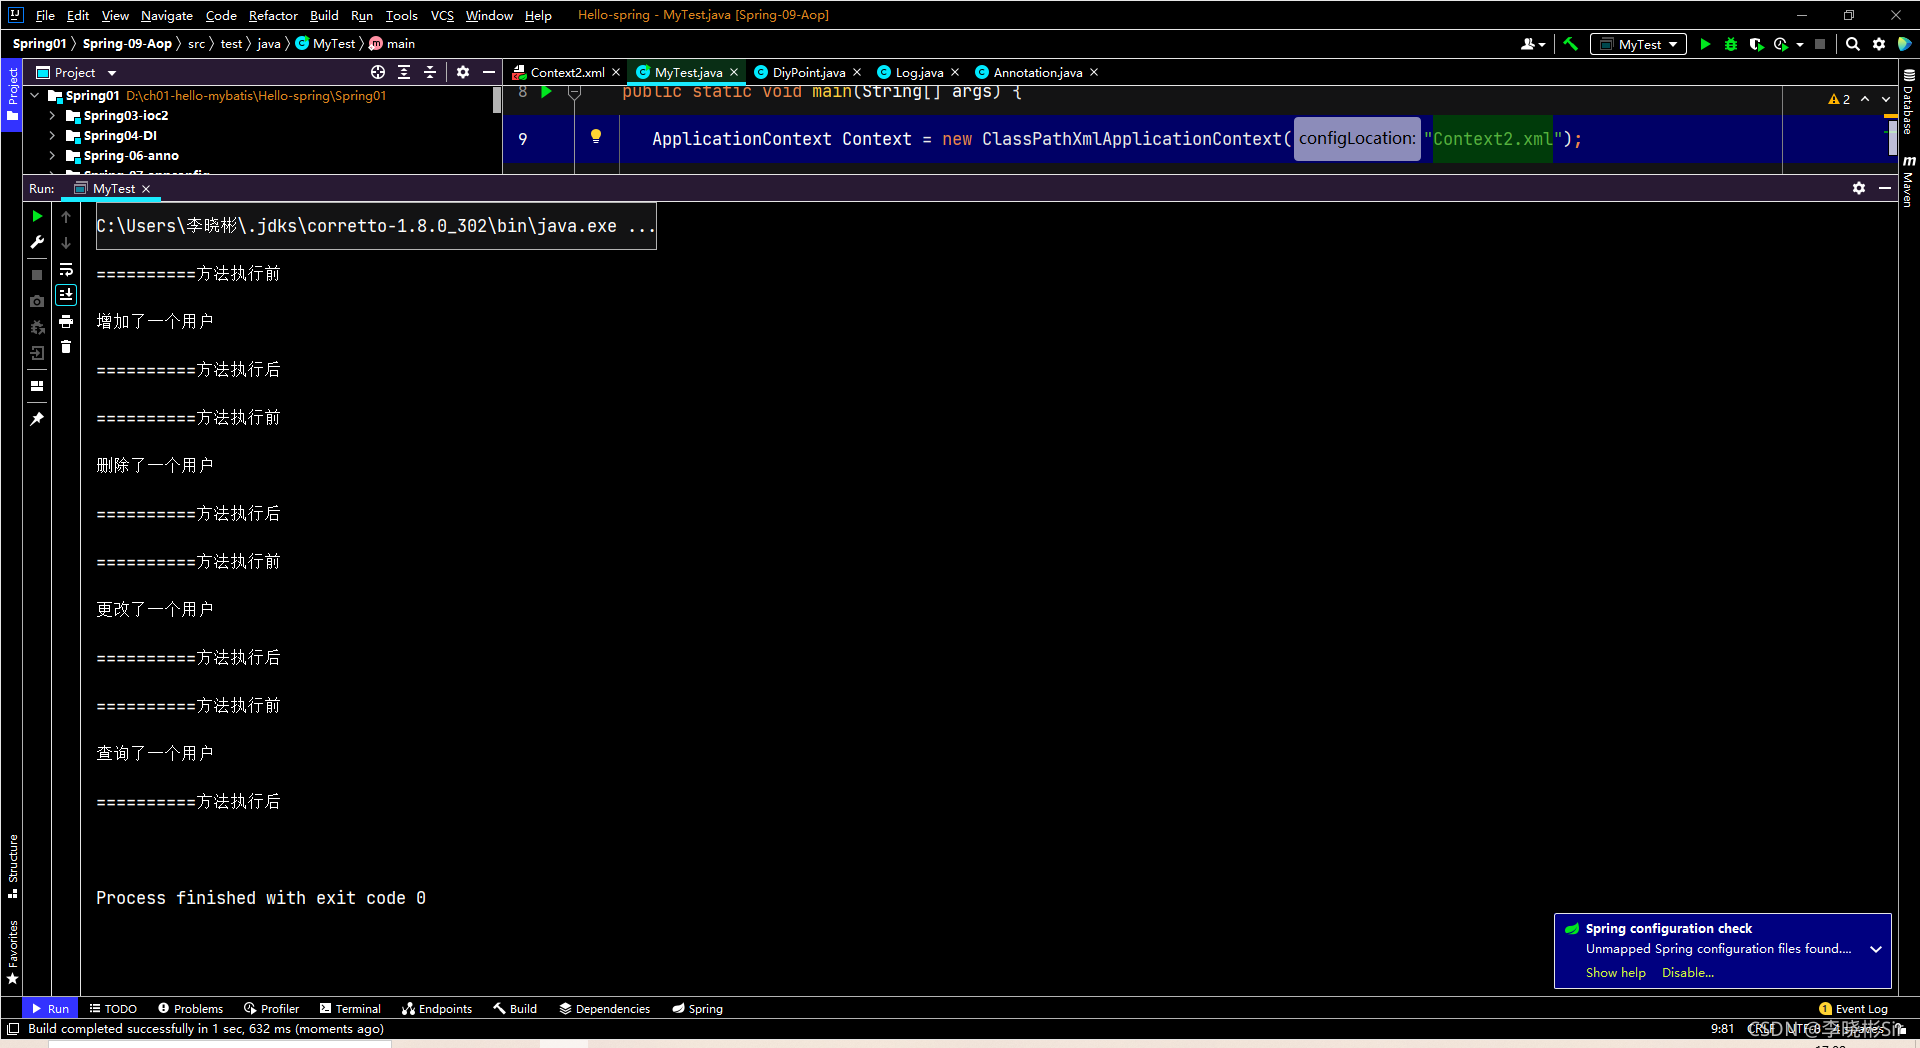
System.out.println("==========方法执行前");
}
public void after(){
System.out.println("==========方法执行后");
}
}这次在xml文件中有所不同的是,把一个类当作切面。
<?xml version="1.0" encoding="UTF-8"?>
<beans xmlns="http://www.springframework.org/schema/beans"
       xmlns:xsi="http://www.w3.org/2001/XMLSchema-instance"
       xmlns:aop="http://www.springframework.org/schema/aop"
       xsi:schemaLocation="http://www.springframework.org/schema/beans
         https://www.springframework.org/schema/beans/spring-beans.xsd
           http://www.springframework.org/schema/aop
            http://www.springframework.org/schema/aop/spring-aop.xsd">
<!--注册bean-->
    <bean id="userServiceImpl" class="com.lixiaobin.service.UserServiceImpl"/>
    <bean id="afterLog" class="com.lixiaobin.log.AfterLog"/>
    <bean id="log" class="com.lixiaobin.log.Log"/>
    <!--方式二-->
    <bean id="diy" class="com.lixiaobin.diy.DiyPoint"/>
    <aop:config>
        <!--aspect为切面,切入的是一个类-->
        <aop:aspect ref="diy">
            <!--切入点-->
            <aop:pointcut id="point" expression="execution(* com.lixiaobin.service.UserServiceImpl.*(..))"/>
            <!--通知-->
            <aop:before method="before" pointcut-ref="point"/>
            <aop:after method="after" pointcut-ref="point"/>

        </aop:aspect>
    </aop:config>


</beans>
运行结果:
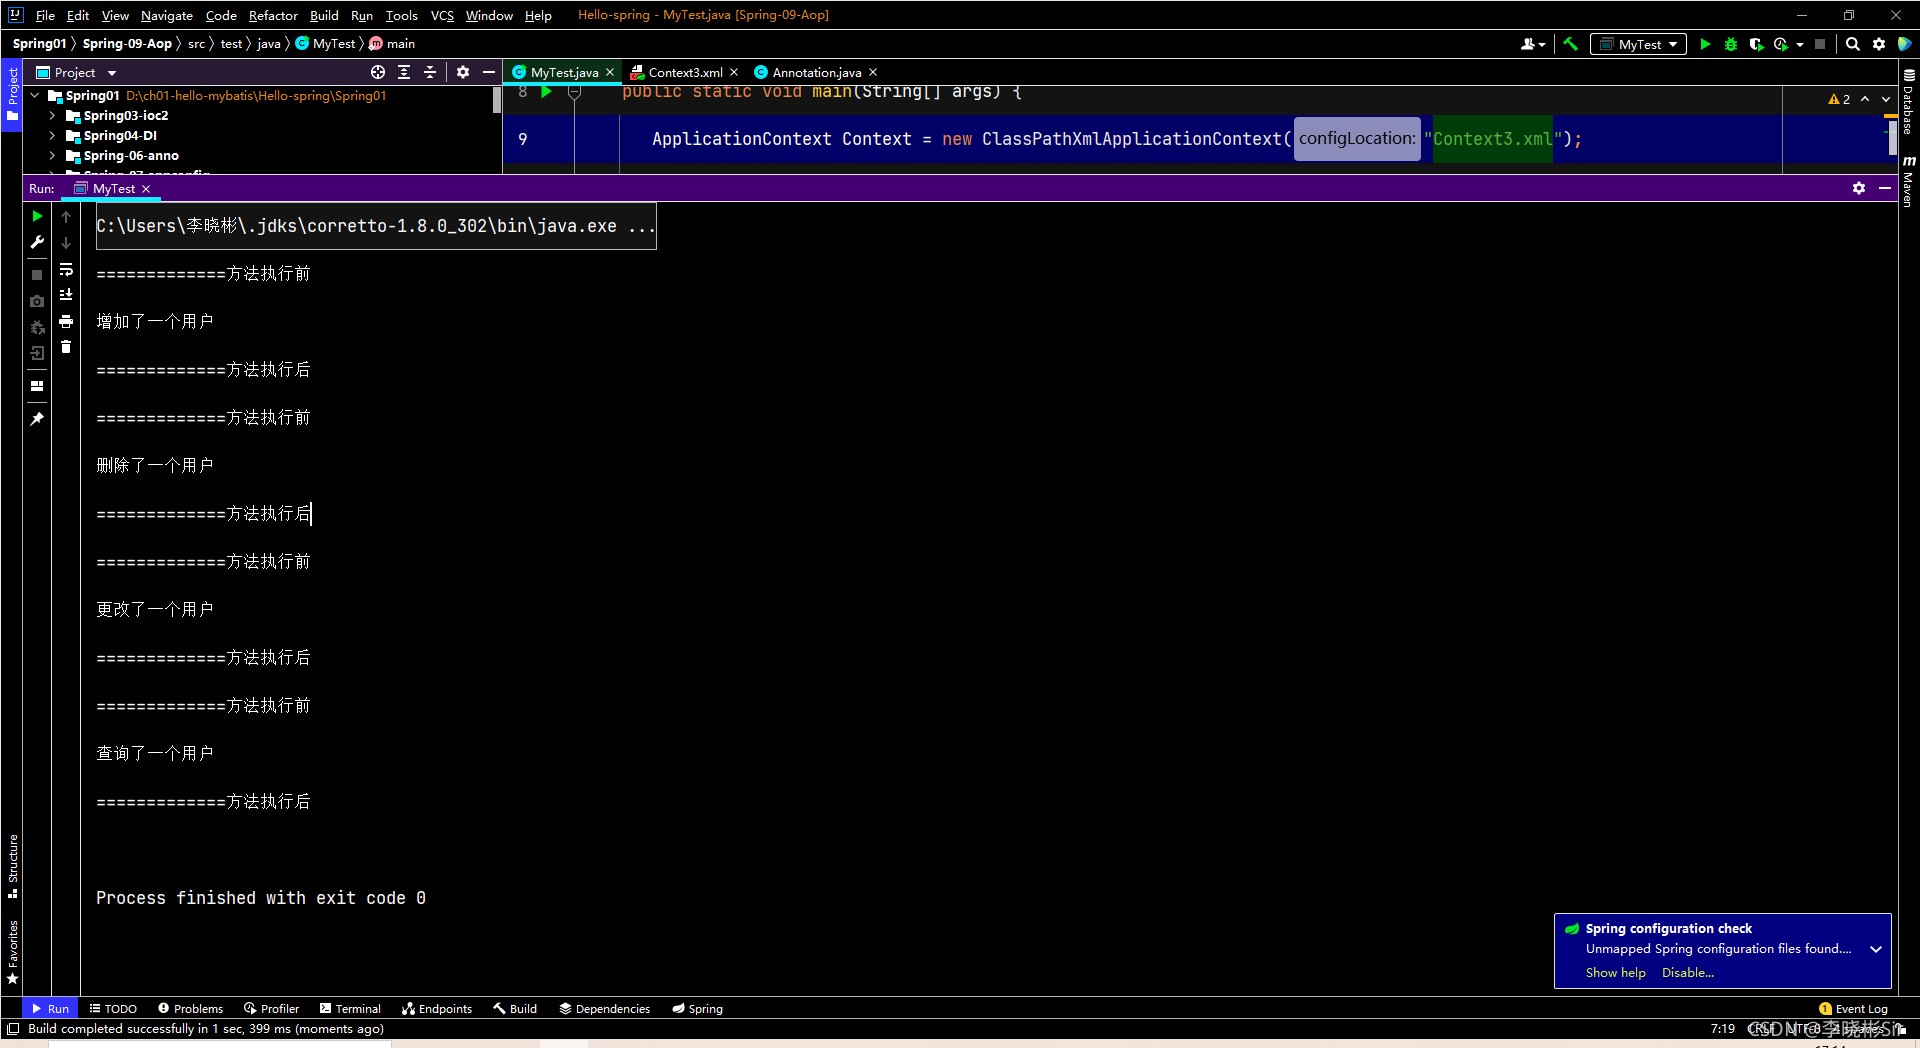
第三种方式,使用注解
import org.aspectj.lang.annotation.After;
import org.aspectj.lang.annotation.Aspect;
import org.aspectj.lang.annotation.Before;

//方式三 使用注解 实现aop
@Aspect //标注这个类是一个切面
public class Annotation {
    @Before("execution(* com.lixiaobin.service.UserServiceImpl.*(..))")

    public void before(){
        System.out.println("=============方法执行前");
    }
    @After("execution(* com.lixiaobin.service.UserServiceImpl.*(..))")
    public void after(){
        System.out.println("=============方法执行后");
    }
}
这里要注意,Before和After都是 org.aspectj.lang.annotation包下的!
<beans xmlns="http://www.springframework.org/schema/beans"
       xmlns:xsi="http://www.w3.org/2001/XMLSchema-instance"
       xmlns:aop="http://www.springframework.org/schema/aop"
       xsi:schemaLocation="http://www.springframework.org/schema/beans
         https://www.springframework.org/schema/beans/spring-beans.xsd
           http://www.springframework.org/schema/aop
            http://www.springframework.org/schema/aop/spring-aop.xsd">
<!--注册bean-->
    <bean id="userServiceImpl" class="com.lixiaobin.service.UserServiceImpl"/>
    <bean id="annotation" class="com.lixiaobin.diy.Annotation"/>
    <!--开启注解支持-->
<aop:aspectj-autoproxy/>在xml中,只需要注册两个类的Bean,开启注解支持就可以了!
<beans xmlns="http://www.springframework.org/schema/beans"
       xmlns:xsi="http://www.w3.org/2001/XMLSchema-instance"
       xmlns:aop="http://www.springframework.org/schema/aop"
       xsi:schemaLocation="http://www.springframework.org/schema/beans
         https://www.springframework.org/schema/beans/spring-beans.xsd
           http://www.springframework.org/schema/aop
            http://www.springframework.org/schema/aop/spring-aop.xsd">
<!--注册bean-->
    <bean id="userServiceImpl" class="com.lixiaobin.service.UserServiceImpl"/>
    <bean id="annotation" class="com.lixiaobin.diy.Annotation"/>
    <!--开启注解支持-->
    <aop:aspectj-autoproxy/>
运行结果:
如有不对请大佬多多指证!
(此文仅供博主复习使用,若要系统学习请借鉴其他大神)


 1330
1330


 被折叠的 条评论
为什么被折叠?
被折叠的 条评论
为什么被折叠?
 到【灌水乐园】发言


