


C语言实现BMP图像的读写
对于刚接触数字图像的同学,应该都有一个疑问,如何把一个BMP格式的图像用纯C语言读入呢,我相信这也是数字图像处理的第一步,如果有幸看到这篇文档,我就有幸的成为你数字图像处理路上的第一盏明灯!
了解BMP的构成
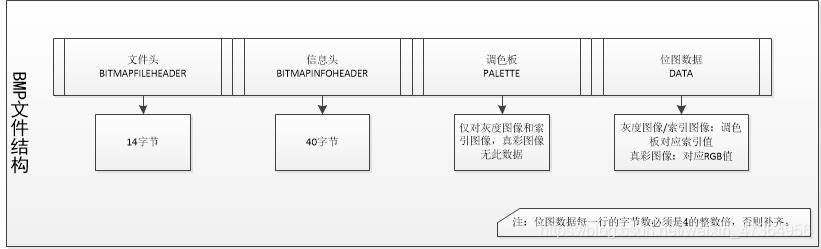
这就是BMP图像的理论知识,有个大概的了解就行,最主要的是从理论到实践!!!
废话不多说,直接上干货。
代码
定义头文件为“bmp.h”,定义read_bmp函数为读函数,write_bmp函数为写函数
读bmp图
#include <stdlib.h>
#include <math.h>
#include <Windows.h>
#include "bmp.h"
/*存储原图的像素宽度高度和位图深度*/
FILE* fpbmp;
FILE* fpout;
unsigned char* fpBmpHeader;   //位图头
unsigned char* fpFileHeader;  //位图信息
RGBQUAD* pColorTable;         //BMP 调色板
int read_bmp(const char* path, unsigned char *pBmpBuf,int *Width,int *Height,int * bitCount)
{
	fpbmp = fopen(path, "rb");//path为图像路径
	unsigned short s;
	fread(&s, 1, 2, fpbmp);
	//判断读入的图像是否为BMP图  字符串"BM"=19778
	if (s == 19778)
	{
		printf("Open bmp success!!!\n");
	}
	else
	{
		printf("Open bmp fail!!!\n");
		return -1;
	}
	fseek(fpbmp, 0, SEEK_SET);
	BITMAPFILEHEADER fileHead;
	fread(&fileHead, sizeof(BITMAPFILEHEADER), 1, fpbmp);

	BITMAPINFOHEADER infoHead;
	fread(&infoHead, sizeof(BITMAPINFOHEADER), 1, fpbmp);

	*Width = infoHead.biWidth;//图像的宽
	*Height = infoHead.biHeight;//图像的高
	*bitCount = infoHead.biBitCount;
	int lineByte = (*Width * *bitCount / 8 + 3) / 4 * 4;
	fseek(fpbmp, sizeof(BITMAPFILEHEADER) + sizeof(BITMAPINFOHEADER) ,SEEK_SET);
	fread(pBmpBuf, lineByte * *Height, 1, fpbmp);//pBmpBuf为图像的RGB数据,也是我们将要处理的数据
	return 0;
}
写BMP图
int write_bmp(unsigned char* img, int* Width, int* Height, int* bitCount)
{
	fpout = fopen("out.bmp", "wb+");
	if (fpbmp == NULL)
	{
		printf("read bmp failed!!!\n");
		return -1;
	}
	int lineByte = (*Width * *bitCount / 8 + 3) / 4 * 4;
	if (lineByte == 0)
	{
		printf("err");
		return -1;
	}
	fpFileHeader = new unsigned char[(sizeof(BITMAPFILEHEADER))];
	fseek(fpbmp, 0, SEEK_SET);  //定位原图 偏移位置
	fseek(fpout, 0, SEEK_SET);  //定位新图 偏移位置
	fread(fpFileHeader, 1, sizeof(BITMAPFILEHEADER), fpbmp);
	fwrite(fpFileHeader, 1, sizeof(BITMAPFILEHEADER), fpout);


	/*复制原图中 位图 信息到新图像*/
	fpBmpHeader = new unsigned char[(sizeof(BITMAPINFOHEADER))];
	fseek(fpbmp, sizeof(BITMAPFILEHEADER), SEEK_SET);
	fseek(fpout, sizeof(BITMAPFILEHEADER), SEEK_SET);
	fread(fpBmpHeader, 1, sizeof(BITMAPINFOHEADER), fpbmp);
	fwrite(fpBmpHeader, 1, sizeof(BITMAPINFOHEADER), fpout);

	fseek(fpout, sizeof(BITMAPFILEHEADER) + sizeof(BITMAPINFOHEADER) , SEEK_SET);
	fwrite(img, lineByte * *Height, sizeof(char), fpout);
	fclose(fpout);
	fclose(fpbmp);
	return 0;
}
main函数调用
#include <stdio.h>
#include <stdlib.h>
#include <math.h>
#include <Windows.h>
#include "bmp.h"

int main()
{
	int width, height, bitCount = 0;
	unsigned char* pBmpBuf = (unsigned char*)malloc(1000 * 1000 * 3);//申请空间
	const char* path = "D:\\test\\read_bmp_image\\1-B.bmp";//图的路径
	read_bmp(path, pBmpBuf, &width, &height, &bitCount);
	write_bmp(pBmpBuf, &width, &height, &bitCount);
}
总结,将read_bmp函数返回的pBmpBuf参数,赋值给write_bmp函数的img参数,就实现了BMP图从读到写的全部过程,有兴趣的同学动手实践下,会有意向不到的收获。
注:在线转换BMP图的网址,可以将任何格式的照片转换为BMP格式。亲测好用。链接奉上BMP图像转换网址


 4210
4210


 被折叠的 条评论
为什么被折叠?
被折叠的 条评论
为什么被折叠?
 到【灌水乐园】发言


