


目录
1146 mysql_MySQL–ERROR 1146 (42S02):table doesn’t exist
MySQL 利用mysqlbinlog二进制文件还原指定数据库
创建sql脚本并利用脚本插入数据
创建create1.sql #存放位置d:\
DROP TABLE IF EXISTS xuexi;
create table xuexi
(
id int NOT NULL AUTO_INCREMENT,
name char(50) NOT NULL,
PRIMARY KEY(id)
) ENGINE=InnoDB;
创建populate1.sql
insert into xuexi values(1,'niubi');
insert into xuexi values(2,'lianxi');
插入数据:
1.创建数据库:
mysql -uroot -p
mysql> create database lianxi;
Query OK, 1 row affected (0.00 sec)
mysql> use lianxi;
Database changed
mysql> source d:\create1.sql;
ERROR 1064 (42000): You have an error in your SQL syntax; check the manual that corresponds to your MySQL server version for the right syntax to use near 'reate1.sql' at line 1
###此处报错原因:在MySQL中,为了区分MySQL的关键字与普通字符,MySQL引入了一个反引号,注意检查编写sql。create为关键字,此处修改为souce d:\\create1.sql或者source d:\\create1.sql;
mysql> source d:\\create1.sql; #末尾不加;就不会报错
ERROR:
Unknown command '\\'.
Query OK, 0 rows affected, 1 warning (0.00 sec)
Query OK, 0 rows affected (0.65 sec)
mysql> show tables \G;
*************************** 1. row ***************************
Tables_in_lianxi: xuexi
1 row in set (0.00 sec)
ERROR:
No query specified
##当在Mysql中运行:show tables \G;发现:显示了我们所需要的内容的同时,弹出一个报错:No query specified。
出现此错误是sql不合法原因:如:select * from abc \G;或者select * from abc;;
\G后面不需要再加分号;
###下面使用source d:\\populate1.sql;或者source d:\populate1.sql命令插入数据
mysql> source d:\populate1.sql
Query OK, 1 row affected (0.04 sec)
Query OK, 1 row affected (0.03 sec)
mysql> select * from xuexi;
+----+--------+
| id | name |
+----+--------+
| 1 | niubi |
| 2 | lianxi |
+----+--------+
2 rows in set (0.00 sec)
Mysql三种常见备份表方式
1、备份到物理机(即客户机上--需要客户机的文件路径)
mysqldump -h 域名 -P 端口 -u用户 -p密码 库名 表名 > /路径/表名.$(date)bak
2、将表备份在数据库里面(create复制表结构、insert复制表内容)
create table one_bak like one; 复制表结构
insert into one_bak select * from one; 复制表内容
3、将表备份在数据库里面(create table as备份)
注:与2步骤备份在库里面不同的是 as 备份表不会备份主键和外键,只备份表数据
create table one_bak as select * from one;
mysql备份整个数据库的表结构和数据
1.物理冷备
备份:tar cvf xxx.tar /usr/local/mysql/data/ ###备份数据库下data目录
恢复:tar xvf xxx.tar -C 另一个数据库的data目录
1146 mysql_MySQL–ERROR 1146 (42S02):table doesn’t exist
ERROR1146(42S02):Table ‘xxx’ doesn’t exist可能是很多人都遇到的问题,尤其在数据库迁移或备份的时候
mysql数据目录结构mysql数据目录下有如下几个重要文件:ibdata1,ib_logfile0,ib_logfile1和数据库xx以及该目录下的一系列.frm文件其中ib_logfile0和ib_logfile1是关于数据库的一些日志文件数据…
mysql数据目录结构 #data目录
mysql数据目录下有如下几个重要文件:ibdata1
ib_logfile0
ib_logfile1
数据库xx 以及该目录下的一系列 .frm 文件
其中
ib_logfile0 和 ib_logfile1 是关于数据库的一些日志文件
数据库xx 是默认数据库和我们添加的数据库目录
ibdata1 存储了数据库的真实表数据
.frm 是存储了数据库表的结构描述说明
失误的操作过程:
当我们把其他mysql下的某个数据库目录,拷贝到我们新的mysql数据目录的时候,(仅仅是copy目录)
启动数据库,可以正常使用 show databases; 和 show tables;
但是在我们想继续查询表数据的时候 select * from video; ,报错了:
ERROR 1146 (42S02): Table ‘djangomysql.getvideo_video’ doesn’t exist1
2MariaDB [videos_db]> select * from video;
ERROR 1146 (42S02): Table ‘videos_db.video’ doesn’t exist
继续探索原因
因为数据库目录 和 表结构也是存储在 .frm 文件内,因此我们可以正常使用 show databases; 和 show tables;
为什么查询表数据的时候发生错误呢?
那是因为ibdata1 文件受影响了,表数据存储在ibdata1中
mysql是通过缓存的方式写入数据到ibdata1,当我们异常拷贝ibdata1的时候,可能缓存数据还没写入,导致有点出入,因此操作顺序很重要
解决方案
介于ibdata1数据被影响了,我们需要矫正下数据写入顺序,如下:
1、在新mysql数据目录下新建我们需要拷贝的数据库 mysql/videos, 同时把旧mysql中对应数据库下的文件全部拷贝过来
2、启动mysql,查询 show databases 和 show tables 确定无误后,退出mysql shell,停止mysql服务(比如 service mariadb stop)
3、然后把旧mysql中的ibdata1文件拷贝到新mysql数据目录下 mysql/ibdata1,这个时候我们会发现目录下有 ib_logfile0 ib_logfile1 和 ibdata1
4、再次启动新的mysql服务,然后验证,mysql服务正常了……
反思
数据库需要严格的备份流程、恢复流程,避免一些低级的操作方式
2.mysqldump命令
备份前将所有数据写到磁盘(包括索引数据)
#mysqladmin -uuser -ppassword flush-tables
①mysqldump命令对单个库进行完全备份
语法:mysqldump -u用户名 -p [密码] [选项] [数据库名] > /备份路径/备份文件名
单库备份:mysqldump -u root -p xuexi > /backup/auth.sql
或者mysqldump -uroot -ppassword xuexi>/backup/auth.sql
②mysqldump命令对多个库进行完全备份
语法:mysqldump -u 用户名 -p [密码] [选项] --databases 库名1 [库名2] ... > /备份路径/备份文件名
多库备份:mysqldump -uroot -p --databases auth mysql > /backup/databases-auth-mysql.sql
③对所有库进行完全备份
语法:mysqldump -u用户名 -p [密码] [选项] --all-databases > /备份路径/备份文件名
所有库备份:mysqldump -u root -p --opt --all-databases > /backup/all-data.sql
④使用mysqldump备份表的操作
语法:mysqldump -u 用户名-p [密码] [|选项] 数据库名 表名 > /备份路径/备份文件名
表备份:mysqldump -u root -p mysql user > /backup/mysql-user.sql
数据库还原(xxxx.sql)
1.mysql database -uroot -ppassword
mysql>source xxx #xxx为sql文件绝对路径
2.mysql -uroot -ppassword<xxx ##xxx为sql文件绝对路径
开启MySQL二进制日志(binlog)
binlog即二进制日志 Binary Log,它记录了所有的DDL和DML(除了数据查询语句)语句,以事件形式记录,还包含语句所执行的消耗的时间,MySQL的二进制日志是事务安全型的。一般来说开启二进制日志大概会有一定的性能损耗。
二进制日志有两个最重要的使用场景:
1.Mysql主从复制模式下,Master(主机)把它的二进制日志传递给Slaves(从机)来达到master-slave数据一致的目的。
2.数据恢复,如果出现数据误删通过使用mysqlbinlog工具进行数据恢复。
二进制日志包括两类文件:二进制日志索引文件(文件名后缀为.index)用于记录所有的二进制文件,二进制日志文件(文件名后缀为.00000*)记录数据库所有的DDL和DML(除了数据查询语句)语句事件。

开启binlog日志
查看是否开启
mysql> show variables like '%log_bin';
+---------------+-------+
| Variable_name | Value |
+---------------+-------+
| log_bin | OFF |
| sql_log_bin | ON |
+---------------+-------+
2 rows in set (0.00 sec)
其中log_bin=OFF,表示未开启,需要手动开启
查找linux系统上的mysql可执行程序所在目录
[root@dongm mysql]# which mysql
/usr/bin/mysql ###我这里的查找结果是/usr/bin/myql
查找mysql配置文件所在路径执行/usr/bin/mysql --verbose --help | grep -A 1 'Default options'
[root@dongm mysql]# /usr/bin/mysql --verbose --help | grep -A 1 'Default options'
Default options are read from the following files in the given order:
/etc/my.cnf /etc/mysql/my.cnf /usr/etc/my.cnf ~/.my.cnf
利用上一步查找到的mysql可执行程序目录,查找mysql配置文件所在目录,查找后会输出多个目录,mysql按照顺序中这些文件中读取配置,如果上一个配置文件不存在则会去读取下一个,依次类推。
尝试查看第一个配置文件/etc/my.cnf的内容
[root@dongm mysql]# cat /etc/my.cnf
# For advice on how to change settings please see
# http://dev.mysql.com/doc/refman/5.7/en/server-configuration-defaults.html
[mysqld]
#
# Remove leading # and set to the amount of RAM for the most important data
# cache in MySQL. Start at 70% of total RAM for dedicated server, else 10%.
# innodb_buffer_pool_size = 128M
#
# Remove leading # to turn on a very important data integrity option: logging
# changes to the binary log between backups.
# log_bin
#
# Remove leading # to set options mainly useful for reporting servers.
# The server defaults are faster for transactions and fast SELECTs.
# Adjust sizes as needed, experiment to find the optimal values.
# join_buffer_size = 128M
# sort_buffer_size = 2M
# read_rnd_buffer_size = 2M
datadir=/var/lib/mysql
socket=/var/lib/mysql/mysql.sock
# Disabling symbolic-links is recommended to prevent assorted security risks
symbolic-links=0
log-error=/var/log/mysqld.log
pid-file=/var/run/mysqld/mysqld.pid
配置文件存在,因此就在此文件中设置log-bin
查看数据库版本
mysql> select version();
+------------+
| version() |
+------------+
| 5.7.41 |
+------------+
1 row in set (0.00 sec)
我的mysql版本是5.7,按照如下配置开启binlog
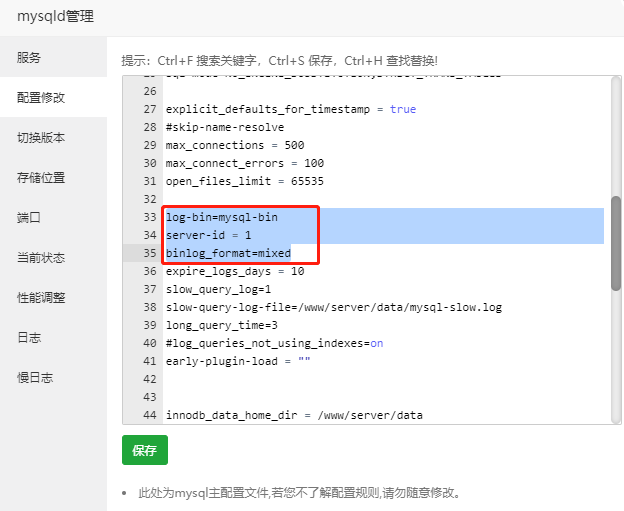
配置binlog参数
vim /etc/my.cnf在[mysqld]下添加
#开启并指定二进制日志前缀
log_bin=mysql-bin
#唯一id
server_id=12000
#二进制日志保存时间
expire_logs_days=7
binlog_format=ROW
贴上一份修改后的配置文件
[root@dongm ~]# cat /etc/my.cnf
# For advice on how to change settings please see
# http://dev.mysql.com/doc/refman/5.7/en/server-configuration-defaults.html
[mysqld]
#
# Remove leading # and set to the amount of RAM for the most important data
# cache in MySQL. Start at 70% of total RAM for dedicated server, else 10%.
# innodb_buffer_pool_size = 128M
#
# Remove leading # to turn on a very important data integrity option: logging
# changes to the binary log between backups.
# log_bin
#
# Remove leading # to set options mainly useful for reporting servers.
# The server defaults are faster for transactions and fast SELECTs.
# Adjust sizes as needed, experiment to find the optimal values.
# join_buffer_size = 128M
# sort_buffer_size = 2M
# read_rnd_buffer_size = 2M
datadir=/var/lib/mysql
socket=/var/lib/mysql/mysql.sock
# Disabling symbolic-links is recommended to prevent assorted security risks
symbolic-links=0
log-error=/var/log/mysqld.log
pid-file=/var/run/mysqld/mysqld.pid
log_bin=mysql-bin
#唯一id
server_id=12000
#二进制日志保存时间
expire_logs_days=7
binlog_format=ROW
mysql8.0开启binlog的配置与5.7略有区别,以后实操后再补上。
重启mysql
service mysqld restart或者systemctl restart mysqld
执行后进入mysql查看配置是否生效
mysql> show variables like '%log_bin';
+---------------+-------+
| Variable_name | Value |
+---------------+-------+
| log_bin | ON |
| sql_log_bin | ON |
+---------------+-------+
2 rows in set (0.00 sec)
可以看出,成功开启了binlog
二进制日志的使用
经过上面的配置后,对数据库进行DDL和DML操作都会记录在binlog中,我们需要使用mysql自带的mysqlbinlog对日志进行分析转储。
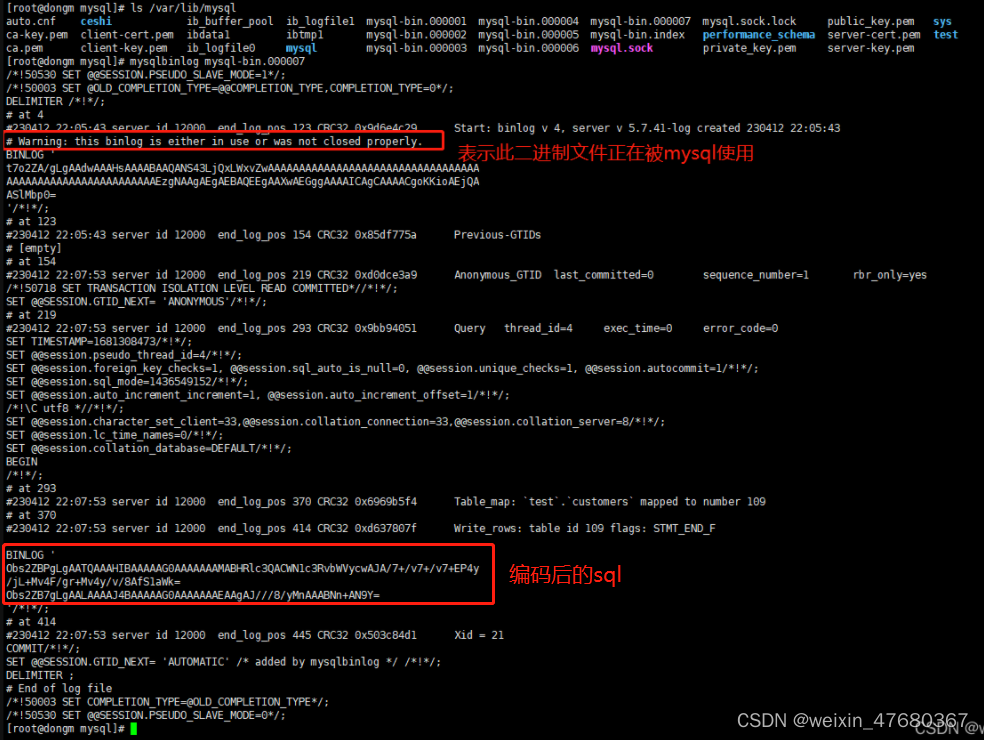
可以看出最新的二进制日志是mysql-bin.000007,最近一次修改时间是2023/4/12/22:07:53,下面对这个日志进行分析。
使用mysqlbinlog对日志进行转储
进入mysqlbinlog所在目录执行,可以先执行下which mysqlbinlog确定其所在目录
[root@dongm mysql]# mysqlbinlog --no-defaults --base64-output=decode-rows -v --database=test --start-datetime='2023-04-12 22:07:53' /var/lib/mysql/mysql-bin.000007 |tee /home/dongm/11111111.txt #指定test数据库
结果如下:
[root@dongm mysql]# mysqlbinlog --no-defaults --base64-output=decode-rows -v --database=test --start-datetime='2023-04-12 22:07:53' /var/lib/mysql/mysql-bin.000007 |tee /home/dongm/11111111.txt
/*!50530 SET @@SESSION.PSEUDO_SLAVE_MODE=1*/;
/*!50003 SET @OLD_COMPLETION_TYPE=@@COMPLETION_TYPE,COMPLETION_TYPE=0*/;
DELIMITER /*!*/;
# at 4
#230412 22:05:43 server id 12000 end_log_pos 123 CRC32 0x9d6e4c29 Start: binlog v 4, server v 5.7.41-log created 230412 22:05:43
# Warning: this binlog is either in use or was not closed properly.
# at 154
#230412 22:07:53 server id 12000 end_log_pos 219 CRC32 0xd0dce3a9 Anonymous_GTID last_committed=0 sequence_number=1 rbr_only=yes
/*!50718 SET TRANSACTION ISOLATION LEVEL READ COMMITTED*//*!*/;
SET @@SESSION.GTID_NEXT= 'ANONYMOUS'/*!*/;
# at 219
#230412 22:07:53 server id 12000 end_log_pos 293 CRC32 0x9bb94051 Query thread_id=4 exec_time=0 error_code=0
SET TIMESTAMP=1681308473/*!*/;
SET @@session.pseudo_thread_id=4/*!*/;
SET @@session.foreign_key_checks=1, @@session.sql_auto_is_null=0, @@session.unique_checks=1, @@session.autocommit=1/*!*/;
SET @@session.sql_mode=1436549152/*!*/;
SET @@session.auto_increment_increment=1, @@session.auto_increment_offset=1/*!*/;
/*!\C utf8 *//*!*/;
SET @@session.character_set_client=33,@@session.collation_connection=33,@@session.collation_server=8/*!*/;
SET @@session.lc_time_names=0/*!*/;
SET @@session.collation_database=DEFAULT/*!*/;
BEGIN
/*!*/;
# at 293
#230412 22:07:53 server id 12000 end_log_pos 370 CRC32 0x6969b5f4 Table_map: `test`.`customers` mapped to number 109
# at 370
#230412 22:07:53 server id 12000 end_log_pos 414 CRC32 0xd637807f Write_rows: table id 109 flags: STMT_END_F
### INSERT INTO `test`.`customers`
### SET
### @1=10019
### @2='6'
### @3=NULL
### @4=NULL
### @5=NULL
### @6=NULL
### @7=NULL
### @8=NULL
### @9=NULL
# at 414
#230412 22:07:53 server id 12000 end_log_pos 445 CRC32 0x503c84d1 Xid = 21
COMMIT/*!*/;
SET @@SESSION.GTID_NEXT= 'AUTOMATIC' /* added by mysqlbinlog */ /*!*/;
DELIMITER ;
# End of log file
/*!50003 SET COMPLETION_TYPE=@OLD_COMPLETION_TYPE*/;
/*!50530 SET @@SESSION.PSEUDO_SLAVE_MODE=0*/;
由于我在指定的时间段内仅执行了一个插入动作,所以仅有一条insert语句。这里转储时一定要加上–base64-output=decode-rows -v参数将DDL、DML语句解码,否则输出的时编码后的语句无法直接阅读。
#####################################################################
#查看所有数据库的二进制日志
[root@dongm mysql]# mysqlbinlog --no-defaults --base64-output=decode-rows -v mysql-bin.000009
#####################################################################
数据恢复
获取转储后的文件后,对文件进行过滤从而得到可执行的sql语句即可进行数据恢复。
mysqlbinlog参数
mysqlbinlog 命令的语法格式:
mysqlbinlog mysql-bin.0000xx | mysql -u用户名 -p密码 数据库名
常用参数选项解释:
--start-position=875 起始pos点
--stop-position=954 结束pos点
--start-datetime="2016-9-25 22:01:08" 起始时间点
--stop-datetime="2019-9-25 22:09:46" 结束时间点
--database=test 指定只恢复test数据库(一台主机上往往有多个数据库,只限本地log日志)
不常用选项:
-u --user=name 连接到远程主机的用户名
-p --password[=name] 连接到远程主机的密码
-h --host=name 从远程主机上获取binlog日志
--read-from-remote-server 从某个MySQL服务器上读取binlog日志
原文链接:https://blog.csdn.net/heima005/article/details/129946475
#############################################################################
二进制日志
要给 test 数据库加上二进制日志,将其保存到 /data/log/mysql/goods/binlog。他需要执行下列哪些操作?
执行shell命令 mkdir -p /data/log/mysql/goods/binlog
编辑 my.cnf 的 [mysqld]节,设置 log_bin = /data/log/mysql/goods/binlog
binlog_format= mixed
binlog_cache_size=32m
max_binlog_cache_size=64m
max_binlog_size=512m
expire_logs_days = 10
重启 MySQL 服务
#############################################################################
mysql查看binlog日志内容
mysql查看binlog日志内容_童安格粉丝的博客-CSDN博客
mysqladmin命令详解
https://www.cnblogs.com/dadonggg/p/8625500.html
MySQL Flush命令
以下是一些有用的刷新命令及其说明。
- flush-hosts:从主机缓存中刷新所有主机信息。
- flush-tables:刷新所有表。
- flush-threads:刷新所有线程缓存。
- flush-logs:刷新所有信息日志。
- flush-privileges:重新加载授权表(与重新加载相同)。
- flush-status:清除状态变量。
# mysqladmin -u root -p flush-hosts
# mysqladmin -u root -p flush-tables
# mysqladmin -u root -p flush-threads
# mysqladmin -u root -p flush-logs
# mysqladmin -u root -p flush-privileges
# mysqladmin -u root -p flush-status
增量备份与还原
Mysql数据库增量备份与恢复_mysql增量备份_Mr.Ron的博客-CSDN博客
MySQL 利用mysqlbinlog二进制文件还原指定数据库
推荐这篇 mysqlbinlog详解 - https://www.cnblogs.com/Presley-lpc/p/9619571.html
1.我的初始环境
系统:CentOS 7.6.1810(Py3.7.8)
MySQL:5.7.31
2.检查MySQL是否开启binlog日志
mysql> show variables like 'log_bin';
+---------------+-------+
| Variable_name | Value |
+---------------+-------+
| log_bin       | ON    |
+---------------+-------+
1 row in set (0.00 sec)
log_bin为ON即为开启,
若未开启?
修改配置文件,在 [mysqld]下添加如下内容
log-bin=mysql-bin
server-id = 1
binlog_format=mixed

#log-bin  开启 Binlog 并写明存放日志的位置;默认使用的设置是“log-bin=mysql-bin”,这样日志是存放在默认的位置上的,一般是放在data目录中。

#server-id  指定一个集群内的 MySQL 服务器 ID,如果做数据库集群那么必须全局唯一,一般来说不推荐 指定 server_id 等于 1。

#binlog_format  三种Bin-log日志模式 -- 自动模式
3.模拟数据丢失
create database test;
use test;
create table t1(
id int primary key,
name varchar(32)
);

INSERT INTO t1 VALUE(1,'val1');
INSERT INTO t1 VALUE(2,'val2');

create database test2;
use test2;
create table t1(
id int primary key,
name varchar(32)
);

INSERT INTO t1 VALUE(1,'val1');
INSERT INTO t1 VALUE(2,'val2');

drop database test;
drop database test2;
4.查看日志并恢复数据
查看当前日志文件
mysql> show master status;
+------------------+----------+--------------+------------------+-------------------+
| File             | Position | Binlog_Do_DB | Binlog_Ignore_DB | Executed_Gtid_Set |
+------------------+----------+--------------+------------------+-------------------+
| mysql-bin.000001 |     4285 |              |                  |                   |
+------------------+----------+--------------+------------------+-------------------+
1 row in set (0.06 sec)
结果:说明 mysql-bin.000001 是当前备份的文件名
也可以直接进入/www/server/data,找到类似mysql-bin.000001的文件,选择后缀最大的文件,因为这个是最新的
如果找不到,可以全局搜索一下,使用 find / -name mysql-bin.000001; 去查看一下路径
由于binlog是二进制的,所以需要先转换成文本文件,一般可以采用Mysql自带的mysqlbinlog转换成文本。
/www/server/mysql/bin/mysqlbinlog --no-defaults --base64-output=decode-rows -v mysql-bin.000001 > ./binlog_2020_12_07;
部分参数说明:
- --no-defaults 为了防止报错:mysqlbinlog: unknown variable 'default_character_set=utf8mb4'
- --base64-output=decode-rows 和-v一起使用, 进行base64解码
- -d databaseName:可以使用-d来指定数据库
- --start-datetime="2020-12-07 14:27:36" :指定开始时间,注意格式不要写错
- --stop-datetime="" :指定结束时间
- --start-position="" : 指定起始点
- --stop-position="" :指定结束点
之后导出文件 ‘binlog_2020_12_07’,我是直接在宝塔面板下载的,用vscode打开文本文件
会看到binlog的基本块如下:
# at 1488
#201207 14:27:26 server id 1  end_log_pos 1569 CRC32 0xcb9c1cbf     Query    thread_id=178    exec_time=0    error_code=0
SET TIMESTAMP=1607322446/*!*/;
BEGIN
基本块解释:
# at 1488
指明的当前位置相对文件开始的偏移位置,这个在mysqlbinlog命令中可以作为--start-position的参数

#201207 14:27:26 server id 1  end_log_pos 1569 CRC32 0xcb9c1cbf     Query    thread_id=178    exec_time=0    error_code=0
201207 14:27:26指明时间为20年12月7号14:27:26,serverid也就是你在配置文件中的配置的,end_log_pos 1569,这个块在1569结束,也就是说结束点是1569。thread_id执行的线程id,exec_time执行时间,error_code错误码

SET TIMESTAMP=1607322446/*!*/;
BEGIN
具体执行语句
截取部分日志:
 1 /*!*/;
 2 # at 1852
 3 #201207 14:27:30 server id 1  end_log_pos 1958 CRC32 0xf8660231     Query    thread_id=178    exec_time=0    error_code=0
 4 SET TIMESTAMP=1607322450/*!*/;
 5 INSERT INTO t1 VALUE(2,'val2')
 6 /*!*/;
 7 # at 1958
 8 #201207 14:27:30 server id 1  end_log_pos 1989 CRC32 0x3a49fcc1     Xid = 607
 9 COMMIT/*!*/;
10 # at 1989
11 #201207 14:27:36 server id 1  end_log_pos 2054 CRC32 0xa4d22816     Anonymous_GTID    last_committed=8    sequence_number=9    rbr_only=no
12 SET @@SESSION.GTID_NEXT= 'ANONYMOUS'/*!*/;
13 # at 2054
14 #201207 14:27:36 server id 1  end_log_pos 2146 CRC32 0x11bdfbca     Query    thread_id=178    exec_time=0    error_code=0
15 SET TIMESTAMP=1607322456/*!*/;
16 drop database test
17 /*!*/;
18 # at 2146
19 #201207 14:27:42 server id 1  end_log_pos 2211 CRC32 0x9a60cd1d     Anonymous_GTID    last_committed=9    sequence_number=10    rbr_only=no
20 SET @@SESSION.GTID_NEXT= 'ANONYMOUS'/*!*/;
21 # at 2211
22 #201207 14:27:42 server id 1  end_log_pos 2306 CRC32 0xd29068e1     Query    thread_id=178    exec_time=0    error_code=0
23 SET TIMESTAMP=1607322462/*!*/;
24 drop database test2
25 /*!*/;
26 SET @@SESSION.GTID_NEXT= 'AUTOMATIC' /* added by mysqlbinlog */ /*!*/;
27 DELIMITER ;
28 # End of log file
29 /*!50003 SET COMPLETION_TYPE=@OLD_COMPLETION_TYPE*/;
30 /*!50530 SET @@SESSION.PSEUDO_SLAVE_MODE=0*/;
这里我们用搜索去找 drop 等关键字,来找到删除操作的日志记录位置
可以看到以上内容,在第16行和第24行,分别删除了数据库test和test2,之后进行恢复数据库`test`操作,有两种方法:
这里我使用的是第一种
1) 利用 drop database test 前的 “时间” 进行恢复,请注意时间格式会产生一个警告,不用管,输入数据库root密码进行验证敲回车
1 [root@iZm5eajbhqhhehk85j4d95Z data]# /www/server/mysql/bin/mysqlbinlog -d test --stop-datetime="2020-12-07 14:27:36" mysql-bin.000001 | mysql -uroot -p;
2 Enter password: WARNING: The option --database has been used. It may filter parts of transactions, but will include the GTIDs in any case. If you want to exclude or include transactions, you should use the options --exclude-gtids or --include-gtids, respectively, instead.
3
4 [root@iZm5eajbhqhhehk85j4d95Z data]#
2) 利用 --stop-position="" 进行恢复
1 [root@iZm5eajbhqhhehk85j4d95Z data]# /www/server/mysql/bin/mysqlbinlog -d test --stop-position="2054" mysql-bin.000001 | mysql -uroot -p;
2 WARNING: The option --database has been used. It may filter parts of transactions, but will include the GTIDs in any case. If you want to exclude or include transactions, you should use the options --exclude-gtids or --include-gtids, respectively, instead.
3 Enter password:
4 [root@iZm5eajbhqhhehk85j4d95Z data]#
再次进入数据库,可以看到数据库`test`以及数据就已经恢复了 # -d test指定test数据库
5.重置日志文件
使用 mysqlbinlog 恢复之后,日志文件会重复记录前面的操作,此时可以选择重置日志文件
mysql> reset master
再次查看二级制文件时,发现已经被重置了
 1 mysql> show binary logs;
 2 +------------------+-----------+
 3 | Log_name         | File_size |
 4 +------------------+-----------+
 5 | mysql-bin.000001 |      8079 |
 6 +------------------+-----------+
 7 1 row in set (0.00 sec)
 8
 9 mysql> reset master;
10 Query OK, 0 rows affected (0.02 sec)
11
12 mysql> show binary logs;
13 +------------------+-----------+
14 | Log_name         | File_size |
15 +------------------+-----------+
16 | mysql-bin.000001 |       154 |
17 +------------------+-----------+
18 1 row in set (0.00 sec)
数据库恢复实战
还原增量失败分析
[root@dongm mysql]# mysqlbinlog --no-defaults --stop-position=1331 mysql-bin.000013|mysql -uroot -p123456 ##注意此处还原的是所有数据库,如果只还原单个数据库可以加-d databasename
mysql: [Warning] Using a password on the command line interface can be insecure.
ERROR 1062 (23000) at line 83: Duplicate entry '4' for key 'PRIMARY' ##此处还原insert into ceshi.employees (empid) values (4);失败报错会导致数据库还原到此处中断,导致后面SQL(insert into client.user_info values('0000000011','aaaa','男','055','100');)没有还原,可以加入-d选项恢复单个数据库-----------重点
[root@dongm mysql]# mysql -uroot -p123456 -e 'select * from client.user_info;'
mysql: [Warning] Using a password on the command line interface can be insecure.
+------------+-----------+--------+-------------+--------+
| 身份证 | 姓名 | 性别 | 用户ID号 | 资费 |
+------------+-----------+--------+-------------+--------+
| 000000006 | 孙空悟 | 男 | 016 | 10 |
| 000000007 | 蓝精灵 | 女 | 017 | 91 |
| 000000008 | 姜姜 | 女 | 018 | 23 |
| 000000009 | 关云长 | 男 | 019 | 37 |
| 0000000010 | 罗纲 | 男 | 020 | 36 |
+------------+-----------+--------+-------------+--------+
数据库备份还原过程:
mysql> select * from ceshi.employees;
+-------+----------+-----------+--------+
| empid | lastname | firstname | salary |
+-------+----------+-----------+--------+
|     1 | Blum     | Rich      |  25000 |
|     2 | 3        | 4         |      5 |
|     3 | NULL     | NULL      |   NULL |
+-------+----------+-----------+--------+
3 rows in set (0.00 sec)

mysql> select * from client.user_info;
+-----------+-----------+--------+-------------+--------+
| 身份证    | 姓名      | 性别   | 用户ID号    | 资费   |
+-----------+-----------+--------+-------------+--------+
| 000000006 | 孙空悟    | 男     | 016         |     10 |
| 000000007 | 蓝精灵    | 女     | 017         |     91 |
| 000000008 | 姜姜      | 女     | 018         |     23 |
+-----------+-----------+--------+-------------+--------+
3 rows in set (0.00 sec)

[root@dongm mysql]# mysqldump -uroot -p123456 client user_info >/mysql_bak/client_userinfo-$(date +%F).sql    #全量备份
mysqldump: [Warning] Using a password on the command line interface can be insecure.
[root@dongm mysql]# mysqladmin -uroot -p123456 flush-logs;   #刷新后生成新的二进制文件
mysqladmin: [Warning] Using a password on the command line interface can be insecure.
[root@dongm mysql]# mysql -uroot -p123456 -e 'show binary logs;'   ##获取binlog文件列表
mysql: [Warning] Using a password on the command line interface can be insecure.
+------------------+-----------+
| Log_name         | File_size |
+------------------+-----------+
| mysql-bin.000001 |       201 |
| mysql-bin.000002 |       201 |
| mysql-bin.000003 |       177 |
| mysql-bin.000004 |       201 |
| mysql-bin.000005 |       468 |
| mysql-bin.000006 |       201 |
| mysql-bin.000007 |       492 |
| mysql-bin.000008 |      1575 |
| mysql-bin.000009 |     65510 |
| mysql-bin.000010 |      4703 |
| mysql-bin.000011 |      3752 |
| mysql-bin.000012 |       154 |       ##正在使用文件mysql-bin.000012
+------------------+-----------+

#添加数据
mysql> insert into client.user_info values('000000009','关云长','男','019','37');
Query OK, 1 row affected (0.01 sec)

mysql> insert into client.user_info values('0000000010','罗纲','男','020','36');
Query OK, 1 row affected (0.01 sec)

mysql> insert into ceshi.employees (empid) values (4);

mysql> insert into client.user_info values('0000000011','aaaa','男','055','100');
Query OK, 1 row affected (0.01 sec)

##查询数据
mysql> select * from ceshi.employees;
+-------+----------+-----------+--------+
| empid | lastname | firstname | salary |
+-------+----------+-----------+--------+
|     1 | Blum     | Rich      |  25000 |
|     2 | 3        | 4         |      5 |
|     3 | NULL     | NULL      |   NULL |
|     4 | NULL     | NULL      |   NULL |
+-------+----------+-----------+--------+
4 rows in set (0.00 sec)

mysql> select * from client.user_info;
+------------+-----------+--------+-------------+--------+
| 身份证     | 姓名      | 性别   | 用户ID号    | 资费   |
+------------+-----------+--------+-------------+--------+
| 000000006  | 孙空悟    | 男     | 016         |     10 |
| 000000007  | 蓝精灵    | 女     | 017         |     91 |
| 000000008  | 姜姜      | 女     | 018         |     23 |
| 000000009  | 关云长    | 男     | 019         |     37 |
| 0000000010 | 罗纲      | 男     | 020         |     36 |
| 0000000011 | aaaa      | 男     | 055         |    100 |
+------------+-----------+--------+-------------+--------+
6 rows in set (0.00 sec)

##解析二进制日志
[root@dongm mysql]# mysqlbinlog --no-defaults --base64-output=decode-rows -v mysql-bin.000012
/*!50530 SET @@SESSION.PSEUDO_SLAVE_MODE=1*/;
/*!50003 SET @OLD_COMPLETION_TYPE=@@COMPLETION_TYPE,COMPLETION_TYPE=0*/;
DELIMITER /*!*/;
# at 4
#230414  0:02:08 server id 12000  end_log_pos 123 CRC32 0xfb8f8d3e 	Start: binlog v 4, server v 5.7.41-log created 230414  0:02:08
# Warning: this binlog is either in use or was not closed properly.
# at 123
#230414  0:02:08 server id 12000  end_log_pos 154 CRC32 0x9270bdb8 	Previous-GTIDs
# [empty]
# at 154
#230414  0:02:19 server id 12000  end_log_pos 219 CRC32 0x443451e0 	Anonymous_GTID	last_committed=0	sequence_number=1	rbr_only=yes
/*!50718 SET TRANSACTION ISOLATION LEVEL READ COMMITTED*//*!*/;
SET @@SESSION.GTID_NEXT= 'ANONYMOUS'/*!*/;
# at 219
#230414  0:02:19 server id 12000  end_log_pos 293 CRC32 0x856b1273 	Query	thread_id=2248	exec_time=0	error_code=0
SET TIMESTAMP=1681401739/*!*/;
SET @@session.pseudo_thread_id=2248/*!*/;
SET @@session.foreign_key_checks=1, @@session.sql_auto_is_null=0, @@session.unique_checks=1, @@session.autocommit=1/*!*/;
SET @@session.sql_mode=1436549152/*!*/;
SET @@session.auto_increment_increment=1, @@session.auto_increment_offset=1/*!*/;
/*!\C utf8 *//*!*/;
SET @@session.character_set_client=33,@@session.collation_connection=33,@@session.collation_server=8/*!*/;
SET @@session.lc_time_names=0/*!*/;
SET @@session.collation_database=DEFAULT/*!*/;
BEGIN
/*!*/;
# at 293
#230414  0:02:19 server id 12000  end_log_pos 359 CRC32 0x5ed21c7d 	Table_map: `client`.`user_info` mapped to number 196
# at 359
#230414  0:02:19 server id 12000  end_log_pos 427 CRC32 0xe937e850 	Write_rows: table id 196 flags: STMT_END_F
### INSERT INTO `client`.`user_info`
### SET
###   @1='000000009'
###   @2='关云长'
###   @3='男'
###   @4='019'
###   @5=37
# at 427
#230414  0:02:19 server id 12000  end_log_pos 458 CRC32 0x9191e9b8 	Xid = 2027
COMMIT/*!*/;         ##第一次插入在458结束
# at 458
#230414  0:02:23 server id 12000  end_log_pos 523 CRC32 0x421f277c 	Anonymous_GTID	last_committed=1	sequence_number=2	rbr_only=yes
/*!50718 SET TRANSACTION ISOLATION LEVEL READ COMMITTED*//*!*/;
SET @@SESSION.GTID_NEXT= 'ANONYMOUS'/*!*/;
# at 523
#230414  0:02:23 server id 12000  end_log_pos 597 CRC32 0x735827a1 	Query	thread_id=2248	exec_time=0	error_code=0
SET TIMESTAMP=1681401743/*!*/;
BEGIN
/*!*/;
# at 597
#230414  0:02:23 server id 12000  end_log_pos 663 CRC32 0xcef94d85 	Table_map: `client`.`user_info` mapped to number 196
# at 663
#230414  0:02:23 server id 12000  end_log_pos 729 CRC32 0x09a4371b 	Write_rows: table id 196 flags: STMT_END_F
### INSERT INTO `client`.`user_info`
### SET
###   @1='0000000010'
###   @2='罗纲'
###   @3='男'
###   @4='020'
###   @5=36
# at 729
#230414  0:02:23 server id 12000  end_log_pos 760 CRC32 0x0d676733 	Xid = 2028
COMMIT/*!*/;          ##第二次插入在760结束
# at 760
#230414  0:02:51 server id 12000  end_log_pos 825 CRC32 0x9676a31f 	Anonymous_GTID	last_committed=2	sequence_number=3	rbr_only=yes
/*!50718 SET TRANSACTION ISOLATION LEVEL READ COMMITTED*//*!*/;
SET @@SESSION.GTID_NEXT= 'ANONYMOUS'/*!*/;
# at 825
#230414  0:02:51 server id 12000  end_log_pos 899 CRC32 0x5a6dbee3 	Query	thread_id=2248	exec_time=0	error_code=0
SET TIMESTAMP=1681401771/*!*/;
BEGIN
/*!*/;
# at 899
#230414  0:02:51 server id 12000  end_log_pos 960 CRC32 0x69d9ebf8 	Table_map: `ceshi`.`employees` mapped to number 117
# at 960
#230414  0:02:51 server id 12000  end_log_pos 1000 CRC32 0xc2f9ef91 	Write_rows: table id 117 flags: STMT_END_F
### INSERT INTO `ceshi`.`employees`
### SET
###   @1=4
###   @2=NULL
###   @3=NULL
###   @4=NULL
# at 1000
#230414  0:02:51 server id 12000  end_log_pos 1031 CRC32 0x83086dce 	Xid = 2029
COMMIT/*!*/;                  #第三次插入在1031结束
# at 1031
#230414  0:02:59 server id 12000  end_log_pos 1096 CRC32 0xf96b0e30 	Anonymous_GTID	last_committed=3	sequence_number=4	rbr_only=yes
/*!50718 SET TRANSACTION ISOLATION LEVEL READ COMMITTED*//*!*/;
SET @@SESSION.GTID_NEXT= 'ANONYMOUS'/*!*/;
# at 1096
#230414  0:02:59 server id 12000  end_log_pos 1170 CRC32 0x73666b4f 	Query	thread_id=2248	exec_time=0	error_code=0
SET TIMESTAMP=1681401779/*!*/;
BEGIN
/*!*/;
# at 1170
#230414  0:02:59 server id 12000  end_log_pos 1236 CRC32 0x160edd5a 	Table_map: `client`.`user_info` mapped to number 196
# at 1236
#230414  0:02:59 server id 12000  end_log_pos 1300 CRC32 0x7637cfe9 	Write_rows: table id 196 flags: STMT_END_F
### INSERT INTO `client`.`user_info`
### SET
###   @1='0000000011'
###   @2='aaaa'
###   @3='男'
###   @4='055'
###   @5=100
# at 1300
#230414  0:02:59 server id 12000  end_log_pos 1331 CRC32 0xfe9d05d8 	Xid = 2030
COMMIT/*!*/;       ##第四次插入在1331结束
SET @@SESSION.GTID_NEXT= 'AUTOMATIC' /* added by mysqlbinlog */ /*!*/;
DELIMITER ;
# End of log file
/*!50003 SET COMPLETION_TYPE=@OLD_COMPLETION_TYPE*/;
/*!50530 SET @@SESSION.PSEUDO_SLAVE_MODE=0*/;

##还原全量备份
[root@dongm mysql]# mysql -uroot -p123456 -e 'drop table client.user_info;'
mysql: [Warning] Using a password on the command line interface can be insecure.
[root@dongm mysql]# mysql client  -uroot -p123456 </mysql_bak/client_userinfo-2023-04-13.sql
mysql: [Warning] Using a password on the command line interface can be insecure.
[root@dongm mysql]# mysql -uroot -p123456 -e 'select * from client.user_info;'
mysql: [Warning] Using a password on the command line interface can be insecure.
+-----------+-----------+--------+-------------+--------+
| 身份证    | 姓名      | 性别   | 用户ID号    | 资费   |
+-----------+-----------+--------+-------------+--------+
| 000000006 | 孙空悟    | 男     | 016         |     10 |
| 000000007 | 蓝精灵    | 女     | 017         |     91 |
| 000000008 | 姜姜      | 女     | 018         |     23 |
+-----------+-----------+--------+-------------+--------+

###还原增量
[root@dongm mysql]# mysqlbinlog --no-defaults --stop-position=1331  mysql-bin.000012|mysql -uroot -p123456      ##注意此处还原的是所有数据库,如果只还原单个数据库可以加-d databasename
mysql: [Warning] Using a password on the command line interface can be insecure.
ERROR 1062 (23000) at line 83: Duplicate entry '4' for key 'PRIMARY'   ##此处还原insert into ceshi.employees (empid) values (4);失败会导致还原到此处中断导致后面SQL没有恢复(insert into client.user_info values('0000000011','aaaa','男','055','100');),可以加入-d选项恢复单个数据库
[root@dongm mysql]# mysql -uroot -p123456 -e 'select * from client.user_info;'
mysql: [Warning] Using a password on the command line interface can be insecure.
+------------+-----------+--------+-------------+--------+
| 身份证     | 姓名      | 性别   | 用户ID号    | 资费   |
+------------+-----------+--------+-------------+--------+
| 000000006  | 孙空悟    | 男     | 016         |     10 |
| 000000007  | 蓝精灵    | 女     | 017         |     91 |
| 000000008  | 姜姜      | 女     | 018         |     23 |
| 000000009  | 关云长    | 男     | 019         |     37 |
| 0000000010 | 罗纲      | 男     | 020         |     36 |
+------------+-----------+--------+-------------+--------+

#下面恢复单个数据库
[root@dongm mysql]# mysql -uroot -p123456 -e 'drop table client.user_info;'
mysql: [Warning] Using a password on the command line interface can be insecure.
[root@dongm mysql]# mysql client  -uroot -p123456 </mysql_bak/client_userinfo-2023-04-13.sql
mysql: [Warning] Using a password on the command line interface can be insecure.
[root@dongm mysql]# mysqlbinlog --no-defaults -d client  --stop-position=1331  mysql-bin.000012|mysql -uroot -p123456
mysql: [Warning] Using a password on the command line interface can be insecure.
WARNING: The option --database has been used. It may filter parts of transactions, but will include the GTIDs in any case. If you want to exclude or include transactions, you should use the options --exclude-gtids or --include-gtids, respectively, instead.
[root@dongm mysql]# mysql -uroot -p123456 -e 'select * from client.user_info;'
mysql: [Warning] Using a password on the command line interface can be insecure.
+------------+-----------+--------+-------------+--------+
| 身份证     | 姓名      | 性别   | 用户ID号    | 资费   |
+------------+-----------+--------+-------------+--------+
| 000000006  | 孙空悟    | 男     | 016         |     10 |
| 000000007  | 蓝精灵    | 女     | 017         |     91 |
| 000000008  | 姜姜      | 女     | 018         |     23 |
| 000000009  | 关云长    | 男     | 019         |     37 |
| 0000000010 | 罗纲      | 男     | 020         |     36 |
| 0000000011 | aaaa      | 男     | 055         |    100 |    ##此行已恢复
+------------+-----------+--------+-------------+--------+

###还原到第一个插入语句实例
[root@dongm mysql]# mysql -uroot -p123456 -e 'drop table client.user_info;'
mysql: [Warning] Using a password on the command line interface can be insecure.
[root@dongm mysql]# mysql client  -uroot -p123456 </mysql_bak/client_userinfo-2023-04-13.sql
mysql: [Warning] Using a password on the command line interface can be insecure.
[root@dongm mysql]# mysql -uroot -p123456 -e 'select * from client.user_info;'
mysql: [Warning] Using a password on the command line interface can be insecure.
+-----------+-----------+--------+-------------+--------+
| 身份证    | 姓名      | 性别   | 用户ID号    | 资费   |
+-----------+-----------+--------+-------------+--------+
| 000000006 | 孙空悟    | 男     | 016         |     10 |
| 000000007 | 蓝精灵    | 女     | 017         |     91 |
| 000000008 | 姜姜      | 女     | 018         |     23 |
+-----------+-----------+--------+-------------+--------+
[root@dongm mysql]# mysqlbinlog --no-defaults -d client  --stop-position=458  mysql-bin.000012|mysql -uroot -p123456
mysql: [Warning] Using a password on the command line interface can be insecure.
WARNING: The option --database has been used. It may filter parts of transactions, but will include the GTIDs in any case. If you want to exclude or include transactions, you should use the options --exclude-gtids or --include-gtids, respectively, instead.
[root@dongm mysql]# mysql -uroot -p123456 -e 'select * from client.user_info;'
mysql: [Warning] Using a password on the command line interface can be insecure.
+-----------+-----------+--------+-------------+--------+
| 身份证    | 姓名      | 性别   | 用户ID号    | 资费   |
+-----------+-----------+--------+-------------+--------+
| 000000006 | 孙空悟    | 男     | 016         |     10 |
| 000000007 | 蓝精灵    | 女     | 017         |     91 |
| 000000008 | 姜姜      | 女     | 018         |     23 |
| 000000009 | 关云长    | 男     | 019         |     37 |
+-----------+-----------+--------+-------------+--------+

########################################
使用 mysqlbinlog 恢复之后,日志文件会重复记录前面的操作,此时可以选择重置日志文件或者使用flush-logs生成新的二进制日志
mysql> flush logs;

mysql> show binary logs;      #生成了新的二进制文件13
+------------------+-----------+
| Log_name         | File_size |
+------------------+-----------+
| mysql-bin.000001 |       201 |
| mysql-bin.000002 |       201 |
| mysql-bin.000003 |       177 |
| mysql-bin.000004 |       201 |
| mysql-bin.000005 |       468 |
| mysql-bin.000006 |       201 |
| mysql-bin.000007 |       492 |
| mysql-bin.000008 |      1575 |
| mysql-bin.000009 |     65510 |
| mysql-bin.000010 |      4703 |
| mysql-bin.000011 |      3752 |
| mysql-bin.000012 |      2616 |
| mysql-bin.000013 |     11859 |
+------------------+-----------+
13 rows in set (0.00 sec)

mysql> reset master;     #重置日志文件
Query OK, 0 rows affected (0.03 sec)

mysql> show binary logs;       #再次查看二级制文件时,发现已经被重置了
+------------------+-----------+
| Log_name         | File_size |
+------------------+-----------+
| mysql-bin.000001 |       154 |
+------------------+-----------+
1 row in set (0.00 sec)
企业数据库备份脚本
[root@mysql ~]# vim /opt/mysql_bak_wanbei.sh		//完全备份脚本

#!/bin/bash
# MySQL 数据库完全备份脚本
# 设置登录变量
MY_USER="root"

MY_PASS="123123"

MY_HOST="localhost"

MY_CONN="-u$MY_USER -p$MY_PASS -h$MY_HOST"

# 设置备份的数据库(或表)

MY_DB="client"

# 定义备份路径、工具、时间、文件名
BF_DIR="/mysql_bak/wanbei"

BF_CMD="/usr/bin/mysqldump"

BF_TIME=$(date +%Y%m%d-%H%M) NAME="$MY_DB-$BF_TIME"

# 备份为.sql 脚本,然后打包压缩(打包后删除原文件)
[ -d $BF_DIR ] || mkdir -p $BF_DIR

cd $BF_DIR

$BF_CMD $MY_CONN --databases $MY_DB > $NAME.sql

/bin/tar zcf $NAME.tar.gz $NAME.sql --remove &>/dev/null

[root@mysql ~]# vim /opt/mysql_bak_zengbei.sh
//增量备份脚本

#!/bin/bash
# MySQL 数据库增量备份脚本
# 设置登录变量
MY_USER="root"
MY_PASS="123123"
MY_HOST="localhost"
MY_CONN="-u$MY_USER -p$MY_PASS -h$MY_HOST"
# 定义备份路径、工具、二进制日志前缀、二进制日志存放路径

BF_TIME="$(date +%Y%m%d)" BF_DIR="/mysql_bak/zengbei/$BF_TIME"

CMD="/usr/bin/mysqladmin"

QZ="mysql-bin"

LOG_DIR="/var/lib/mysql"
# 拷贝二进制日志

[ -d $BF_DIR ] || mkdir -p $BF_DIR

$CMD $MY_CONN flush-logs

/bin/cp -p $(ls $LOG_DIR/$QZ.* |awk -v RS="" '{print $(NF-2)}') $BF_DIR   #-p:复制时保持源文件的权限、属主及时间标记等属性不变。awk -v RS="" '{print $(NF-2)}'相当于awk 'BEGIN{RS=""}{print $(NF-2)}'

[root@mysql ~]# chmod +x /opt/mysql_bak_*

[root@mysql ~]# crontab -e

0 0 * * 1 /opt/mysql_bak_wanbei.sh //每周一 0:00 进行完备
0 0 * * * /opt/mysql_bak_zengbei.sh //每天 0:00 进行增量备份


 800
800

 被折叠的 条评论
为什么被折叠?
被折叠的 条评论
为什么被折叠?
 到【灌水乐园】发言


