


生命周期的概念:一个对象从创建、运行、销毁的整个过程被称为生命周期。
一、vue生命周期的讲解,参考——vue的生命周期图解。
Vue实例在创建、运行、销毁的过程中,会伴随各种事件(函数),这些事件就是Vue的生命周期函数,也可以叫做生命周期钩子。


二、uni-app生命周期【uni-app官网生命周期 】
uni-app生命周期分为应用生命周期和页面生命周期,后期用得比较多的是页面生命周期。
1、应用生命周期
应用生命周期只能在App.vue中监听,在其它页面无效。打开App.vue,默认有3个生命周期函数。代码如下:
<script>
	export default {
		// 应用生命周期
		// 项目初始化完成执行
		// 只运行一次
		onLaunch: function() {
			console.log('App Launch--项目初始化完成')
		},
		onShow: function() {
			console.log('App Show--打开项目')
		},
		onHide: function() {
			console.log('App Hide--关闭项目')
		},
        onError:function(){
            console.log('App Error--当uni-app报错时触发')
        }
	}
</script>onLaunch:只运行一次;
onShow 和 onHide只要切换前后台就可以触发。
2、页面生命周期
| 函数名 | 说明 | 平台差异说明 | 最低版本 |
|---|---|---|---|
| onLoad | 监听页面加载,该钩子被调用时,响应式数据、计算属性、方法、侦听器、props、slots 已设置完成,其参数为上个页面传递的数据 | ||
| onShow | 监听页面显示,页面每次出现在屏幕上都触发,包括从下级页面点返回露出当前页面 | ||
| onReady | 监听页面初次渲染完成,此时组件已挂载完成,DOM 树($el)已可用,注意如果渲染速度快,会在页面进入动画完成前触发 | ||
| onHide | 监听页面隐藏 | ||
| onUnload | 监听页面卸载 | ||
| onPullDownRefresh | 监听用户下拉动作,一般用于下拉刷新,参考示例 | ||
| onReachBottom | 页面滚动到底部的事件(不是scroll-view滚到底),常用于上拉加载下一页数据。 | ||
| onShareAppMessage | 用户点击右上角分享 | 微信小程序、QQ小程序、支付宝小程序、抖音小程序、飞书小程序、快手小程序、京东小程序 | |
| onPageScroll | 监听页面滚动,参数为Object | nvue暂不支持 | |
| onShareTimeline | 监听用户点击右上角转发到朋友圈 | 微信小程序 | 2.8.1+ |
| onAddToFavorites | 监听用户点击右上角收藏 | 微信小程序、QQ小程序 | 2.8.1+ |
下面就讲解几个常用的生命周期函数。
-
onLoad()
onLoad()用于监听页面加载,其参数是上一个页面传递的参数。
作用:
①在onLoad中调用数据接口,获取服务器端数据。
②接收上一个页面传递的参数。
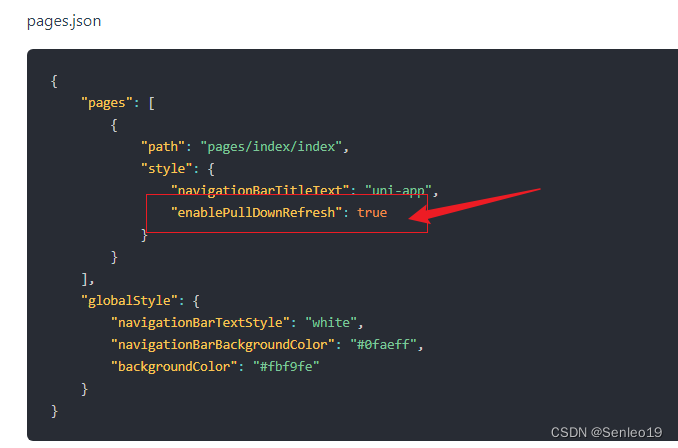
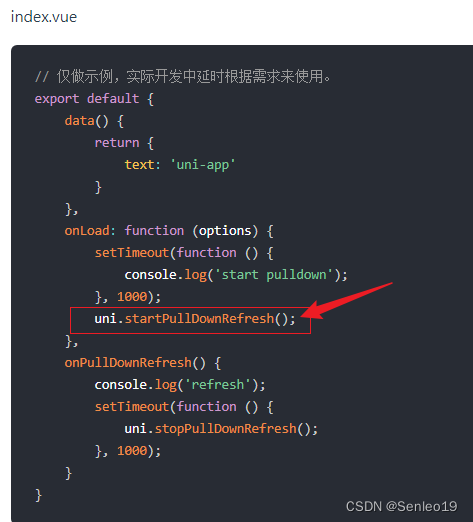
onPullDownRefresh:监听用户下拉动作,用于下拉刷新。在uni-app中有两种方式开启下拉刷新。
第一种方式:需要在 pages.json 里,找到的当前页面的pages节点,并在 style 选项中开启 enablePullDownRefresh。注意:当处理完数据刷新后,使用uni.stopPullDownRefresh 停止当前页面的下拉刷新。
第二种方式:通过API----uni.startPullDownRefresh开启
-
上拉加载onReachBottom()
上拉加载是指当页面滚动条到达底部时,触发onReachBottom生命周期函数,实现数据加载。
	onReachBottom() {
			console.log("页面触底");
            //每次到达底部都会加载这两条假数据
            if(this.list.length == 10){
                uni.stopPullDownRefresh();
            }else{
                this.list = [...this.list,...['加数据1','假数据2'];
            }

	}
三、API
1、传参和拿参
//a页
<navigator url="/pages/parentlist/parentlist?ly=index">跳到父组件</navigator>
//parentlist页
mounted(){
console.log(this.$router); //undefine}
注意:上发在小程序中,通过路由this.$router是拿不到上一个跳转过来的参数,得到的是undefine。应该在onLoad()中获取上个页面传过来的参数。或者通过页面栈获取参数。
onLoad(data){
console.log(data) //{ly: "index"}console.log(getCurrentPages())
},

从index页跳到parentliast,可以看出有两个页面栈。
//a页,传递多个参时用&符号连接
<navigator url="/pages/parentlist/parentlist?ly=index&name=Senleo">跳到父组件</navigator>
2、交互反馈
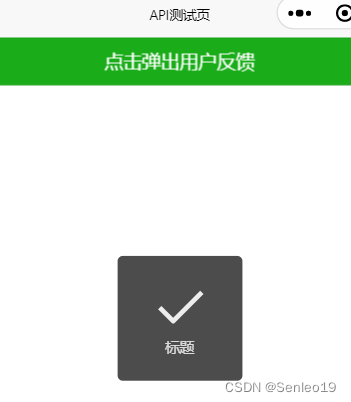
2.1 uni.showToast交互反馈的用法
<template>
<view>
<button type="primary" @click="openFun">点击弹出用户反馈</button>
</view>
</template><script>
export default {
methods:{
openFun(){
uni.showToast({
icon:'success',
title: '标题',
mask:true, //弹出框出现的时,其余地方都不能点击
// image:'/static/logo.png',
duration: 2000,
success() {
console.log('222');
}
});
}
},
}
</script>
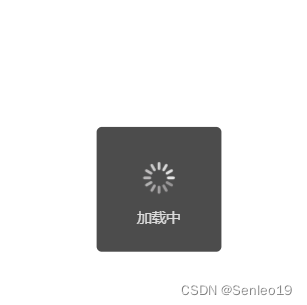
2.2 uni.showLoading 数据加载中
onShow(){
	uni.showLoading({
		title: '加载中',
        mask:true
	);

	setTimeout(function () {
		uni.hideLoading();  //隐藏 loading 提示框。
	}, 2000);
} 
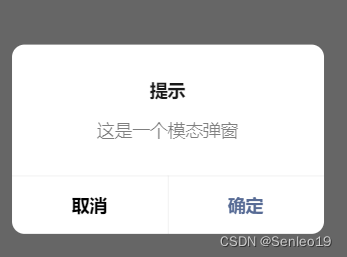
2.3 uni.showModal模态弹窗
显示模态弹窗,可以只有一个确定按钮,也可以同时有确定和取消按钮。类似于一个API整合了 html 中:alert、confirm。
uni.showModal({
	title: '提示',
	content: '这是一个模态弹窗',
	success: function (res) {
		if (res.confirm) {
			console.log('用户点击确定');
		} else if (res.cancel) {
			console.log('用户点击取消');
		}
	}
});
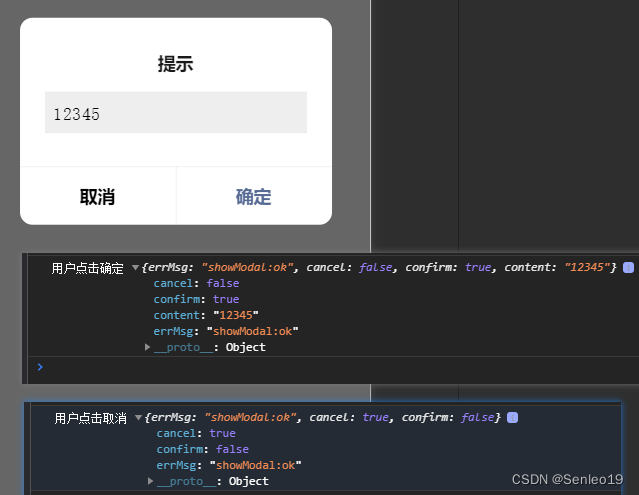
uni.showModal({
title: '提示',
editable: true,
placeholderText:'手机号验证',
success: function (res) {
if (res.confirm) {
console.log('用户点击确定',res);
} else if (res.cancel) {
console.log('用户点击取消',res);
}
}
});
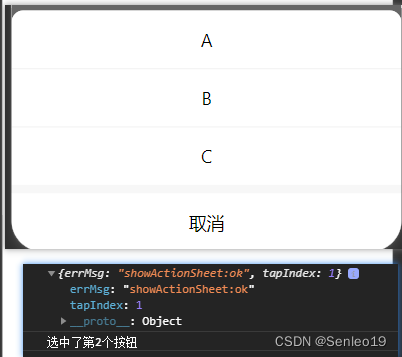
2.4uni.showActionSheet
从底部向上弹出操作菜单。tapIndex,Number类型,用户点击的按钮,从上到下的顺序,从0开始。
uni.showActionSheet({
itemList: ['A', 'B', 'C'],
success: function (res) {
console.log(res);
console.log('选中了第' + (res.tapIndex + 1) + '个按钮');
},
fail: function (res) {
console.log(res.errMsg);
}
});

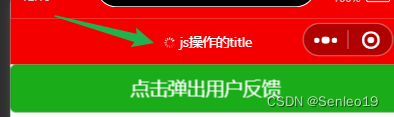
3、uni.setNavigationBarTitle动态设置导航条
一般做 详情页 时需要动态设置当前页面的标题。js里操作的权限高于在配置项里的设置。
注意:如果需要在页面进入时设置标题,可以在onReady/onLoad内执行,以避免被框架内的修改所覆盖。如果必须在onShow内执行需要延迟一小段时间。
在配置项设置
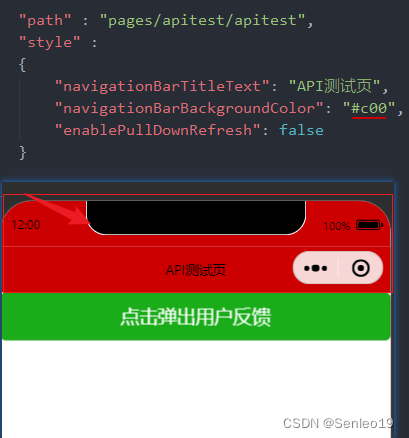
在js中配置时
onLoad() {
uni.setNavigationBarTitle({
title: 'js操作的title'
});
},
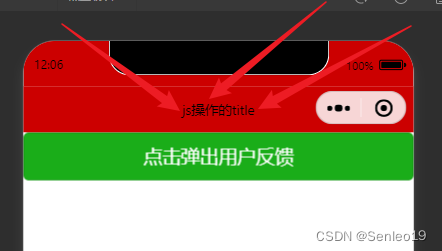
uni.setNavigationBarColor({ //设置页面导航条颜色。如果需要进入页面就设置颜色,请延迟执行,防止被框架内设置颜色逻辑覆盖
frontColor: '#ffffff', //仅支持 #ffffff 和 #000000
backgroundColor: '#ff0000',
animation: {
duration: 400,
timingFunc: 'easeIn'
}
})
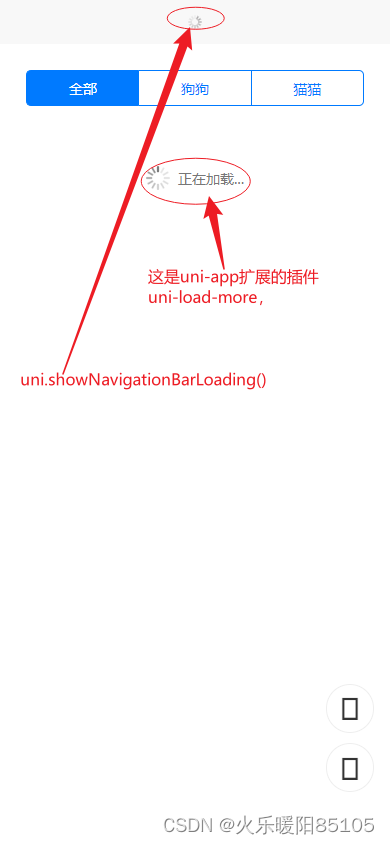
uni.showNavigationBarLoading(); //在当前页面显示导航条加载动画。setTimeout(() => {
uni.hideNavigationBarLoading();//在当前页面隐藏导航条加载动画。
},1500)
4、配置tabBar
1、给tabBar设置iconfont字体图标(小程序不支持)
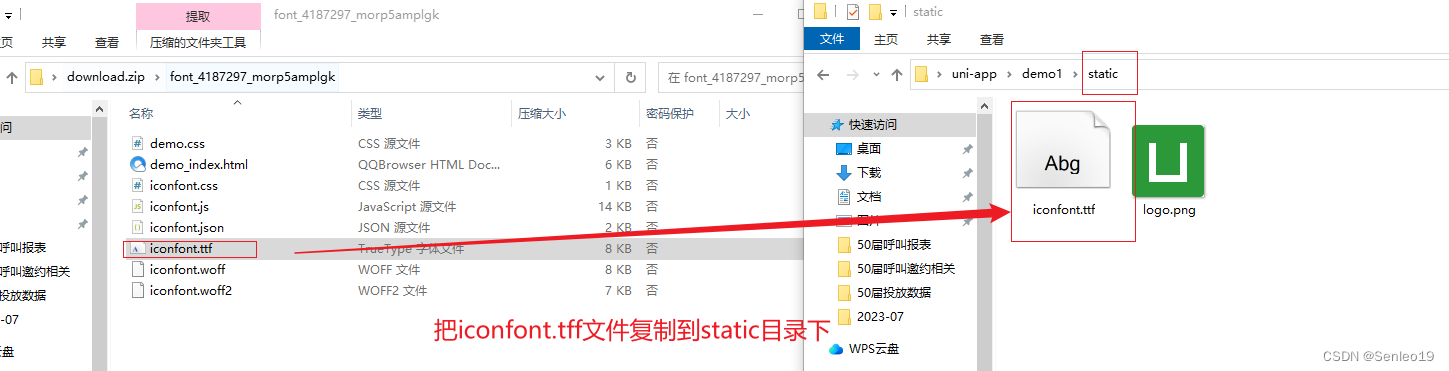
注意: 设置 iconfont 属性时,pages.json iconfontSrc 需要指定字体文件,参考下面的配置
| 属性 | 类型 | 说明 |
|---|---|---|
| text | String | 字库 Unicode 码,例如""改成"\ue8ab",就是将【&#x】转成【\u】表示 |
| selectedText | String | 选中后字库 Unicode 码 |
| fontSize | String | 字体图标字号(px) |
| color | String | 字体图标颜色 |
| selectedColor | String | 字体图标选中颜色 |
// pages.json
{
  "tabBar": {
    "iconfontSrc":"static/iconfont.ttf",
    "list": [
      {
        "pagePath": "pages/index/index",
        "text": "Tab1",
        "iconfont": {
          "text": "\ue102",
          "selectedText": "\ue103",
          "fontSize": "17px",
          "color": "#000000",
          "selectedColor": "#0000ff"
        }
      }
    ]
  }
}
2、隐藏tabBar
uni.hideTabBar();
3、显示tabBar
uni.showTabBar();
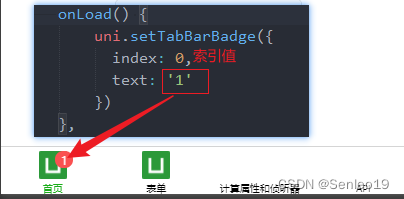
4、uni.setTabBarBadge()
为 tabBar 某一项的右上角添加文本。
相反,移除 tabBar 某一项右上角的文本。uni.removeTabBarBadge(OBJECT)
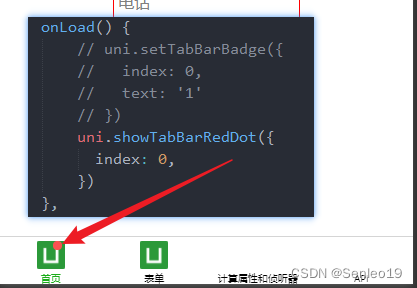
5、uni.showTabBarRedDot()
显示 tabBar 某一项的右上角的红点。
相反,隐藏 tabBar 某一项的右上角的红点。uni.hideTabBarRedDot(OBJECT)
5、网络请求
在各个小程序平台运行时,网络相关的 API 在使用前需要配置域名白名单。
uni.showLoading({
	title: '数据加载中...'
});
uni.request({
	 url: 'https://api.uomg.com/api/rand.qinghua', //仅为示例,并非真实接口地址。
	 // data: {
	 //     text: 'uni.request'
	 // },
	 // header: {
	 //     'custom-header': 'hello' //自定义请求头信息
	 // },
	 method:"GET",
	 success: (res) => {
		console.log(res);
		this.text = res.data.content;
	  },
	  fail: (res) => {
		// 接口调用失败的回调函数
	  },
	  complete:()=>{
		 // 接口调用结束的回调函数(调用成功、失败都会执行)
		 uni.hideLoading();
	   }
});
6、页面函数
1、getApp()
getApp()函数用户获取当前应用实例,一般用于获取在App.vue中设置的globalData。
2、globalData使用
在 App.vue中设置
<script>
	export default {
		globalData: {
			token: '',
			userid: null,
		},
		onLaunch: function() {
			console.log('App Launch')

			// 获取缓存信息Token
			this.getStorageInfo()
		},
		methods: {
			/**
			 * 获取缓存信息
			 */
			getStorageInfo() {
				this.globalData.token = uni.getStorageSync("equipment_token");
				this.globalData.userid = uni.getStorageSync("userid");
			}
		}
	}
</script>
var app = getApp();
Page({
onLoad: function() {
//读取
console.log(app.globalData.name);
//赋值
getApp().globalData.name = "王五";
}
})注意:在其他页面读取以及修改globalData,首先引用app()实例
7、网络请求
三种方式网络请求。
① 不建议使用,容易形成回调地狱。
// 第一种
function request(){
uni.request({
url:'http://jsonplaceholder.typicode.com/posts',
success: (res) => {
console.log('第一种',res);
}
})
}
② promise | then 建议使用。
function request(){
uni.request({
url:'http://jsonplaceholder.typicode.com/posts',
}).then(res => {
console.log('第二种',res);
})
}
//严谨性写法
function request(){
uni.request({
url:'http://jsonplaceholder.typicode.com/posts',
}).then(res => {
console.log('第二种',res);
}).catch(err => {uni.showToast({
title: "请求有误,请重新刷新",
icon:"none"
})
}).finally(() => {
//请求无论成不成功,都执行
uni.hideLoading();
console.log(123)
})
}
③async | await建议使用。
async function request(){
let res = await uni.request({
url:'http://jsonplaceholder.typicode.com/posts',
})
console.log('第三种',res);
}
8、uni.pageScrollTo返回顶部
// 点击返回顶部
const onTop = ()=>{
uni.pageScrollTo({
scrollTop: 0,
duration: 100
});
}
四、宠物上拉加载和下拉刷新的案例
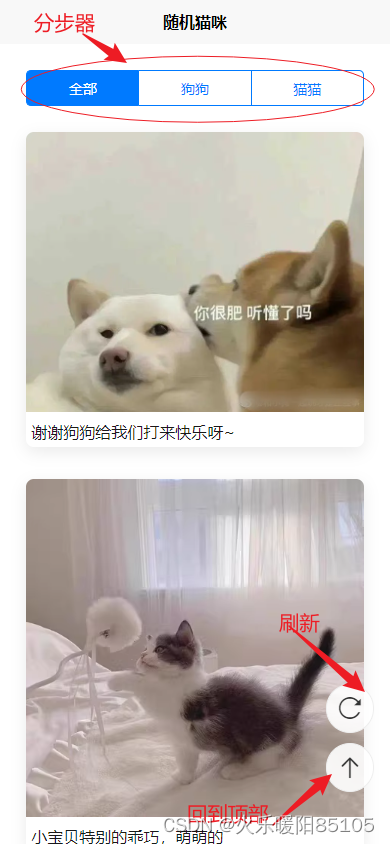
<template>
	<view class="container">
		<!-- 分步器,切换tab -->
		<view class="menu">
			<uni-segmented-control
				:current="current"
				:values="values"
				style-type="button"
				active-color="#007aff"
				@clickItem="onClickItem"
			/>
		</view>
		<!-- 内容主体 -->
		<view class="layout">
			<view class="box" v-for="(item,index) in pets" :key="item._id">
				<view class="pic">
					<image :src="item.url" lazy-load mode="widthFix" @click="onPreview(index)"></image>
				</view>
				<view class="text">{{item.content}}</view>
			</view>
		</view>
		<!-- 右边浮动固定按钮 刷新 回到顶部 -->
		<view class="float">
			<view class="item" @click="onRefresh"><uni-icons type="refreshempty" size="30"></uni-icons></view>
			<view class="item" @click="onTop"><uni-icons type="arrow-up" size="30"></uni-icons></view>
		</view>
		<!-- 加载更多 -->
		<view class="loadMore">
			<uni-load-more status="loading"></uni-load-more>
		</view>
	</view>
</template>

<script setup>
import { computed } from 'vue';
// ref变量
const pets = ref([])
const current = ref(0)
const items =  [{key:'all',value:'全部'}, {key:'dog',value:'狗狗'}, {key:'cat',value:'猫猫'}]

// 计算属性
const values = computed(()=> items.map(item => item.value))

// request 请求
function network(){
	// 请求时导航栏显示加载
	uni.showNavigationBarLoading()
	uni.request({
		url:'https://xxx',
		data:{
			size:5,  //每次只请求5条
			type:items[current.value].key  //获取什么类型的萌宠 all / dog / cat ,什么都不传就是all
		}
	}).then(res => {
		// console.log('res',res);
		pets.value = [...pets.value,...res.data.data]  //触底追加
	}).catch(err => {
		uni.showToast({
			title:'请求有误,请重新刷新',
			icon:'none'
		})
	}).finally(()=> { // 无论请求成功或失败,都执行
		// 停止导航栏刷新
		uni.hideNavigationBarLoading()
		// 手动停止下拉刷新
		uni.stopPullDownRefresh()
	})
}
// 一进入该页就加载
network()

// 上拉触底更新
onReachBottom(()=>{
	network()
})

// 下拉刷新
onPullDownRefresh(()=>{
	pets.value = [];
	current.value = 0
	network()
})

// 点击预览图片
const onPreview = function(index){
	let urls = pets.value.map(item => item.url)
	uni.previewImage({
		current:index,
		urls:urls
	})
}

// 点击刷新
const onRefresh = function(){
	uni.startPullDownRefresh()
}

// 点击返回顶部
const onTop = ()=>{
	uni.pageScrollTo({
		scrollTop: 0,
		duration: 100
	});
}

// 分段器 -- 切换请求内容的类型
const onClickItem = function(e){
	current.value = e.currentIndex
	pets.value = []
	// console.log('类型',items[current.value].key);
	network()

}
</script>

<style lang="scss" scoped>
.container{
	.menu{
		padding: 50rpx 50rpx 0;
	}
	.layout{
		padding: 50rpx;
		.box{
			margin-bottom: 60rpx;
			box-shadow: 0 10rpx 30rpx rgba(0, 0, 0, 0.08);
			border-radius: 15rpx;
			overflow: hidden;
			.pic{
				image{
					width: 100%;
				}
			}
			.text{
				padding: 10rpx;
			}
		}
	}
	.float{
		position: fixed;
		right: 30rpx;
		bottom: 80rpx;
		padding-bottom: env(safe-area-inset-bottom);
		.item{
			width: 90rpx;
			height: 90rpx;
			background-color: rgba(255, 255, 255, .9);
			border-radius: 50%;
			margin-bottom: 20rpx;
			display: flex;
			align-items: center;
			justify-content: center;
			border: 1px solid #eee;
		}
		.box{
			border:1px solid red;
		}
	}
	.loadMore{
		padding-bottom: calc(env(safe-area-inset-bottom) + 50rpx);
	}
}
</style>


 9069
9069

 被折叠的 条评论
为什么被折叠?
被折叠的 条评论
为什么被折叠?
 到【灌水乐园】发言


