


文章目录
1.总结eureka微服务创建的流程
1.创建server模块
1.创建maven项目spring-boot-eureka-server,引入eureka依赖
    <dependency>
        <groupId>org.springframework.cloud</groupId>
        <artifactId>spring-cloud-starter-netflix-eureka-server</artifactId>
    </dependency>
2.配置application.yml文件
server:
  port: 7001

eureka:
  instance:  #实例
    hostname: eureka7001.com  # eureka 服务器的实例名称
  client:
    # false 代表不向服务注册中心注册自己,因为它本身就是服务中心
    register-with-eureka: false
    # false 代表自己就是服务注册中心,自己的作用就是维护服务实例,并不需要去检索服务
    fetch-registry: false
    service-url:
    # 设置与 Eureka Server 交互的地址,查询服务 和 注册服务都依赖这个地址
      defaultZone: http://eureka7002.com:7002/eureka/
3.编写启动类
@SpringBootApplication(exclude = DataSourceAutoConfiguration.class) //eclude:表示不启动DataSource
//的自动配置检查
@EnableEurekaServer //开启eureka服务
public class EurekaApplication {
    public static void main(String[] args) {
        SpringApplication.run(EurekaApplication.class,args);
    }
}
2.创建服务提供方
1.创建cloud-provider-payment8001服务提供方,引入eureka客户端依赖
        <!--eureka-client-->
        <dependency>
            <groupId>org.springframework.cloud</groupId>
            <artifactId>spring-cloud-starter-netflix-eureka-client</artifactId>
        </dependency>
2.编写application.yml配置文件,向eureka里注册服务提供方
server:
  port: 8001  #端口号
spring:
  application:
    name: cloud-service-payment   #指定应用的名称,,在spring cloud中被用来注册的服务名
  datasource:  # 配置数据源
    type: com.alibaba.druid.pool.DruidDataSource
    driver-class-name: org.gjt.mm.mysql.Driver
    url: jdbc:mysql://localhost:3306/spring_cloud_day05?useUnicode=true&characterEncoding=utf-8&useSSL=false
    username: root
    password: 123
mybatis:
  mapper-locations: classpath:mapper/*.xml
eureka:
  client:
    # 注册进eureka的服务中心
    register-with-eureka: true
    # 检索服务中心的其他服务
    fetch-registry: true
    service-url:
      # 设置与eureka服务中心的交互抵制
      defaultZone: http://eureka7001.com:7001/eureka/
3.搭建一个简单的ssm小项目,定义一个根据id查询数据库信息的方法,用于测试。目录如下

4.编写启动类
@SpringBootApplication
@MapperScan(value = "com.usian.dao")
@EnableEurekaClient //标识开启eureka客户端
public class CloudProviderApplicationApp8001 {
    public static void main(String[] args) {
        SpringApplication.run(CloudProviderApplicationApp8001.class,args);
    }
}
3.创建服务消费方
		1.建立cloud-consumer-payment80服务提供方,引入eureka客户端依赖
		2.编写yml文件,注入进eureka注册中心
		3.编写启动类,yml文件和启动类和服务提供方差不多
		4.编写controller,代码如下
package com.usian.controller;

import com.usian.pojo.CommonResult;
import com.usian.pojo.Payment;
import lombok.extern.slf4j.Slf4j;
import org.springframework.beans.factory.annotation.Autowired;
import org.springframework.web.bind.annotation.GetMapping;
import org.springframework.web.bind.annotation.PathVariable;
import org.springframework.web.bind.annotation.RequestMapping;
import org.springframework.web.bind.annotation.RestController;
import org.springframework.web.client.RestTemplate;

@RestController
@Slf4j
public class PaymentController {

    private static final String URL = "http://cloud-service-payment";//记录服务提供方的主机地址和端口号

    @Autowired
    RestTemplate restTemplate;

    @GetMapping("consumer/findById/{id}")
    public CommonResult<Payment> findById(@PathVariable("id") Integer id){
        return this.restTemplate.getForObject(URL+"/findById/"+id,CommonResult.class);
    }

    @RequestMapping("/consumer/create")
    public CommonResult<Payment> create(Payment payment){
        /**
         * 注意:使用restTemplate使用POST请求服务提供方,携带的参数,在底层会转换成一个json格式的字符串。
         */
        return this.restTemplate.postForObject(URL + "/create",payment,CommonResult.class);
    }
}
5.配置类
@Bean
    @LoadBalanced  //使用RestTemplate对服务提供方进行负载均衡的调用
    public RestTemplate restTemplate(){
        return new RestTemplate();
    }
然后运行spring-boot-eureka-server,访问:http://localhost:7001/成功页面如下

运行服务提供方和服务消费方,访问http://localhost/consumer/findById/1
2.如何搭建eureka集群
		在刚才的案例中,我们只有一个EurekaServer,如果这个EurekaServer挂掉了,也会影响整个应用。事实上EurekaServer也可以是一个集群,我们可以实现EurekaServer的高可用,一台EurekaServer挂掉还有其他EurekaServer顶上。
		服务同步:
		EurekaServer之间也可以相互注册服务,当服务提供者注册当EurekaServer集群中的某个节点时,该节点会把这个服务提供者共享给EurekaServer的每个节点,实现数据同步。所以,不论访问EurekaServer集群中的任意节点,都能获取完整的EurekaServer服务列表信息
		1.模拟多个EurekaServer在不同机器上,进入C:\Windows\System32\drivers\etc\hosts,修改hosts文件末尾,加入
		127.0.0.1 eureka7001.com
		127.0.0.1 eureka7002.com
		2.创建springboot-eureka-server7002服务,pom依赖复制springboot-eureka-server
		      2.1修改springboot-eureka-server的配置文件
server:
  port: 7001

eureka:
  instance:  #instance实例
    hostname: eureka7001.com  # eureka 服务器的实例名称
  client:
    # false 代表不向服务注册中心注册自己,因为它本身就是服务中心
    register-with-eureka: false
    # false 代表自己就是服务注册中心,自己的作用就是维护服务实例,并不需要去检索服务
    fetch-registry: false
    service-url:
    # 设置与 Eureka Server 交互的地址,查询服务 和 注册服务都依赖这个地址
      defaultZone: http://eureka7002.com:7002/eureka/
2.2修改springboot-eureka-server7002的配置文件
server:
  port: 7002

eureka:
  instance:  #instance实例
    hostname: eureka7002.com  # eureka 服务器的实例名称
  client:
    # false 代表不向服务注册中心注册自己,因为它本身就是服务中心
    register-with-eureka: false
    # false 代表自己就是服务注册中心,自己的作用就是维护服务实例,并不需要去检索服务
    fetch-registry: false
    service-url:
    # 设置与 Eureka Server 交互的地址,查询服务 和 注册服务都依赖这个地址
      defaultZone: http://eureka7001.com:7001/eureka/
		3.编写启动类

	随后访问:http://localhost:7002/      http://localhost:7001/    即可
	总结:
			服务的注册地址实际上是eureka.instance.hostname,而service-url 是key:value类型,只要保证是key:value类型即可,它代表本server指向的其他服务,这样就可以实现EurekaServer之间的注册,从而实现集群。
3.服务提供方集群如何搭建
修改yml配置文件,将服务提供方注册进两台EurekaServer中
eureka:
  client:
    # 注册进eureka的服务中心
    register-with-eureka: true
    # 检索服务中心的其他服务
    fetch-registry: true
    service-url:
      # 设置与eureka服务中心的交互抵制
      defaultZone: http://eureka7001.com:7001/eureka/,http://eureka7002.com:7002/eureka/
4.RestTemplate如何使用?
		RestTemplate 是由 Spring 提供的一个 HTTP 请求工具,使用方便,基本上一个请求一行代码即可完成。
		要用RestTemplate的话,我们需要在spring容器中注入RestTemplate,然后在需要调用的controller注入:
@Bean
    @LoadBalanced  //使用RestTemplate对服务提供方进行负载均衡的调用
    public RestTemplate restTemplate(){
        return new RestTemplate();
    }
RestTemplate 有两个我们常用的方法 :restTemplate.getForObject ,	restTemplate.postForObject
getForObject方法这里用的是两个参数的,第一个是服务提供方的请求路径,第二个是指定这个方法的返回值类型  ,是一个字节码文件。
postForObject方法有三个参数,第一个参数是请求地址,第二个参数是传入的参数类型,第三个参数是返回值类型。
例如:
return this.restTemplate.postForObject(URL + "/create",payment,CommonResult.class);
5.简述eureka的自我保护模式? 如何配置其自我保护模式
eureka默认一个服务没有在30秒之内向注册中心发送心跳,即服务不可用了,那么eureka会在90秒后会注销该实例,但是如果是因为网络问题导致的,此时这个行为就非常危险。因为这个服务是健康的,本不应该注销次服务,eureka通过自我保护机制来解决这个问题,当eureka在短时间内丢失过多客户端时,这个节点就会进入自我保护模式。
自我保护模式默认是开启的。
关闭自我保护模式:

6.什么是CAP理论? cp ap原则的含义
CAP即:
Consistency(一致性)
Availability(可用性)
Partition tolerance(分区容忍性)

而CAP理论说的就是:一个分布式系统,不可能同时做到这三点
但是这里有个误区,在不存在网络失败的情况下,C和A可以同时存在,只用当网络发生分区或失败的情况下才会进行C和A的选择。
对于一个分布式系统而言,必须要保证系统不能挂掉,所以P是必须的,只需要在C和A之间做出选择,要么保证数据的一致性(保证数据绝对正确),要么保证数据的 可用性(保证系统不出错)
选择C(一致性)时,由于网络分区无法保证数据是最新的,系统将返回错误或超时
选择A(可用性)时,系统始终会处理客户端的请求并尝试返回最新的信息版本,即使由于网络分区而无法保证信息是最新的。
7.eureka 和zookeeper consul的区别?
			**eureka**
			eureka 保证AP,即保证可用性。eureka 节点之间是平等的,几个几点的挂掉不会影响正常节点的工作,正常节点仍然能够查询和注册服务,客户端向某个节点注册服务失败,会自动寻找其他服务。只要有一个节点在,就能保证服务可用(即可用性)。只不过查到的数据不是最新,即不保证数据的强一致性。
		eureka还提供了一种保护机制,即在15分钟内有85%的节点没有心跳,那么eureka 就会认为客户端与服务端发生了网络故障。此时还会出现以下几种情况:
		1.eureka 不再从注册列表移除没有心跳的服务
		2.eureka 仍然能接受查询和注册请求,不过不会同步到其他节点上(保证当前节点可用)
		3.当网络稳定时,将新注册的实例信息同步到其他节点

	**zookeeper consul**
	zookeeper和consul会出现这样的一种情况,当master节点因为网络故障与其他节点失去联系时,剩下的节点会重新进行leader选举。问题在于,选举leader的时间太长,30~120s,且选举期间整个zookeeper和consul集群都是不可用的,这就导致在选举期间注册服务瘫痪。
8.使用ribbon进行负载均衡的步骤
		1.引入依赖,由于spring-cloud-starter-netflix-eureka-client已经集成ribbon,所以不需要单独引入。
		2.在注入RestTemplate时加入@LocadBalanced注解,表示开启负载均衡
@Bean
    @LoadBalanced  //使用RestTemplate对服务提供方进行负载均衡的调用
    public RestTemplate restTemplate(){
        return new RestTemplate();
    }
9.ribbon负载均衡的策略有哪些?
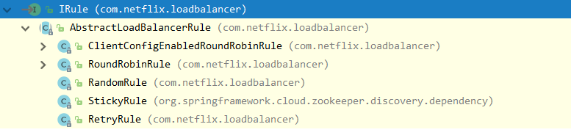
默认是轮询RoundRobinRule,常用的有:
RandomRule随机
RetryRule:先按照轮询策略获取服务,如果获取服务失败会在指定时间进行重试,获取可用服务。
WeightedResponseRule:对RoundRobinRule的拓展,响应越快的服务实例权重越大,越容易被选择
10.如何自定义负载均衡
		配置负载均衡需要不能放在@ComponentScan所扫描的包或子包下,不然就会被所有Ribbon客户端共享,就达不到特殊定制化的目的了。
		首先我们在不属于@ComponentScan范围的地方建立一个包myrule,在包内创建MyRule配置类
		创建一个bean
@Bean
    public IRule iRule(){
        return new RandomRule();
    }
		想要什么负载均衡策略就new 一个。
		然后在启动类上加上如下注解
@RibbonClient(value = "cloud-service-payment", configuration = MyRule.class)//指定访问哪个服务,使用哪种负载均衡策略访问
完毕。


 803
803

 被折叠的 条评论
为什么被折叠?
被折叠的 条评论
为什么被折叠?
 到【灌水乐园】发言


