sip服务器搭建过程及linphone拨号------实现SIP协议的抓取


前言

boss要求我们自己搭个服务器,那就干吧。

https://blog.csdn.net/qq_38631503/article/details/80005454


一、Sip协议

工作原理相关的参见该文章,写的很详细:https://blog.csdn.net/yunmao2882/article/details/86646608

二、使用步骤

前提条件:在Ubuntu 电脑上安装好数据库

1 sudo apt-get install mysql-server

2 sudo apt-get isntall mysql-client

3 sudo apt-get install libmysqlclient-dev

一、Sip服务器搭建

a)  下载opensips

①官网下载地址:http://www.opensips.org/Resources/Downloads

②下载完成后解压 tar -xzvf opensips-2.2.tar.gz

b)  编译opensips

①cd  home/test/opensips-2.2        //进入opensips目录

②sudo make menuconfig  //执行此命令弹出图1

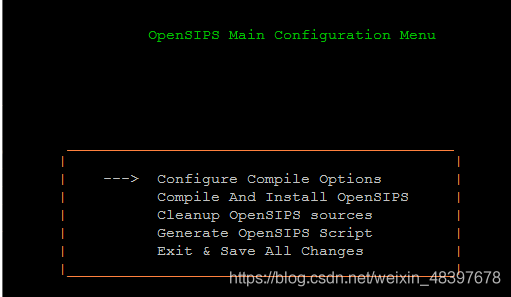
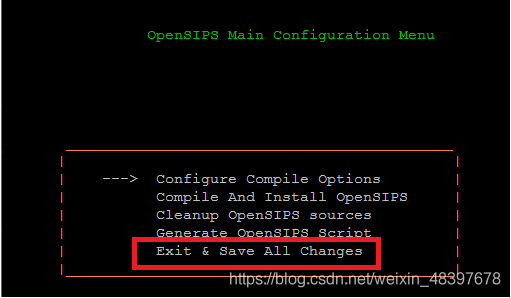
选择Exit & Save All Changes(图2)直接退出,会在源码根目录下生成Makefile.conf文件

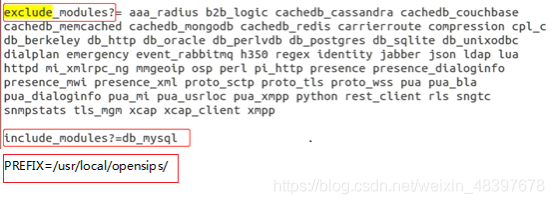
③sudo vim Makefile.conf  /修改Makefile.conf文件:

在exclude_modules中删掉db_mysql,

在include_modules中添加db_mysql,

修改安装目录为PREFIX=/usr/local/opensips/

④sudo make all

⑤sudo make install

c)  配置opensips:cd /usr/local/opensips

①tree -d     //查看目录结构

②cd /usr/local/opensips/etc/opensips

③egrep -v "#|^$" opensipsctlrc

④sudo vim opensipsctlrc  //修改opensipsctlrc文件

⑤修改opensips.cfg文件    

⑥cd /home/test/opensips-2.2

sudo make menuconfig   //弹出下图

选择Generate Opensips Script,回车

选择Residential Script,回车

选择Configure Residential Script,回车

按空格键选择ENABLE_TCP,USE_AUTH,USE_DBACC,USE_DBUSERLOC,USE_DIALOG回车

返回,选择Save Residential Script

选择Generate Residential Script

弹出提示,记住保存的路径Config generated : etc/opensips_residential_2020-6-5_14:27:5.cfg =  SUCCESS. Press any key to continue,按q返回配置界面首页,选择Exit & Save All Changes 退出设置

⑦cd etc/

mv opensips_residential_2020-6-5_14:27:5.cfg  opensips.cfg

cp opensips.cfg  /usr/local/opensips/etc/opensips/opensips.cfg

⑧cd /usr/local/opensips/etc/opensips/

chmod 777 opensips.cfg

sudo vim opensips.cfg  //修改opensips.cfg文件  

listen: 本机IP:5060  UDP

listen: 本机IP :5060 TCP

mpath:/usr/local/opensips/lib64/opensips/modules


d)  创建opensips数据库

①cd /usr/local/opensips/sbin

②sudo ./opensips -C   //检测配置文件语法

③sudo ./opensipsdbctl create 创建数据库

test@test-***:/usr/local/opensips/sbin$ ./opensipsdbctl create

如果弹出错误1:

ERROR: database engine not specified, please setup one in the config script

解决办法:

test@test-***:/usr/local/opensips/etc/opensips$ sudo vim opensipsctlrc

## database name (for ORACLE this is TNS name)

# DBNAME=MYSQL  去掉#

如果弹出错误2:

test@test-***:/usr/local/opensips/sbin$ ./opensipsdbctl create

MySQL password for root: 1

INFO: test server charset

mysql: [Warning] Using a password on the command line interface can be insecure.

ERROR 1698 (28000): Access denied for user 'root'@'localhost'

mysql: [Warning] Using a password on the command line interface can be insecure.

ERROR 1698 (28000): Access denied for user 'root'@'localhost'

WARNING: Failed to get the available and used character sets

解决办法:

test@test-***:/usr/local/opensips/sbin$ sudo mysql -u root -p

Enter password: 1

Welcome to the MySQL monitor.  Commands end with ; or \g.

Your MySQL connection id is 5

Server version: 5.7.30-0ubuntu0.18.04.1 (Ubuntu)

Copyright (c) 2000, 2020, Oracle and/or its affiliates. All rights reserved.

Oracle is a registered trademark of Oracle Corporation and/or its

affiliates. Other names may be trademarks of their respective

owners.

Type 'help;' or '\h' for help. Type '\c' to clear the current input statement.

mysql> ALTER USER 'root'@'localhost' IDENTIFIED WITH mysql_native_password BY '1';

Query OK, 0 rows affected (0.00 sec)

mysql> USE mysql

Reading table information for completion of table and column names

You can turn off this feature to get a quicker startup with -A

Database changed

mysql> CREATE USER 'test'@'localhost' IDENTIFIED BY '';

Query OK, 0 rows affected (0.00 sec)

mysql> GRANT ALL PRIVILEGES ON *.* TO 'test'@'localhost';

Query OK, 0 rows affected (0.00 sec)

mysql> UPDATE user SET plugin='auth_socket' WHERE User='test';

Query OK, 1 row affected (0.00 sec)

Rows matched: 1  Changed: 1  Warnings: 0

mysql> FLUSH PRIVILEGES;

Query OK, 0 rows affected (0.00 sec)

mysql> exit

Bye

test@test-***:/usr/local/opensips/sbin$ service mysql restart

test@test-***:/usr/local/opensips/sbin$ sudo ./opensipsdbctl create

e)  开启opensips服务

test@test-***:/usr/local/opensips/sbin$ ./opensipsctl start

INFO: Starting OpenSIPS :

错误:

ERROR: PID file /var/run/opensips.pid does not exist -- OpenSIPS start failed

解决办法:

test@test-***:/usr/local/opensips/sbin$ sudo ./opensipsctl start

f)  添加sip用户

①test@test-***:/usr/local/opensips/sbin$sudo ./opensipsctl add username password       #添加用户

错误:

test@test-***:/usr/local/opensips/sbin$ sudo ./opensipsctl add 1000 1

[sudo] password for test:

ERROR: domain unknown: use usernames with domain or set default domain in SIP_DOMAIN

解决办法:

test@test-***:/usr/local/opensips/etc/opensips$ sudo vim opensipsctl

## your SIP domain

# SIP_DOMAIN=本机IP   去掉 "#"

②test@test-***:/usr/local/opensips/sbin$ sudo ./opensipsctl add 1000 1

(默认的密码为opensipsrw

MySQL password for user 'opensips@localhost': mysql: [Warning] Using a password on the command line interface can be insecure.

MySQL password for user 'opensips@localhost': opensipsrw

mysql: [Warning] Using a password on the command line interface can be insecure.

new user '1000' added(弹出该提示说明添加用户成功)

sudo ./opensipsctl rm username                 #删除用户

(多添加两个用户方便呼叫)

  • linphone拨号

a)选择USE SIP ACCOUNT


b)输入创建的用户名密码和domain


c)注册成功后进行拨号

总结

开始抓包旅程


  • 1
    点赞
  • 12
    收藏
    觉得还不错? 一键收藏
  • 0
    评论

“相关推荐”对你有帮助么?

  • 非常没帮助
  • 没帮助
  • 一般
  • 有帮助
  • 非常有帮助
提交
评论
添加红包

请填写红包祝福语或标题

红包个数最小为10个

红包金额最低5元

当前余额3.43前往充值 >
需支付:10.00
成就一亿技术人!
领取后你会自动成为博主和红包主的粉丝 规则
hope_wisdom
发出的红包
实付
使用余额支付
点击重新获取
扫码支付
钱包余额 0

抵扣说明:

1.余额是钱包充值的虚拟货币,按照1:1的比例进行支付金额的抵扣。
2.余额无法直接购买下载,可以购买VIP、付费专栏及课程。

余额充值