


目录
- 1. Docsify 介绍
- 2. 创建 Docsify 项目
- 3. 配置 Docsify 项目
- 4. 添加 Docsify 插件
- 4.1 设置侧边栏顶部的搜索框
- 4.2 添加 emoji 表情插件
- 4.3 添加外链脚本执行 src 引用的 js
- 4.4 添加图片缩放插件
- 4.5 复制到剪切板
- 4.6 字数统计
- 4.7 Tabs 选项卡
- 4.8 代码高亮
- 4.9 强调内容
- 4.10 取消编译超链接
- 4.11 设置超链接打开方式
- 4.12 禁用超链接
- 4.13 跨域链接
- 4.14 Github 任务列表
- 4.15 图片处理
- 4.16 设置标题的 ID 属性
- 4.17 在 html 标签中写 Markdown
- 4.18 Pagination 底部分页导航
- 4.19 支持使用 Vue 语法
- 4.20 离线模式(PWA)
- 4.21 文件嵌入
- 4.22 IIS 部署
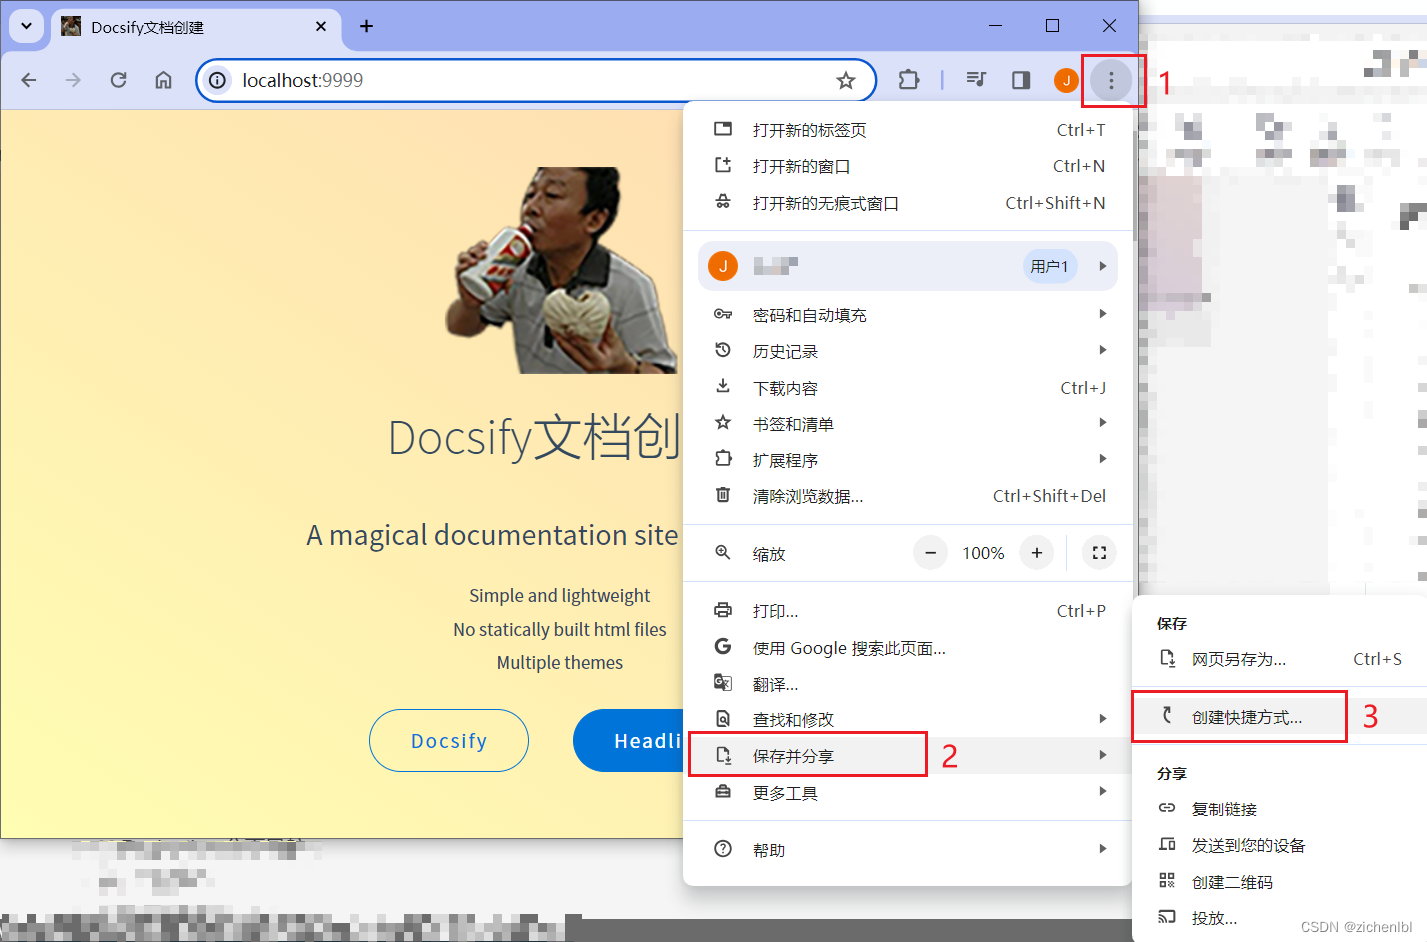
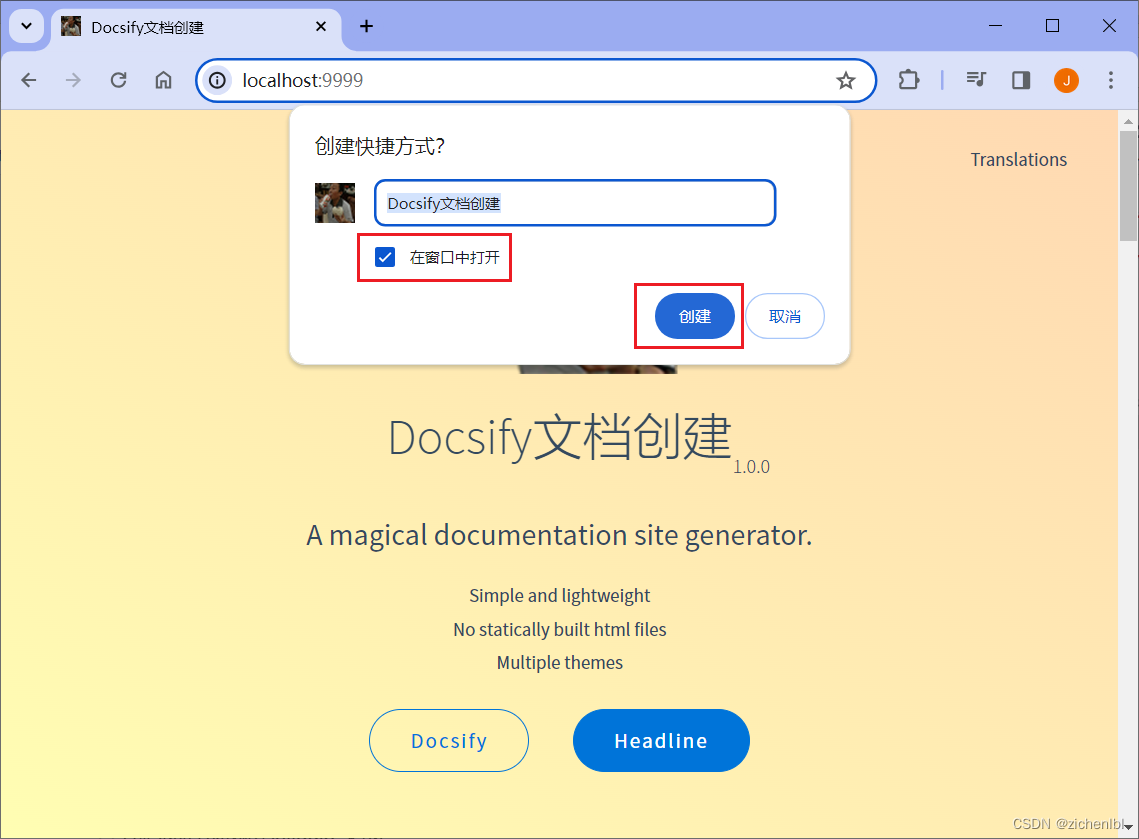
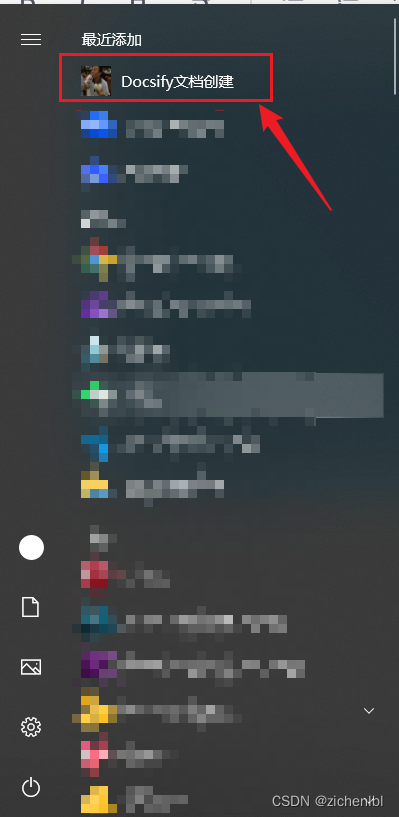
- 4.23 网页保存为应用
- 4.24 不联网使用本地 js 文件
- 4.25 不联网使用本地 css 文件
- 5. 交互
- 6.更多插件
- 7. Other
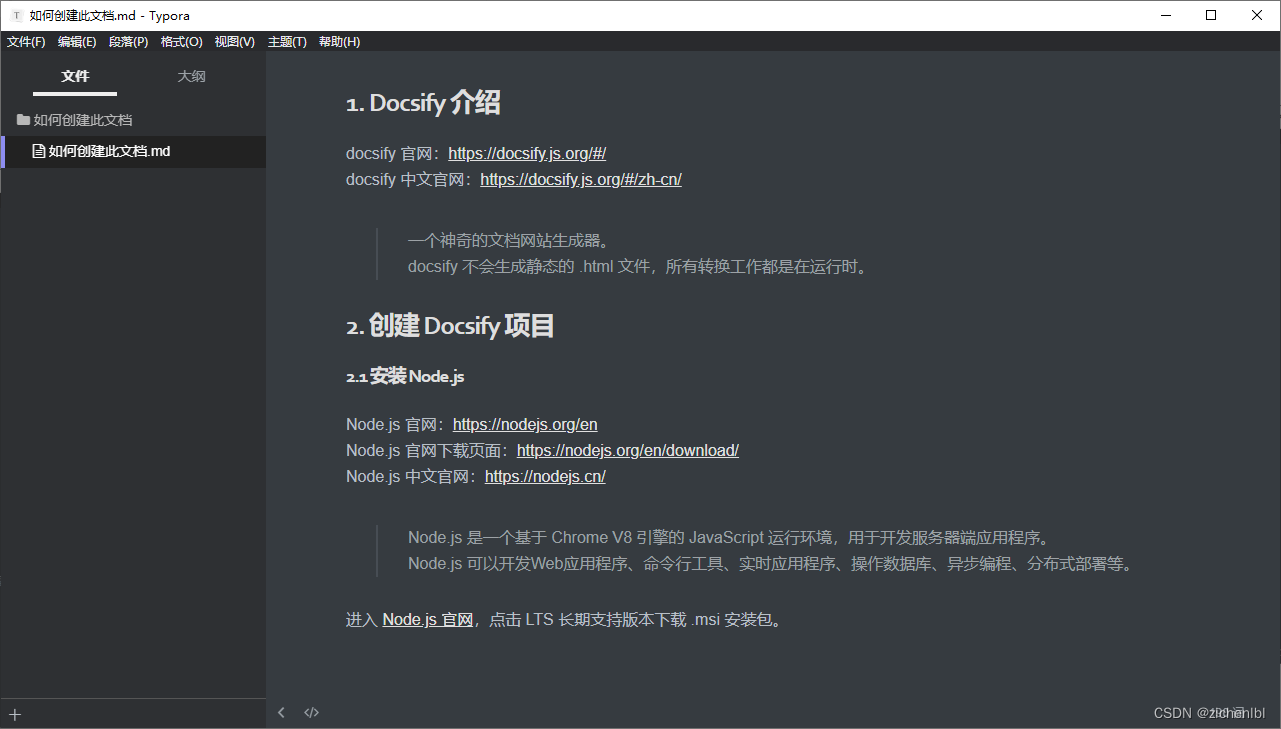
1. Docsify 介绍
docsify 官网:https://docsify.js.org/#/
docsify 中文官网:https://docsify.js.org/#/zh-cn/
一个神奇的文档网站生成器。
docsify 不会生成静态的 .html 文件,所有转换工作都是在运行时。
2. 创建 Docsify 项目
2.1 安装 Node.js
Node.js 官网:https://nodejs.org/en
Node.js 官网下载页面:https://nodejs.org/en/download/
Node.js 中文官网:https://nodejs.cn/
Node.js 是一个基于 Chrome V8 引擎的 JavaScript 运行环境,用于开发服务器端应用程序。
Node.js 可以开发 Web 应用程序、命令行工具、实时应用程序、操作数据库、异步编程、分布式部署等。
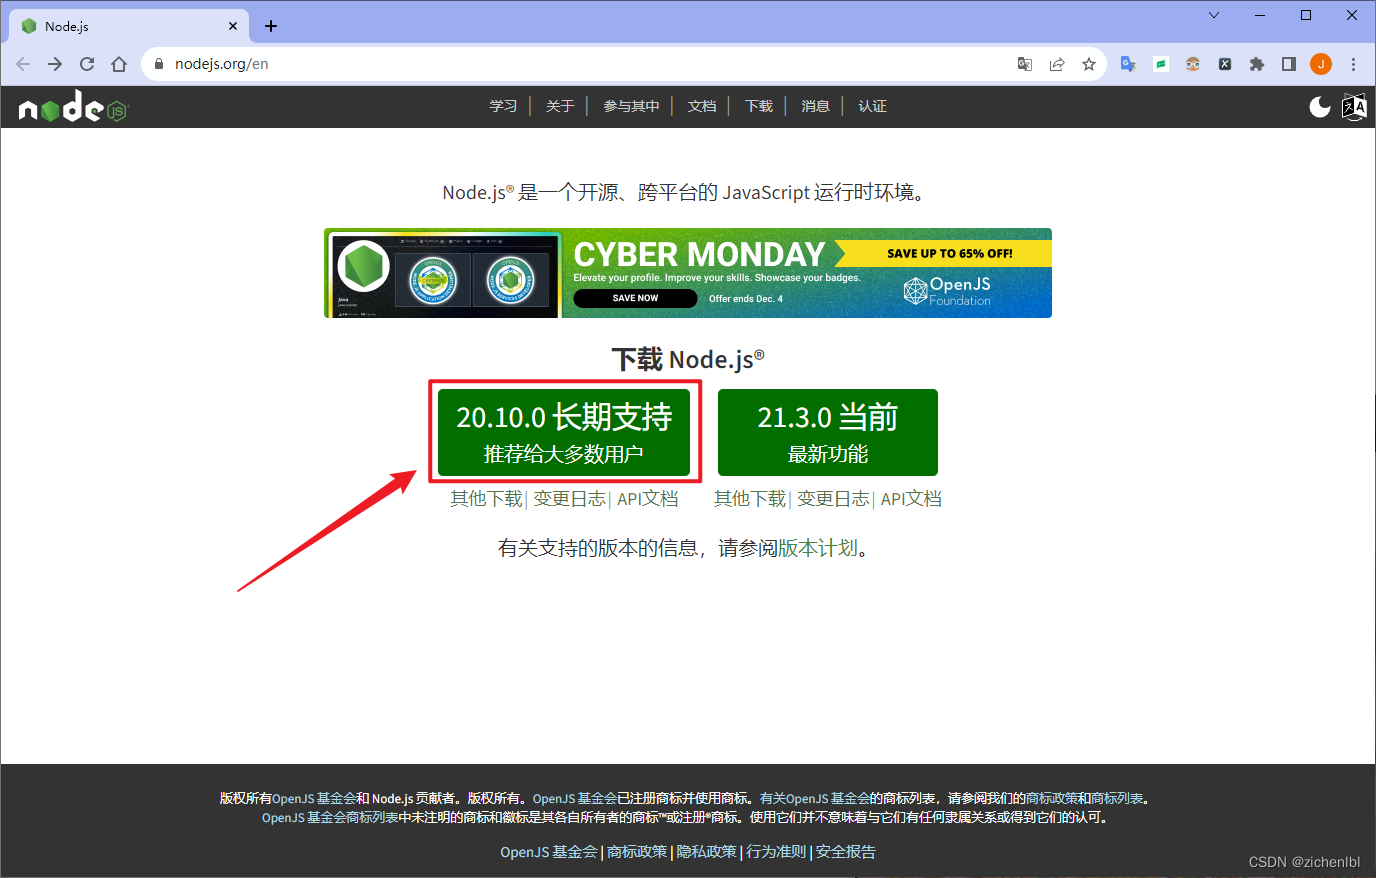
进入 Node.js 官网,点击 LTS 长期支持版本下载 .msi 安装包。
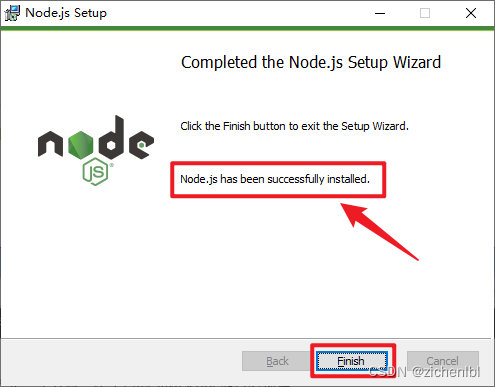
运行安装包,一直选 Next 下一步进行安装,安装成功。
CMD命令提示符中输入 node --version 查看 nodejs 版本,显示版本号正确,即可以正常使用。

2.1 安装 docsfiy-cli
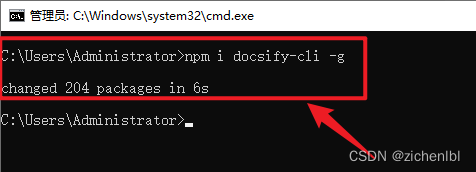
下载 Node.js 包 docsify-cli。-g 全局安装可以将模块安装到全局环境,使得无论在哪个目录下,都可以轻松调用这个模块。。
npm i docsify-cli -g
安装成功。
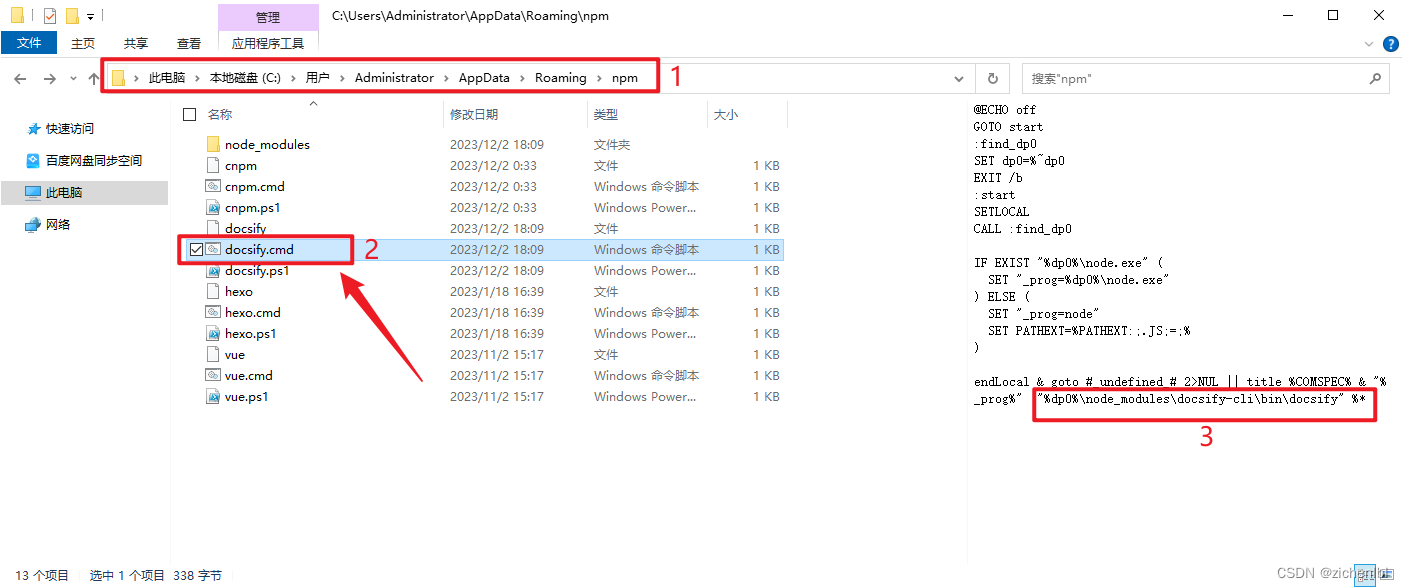
全局安装的位置。

安装 Node.js 后系统环境变量 Path 中会添加这个 npm 的路径。
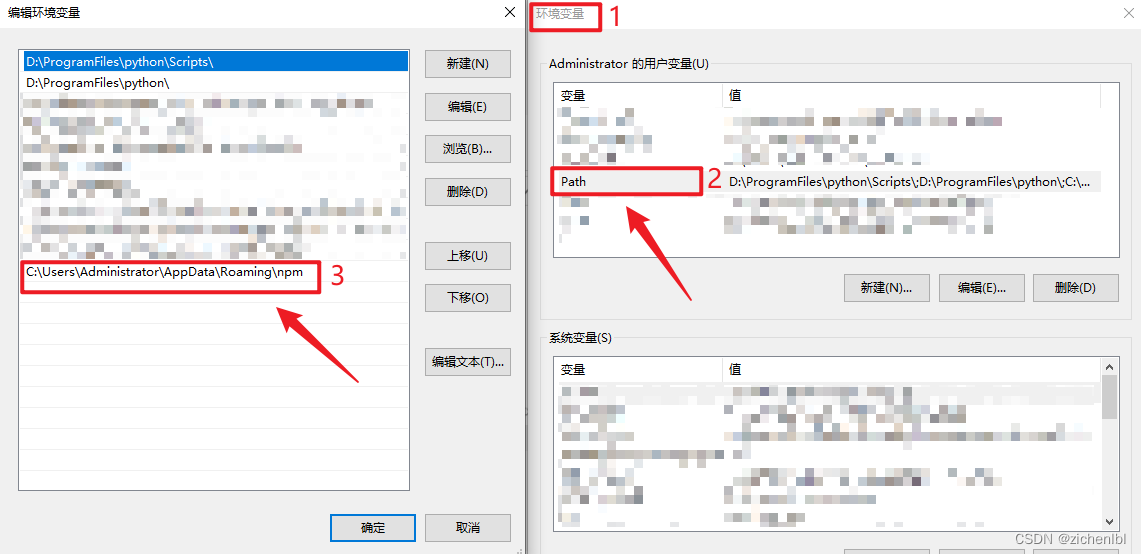
安装 docsify-cli 后就可以在任何位置使用 docsify 命令调用 docsify.cmd 程序,然后会执行这个路径的 docsify 文件。
2.3 初始化项目
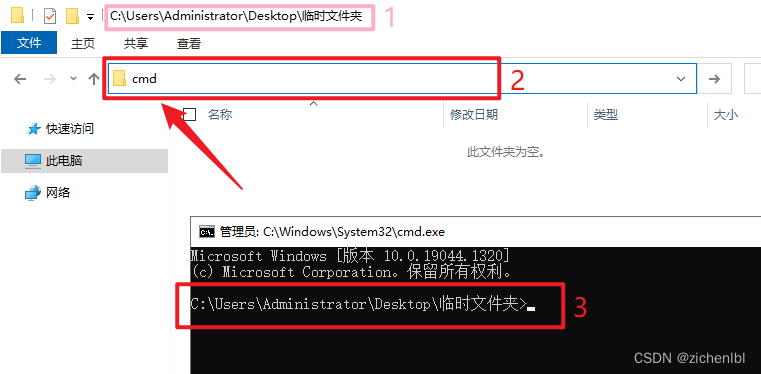
打开一个文件夹,在地址栏中输入 cmd 并按回车,就会打开 CMD 命令提示符并进入当前文件夹。
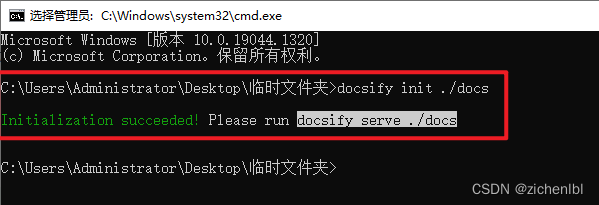
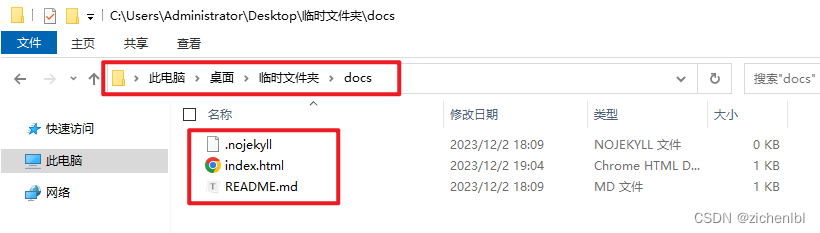
初始化一个项目,项目文件夹名称叫 docs。
docsify init ./docs
项目文件夹名称 docs。
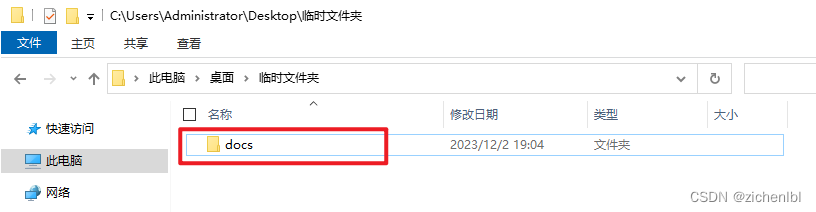
项目文件。
.nojekyll 用于阻止 GitHub Pages 忽略掉下划线开头的文件
index.html 入口文件
README.md 会作为主页内容渲染
2.4 运行项目
本地预览项目运行的效果。
docsify serve ./docs
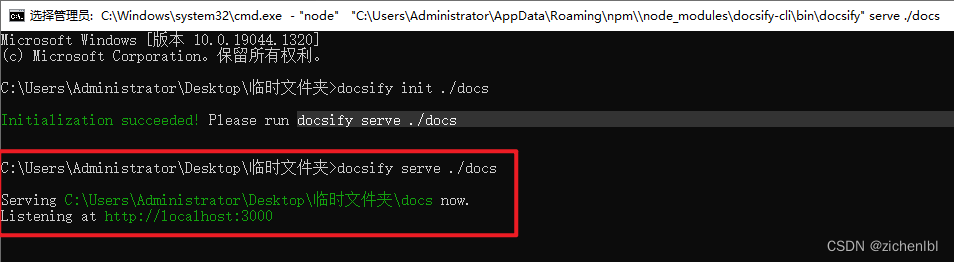
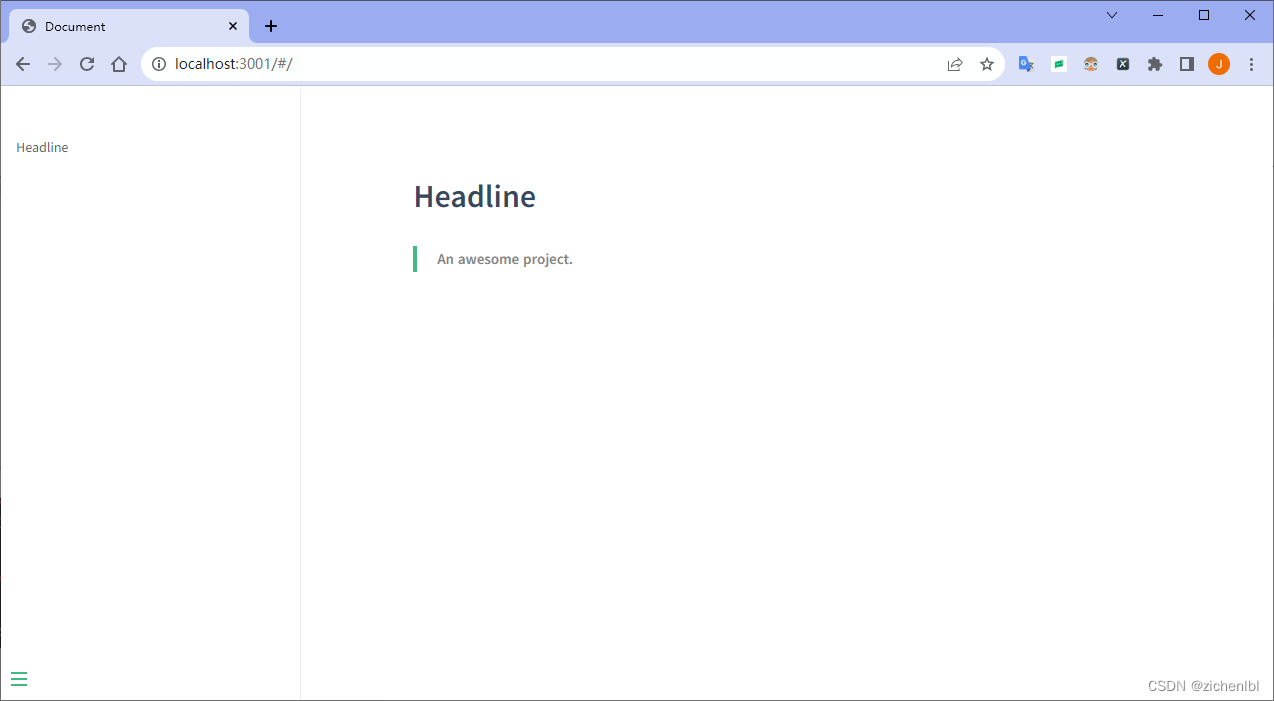
浏览器访问 http://localhost:3000 预览效果。

2.5 使用 Python 运行项目(扩展,不推荐有bug)
如果你安装了 Python,也可以使用 python 启动一个静态服务器去预览项目运行的效果。
cd 进入项目文件夹 docs ,并且用 python 启动 HTTP 服务器。
cd ./docs && python -m http.server 3001
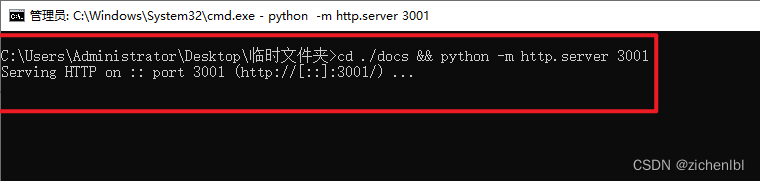
浏览器访问 http://localhost:3001 预览效果。
3. 配置 Docsify 项目
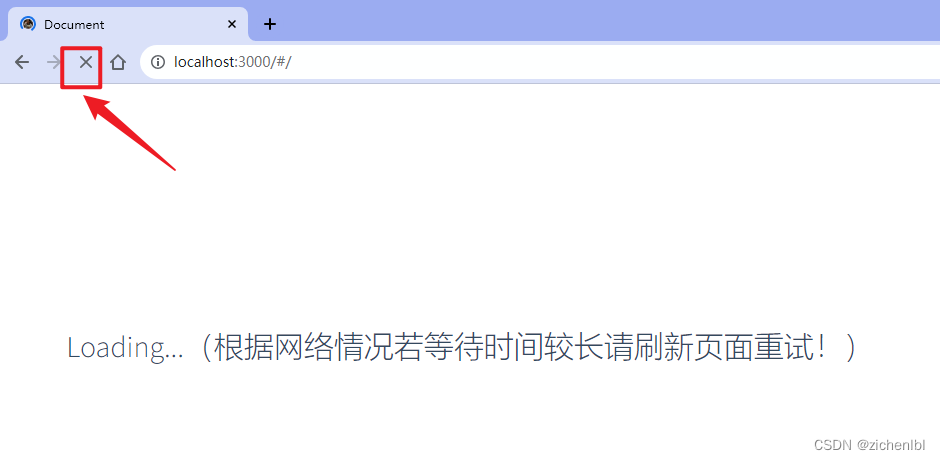
3.1 修改等待加载文字
修改为如下内容。
Loading...(根据网络情况若等待时间较长请刷新页面重试!)
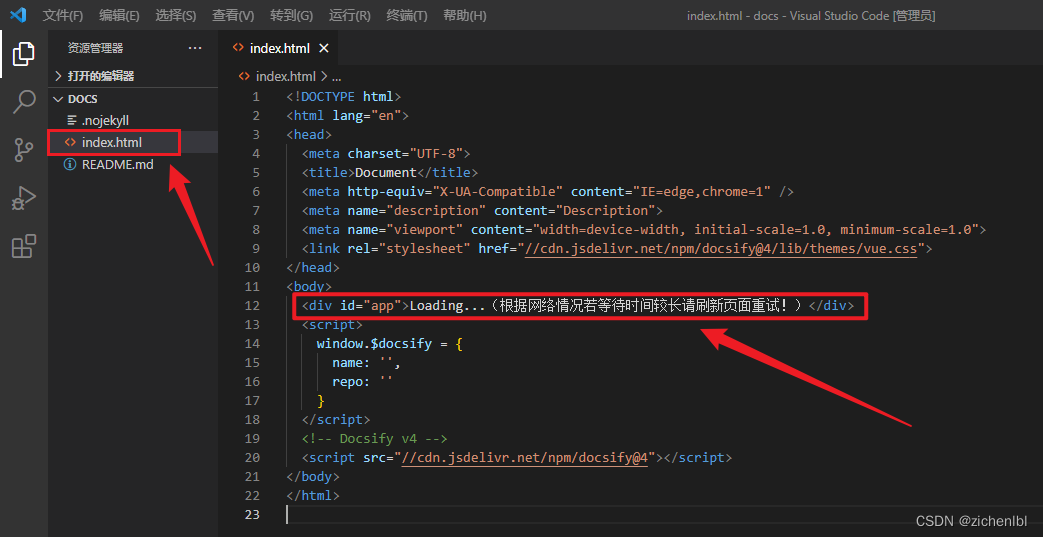
文档内容过多或网络缓慢则加载提示文字。
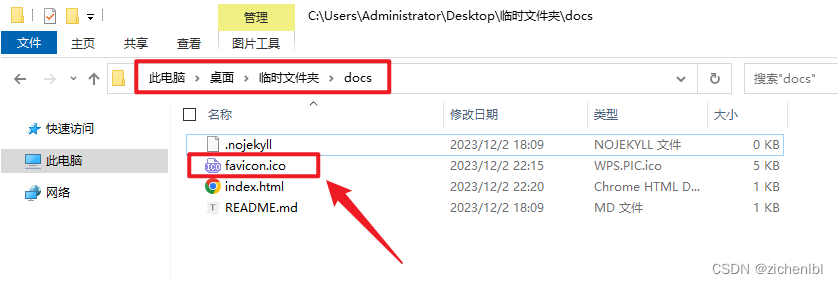
3.2 添加网站 ico 图标
制作 ico 图标网站1:https://www.bitbug.net/
制作 ico 图标网站2:http://www.ico8.net/
制作 ico 图标网站3:https://www.butterpig.top/icopro
制作好的图标,保存到 docs 目录中,重命名为 favicon.ico。
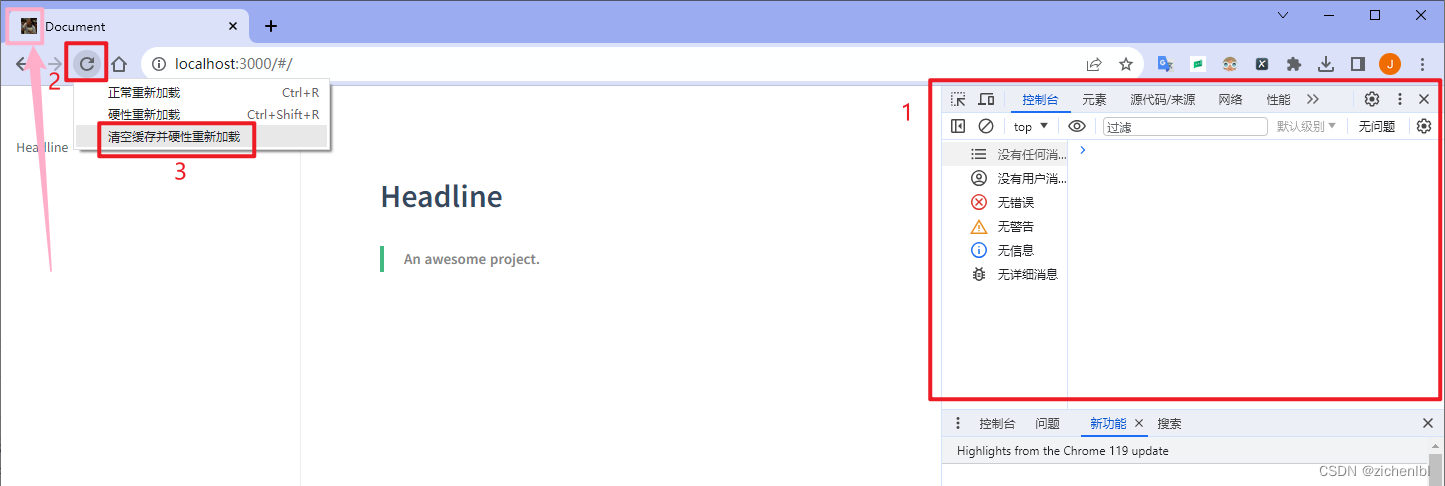
打开浏览器,按 F12 打开控制台,在刷新按钮上右键,选择清空缓存并硬性重新加载。重新加载后网页标签页左上角显示 ico 图标。
3.3 创建新页面写文档
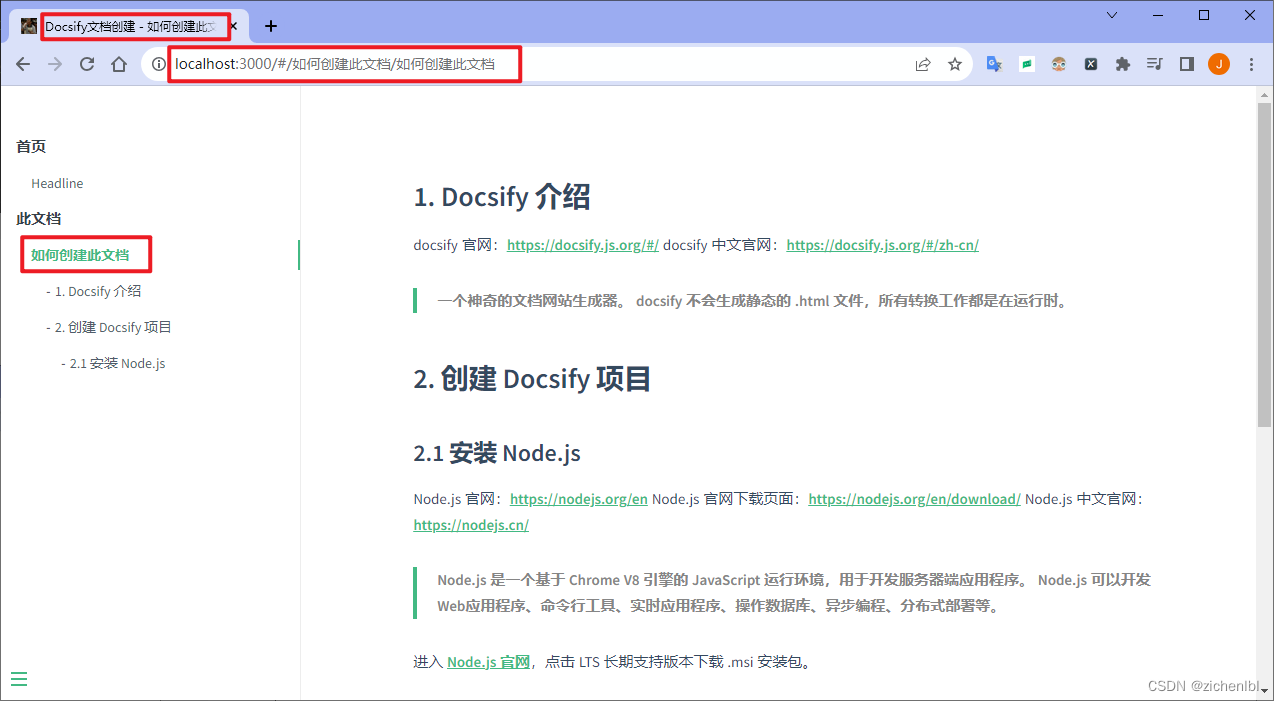
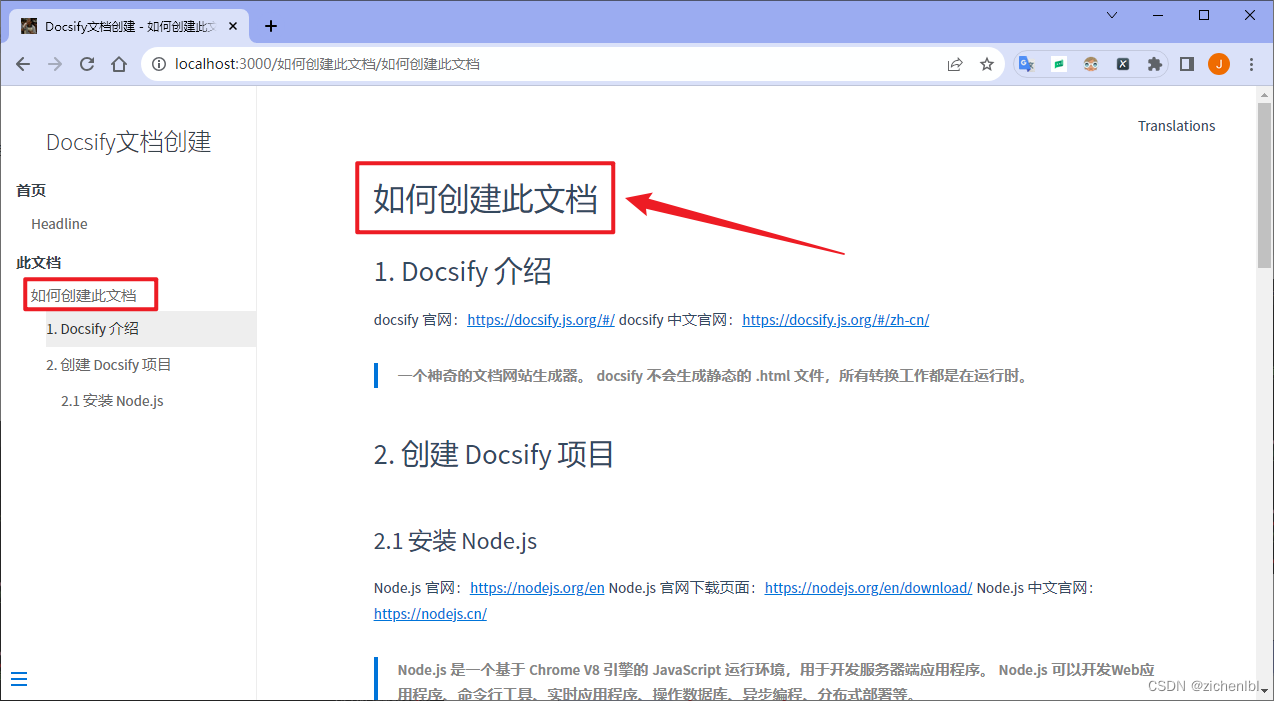
创建一个文件夹:如何创建此文档 ,在文件夹中创建 md 文件:如何创建此文档.md。
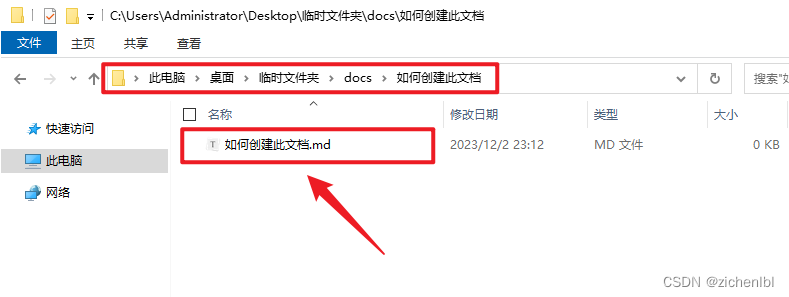
打开 如何创建此文档.md 文件,写入内容。
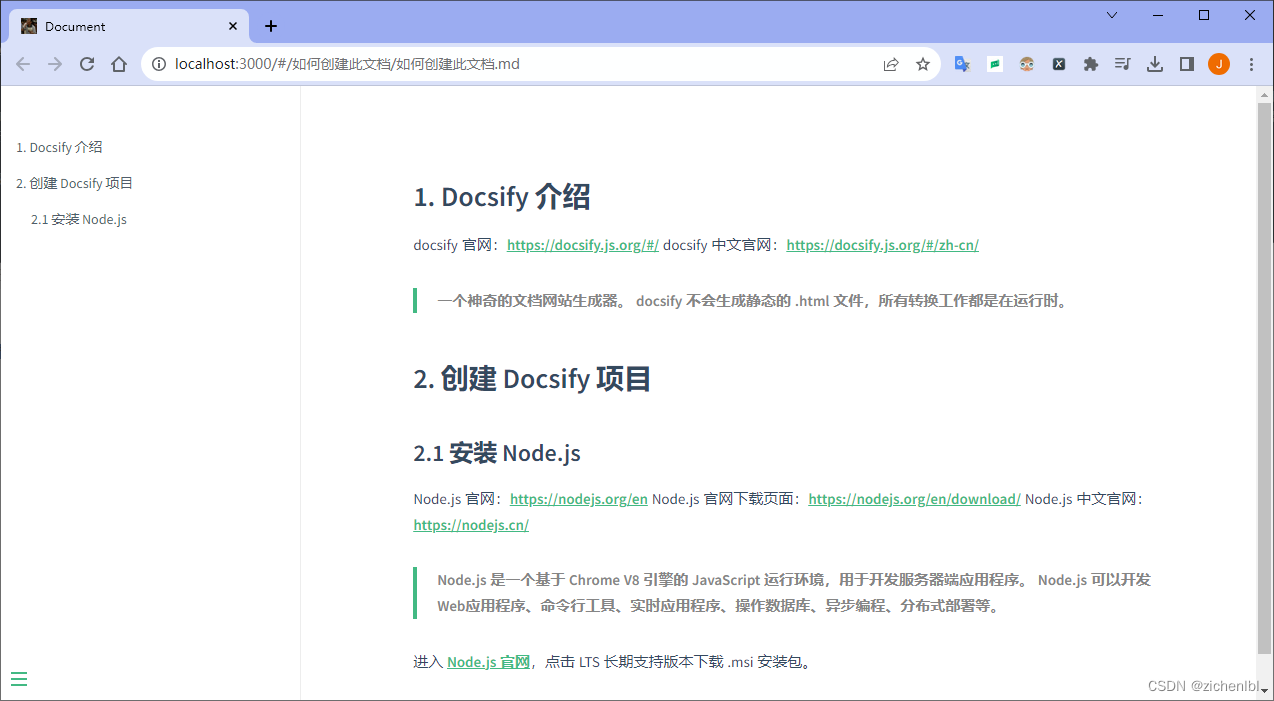
浏览器访问 http://localhost:3000/#/如何创建此文档/如何创建此文档.md 预览效果。
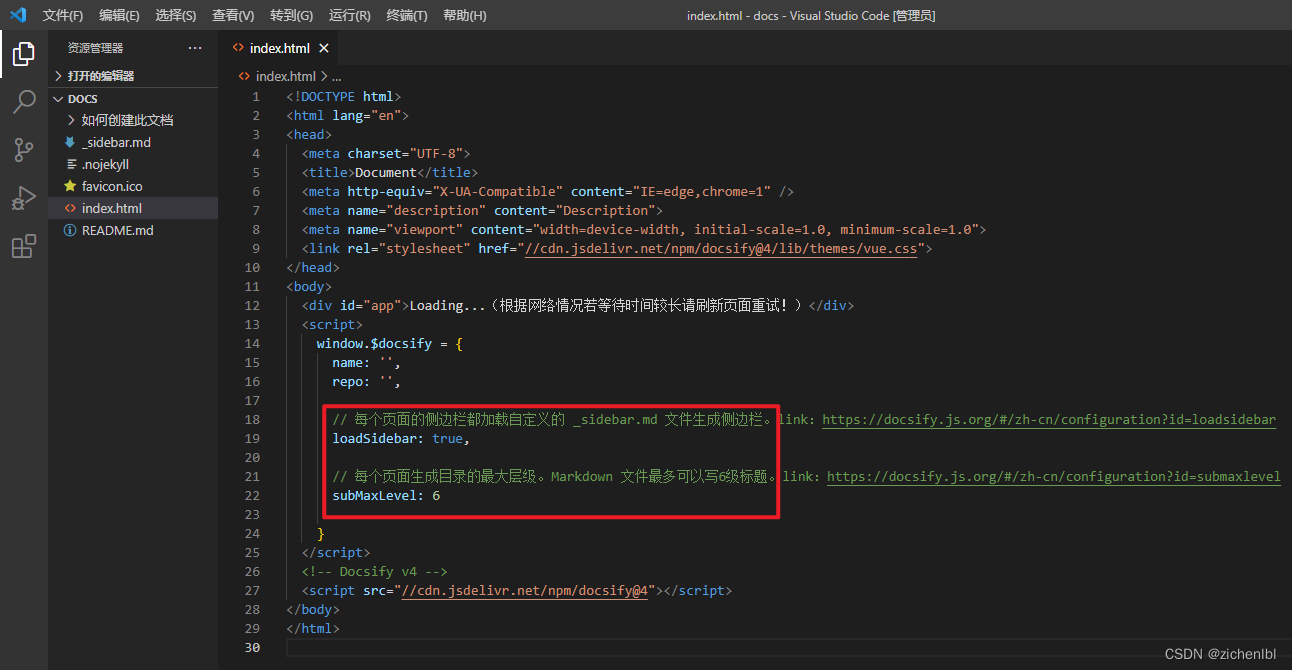
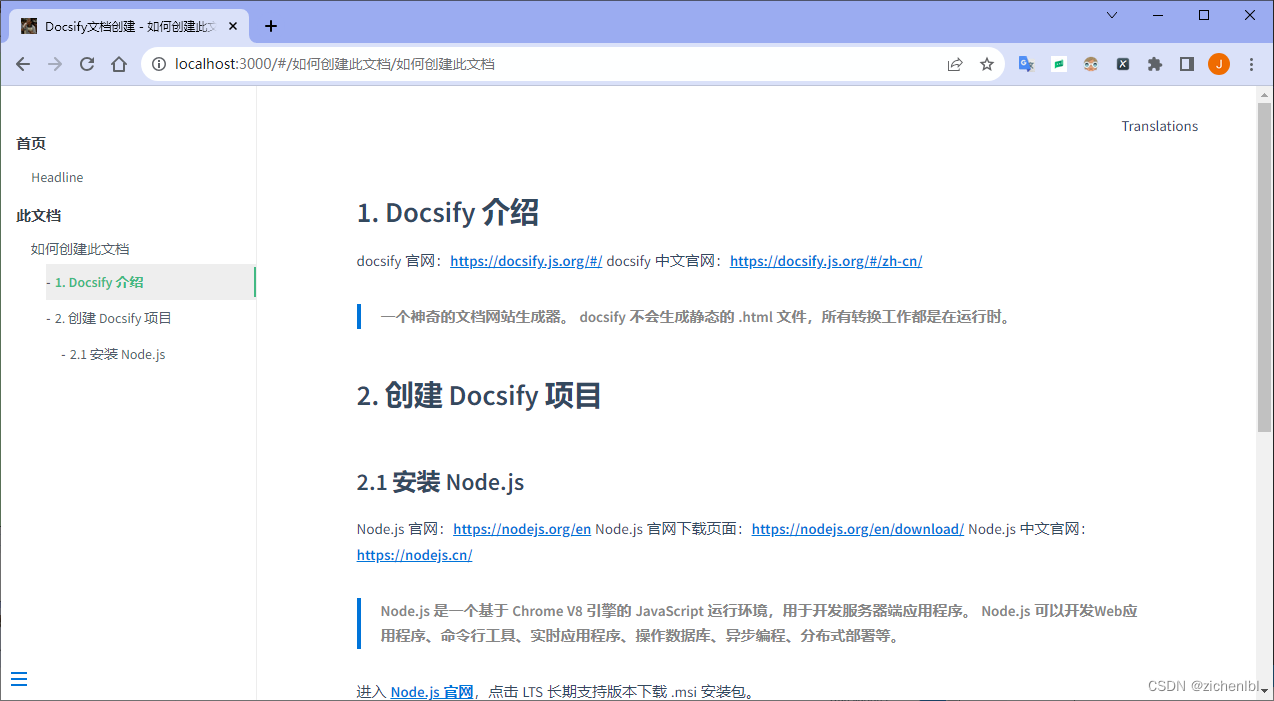
3.4 添加新页面到首页侧边栏
上面添加的新页面,左侧侧边栏只显示了当前页面的导航标题,缺少了首页导航标题。
这时我们可以自定义一个侧边栏,在侧边栏中添加首页导航标题和新页面的导航标题。
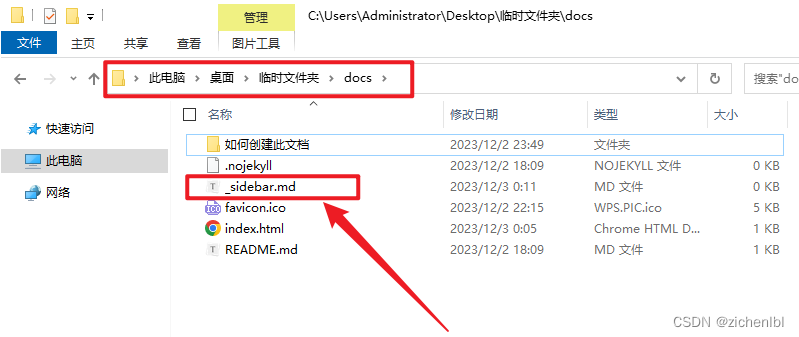
在 docs 目录中创建 _sidebar.md 文件。
文件内容如下,/ 表示 docs 目录;“Docsify文档创建” 表示当前页面的标签页上的标题,可以更好的 SEO。
* 首页

  * [Headline](/ "Docsify文档创建")

* 此文档

  * [如何创建此文档](/如何创建此文档/如何创建此文档.md "Docsify文档创建 - 如何创建此文档")
添加配置项如下。
loadSidebar: true,
subMaxLevel: 6,
浏览器访问 http://localhost:3000/#/ 预览效果。

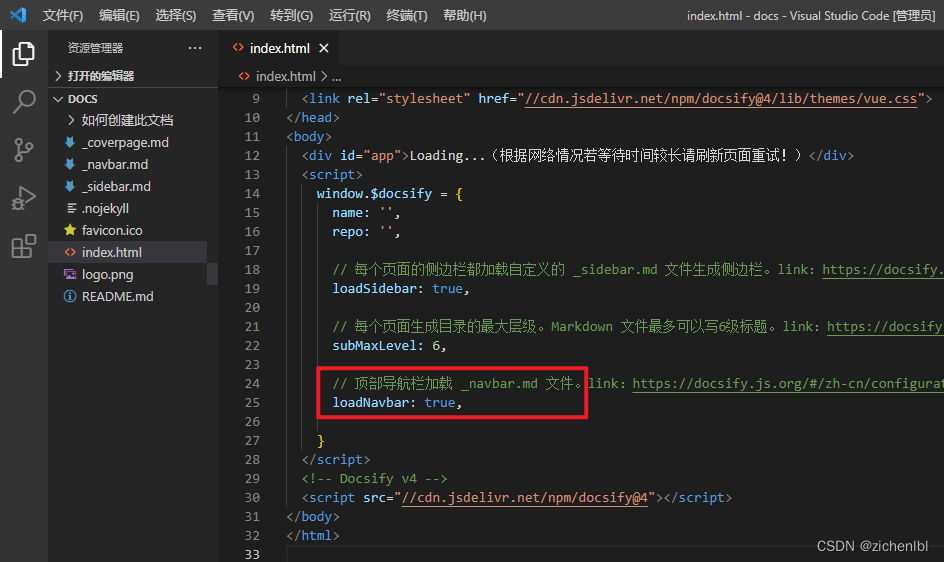
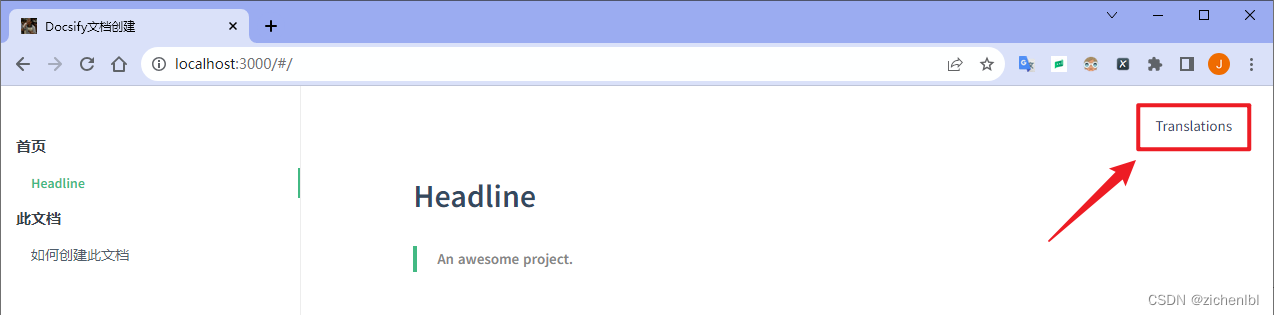
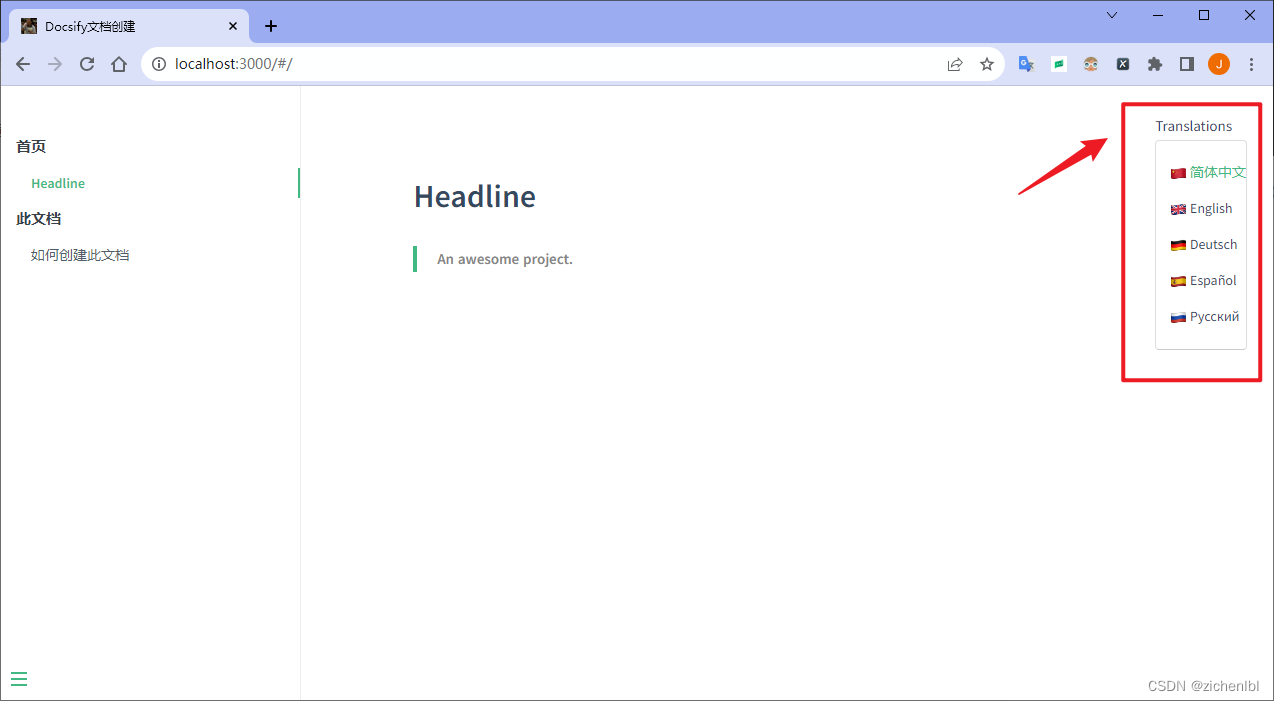
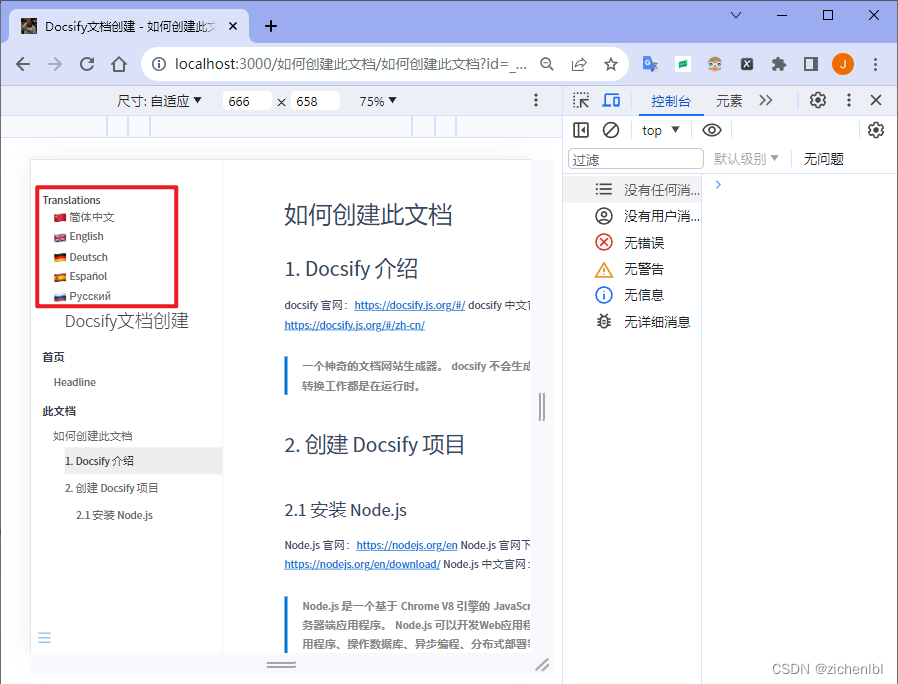
3.5 添加顶部导航
在 docs 目录中创建 _navbar.md 文件。
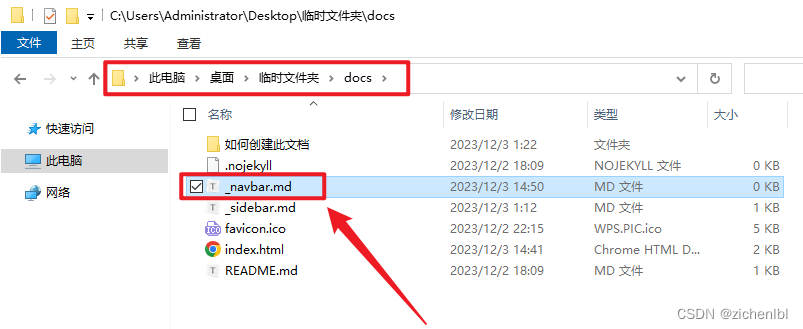
文件内容如下,:cn: 会解析成 emoji 图标;/ 表示 docs 目录;/en/ 表示 docs/en/ 目录,如有需要可以创建 en 文件夹。
- Translations
  - [:cn: 简体中文](/)
  - [:uk: English](/en)
  - [:de: Deutsch](/de-de/)
  - [:es: Español](/es/)
  - [:ru: Русский](/ru-ru/)
添加配置项如下。
loadNavbar: true,
浏览器访问 http://localhost:3000/#/ 预览效果。
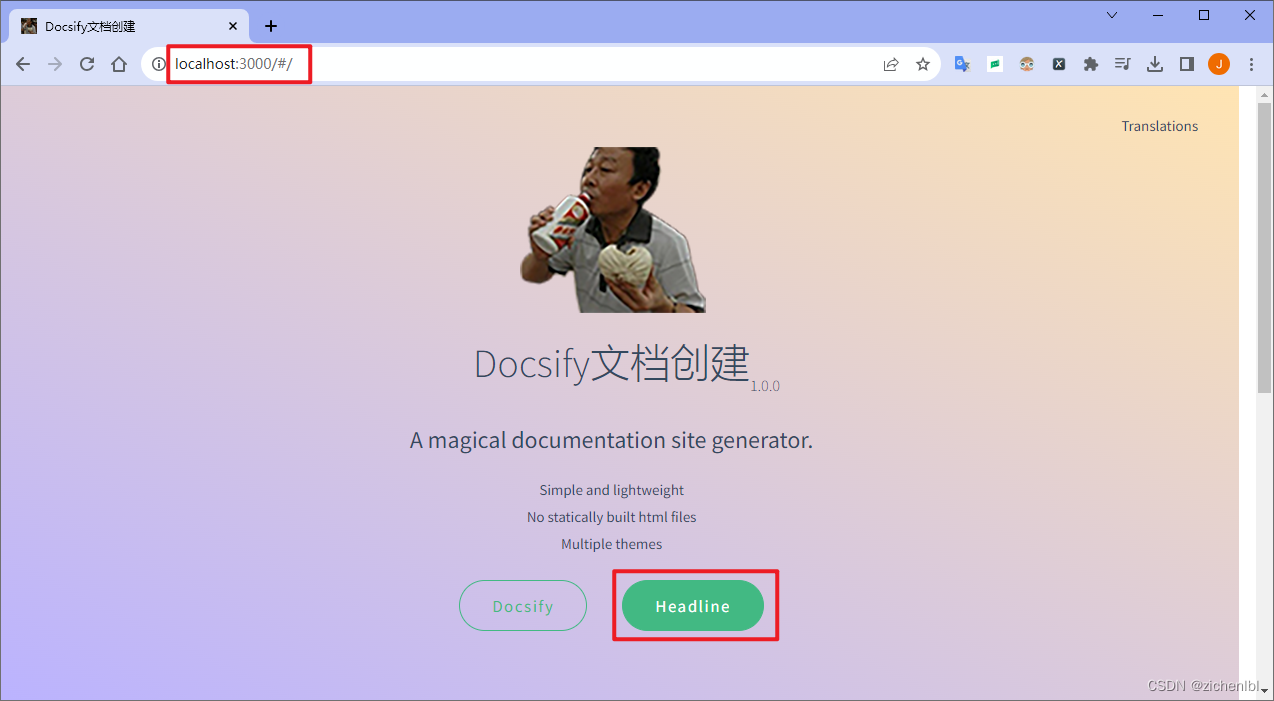
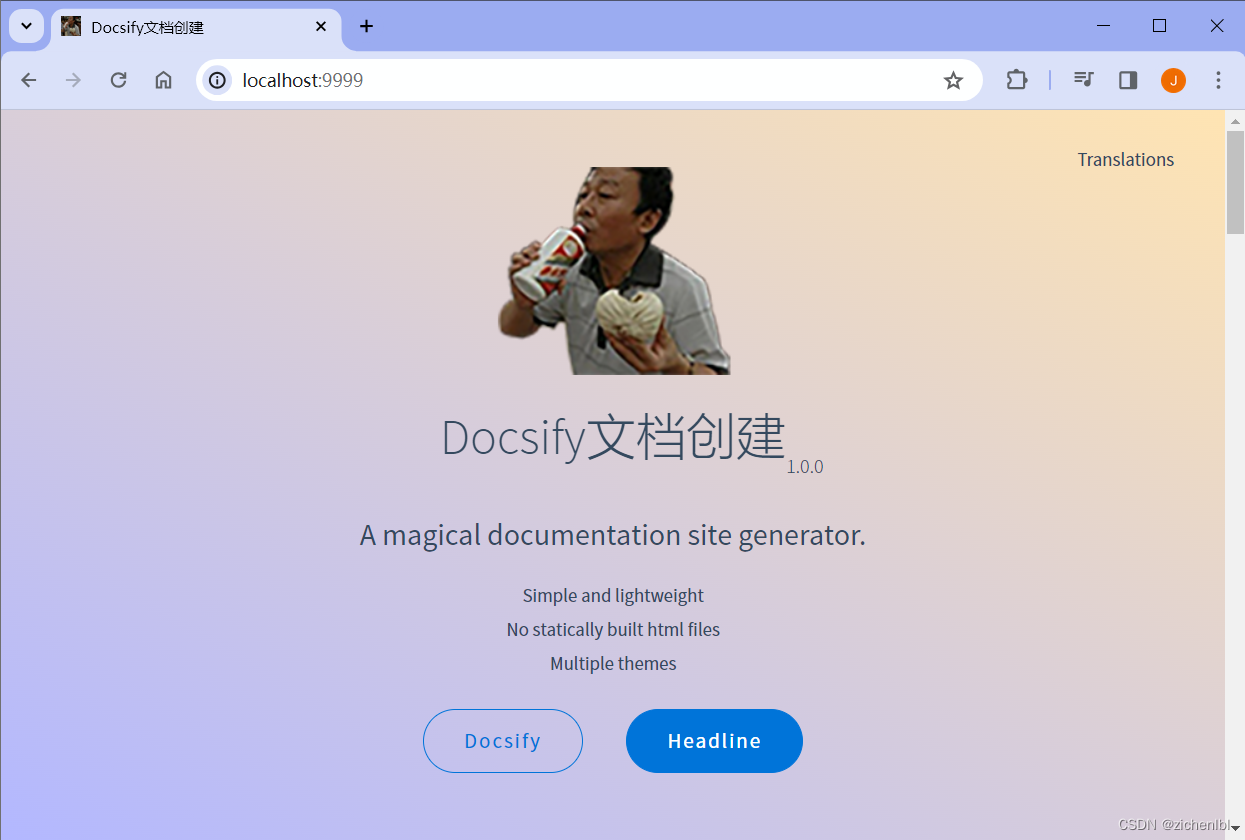
3.6 添加首页封面
在 docs 目录中添加 logo.png 图片。
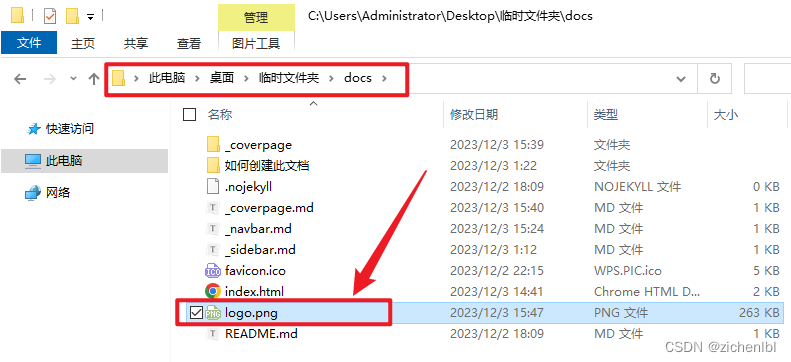
在 docs 目录中创建 _coverpage.md 文件。
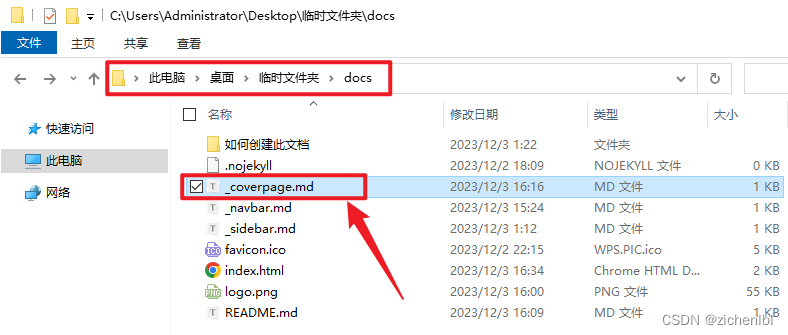
文件内容如下,/logo.png 表示 docs 目录下的 logo.png 图片;/#Headline 表示跳转到首页 Headline 标题。

# Docsify文档创建 <small>1.0.0</small>
> A magical documentation site generator.
- Simple and lightweight
- No statically built html files
- Multiple themes
[Docsify](https://github.com/docsifyjs/docsify/)
[Headline](/#Headline)
添加配置项如下。
coverpage: {
  '/': '_coverpage.md',
}

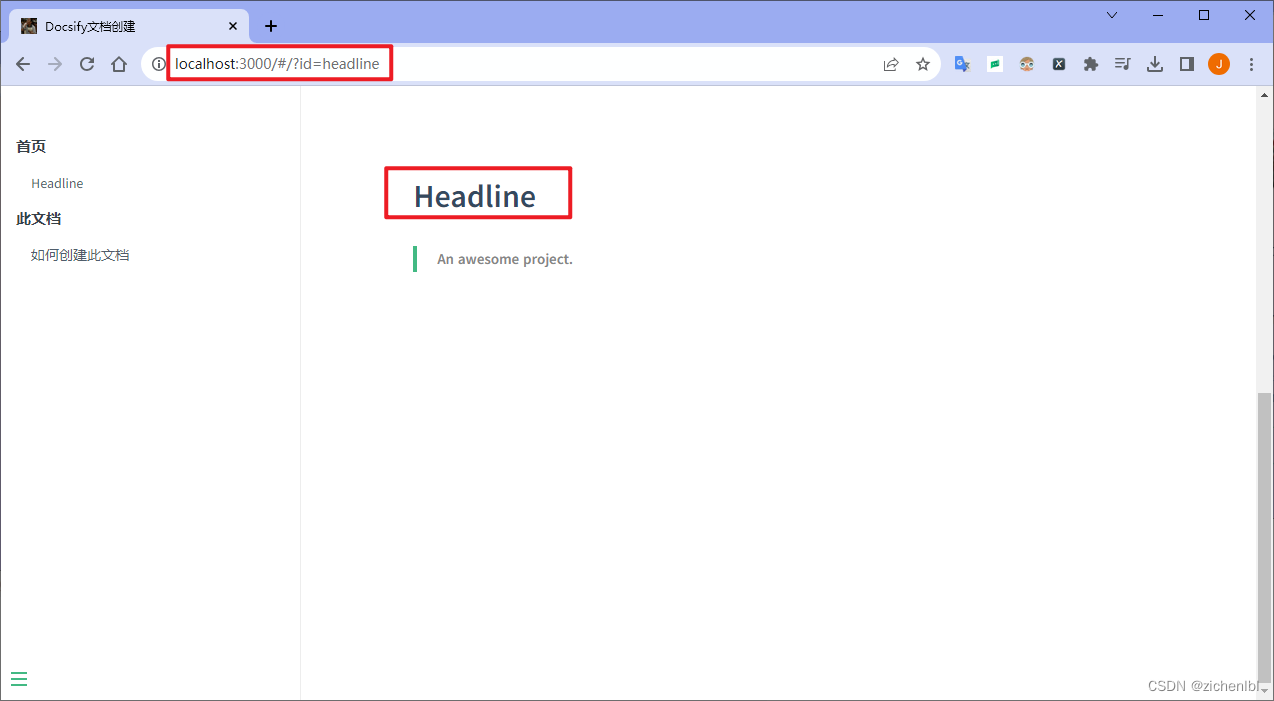
浏览器访问 http://localhost:3000/#/ 预览效果。点击 Headline 按钮会跳转到 Headline 标题。
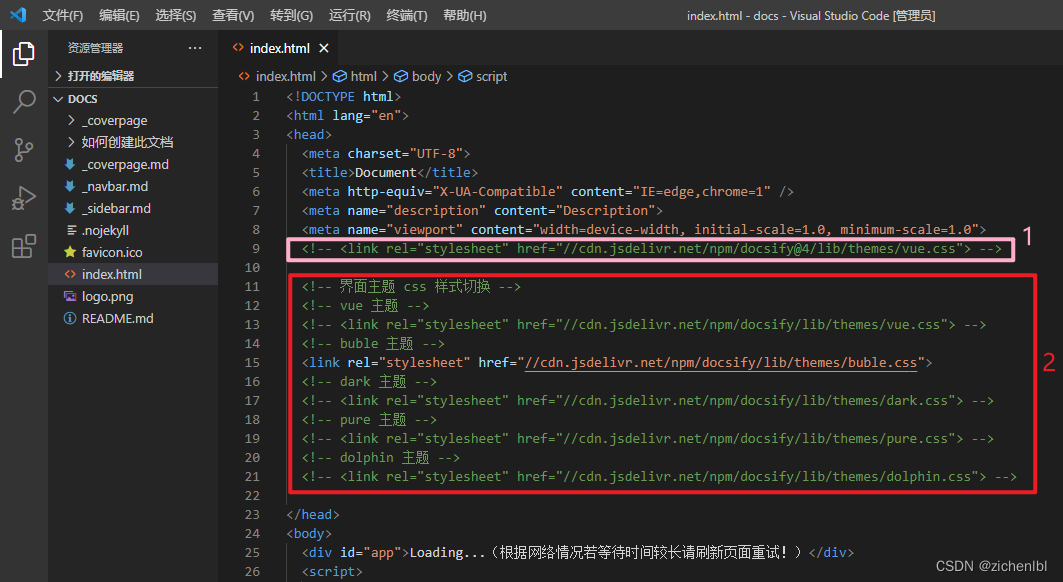
3.7 使用主题
注释删除默认的 vue 主题,然后添加配置项如下,使用 buble 主题。
<link rel="stylesheet" href="//cdn.jsdelivr.net/npm/docsify/lib/themes/buble.css">
或者使用其他主题。
<!-- <link rel="stylesheet" href="//cdn.jsdelivr.net/npm/docsify/lib/themes/vue.css"> -->
<!-- <link rel="stylesheet" href="//cdn.jsdelivr.net/npm/docsify/lib/themes/dark.css"> -->
<!-- <link rel="stylesheet" href="//cdn.jsdelivr.net/npm/docsify/lib/themes/pure.css"> -->
<!-- <link rel="stylesheet" href="//cdn.jsdelivr.net/npm/docsify/lib/themes/dolphin.css"> -->
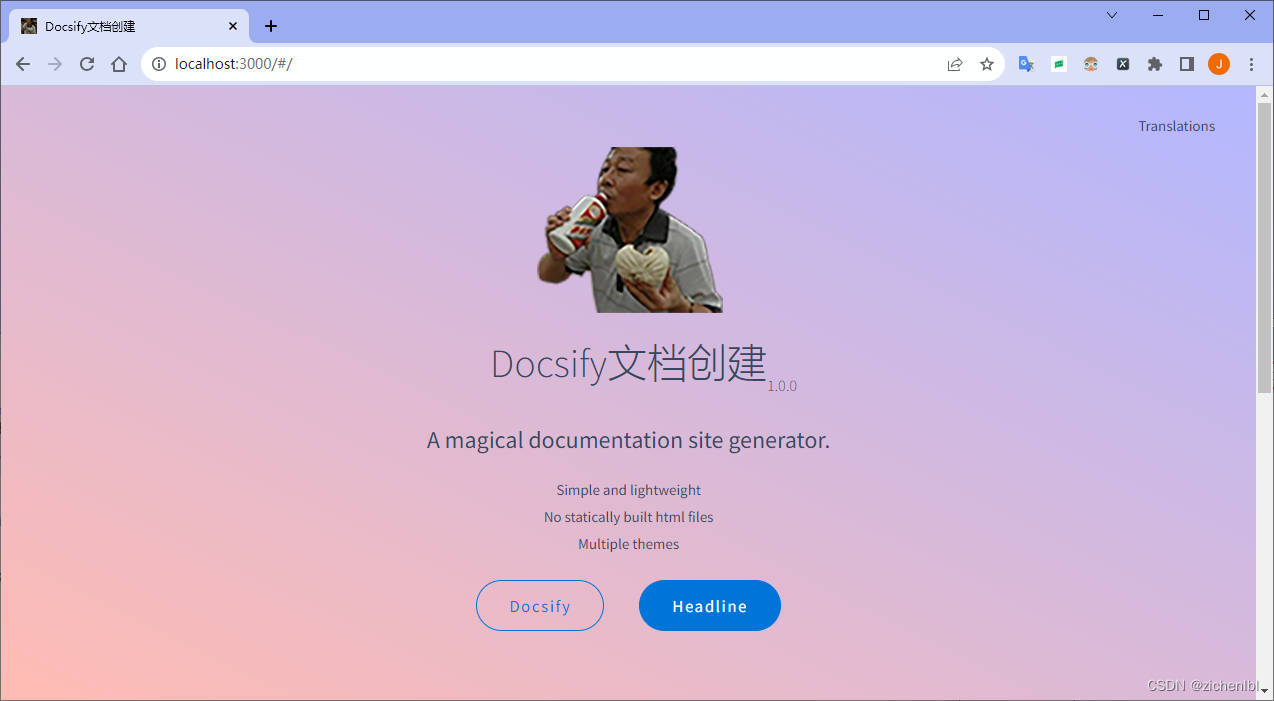
浏览器访问 http://localhost:3000/#/ 预览效果。
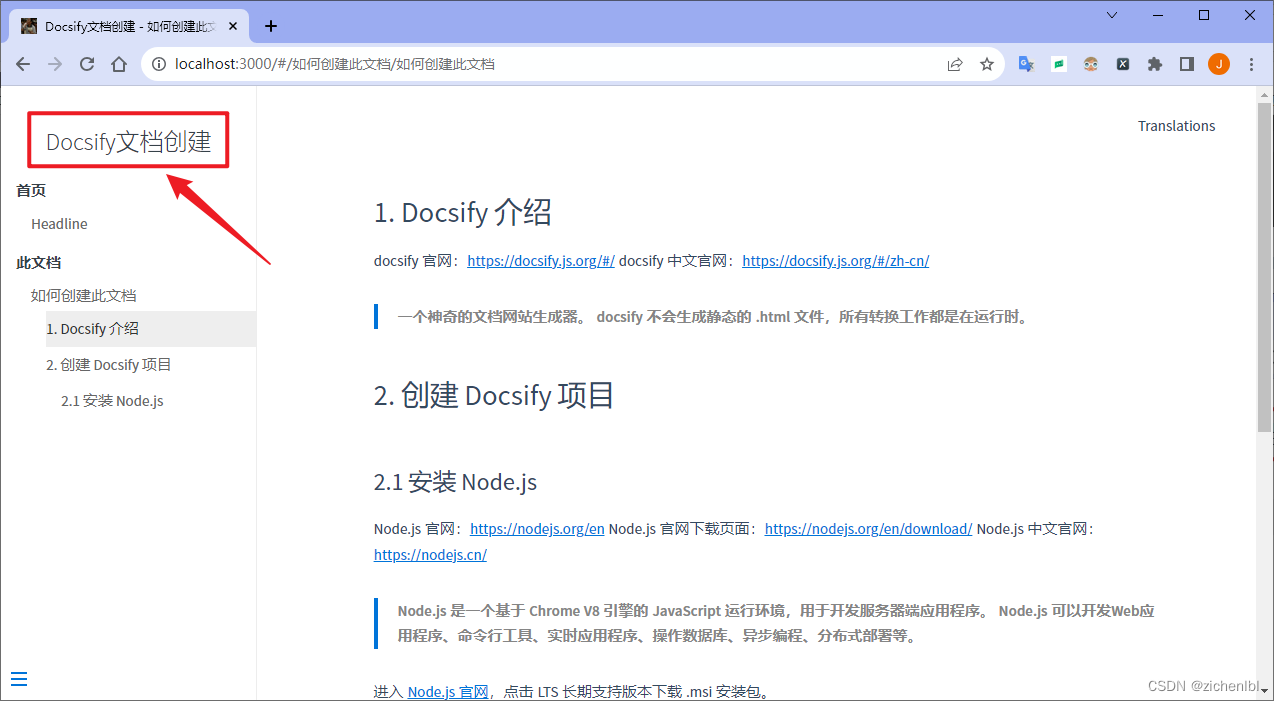
3.8 设置侧边栏上方的文档标题
添加配置项如下。
name: 'Docsify文档创建',
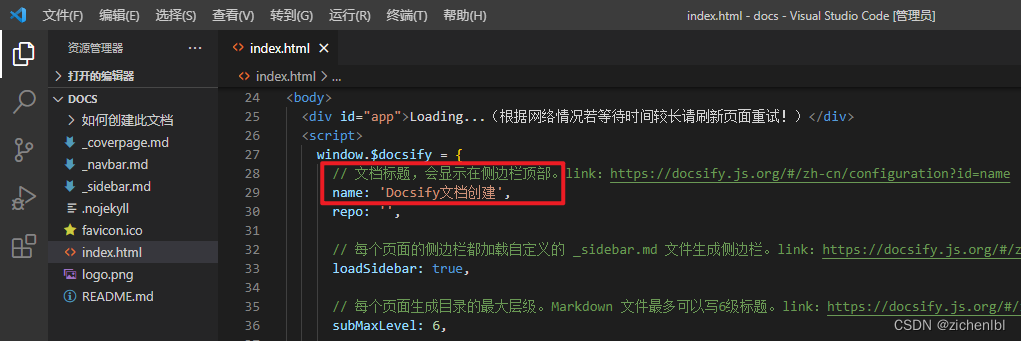
浏览器访问 http://localhost:3000/#/ 预览效果。

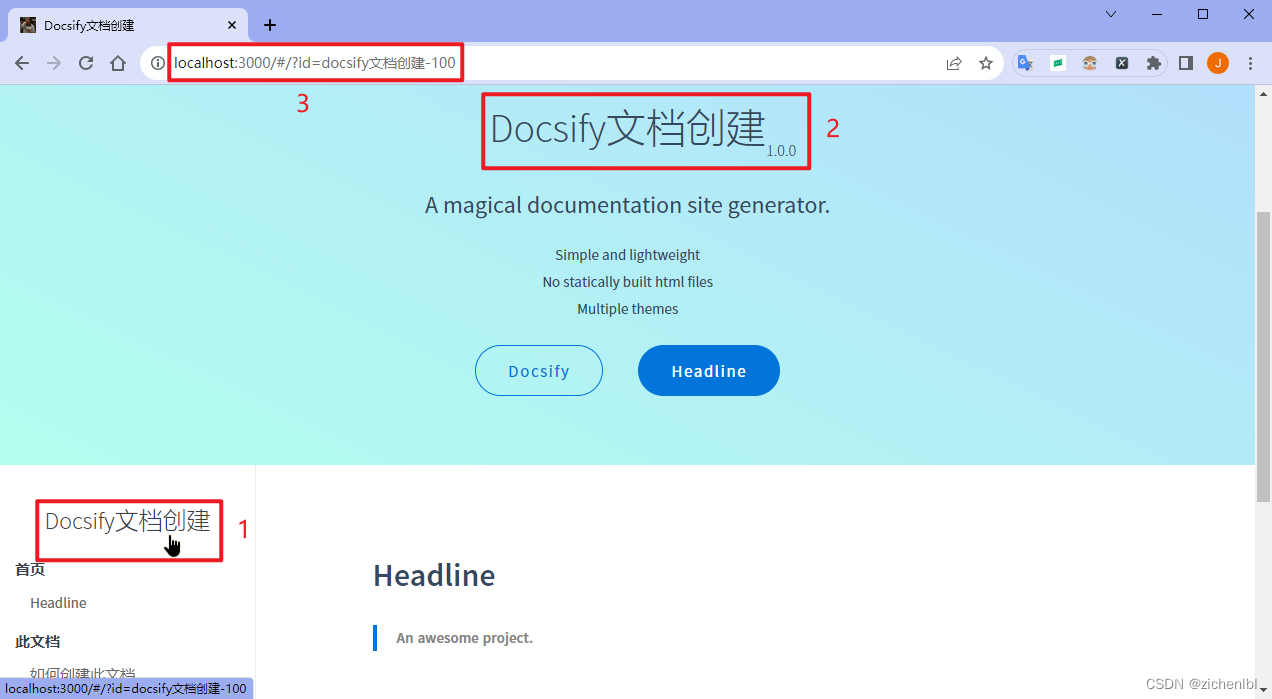
3.9 设置文档标题的跳转链接
添加配置项如下。
nameLink: {
  '/': '/#/?id=docsify文档创建-100',
},
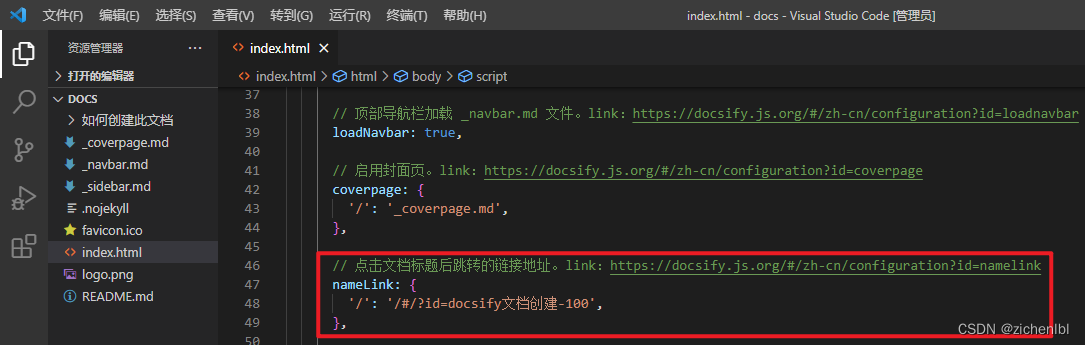
浏览器访问 http://localhost:3000/#/ 预览效果。点击 Docsify文档创建,跳转到对应的标题 docsify文档创建-100。
3.10 去掉地址栏中的/#
添加配置项如下。修改路由模式为 history,就不会出现 /#;修改之前的链接地址不用 /# 开头。
nameLink: {
  '/': '/?id=docsify文档创建-100',
},

routerMode: 'history',
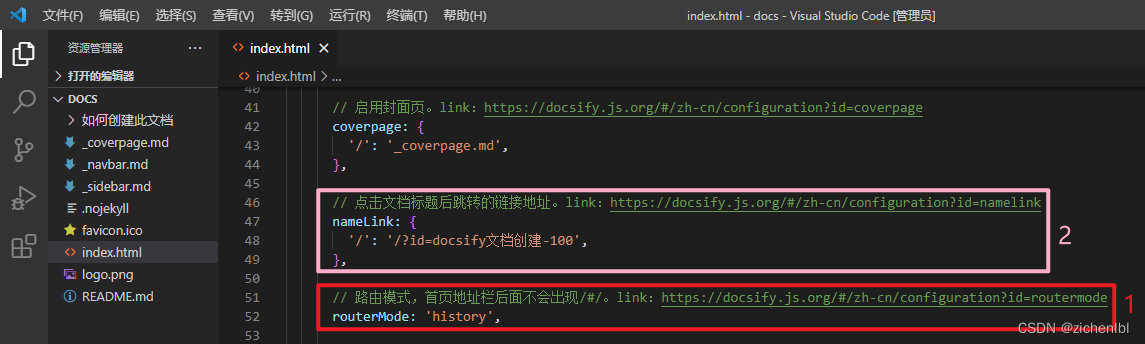
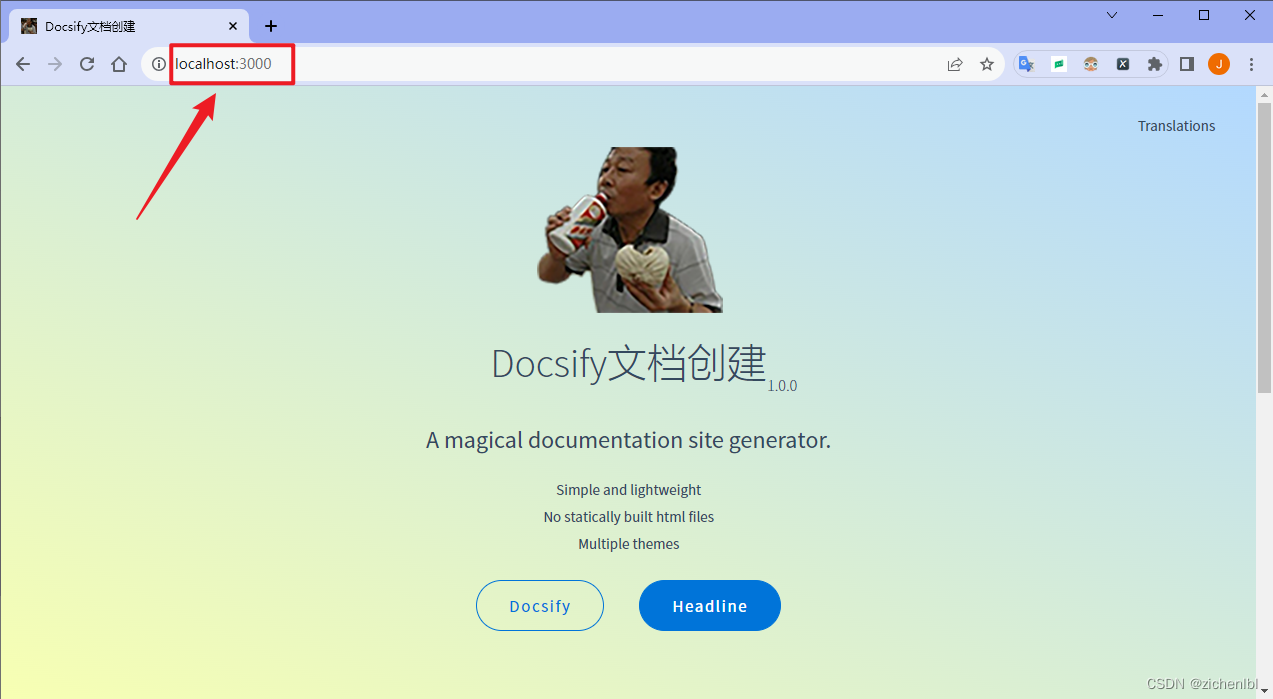
浏览器访问 http://localhost:3000 预览效果。
3.11 每个页面顶部自动添加侧边栏标题
添加配置项如下。
autoHeader: true,

mergeNavbar: true,

topMargin: 15,
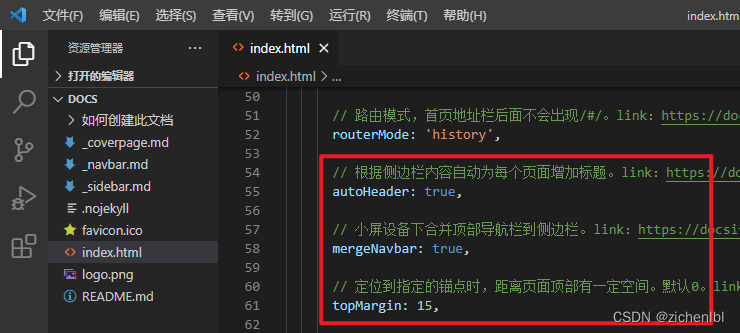
浏览器访问 http://localhost:3000 预览效果。
- 根据侧边栏内容自动为每个页面增加标题。
- 小屏设备下合并顶部导航栏到侧边栏。
- 定位到指定的锚点时,距离页面顶部有一定空间。
默认 0 ,未设置的效果,标题距离顶部很近。
设置为 15 后的效果,定位到标题时,标题距离页面顶部有一定空间。
4. 添加 Docsify 插件
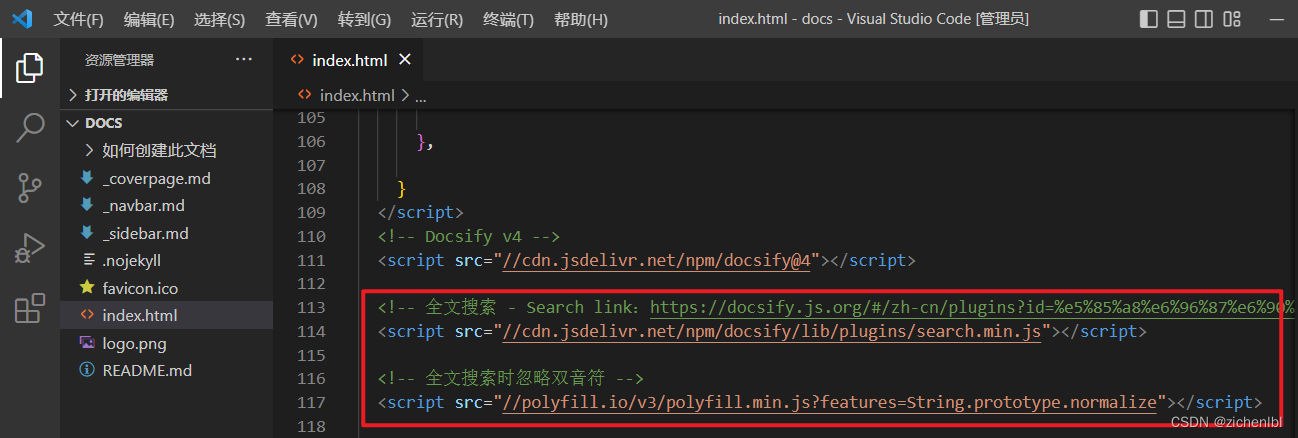
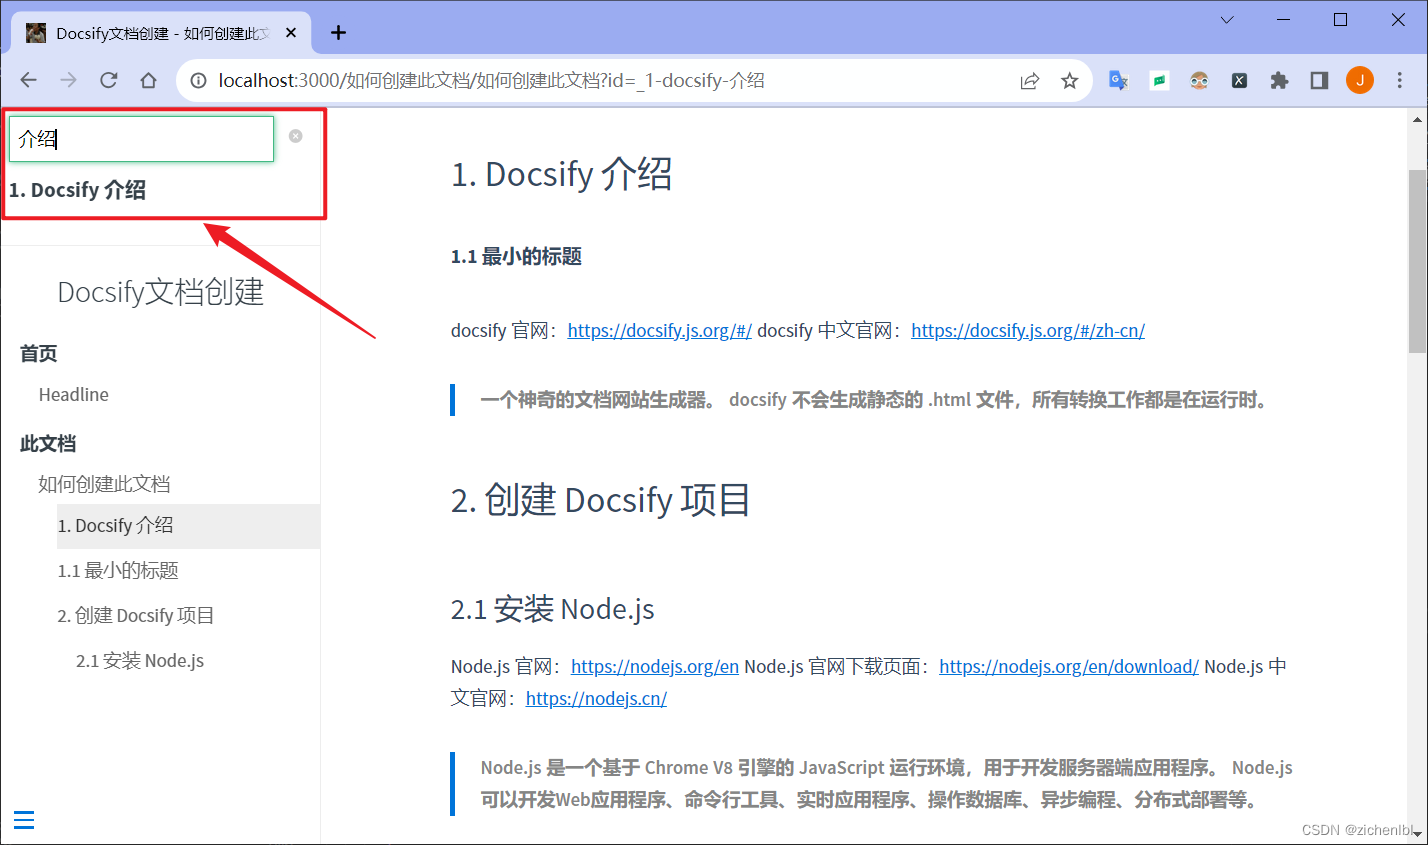
4.1 设置侧边栏顶部的搜索框
- 全文搜索 - Search
添加配置项如下。
search: {
maxAge: 86400000,
paths: [
'/',
'/如何创建此文档/如何创建此文档',
],
placeholder: {
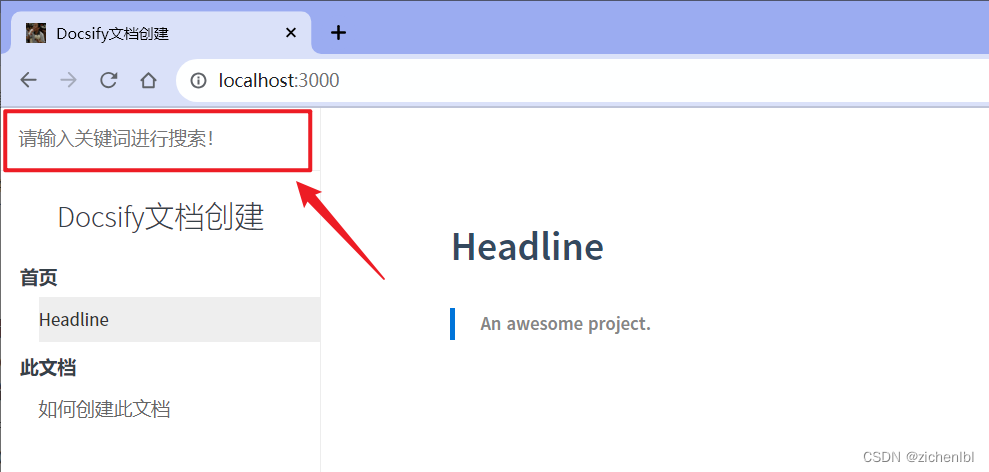
'/': '请输入关键词进行搜索!',
},
noData: {
'/': '未搜索到结果,换个关键词试试!',
},
depth: 6,
hideOtherSidebarContent: false,
namespace: 'Docsify文档创建',
pathNamespaces: [
'/如何创建此文档',
],
},
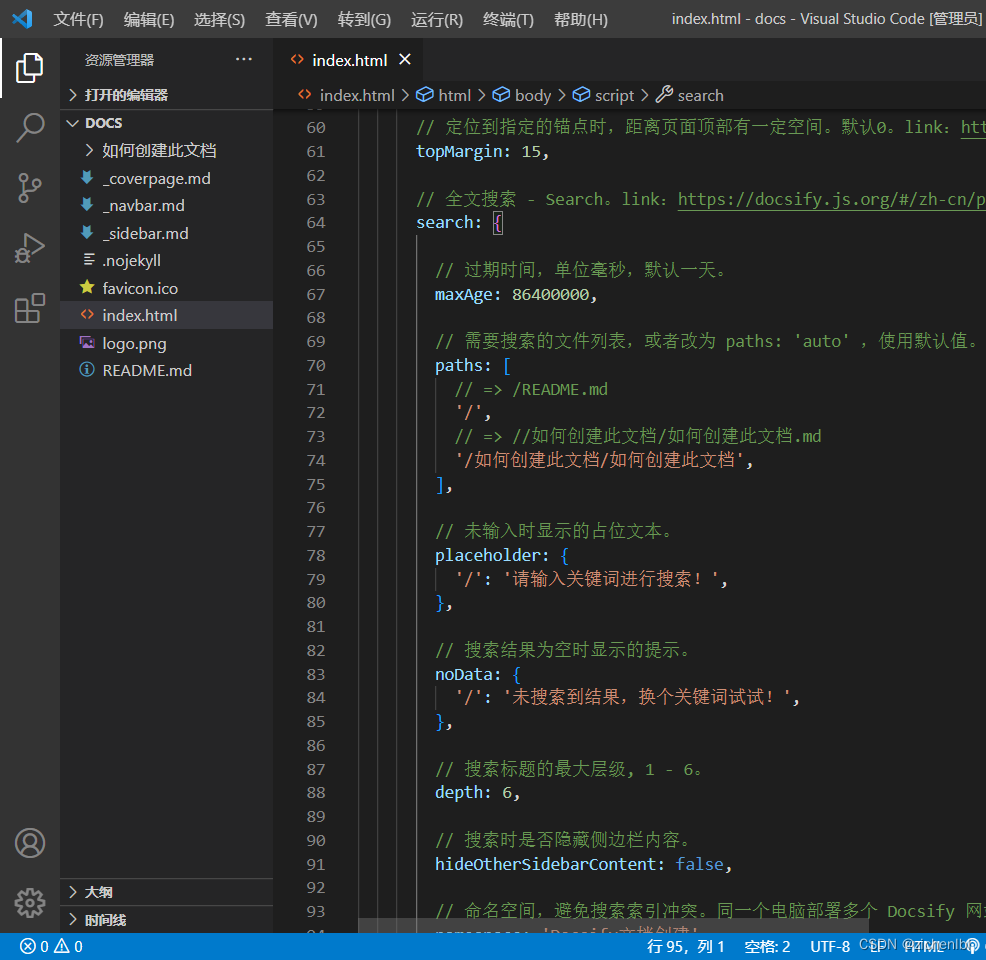
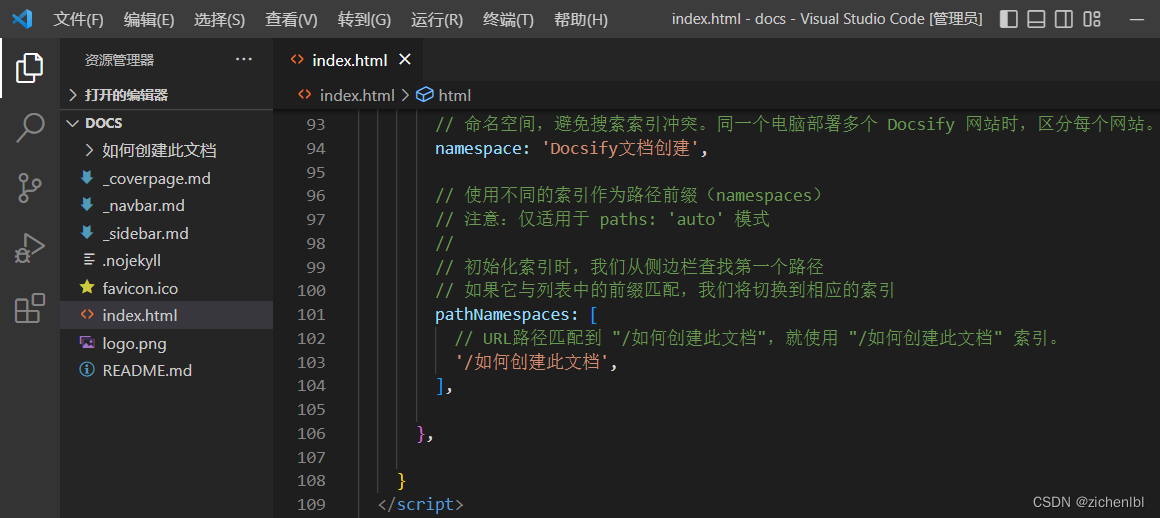
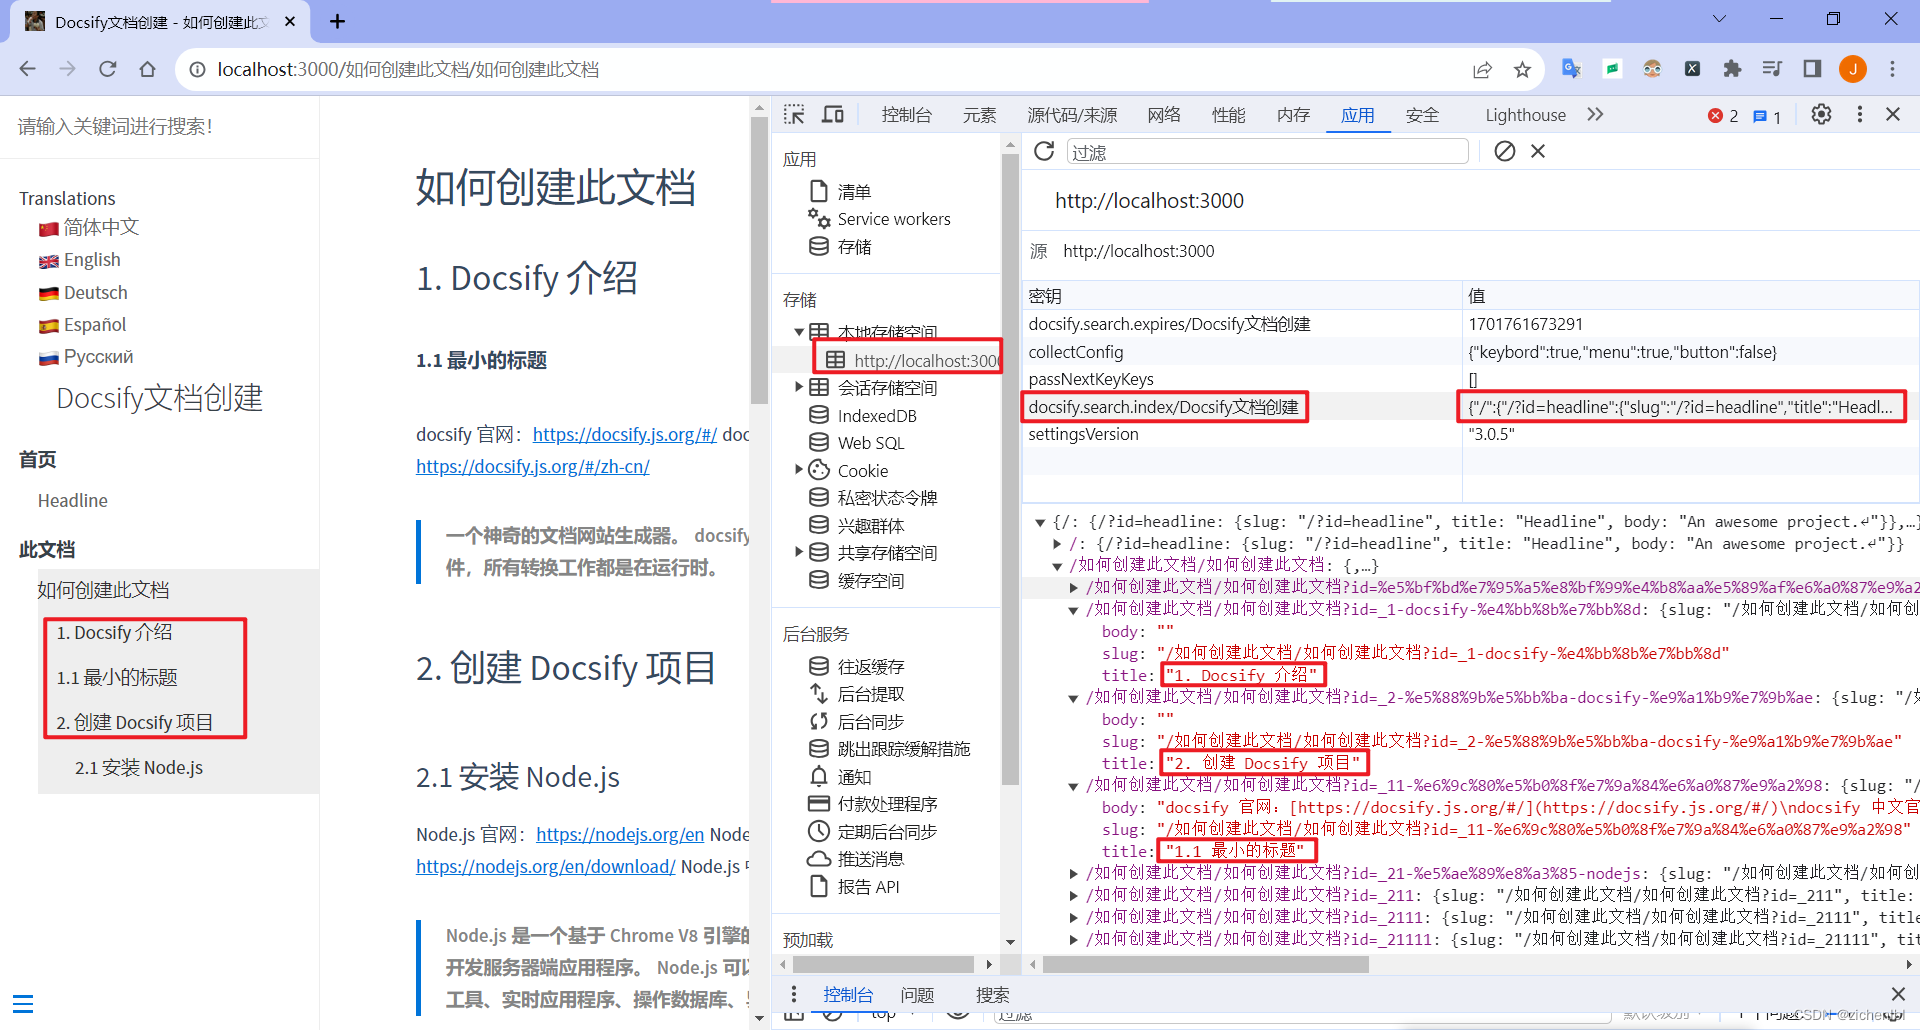
查看本地索引的命名空间 Docsify文档创建,根据文件列表生成的本地搜索索引。
添加 js 配置项如下。
<script src="//cdn.jsdelivr.net/npm/docsify/lib/plugins/search.min.js"></script>

<script src="//polyfill.io/v3/polyfill.min.js?features=String.prototype.normalize"></script>
浏览器访问 http://localhost:3000 预览效果。
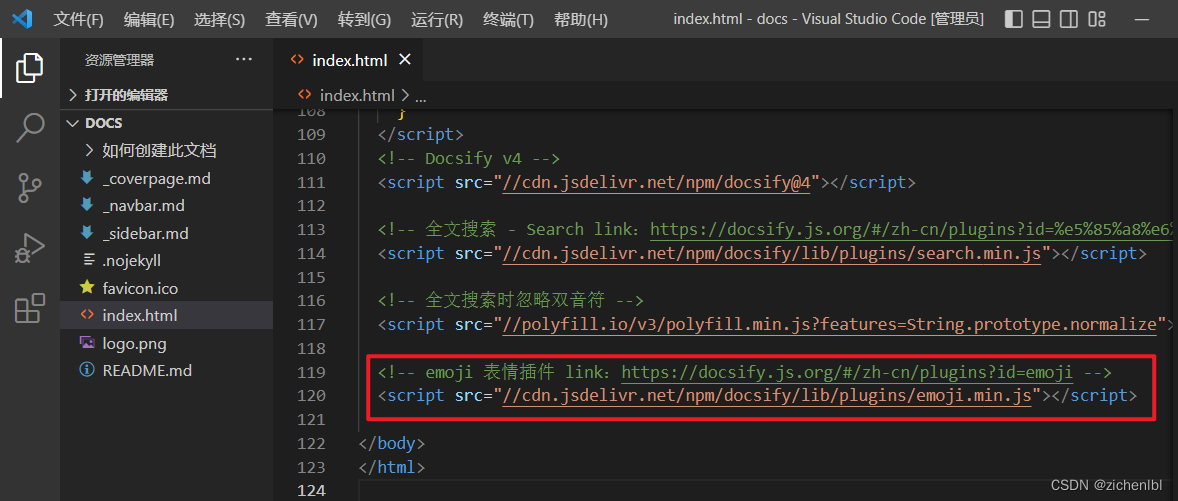
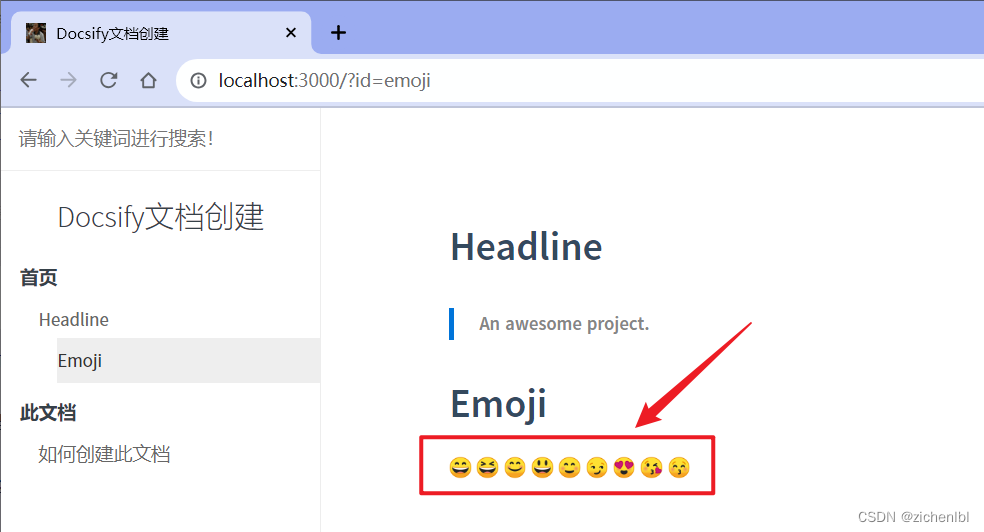
4.2 添加 emoji 表情插件
- emoji
添加 js 配置项如下。
<script src="//cdn.jsdelivr.net/npm/docsify/lib/plugins/emoji.min.js"></script>
在 docs\README.md 文件中添加如下 emoji 表情。
# Emoji

:smile: :laughing: :blush: :smiley: :relaxed: :smirk: :heart_eyes: :kissing_heart: :kissing_closed_eyes:
浏览器访问 http://localhost:3000 预览效果。
4.3 添加外链脚本执行 src 引用的 js
- 外链脚本 - External Script
添加 js 配置项如下。
<script src="//cdn.jsdelivr.net/npm/docsify/lib/plugins/external-script.min.js"></script>
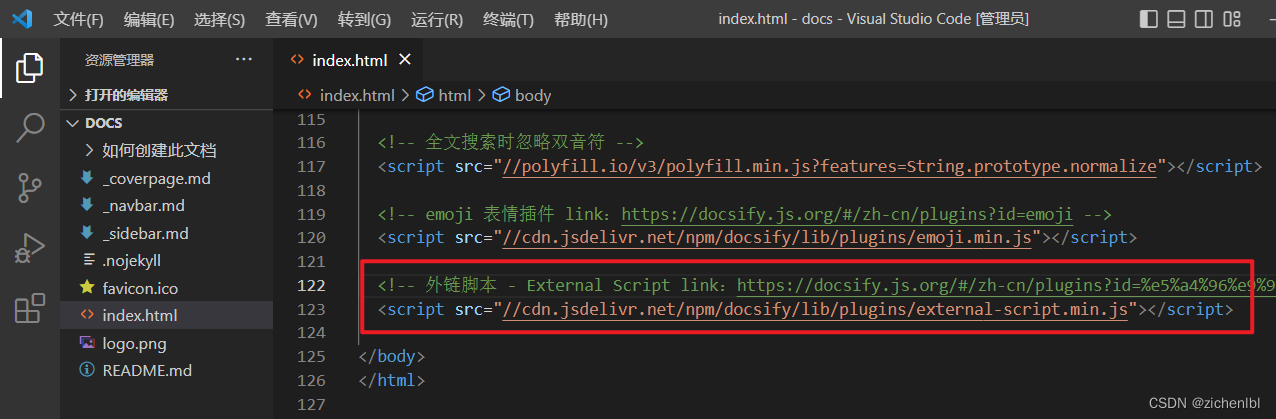
浏览器访问 http://localhost:3000 预览效果。
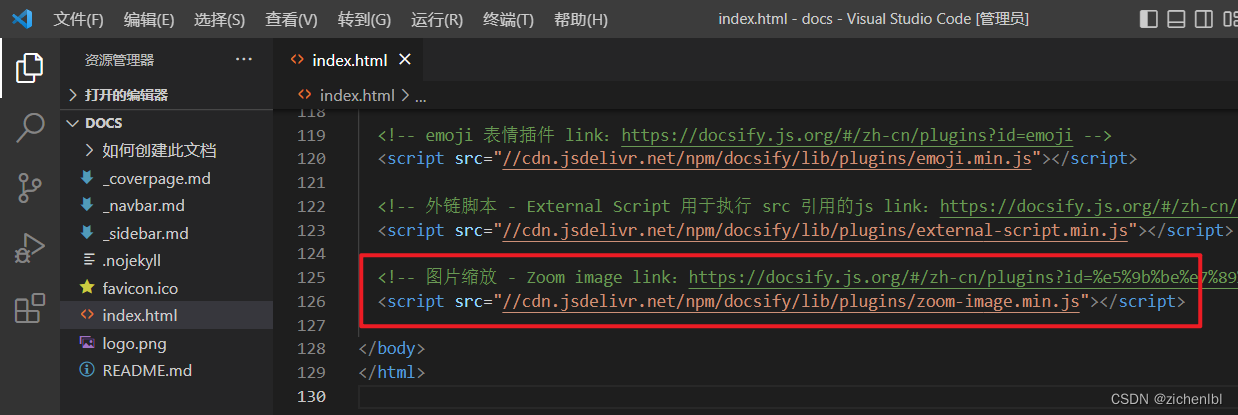
4.4 添加图片缩放插件
- 图片缩放 - Zoom image
更多使用参考视频:https://www.bilibili.com/video/BV1tQ4y1V7DR
添加 js 配置项如下。
<script src="//cdn.jsdelivr.net/npm/docsify/lib/plugins/zoom-image.min.js"></script>
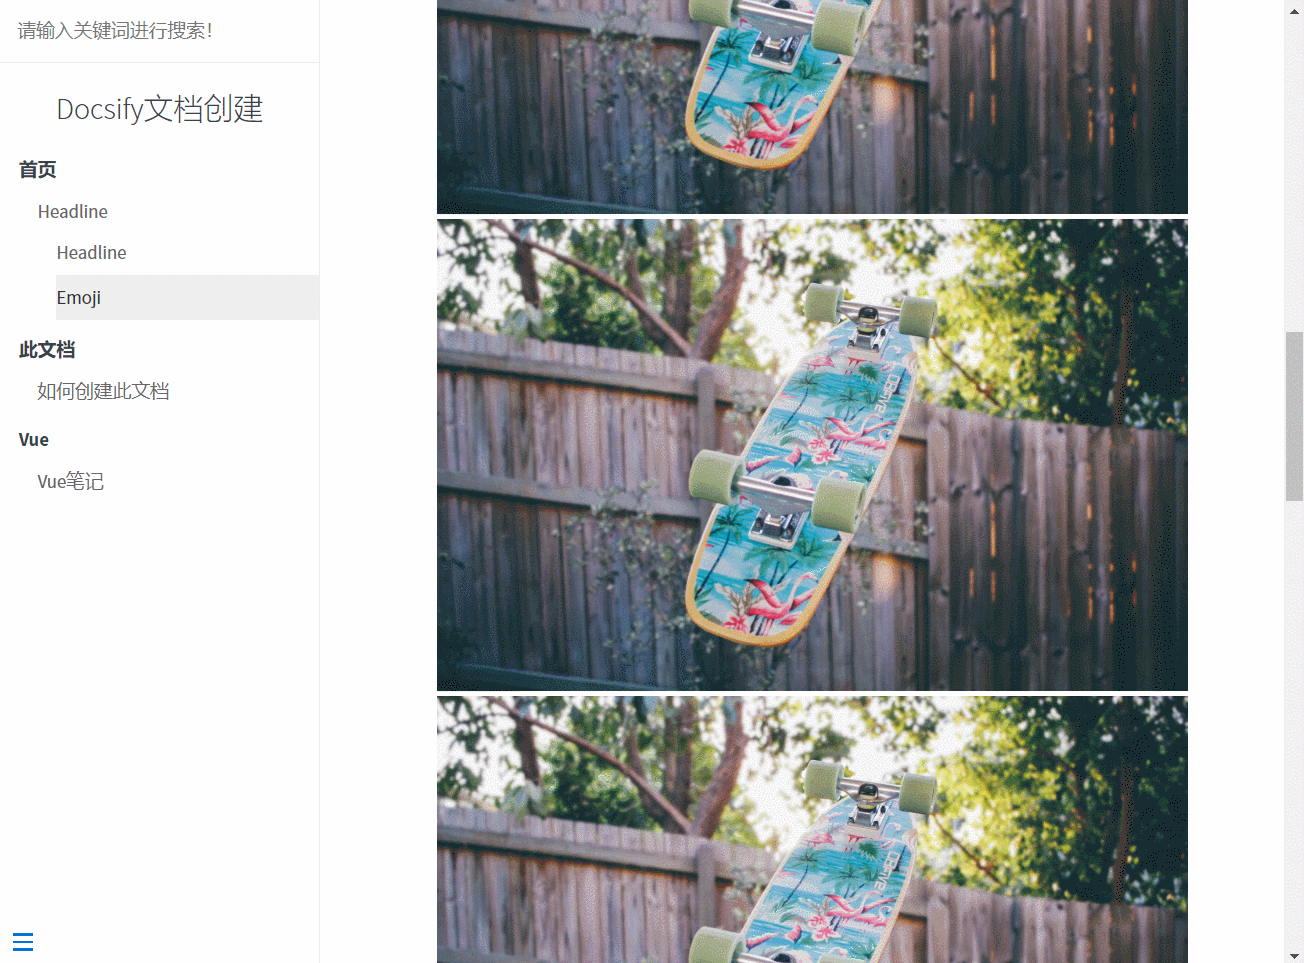
在 README.md 中使用 img 标签添加一张图片。
<img id="zoom-margin" src="https://medium-zoom.francoischalifour.com/image-2.ddbb59d5.jpg" >
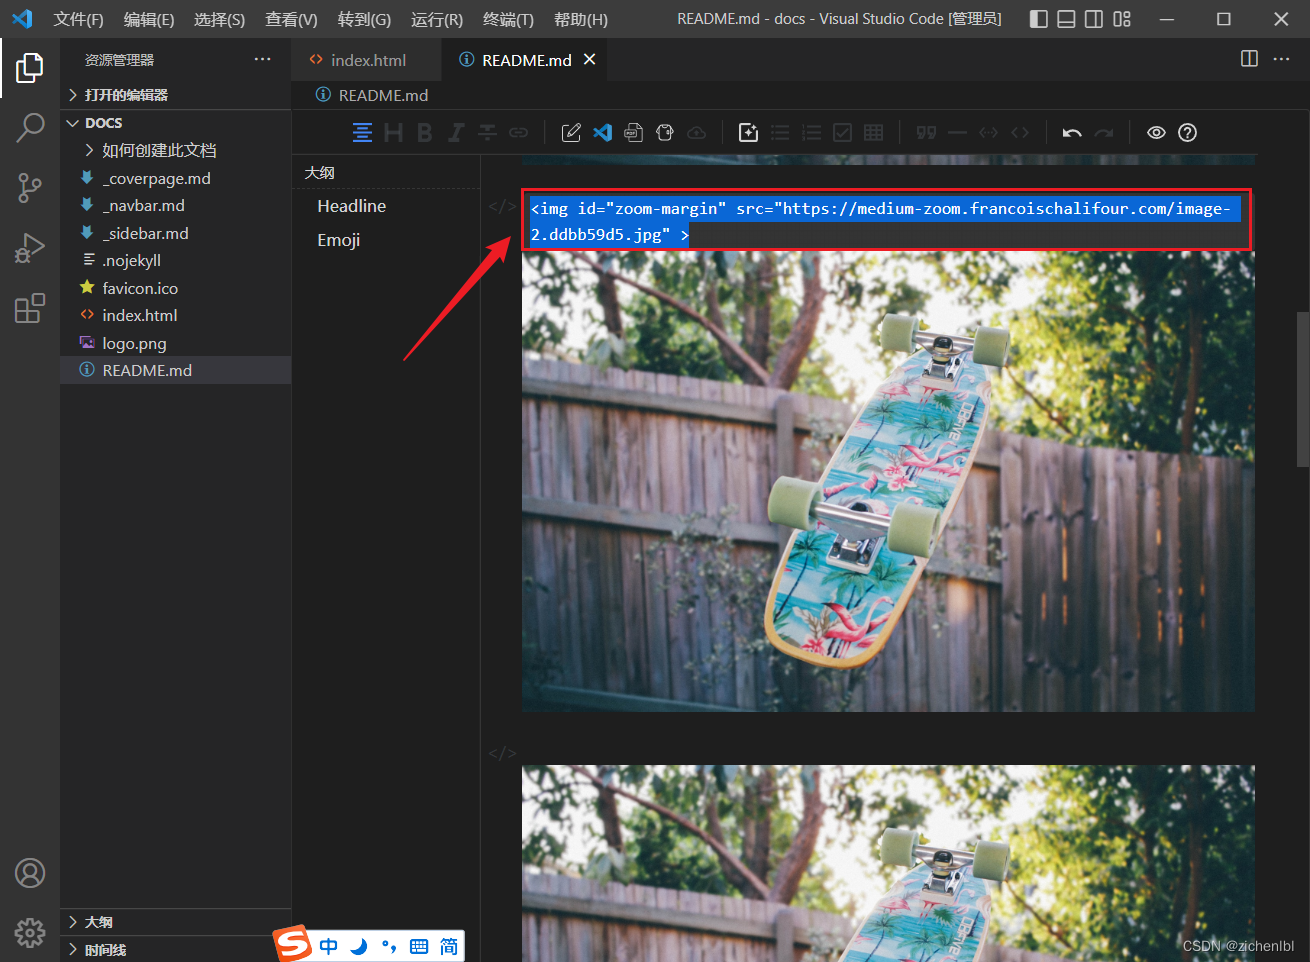
浏览器访问 http://localhost:3000 预览效果。
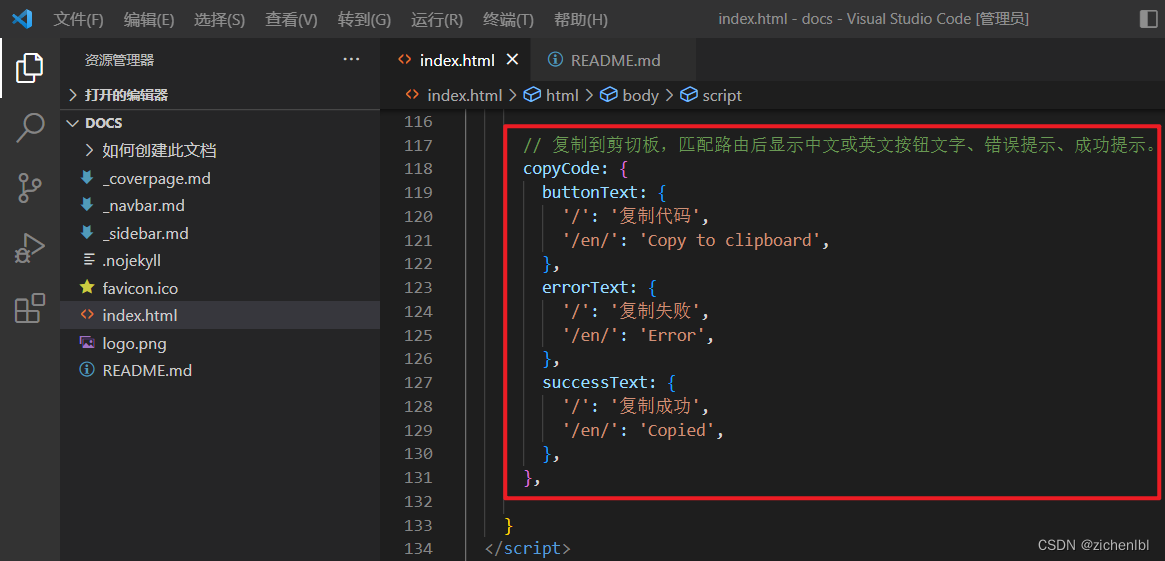
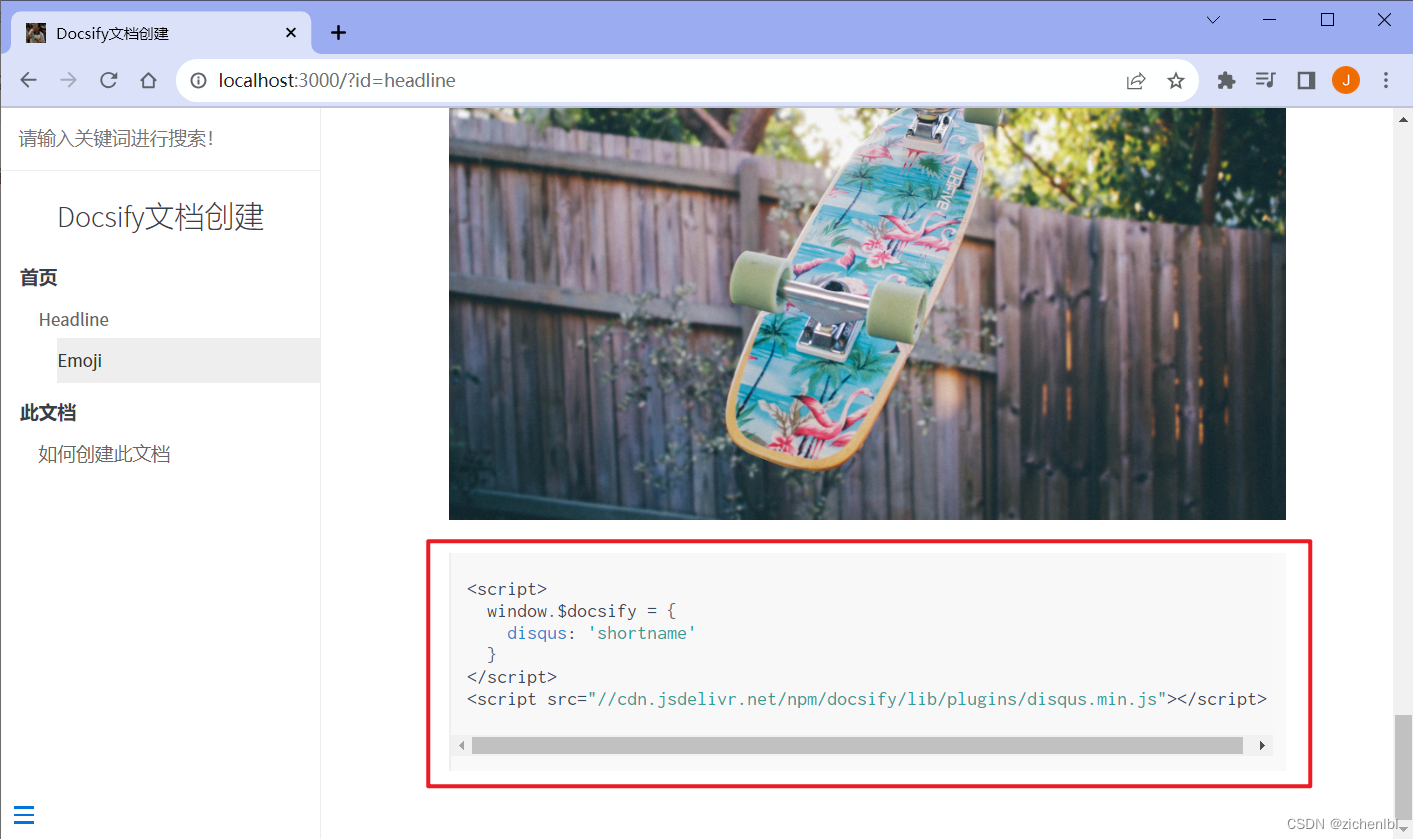
4.5 复制到剪切板
- 复制到剪贴板
添加配置项如下。
copyCode: {
  buttonText: {
    '/': '复制代码',
    '/en/': 'Copy to clipboard',
  },
  errorText: {
    '/': '复制失败',
    '/en/': 'Error',
  },
  successText: {
    '/': '复制成功',
    '/en/': 'Copied',
  },
},
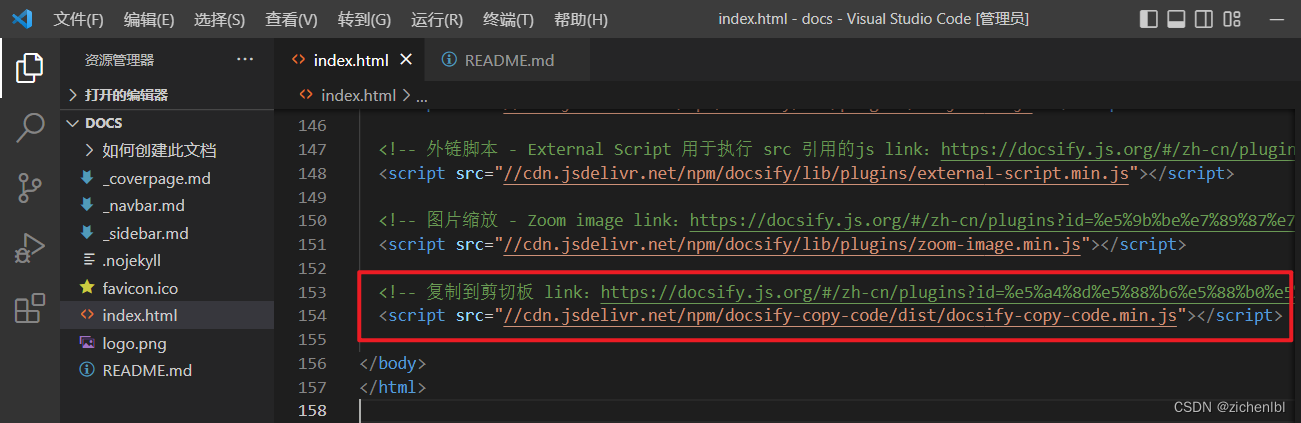
添加 js 配置项如下。
<script src="//cdn.jsdelivr.net/npm/docsify-copy-code/dist/docsify-copy-code.min.js"></script>
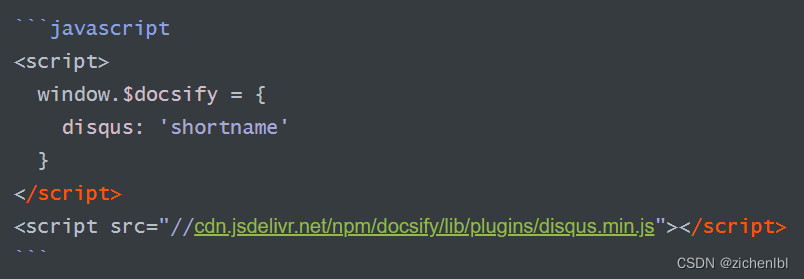
在 docs\README.md 文件中添加如下。然后取消注释第一行和最后一行(Markdown 代码片语法)。
//```javascript
<script>
  window.$docsify = {
    disqus: 'shortname'
  }
</script>
<script src="//cdn.jsdelivr.net/npm/docsify/lib/plugins/disqus.min.js"></script>
//```
浏览器访问 http://localhost:3000 预览效果。
鼠标未移动到代码上效果。
鼠标移动到代码上出现复制代码按钮。
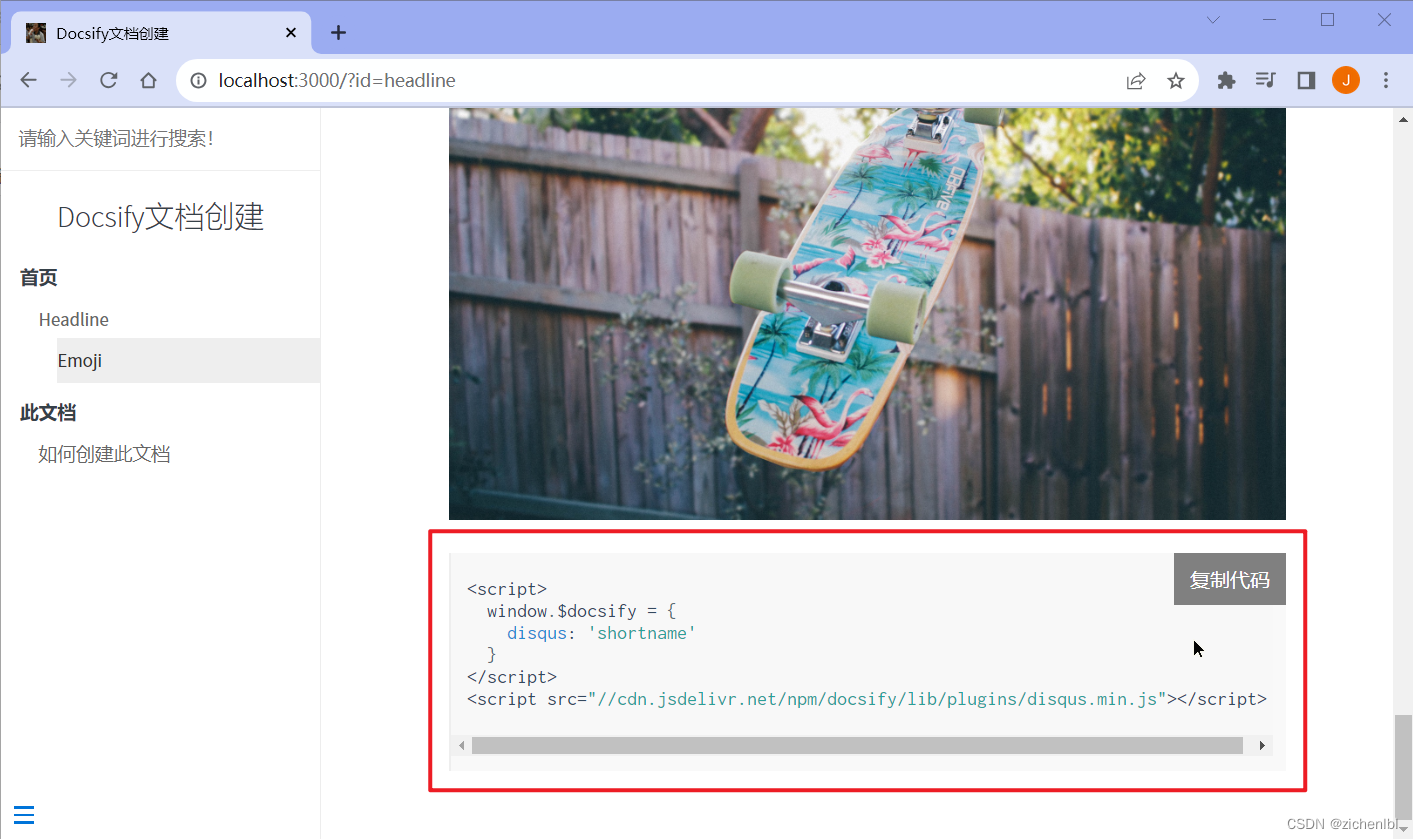
点击复制代码,提示复制成功。然后就可以 Ctrl + V 粘贴代码了。

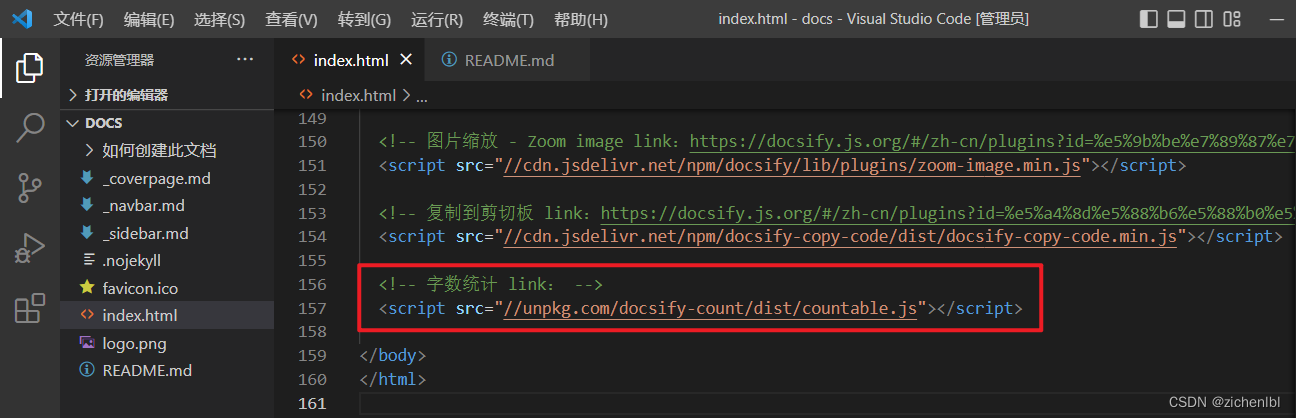
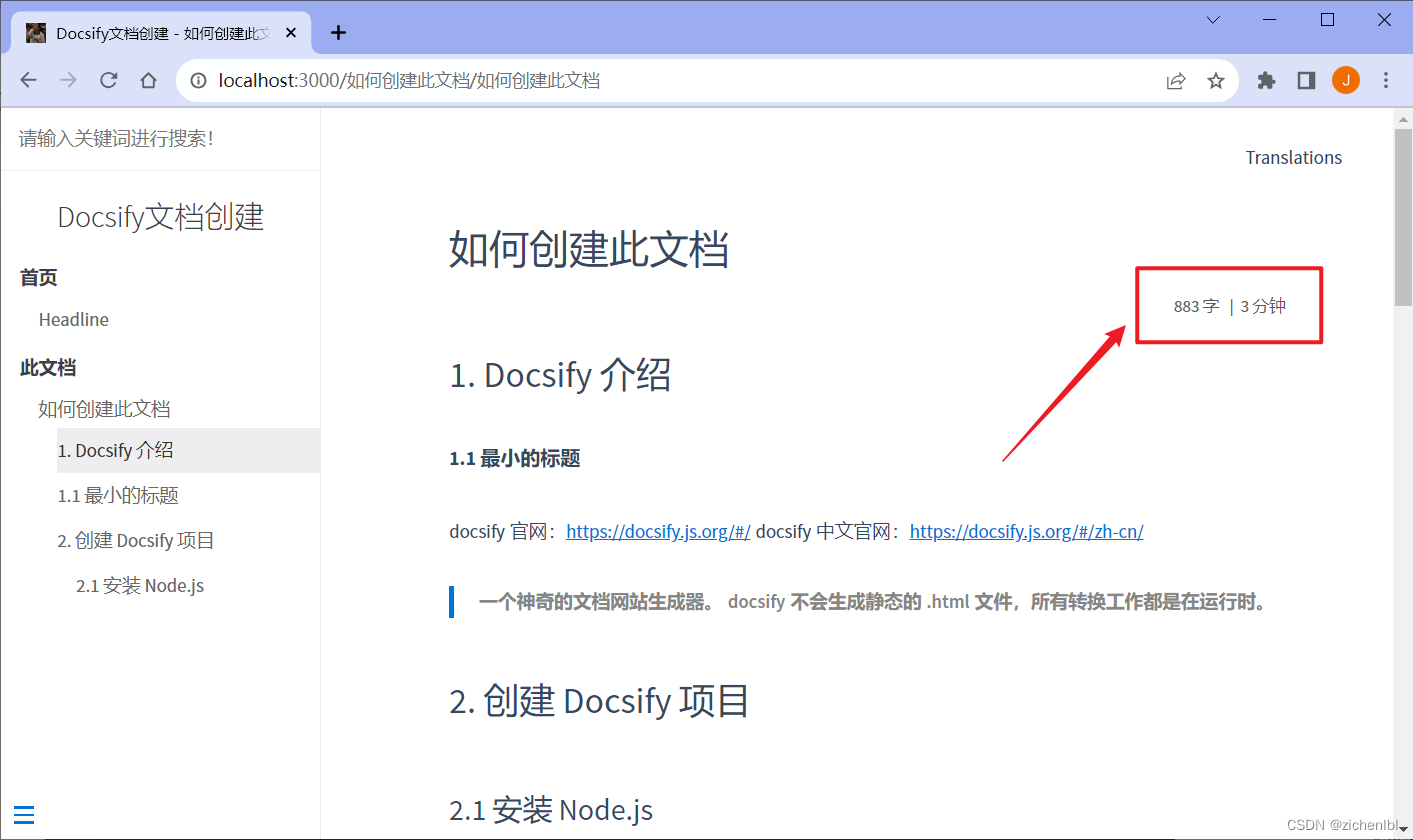
4.6 字数统计
- 字数统计
添加配置项如下。
count:{
  countable: true,
  position: 'top',
  margin: '10px',
  float: 'right',
  fontsize:'0.9em',
  color:'rgb(90,90,90)',
  language:'chinese',
  localization: {
    words: "",
    minute: ""
  },
  isExpected: true,
}
添加 js 配置项如下。
<script src="//unpkg.com/docsify-count/dist/countable.js"></script>
浏览器访问 http://localhost:3000 预览效果。
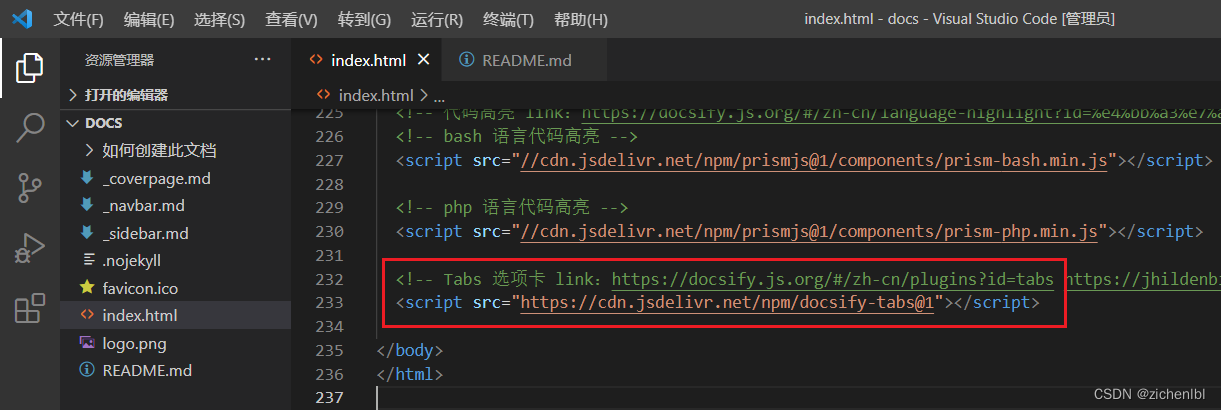
4.7 Tabs 选项卡
- Tabs 选项卡
添加配置项如下。
tabs: {
  persist    : true,
  sync       : true,
  theme      : 'classic',
  tabComments: true,
  tabHeadings: true
},
添加 js 配置项如下。
<script src="https://cdn.jsdelivr.net/npm/docsify-tabs@1"></script>
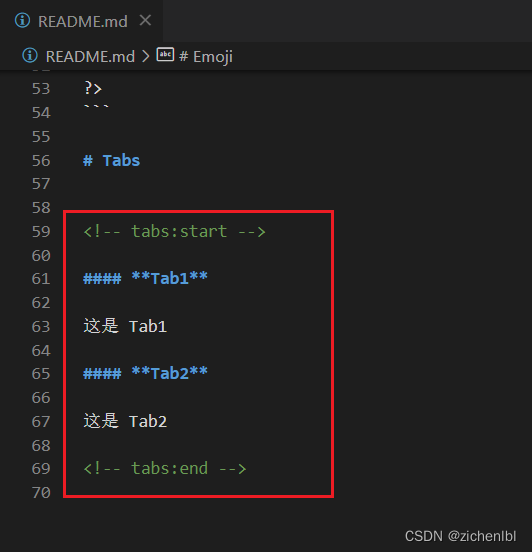
在 docs\README.md 文件中添加如下。
<!-- tabs:start -->

#### **Tab1**

这是 Tab1

#### **Tab2**

这是 Tab2

<!-- tabs:end -->
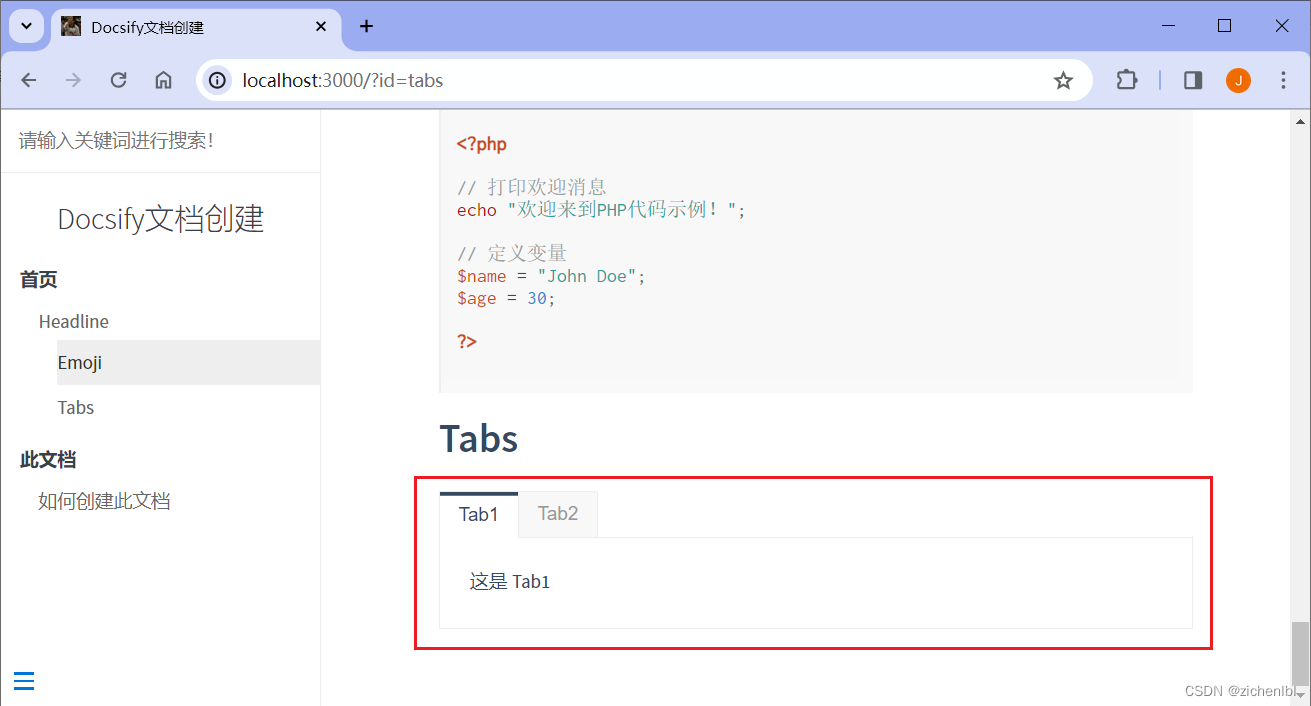
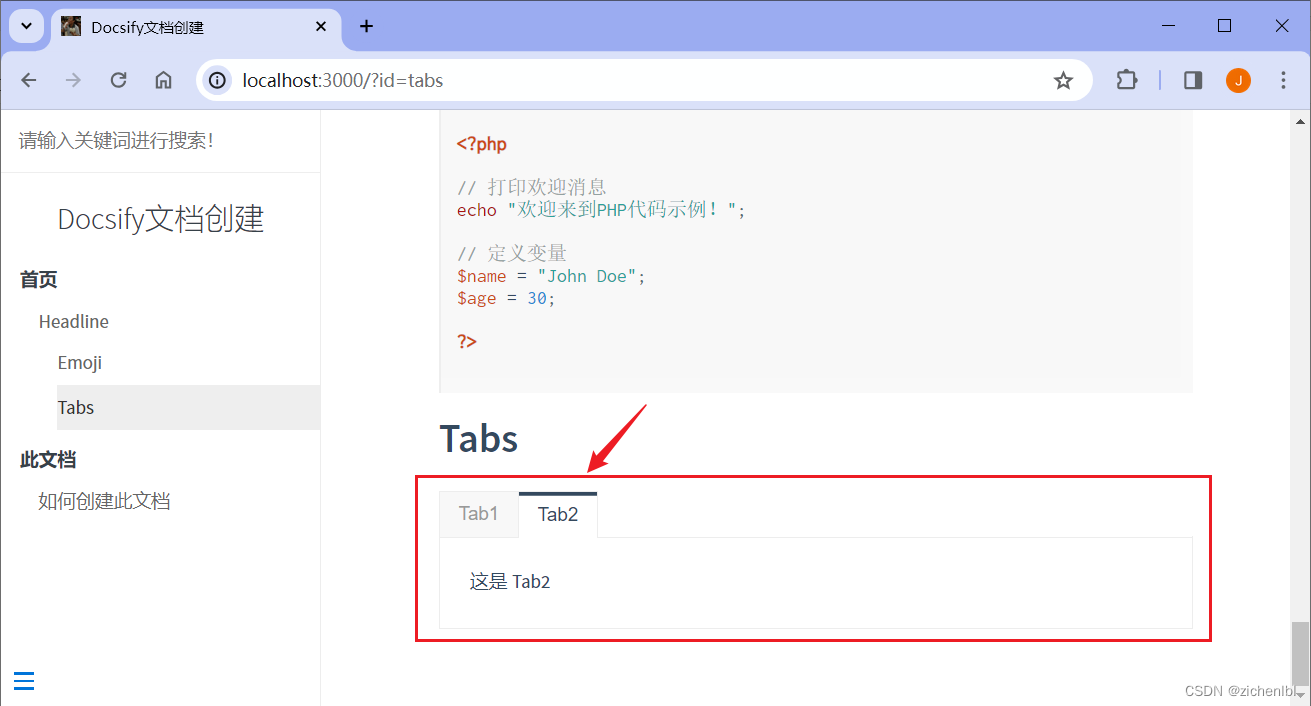
浏览器访问 http://localhost:3000 预览效果。
4.8 代码高亮
- 代码高亮
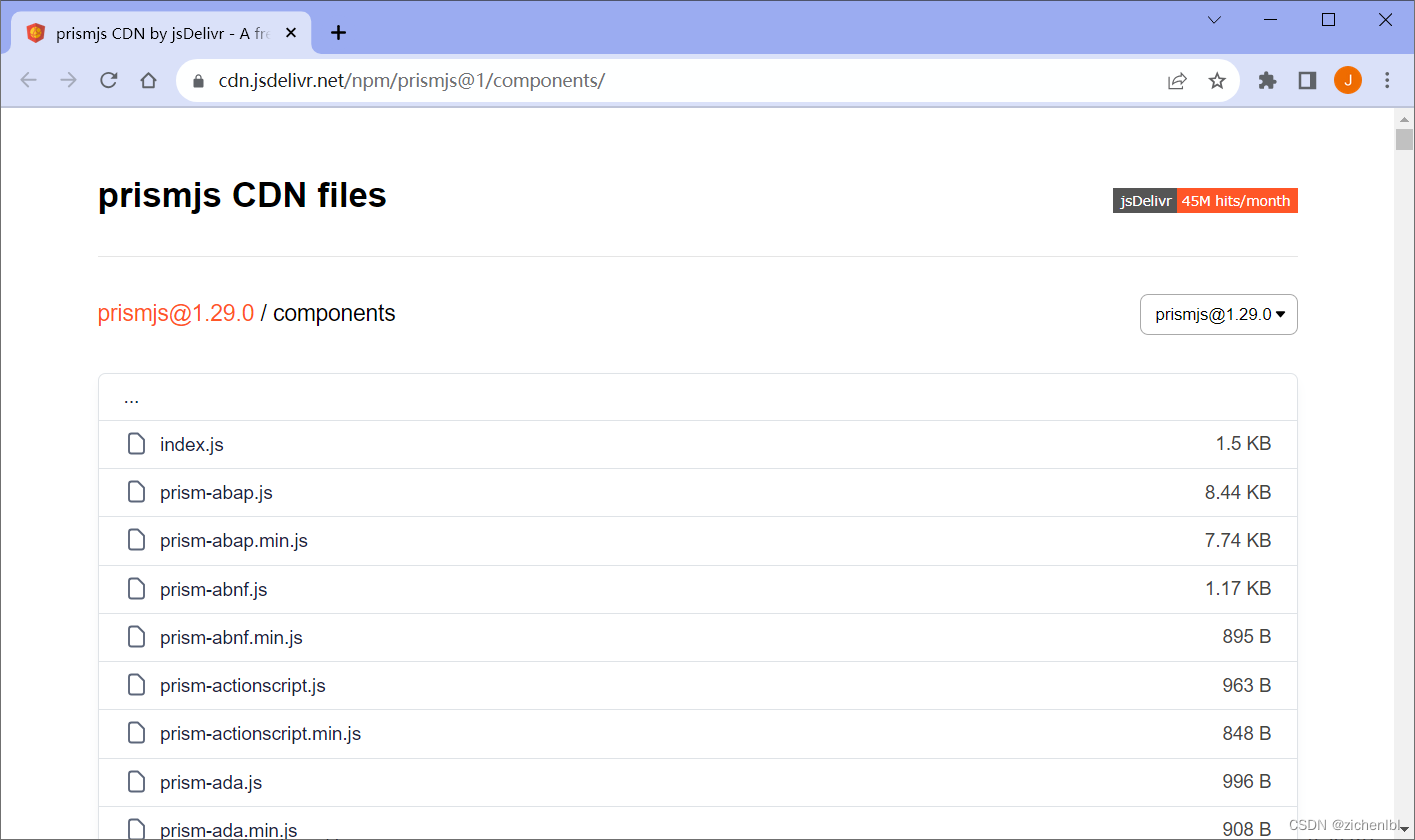
访问 https://cdn.jsdelivr.net/npm/prismjs@1/components/ 查找对应语言的代码高亮的 js 文件。
添加 js 配置项如下。
添加 Bash、PHP 语言代码高亮,则引用 prism-bash.min.js、prism-php.min.js 文件。
<script src="//cdn.jsdelivr.net/npm/prismjs@1/components/prism-bash.min.js"></script>
<script src="//cdn.jsdelivr.net/npm/prismjs@1/components/prism-php.min.js"></script>
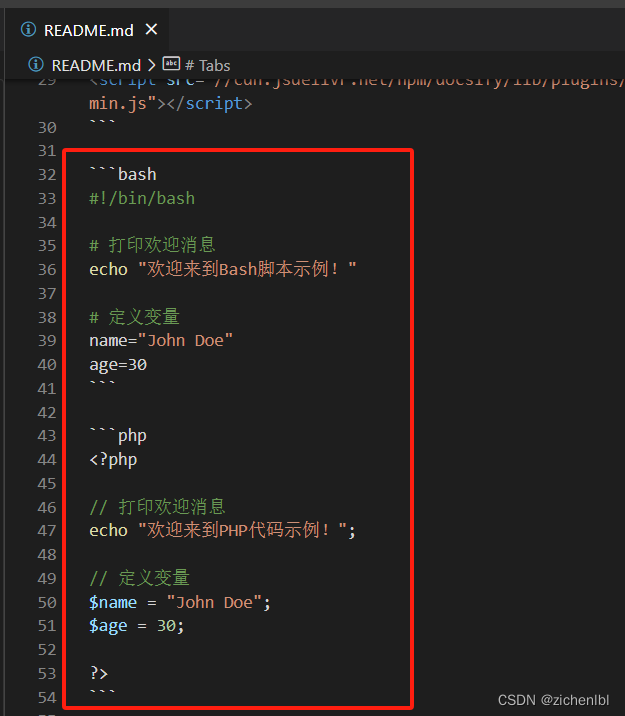
在 docs\README.md 文件中添加如下。删除 ```前面的 // 注释。
//```bash
#!/bin/bash

# 打印欢迎消息
echo "欢迎来到Bash脚本示例!"

# 定义变量
name="John Doe"
age=30
//```

//```php
<?php

// 打印欢迎消息
echo "欢迎来到PHP代码示例!";

// 定义变量
$name = "John Doe";
$age = 30;

?>
//```
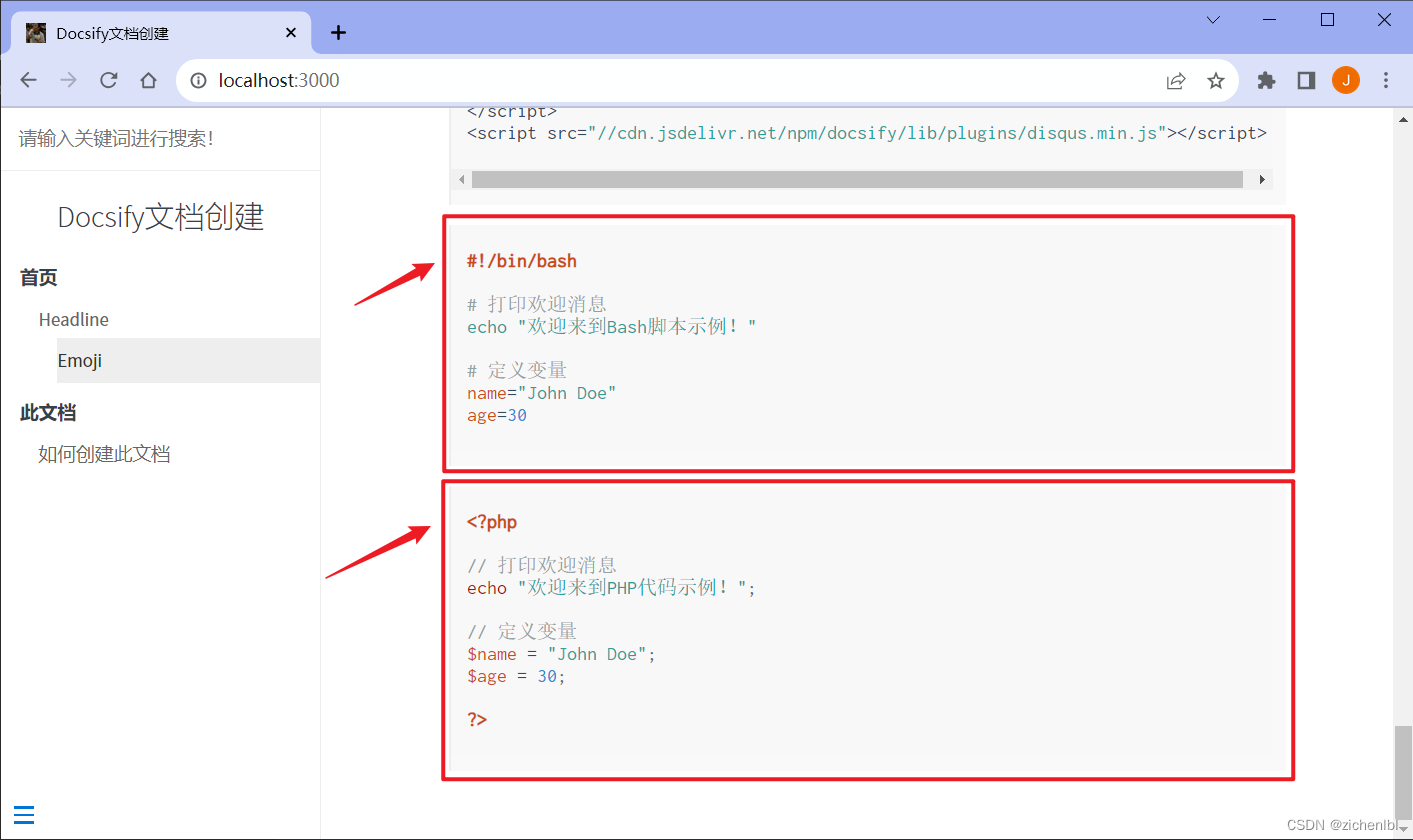
浏览器访问 http://localhost:3000 预览效果。
4.9 强调内容
- 强调内容
- 普通提示
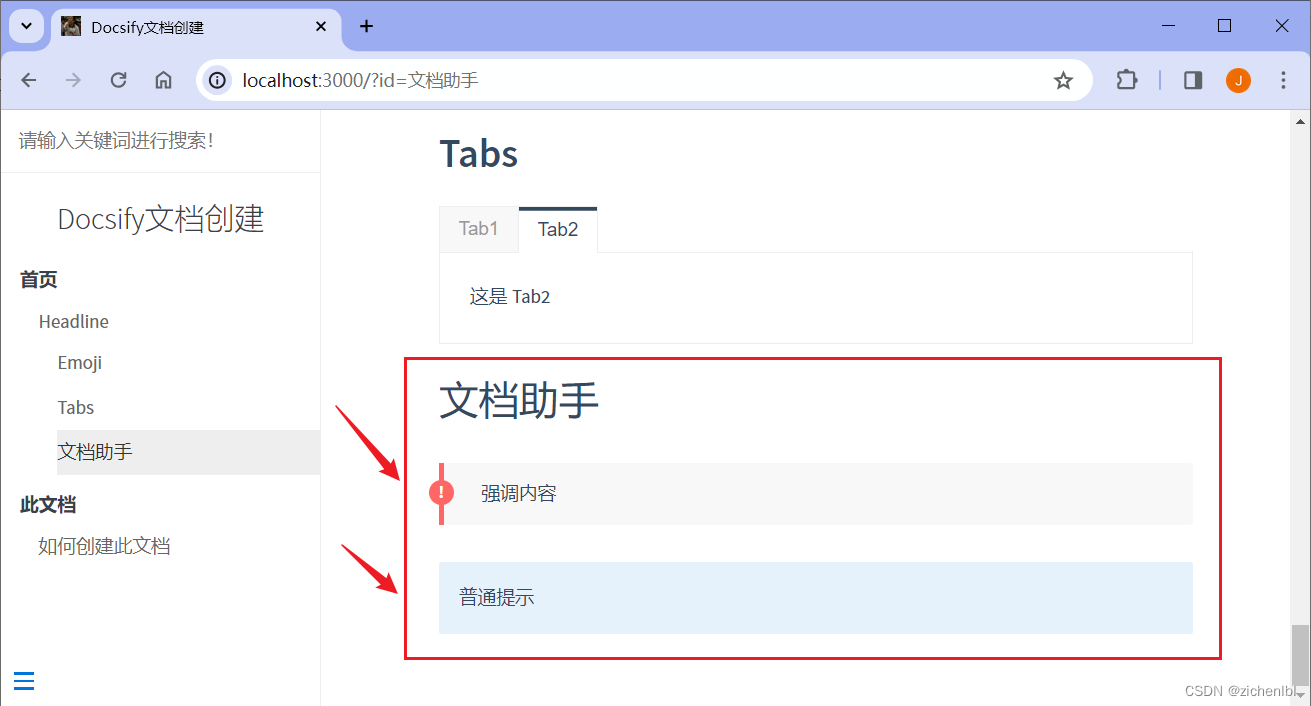
在 docs\README.md 文件中添加如下。!> 表示强调内容;?> 表示普通提示。
# 文档助手

!> 强调内容

?> 普通提示
浏览器访问 http://localhost:3000 预览效果。
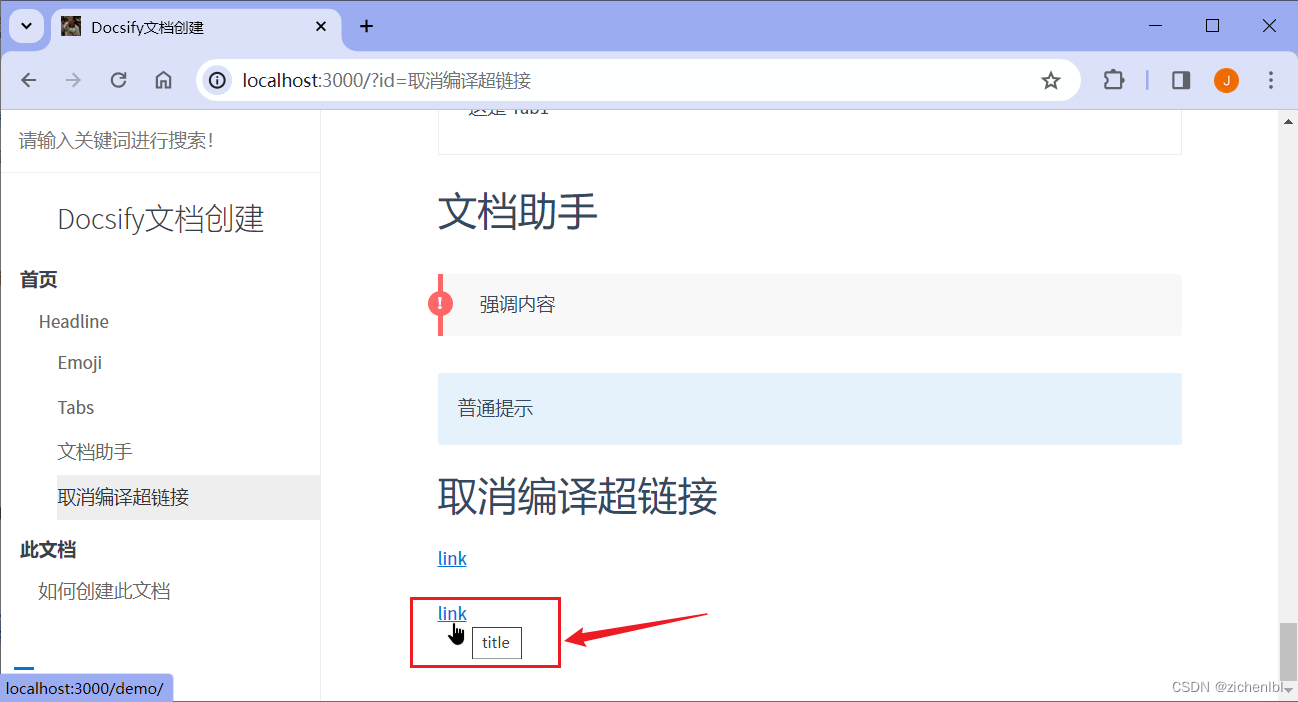
4.10 取消编译超链接
- 忽略编译链接
有时候我们把相对地址放在超链接上,如果不需要 Docsify 对超链接编译,就可以使用如下写法。在后面添加 ':ignore'。
[link](/demo/ ':ignore')
超链接会原样显示为 <a href="/demo/">link</a>。
添加带有标题的超链接,这意味着当你将鼠标悬停在该链接上时,浏览器会显示该标题的值作为工具提示。则如下添加。
[link](/demo/ ':ignore title')
超链接会显示为 <a href="/demo/" title="title"。
在 docs\README.md 文件中添加如下。
[link](/demo/ ':ignore')

[link](/demo/ ':ignore title')
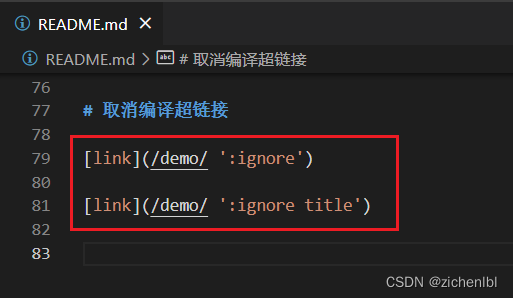
浏览器访问 http://localhost:3000 预览效果。
不会编译成访问 /demo/README.md。

带有标题的超链接。
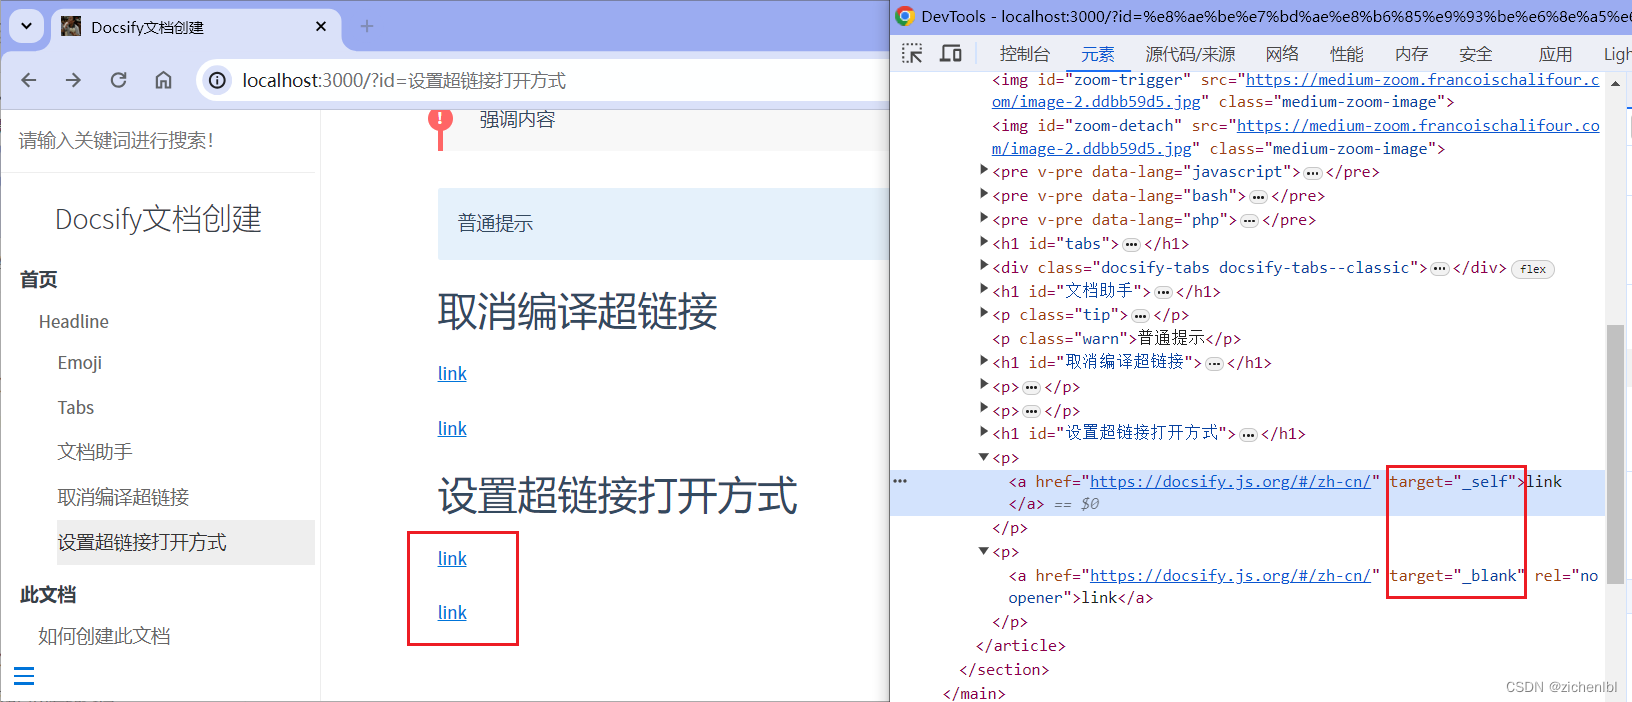
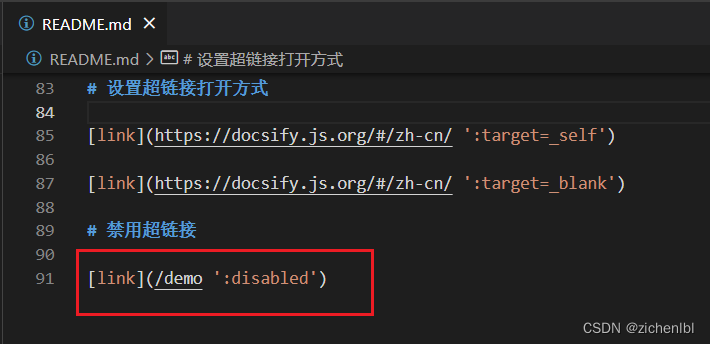
4.11 设置超链接打开方式
- 设置链接的 target 属性
在当前页面打开。
[link](https://docsify.js.org/#/zh-cn/ ':target=_self')
在新标签页打开。
[link](https://docsify.js.org/#/zh-cn/ ':target=_blank')
在 docs\README.md 文件中添加如下。
[link](https://docsify.js.org/#/zh-cn/ ':target=_self')

[link](https://docsify.js.org/#/zh-cn/ ':target=_blank')
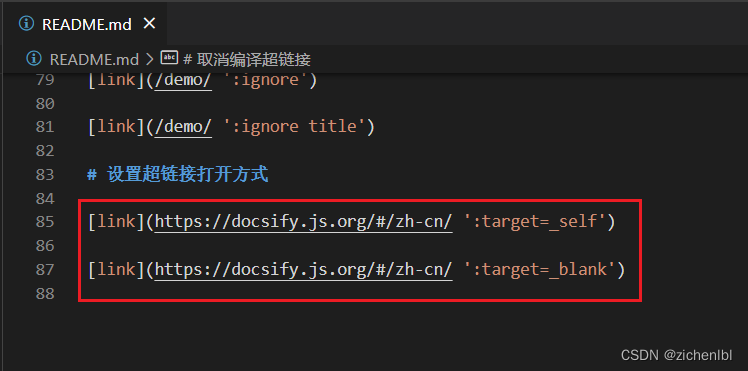
浏览器访问 http://localhost:3000 预览效果。

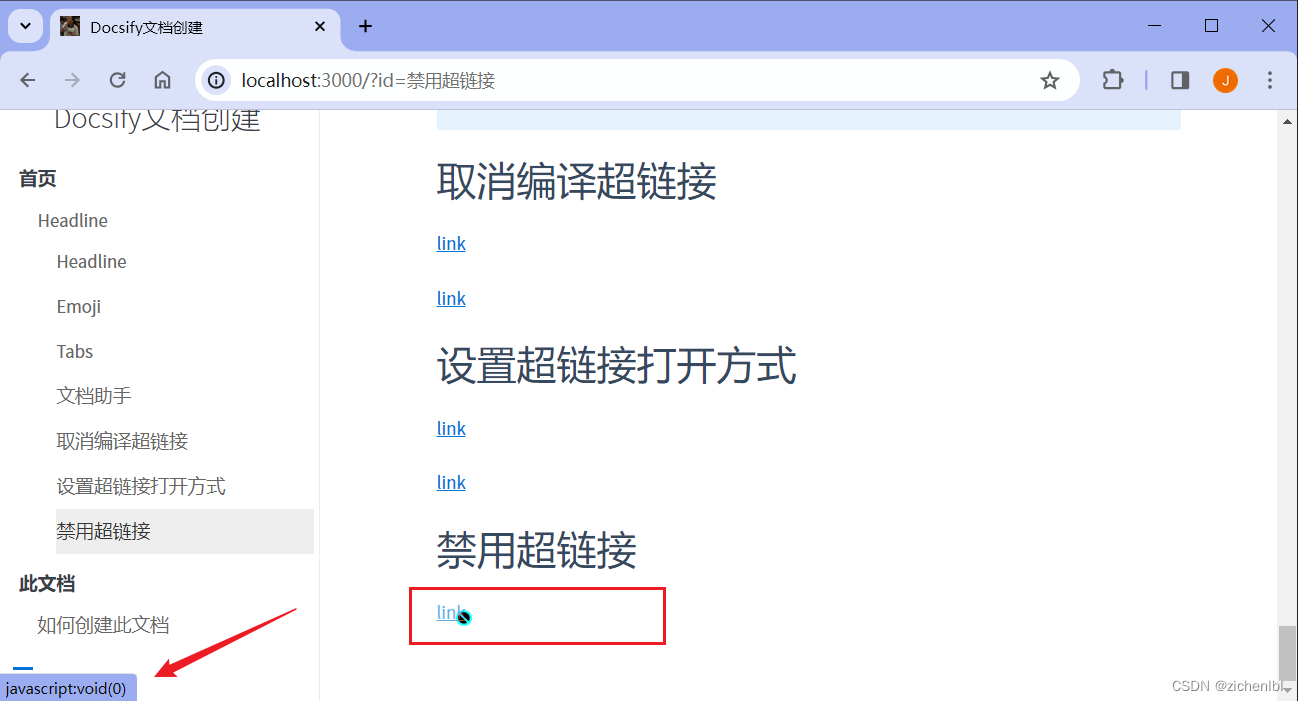
4.12 禁用超链接
- 禁用链接
如下写法可以禁用该超链接。
[link](/demo ':disabled')
在 docs\README.md 文件中添加如下。
[link](/demo ':disabled')
浏览器访问 http://localhost:3000 预览效果。
鼠标移动到超链接上,超链接被禁用点击不了。
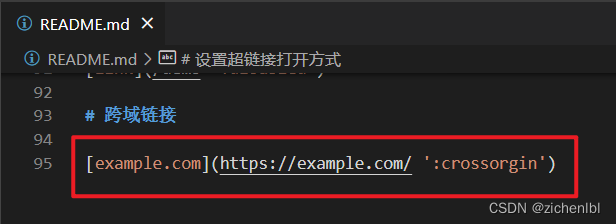
4.13 跨域链接
- 跨域链接
当你同时设置了 routerMode: ‘history’ 和 externalLinkTarget: ‘_self’ 时,你需要为这些跨域链接添加这个配置。
在 docs\README.md 文件中添加如下。
[example.com](https://example.com/ ':crossorgin')
浏览器访问 http://localhost:3000 预览效果。

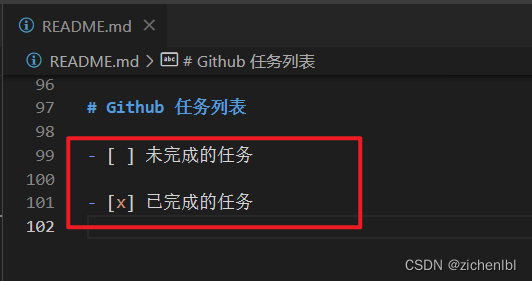
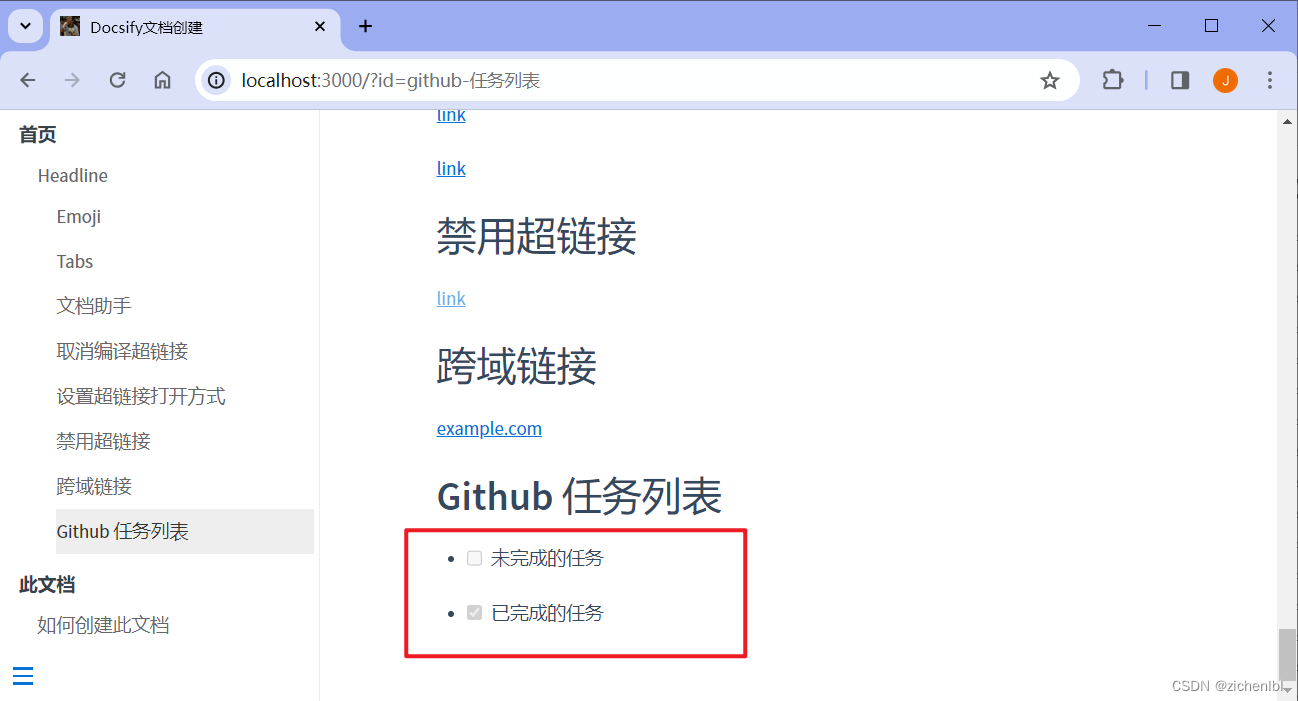
4.14 Github 任务列表
- Github 任务列表
使用如下语法可以显示为任务列表,勾选已完成的任务。
在 docs\README.md 文件中添加如下。
- [ ] 未完成的任务

- [x] 已完成的任务
浏览器访问 http://localhost:3000 预览效果。
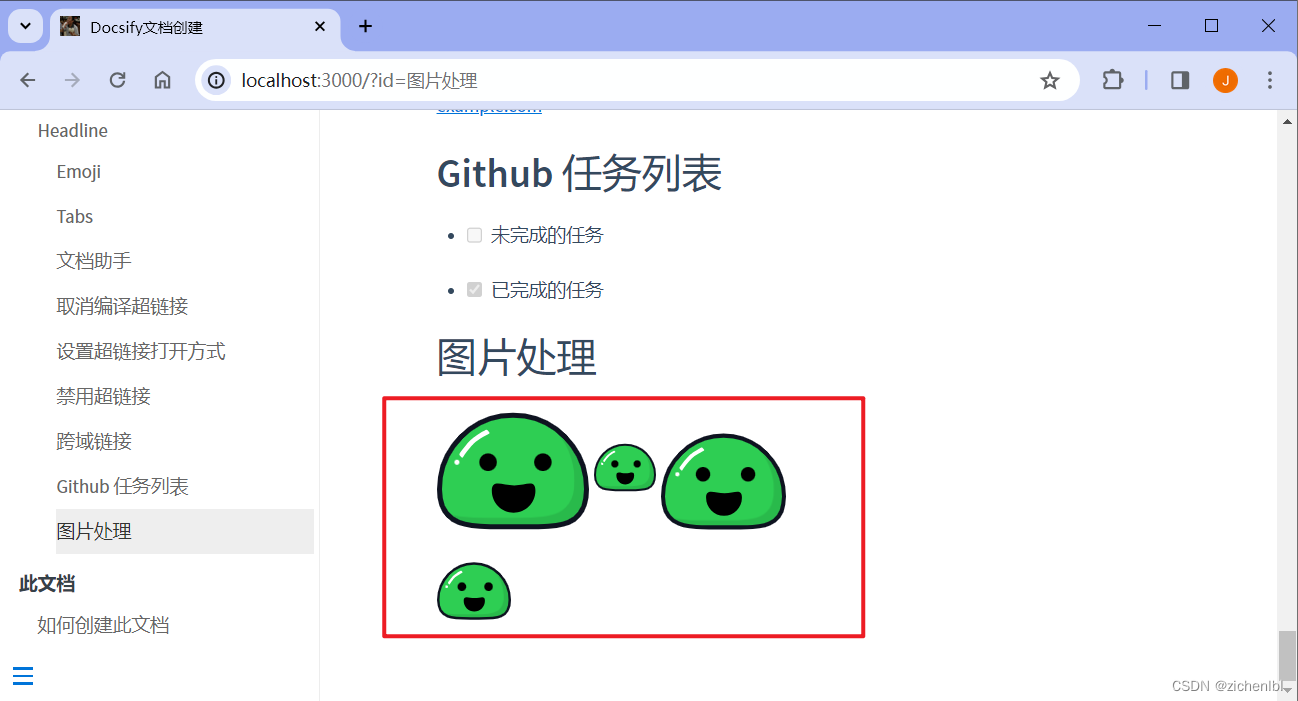
4.15 图片处理
- 图片处理
4.15.1 图片显示缩放后大小
- 图片显示缩放后大小
图片显示缩放后大小,宽 x 高。
在 docs\README.md 文件中添加如下。


<!-- 支持按百分比缩放 -->

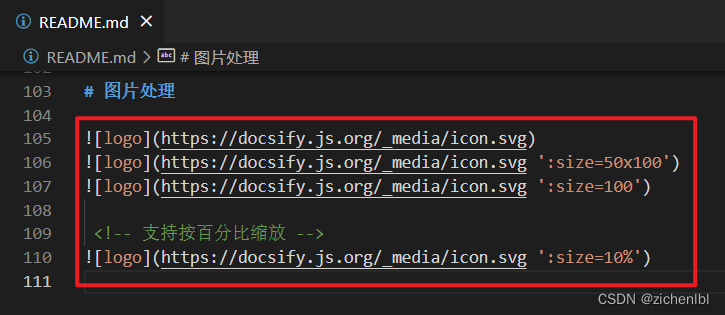
浏览器访问 http://localhost:3000 预览效果。
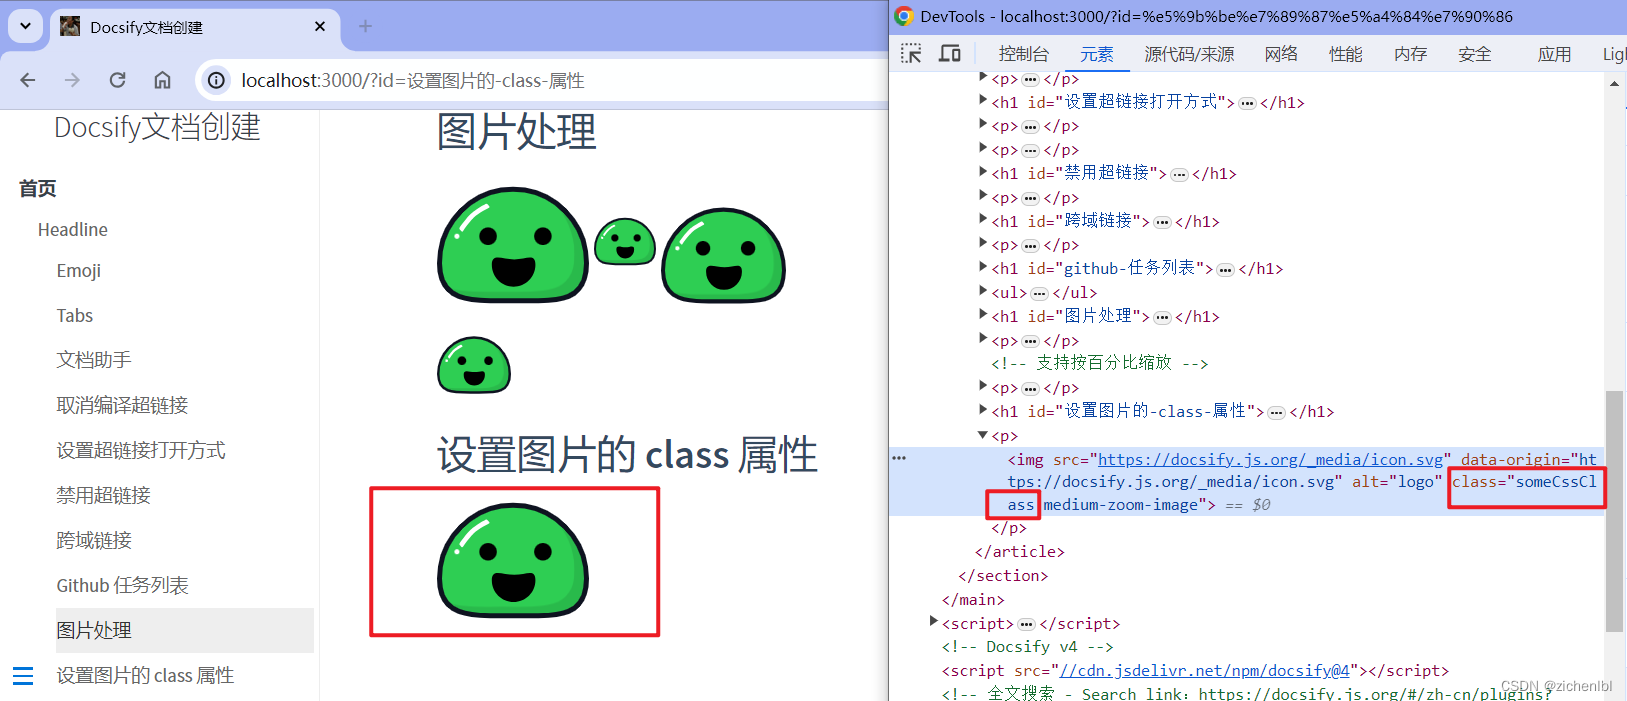
4.15.2 设置图片的 class 属性
- 设置图片class属性
如下给图片添加 class 属性:someCssClass。
在 docs\README.md 文件中添加如下。

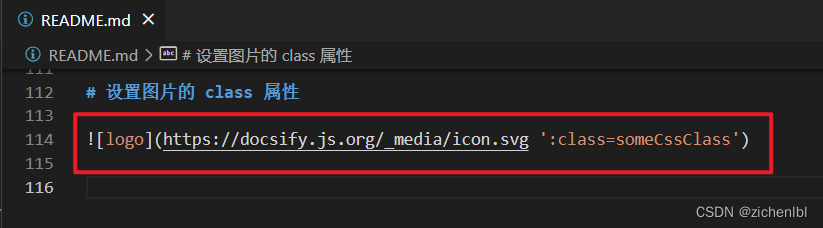
浏览器访问 http://localhost:3000 预览效果。
图片 class 添加了 someCssClass。
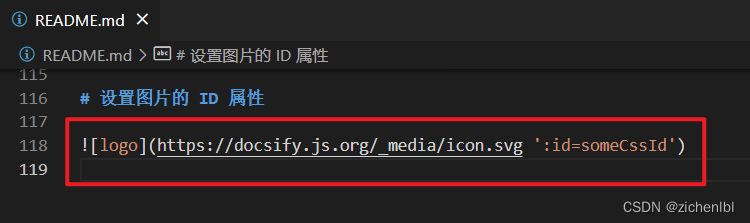
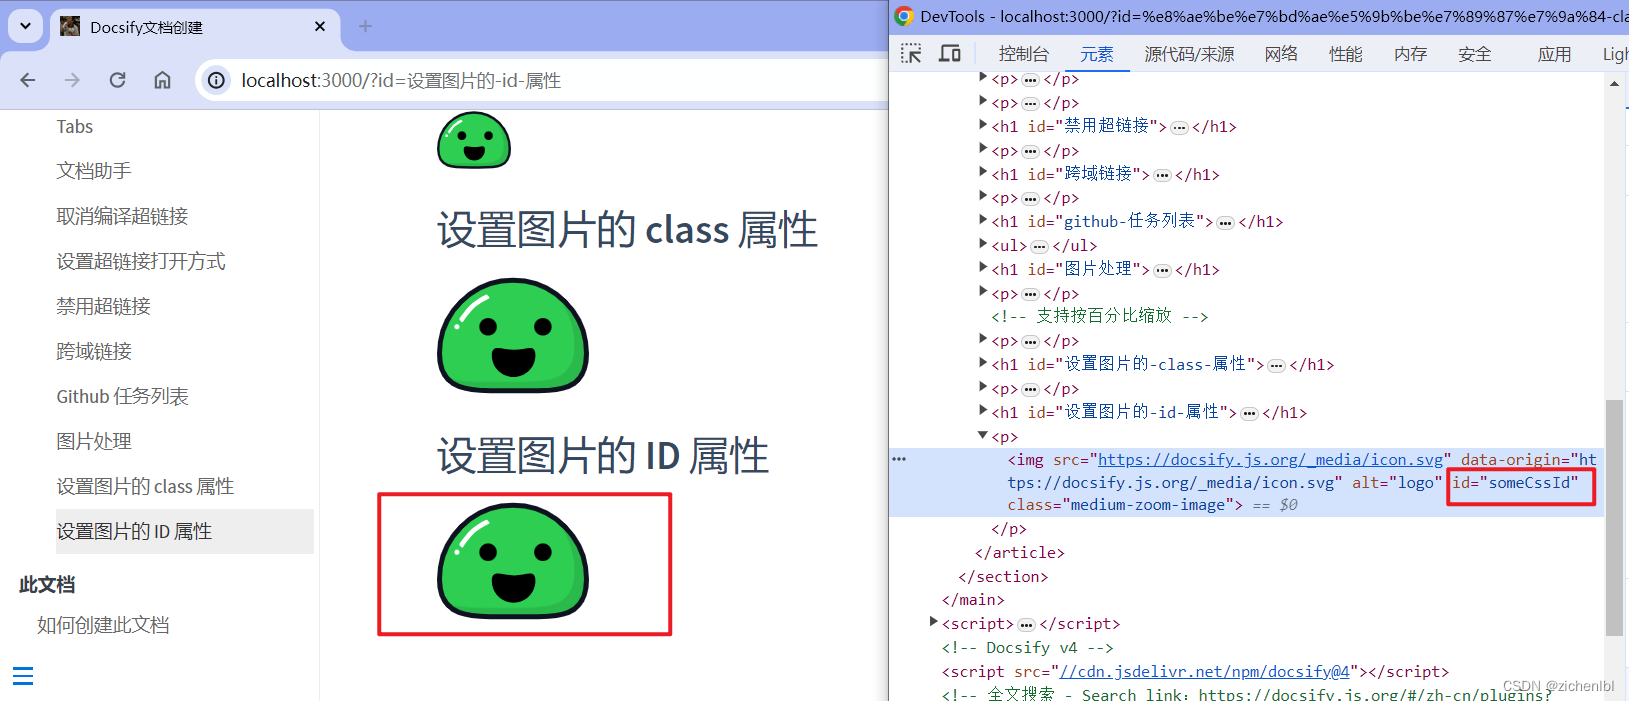
4.15.3 设置图片的 ID 属性
- 设置图片的 ID 属性
如下给图片添加 id 属性:someCssId。
在 docs\README.md 文件中添加如下。

浏览器访问 http://localhost:3000 预览效果。
图片 id 添加了 someCssId。
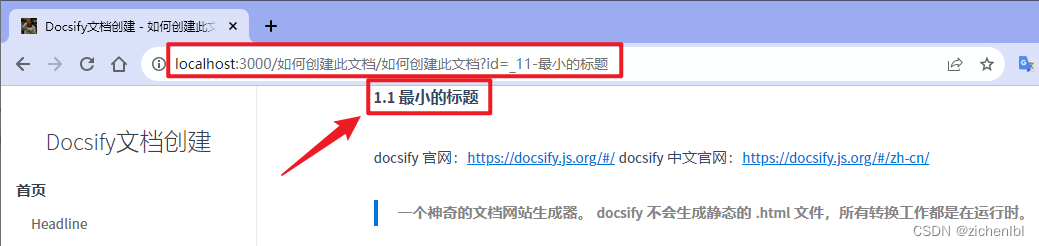
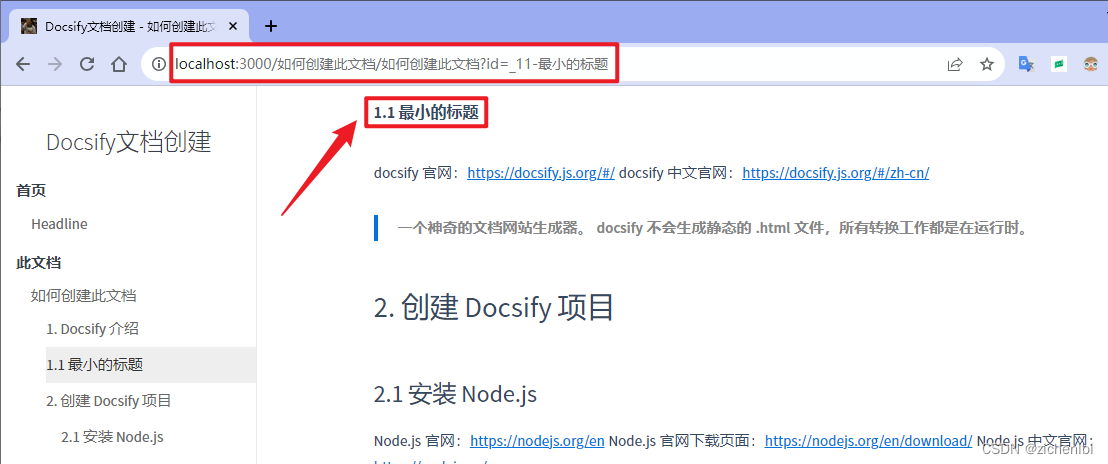
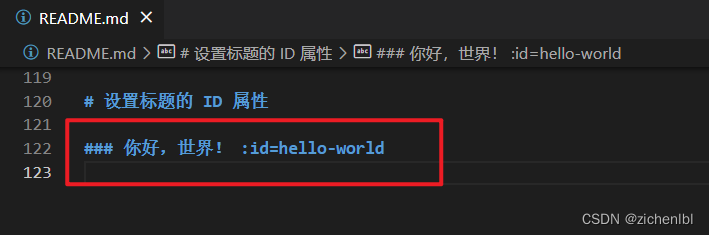
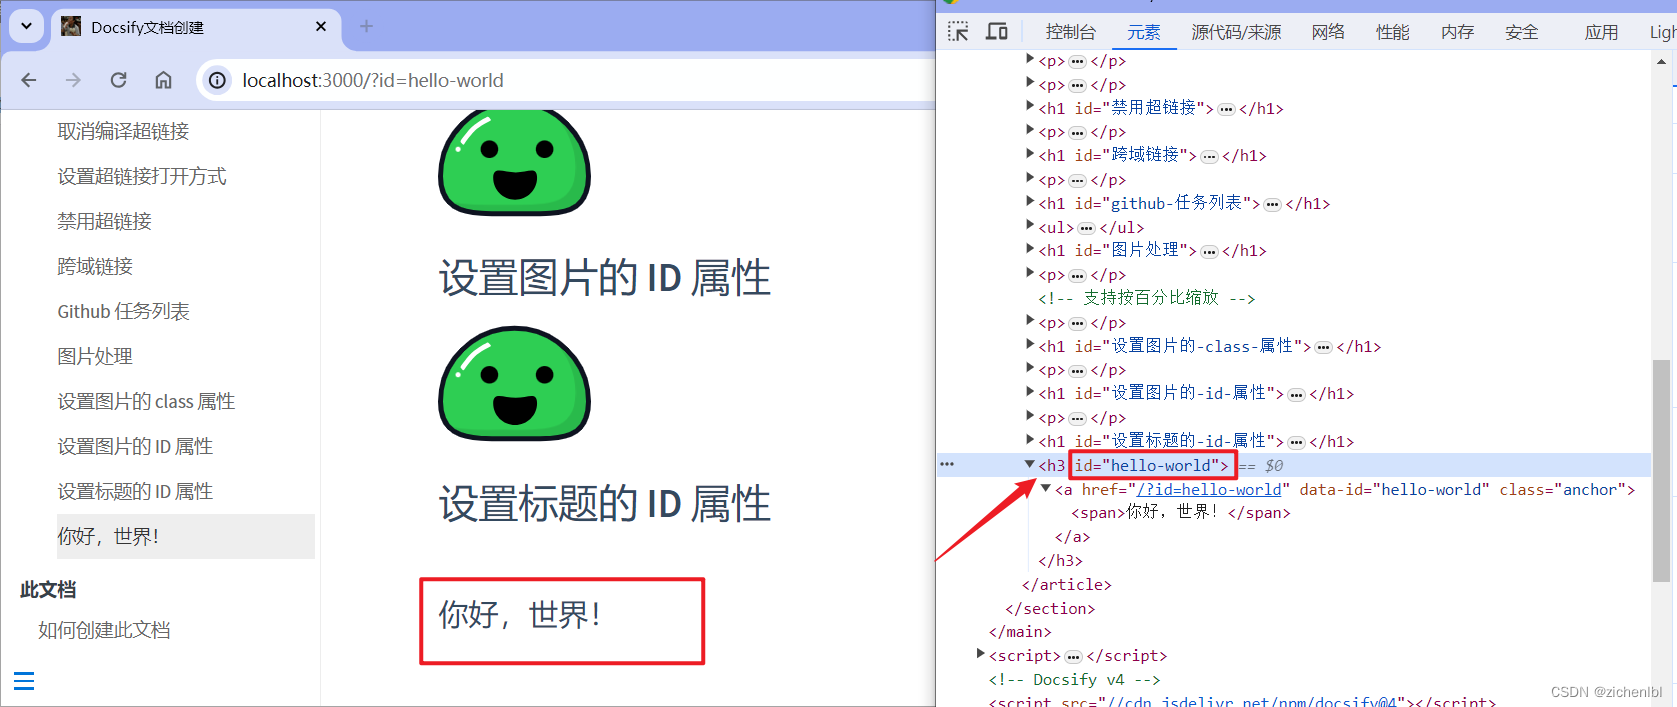
4.16 设置标题的 ID 属性
- 设置标题的 id 属性
如下给标题添加 id 属性:hello-world。
在 docs\README.md 文件中添加如下。
### 你好,世界! :id=hello-world
浏览器访问 http://localhost:3000 预览效果。
标题 id 添加了 hello-world。
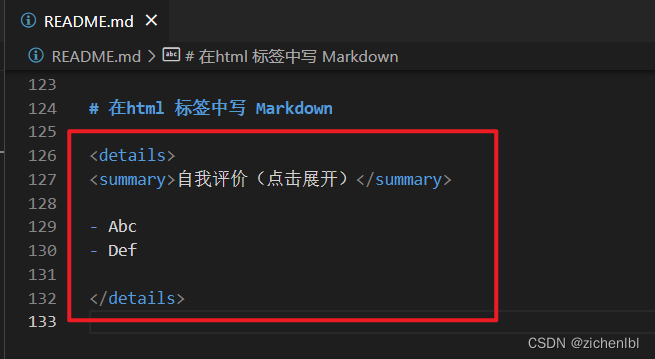
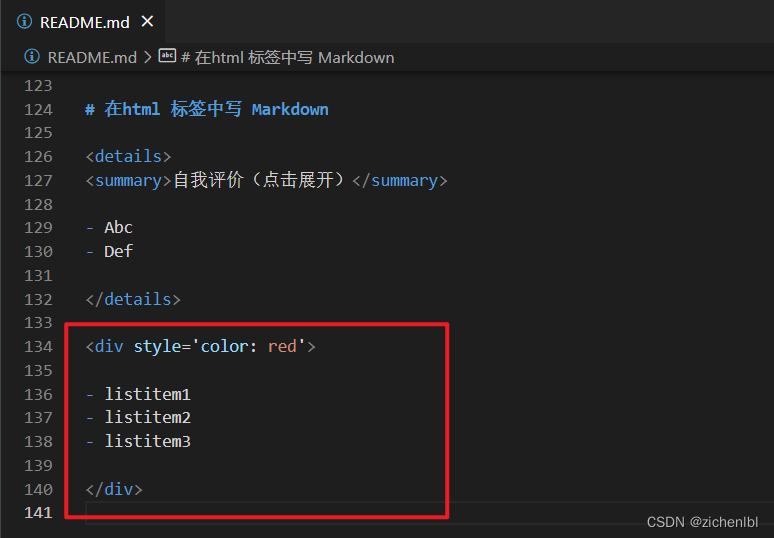
4.17 在 html 标签中写 Markdown
- html 标签中的 Markdown
当你需要在 details 元素中渲染 Markdown,你需要在 html 和 Markdown 内容中插入空行。
如下在 html 标签中写 Markdown 内容。
<details>
<summary>自我评价(点击展开)</summary>

- Abc
- Def

</details>
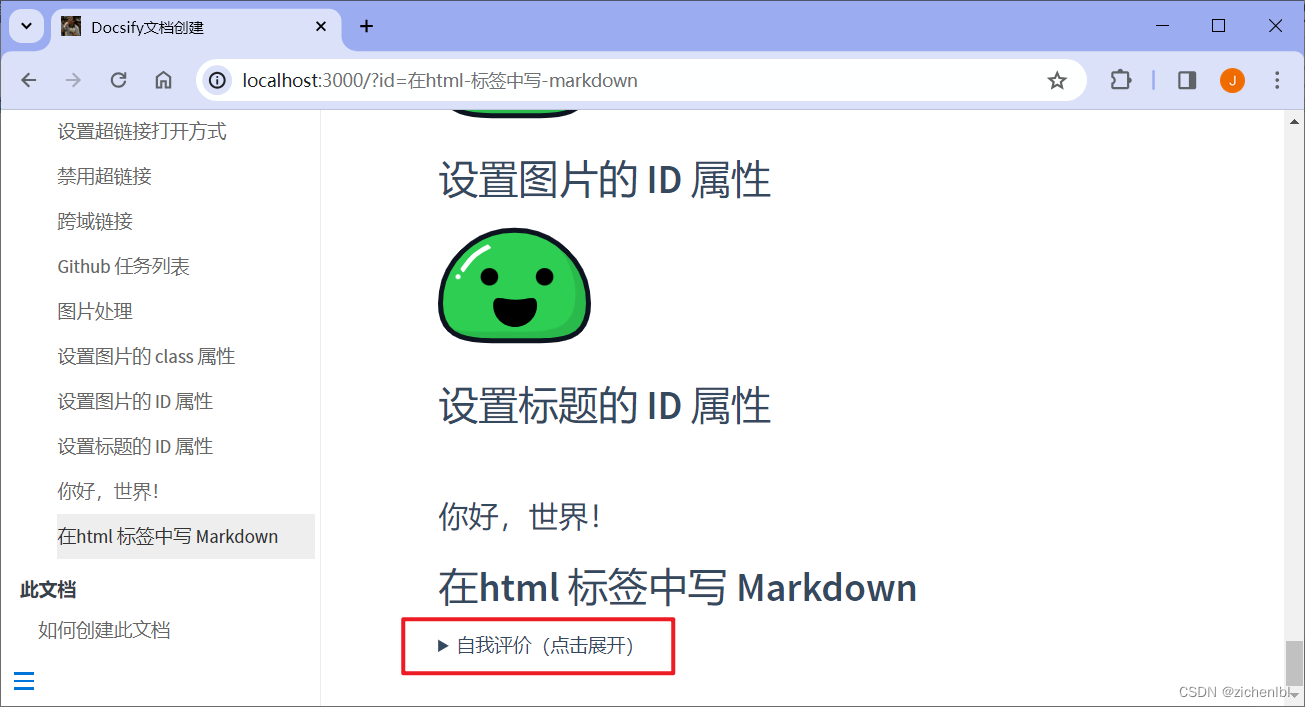
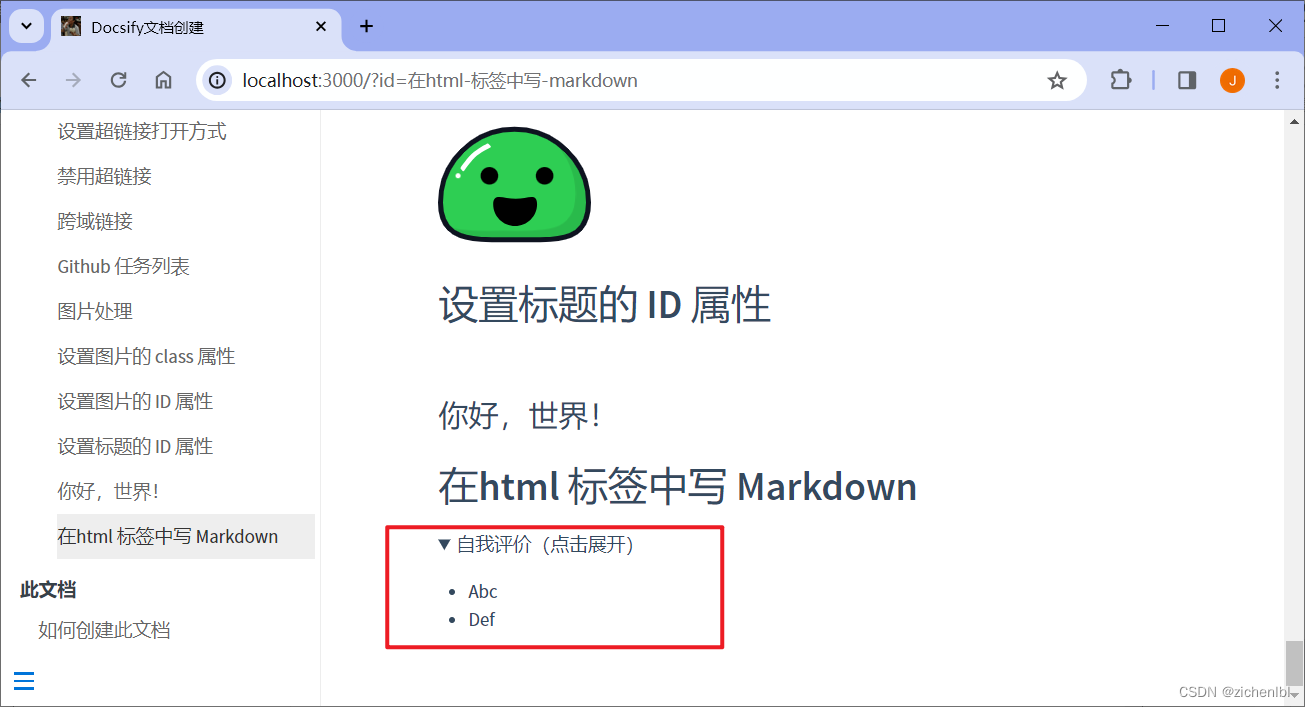
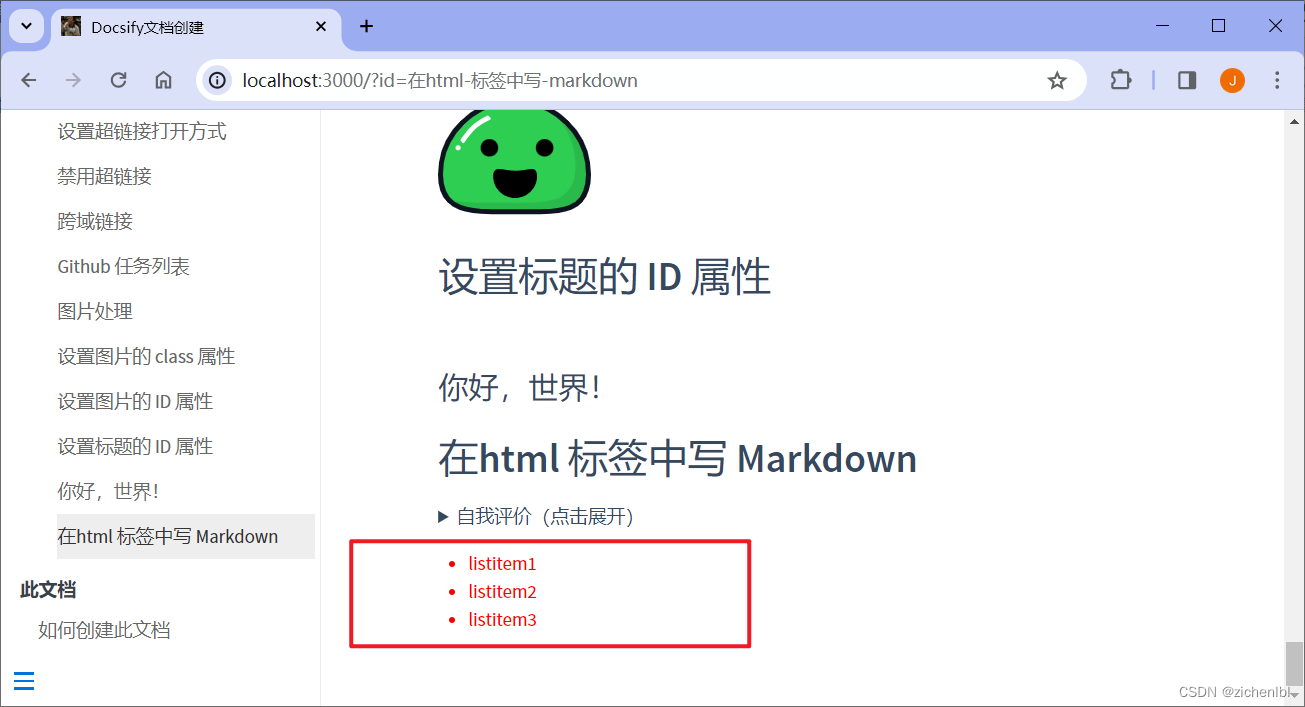
浏览器访问 http://localhost:3000 预览效果。
与 summary 标签配合使用可以为 details 定义标题。标题是可见的,用户点击标题时,会显示出 details。
如下,点击自我评价,展开后显示出 MarkDown 内容。
Markdown 内容也可以被 html 标签包裹。
<div style='color: red'>

- listitem
- listitem
- listitem

</div>
浏览器访问 http://localhost:3000 预览效果。
如下,Markdown 内容显示为红色。
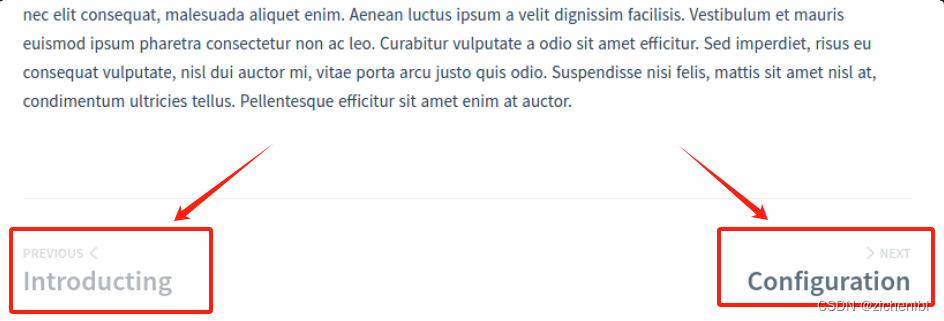
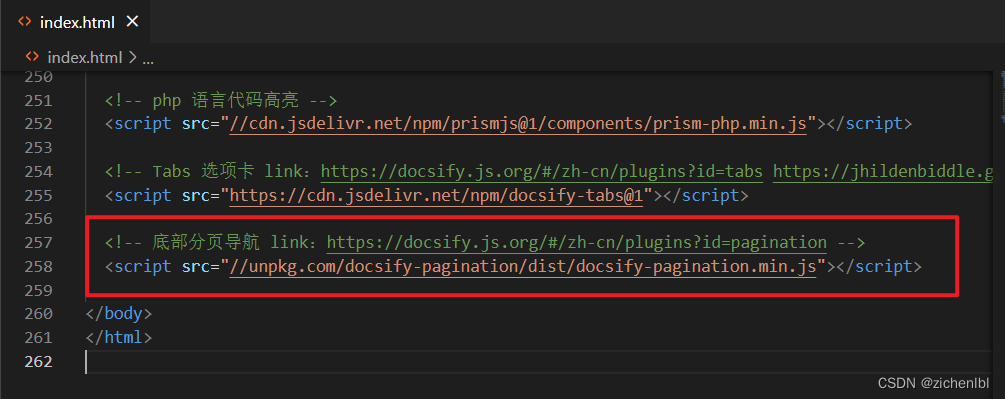
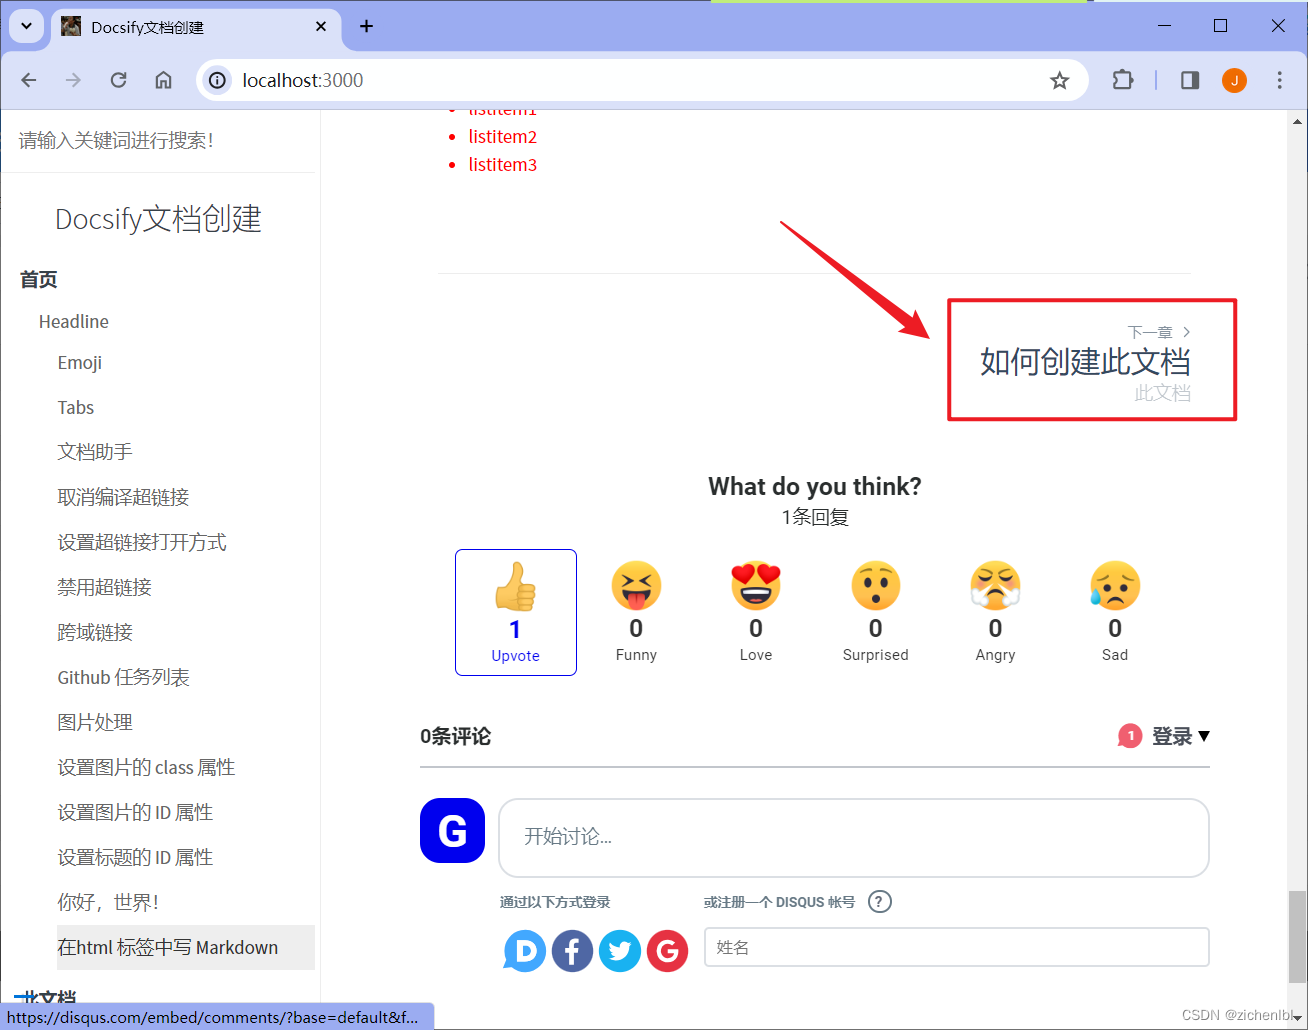
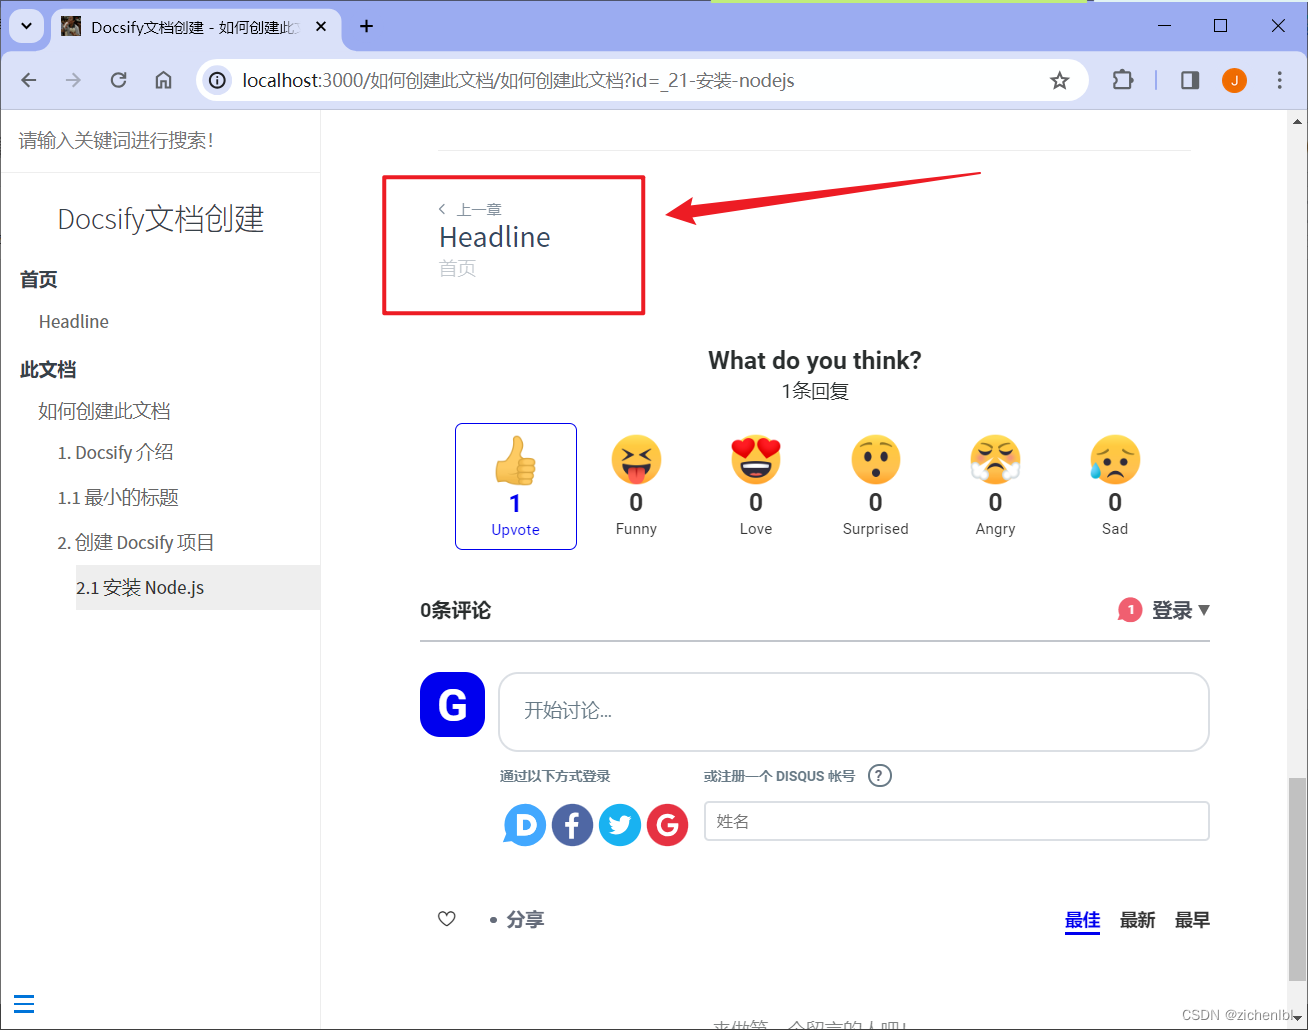
4.18 Pagination 底部分页导航
- Pagination 分页导航
在文章底部显示上一页,下一页导航。
添加配置项如下。
pagination: {
  previousText: '上一章',
  nextText: {
    '/en/': 'NEXT',
    '/': '下一章'
  },
  crossChapter: true,
  crossChapterText: true,
},
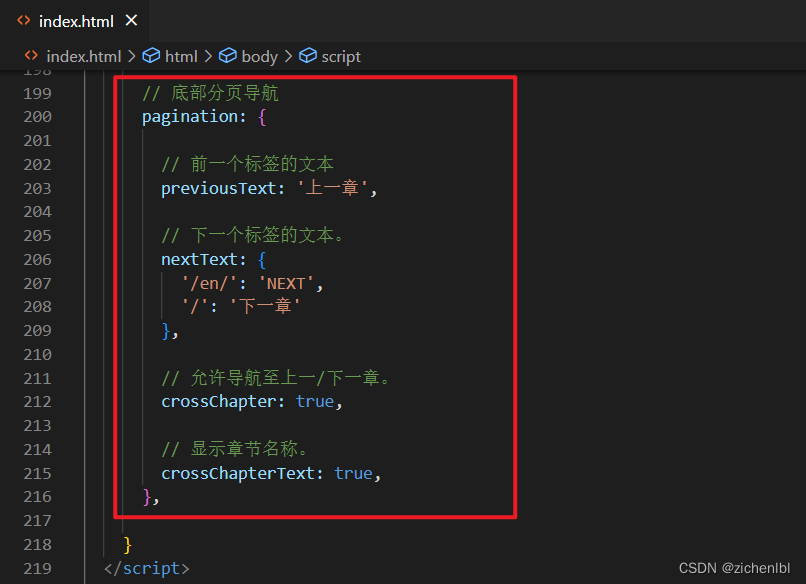
添加 js 配置项如下。
<script src="//unpkg.com/docsify-pagination/dist/docsify-pagination.min.js"></script>
浏览器访问 http://localhost:3000 预览效果。
文章底部显示上一页、下一页导航。
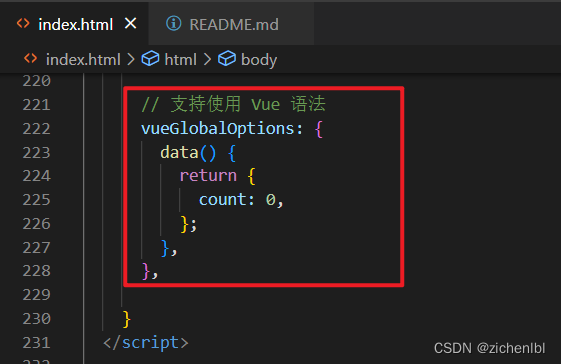
4.19 支持使用 Vue 语法
- 兼容 Vue
你可以直接在 Markdown 文件里写 Vue 代码,它将被执行。
详细使用说明:https://docsify.js.org/#/zh-cn/vue?id=%e5%85%bc%e5%ae%b9-vue
添加配置项如下。
vueGlobalOptions: {
  data() {
    return {
      count: 0,
    };
  },
},
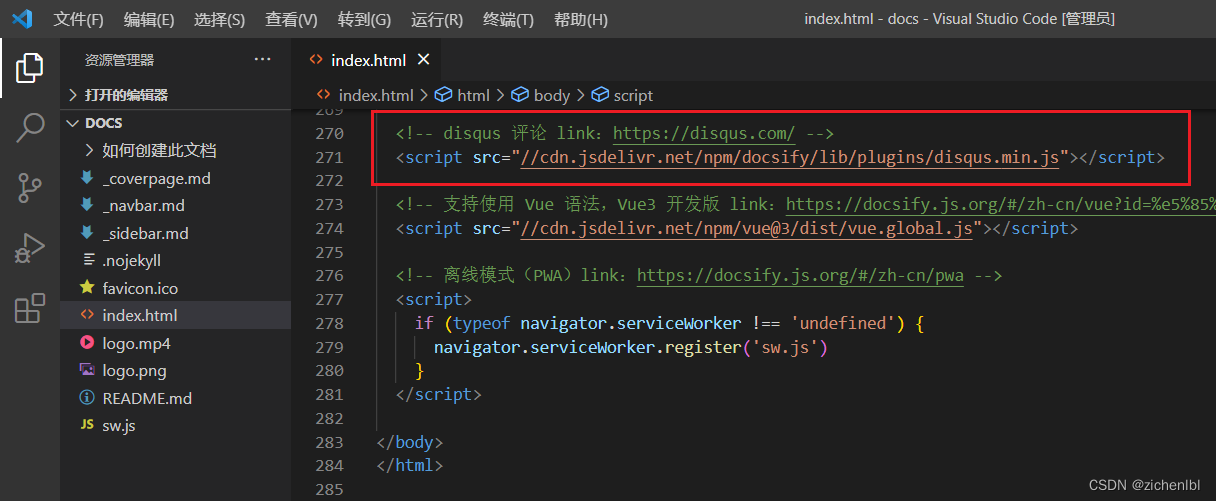
添加 js 配置项如下。添加 Vue3 开发版。
<script src="//cdn.jsdelivr.net/npm/vue@3/dist/vue.global.js"></script>

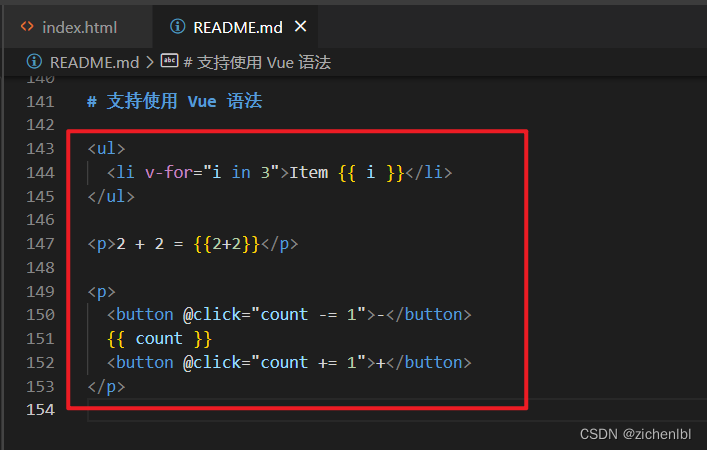
在 docs\README.md 文件中添加如下。
<ul>
  <li v-for="i in 3">Item {{ i }}</li>
</ul>

<p>2 + 2 = {{2+2}}</p>

<p>
  <button @click="count -= 1">-</button>
  {{ count }}
  <button @click="count += 1">+</button>
</p>
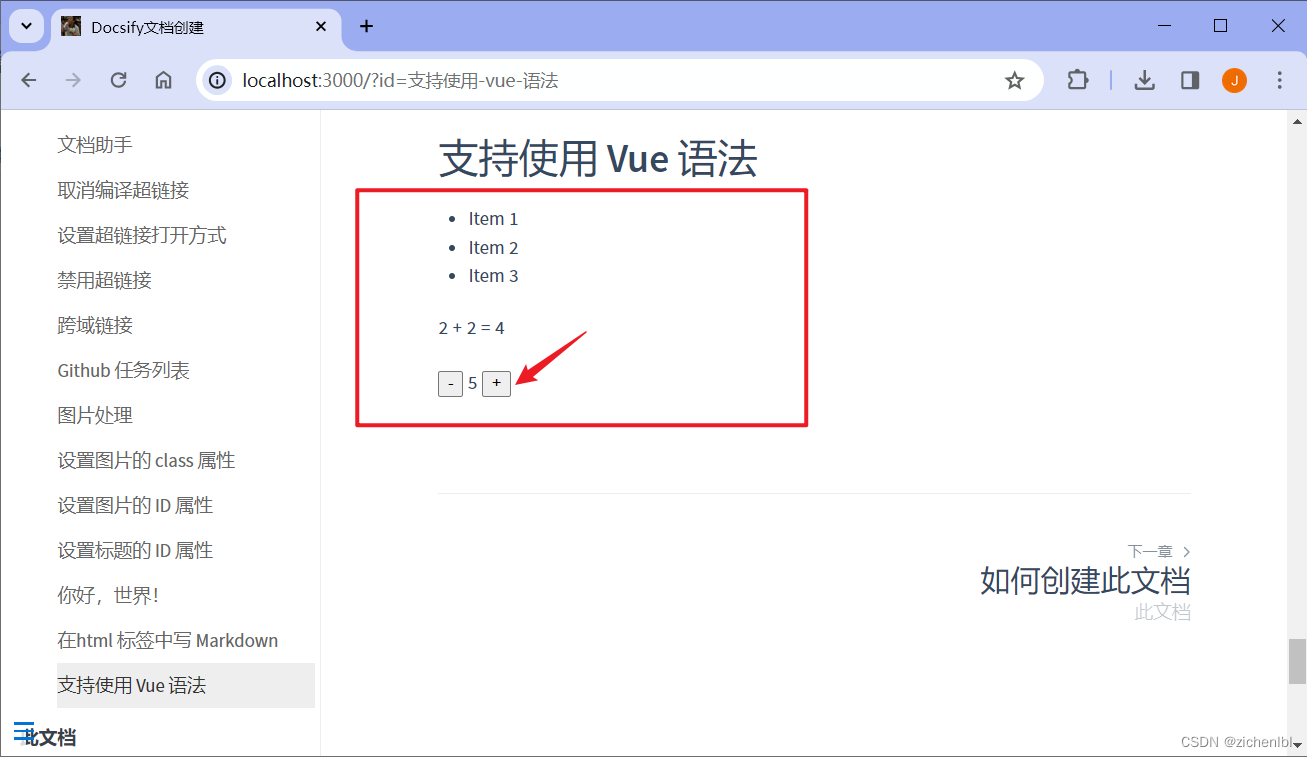
浏览器访问 http://localhost:3000 预览效果。
点击加号可以改变中间数字的值。
4.20 离线模式(PWA)
- 离线模式
Progressive Web Apps (PWA) 是一项融合 Web 和 Native 应用各项优点的解决方案。我们可以利用其支持离线功能的特点,让我们的网站可以在信号差或者离线状态下正常运行。 要使用它也非常容易。
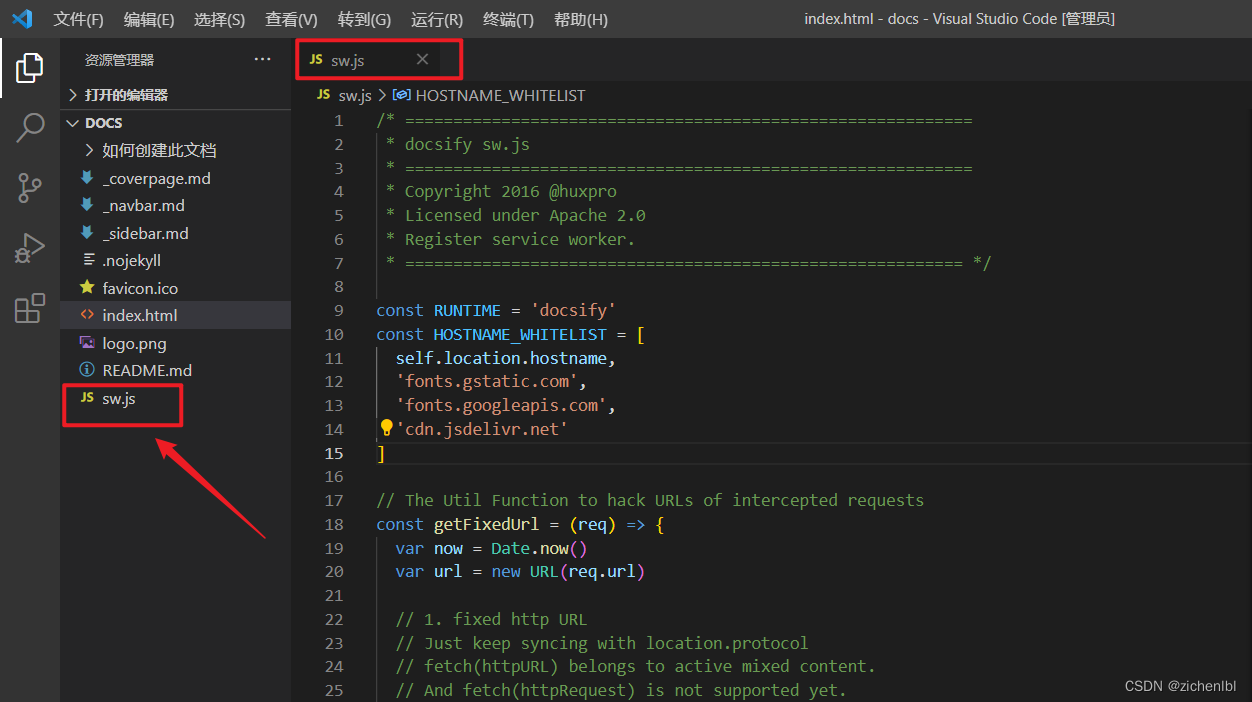
在 docs/ 目录中创建一个 sw.js,并粘贴以下代码。
/* ===========================================================
 * docsify sw.js
 * ===========================================================
 * Copyright 2016 @huxpro
 * Licensed under Apache 2.0
 * Register service worker.
 * ========================================================== */

const RUNTIME = 'docsify'
const HOSTNAME_WHITELIST = [
  self.location.hostname,
  'fonts.gstatic.com',
  'fonts.googleapis.com',
  'cdn.jsdelivr.net'
]

// The Util Function to hack URLs of intercepted requests
const getFixedUrl = (req) => {
  var now = Date.now()
  var url = new URL(req.url)

  // 1. fixed http URL
  // Just keep syncing with location.protocol
  // fetch(httpURL) belongs to active mixed content.
  // And fetch(httpRequest) is not supported yet.
  url.protocol = self.location.protocol

  // 2. add query for caching-busting.
  // Github Pages served with Cache-Control: max-age=600
  // max-age on mutable content is error-prone, with SW life of bugs can even extend.
  // Until cache mode of Fetch API landed, we have to workaround cache-busting with query string.
  // Cache-Control-Bug: https://bugs.chromium.org/p/chromium/issues/detail?id=453190
  if (url.hostname === self.location.hostname) {
    url.search += (url.search ? '&' : '?') + 'cache-bust=' + now
  }
  return url.href
}

/**
 *  @Lifecycle Activate
 *  New one activated when old isnt being used.
 *
 *  waitUntil(): activating ====> activated
 */
self.addEventListener('activate', event => {
  event.waitUntil(self.clients.claim())
})

/**
 *  @Functional Fetch
 *  All network requests are being intercepted here.
 *
 *  void respondWith(Promise<Response> r)
 */
self.addEventListener('fetch', event => {
  // Skip some of cross-origin requests, like those for Google Analytics.
  if (HOSTNAME_WHITELIST.indexOf(new URL(event.request.url).hostname) > -1) {
    // Stale-while-revalidate
    // similar to HTTP's stale-while-revalidate: https://www.mnot.net/blog/2007/12/12/stale
    // Upgrade from Jake's to Surma's: https://gist.github.com/surma/eb441223daaedf880801ad80006389f1
    const cached = caches.match(event.request)
    const fixedUrl = getFixedUrl(event.request)
    const fetched = fetch(fixedUrl, { cache: 'no-store' })
    const fetchedCopy = fetched.then(resp => resp.clone())

    // Call respondWith() with whatever we get first.
    // If the fetch fails (e.g disconnected), wait for the cache.
    // If there’s nothing in cache, wait for the fetch.
    // If neither yields a response, return offline pages.
    event.respondWith(
      Promise.race([fetched.catch(_ => cached), cached])
        .then(resp => resp || fetched)
        .catch(_ => { /* eat any errors */ })
    )

    // Update the cache with the version we fetched (only for ok status)
    event.waitUntil(
      Promise.all([fetchedCopy, caches.open(RUNTIME)])
        .then(([response, cache]) => response.ok && cache.put(event.request, response))
        .catch(_ => { /* eat any errors */ })
    )
  }
})
现在,到 index.html 里注册它。这个功能只能工作在一些现代浏览器上,所以我们需要加个判断。
index.html
<script>
  if (typeof navigator.serviceWorker !== 'undefined') {
    navigator.serviceWorker.register('sw.js')
  }
</script>
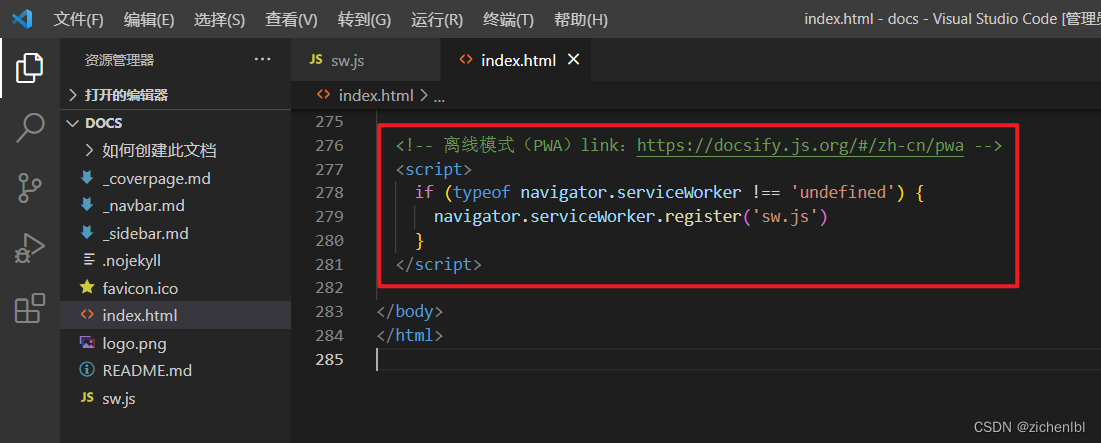
发布你的网站,并开始享受离线模式的魔力吧!ghost 当然你现在看到的 docsify 的文档网站已经支持离线模式了,你可以关掉 Wi-Fi 体验一下。
4.21 文件嵌入
- 文件嵌入
docsify 4.6 开始支持嵌入任何类型的文件到文档里。你可以将文件当成 iframe、video、audio 或者 code block,如果是 Markdown 文件,甚至可以直接插入到当前文档里。
当前,嵌入的类型是通过文件后缀自动识别的,这是目前支持的类型:
| 文件类型 | 文件后缀 |
|---|---|
| iframe | .html, .htm |
| markdown | .markdown, .md |
| audio | .mp3 |
| video | .mp4, .ogg |
| code | other file extension |
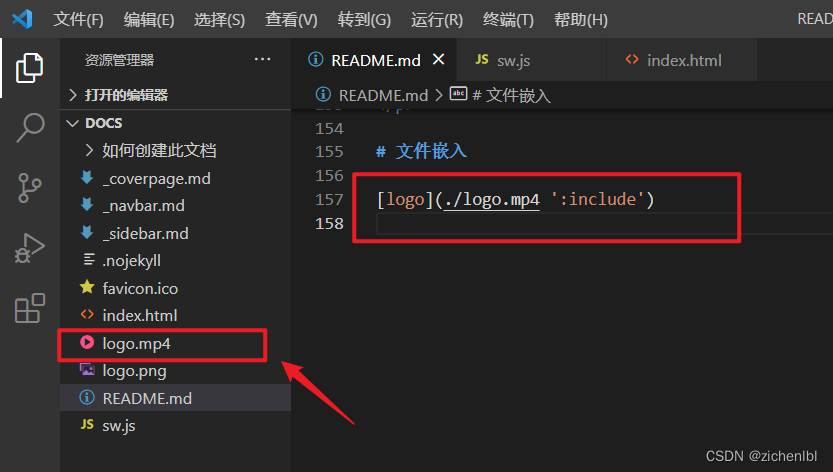
在 docs\ 目录中添加 logo.mp4 文件。
在 docs\README.md 文件中添加如下。
[logo](./logo.mp4 ':include')
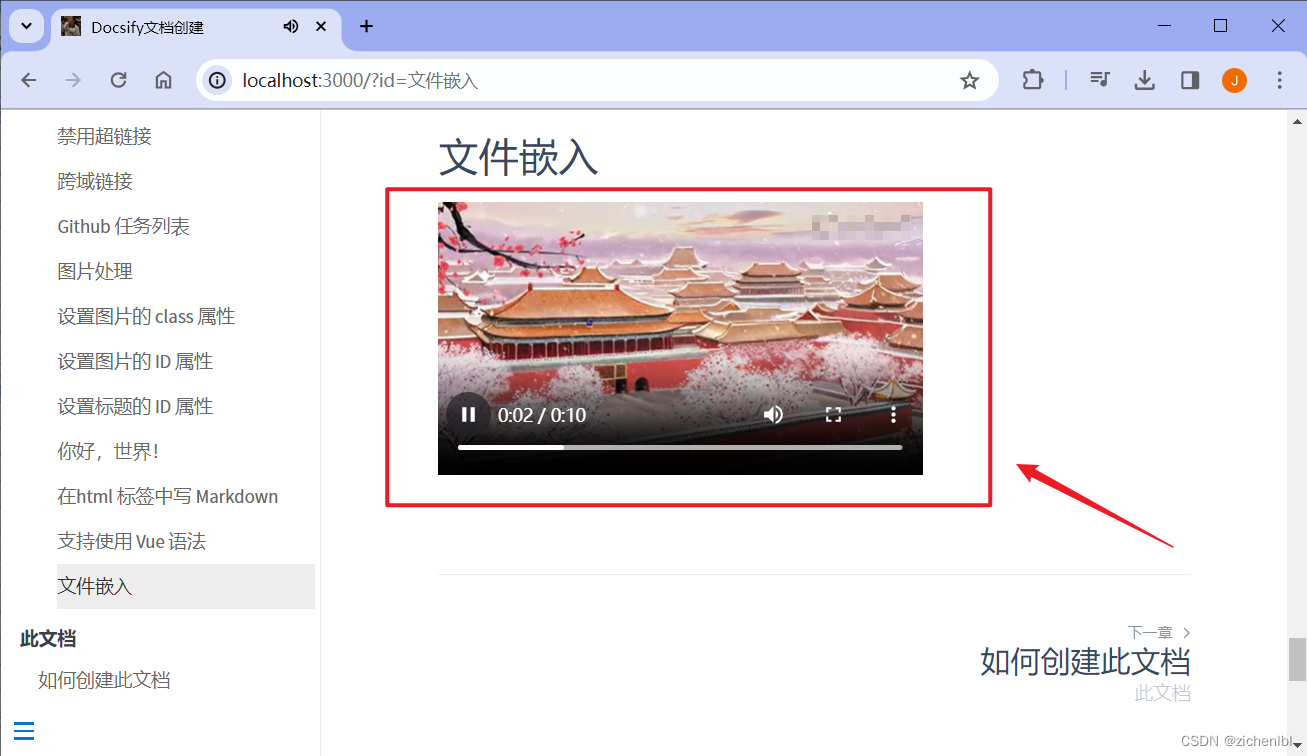
浏览器访问 http://localhost:3000 预览效果。
嵌入可以播放的 mp4 文件。
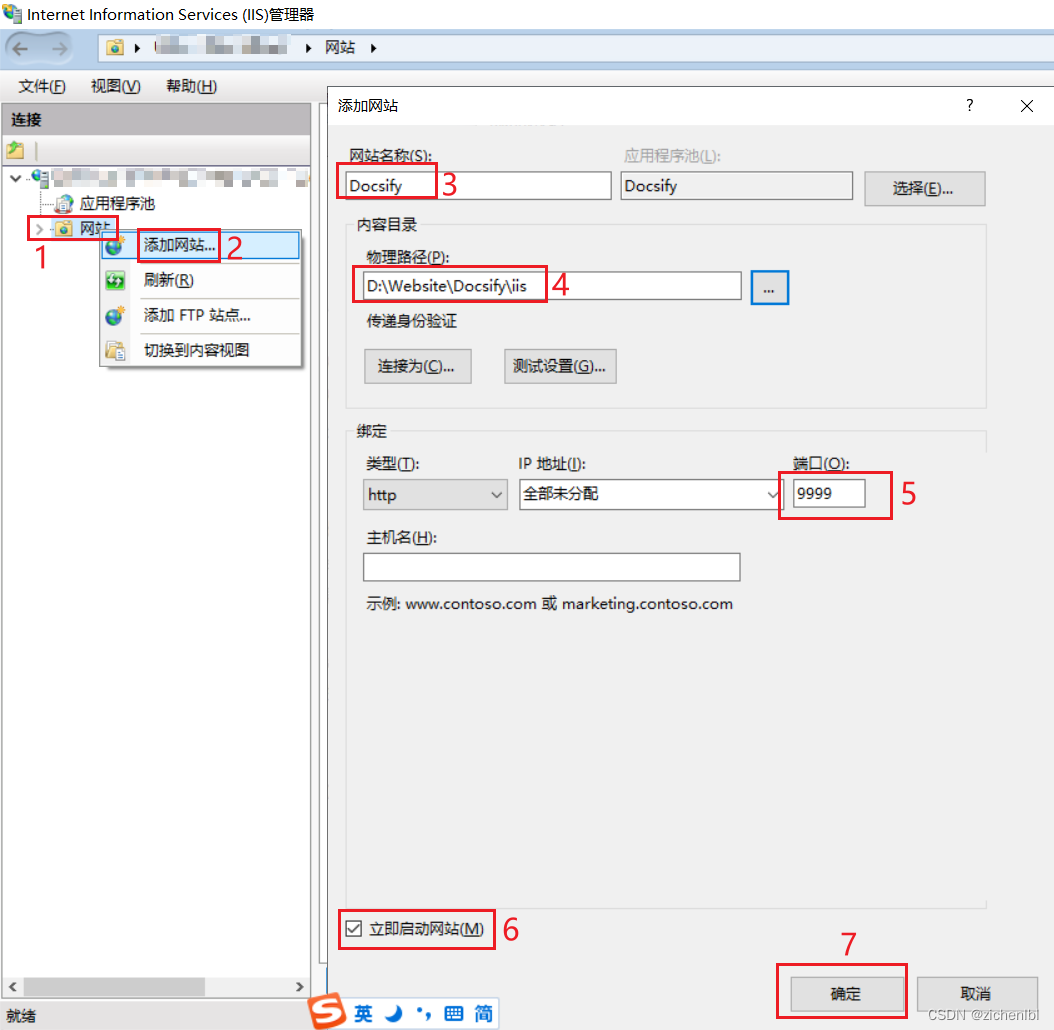
4.22 IIS 部署
4.22.1 添加网站
Docsify 项目目录:D:\Website\Docsify\iis
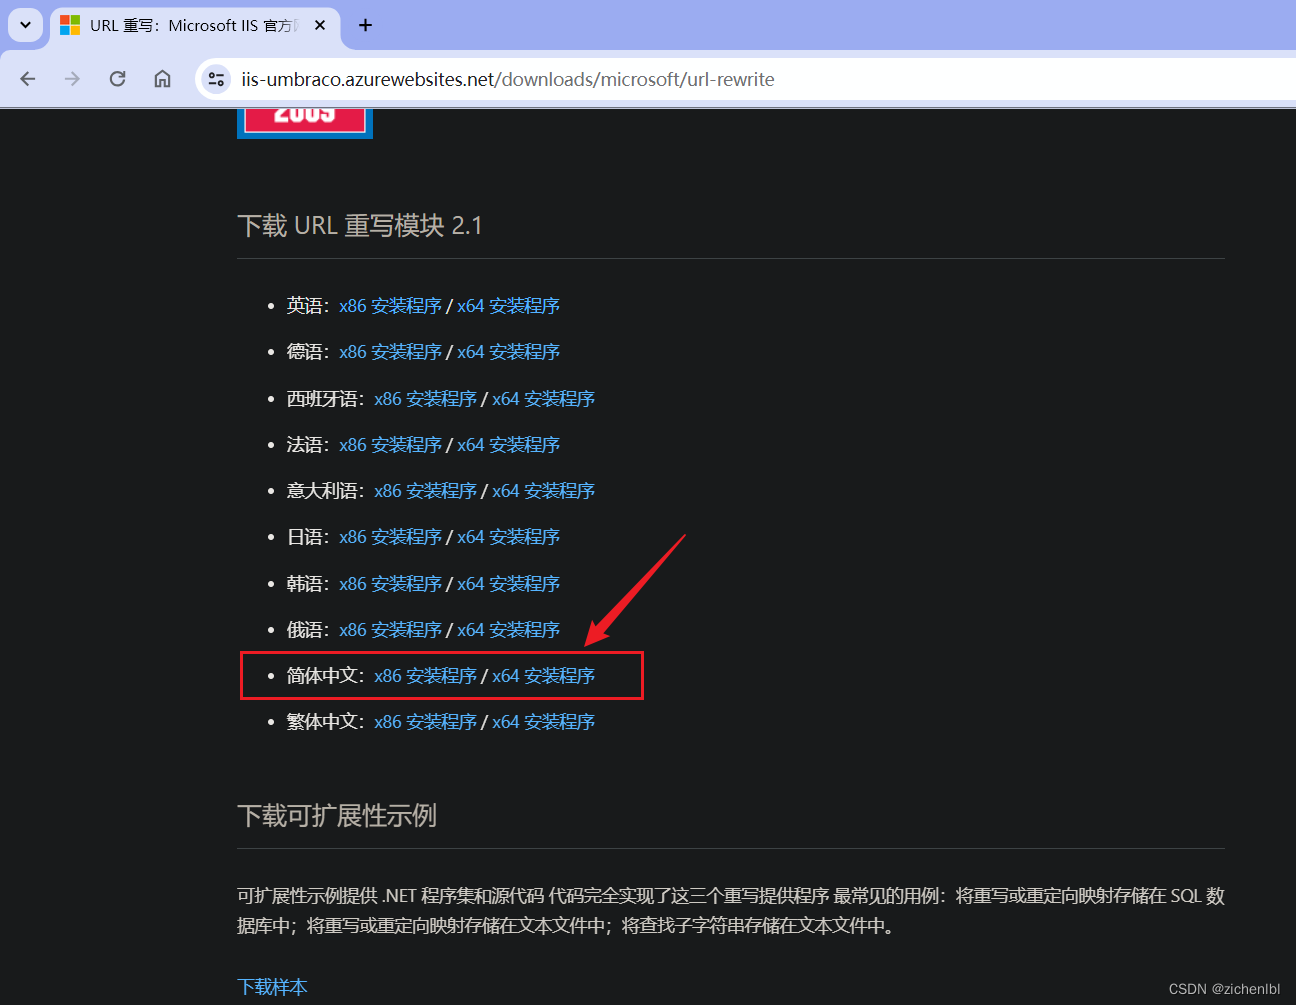
4.22.2 安装 url 重写
下载地址1:https://iis-umbraco.azurewebsites.net/downloads/microsoft/url-rewrite
下载地址2:https://www.iis.net/downloads/microsoft/url-rewrite
修改 D:\Website\Docsify\iis\web.config文件。标识 md 文件,请求重写到 /index.html 页面。
<?xml version="1.0" encoding="UTF-8"?>
<configuration>
    <system.webServer>
        <staticContent>
            <mimeMap fileExtension=".md" mimeType="text/md" />
        </staticContent>
    <rewrite>
      <rules>
        <rule name="ReactRouter" patternSyntax="ECMAScript" stopProcessing="true">
          <match url=".*" />
          <conditions>
            <add input="{HTTP_METHOD}" pattern="^GET$" />
            <add input="{HTTP_ACCEPT}" pattern="^text/html" />
            <add input="{REQUEST_FILENAME}" matchType="IsFile" negate="true" />
          </conditions>
          <action type="Rewrite" url="/index.html" />
        </rule>
      </rules>
    </rewrite>
    </system.webServer>
</configuration>
4.23 网页保存为应用


4.24 不联网使用本地 js 文件
- 不联网使用本地 js 文件
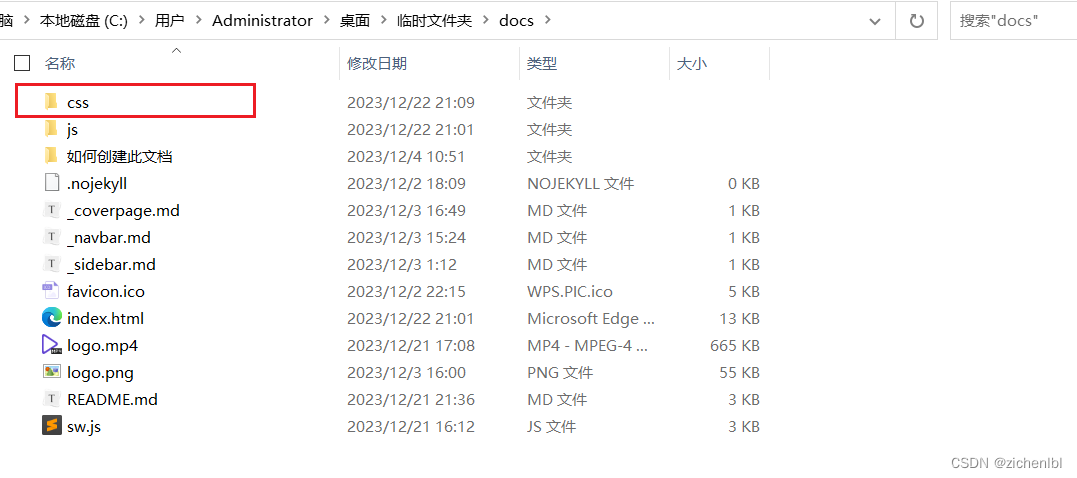
新建 js 文件夹,在里面存放本地 js 文件。

下载需要的 js 文件。

访问 js 地址,右键另存为,保存到本地。
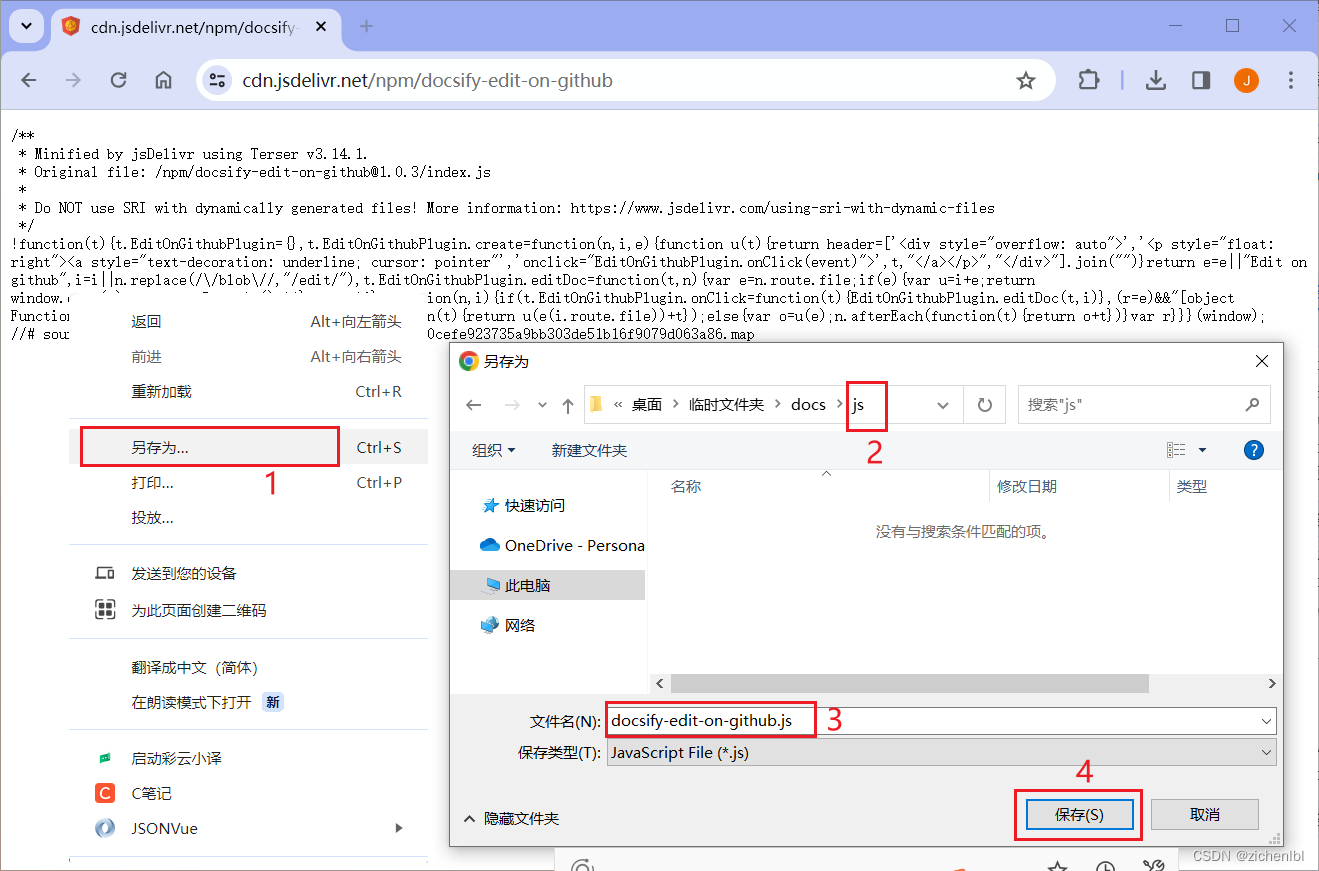
然后修改为本地 js 引用地址。
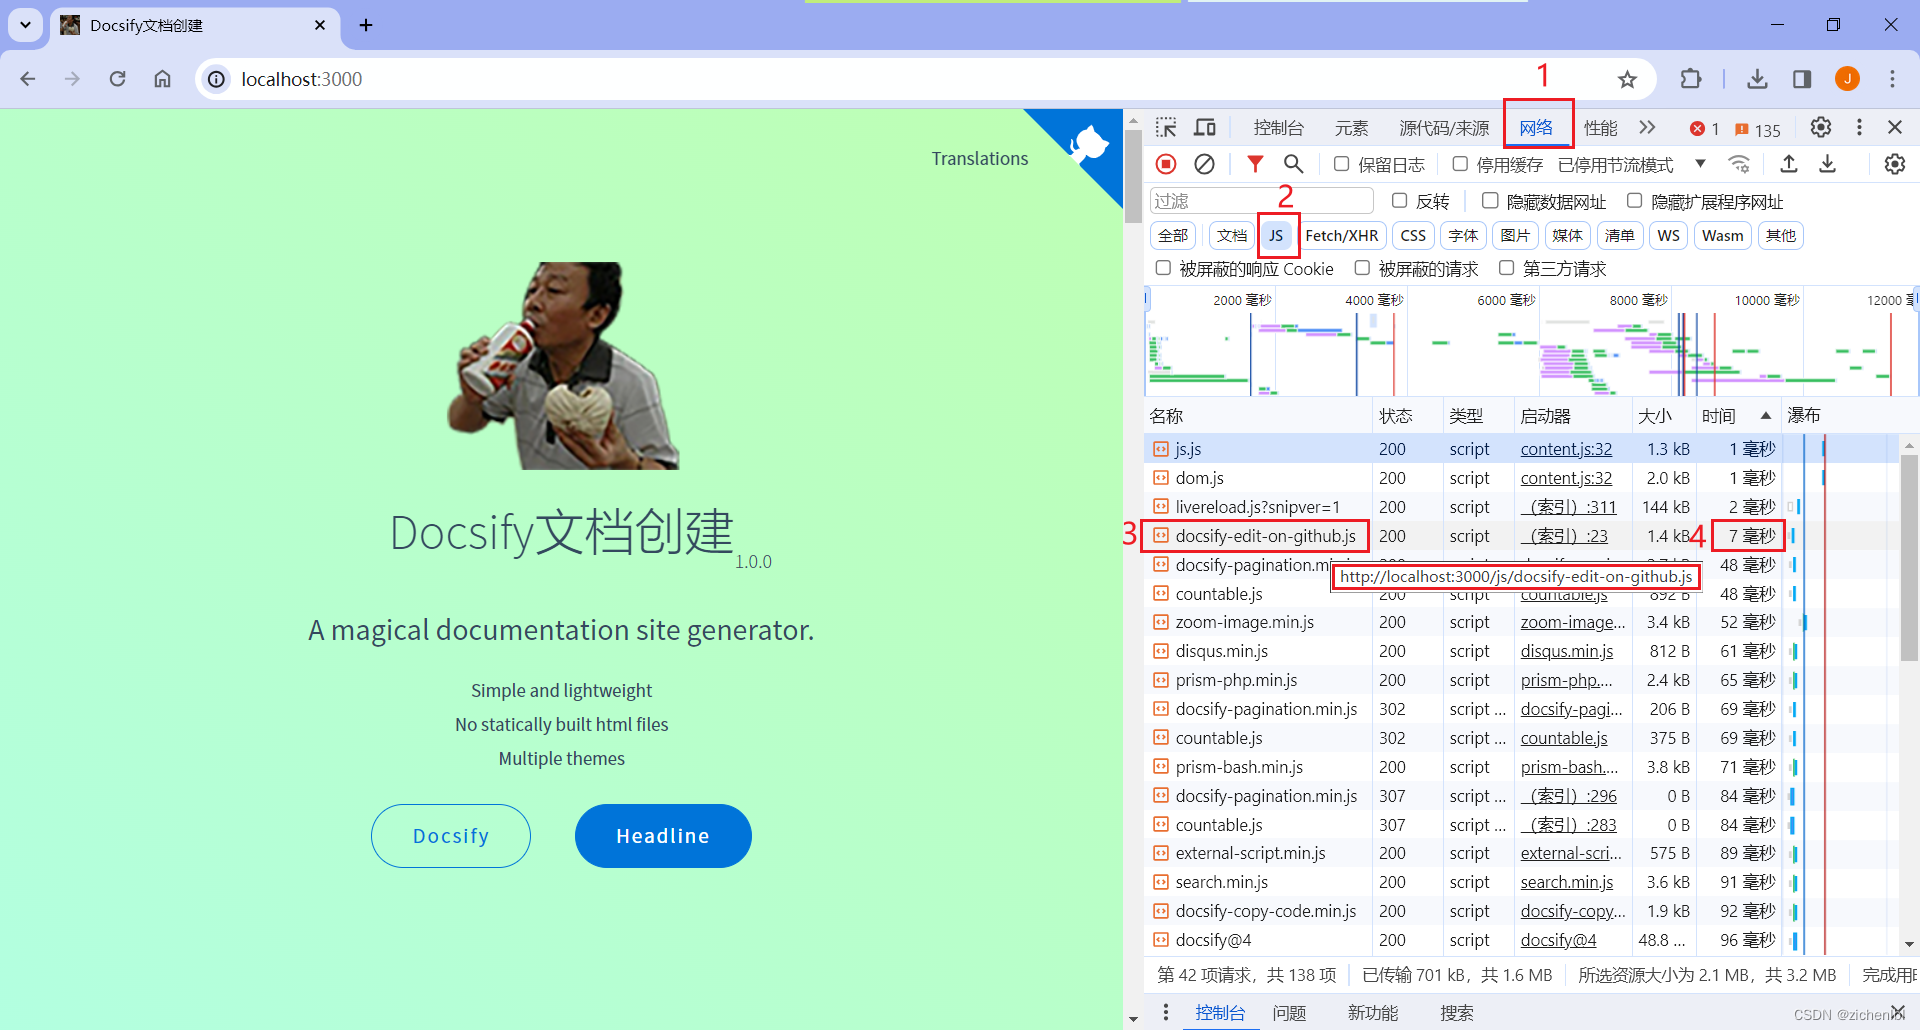
浏览器访问 http://localhost:3000 预览效果。
然后再保存其它 js 文件到本地。
4.25 不联网使用本地 css 文件
- 不联网使用本地 css 文件
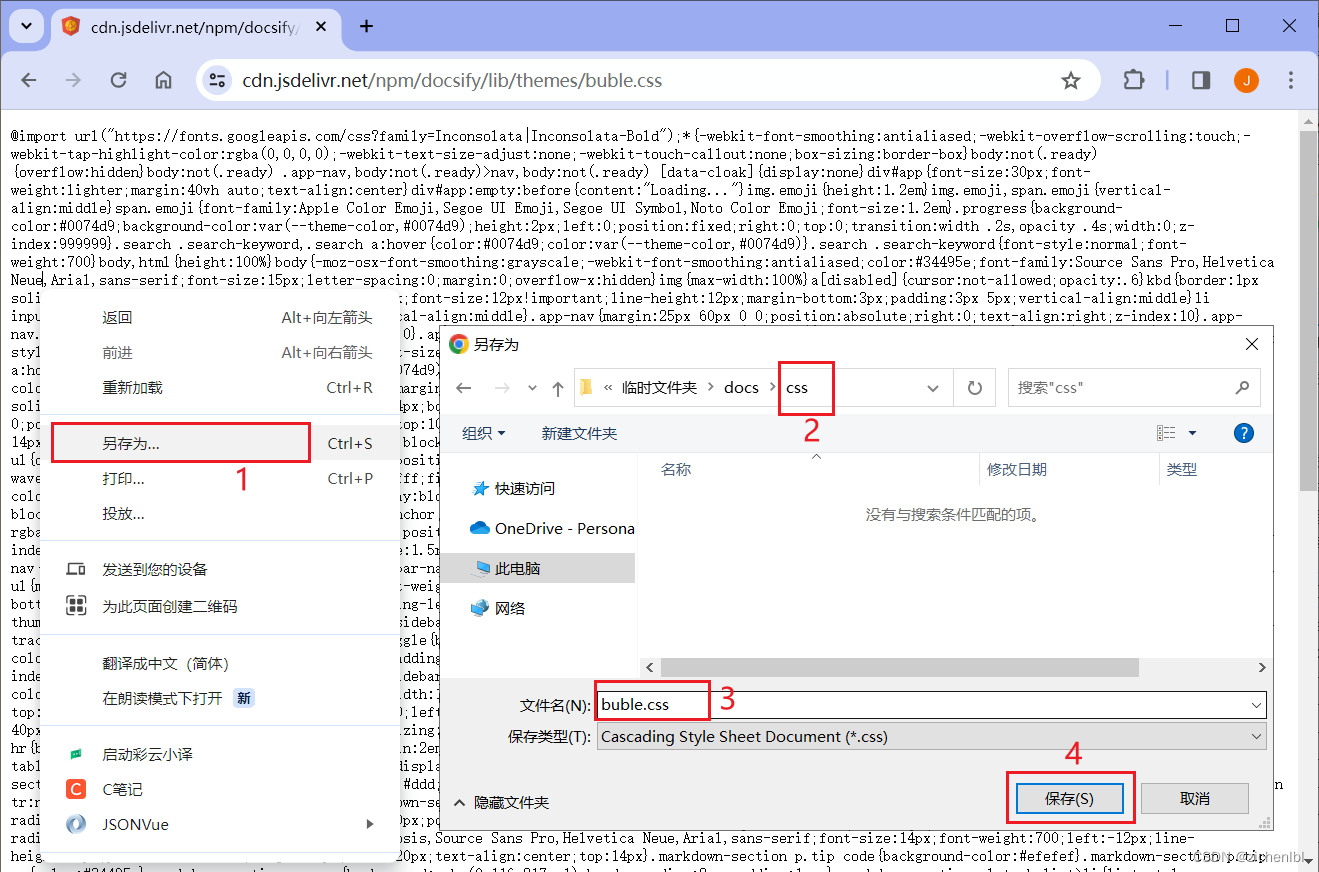
新建 css 文件夹,在里面存放本地 css 文件。
下载需要的 css 文件。
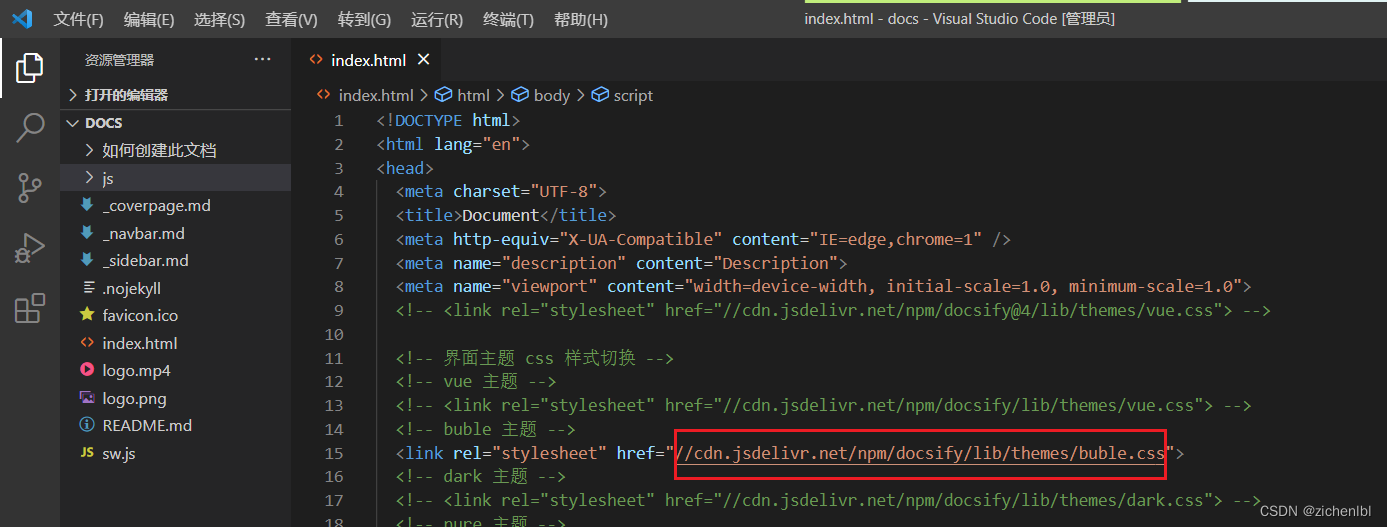
访问 css 地址,右键另存为,保存到本地。
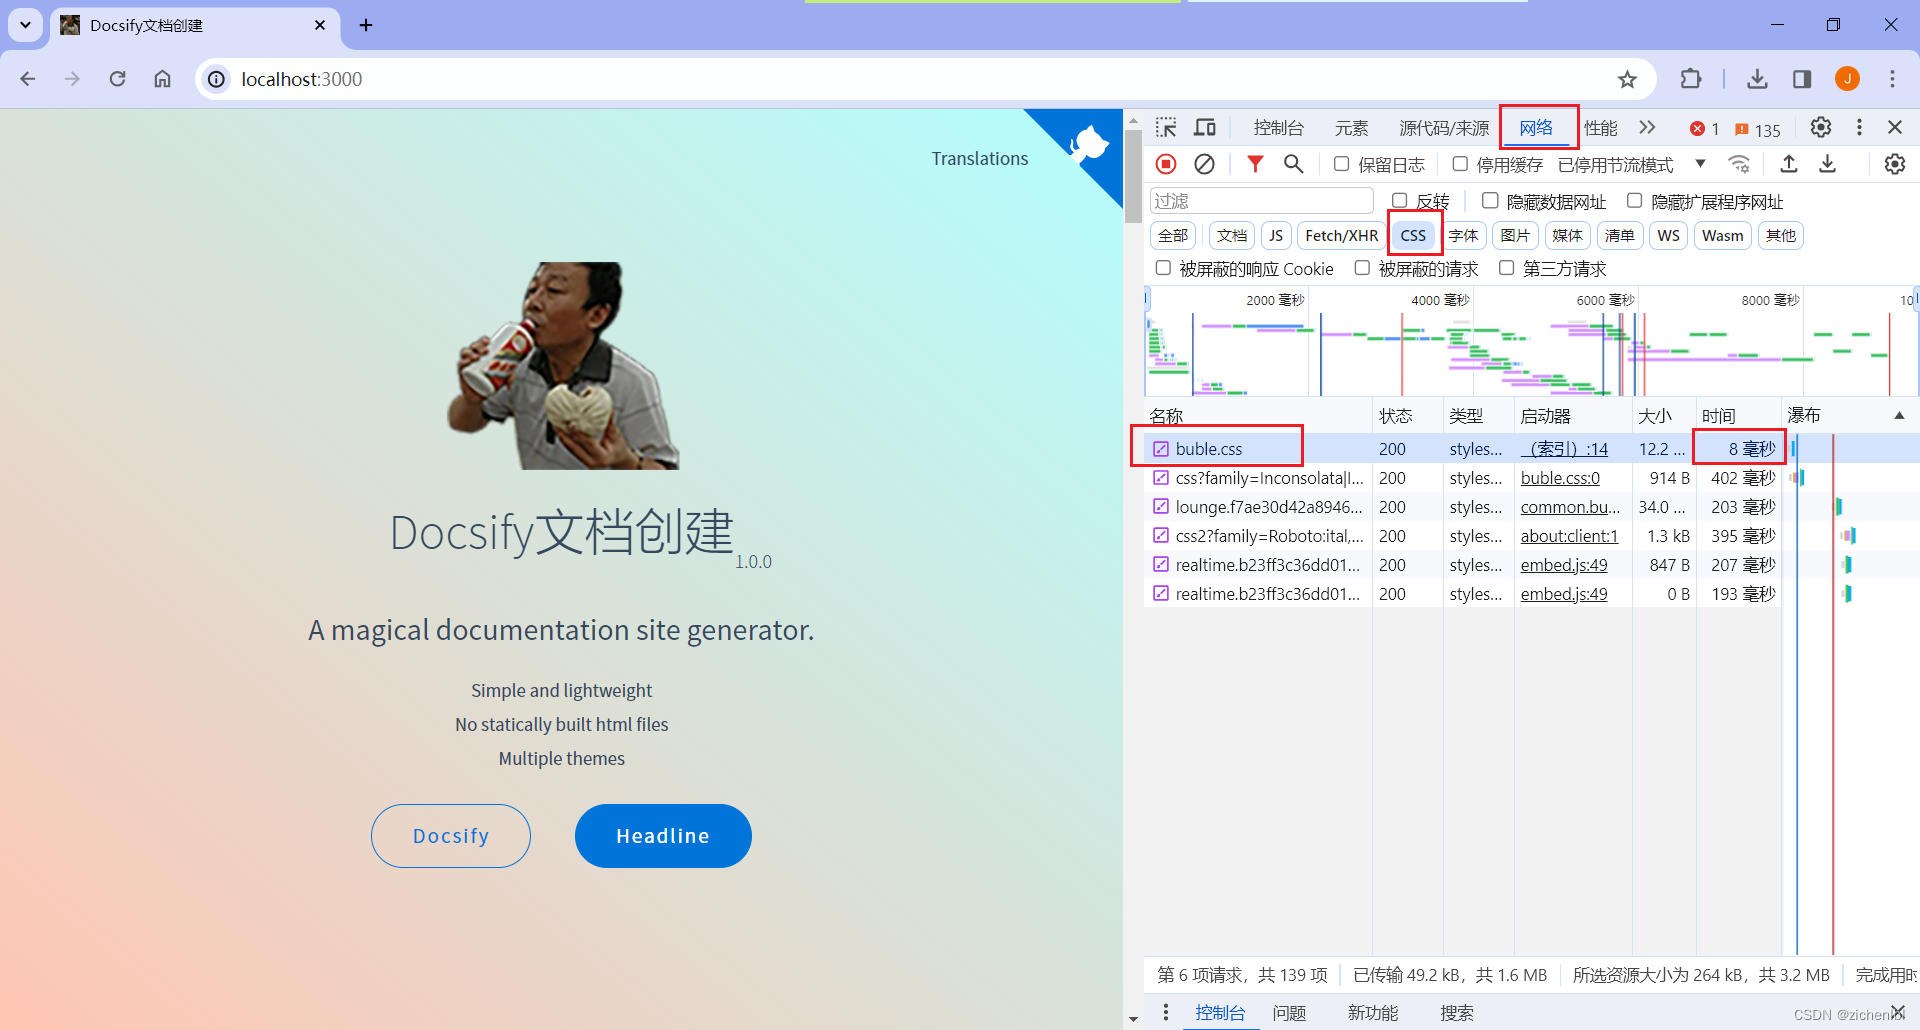
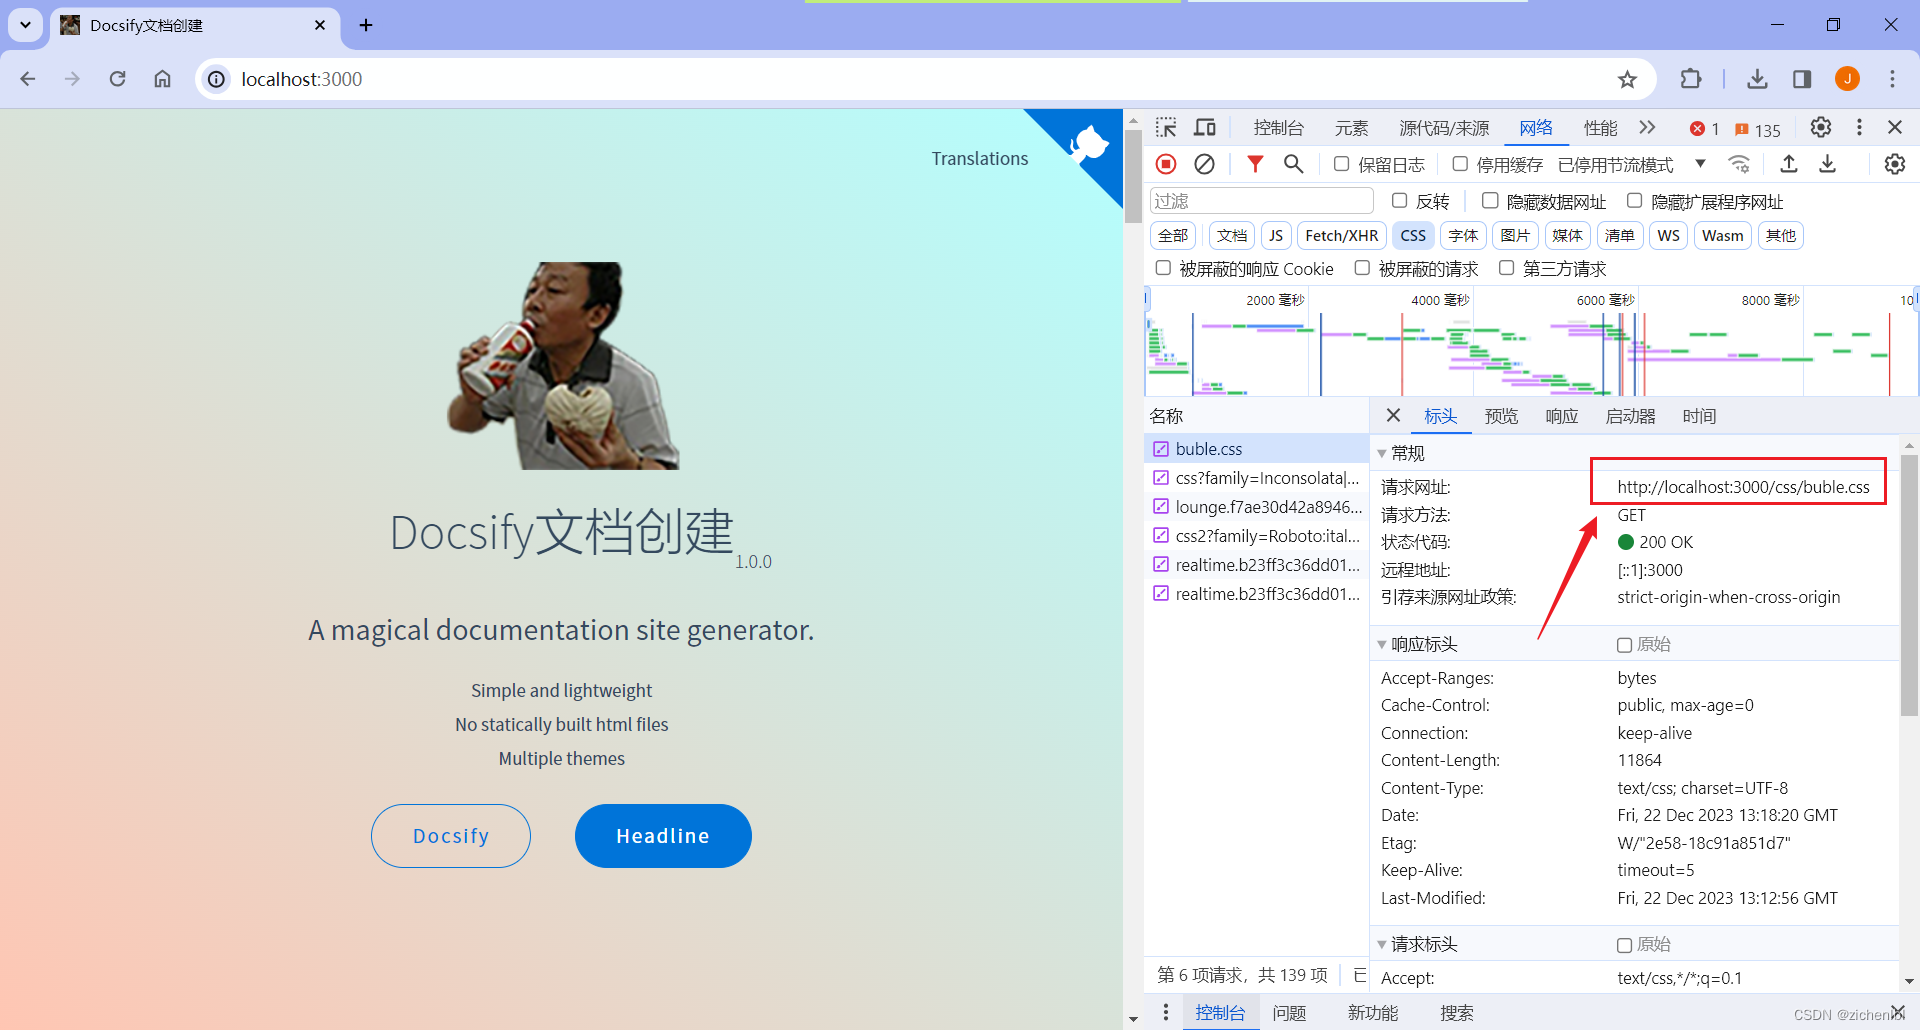
然后修改为本地 css 引用地址。

浏览器访问 http://localhost:3000 预览效果。
然后再保存其它 css 文件到本地。
5. 交互
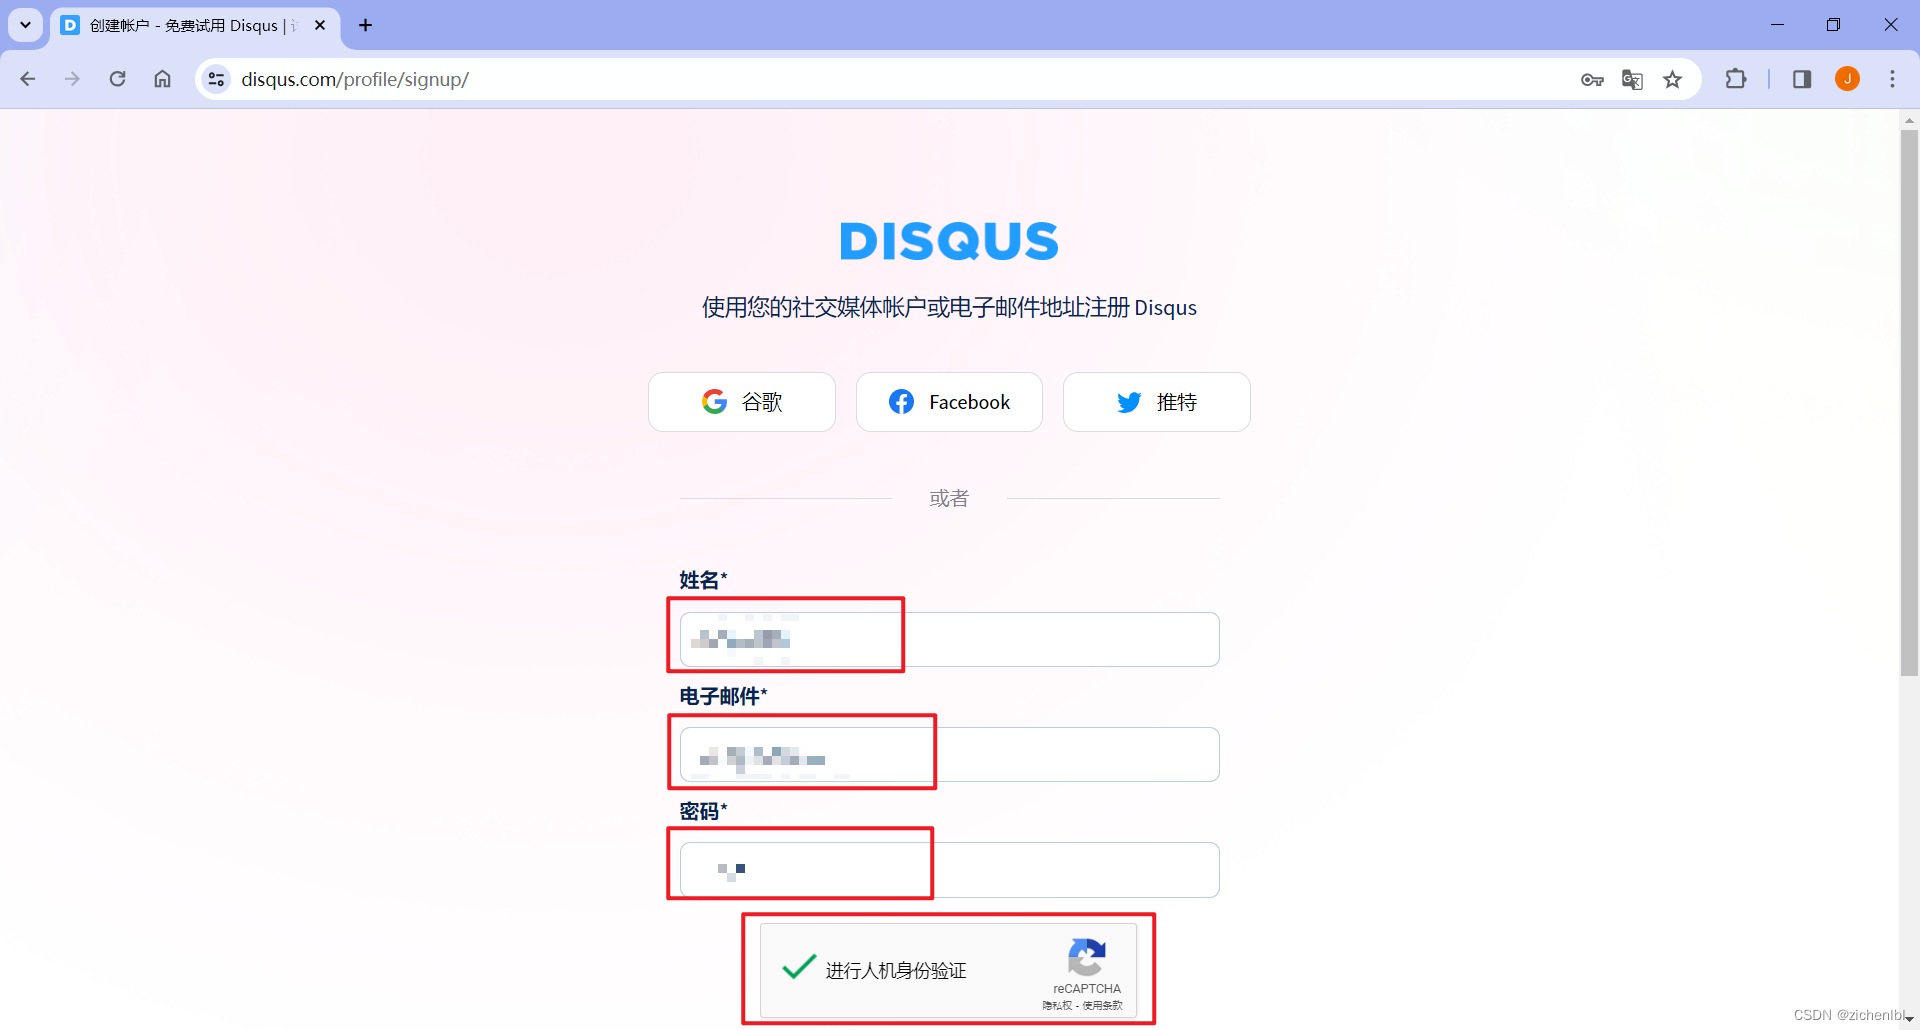
5.1 Disqus 评论系统
- Disqus 评论系统
Disqus 官网:https://disqus.com/

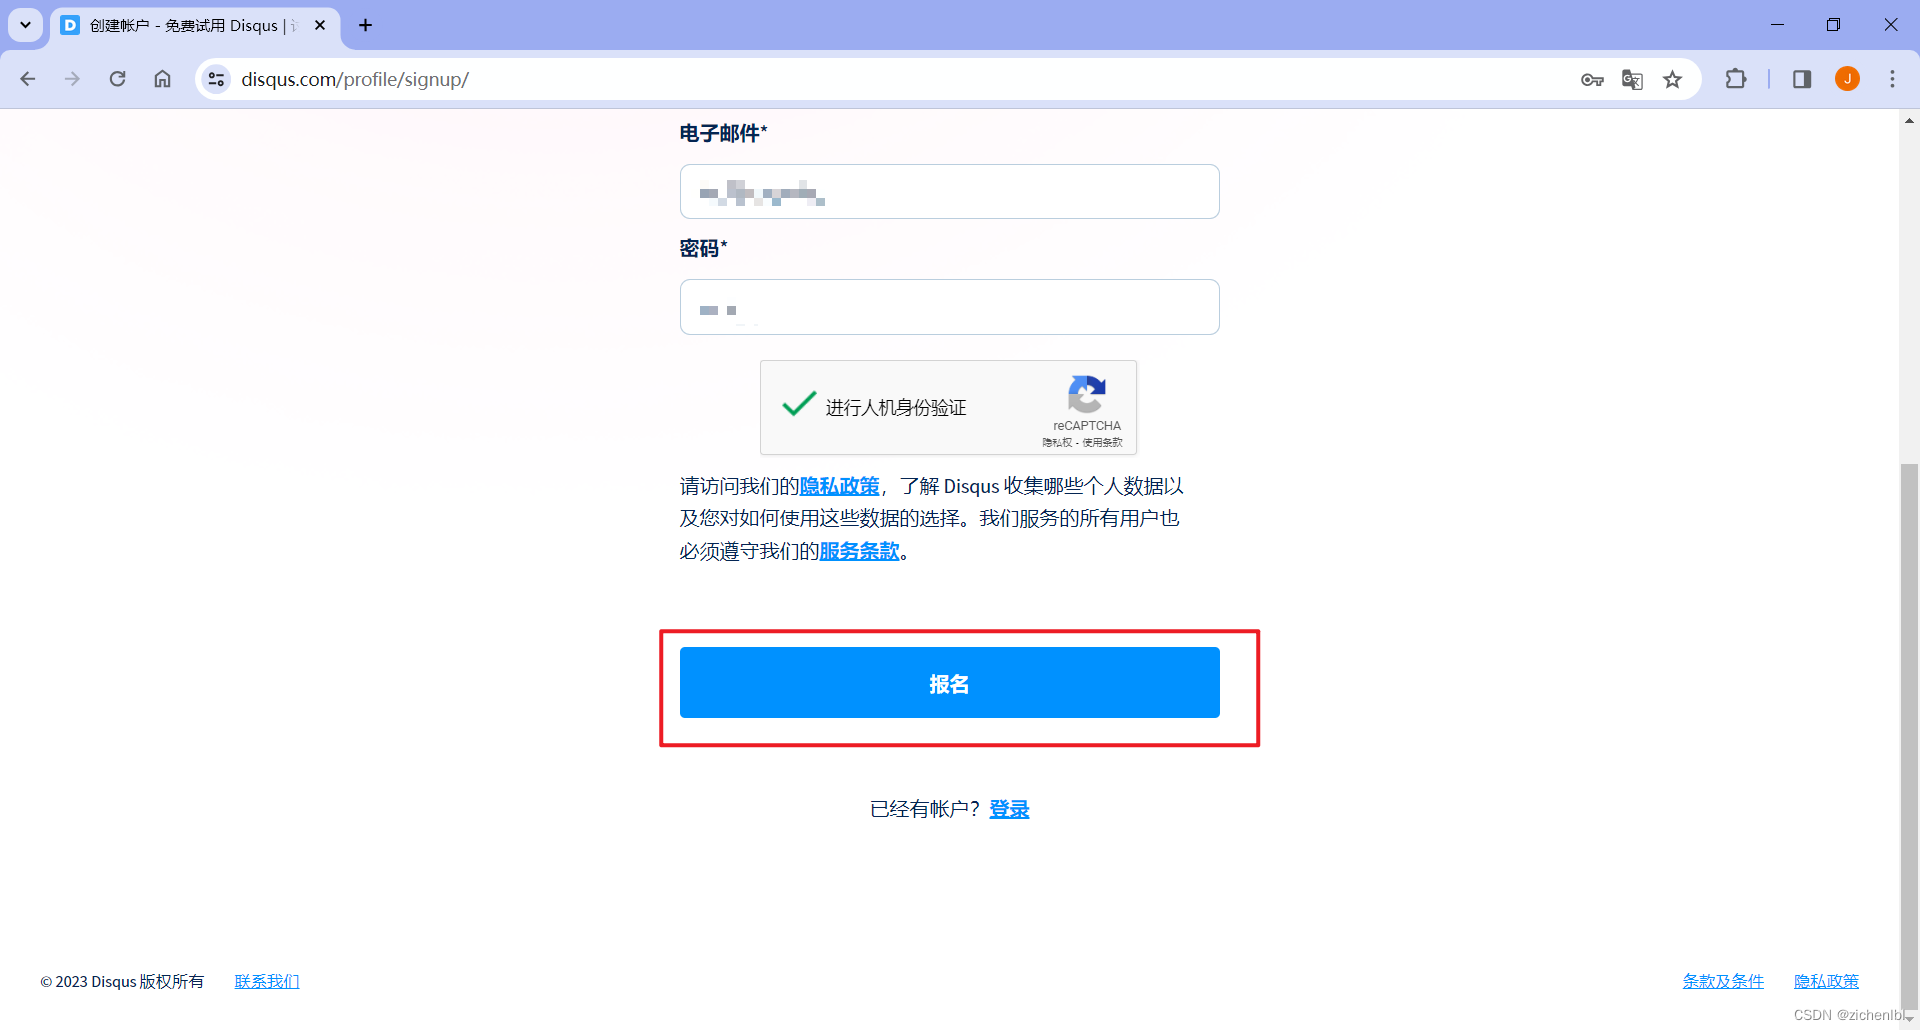
注册账户。
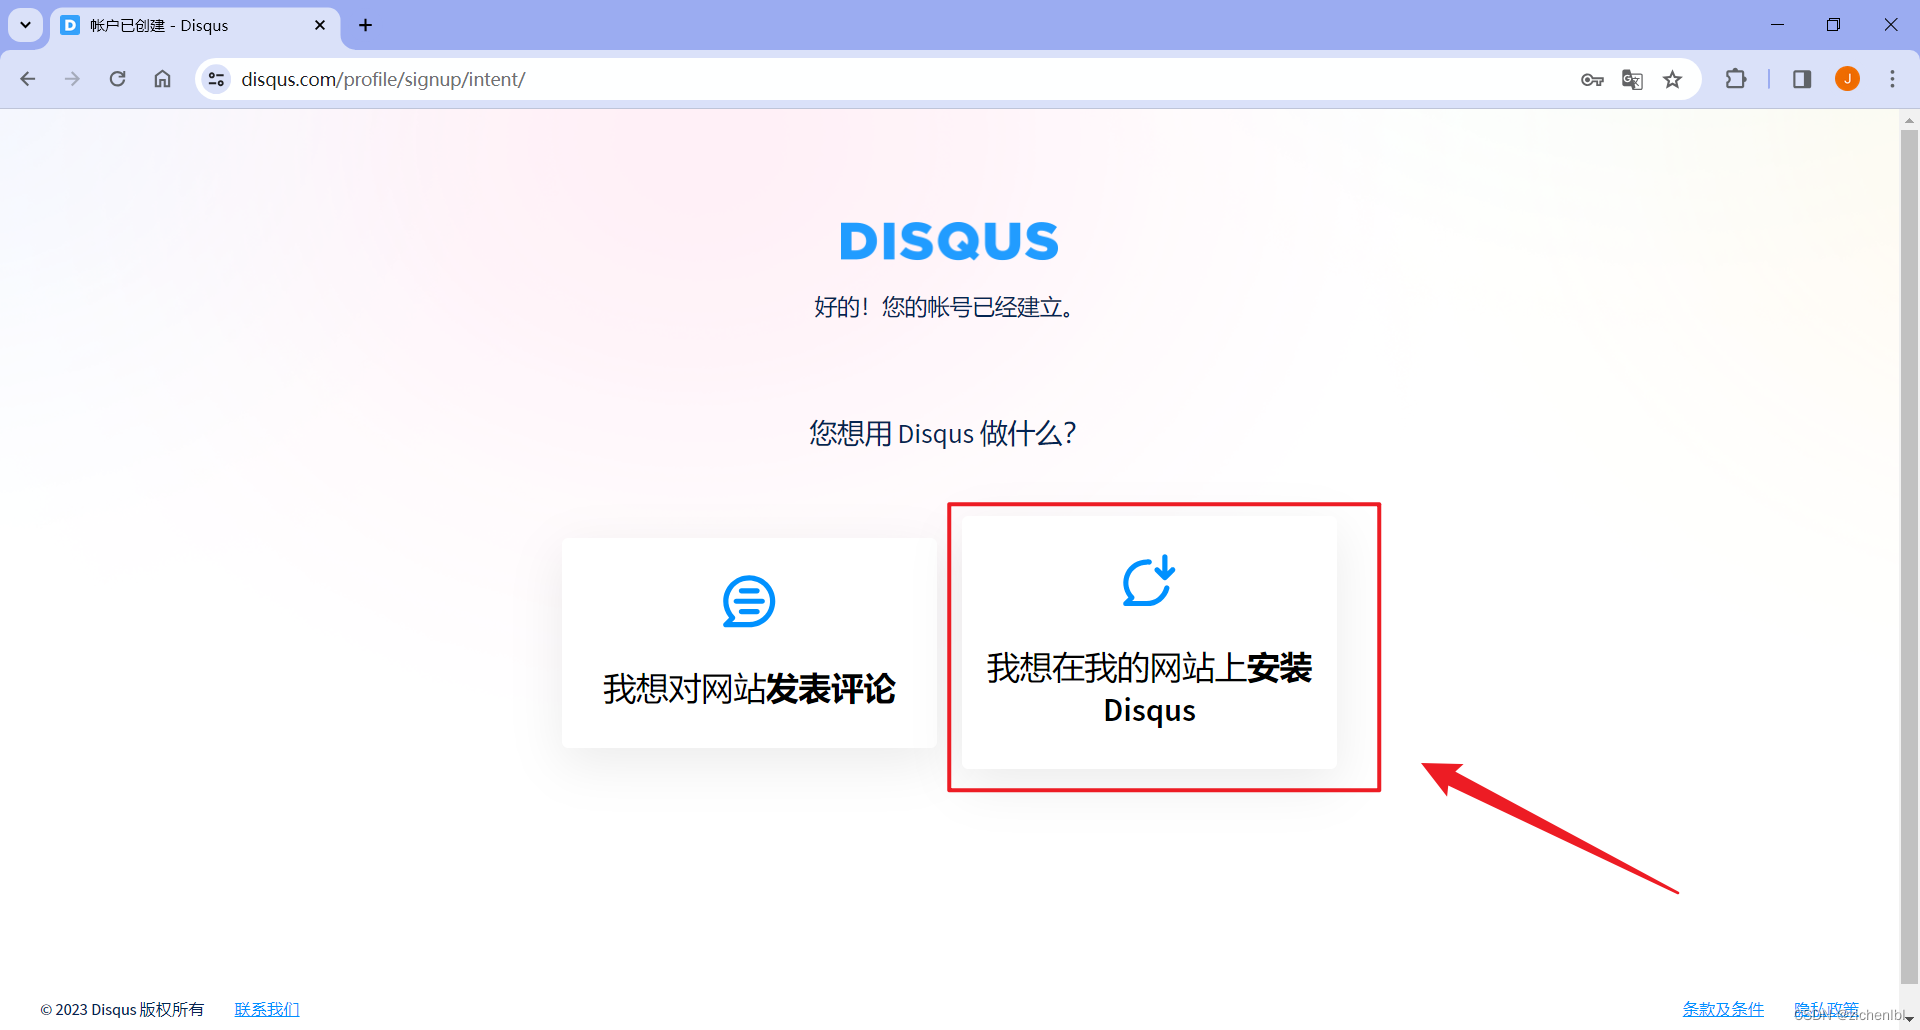
登录后,选择我想在我的网站上安装 Disqus。
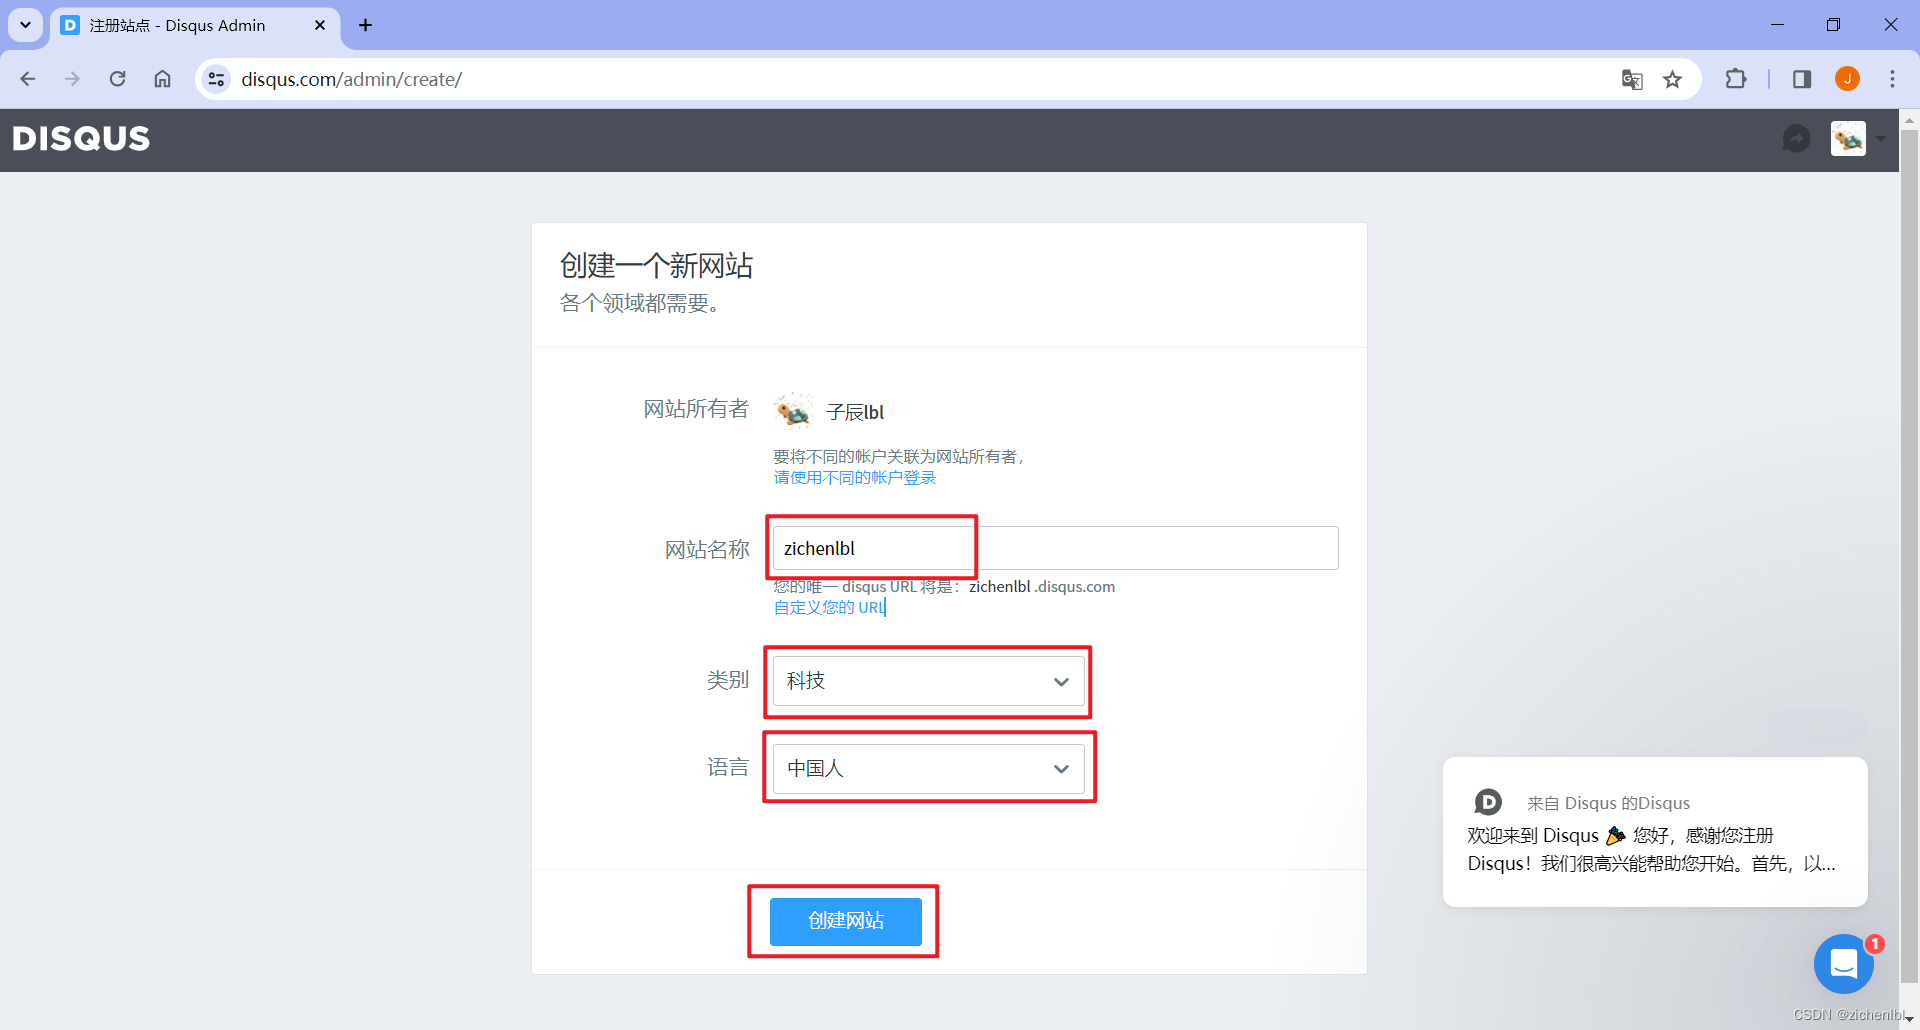
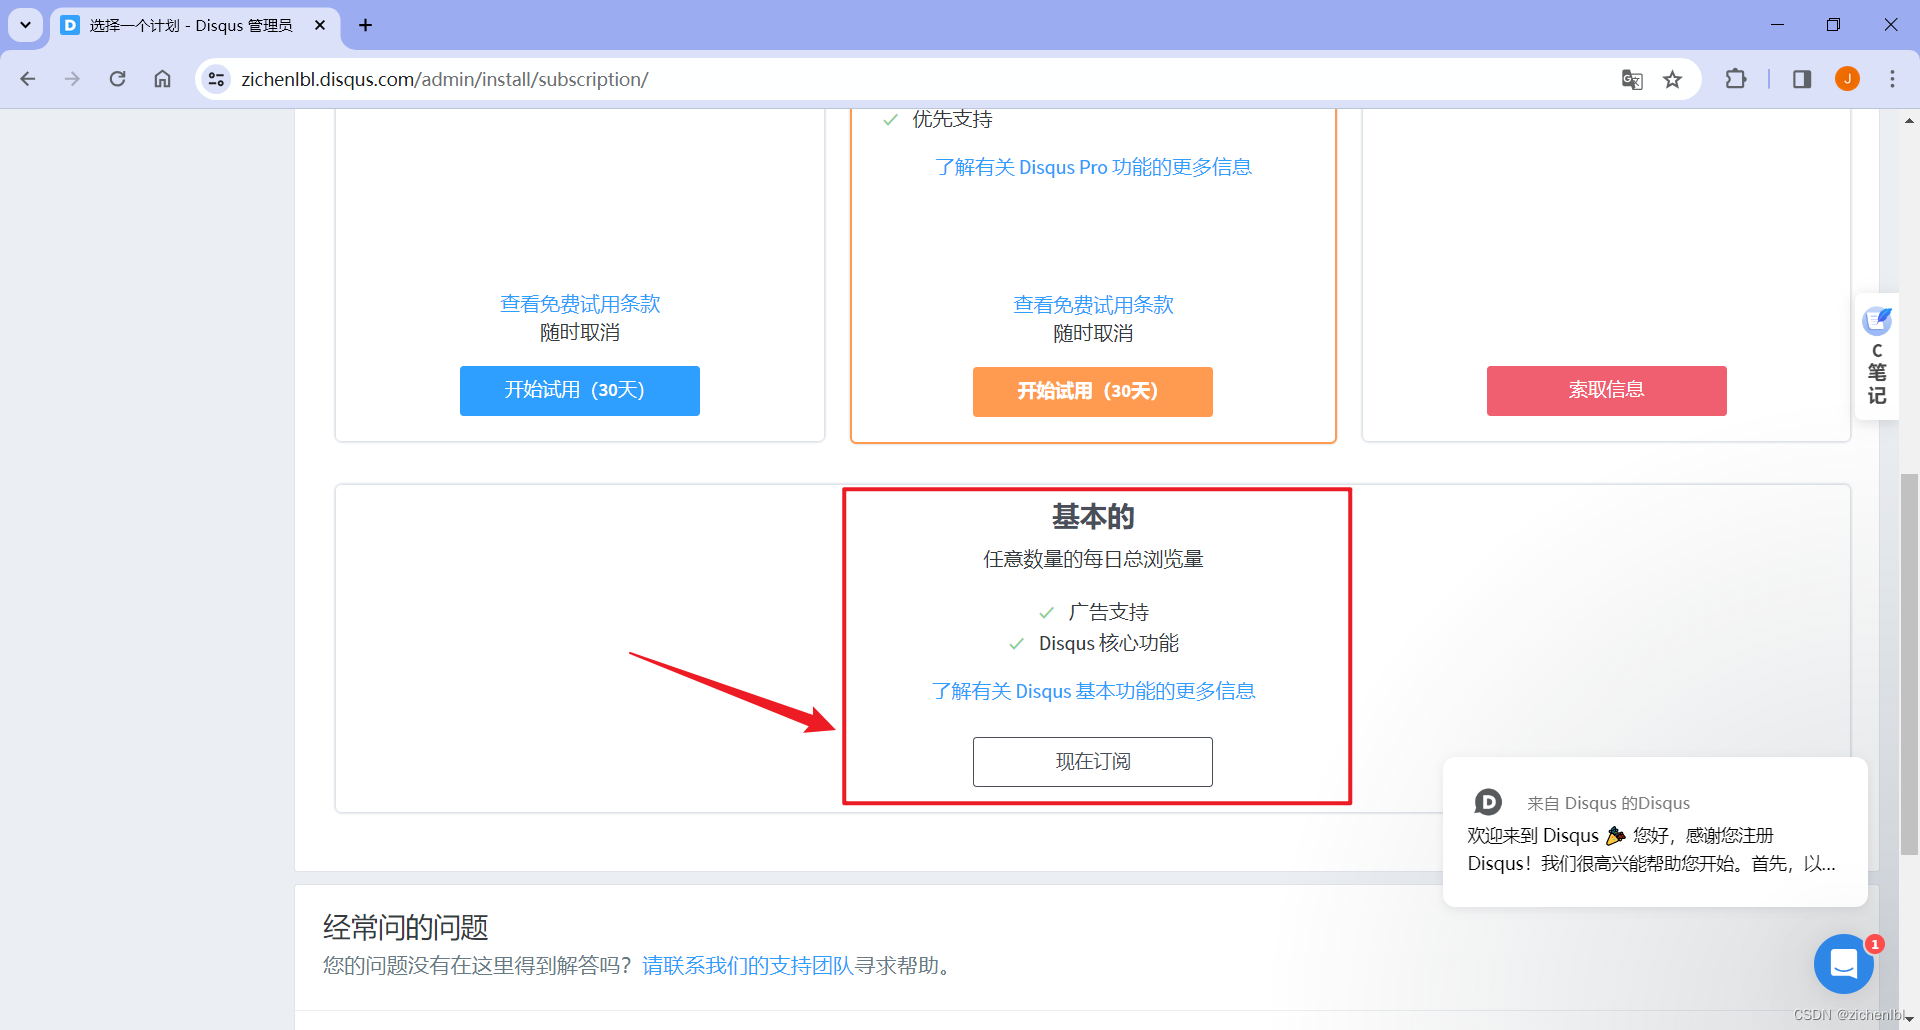
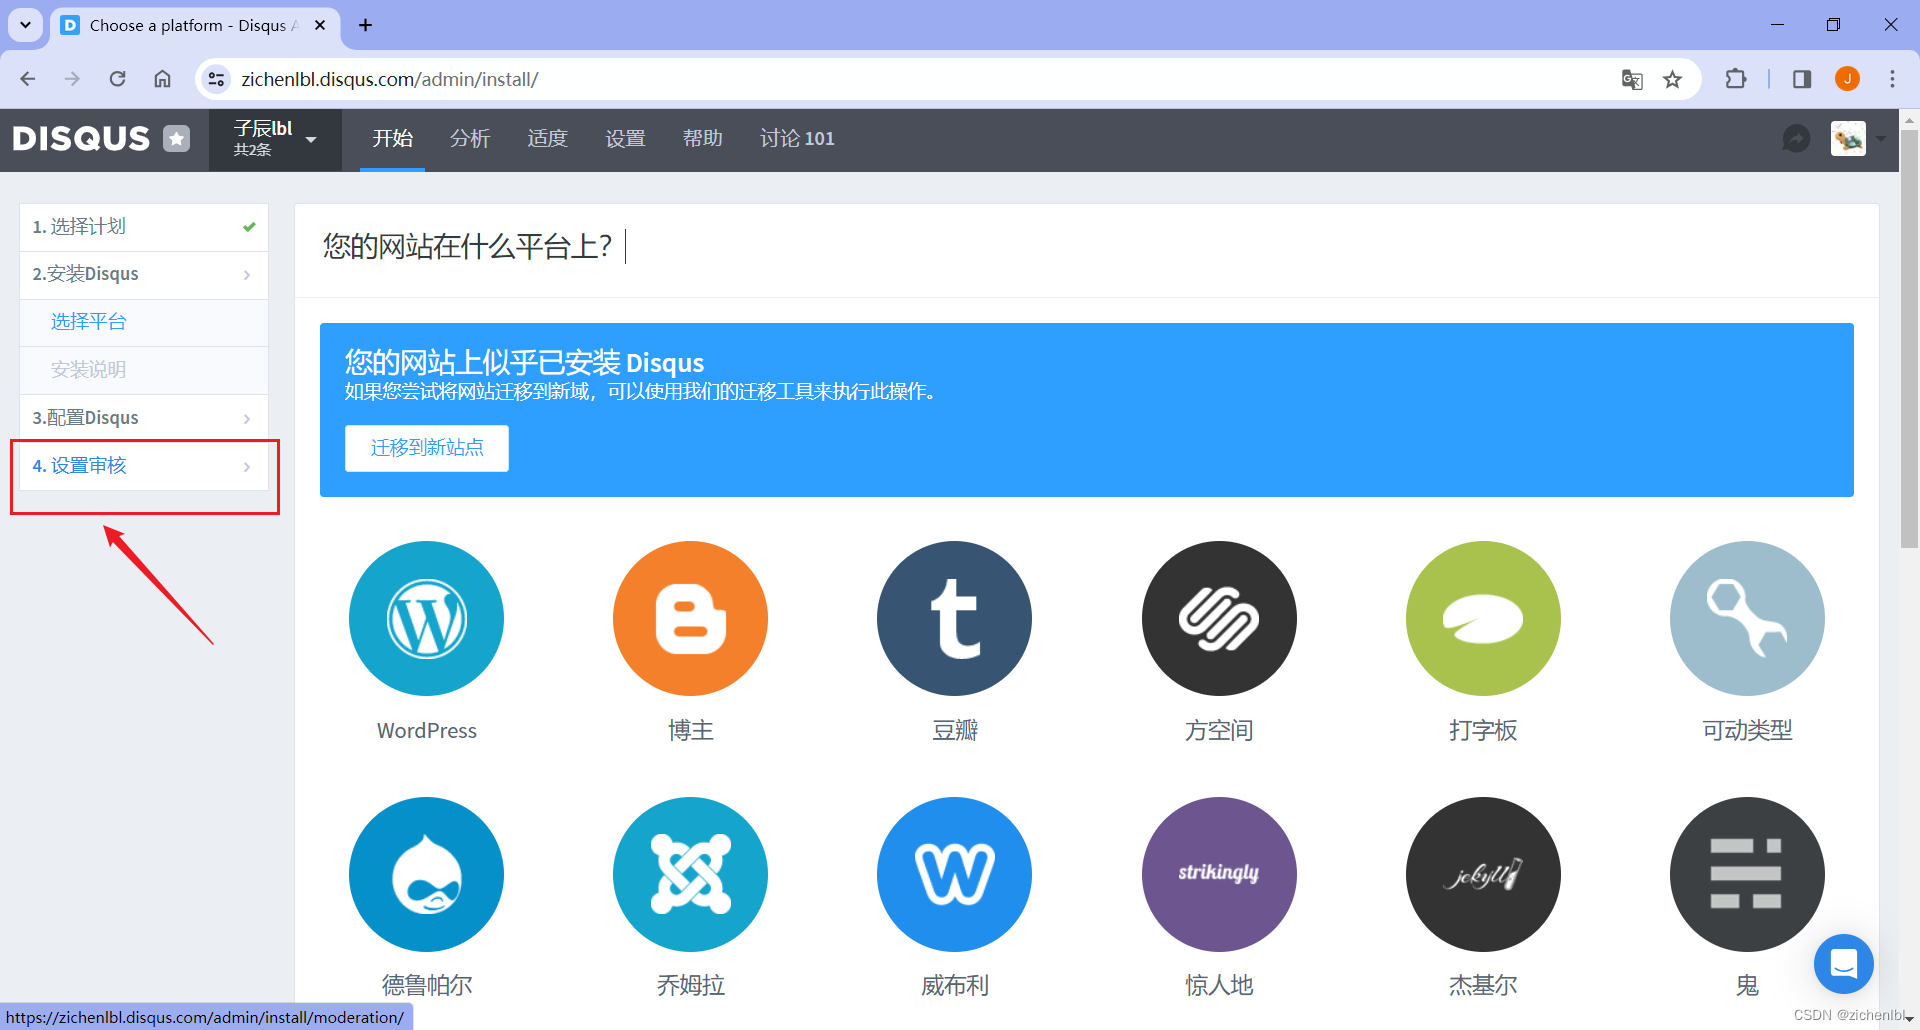
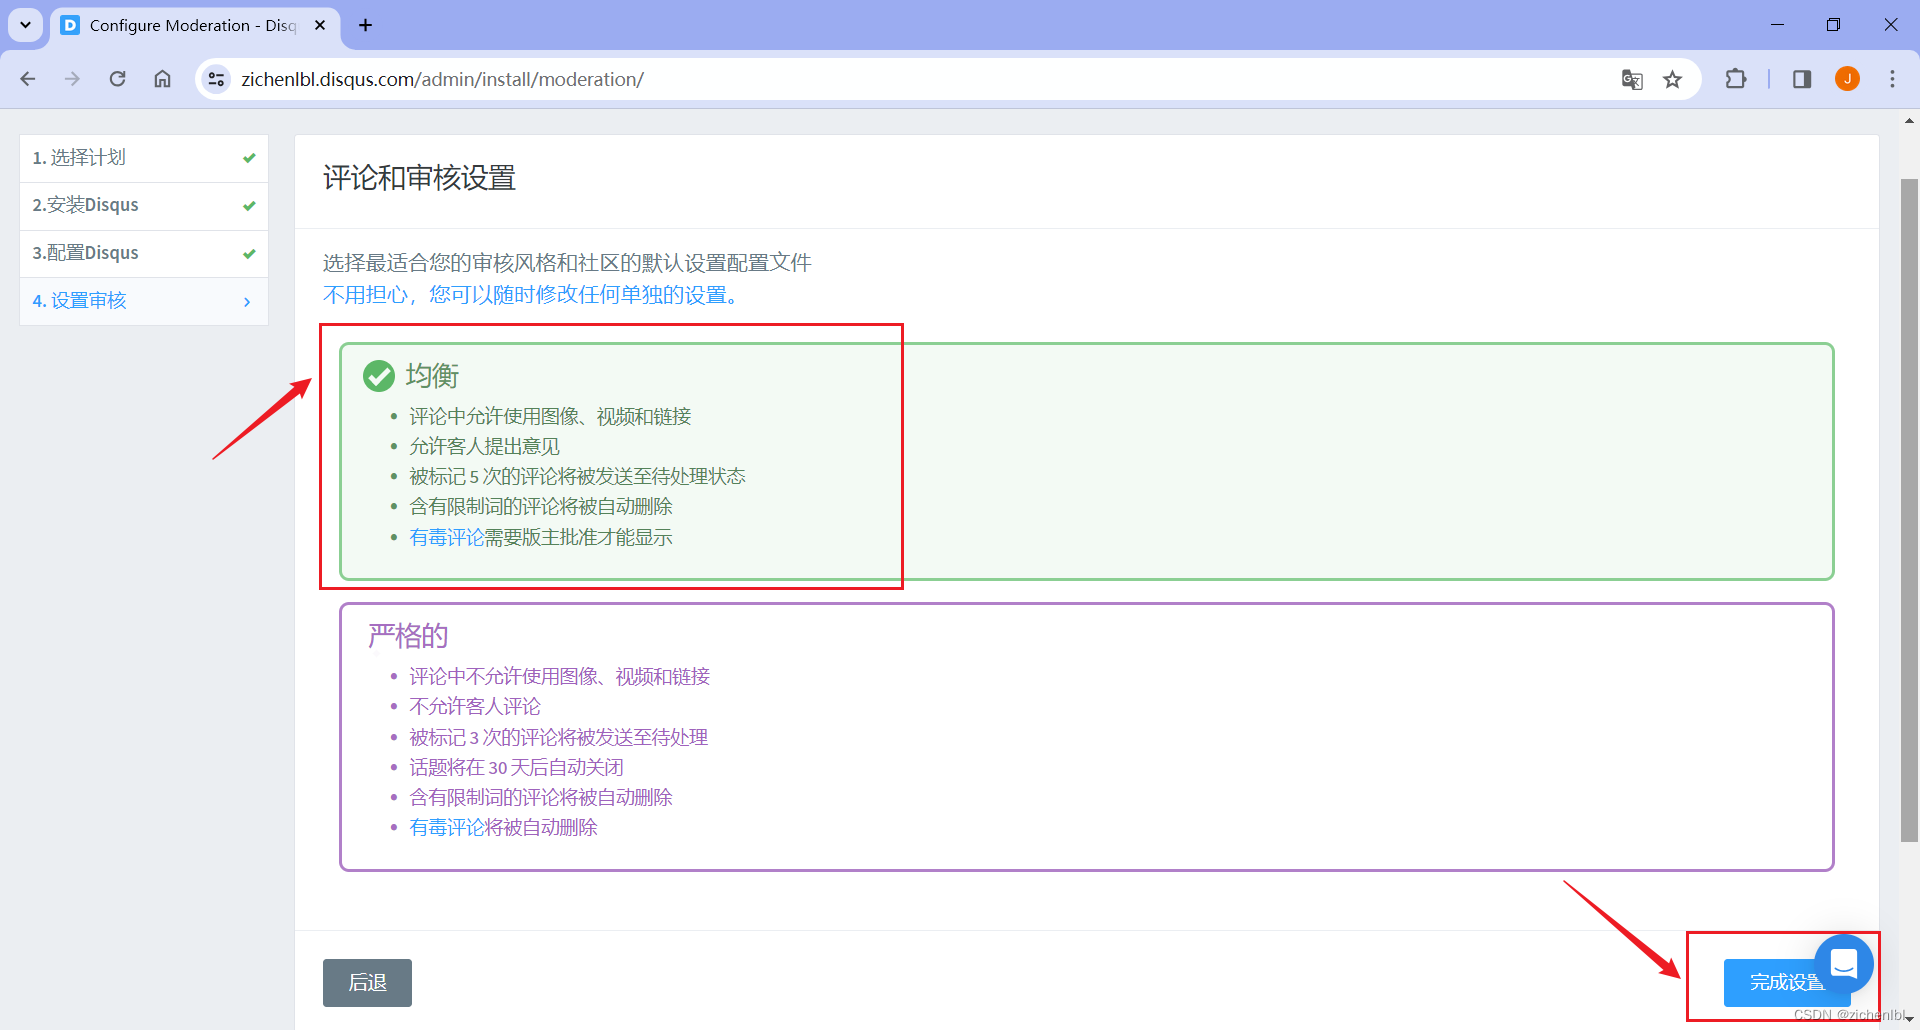
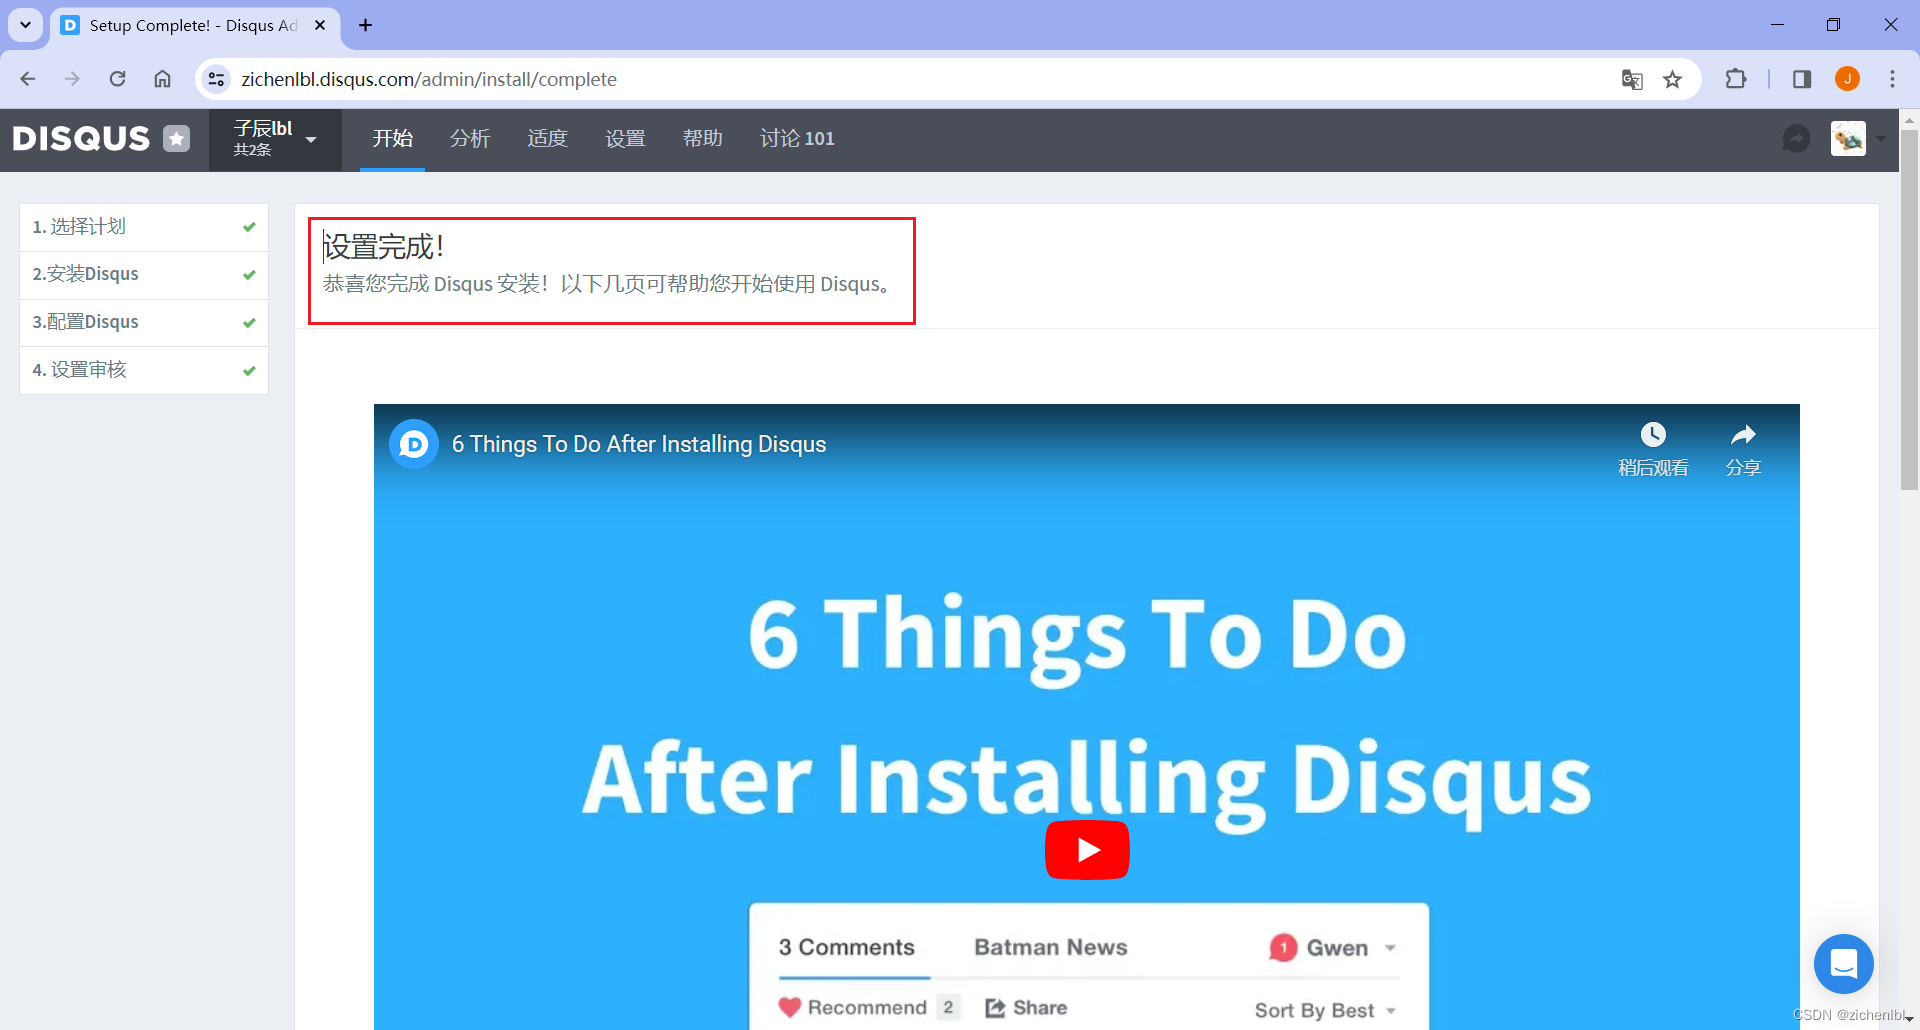
添加配置项如下。zichenlbl 就是刚才创建的网站名称。
disqus: 'zichenlbl'
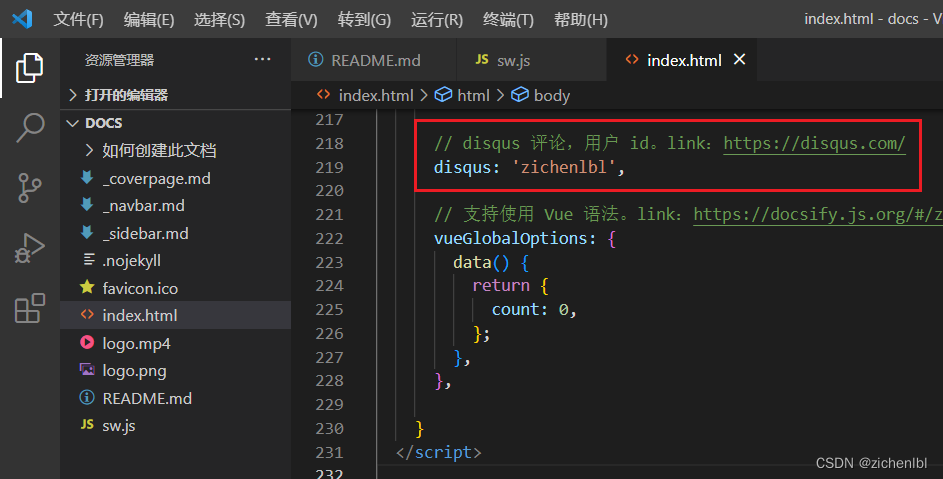
添加 js 配置项如下。
<script src="//cdn.jsdelivr.net/npm/docsify/lib/plugins/disqus.min.js"></script>
浏览器访问 http://localhost:3000 预览效果。
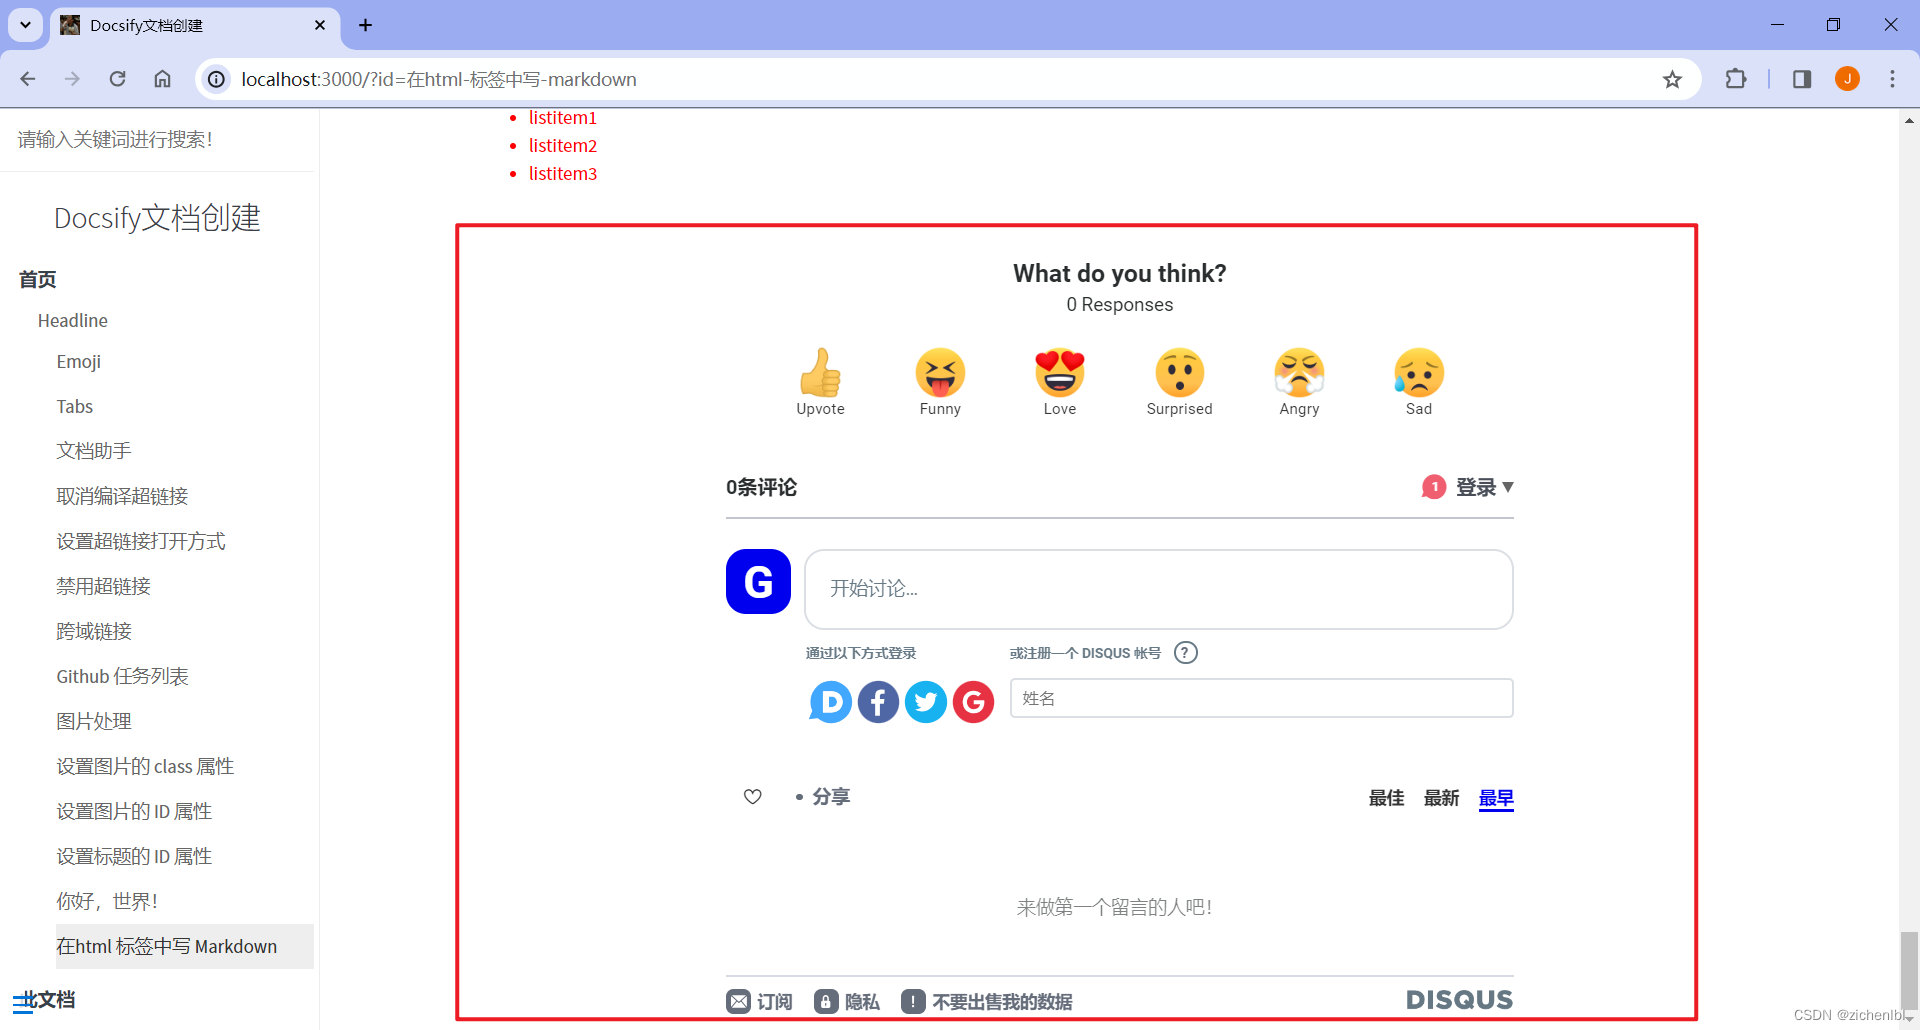
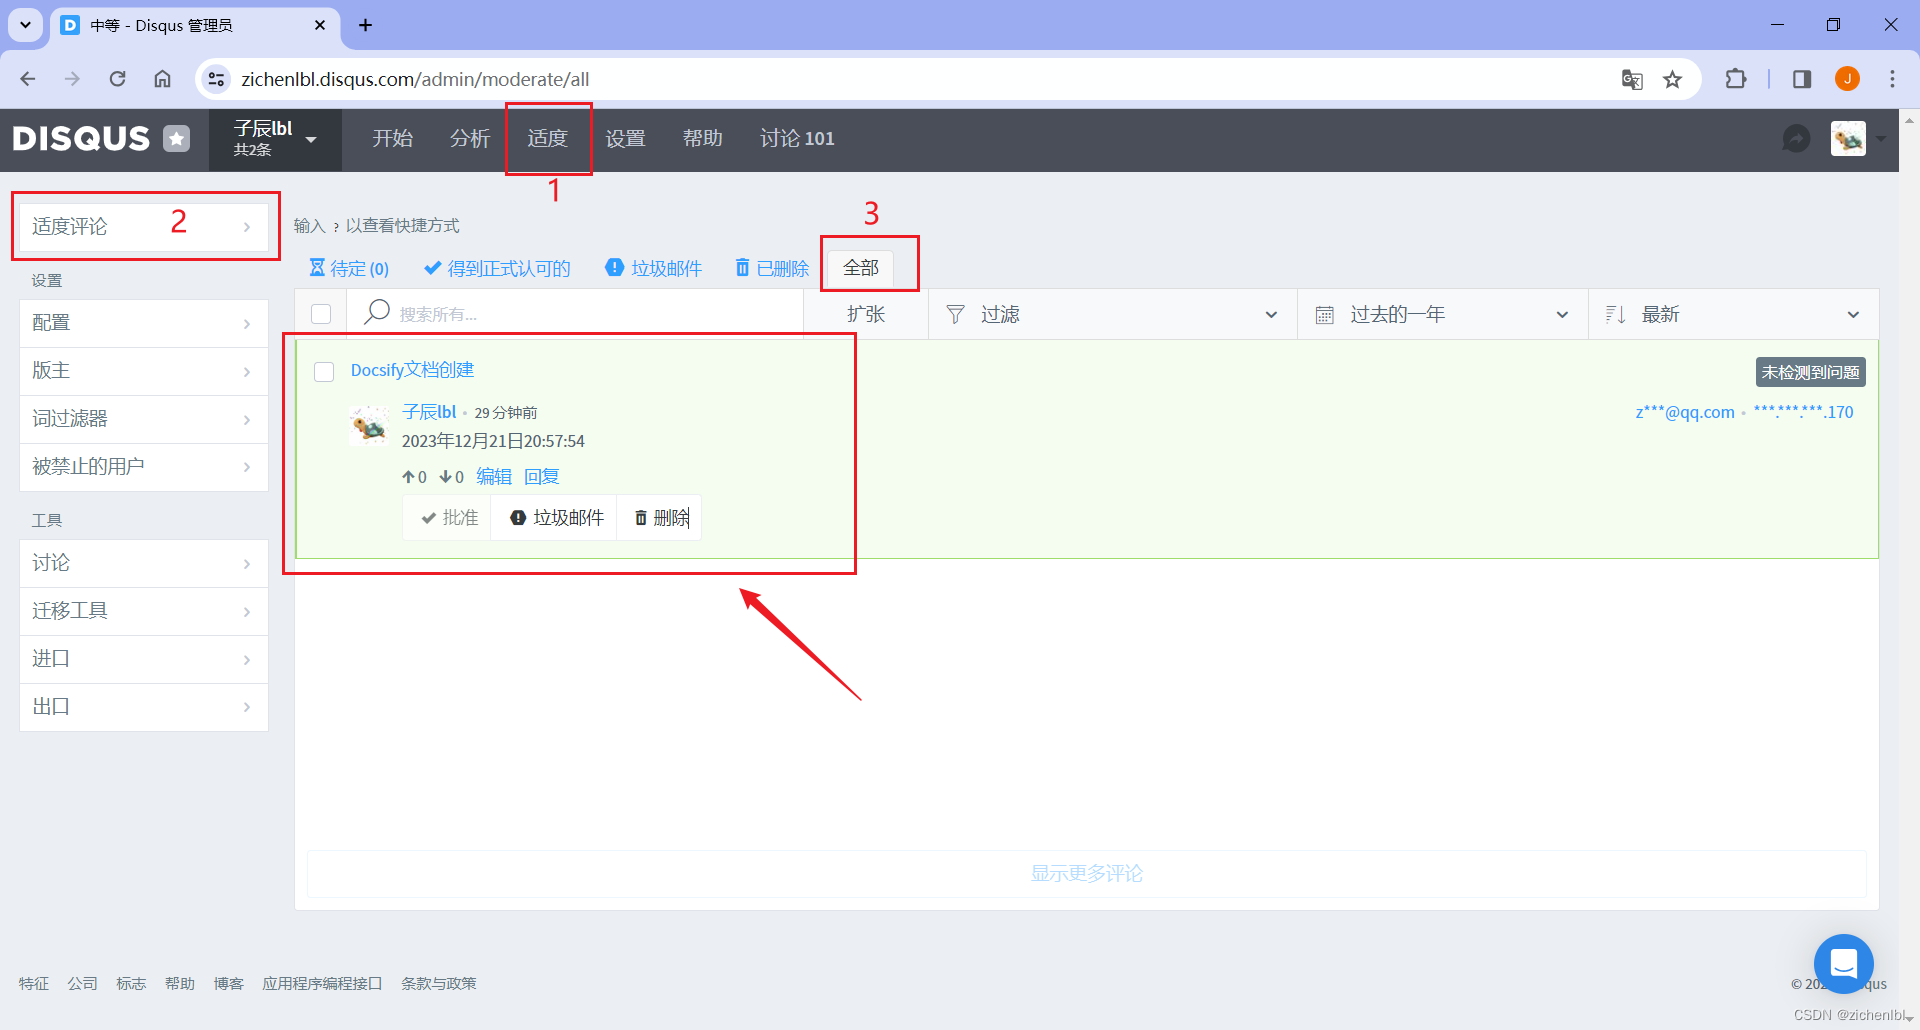
添加一条评论。
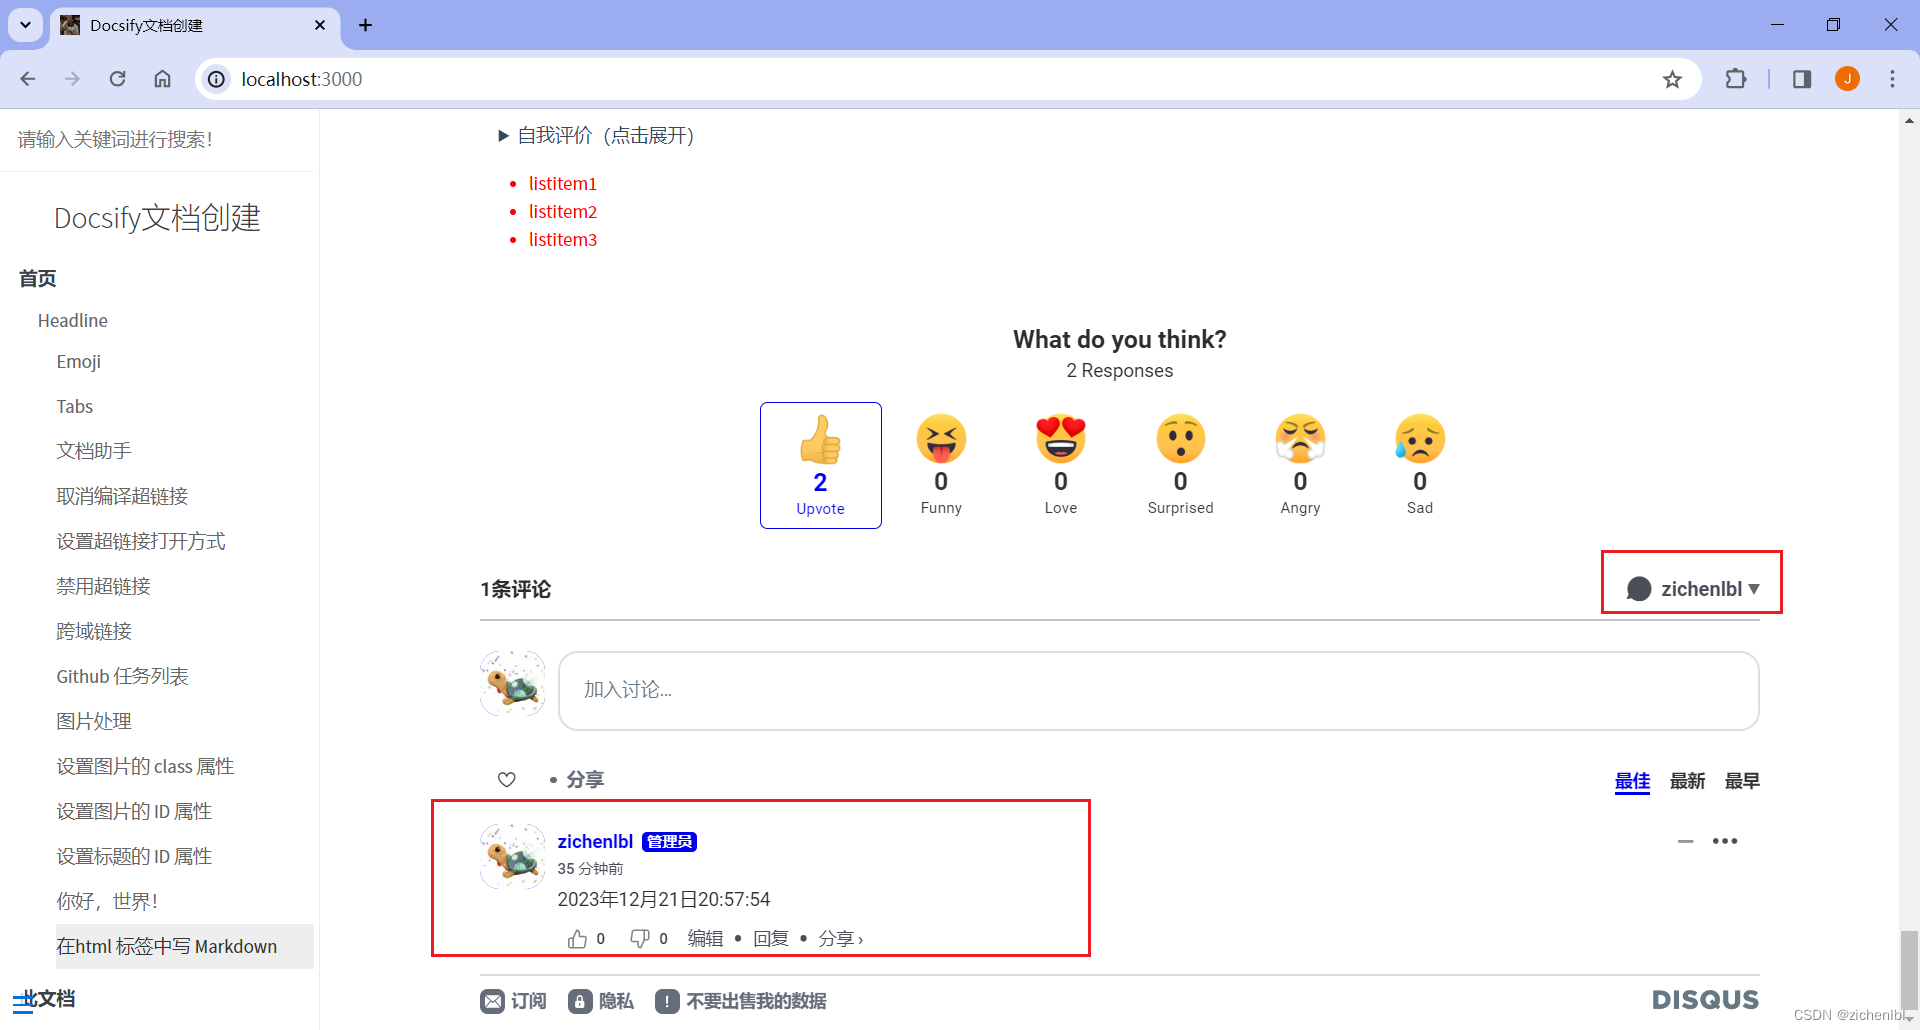
在 Disqus 中管理评论。
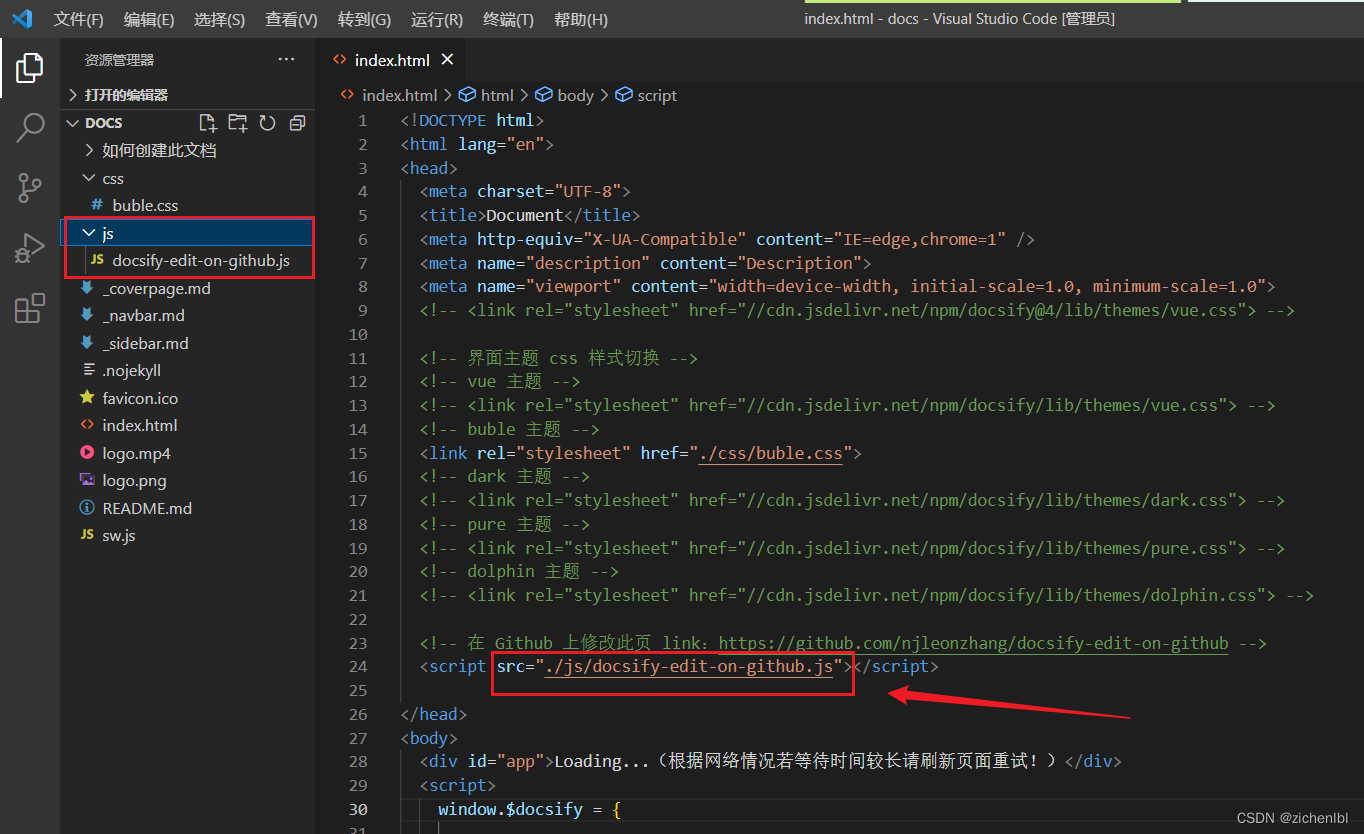
5.2 在 Github 上修改此页
- 在 Github 上编辑
插件:https://github.com/njleonzhang/docsify-edit-on-github
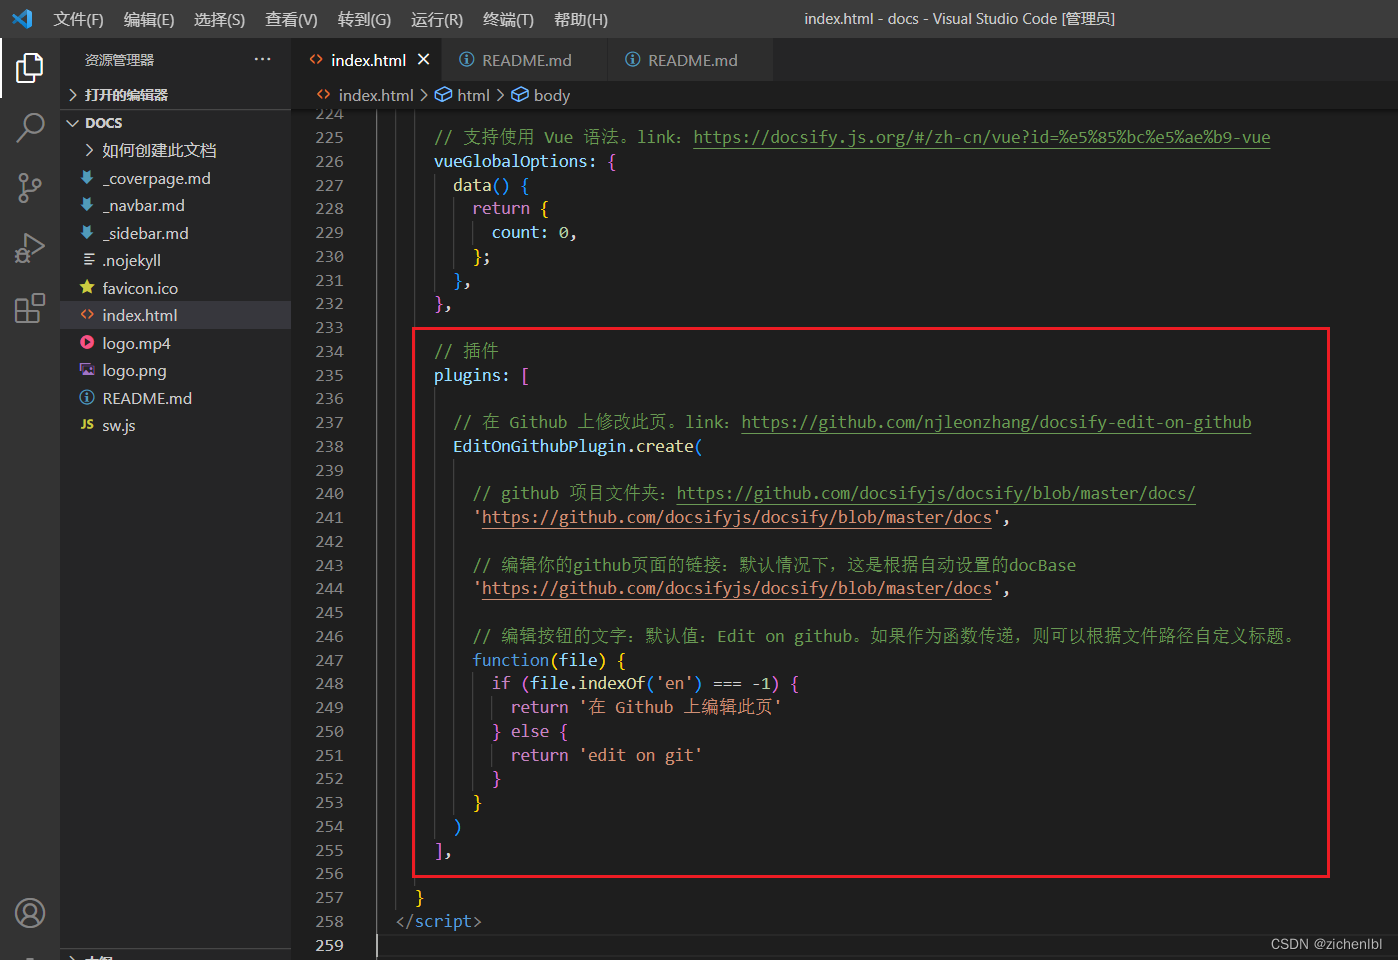
添加配置项如下。
plugins: [
EditOnGithubPlugin.create(
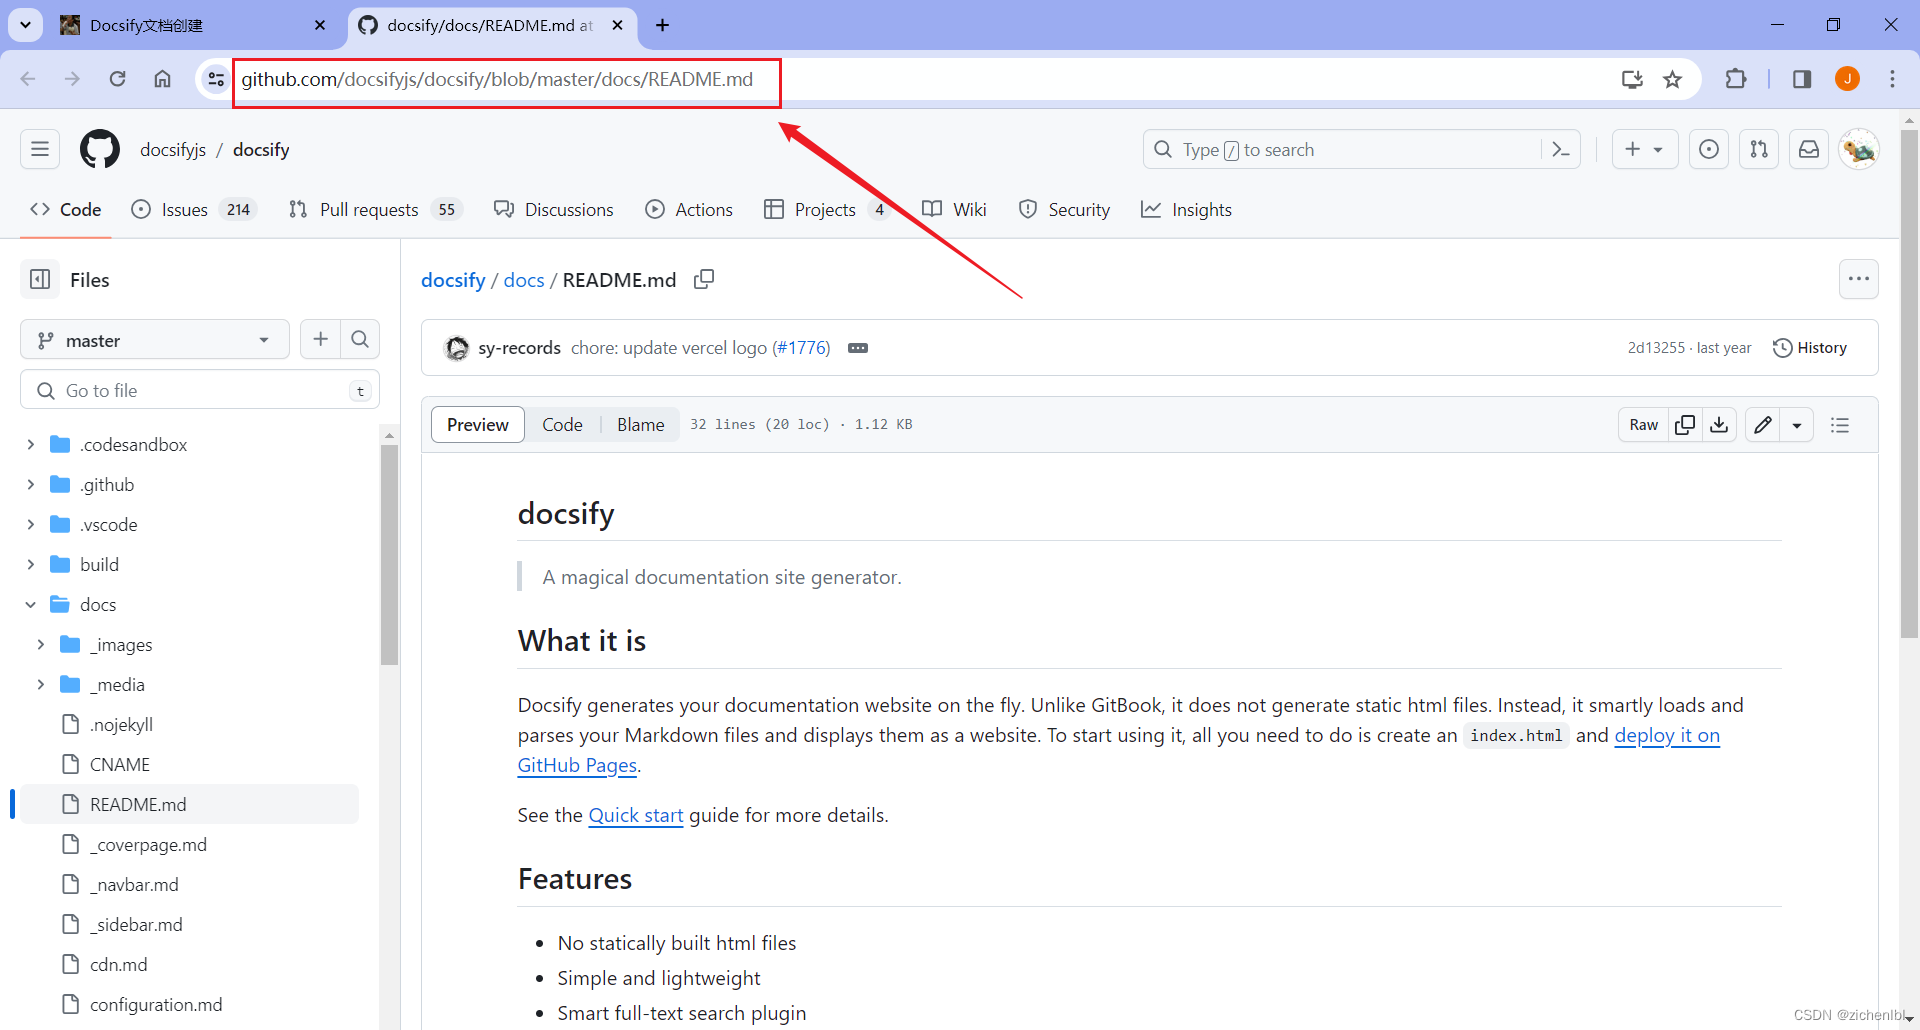
'https://github.com/docsifyjs/docsify/blob/master/docs',
'https://github.com/docsifyjs/docsify/blob/master/docs',
function(file) {
if (file.indexOf('en') === -1) {
return '在 Github 上编辑此页'
} else {
return 'edit on git'
}
}
)
],
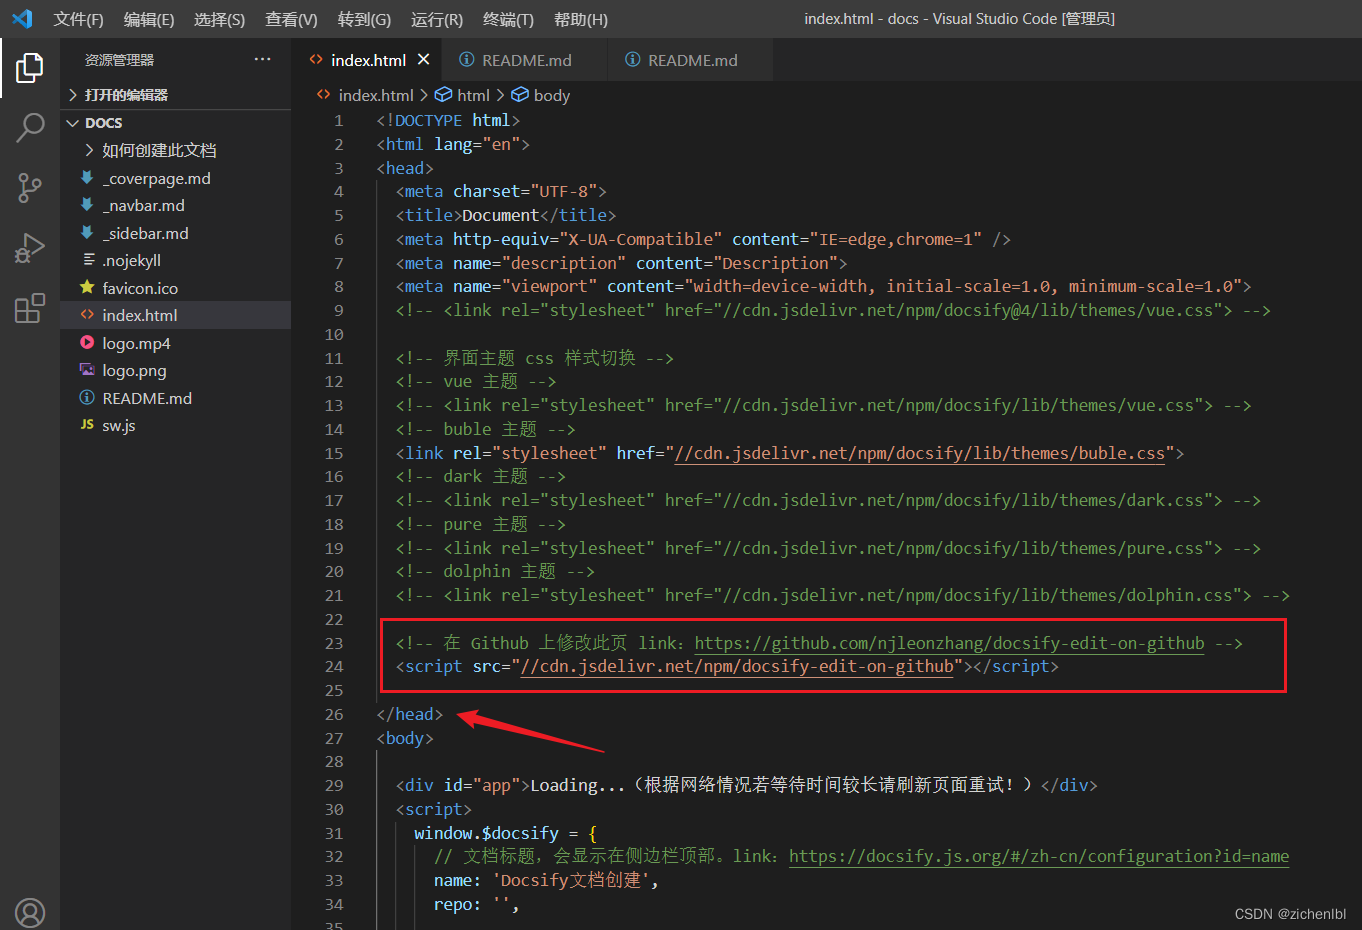
添加 js 配置项如下。在 <head></head> 标签中添加 js 。
<script src="//cdn.jsdelivr.net/npm/docsify-edit-on-github"></script>
浏览器访问 http://localhost:3000 预览效果。
点击右上角 在 Github 上编辑此页,会跳转到配置项中的 https://github.com/docsifyjs/docsify/blob/master/docs 地址,地址后面会自动加上当前页面的 md 文件名。

5.3 CDN
- CDN
docsify 最新版本访问 CDN 获取。
网址:https://docsify.js.org/#/zh-cn/cdn
CDN 是 Content Delivery Network 的缩写,即内容分发网络。它是在现有的互联网基础上再构建的一层智能虚拟网络,包括分布式存储、负载均衡、请求重定向和内容管理等。CDN能实时地根据网络流量、负载状态、用户的距离和响应时间等综合信息,把用户的请求导向离他最近地节点服务器上,使用户能就近获取所需地内容。
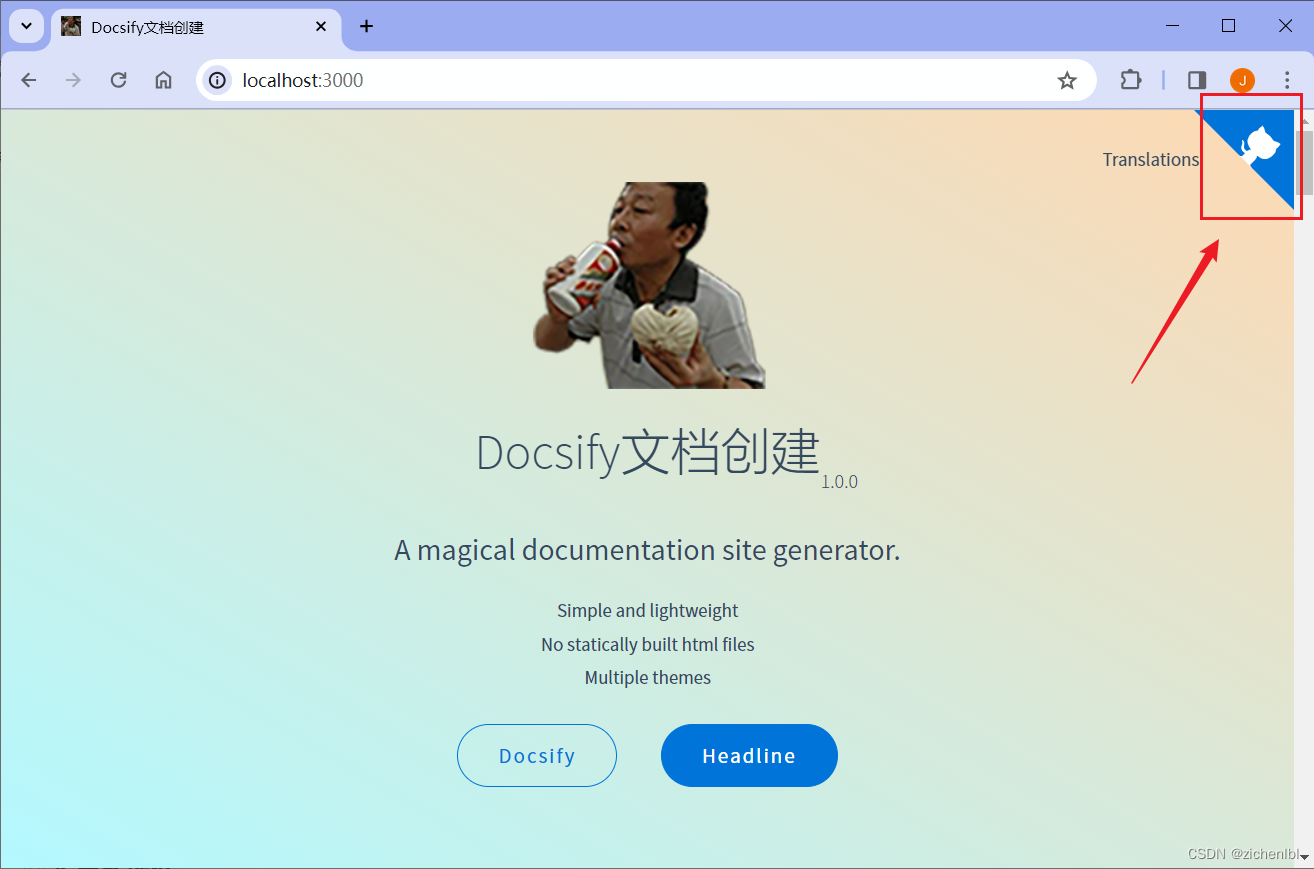
5.4 右上角 Github 挂件
- 右上角 Github 挂件
添加配置项如下。‘https://github.com/docsifyjs/docsify/’ 修改为你的文档 github 仓库地址。
repo: 'https://github.com/docsifyjs/docsify/'
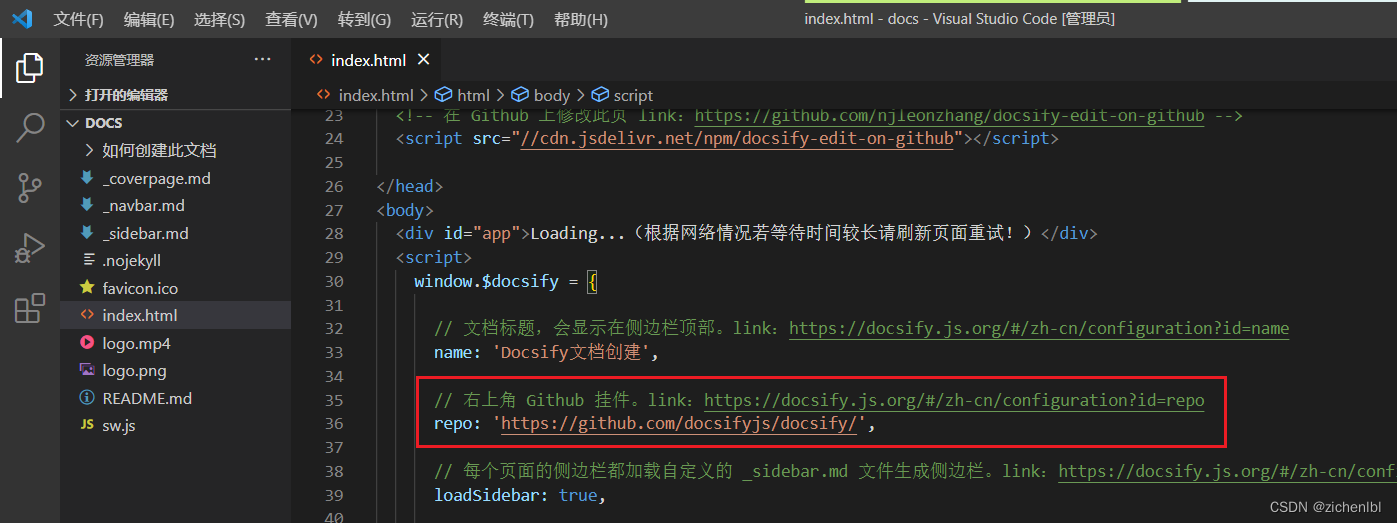
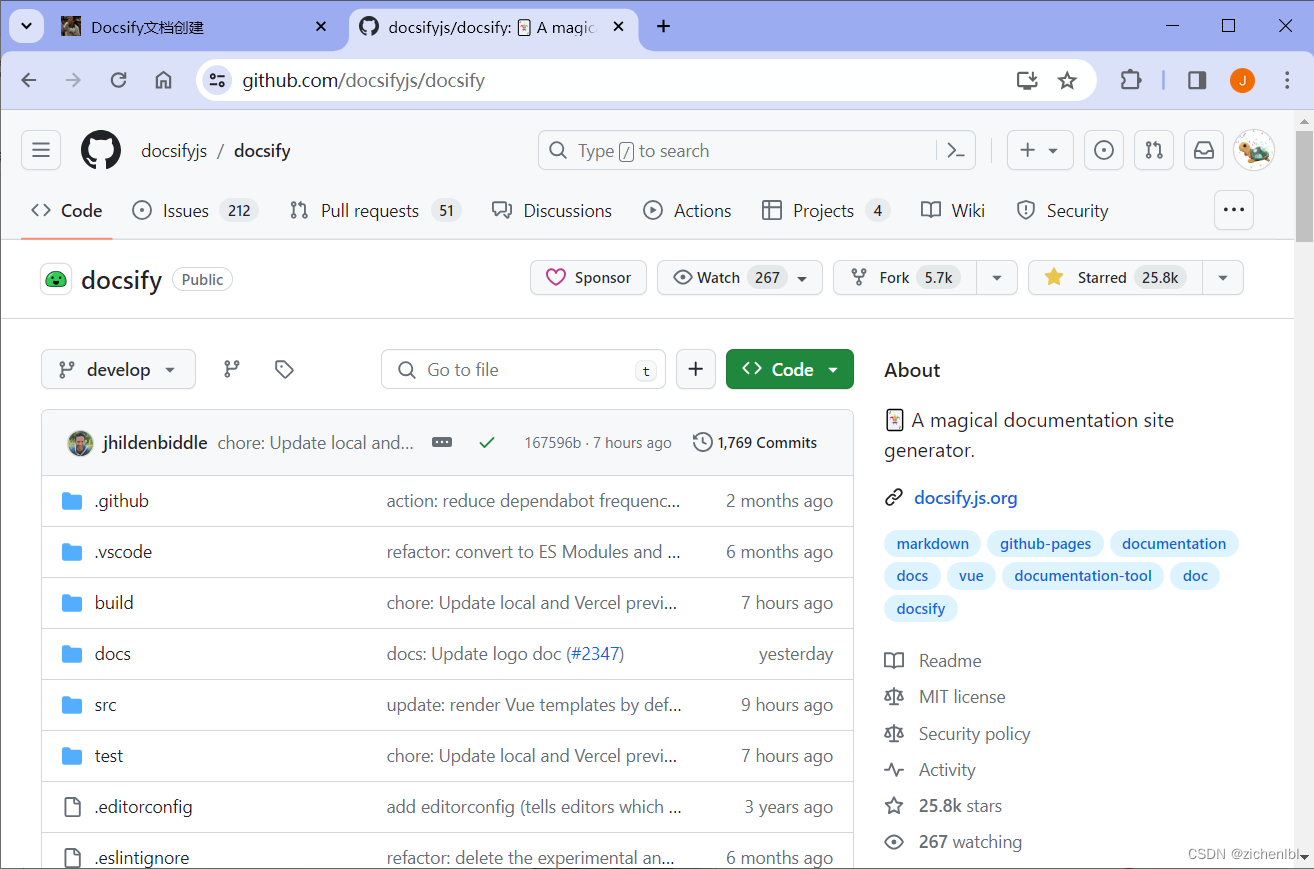
浏览器访问 http://localhost:3000 预览效果。
点击右上角 Github 挂件,会跳转到配置项中的 https://github.com/docsifyjs/docsify 地址。
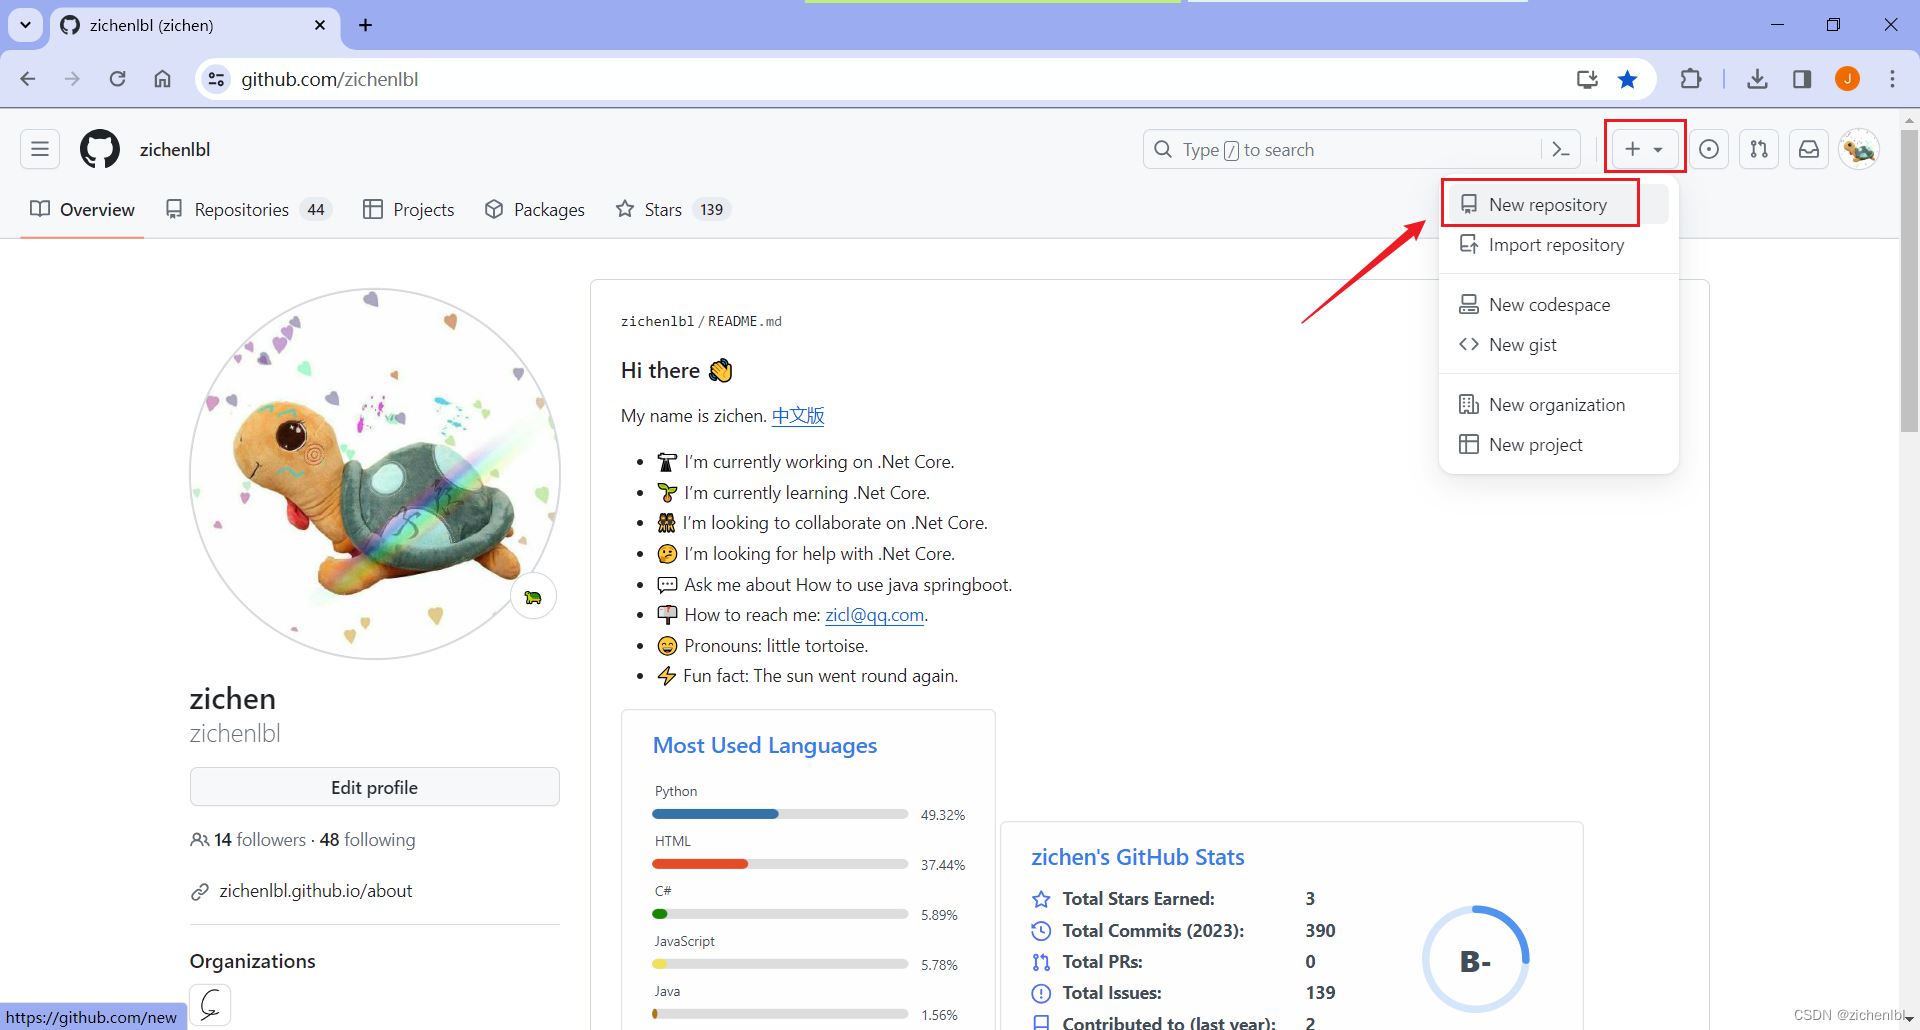
5.6 部署到 Github
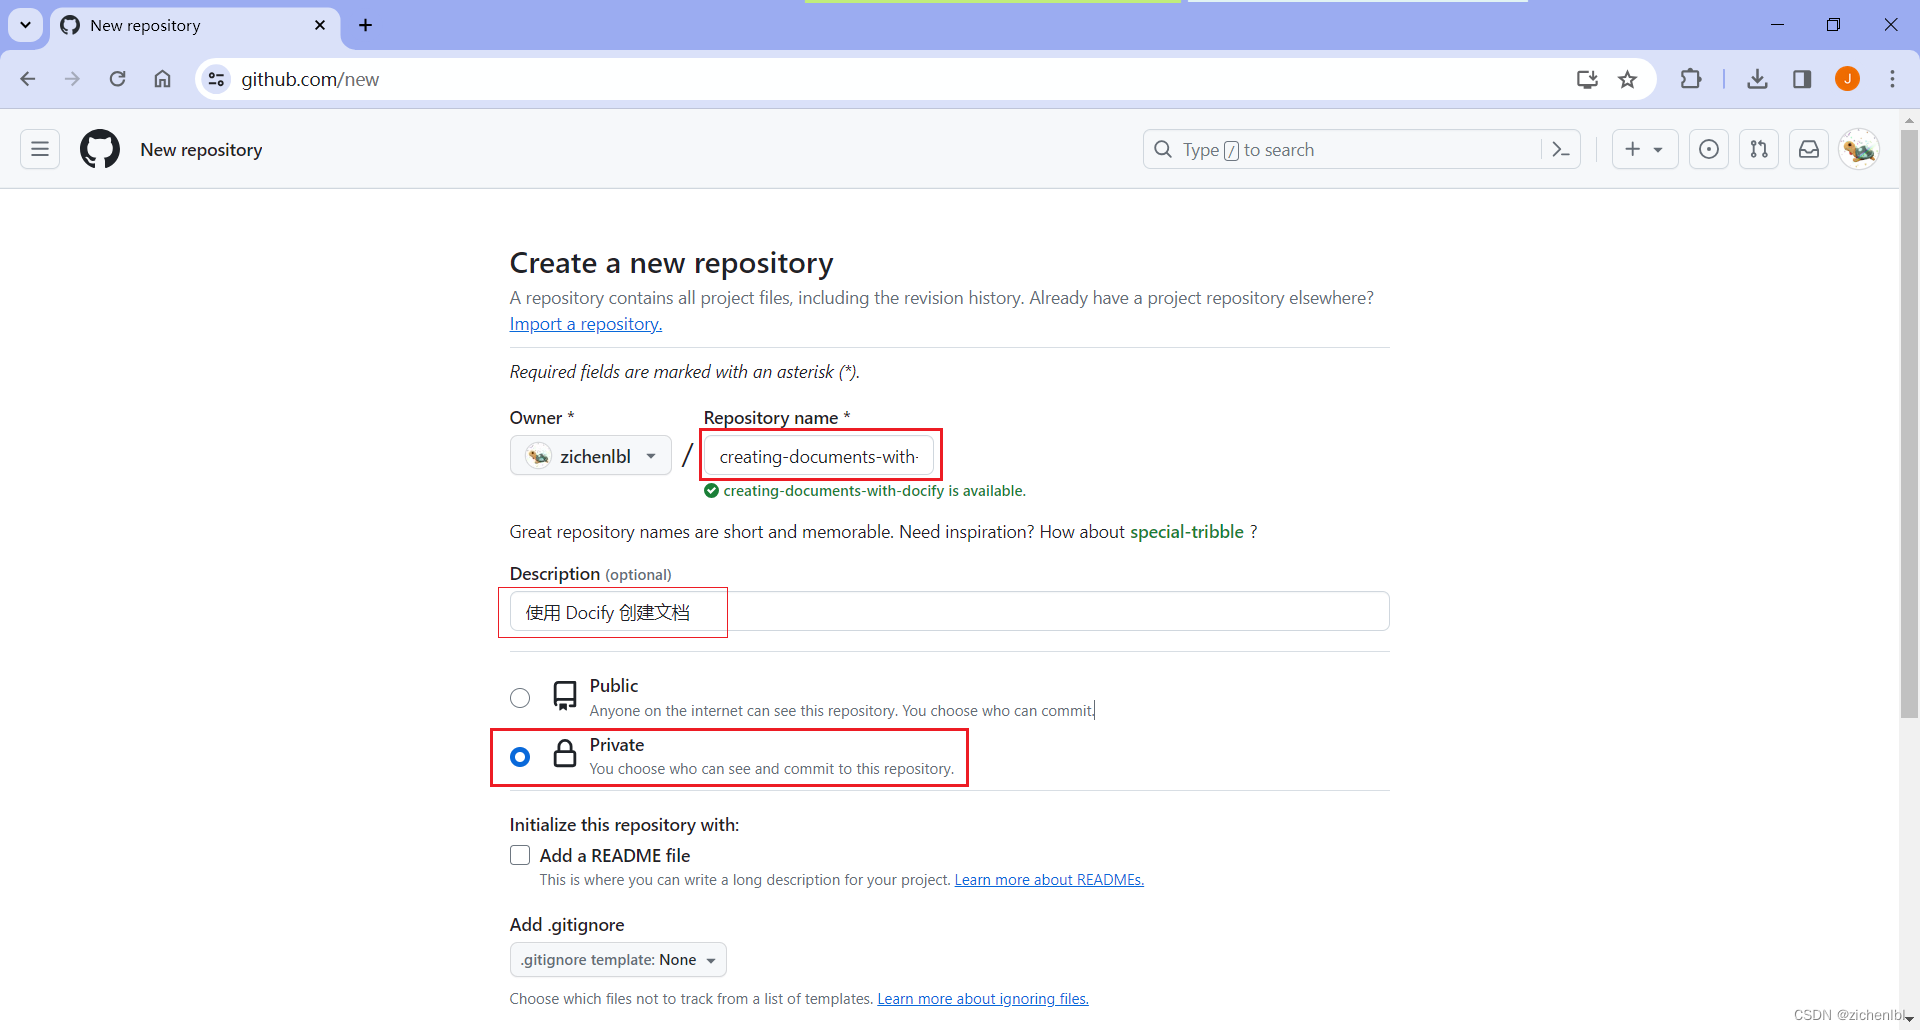
- 部署到 Github
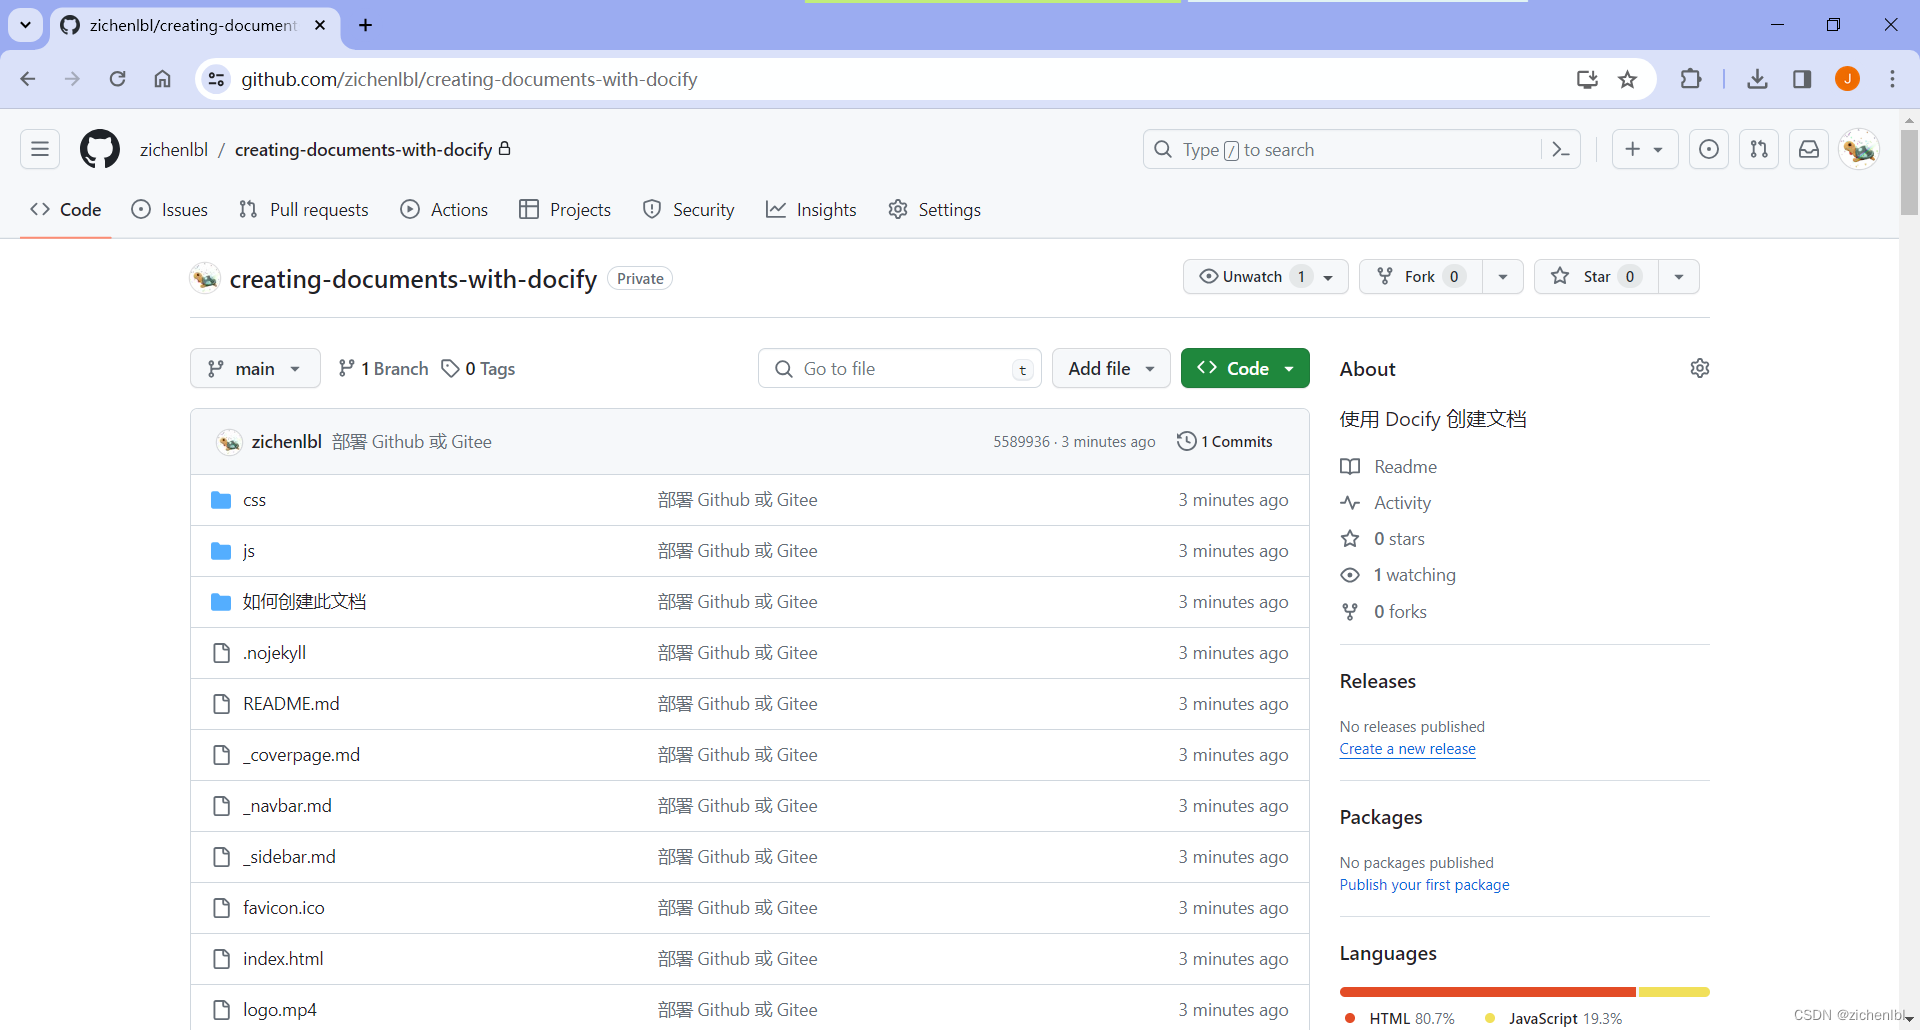
创建一个仓库。
2023年12月25日09:39:30 仓库地址更新为:https://github.com/zichenlbl/creating-documents-with-docsify
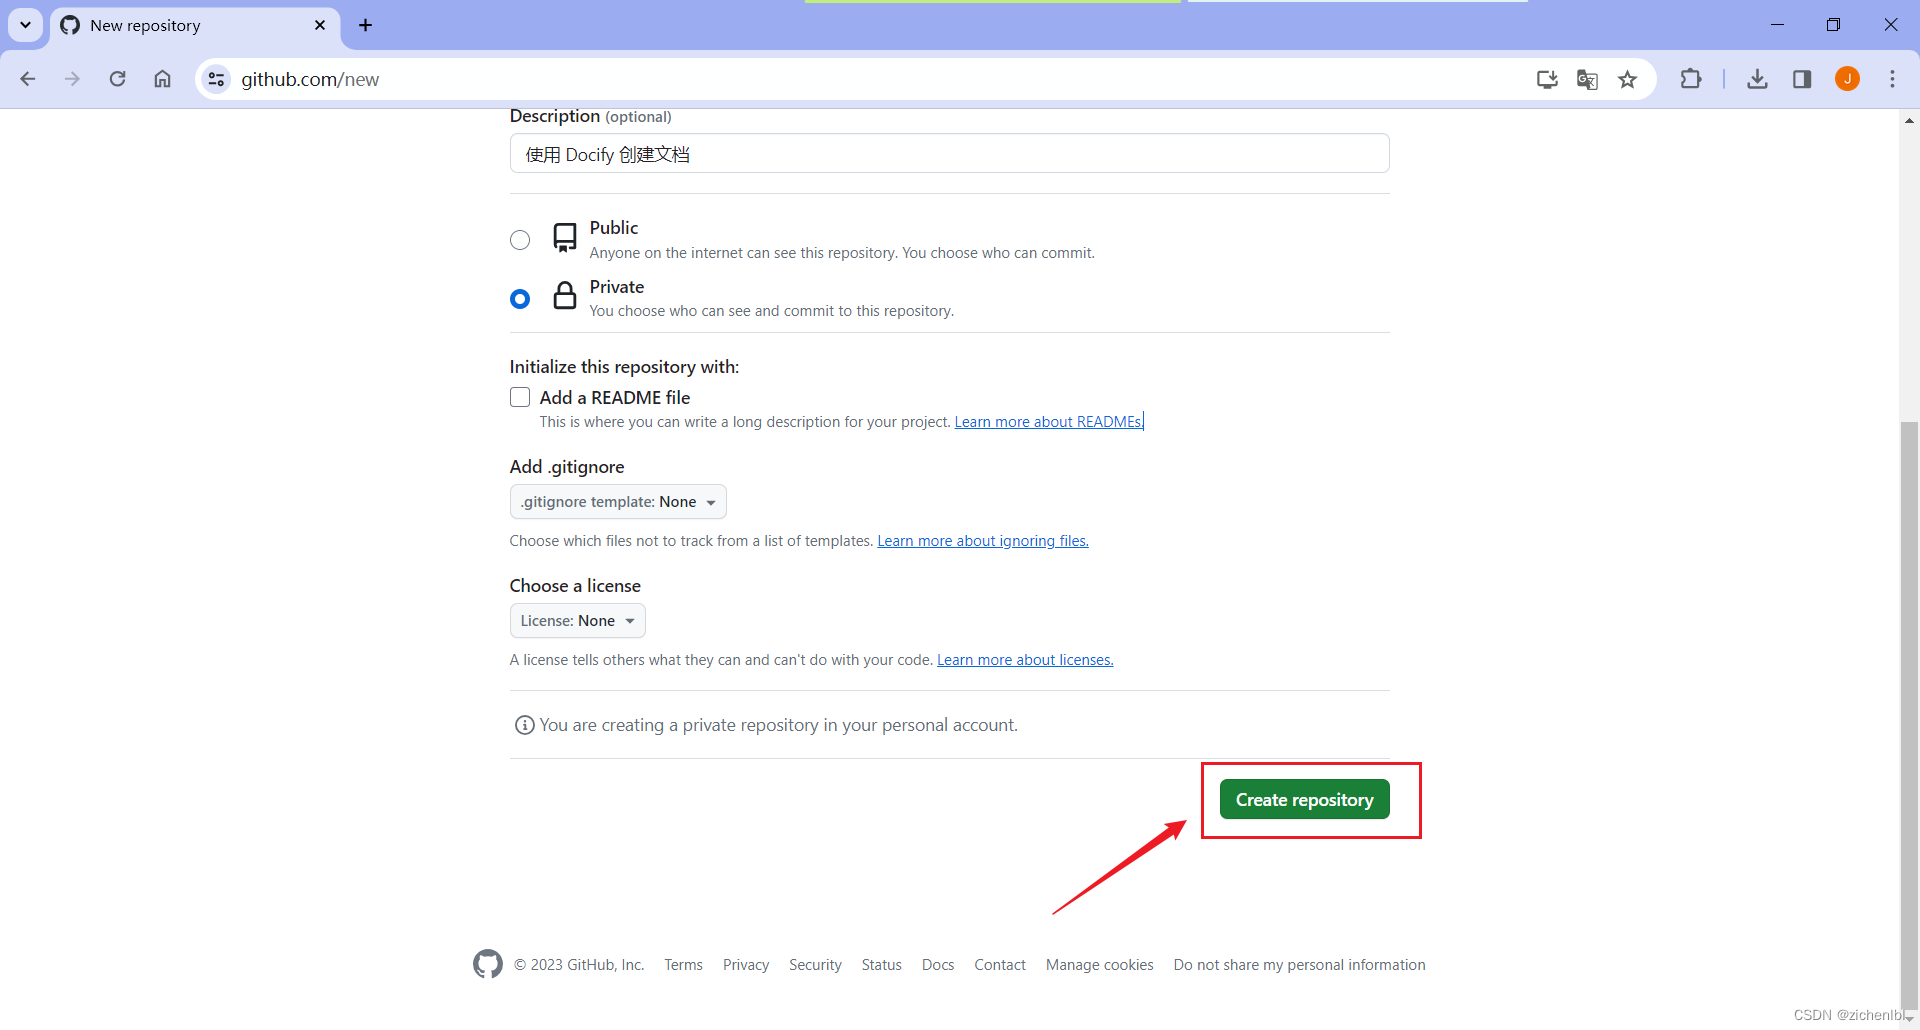

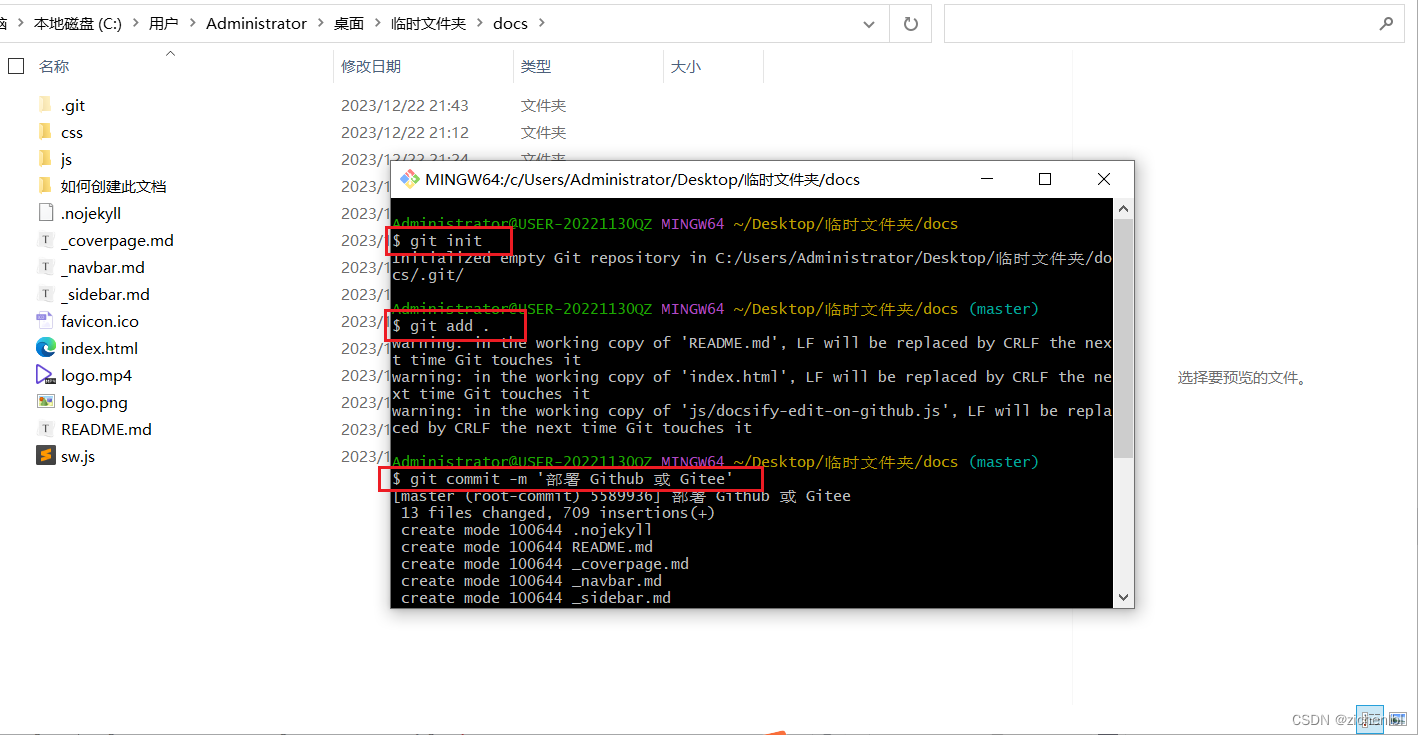
执行这三步,提交到本地仓库。
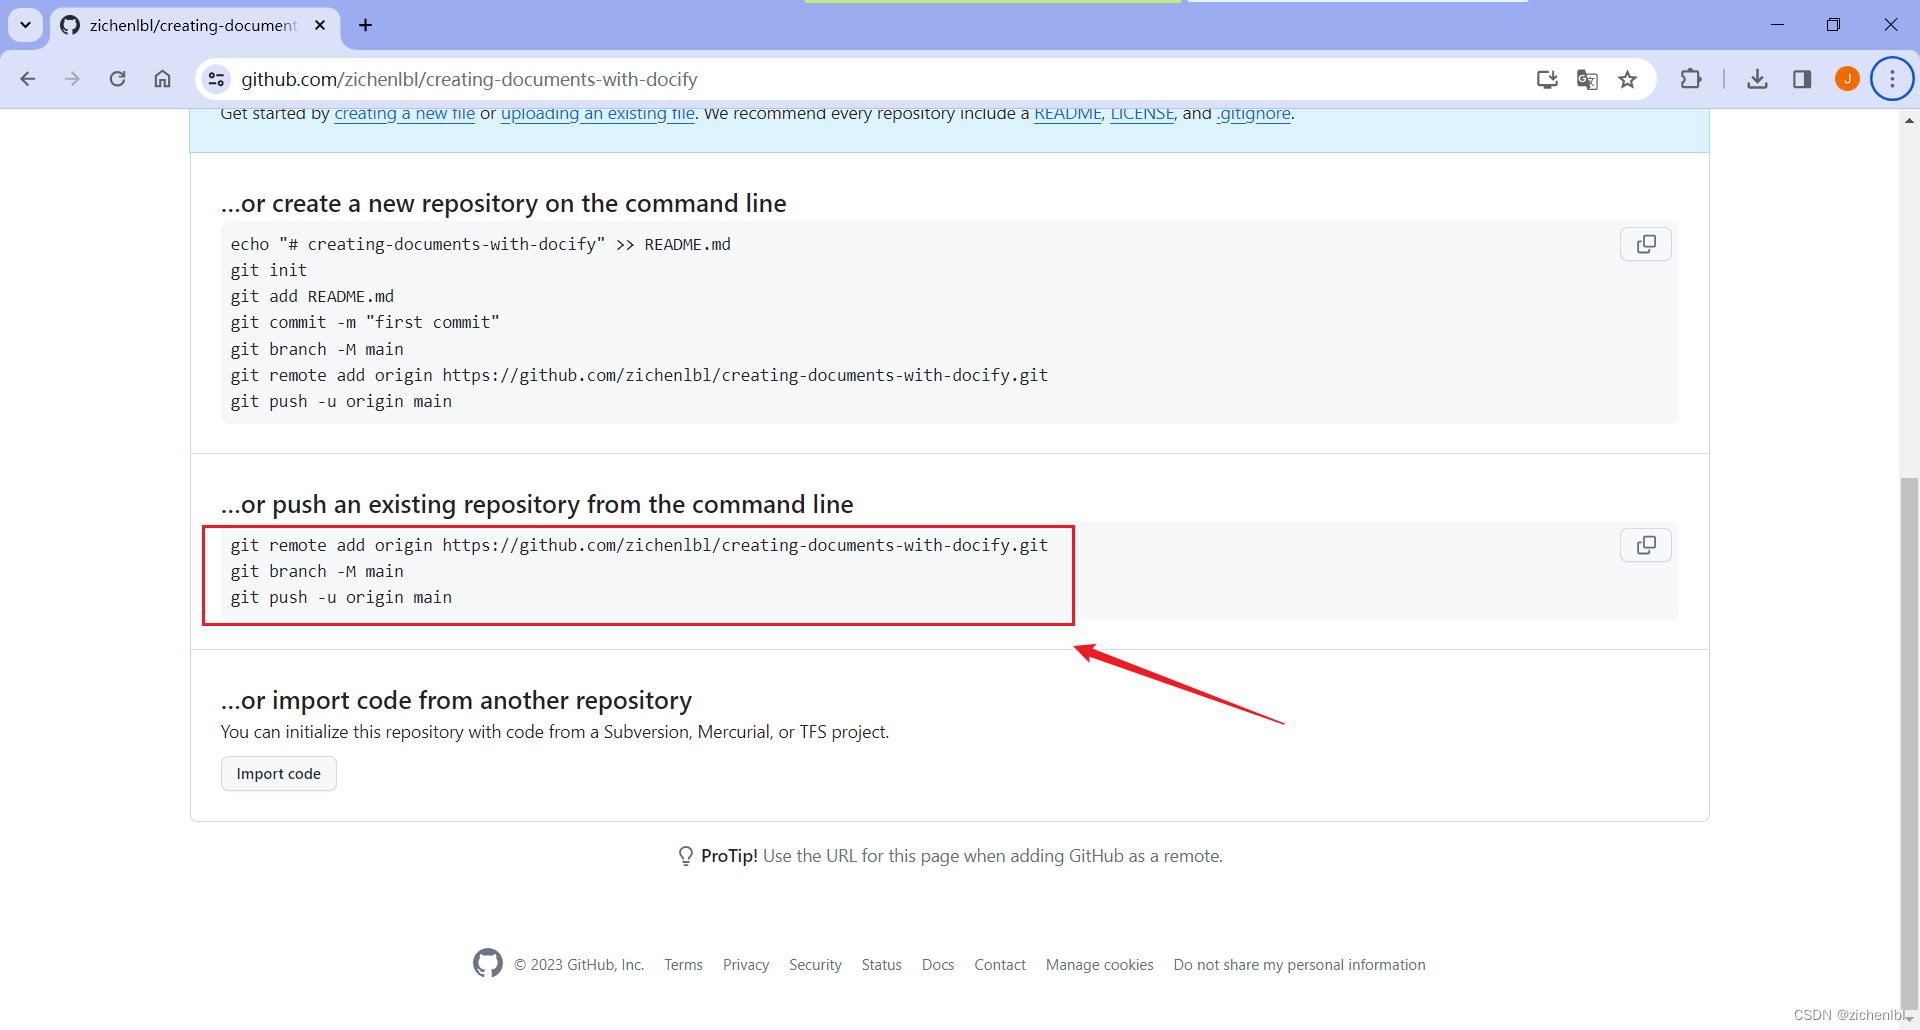
然后执行这个代码,提交到 Github 仓库。

刷新 Github 页面,查看仓库。
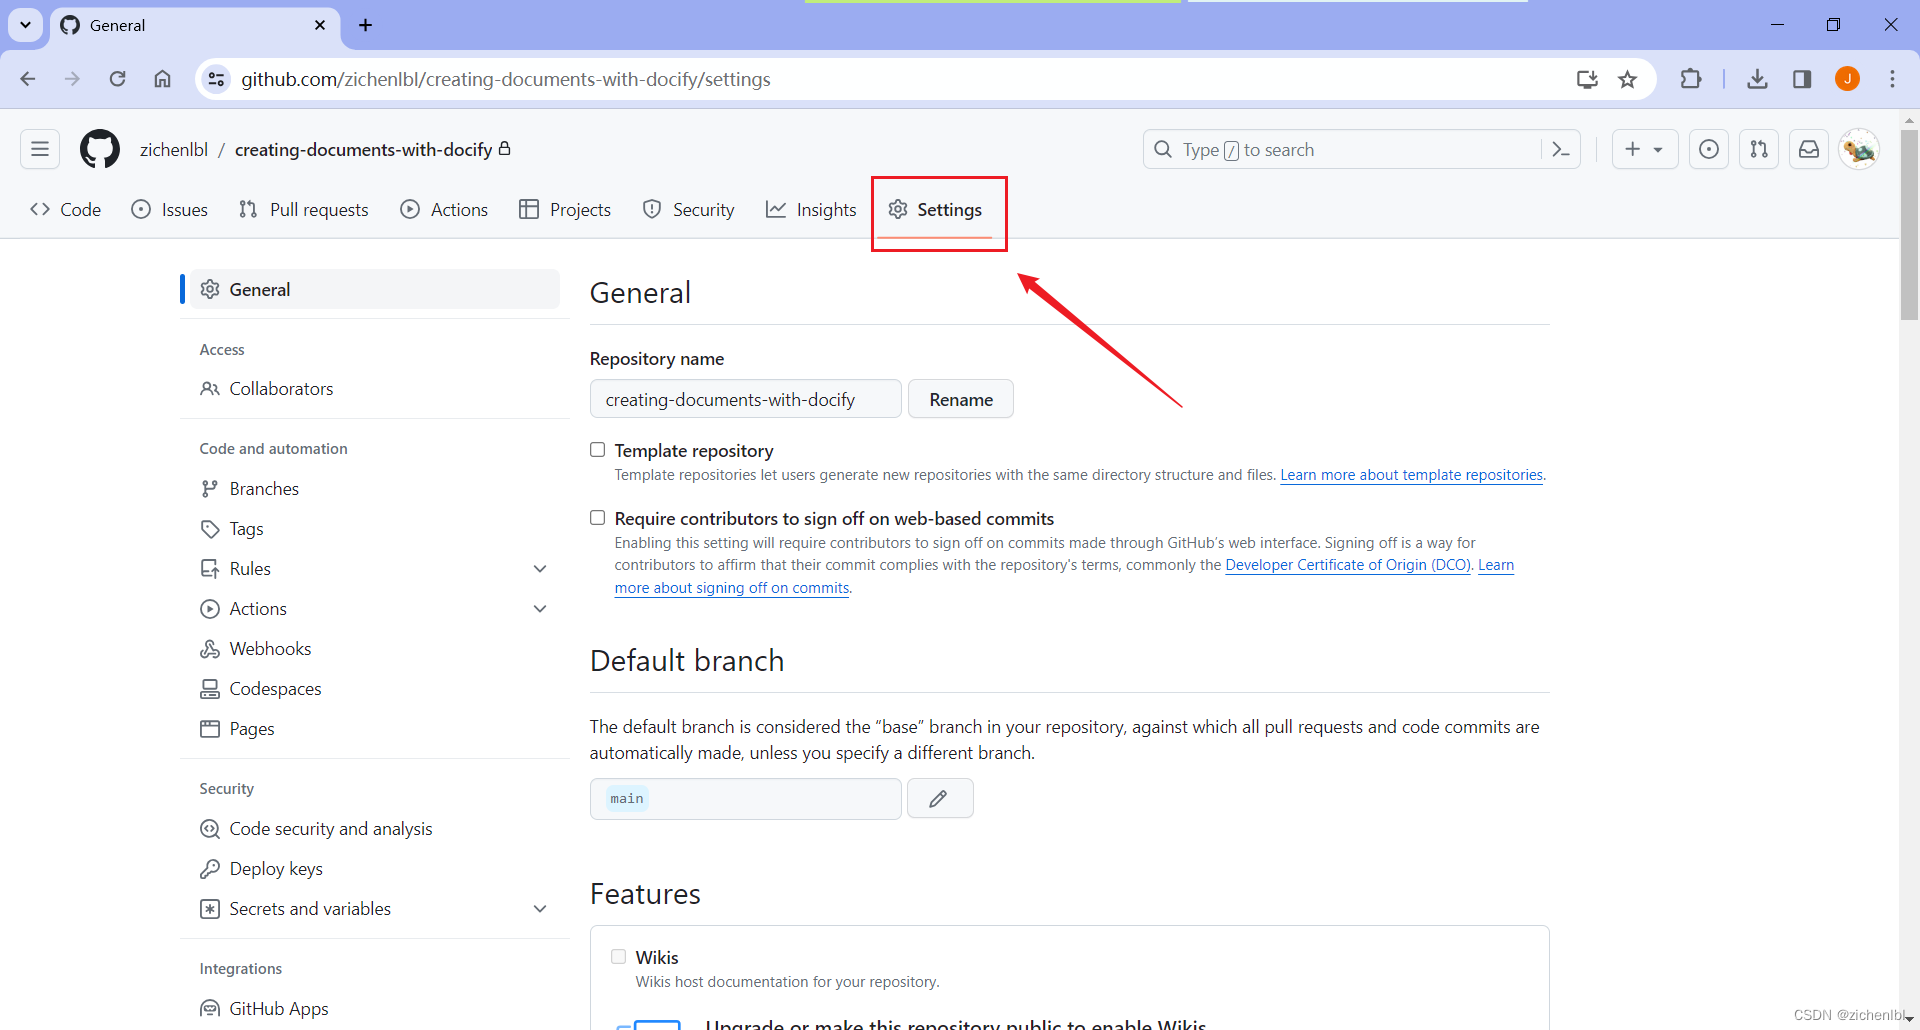
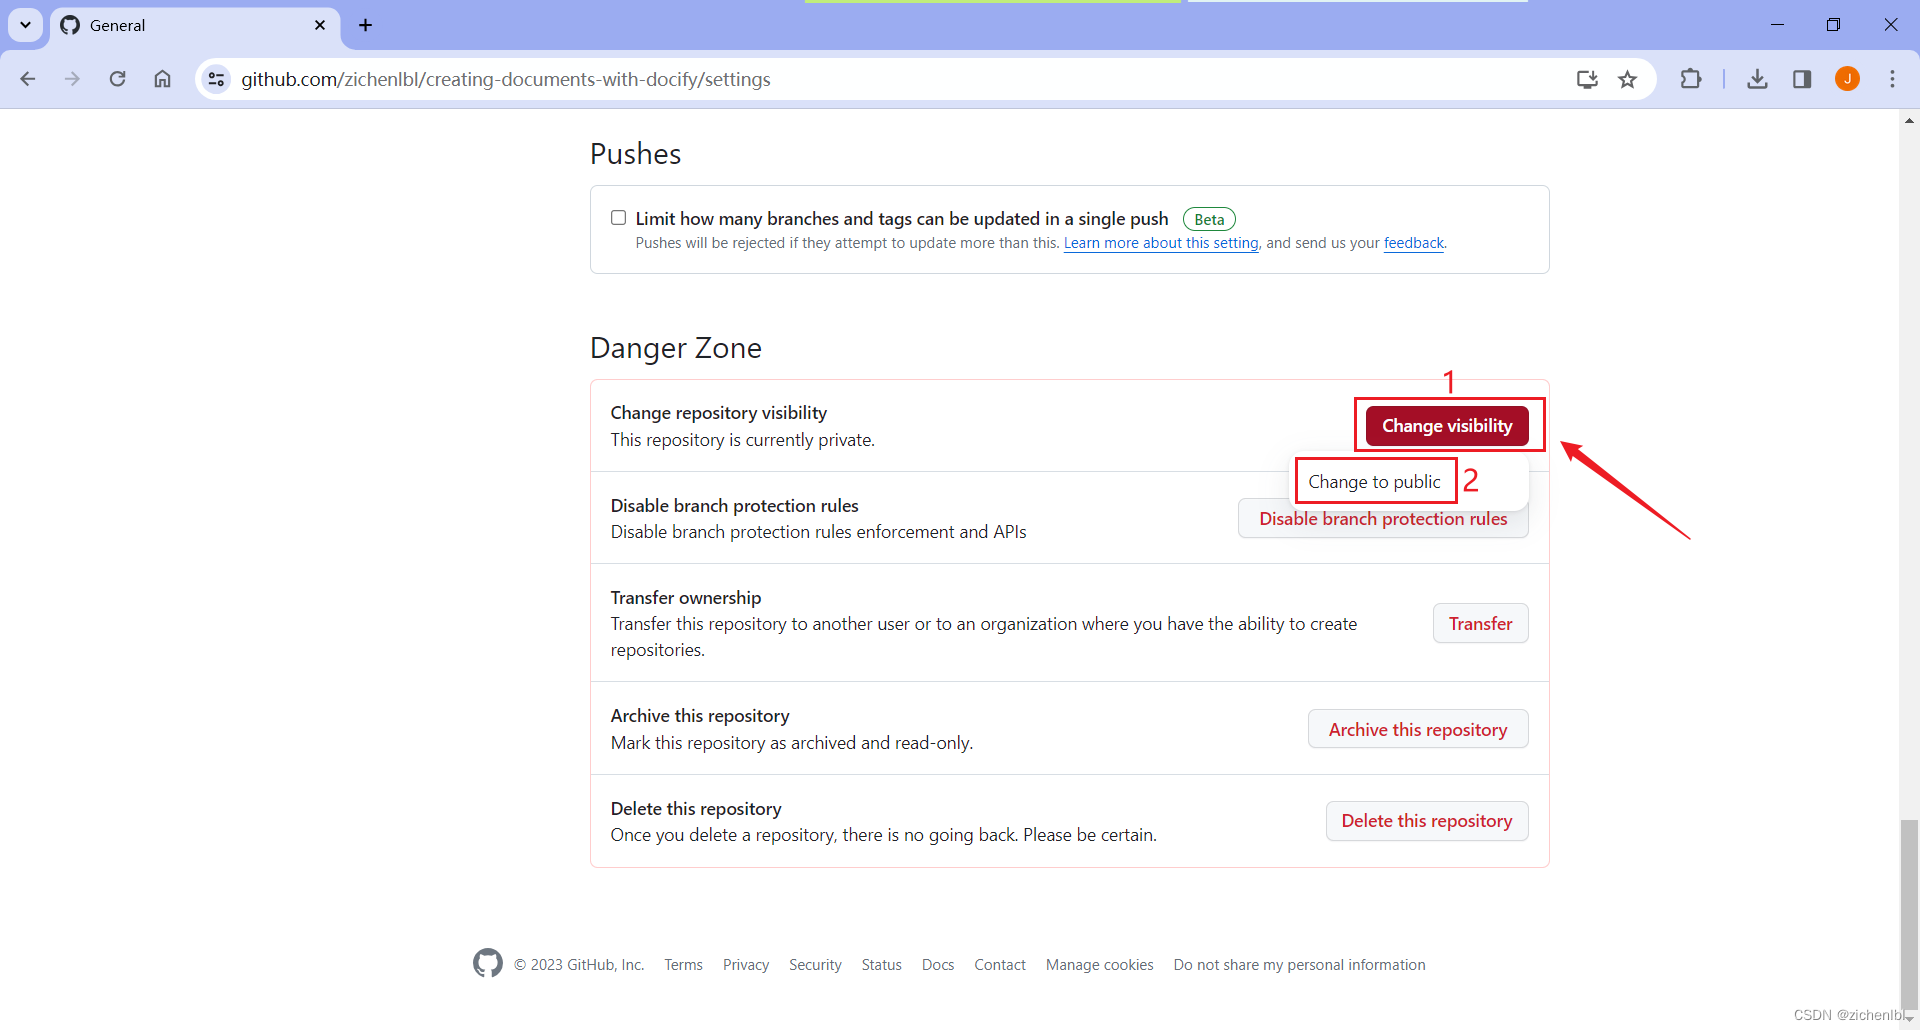
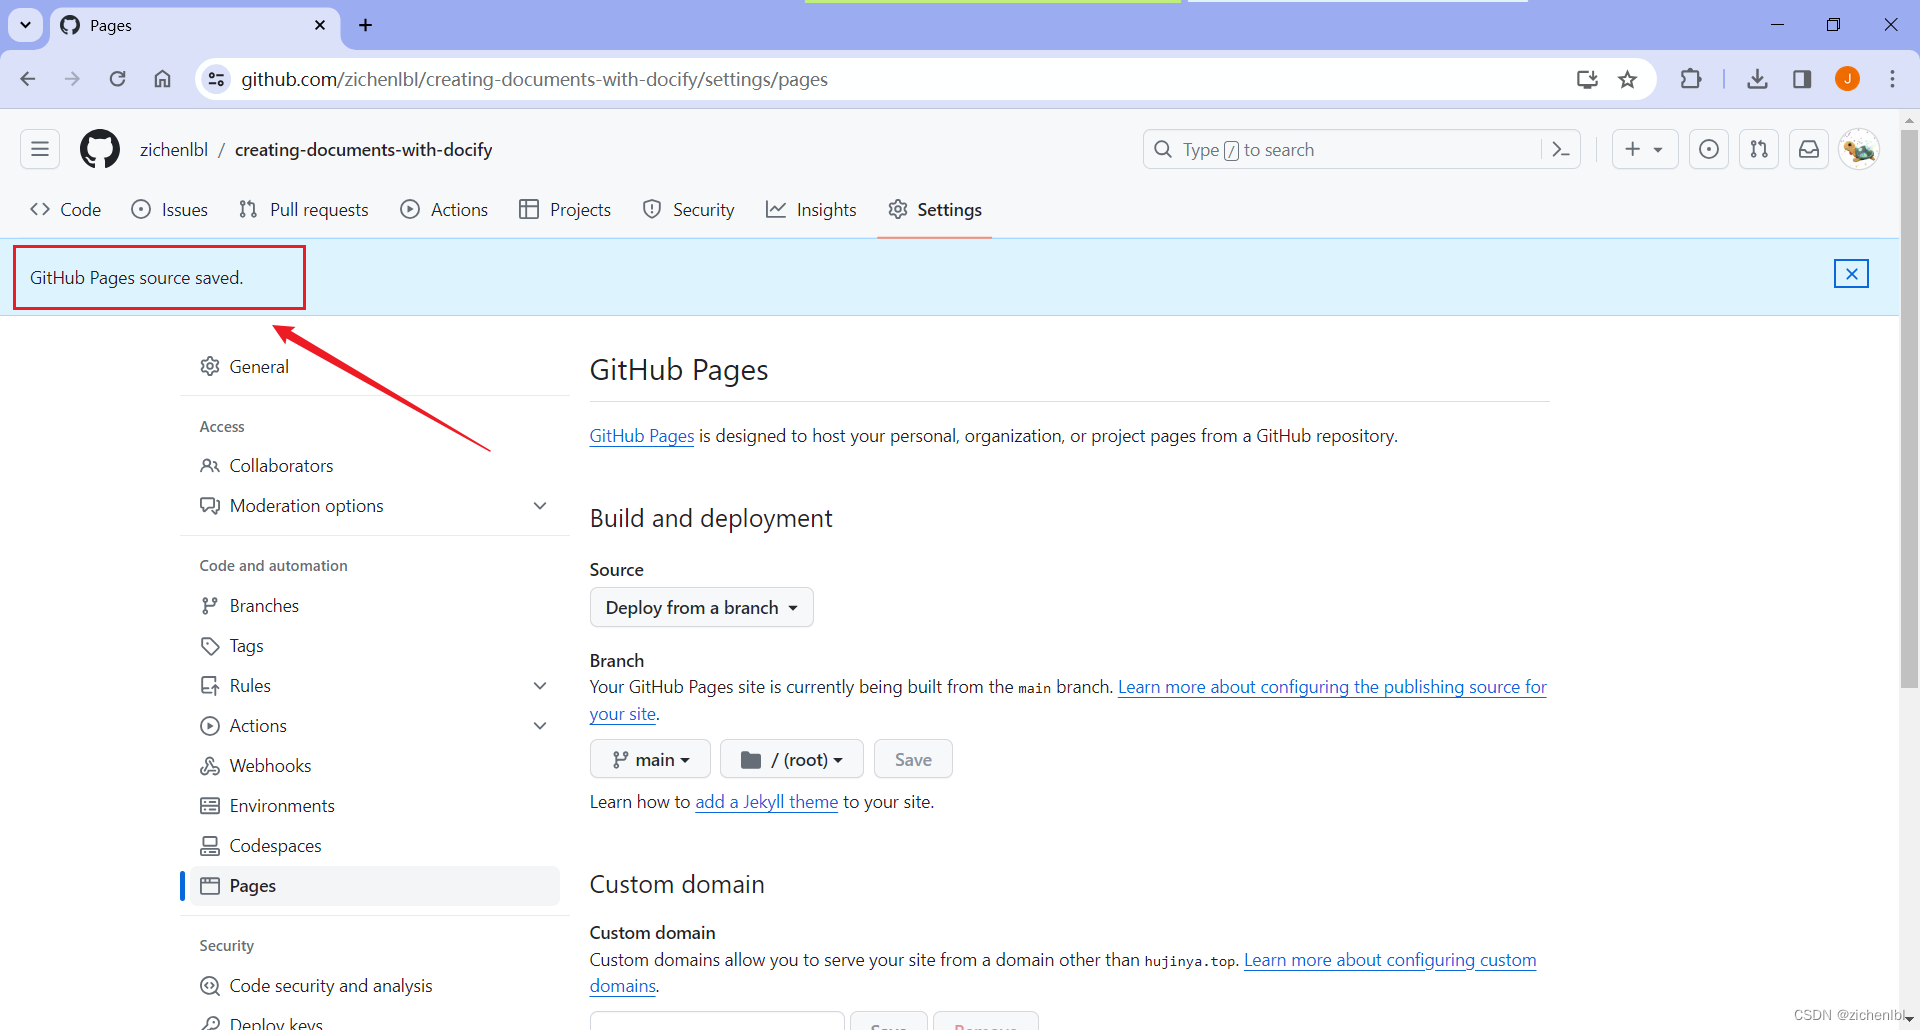
如果需要部署免费的在线文档访问,则需要修改仓库可见性为公共。

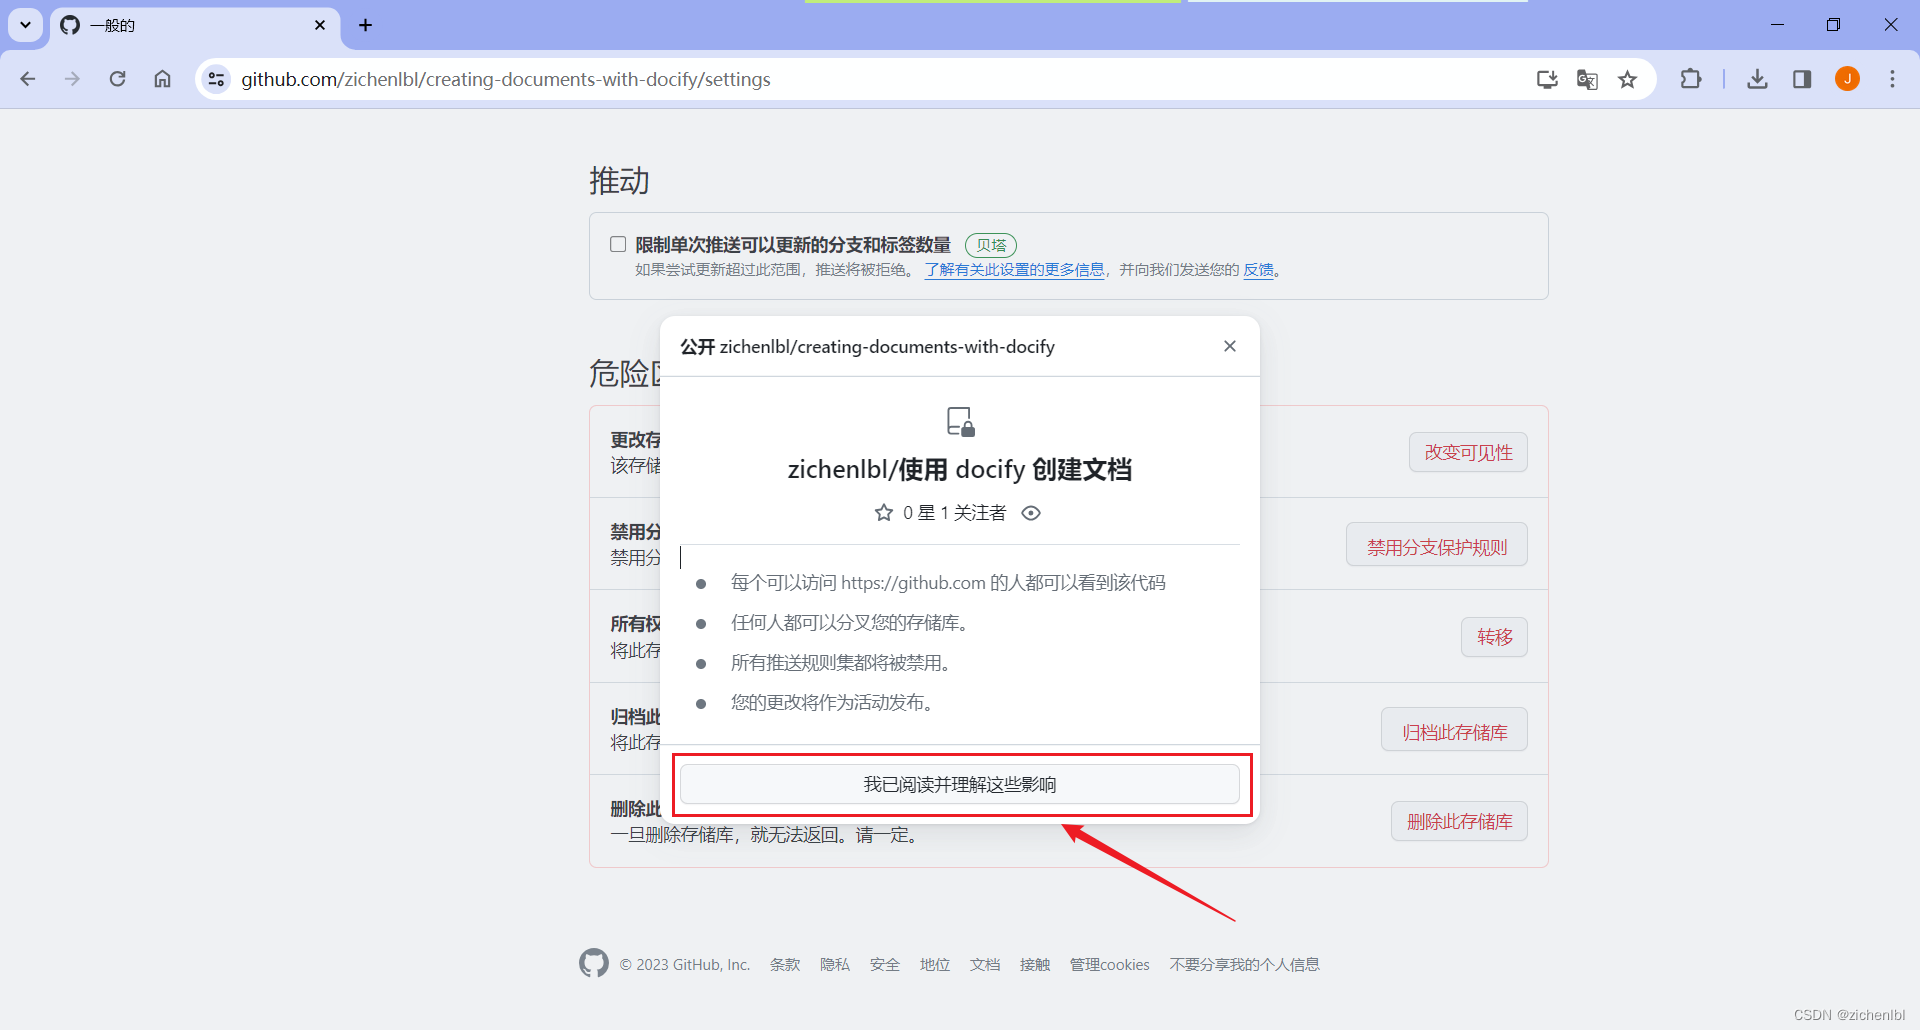
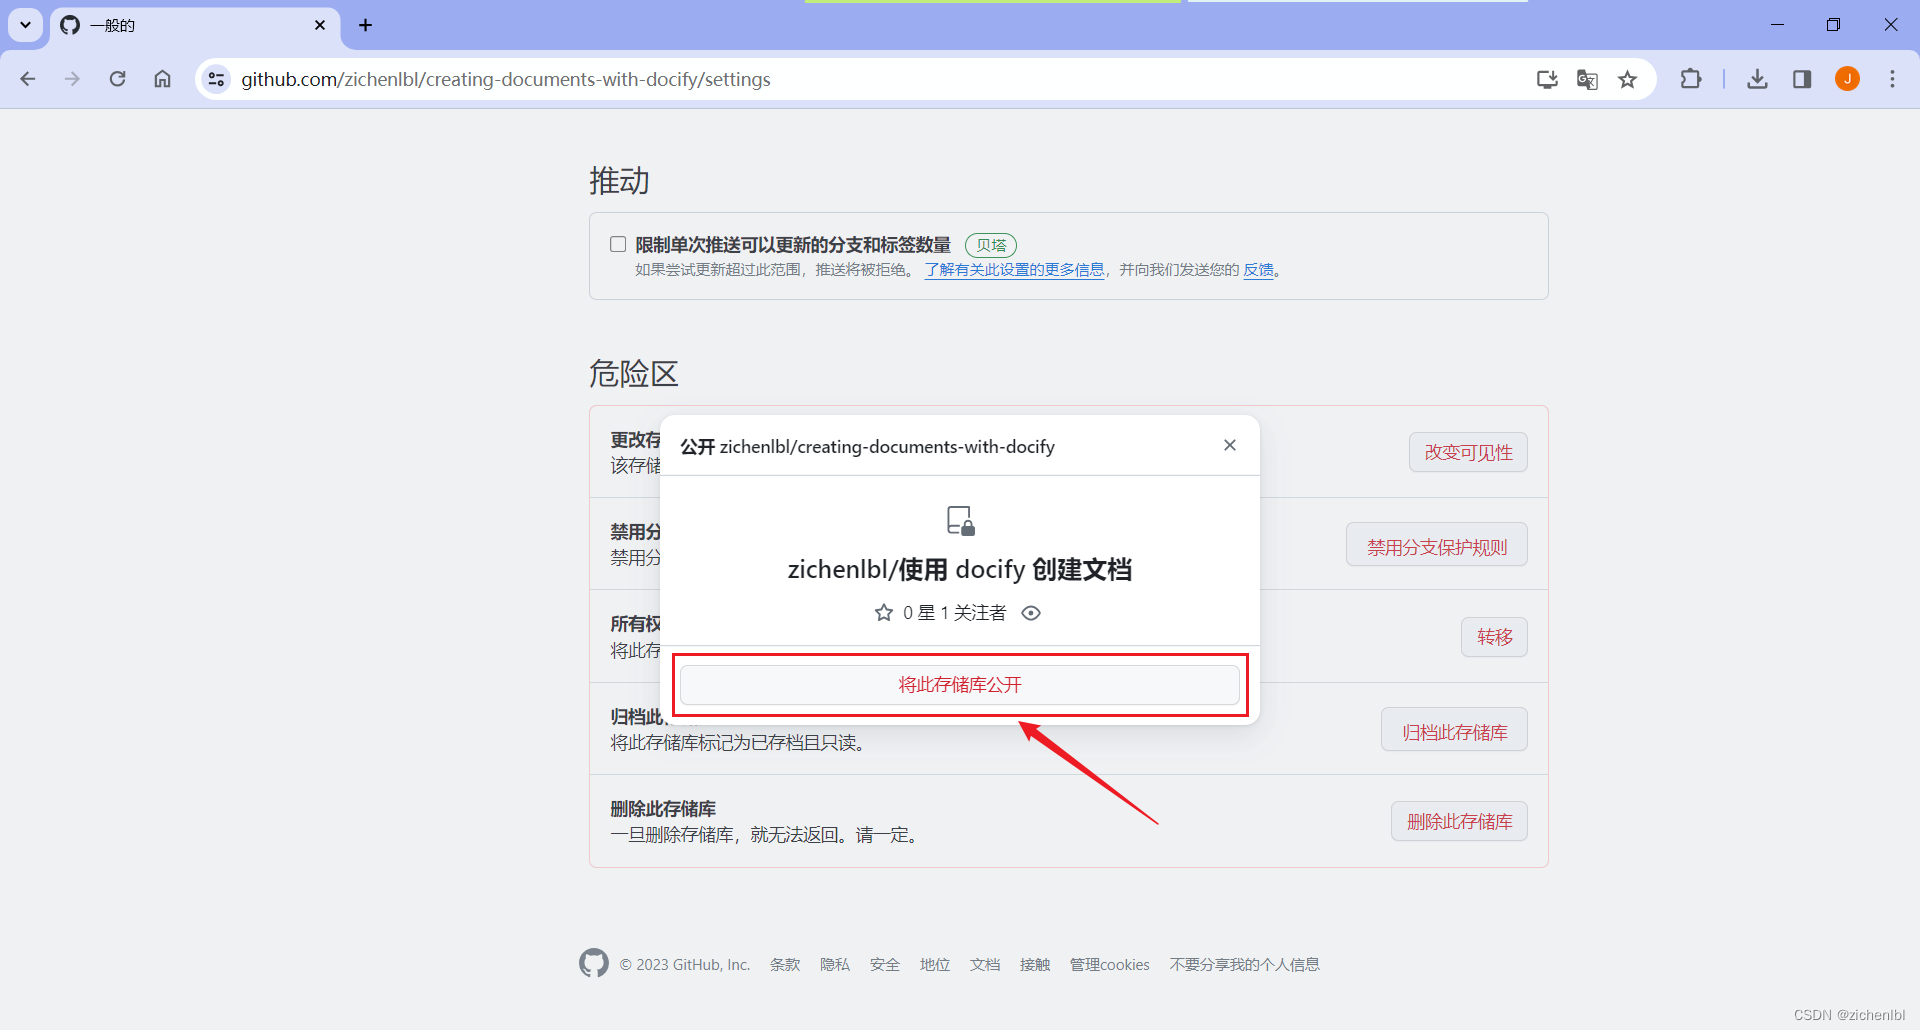
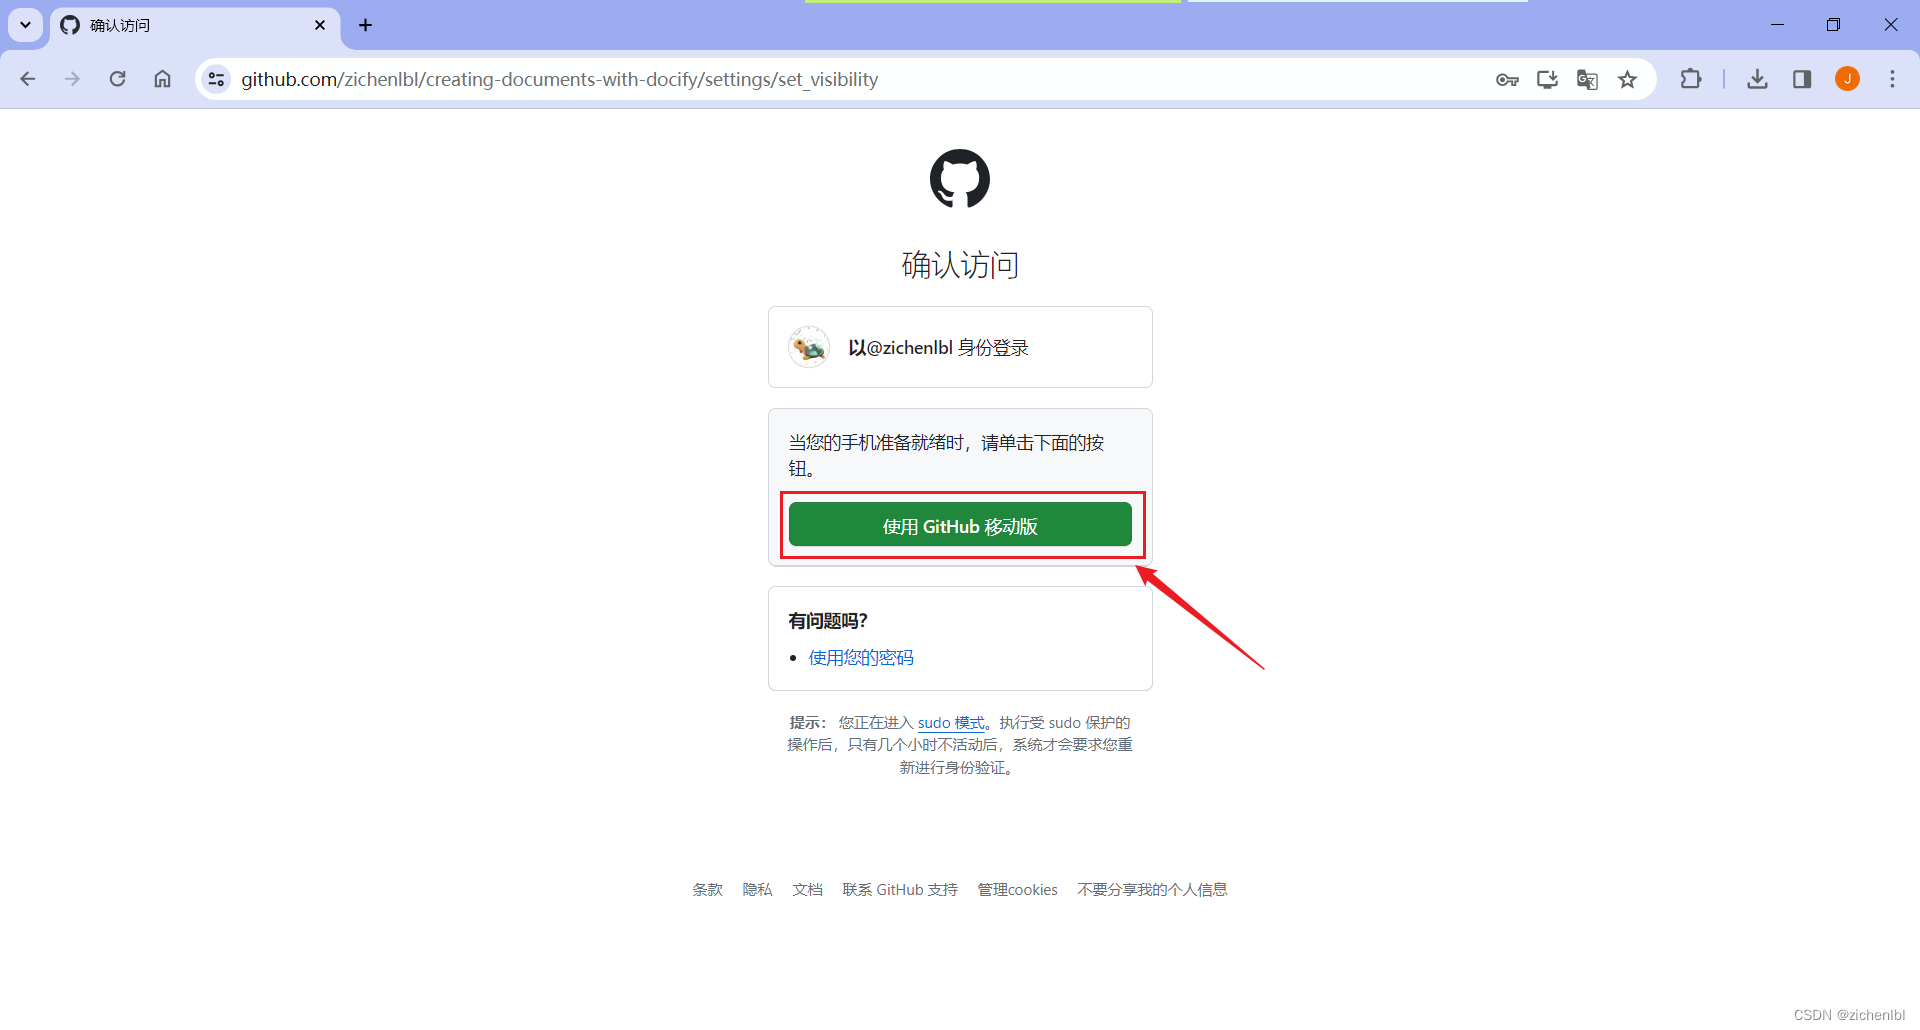
现在该仓库就是公共访问的。
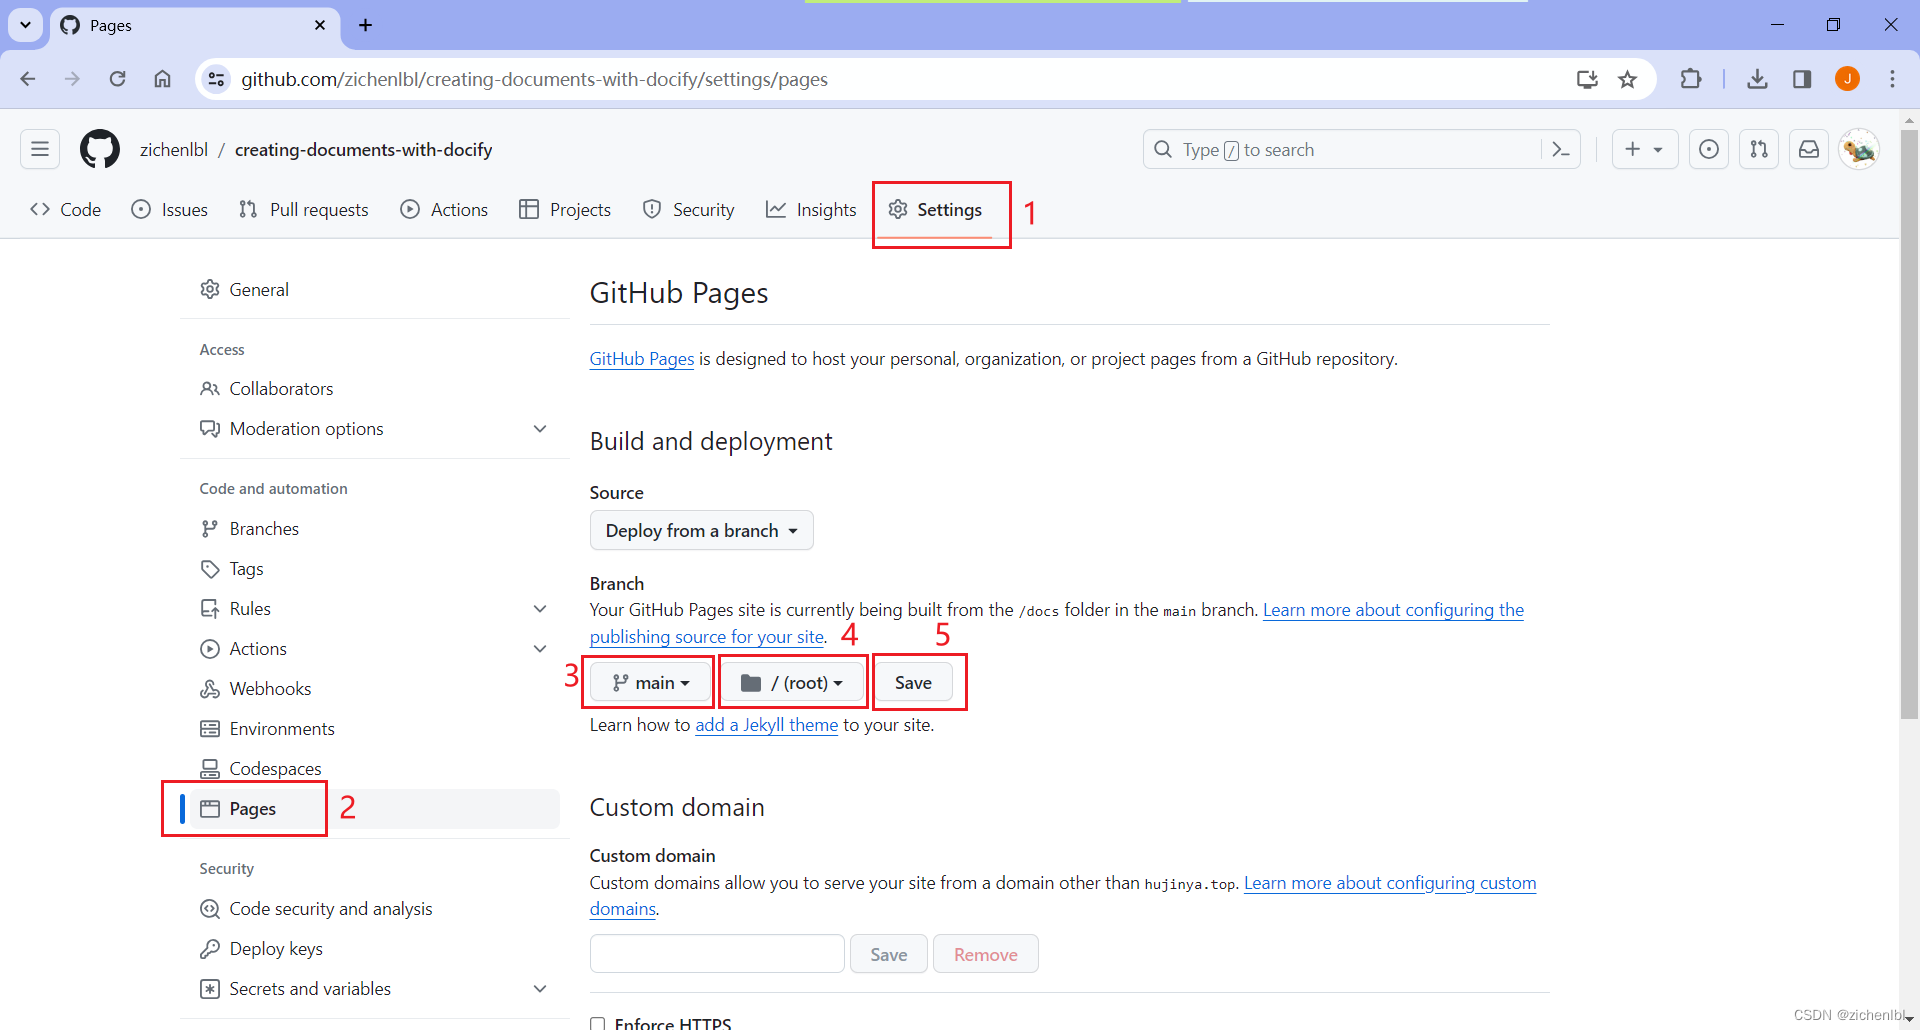
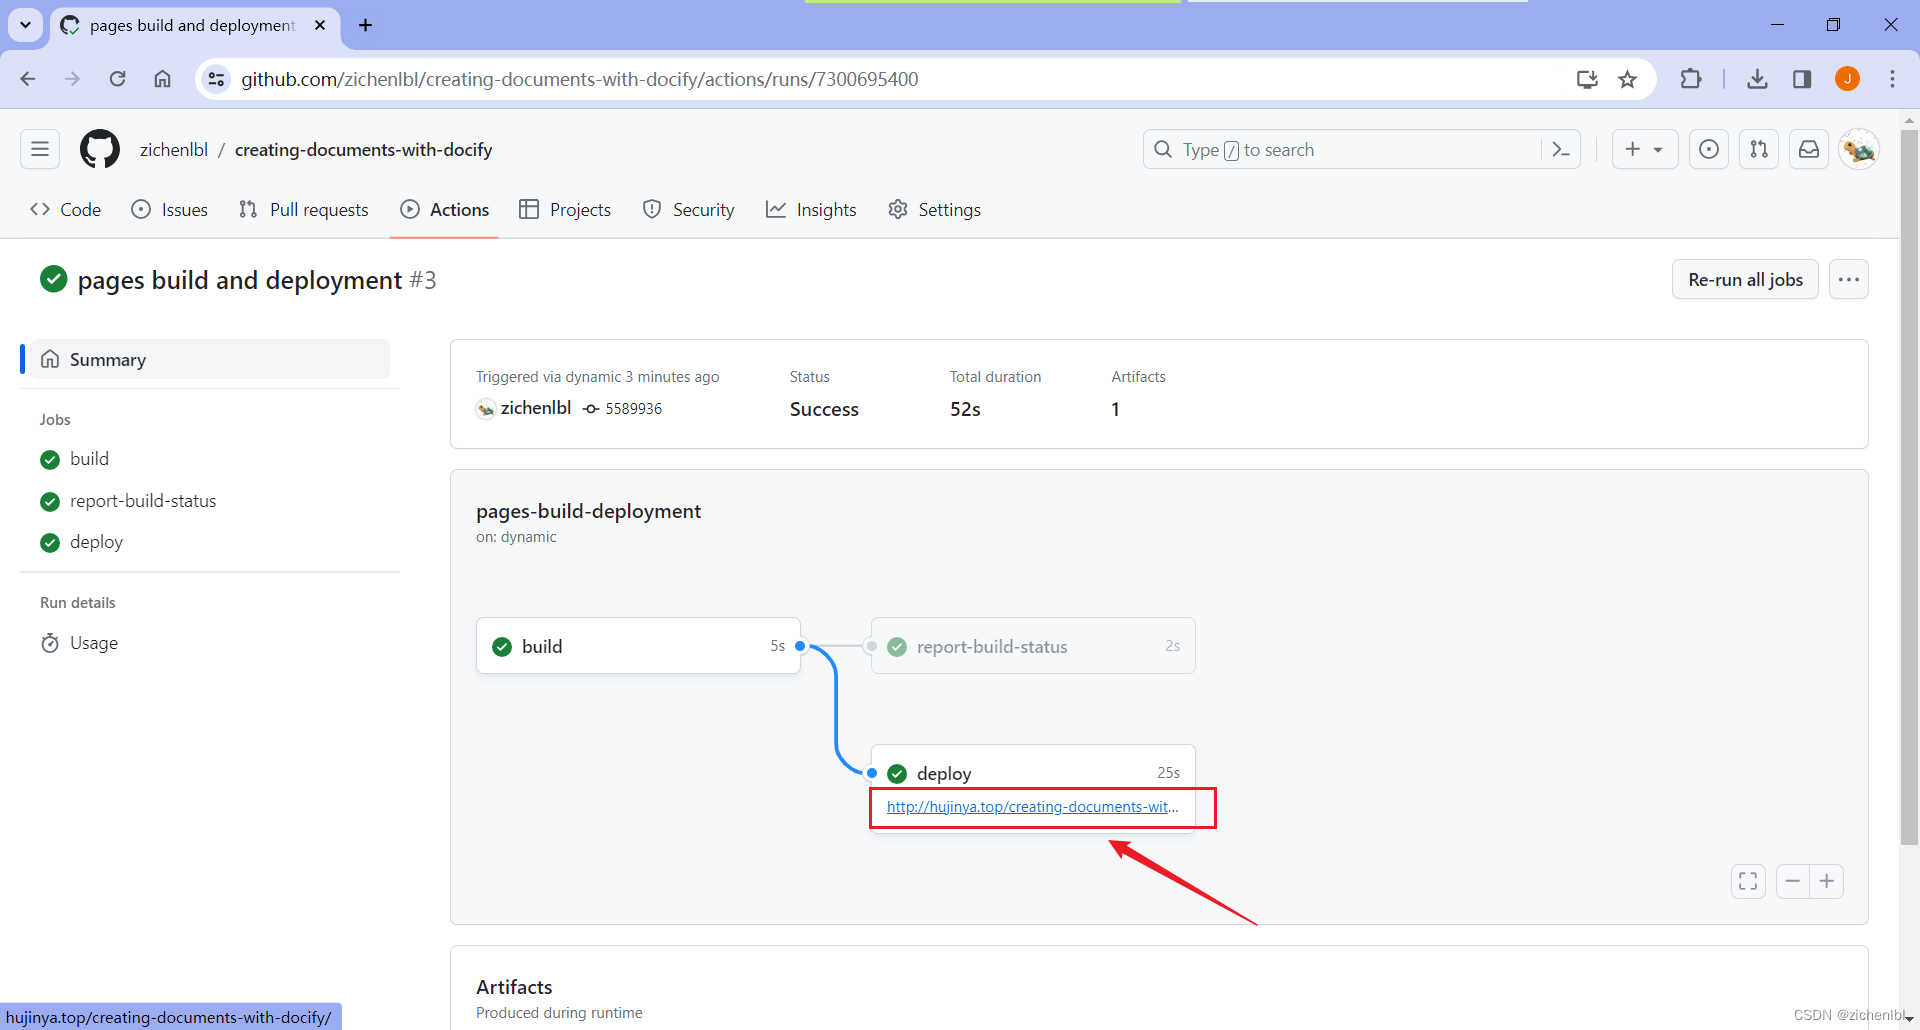
启用 Pages 功能。
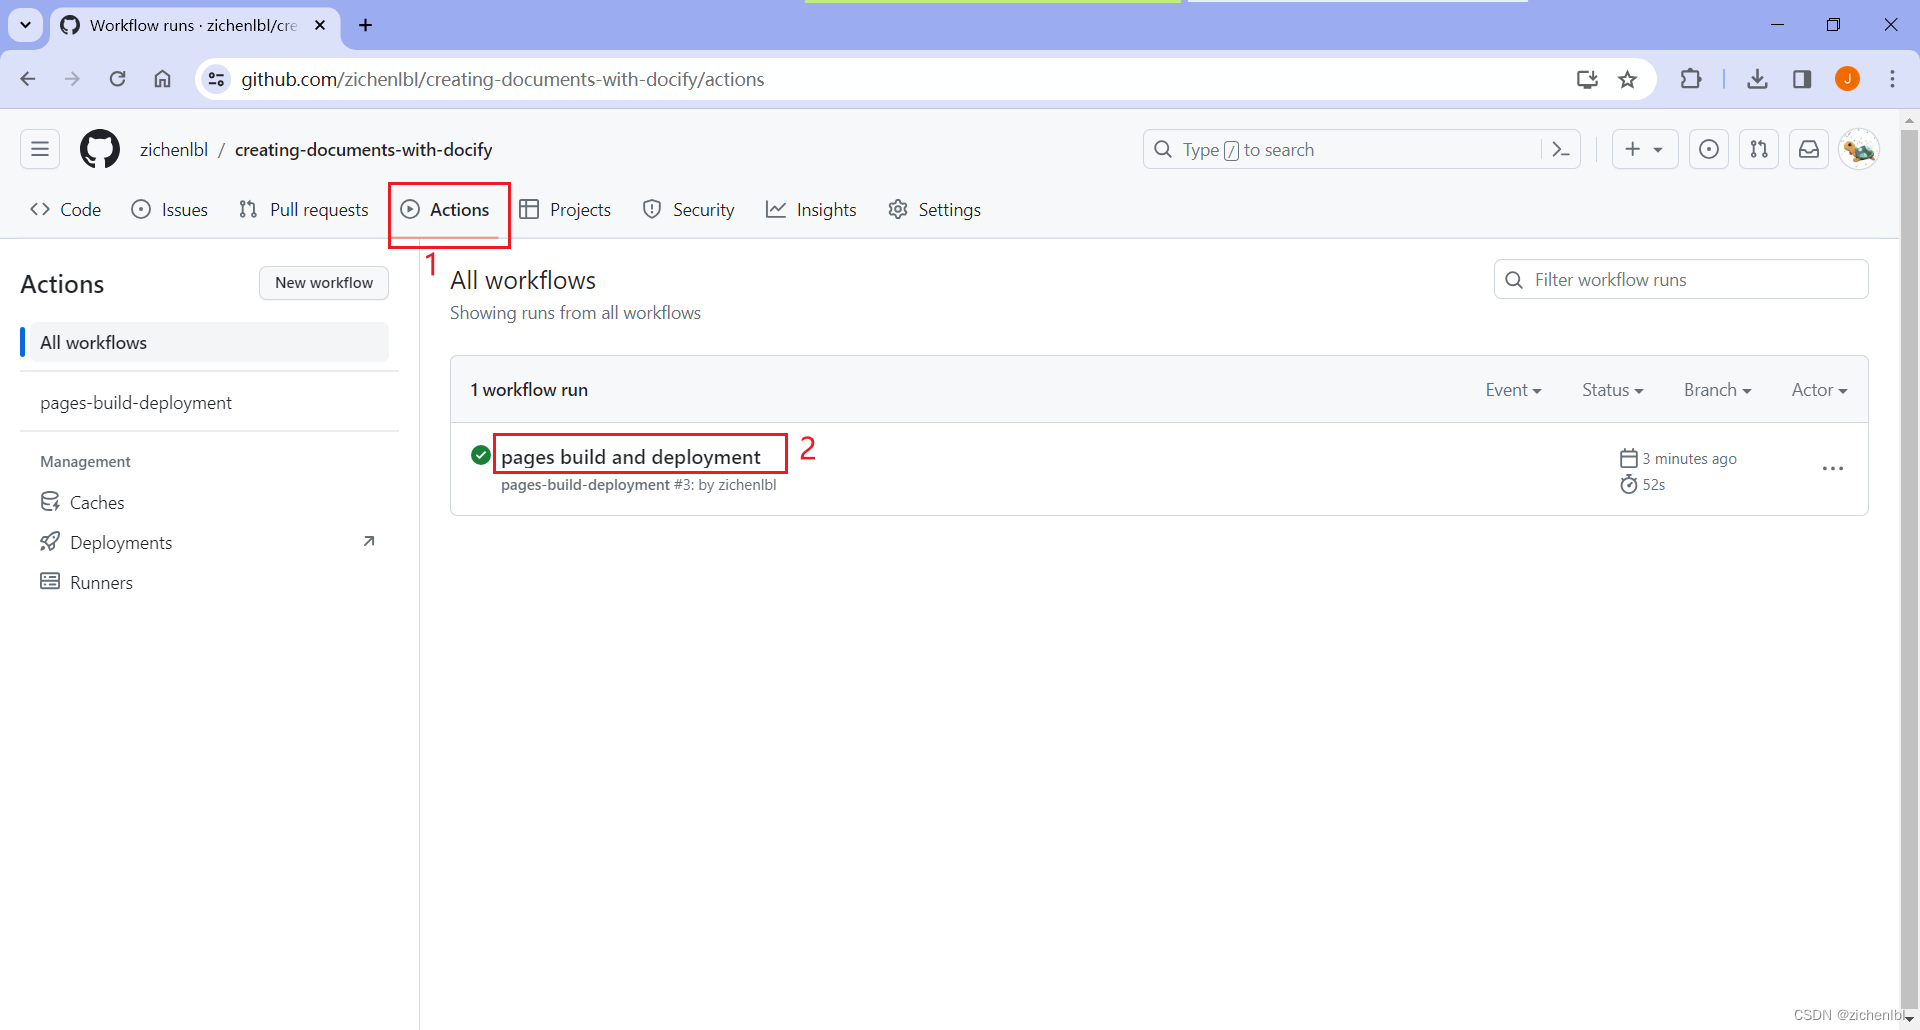
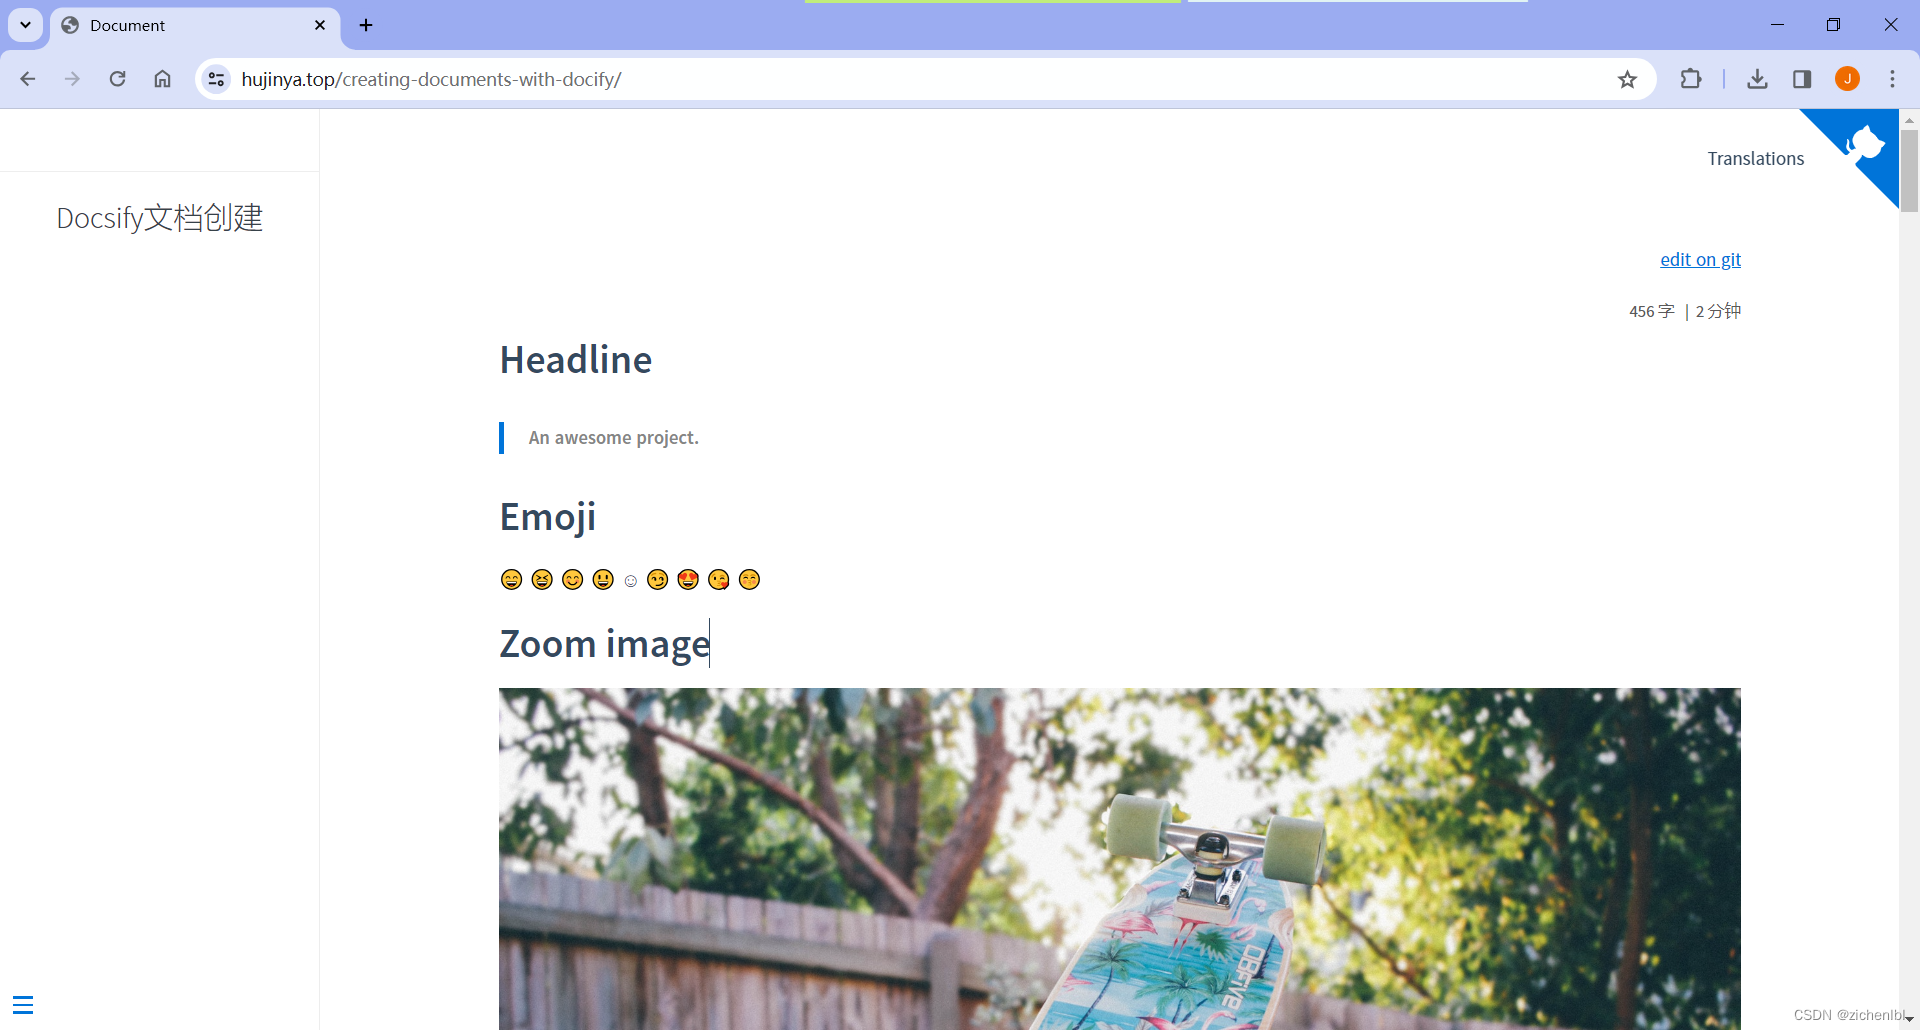
访问这个地址,打开部署成功后的页面。界面有些文件没有加载成功,后面再调整仓库文件内容。
代码即时预览和 jsfiddle 集成 TODO
- 代码即时预览和 jsfiddle 集成
Markdown 配置 TODO
Gitalk 评论系统 TODO
6.更多插件
网址: https://docsify.js.org/#/awesome?id=plugins
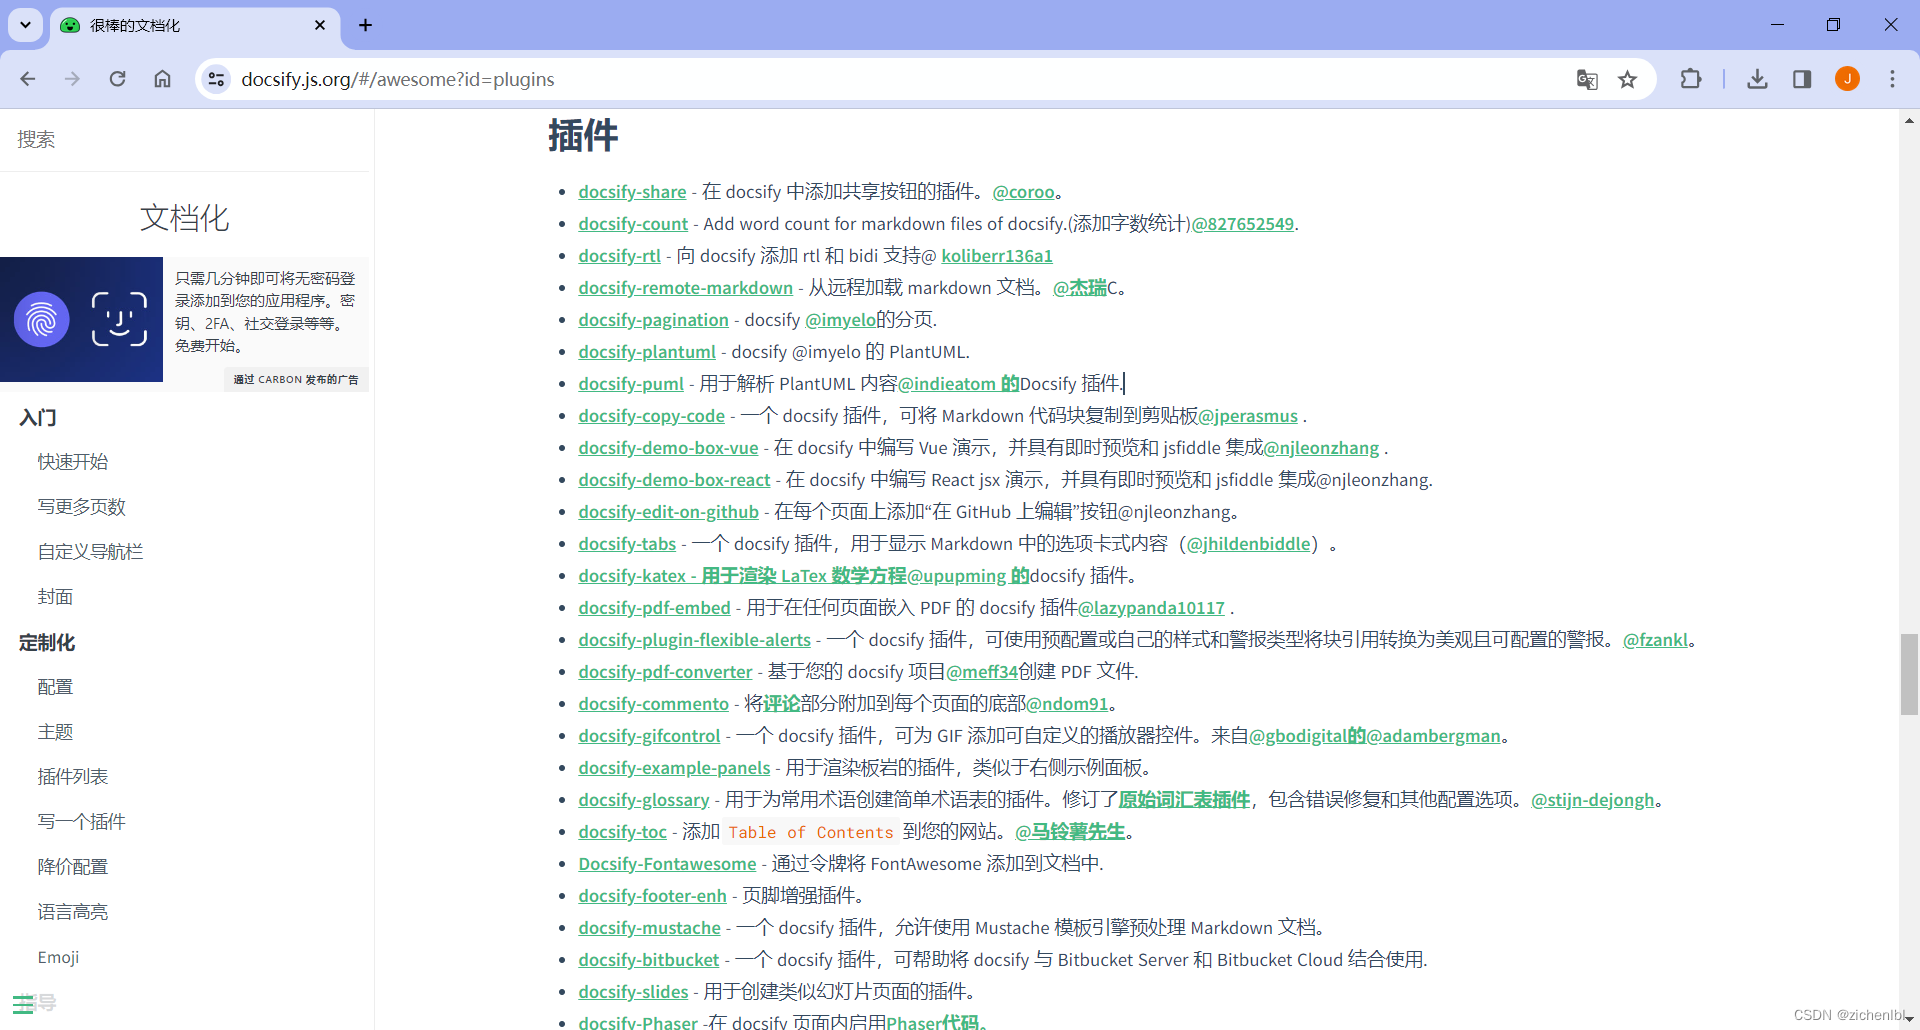
TODO
插件列表
- 谷歌统计 - Google Analytics
- emoji
- 外链脚本 - External Script
- 图片缩放 - Zoom image
- 在 Github 上编辑
- 代码即时预览和 jsfiddle 集成
- 复制到剪贴板
- Disqus 评论系统
- Gitalk 评论系统
- Pagination 分页导航
- 字数统计
- Tabs 选项卡
- Markdown 配置
- 代码高亮
文档助手
- 强调内容
- 普通提示
- 忽略编译链接
- 设置链接的 target 属性
- 禁用链接
- 跨域链接
- Github 任务列表
- 图片处理
- 设置标题的 id 属性
- html 标签中的 Markdown
其他
- 兼容 Vue
- CDN
- 离线模式
- 服务端渲染(SSR)
- 文件嵌入
- IIS部署
- 不联网使用本地 js 文件
更多
- 右上角 Github 挂件
- 部署到 Github
7. Other
7.1 网络图片快速复制到本地
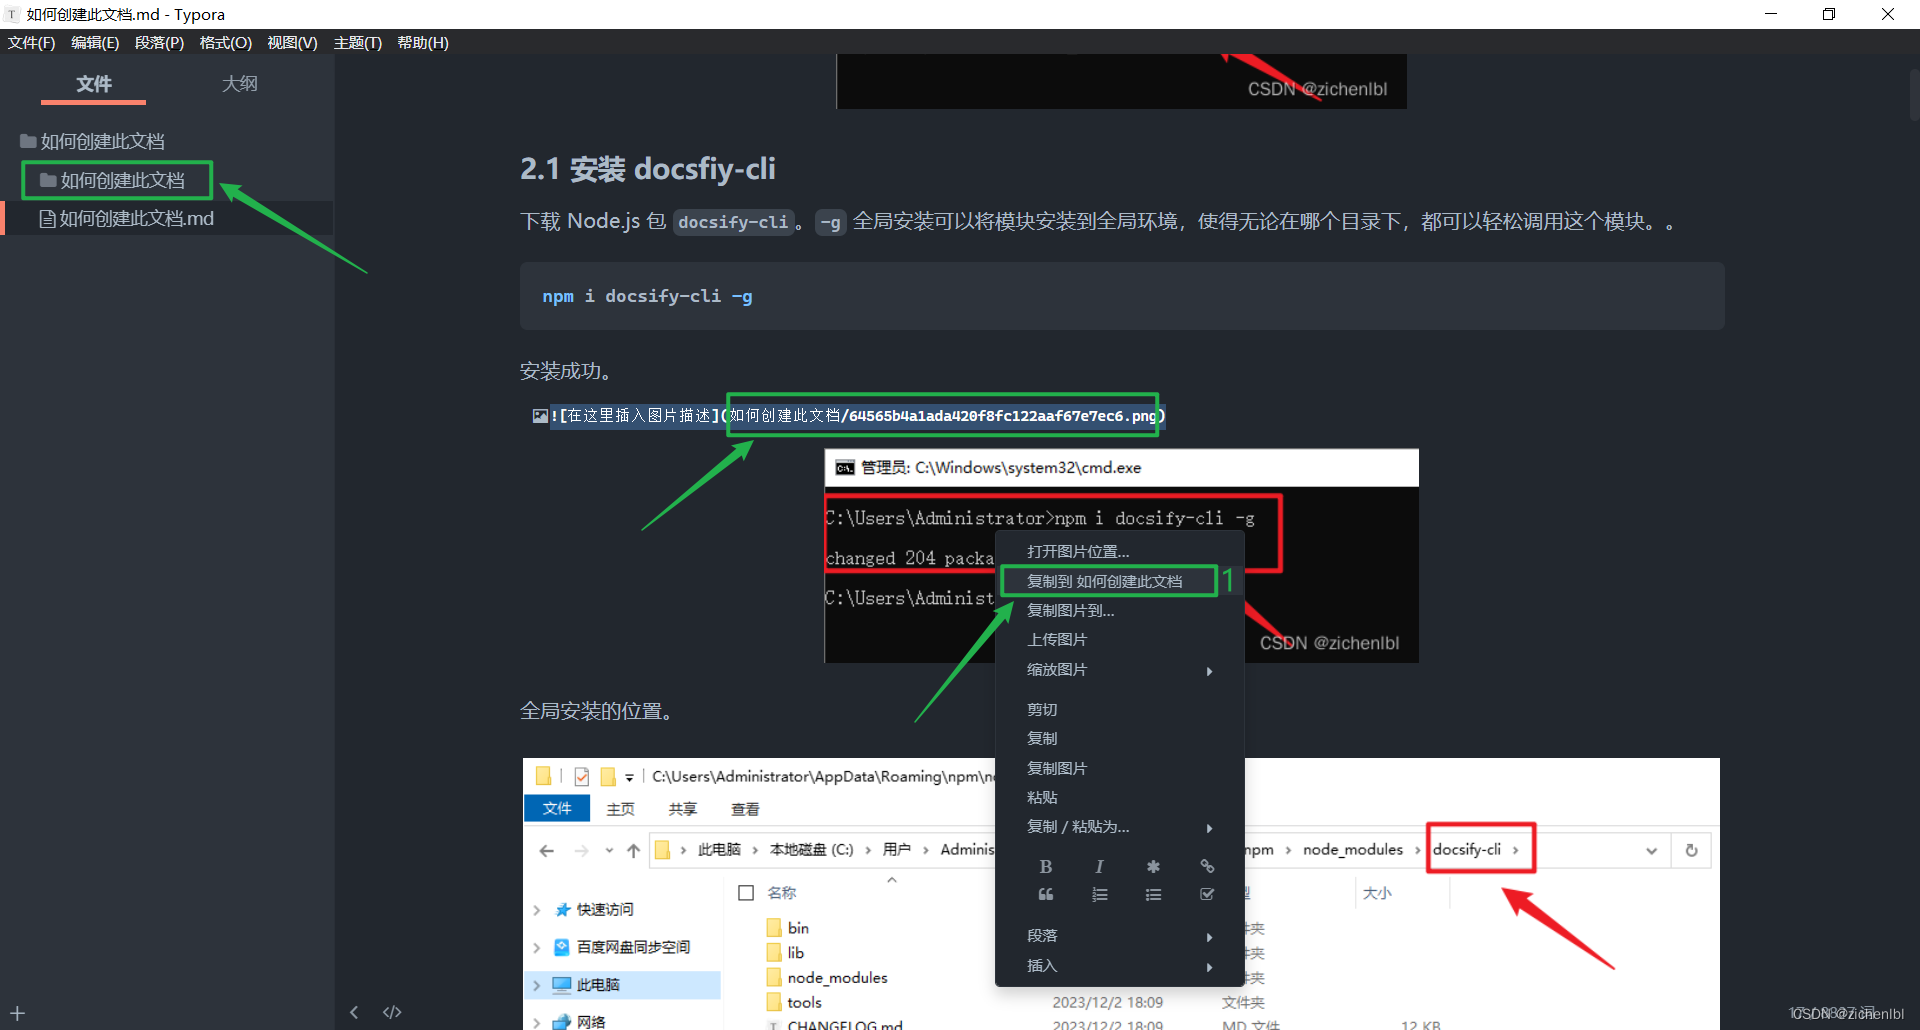
使用 Typora 软件,撰写文章。修改配置,文件 -> 偏好设置。
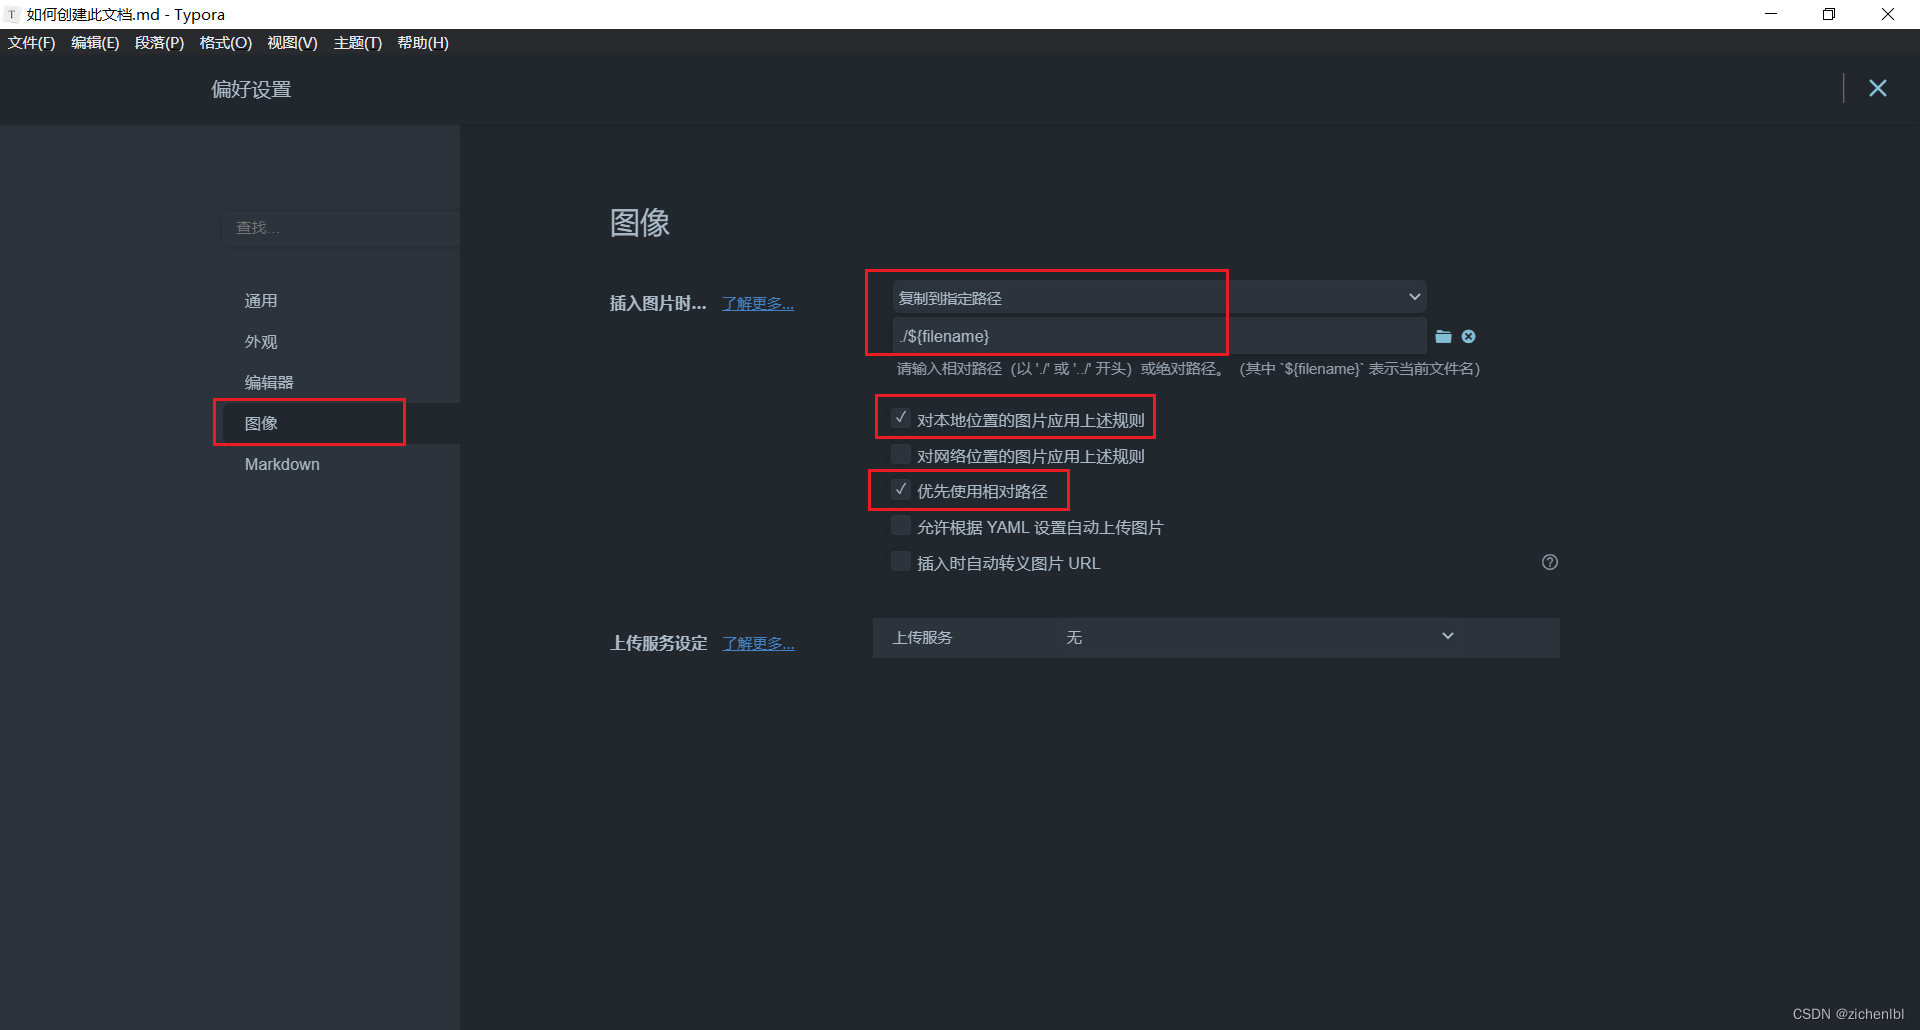
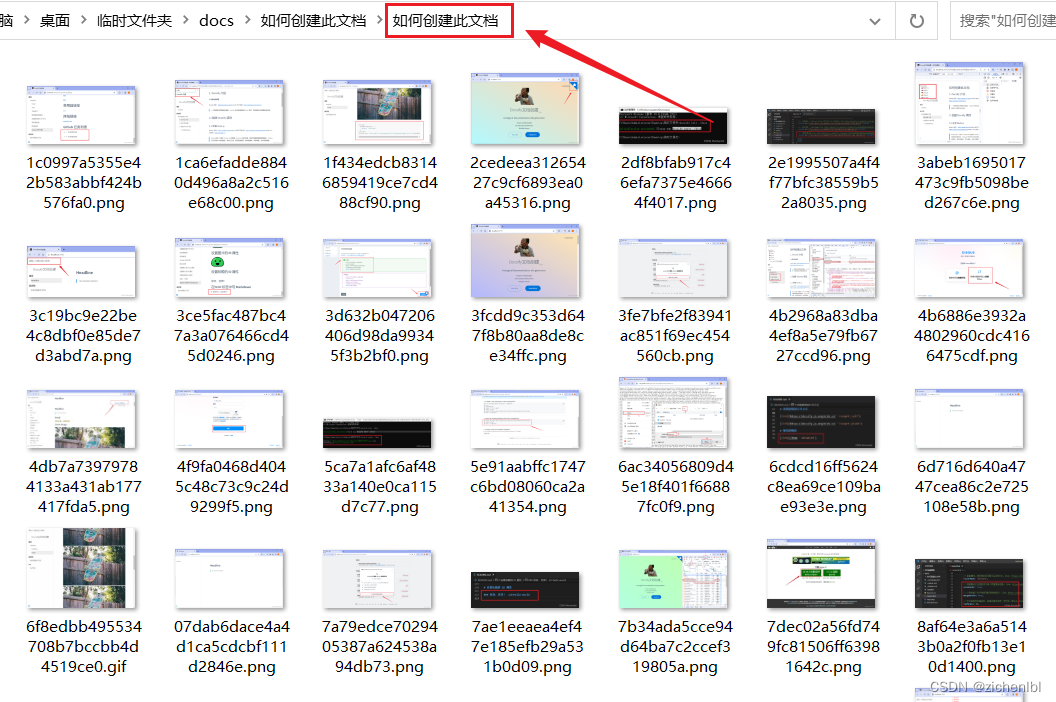
在网络图片上右键,选择复制到 xxx 当前 Markdown 同名的文件夹中,会自动下载图片并保存到本地。
打开文件夹,查看效果。


 1439
1439


 被折叠的 条评论
为什么被折叠?
被折叠的 条评论
为什么被折叠?
 到【灌水乐园】发言


