


Fabric CA部署
前言
不知不觉,研究生三年的时光即将告一段落,毕业在即。回想起当初学习的场景,那时候笔记本上记满了密密麻麻的笔记,如今想要扔掉却又舍不得。因此,我决定将当初刚入门区块链时的学习笔记分享出来。由于是跨考的,所以当时的我对区块链甚至是计算机都一窍不通,直接开始了学习之旅。因此,笔记中可能存在一些错误,仅供参考,切勿直接照搬。希望读者能够在阅读的过程中保持思考,同时,大体逻辑是可靠的。如果发现了任何错误,请务必告知我,我将及时进行修改。
一、Fabric CA简介
HyperLedger Fabric CA 是 HyperLedger Fabric 的证书颁发机构。前面几章演示的案例所需要的证书及公私钥,都是通过cryptogen工具根据crypto-config.yaml配置情况生成证书及公私钥文件的。但是如果用于生产环境,则必须要有一个中心证书机构统一管理和维护证书,合理地划分CA层级,使得新组织加入时不会影响正在使用的证书,使其具有良好的可扩展性。
HyperLedger Fabric把 CA 提炼成单独的组件,与总体架构相配合,形成完整的证书颁发方案,Fabric CA架构如图9-1所示。
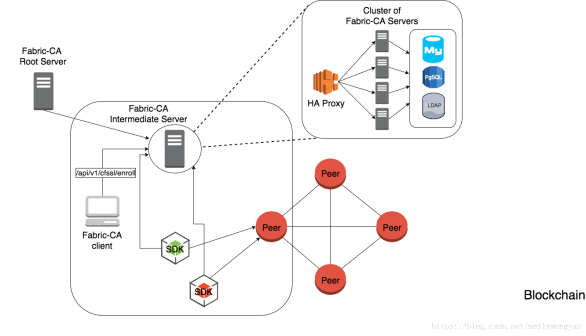
图9-1是Fabric CA官方提供的架构图,说明如下。
(1)Fabric CA Root Server是根证书服务,在一个正式的Fabric 网络中,可以有一个或多个根证书。建议在正式环境中只存在一个根证书,这个根证书不用于具体CA证书颁发,具体的颁发交由中间CA处理。
(2)Fabric CA Intermediate Server是中间证书服务,每个中间证书隶属于根证书,或者隶属于其他中间证书。在正式环境中,建议每个组织对应一个中间证书,由该中间证书负责处理该组织的全部节点和成员的证书颁发。
(3)Cluster of Fabric CA Servers 是Fabric CA 服务器集群,可以把中间证书服务通过HA Proxy代理实现Fabric CA服务器集群,将流量负载平衡到一个Fabric CA集群成员。各集群成员生成的证书保存到同一个数据库中,方便查询身份和证书。数据库可以采用MySQL、PostgreSQL和LDAP (Lightweight Directory Access Protocol,轻量目录访问协议)。
(4)Fabric CA Client是 CA客户端,负责登记、注册、销毁证书等。
(5)与Hyperledger Fabric CA服务器交互有两种方式,一种是通过Fabric CA 客户端,另一种是通过其中一个Fabric SDK。所有交互的通信都是通过 REST API进行的。
Fabric CA 有以下4个主要功能。
(1〉各实体的身份注册和登记。
(2)给各实体发放登记证书(ECerts)。
(3)给各交易发布交易证书(TCerts)。
(4)各颁发证书的更新和撤销。
二、Fabric CA 安装
1、目录
$GOPATH/src/github.com/hyperledger/fabric-ca
2、依赖工具安装
cd $GOPATH/src/github.com/hyperledger
yum install libtool libl-dev libtool-ltdl-devel
安装出错,关机重启
3、Fabric CA 安装
git clone https://github.com/hyperledger/fabric-ca.git
git branch -a
cd fabric-ca
git checkout v1.4.0
make fabric-ca-server
make fabric-ca-client
备注:不知道为在当前目录下自动生成bin目录,同时在 bin目录下生成fabric-ca-client和fabric-ca-server 两个文件。
3.2错误
make: *** 没有规则可以创建目标“fabric-ca-server”。 停止
这里我执行命令时遇到了关于golang第三方包的引用报错的问题
3.2.1报错如下:
no required module provides package github.com/hyperledger/fabric-ca/cmd/fabric-ca-server: go.mod file not found in current directory or any parent directory; see 'go help modules'
3.2.2解决办法
go env -w GO111MODULE=auto
3.2.3—配置环境变量
vi /etc/profile
3.2.4添加以下内容
export GOBIN=$GOPATH/src/github.com/hyperledger/fabric-ca/bin
export PATH=$PATH:$GOBIN
3.2.5环境变量生效
service /etc/profile
3.3检查是否安装成功
fabric-ca-server version
fabric-ca-client version
三、目录
目录$GOPATH/src/github.com/hyperledger/fabric-ca
四、fabric CA 服务端命令
4.1、Fabric CA服务器初始化
4.1.1前置信息
在启动Fabric CA 服务之前需要进行初始化,初始化完成后会生成配置文件 fabric-ca-serverconfig.yaml,在Fabric CA 启动前可以在配置文件中自定义配置证书签名请求(Certificate Signing Request,CSR)参数。
Fabric CA 主目录使用的顺序如下。
(1)如果设置了-home命令行选项,优先使用该值。
(2)否则,如果设置了FABRIC_CA_SERVER_HOME环境变量,使用该值。
(3)否则,如果设置了FABRIC_CA_HOME环境变量,使用该值。
(4)否则,如果设置了CA_CFG_PATH环境变量,使用该值。
(5)否则,使用当前工作目录。
4..1.2Fabric CA服务器初始化
Fabric CA 通过init命令进行服务器初始化,在LDAP禁用的情况下,需要指定-b<USER_NAME> :<PASSWORD>参数,<USER_NAME>:<PASSWORD>为默认管理员用户名和密码,通过--home参数指定Fabric CA Server 主目录。
4.2、init命令如下。
简单
fabric-ca-server init -b admin:adminpw
书上
fabric-ca-server init -b admin:adminpw --home ./fabriccaserver --cfg.affiliations.allowremove --cfg.identities.allowremove
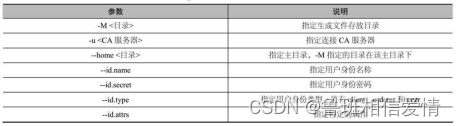
init参数说明
| 参数 | 说明 |
| --home<目录> | 指定主目录 |
| --cfg.affiliations.allowremove | 指定允许删除联盟 |
| cfg.identities.allowremove | 指定允许删除用户 |
错误
问题描述
fabric-ca-server: /lib64/libc.so.6: version `GLIBC_2.28' not found (required by fabric-ca-server)
CentOS Linux release 7.3.1611 (Core) 环境安装Mysql8.0.27版本的时候,报错如下: mysqld: /lib64/libc.so.6: version `GLIBC_2.28' not found (required by mysqld) mysqld: /lib64/libc.so.6: version `GLIBC_2.18' not found (required by /lib64/libstdc++.so.6) 本文详细说明了报错的处理
查看.
错误原因
出现这个问题的原因是glibc的版本太低,
查看系统glibc支持的版本
strings /lib64/libc.so.6 |grep GLIBC_
解决办法
1.centos 升级GCC编译器
yum -y install centos-release-scl
yum -y install devtoolset-8-gcc devtoolset-8-gcc-c++ devtoolset-8-binutils
scl enable devtoolset-8 bash
echo "source /opt/rh/devtoolset-8/enable" >>/etc/profile
2、升级make
wget http://ftp.gnu.org/gnu/make/make-4.2.tar.gz
tar -xzvf make-4.2.tar.gz
cd make-4.2
./configure
make
make install
rm -rf /usr/bin/make
cp ./make /usr/bin/
make -v
3编译安装glibc-2.28
curl -O http://ftp.gnu.org/gnu/glibc/glibc-2.28.tar.gz
tar zxf glibc-2.28.tar.gz
cd glibc-2.28/
mkdir build
cd build/
../configure --prefix=/usr --disable-profile --enable-add-ons --with-headers=/usr/include --with-binutils=/usr/bin
make && make install
注意:此过程需要耐心等待10分钟即可
在执行make install 的时候
Please read the FAQ and the README file and check the following:
- Did you change the gcc specs file (necessary after upgrading from
Linux libc5)?
- Are there any symbolic links of the form libXXX.so to old libraries?
Links like libm.so -> libm.so.5 (where libm.so.5 is an old library) are wrong,
libm.so should point to the newly installed glibc file - and there should be
only one such link (check e.g. /lib and /usr/lib)
You should restart this script from your build directory after you've
fixed all problems!
Btw. the script doesn't work if you're installing GNU libc not as your
primary library!
make[1]: *** [Makefile:111: install] Error 1
make[1]: Leaving directory '/opt/tmp/glibc-2.30'
make: *** [Makefile:12: install] Error 2 # 此编译错误可以无视
4、查看是否安装成功
ls -l /lib64/libc.so.6
lrwxrwxrwx 1 root root 12 Sep 18 15:14 /lib64/libc.so.6 -> libc-2.30.so # 表示安装成功
5、错误
终端无法使用
用xshell链接centos7 显示:
-bash: warning: setlocale: LC_TIME: cannot change locale (en_US.UTF-8)
原因分析:
编译升级了某个软件如 glibc
解决方法:
继续执行
make localedata/install-locales
如果不执行,系统不会安装 设置的 字符编码:比如我系统上设置的是字符编码是en_US.UTF-8,而系统并没有安装en_US.UTF-8字符编码
4.3、fabric-ca服务器启动
创建fabriccaserver文件夹
简单
fabric-ca-server start -b admin:adminpw
书上
fabric-ca-server start -b admin:adminpw --home ./fabriccaserver
5、启动fabric-ca-server
4.1、docker启动
此处采取docker启动,可以参考fabric-sample/first-network/docker-compose-cli-ca.yaml
docker-compose -f docker-compose-cli-ca.yaml up -d ca0
4.2、命令行启动
4.2.1初始化
fabric-ca-server init -b admin:adminpw
4.2.2随便找一处创建文件夹
mkdir fabriccaserver
cd fabriccaserver
fabric-ca-server start -b admin:adminpw
4.3 操作
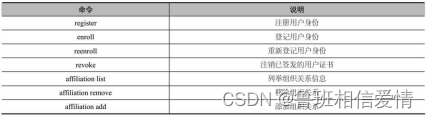
主要通过调用Fabric CA的客户端来测试Fabric相关功能。对外提供的接口如下:
enroll:登记账号
gencrl:撤销证书
gencsr:创建证书签名
cainfo:获取CA信息
reenroll:重新登记账号
register:注册一个新账号
revoke:撤销一个账号
version:显示版本信息
五、fabric CA 客户端命令
Fabric CA客户端命令与服务端交互是通过RESTful API和客户端工具fabric-ca-client两种方式。本节主要介绍fabric-ca-client方式,RESTful API的调用将在第12章进行详细介绍。
Fabric CA主要命令如表9-3所示。
5.1、备注:操作
主要通过调用Fabric CA的客户端来测试Fabric相关功能。对外提供的接口如下:
enroll:登记账号
gencrl:撤销证书
gencsr:创建证书签名
cainfo:获取CA信息
reenroll:重新登记账号
register:注册一个新账号
revoke:撤销一个账号
version:显示版本信息
5.2使用fabric-ca
5.2.1、fabric注册用户身份
打开一个新的端口
创建fabriccaclient文件夹
5.1 获取CA信息
fabric-ca-client getcainfo -u http://admin:adminpw@localhost:7054
5.2 登记用户
fabric-ca-client enroll -u http://admin:adminpw@localhost:7054
enroll 命令访问指定的 Fabric-CA 服务,采用 admin 用户进行注册。 在 Fabric-CA 客户端主目录下创建配置文件 fabric-ca-clien-config.yaml 和 msp 子目录,存储注册证书(ECert),相应的私钥和 CA 证书 PEM 文件
enroll命令参数说明

5.3 注册用户
admin用户是enroll成功的,接下来用admin作为登记员(Register)来注册(register)一个新用户。
fabric-ca-client register --id.name Eric --id.type user --id.affiliation org1.department1 --id.attrs 'hf.Revoker=true,foo=bar'
register命令参数
其他命令(未验证)
重新登记用户身份
注销已签发的用户证书
列举组织关系信息、
移除组织关系
添加组织关系
5.4 生成peer/orderer节点msp/tls信息
5.4.1创建fabric-ca-client配置文件环境变量:
vi /etc/profile
source /etc/profile
目录
/home/lhc/go-work/src/github.com/hyperledger/fabric-ca/fabriccaclient
export FABRIC_CA_CLIENT_HOME=/home/lhc/go-work/src/github.com/hyperledger/fabric-ca/fabriccaclient
5.4.2创建fabric-ca-client-msp配置文件路径
mkdir -p /home/lhc/go-work/src/github.com/hyperledger/fabric-ca-client
5.4.3从fabric-ca源码中复制fabric-ca客户端配置文件:
cp $GOPATH/src/github.com/hyperledger/fabric-ca/testdata/fabric-ca-client-config.yaml /home/lhc/go-work/src/github.com/hyperledger/fabric-ca/fabriccaclient
5.4.4登记admin用户
fabric-ca-client enroll -u http://admin:adminpw@localhost:7054
5.5 msp信息
打开fabric-ca-client终端
5.5.1注册ordere节点
fabric-ca-client register --id.name orderer --id.type orderer --id.affiliation org1.department1 --id.secret orderer-password
5.5.2注册peer节点
fabric-ca-client register --id.name peer --id.type peer --id.affiliation org1.department1 --id.secret peer-password
5.5.3登记orderer节点
fabric-ca-client enroll -u http://orderer:orderer-password@localhost:7054 -c fabric-ca-client-config-orderer.yaml -M $FABRIC_CA_CLIENT_HOME/orderer/msp
不知道为啥,这里识别不到环境变量修改为
fabric-ca-client enroll -u http://orderer:orderer-password@localhost:7054 -c fabric-ca-client-config-orderer.yaml -M ./orderer/msp
查看文件目录
5.5.6登记peer节点
fabric-ca-client enroll -u http://peer:peer-password@localhost:7054 -c fabric-ca-client-config-peer.yaml -M .home/peer/msp
查看文件目录
生成order节点和peer节点的tls信息
生成peer节点tls信息
fabric-ca-client enroll -d --enrollment.profile tls -u http://peer:peer-password@localhost:7054 -c fabric-ca-client-config-peer.yaml -M .home/peer/tls
生成order节点tls信息
fabric-ca-client enroll -d --enrollment.profile tls -u http://orderer:orderer-password@localhost:7054 -c fabric-ca-client-config-orderer.yaml -M .home/orderer/tls
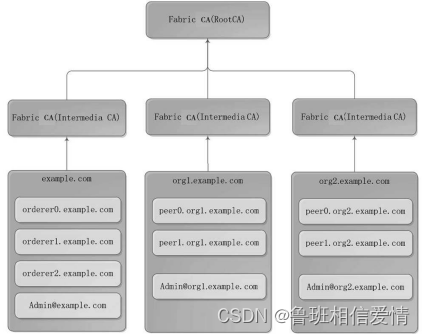
六、生产环境fabric CA 网络拓扑
在Fabric Kafka生产环境部署的基础上部署Fabric CA,使用
Fabric CA 来生成公私钥和证书等文件,包括生成TLS相关的公私钥和证书等文件,以及全部替换cryptogen工具。
Fabric kafka生产环境部署有3个组织,分别为1个Orderer 组织和2个Peer 组织,对应的组织ID分别为example.com、org1.example.com和 org2.example.com。为了让生产环境Fabric CA 具有扩展性和安全性,会分配1个逻辑的根CA (RootCA)和3个中间CA(IntermediCA),3个Intermedia CA 都隶属于RootCA。
3个IntermediaCA 分别负责1个Orderer 组织和2个Peer 组织的公私钥和证书的生成。当有新的组织加入时,只需再生成一个
Intermedia CA 接入RootCA 下,不会影响其他 lntermedia CA,生产环境FabricCA网络拓扑图如图9-2所示。
9.6 生产环境Fabric CA运行与配置
根据生产环境Fabric CA 网络拓扑图,实现生产环境Fabric CA 的部署,并生成 Fabric Kafka 生产环境部署所需要的公私钥、证书及TLS证书等文件。将生产环境Fabric CA 部署到第8章Fabric Kafka生产环境的kafka3 (192.168.235.6)服务器上。4个CA都在同一台计算机上,端口号不能使用同一个,对应的端口号如表9-11所示。
表9-11端口号配置
| CA | 端口 |
| rootCA | 7054 |
| IntermediaCA1 | 7055||10443 |
| IntermediaCAtls1 | 8055||11434 |
| IntermediaCA2 | 7056||10444 |
| IntermediaCAtls2 | 8056||11444 |
| IntermediaCA3 | 7057||10445 |
| IntermediaCAtls3 | 8057||11445 |
9.6.1CA服务启动
CA服务启动步骤如下
1. RootCA启动
RootCA启动的步骤如下。
(1)创建目录ca-server
cd $GOPATH/src/github.com/hyperledger/fabric-ca/bin
mkdir ca-server
cd ca-server
(2)初始化RootCA服务
fabric-ca-server init -b admin:adminpw --home ./rootca
vi ./rootca/fabric-ca-server-config.yaml
修改RootCA的服务端配置如下
version: 1.4.0
(3)启动Root CA服务
①命令行启动:
fabric-ca-server start -b admin:adminpw --home ./rootca --cfg.affiliations.allowremove --cfg.identities.allowremove
错误(解决了,但是过程可能不太行)
Error: listen tcp 127.0.0.1:9443: bind: address already in use
导致了我的服务器无法使用,身为计算机网络原理和网络工程的我知道问题所在:原来我的TCP 6443被占用了
终端输入
sudo lsof -i :9443
所以,问题找出来了。是个pid 9691 的玩意儿在使用我的TCP端口
kill 掉这个PID
kill xx端口 -9 pid
②Docker启动:
复制文件docker-rootca.yaml到ca-server目录。
docker-compose -f docker-rootca.yaml up -d
2.IntermediaCA1启动
IntermediaCA1启动的步骤如下。
(1)初始化IntermediaCA1服务
fabric-ca-server init -b admin1:adminpw1 -u http://admin:adminpw@localhost:7054 --home ./intermediaca1
vi ./intermediaca1/fabric-ca-server-config.yaml
修改IntermediaCA1的服务端配置文件如下
version: 1.4.0
port: 7055
(2)启动IntermediaCA1服务
①命令行启动:
fabric-ca-server start -b admin1:adminpw1 -u http://admin:adminpw@localhost:7054 --home ./intermediaca1 --cfg.affiliations.allowremove --cfg.identities.allowremove
Error: listen tcp 127.0.0.1:9443: bind: address already in use
②docker启动:
复制文件docker-intermediaca1.yaml到ca-server目录。
docker-compose -f docker-intermediaca1.yaml up -d
3.IntermediaCAtls1启动
IntermediaCAtls1启动的步骤如下。
(1)初始化IntermediaCAtls1服务
fabric-ca-server init -b admin1:adminpw1 -u http://admin:adminpw@localhost:7054 --home ./intermediacatls1
vi ./intermediacatls1/fabric-ca-server-config.yaml
修改IntermediaCAtls1的服务端配置文件如下:
version: 1.4.0
port: 8055
(2)启动IntermediaCAtls1服务
①命令行启动:
fabric-ca-server start -b admin1:adminpw1 -u http://admin:adminpw@localhost:7054 --home ./intermediacatls1 --cfg.affiliations.allowremove --cfg.identities.allowremove
②Docker启动:
复制文件docker-intermediacatls1.yaml到ca-server目录。
docker-compose -f docker-intermediacatls1.yaml up -d
4、IntermediaCA2启动
修改IntermediaCA2启动的步骤如下。
(1)初始化IntermediaCA2服务
fabric-ca-server init -b admin2:adminpw2 -u http://admin:adminpw@localhost:7054 --home ./intermediaca2
vi ./intermediaca2/fabric-ca-server-config.yaml
修改IntermediaCA2的服务端配置文件如下:
version: 1.4.0
port:7056
(2)启动IntermediaCA2服务
①命令行启动:
fabric-ca-server start -b admin2:adminpw2 -u http://admin:adminpw@localhost:7054 --home ./intermediaca2 --cfg.affiliations.allowremove --cfg.identities.allowremove
②Docker启动:
复制文件docker-intermediacatls2.yaml到ca-server目录。
# docker-compose -f docker-intermediaca2.yaml up -d
5、IntermediaCAtls2启动
IntermediaCAtls2启动的步骤如下。
(1)初始化IntermediaCAtls2服务
fabric-ca-server init -b admin2:adminpw2 -u http://admin:adminpw@localhost:7054 --home ./intermediacatls2
vi ./intermediacatls2/fabric-ca-server-config.yaml
修改IntermediaCAtls2的服务端配置文件如下:
version: 1.4.0
port:8056
(2)启动IntermediaCAtls2服务
①命令行启动:
fabric-ca-server start -b admin2:adminpw2 -u http://admin:adminpw@localhost:7054 --home ./intermediacatls2 --cfg.affiliations.allowremove --cfg.identities.allowremove
②Docker启动:
复制文件docker-intermediacatls2.yaml到ca-server目录。
# docker-compose -f docker-intermediacatls2.yaml up -d
6、IntermediaCA3启动
IntermediaCA3启动步骤如下。
(1)初始化IntermediaCA3服务
fabric-ca-server init -b admin3:adminpw3 -u http://admin:adminpw@localhost:7054 --home ./intermediaca3
vi ./intermediaca3/fabric-ca-server-config.yaml
修改IntermediaCA3的服务端配置文件如下:
version: 1.4.0
port: 7057
(2)启动IntermediaCA3服务
①命令行启动:
fabric-ca-server start -b admin3:adminpw3 -u http://admin:adminpw@localhost:7054 --home ./intermediaca3 --cfg.affiliations.allowremove --cfg.identities.allowremove
②Docker启动:
复制文件docker-intermediaca3.yaml到ca-server目录。
# docker-compose -f docker-intermediaca3.yaml up -d
7、IntermediaCAtls3启动
IntermediaCAtls3的启动步骤如下。
(1)初始化IntermediaCAtls3服务
fabric-ca-server init -b admin3:adminpw3 -u http://admin:adminpw@localhost:7054 --home ./intermediacatls3
vi ./intermediacatls3/fabric-ca-server-config.yaml
修改IntermediaCAtls3的服务端配置文件如下:
version: 1.4.0
port: 8057
(2)启动IntermediaCAtls3服务
①命令行启动:
fabric-ca-server start -b admin3:adminpw3 -u http://admin:adminpw@localhost:7054 --home ./intermediacatls3 --cfg.affiliations.allowremove --cfg.identities.allowremove
②Docker启动:
复制文件docker-intermediacatls3.yaml到ca-server目录。
# docker-compose -f docker-intermediacatls3.yaml up -d
9.6.2 IntermediaCA1生成
证书
IntermediaCA1生成证书的步骤如下。
1.生成example.com的MSP
生成example.com的MSP的步骤如下。
(1)登记example.com
cd /opt/gopath/src/github.com/hyperledger/fabric-ca/bin/ca-server
fabric-ca-client enroll -M ./crypto-config/ordererOrganizations/example.com/msp -u http://admin1:adminpw1@localhost:7055 --home ./fabric-ca-client
(2)添加联盟成员
①
fabric-ca-client affiliation list -M ./crypto-config/ordererOrganizations/example.com/msp -u http://admin1:adminpw1@localhost:7055 --home ./fabric-ca-client
②
fabric-ca-client affiliation remove --force org1 -M ./crypto-config/ordererOrganizations/example.com/msp -u http://admin1:adminpw1@localhost:7055 --home ./fabric-ca-client
③
fabric-ca-client affiliation remove --force org2 -M ./crypto-config/ordererOrganizations/example.com/msp -u http://admin1:adminpw1@localhost:7055 --home ./fabric-ca-client
④
fabric-ca-client affiliation add com -M ./crypto-config/ordererOrganizations/example.com/msp -u http://admin1:adminpw1@localhost:7055 --home ./fabric-ca-client
⑤
fabric-ca-client affiliation add com.example -M ./crypto-config/ordererOrganizations/example.com/msp -u http://admin1:adminpw1@localhost:7055 --home ./fabric-ca-client
2.生成Admin@example.com的MSP
生成Admin@example.com的MSP的步骤如下。
(1)注册Admin@example.com
fabric-ca-client register --id.name Admin@example.com --id.type client --id.affiliation "com.example" --id.attrs '"hf.Registrar.Roles=client,orderer,peer,user","hf.Registrar.DelegateRoles=client,orderer,peer,user",hf.Registrar.Attributes=*,hf.GenCRL=true,hf.Revoker=true,hf.AffiliationMgr=true,hf.IntermediateCA=true,role=admin:ecert' --id.secret=123456 --csr.cn=example.com --csr.hosts=['example.com'] -M ./crypto-config/ordererOrganizations/example.com/msp -u http://admin1:adminpw1@localhost:7055 --home ./fabric-ca-client
(2)登记Admin@example.com
fabric-ca-client enroll -u http://Admin@example.com:123456@localhost:7055 --csr.cn=example.com --csr.hosts=['example.com'] -M ./crypto-config/ordererOrganizations/example.com/users/Admin@example.com/msp --home ./fabric-ca-client
(3)生成MSP
mkdir ./fabric-ca-client/crypto-config/ordererOrganizations/example.com/users/Admin@example.com/msp/admincerts
# cp ./fabric-ca-client/crypto-config/ordererOrganizations/example.com/users/Admin@example.com/msp/signcerts/cert.pem ./fabric-ca-client/crypto-config/ordererOrganizations/example.com/users/Admin@example.com/msp/admincerts
# mkdir ./fabric-ca-client/crypto-config/ordererOrganizations/example.com/msp/admincerts
# cp ./fabric-ca-client/crypto-config/ordererOrganizations/example.com/users/Admin@example.com/msp/signcerts/cert.pem ./fabric-ca-client/crypto-config/ordererOrganizations/example.com/msp/admincerts
3.生成orderer0.example.com的MSP
生成orderer0.example.com的MSP的步骤如下
(1)注册orderer0.example.com
fabric-ca-client register --id.name orderer0.example.com --id.type orderer --id.affiliation "com.example" --id.attrs '"role=orderer",ecert=true' --id.secret=123456 --csr.cn=orderer0.example.com --csr.hosts=['orderer0.example.com'] -M ./crypto-config/ordererOrganizations/example.com/msp -u http://admin1:adminpw1@localhost:7055 --home ./fabric-ca-client
(2)登记orderer0.example.com
fabric-ca-client enroll -u http://orderer0.example.com:123456@localhost:7055 --csr.cn=orderer0.example.com --csr.hosts=['orderer0.example.com'] -M ./crypto-config/ordererOrganizations/example.com/orderers/orderer0.example.com/msp --home ./fabric-ca-client
(3)生成MSP
# mkdir ./fabric-ca-client/crypto-config/ordererOrganizations/example.com/orderers/orderer0.example.com/msp/admincerts
# cp ./fabric-ca-client/crypto-config/ordererOrganizations/example.com/users/Admin@example.com/msp/signcerts/cert.pem ./fabric-ca-client/crypto-config/ordererOrganizations/example.com/orderers/orderer0.example.com/msp/admincerts
4.生成orderer1.example.com的MSP
生成orderer1.example.com的MSP的步骤如下。
(1)注册orderer1.example.com
fabric-ca-client register --id.name orderer1.example.com --id.type orderer --id.affiliation "com.example" --id.attrs '"role=orderer",ecert=true' --id.secret=123456 --csr.cn=orderer1.example.com --csr.hosts=['orderer1.example.com'] -M ./crypto-config/ordererOrganizations/example.com/msp -u http://admin1:adminpw1@localhost:7055 --home ./fabric-ca-client
(2)登记orderer1.example.com
fabric-ca-client enroll -u http://orderer1.example.com:123456@localhost:7055 --csr.cn=orderer1.example.com --csr.hosts=['orderer1.example.com'] -M ./crypto-config/ordererOrganizations/example.com/orderers/orderer1.example.com/msp --home ./fabric-ca-client
(3)生成MSP
mkdir ./fabric-ca-client/crypto-config/ordererOrganizations/example.com/orderers/orderer1.example.com/msp/admincerts
# cp ./fabric-ca-client/crypto-config/ordererOrganizations/example.com/users/Admin@example.com/msp/signcerts/cert.pem ./fabric-ca-client/crypto-config/ordererOrganizations/example.com/orderers/orderer1.example.com/msp/admincerts
5.生成orderer2.example.com的MSP
MSP的步骤如下。
(1)注册orderer2.example.com
fabric-ca-client register --id.name orderer2.example.com --id.type orderer --id.affiliation "com.example" --id.attrs '"role=orderer",ecert=true' --id.secret=123456 --csr.cn=orderer2.example.com --csr.hosts=['orderer2.example.com'] -M ./crypto-config/ordererOrganizations/example.com/msp -u http://admin1:adminpw1@localhost:7055 --home ./fabric-ca-client
(2)登记orderer2.example.com
fabric-ca-client enroll -u http://orderer2.example.com:123456@localhost:7055 --csr.cn=orderer2.example.com --csr.hosts=['orderer2.example.com'] -M ./crypto-config/ordererOrganizations/example.com/orderers/orderer2.example.com/msp --home ./fabric-ca-client
(3)生成MSP
mkdir ./fabric-ca-client/crypto-config/ordererOrganizations/example.com/orderers/orderer2.example.com/msp/admincerts
# cp ./fabric-ca-client/crypto-config/ordererOrganizations/example.com/users/Admin@example.com/msp/signcerts/cert.pem ./fabric-ca-client/crypto-config/ordererOrganizations/example.com/orderers/orderer2.example.com/msp/admincerts
9.6.3 IntermediaCAtls1生成证书
IntermediaCAtls1生成证书的步骤如下。
1.生成example.com的MSP
生成example.com的MSP的步骤如下。
(1)登记example.com
cd /opt/gopath/src/github.com/hyperledger/fabric-ca/bin/ca-server
fabric-ca-client enroll -M ./crypto-config/ordererOrganizations/example.com/tlstmp -u http://admin1:adminpw1@localhost:8055 --home ./fabric-ca-client
(2)添加联盟成员
①
fabric-ca-client affiliation list -M ./crypto-config/ordererOrganizations/example.com/tlstmp -u http://admin1:adminpw1@localhost:8055 --home ./fabric-ca-client
②
fabric-ca-client affiliation remove --force org1 -M ./crypto-config/ordererOrganizations/example.com/tlstmp -u http://admin1:adminpw1@localhost:8055 --home ./fabric-ca-client
③
fabric-ca-client affiliation remove --force org2 -M ./crypto-config/ordererOrganizations/example.com/tlstmp -u http://admin1:adminpw1@localhost:8055 --home ./fabric-ca-client
④
# fabric-ca-client affiliation add com -M ./crypto-config/ordererOrganizations/example.com/tlstmp -u http://admin1:adminpw1@localhost:8055 --home ./fabric-ca-client
⑤
# fabric-ca-client affiliation add com.example -M ./crypto-config/ordererOrganizations/example.com/tlstmp -u http://admin1:adminpw1@localhost:8055 --home ./fabric-ca-client
2.生成Admin@example.com的TLS
生成Admin@example.com的TLS的步骤如下。
(1)注册Admin@example.com
fabric-ca-client register --id.name Admin@example.com --id.type client --id.affiliation "com.example" --id.attrs '"hf.Registrar.Roles=client,orderer,peer,user","hf.Registrar.DelegateRoles=client,orderer,peer,user",hf.Registrar.Attributes=*,hf.GenCRL=true,hf.Revoker=true,hf.AffiliationMgr=true,hf.IntermediateCA=true,role=admin:ecert' --id.secret=123456 --csr.cn=example.com --csr.hosts=['example.com'] -M ./crypto-config/ordererOrganizations/example.com/tlstmp -u http://admin1:adminpw1@localhost:8055 --home ./fabric-ca-client
(2)登记Admin@example.com
fabric-ca-client enroll -d --enrollment.profile tls -u http://Admin@example.com:123456@localhost:8055 --csr.cn=example.com --csr.hosts=['example.com'] -M ./crypto-config/ordererOrganizations/example.com/users/Admin@example.com/tlstmp --home ./fabric-ca-client
(3)生成TLS
#
mkdir ./fabric-ca-client/crypto-config/ordererOrganizations/example.com/users/Admin@example.com/tls
cp ./intermediacatls1/ca-chain.pem ./fabric-ca-client/crypto-config/ordererOrganizations/example.com/users/Admin@example.com/tls/ca.crt
# cp ./fabric-ca-client/crypto-config/ordererOrganizations/example.com/users/Admin@example.com/tlstmp/signcerts/cert.pem ./fabric-ca-client/crypto-config/ordererOrganizations/example.com/users/Admin@example.com/tls/client.crt
(好像需要自己找)
# cp ./fabric-ca-client/crypto-config/ordererOrganizations/example.com/users/Admin@example.com/tlstmp/keystore/7f5bd7992d4e4ce1a61adfc9dec61b32c40e474e70825425d45c7d5619d110bc_sk ./fabric-ca-client/crypto-config/ordererOrganizations/example.com/users/Admin@example.com/tls/client.key
# cp -r ./fabric-ca-client/crypto-config/ordererOrganizations/example.com/users/Admin@example.com/tlstmp/tlscacerts ./fabric-ca-client/crypto-config/ordererOrganizations/example.com/msp
# cp -r ./fabric-ca-client/crypto-config/ordererOrganizations/example.com/users/Admin@example.com/tlstmp/tlsintermediatecerts ./fabric-ca-client/crypto-config/ordererOrganizations/example.com/msp
#rm -rf ./fabric-ca-client/crypto-config/ordererOrganizations/example.com/users/Admin@example.com/tlstmp
3.生成orderer0.example.com的TLS
生成orderer0.example.com的TLS的步骤如下。
(1)注册orderer0.example.com
# fabric-ca-client register --id.name orderer0.example.com --id.type orderer --id.affiliation "com.example" --id.attrs '"role=orderer",ecert=true' --id.secret=123456 --csr.cn=orderer0.example.com --csr.hosts=['orderer0.example.com'] -M ./crypto-config/ordererOrganizations/example.com/tlstmp -u http://admin1:adminpw1@localhost:8055 --home ./fabric-ca-client
(2)登记orderer0.example.com
# fabric-ca-client enroll -d --enrollment.profile tls -u http://orderer0.example.com:123456@localhost:8055 --csr.cn=orderer0.example.com --csr.hosts=['orderer0.example.com'] -M ./crypto-config/ordererOrganizations/example.com/orderers/orderer0.example.com/tlstmp --home ./fabric-ca-client
(3)生成TLS
# mkdir ./fabric-ca-client/crypto-config/ordererOrganizations/example.com/orderers/orderer0.example.com/tls
# cp ./intermediacatls1/ca-chain.pem ./fabric-ca-client/crypto-config/ordererOrganizations/example.com/orderers/orderer0.example.com/tls/ca.crt
# cp ./fabric-ca-client/crypto-config/ordererOrganizations/example.com/orderers/orderer0.example.com/tlstmp/signcerts/cert.pem ./fabric-ca-client/crypto-config/ordererOrganizations/example.com/orderers/orderer0.example.com/tls/server.crt
# cp ./fabric-ca-client/crypto-config/ordererOrganizations/example.com/orderers/orderer0.example.com/tlstmp/keystore/91362ee1759b9effe73e220a8595294e5cd718888e474235f911e4a9bea44d09_sk ./fabric-ca-client/crypto-config/ordererOrganizations/example.com/orderers/orderer0.example.com/tls/server.key
# cp -r ./fabric-ca-client/crypto-config/ordererOrganizations/example.com/orderers/orderer0.example.com/tlstmp/tlscacerts ./fabric-ca-client/crypto-config/ordererOrganizations/example.com/orderers/orderer0.example.com/msp
# cp -r ./fabric-ca-client/crypto-config/ordererOrganizations/example.com/orderers/orderer0.example.com/tlstmp/tlsintermediatecerts ./fabric-ca-client/crypto-config/ordererOrganizations/example.com/orderers/orderer0.example.com/msp
#rm -rf ./fabric-ca-client/crypto-config/ordererOrganizations/example.com/orderers/ orderer0.example.com/tlstmp
4.生成orderer1.example.com的TLS
生成orderer1.example.com的TLS的步骤如下。
(1)注册orderer1.example.com
# fabric-ca-client register --id.name orderer1.example.com --id.type orderer --id.affiliation "com.example" --id.attrs '"role=orderer",ecert=true' --id.secret=123456 --csr.cn=orderer1.example.com --csr.hosts=['orderer1.example.com'] -M ./crypto-config/ordererOrganizations/example.com/tlstmp -u http://admin1:adminpw1@localhost:8055 --home ./fabric-ca-client
(2)登记orderer1.example.com
# fabric-ca-client enroll -d --enrollment.profile tls -u http://orderer1.example.com:123456@localhost:8055 --csr.cn=orderer1.example.com --csr.hosts=['orderer1.example.com'] -M ./crypto-config/ordererOrganizations/example.com/orderers/orderer1.example.com/tlstmp --home ./fabric-ca-client
(3)生成TLS
# mkdir ./fabric-ca-client/crypto-config/ordererOrganizations/example.com/orderers/orderer1.example.com/tls
# cp ./intermediacatls1/ca-chain.pem ./fabric-ca-client/crypto-config/ordererOrganizations/example.com/orderers/orderer1.example.com/tls/ca.crt
# cp ./fabric-ca-client/crypto-config/ordererOrganizations/example.com/orderers/orderer1.example.com/tlstmp/signcerts/cert.pem ./fabric-ca-client/crypto-config/ordererOrganizations/example.com/orderers/orderer1.example.com/tls/server.crt
# cp ./fabric-ca-client/crypto-config/ordererOrganizations/example.com/orderers/orderer1.example.com/tlstmp/keystore/d313f670155fffaba890ac3140ff37000632b9b7809a298b69f8d31be0bcc8c4_sk ./fabric-ca-client/crypto-config/ordererOrganizations/example.com/orderers/orderer1.example.com/tls/server.key
# cp -r ./fabric-ca-client/crypto-config/ordererOrganizations/example.com/orderers/orderer1.example.com/tlstmp/tlscacerts ./fabric-ca-client/crypto-config/ordererOrganizations/example.com/orderers/orderer1.example.com/msp
#
cp -r ./fabric-ca-client/crypto-config/ordererOrganizations/example.com/orderers/orderer1.example.com/tlstmp/tlsintermediatecerts ./fabric-ca-client/crypto-config/ordererOrganizations/example.com/orderers/orderer1.example.com/msp
#rm -rf ./fabric-ca-client/crypto-config/ordererOrganizations/example.com/orderers/orderer1.example.com/tlstmp
5.生成orderer2.example.com的TLS
生成orderer2.example.com的TLS的步骤如下。
(1)注册orderer2.example.com
# fabric-ca-client register --id.name orderer2.example.com --id.type orderer --id.affiliation "com.example" --id.attrs '"role=orderer",ecert=true' --id.secret=123456 --csr.cn=orderer2.example.com --csr.hosts=['orderer2.example.com'] -M ./crypto-config/ordererOrganizations/example.com/tlstmp -u http://admin1:adminpw1@localhost:8055 --home ./fabric-ca-client
(2)登记orderer2.example.com
fabric-ca-client enroll -d --enrollment.profile tls -u http://orderer2.example.com:123456@localhost:8055 --csr.cn=orderer2.example.com --csr.hosts=['orderer2.example.com'] -M ./crypto-config/ordererOrganizations/example.com/orderers/orderer2.example.com/tlstmp --home ./fabric-ca-client
(3)生成TLS
# mkdir ./fabric-ca-client/crypto-config/ordererOrganizations/example.com/orderers/orderer2.example.com/tls
# cp ./intermediacatls1/ca-chain.pem ./fabric-ca-client/crypto-config/ordererOrganizations/example.com/orderers/orderer2.example.com/tls/ca.crt
# cp ./fabric-ca-client/crypto-config/ordererOrganizations/example.com/orderers/orderer2.example.com/tlstmp/signcerts/cert.pem ./fabric-ca-client/crypto-config/ordererOrganizations/example.com/orderers/orderer2.example.com/tls/server.crt
# cp ./fabric-ca-client/crypto-config/ordererOrganizations/example.com/orderers/orderer2.example.com/tlstmp/keystore/9ac6d07e29550b941f75f97bee377bc48db682d49a432dbf676a0f408aef00d1_sk ./fabric-ca-client/crypto-config/ordererOrganizations/example.com/orderers/orderer2.example.com/tls/server.key
# cp -r ./fabric-ca-client/crypto-config/ordererOrganizations/example.com/orderers/orderer2.example.com/tlstmp/tlscacerts ./fabric-ca-client/crypto-config/ordererOrganizations/example.com/orderers/orderer2.example.com/msp
# cp -r ./fabric-ca-client/crypto-config/ordererOrganizations/example.com/orderers/orderer2.example.com/tlstmp/tlsintermediatecerts ./fabric-ca-client/crypto-config/ordererOrganizations/example.com/orderers/orderer2.example.com/msp
#rm -rf ./fabric-ca-client/crypto-config/ordererOrganizations/example.com/orderers/orderer2.example.com/tlstmp
#rm -rf ./fabric-ca-client/crypto-config/ordererOrganizations/example.com/tlstmp
9.6.4 IntermediaCA2生成证书
IntermediaCA2生成证书的步骤如下。
1.生成org1.example.com的MSP
生成org1.example.com的MSP的步骤如下。
(1)登记org1.example.com
# fabric-ca-client enroll --csr.cn=org1.example.com --csr.hosts=['org1.example.com'] -M ./crypto-config/peerOrganizations/org1.example.com/msp -u http://admin2:adminpw2@localhost:7056 --home ./fabric-ca-client
# vi ./fabric-ca-client/crypto-config/peerOrganizations/org1.example.com/msp/config.yaml
在/msp/config.yaml中做如下配置
NodeOUs:
Enable: true
ClientOUIdentifier:
Certificate: intermediatecerts/localhost-7056.pem
OrganizationalUnitIdentifier: client
PeerOUIdentifier:
Certificate: intermediatecerts/localhost-7056.pem
OrganizationalUnitIdentifier: peer
(2)添加联盟成员
# fabric-ca-client affiliation list -M ./crypto-config/peerOrganizations/org1.example.com/msp -u http://admin2:adminpw2@localhost:7056 --home ./fabric-ca-client
#
fabric-ca-client affiliation remove --force org1 -M ./crypto-config/peerOrganizations/org1.example.com/msp -u http://admin2:adminpw2@localhost:7056 --home ./fabric-ca-client
#
fabric-ca-client affiliation remove --force org2 -M ./crypto-config/peerOrganizations/org1.example.com/msp -u http://admin2:adminpw2@localhost:7056 --home ./fabric-ca-client
#
fabric-ca-client affiliation add com -M ./crypto-config/peerOrganizations/org1.example.com/msp -u http://admin2:adminpw2@localhost:7056 --home ./fabric-ca-client
# fabric-ca-client affiliation add com.example -M ./crypto-config/peerOrganizations/org1.example.com/msp -u http://admin2:adminpw2@localhost:7056 --home ./fabric-ca-client
# fabric-ca-client affiliation add com.example.org1 -M ./crypto-config/peerOrganizations/org1.example.com/msp -u http://admin2:adminpw2@localhost:7056 --home ./fabric-ca-client
2.生成Admin@example.com的MSP
生成Admin@example.com的MSP的步骤如下。
(1)注册Admin@example.com
fabric-ca-client register --id.name Admin@org1.example.com --id.type client --id.affiliation "com.example.org1" --id.attrs '"hf.Registrar.Roles=client,orderer,peer,user","hf.Registrar.DelegateRoles=client,orderer,peer,user",hf.Registrar.Attributes=*,hf.GenCRL=true,hf.Revoker=true,hf.AffiliationMgr=true,hf.IntermediateCA=true,role=admin:ecert' --id.secret=123456 --csr.cn=org1.example.com --csr.hosts=['org1.example.com'] -M ./crypto-config/peerOrganizations/org1.example.com/msp -u http://admin2:adminpw2@localhost:7056 --home ./fabric-ca-client
参考
# fabric-ca-client register --id.name Admin@org1.example.com --id.type client --id.affiliation "com.example.org1" --id.attrs '"hf.Registrar.Roles=client,orderer,peer, user","hf.Registrar.DelegateRoles=client,orderer,peer,user",hf.Registrar.Attributes=*,hf.GenCRL=true,hf.Revoker=true,hf.AffiliationMgr=true,hf.IntermediateCA=true,role=admin:ecert' --id.secret=123456 --csr.cn=org1.example.com --csr.hosts=['org1.example.com'] -M ./ crypto-config/peerOrganizations/org1.example.com/msp -u http://admin2:adminpw2@localhost: 7056 --home ./fabric-ca-client
(2)登记Admin@examle.com
fabric-ca-client enroll -u http://Admin@org1.example.com:123456@localhost:7056 --csr.cn=org1.example.com --csr.hosts=['org1.example.com'] -M ./crypto-config/peerOrganizations/org1.example.com/users/Admin@org1.example.com/msp --home ./fabric-ca-client
(3)生成MSP
# mkdir ./fabric-ca-client/crypto-config/peerOrganizations/org1.example.com/users/Admin@org1.example.com/msp/admincerts
# cp ./fabric-ca-client/crypto-config/peerOrganizations/org1.example.com/users/Admin@org1.example.com/msp/signcerts/cert.pem ./fabric-ca-client/crypto-config/peerOrganizations/org1.example.com/users/Admin@org1.example.com/msp/admincerts
#
mkdir ./fabric-ca-client/crypto-config/peerOrganizations/org1.example.com/msp/admincerts
#
cp ./fabric-ca-client/crypto-config/peerOrganizations/org1.example.com/users/Admin@org1.example.com/msp/signcerts/cert.pem ./fabric-ca-client/crypto-config/peerOrganizations/org1.example.com/msp/admincerts
3.生成peer0.org1.example.com的MSP
生成peer0.org1.example.com的MSP的步骤如下。
(1)注册peer0.org1.example.com
#
fabric-ca-client register --id.name peer0.org1.example.com --id.type peer --id.affiliation "com.example.org1" --id.attrs '"role=peer",ecert=true' --id.secret=123456 --csr.cn=peer0.org1.example.com --csr.hosts=['peer0.org1.example.com'] -M ./crypto-config/peerOrganizations/org1.example.com/msp -u http://admin2:adminpw2@localhost:7056 --home ./fabric-ca-client
(2)登记peer0.org1.example.com
fabric-ca-client enroll -u http://peer0.org1.example.com:123456@localhost:7056 --csr.cn=peer0.org1.example.com --csr.hosts=['peer0.org1.example.com'] -M ./crypto-config/peerOrganizations/org1.example.com/peers/peer0.org1.example.com/msp --home ./fabric-ca-client
(3)生成MSP
# mkdir ./fabric-ca-client/crypto-config/peerOrganizations/org1.example.com/peers/peer0.org1.example.com/msp/admincerts
# cp ./fabric-ca-client/crypto-config/peerOrganizations/org1.example.com/users/Admin@org1.example.com/msp/signcerts/cert.pem ./fabric-ca-client/crypto-config/peerOrganizations/org1.example.com/peers/peer0.org1.example.com/msp/admincerts
4.生成peer1.org1.example.com的MSP
生成peer1.org1.example.com的MSP的步骤如下。
(1)注册peer1.org1.example.com
fabric-ca-client register --id.name peer1.org1.example.com --id.type peer --id.affiliation "com.example.org1" --id.attrs '"role=peer",ecert=true' --id.secret=123456 --csr.cn=peer1.org1.example.com --csr.hosts=['peer1.org1.example.com'] -M ./crypto-config/peerOrganizations/org1.example.com/msp -u http://admin2:adminpw2@localhost:7056 --home ./fabric-ca-client
(2)登记peer1.org1.example.com
# fabric-ca-client enroll -u http://peer1.org1.example.com:123456@localhost:7056 --csr.cn=peer1.org1.example.com --csr.hosts=['peer1.org1.example.com'] -M ./crypto-config/peerOrganizations/org1.example.com/peers/peer1.org1.example.com/msp --home ./fabric-ca-client
(3)生成MSP
# mkdir ./fabric-ca-client/crypto-config/peerOrganizations/org1.example.com/peers/peer1.org1.example.com/msp/admincerts
# cp ./fabric-ca-client/crypto-config/peerOrganizations/org1.example.com/users/Admin@org1.example.com/msp/signcerts/cert.pem ./fabric-ca-client/crypto-config/peerOrganizations/org1.example.com/peers/peer1.org1.example.com/msp/admincerts
9.6.5 IntermediaCAtls2生成证书
IntermediaCAtls2生成证书的步骤如下。
1.生成org1.example.com的TLS
生成org1.example.com的TLS的步骤如下。
(1)登记org1.example.com
# fabric-ca-client enroll --csr.cn=org1.example.com --csr.hosts=['org1.example.com'] -M ./crypto-config/peerOrganizations/org1.example.com/tlstmp -u http://admin2:adminpw2@localhost:8056 --home ./fabric-ca-client
(2)添加联盟成员
# fabric-ca-client affiliation list -M ./crypto-config/peerOrganizations/org1.example.com/tlstmp -u http://admin2:adminpw2@localhost:8056 --home ./fabric-ca-client
#
fabric-ca-client affiliation remove --force org1 -M ./crypto-config/peerOrganizations/org1.example.com/tlstmp -u http://admin2:adminpw2@localhost:8056 --home ./fabric-ca-client
# fabric-ca-client affiliation remove --force org2 -M ./crypto-config/peerOrganizations/org1.example.com/tlstmp -u http://admin2:adminpw2@localhost:8056 --home ./fabric-ca-client
# fabric-ca-client affiliation add com -M ./crypto-config/peerOrganizations/org1.example.com/tlstmp -u http://admin2:adminpw2@localhost:8056 --home ./fabric-ca-client
#
fabric-ca-client affiliation add com.example -M ./crypto-config/peerOrganizations/org1.example.com/tlstmp -u http://admin2:adminpw2@localhost:8056 --home ./fabric-ca-client
# fabric-ca-client affiliation add com.example.org1 -M ./crypto-config/peerOrganizations/org1.example.com/tlstmp -u http://admin2:adminpw2@localhost:8056 --home ./fabric-ca-client
2.生成Admin@example.com的TLS
(1)注册Admin@example.com
# fabric-ca-client register --id.name Admin@org1.example.com --id.type client --id.affiliation "com.example.org1" --id.attrs '"hf.Registrar.Roles=client,orderer,peer,user","hf.Registrar.DelegateRoles=client,orderer,peer,user",hf.Registrar.Attributes=*,hf.GenCRL=true,hf.Revoker=true,hf.AffiliationMgr=true,hf.IntermediateCA=true,role=admin:ecert' --id.secret=123456 --csr.cn=org1.example.com --csr.hosts=['org1.example.com'] -M ./crypto-config/peerOrganizations/org1.example.com/tlstmp -u http://admin2:adminpw2@localhost:8056 --home ./fabric-ca-client
(2)登记Admin@example.com
# fabric-ca-client enroll -d --enrollment.profile tls -u http://Admin@org1.example.com:123456@localhost:8056 --csr.cn=org1.example.com --csr.hosts=['org1.example.com'] -M ./crypto-config/peerOrganizations/org1.example.com/users/Admin@org1.example.com/tlstmp --home ./fabric-ca-client
(3)生成TLS
# mkdir ./fabric-ca-client/crypto-config/peerOrganizations/org1.example.com/users/Admin@org1.example.com/tls
#
cp ./intermediacatls2/ca-chain.pem ./fabric-ca-client/crypto-config/peerOrganizations/org1.example.com/users/Admin@org1.example.com/tls/ca.crt
# cp ./fabric-ca-client/crypto-config/peerOrganizations/org1.example.com/users/Admin@org1.example.com/tlstmp/signcerts/cert.pem ./fabric-ca-client/crypto-config/peerOrganizations/org1.example.com/users/Admin@org1.example.com/tls/client.crt
#
cp ./fabric-ca-client/crypto-config/peerOrganizations/org1.example.com/users/Admin@org1.example.com/tlstmp/keystore/ef1a30829aff7d2d4066e272fa62259a15b70c4cbf4fa8ae5049904331c7a288_sk ./fabric-ca-client/crypto-config/peerOrganizations/org1.example.com/users/Admin@org1.example.com/tls/client.key
# rm -rf ./fabric-ca-client/crypto-config/peerOrganizations/org1.example.com/users/Admin@org1.example.com/tlstmp
3.生成peer0.org1.example.com的TLS
生成peer0.org1.example.com的TLS的步骤如下。
(1)注册peer0.org1.example.com
#
fabric-ca-client register --id.name peer0.org1.example.com --id.type peer --id.affiliation "com.example.org1" --id.attrs '"role=peer",ecert=true' --id.secret=123456 --csr.cn=peer0.org1.example.com --csr.hosts=['peer0.org1.example.com'] -M ./crypto-config/peerOrganizations/org1.example.com/tlstmp -u http://admin2:adminpw2@localhost:8056 --home ./fabric-ca-client
(2)登记peer0.org1.example.com
# fabric-ca-client enroll -d --enrollment.profile tls -u http://peer0.org1.example.com:123456@localhost:8056 --csr.cn=peer0.org1.example.com --csr.hosts=['peer0.org1.example. com'] -M ./crypto-config/peerOrganizations/org1.example.com/peers/peer0.org1.example.com/tlstmp --home ./fabric-ca-client
(3)生成TLS
# mkdir ./fabric-ca-client/crypto-config/peerOrganizations/org1.example.com/peers/peer0.org1.example.com/tls
# cp ./intermediacatls2/ca-chain.pem ./fabric-ca-client/crypto-config/peerOrganizations/org1.example.com/peers/peer0.org1.example.com/tls/ca.crt
#
cp ./fabric-ca-client/crypto-config/peerOrganizations/org1.example.com/peers/peer0.org1.example.com/tlstmp/signcerts/cert.pem ./fabric-ca-client/crypto-config/peerOrganizations/org1.example.com/peers/peer0.org1.example.com/tls/server.crt
# cp ./fabric-ca-client/crypto-config/peerOrganizations/org1.example.com/peers/peer0.org1.example.com/tlstmp/keystore/f0dfb5c4b78407c41f8a040e4ca4f7dba204278086cc718ef0b46697336a0ccd_sk ./fabric-ca-client/crypto-config/peerOrganizations/org1.example.com/peers/peer0.org1.example.com/tls/server.key
# rm -rf ./fabric-ca-client/crypto-config/peerOrganizations/org1.example.com/peers/peer0.org1.example.com/tlstmp
4.生成peer1.org1.example.com的TLS
生成peer1.org1.example.com的TLS的步骤如下。
(1)注册peer1.org1.example.com
# fabric-ca-client register --id.name peer1.org1.example.com --id.type peer --id.affiliation "com.example.org1" --id.attrs '"role=peer",ecert=true' --id.secret=123456 --csr.cn=peer1.org1.example.com --csr.hosts=['peer1.org1.example.com'] -M ./crypto-config/peerOrganizations/org1.example.com/tlstmp -u http://admin2:adminpw2@localhost:8056 --home ./fabric-ca-client
(2)登记peer1.org1.example.com
# fabric-ca-client enroll -d --enrollment.profile tls -u http://peer1.org1.example.com:123456@localhost:8056 --csr.cn=peer1.org1.example.com --csr.hosts=['peer1.org1.example. com'] -M ./crypto-config/peerOrganizations/org1.example.com/peers/peer1.org1.example.com/tlstmp --home ./fabric-ca-client
(3)生成TLS
# mkdir ./fabric-ca-client/crypto-config/peerOrganizations/org1.example.com/peers/peer1.org1.example.com/tls
#
cp ./intermediacatls2/ca-chain.pem ./fabric-ca-client/crypto-config/peerOrganizations/org1.example.com/peers/peer1.org1.example.com/tls/ca.crt
#
cp ./fabric-ca-client/crypto-config/peerOrganizations/org1.example.com/peers/peer1.org1.example.com/tlstmp/signcerts/cert.pem ./fabric-ca-client/crypto-config/peerOrganizations/org1.example.com/peers/peer1.org1.example.com/tls/server.crt
# cp ./fabric-ca-client/crypto-config/peerOrganizations/org1.example.com/peers/peer1.org1.example.com/tlstmp/keystore/1f61eb4458ef96c3f5bd0ef2a5761e11506804a53681c65f3761bb6090c3aad7_sk ./fabric-ca-client/crypto-config/peerOrganizations/org1.example.com/peers/peer1.org1.example.com/tls/server.key
#
rm -rf ./fabric-ca-client/crypto-config/peerOrganizations/org1.example.com/peers/peer1.org1.example.com/tlstmp
# rm -rf ./fabric-ca-client/crypto-config/peerOrganizations/org1.example.com/tlstmp
9.6.6 IntermediaCA3生成
证书
IntermediaCA3生成证书的步骤如下。
1.生成org2.example.com的MSP
生成org2.example.com的MSP的步骤如下。
(1)登记org2.example.com
# fabric-ca-client enroll --csr.cn=org2.example.com --csr.hosts=['org2.example.com'] -M ./crypto-config/peerOrganizations/org2.example.com/msp -u http://admin3:adminpw3@localhost:7057 --home ./fabric-ca-client
# vi ./fabric-ca-client/crypto-config/peerOrganizations/org2.example.com/msp/config.yaml
在/msp/config.yaml中做如下配置。
NodeOUs:
Enable: true
ClientOUIdentifier:
Certificate: intermediatecerts/localhost-7057.pem
OrganizationalUnitIdentifier: client
PeerOUIdentifier:
Certificate: intermediatecerts/localhost-7057.pem
OrganizationalUnitIdentifier: peer
(2)添加联盟成员
# fabric-ca-client affiliation list -M ./crypto-config/peerOrganizations/org2.example.com/msp -u http://admin3:adminpw3@localhost:7057 --home ./fabric-ca-client
#
fabric-ca-client affiliation remove --force org1 -M ./crypto-config/peerOrganizations/org2.example.com/msp -u http://admin3:adminpw3@localhost:7057 --home ./fabric-ca-client
# fabric-ca-client affiliation remove --force org2 -M ./crypto-config/peerOrganizations/org2.example.com/msp -u http://admin3:adminpw3@localhost:7057 --home ./fabric-ca-client
# fabric-ca-client affiliation add com -M ./crypto-config/peerOrganizations/org2.example.com/msp -u http://admin3:adminpw3@localhost:7057 --home ./fabric-ca-client
# fabric-ca-client affiliation add com.example -M ./crypto-config/peerOrganizations/org2.example.com/msp -u http://admin3:adminpw3@localhost:7057 --home ./fabric-ca-client
# fabric-ca-client affiliation add com.example.org2 -M ./crypto-config/peerOrganizations/org2.example.com/msp -u http://admin3:adminpw3@localhost:7057 --home ./fabric-ca-client
2.生成Admin@example.com的MSP
生成Admin@example.com的MSP的步骤如下。
(1)注册Admin@example.com
#
fabric-ca-client register --id.name Admin@org2.example.com --id.type client --id.affiliation "com.example.org2" --id.attrs '"hf.Registrar.Roles=client,orderer,peer,user","hf.Registrar.DelegateRoles=client,orderer,peer,user",hf.Registrar.Attributes=*,hf.GenCRL=true,hf.Revoker=true,hf.AffiliationMgr=true,hf.IntermediateCA=true,role=admin:ecert' --id.secret=123456 --csr.cn=org2.example.com --csr.hosts=['org2.example.com'] -M ./crypto-config/peerOrganizations/org2.example.com/msp -u http://admin3:adminpw3@localhost:7057 --home ./fabric-ca-client
(2)登记Admin@example.com
fabric-ca-client enroll -u http://Admin@org2.example.com:123456@localhost:7057 --csr.cn=org2.example.com --csr.hosts=['org2.example.com'] -M ./crypto-config/peerOrganizations/org2.example.com/users/Admin@org2.example.com/msp --home ./fabric-ca-client
(3)生成MSP
# mkdir ./fabric-ca-client/crypto-config/peerOrganizations/org2.example.com/users/Admin@org2.example.com/msp/admincerts
# cp ./fabric-ca-client/crypto-config/peerOrganizations/org2.example.com/users/Admin@org2.example.com/msp/signcerts/cert.pem ./fabric-ca-client/crypto-config/peerOrganizations/org2.example.com/users/Admin@org2.example.com/msp/admincerts
#
mkdir ./fabric-ca-client/crypto-config/peerOrganizations/org2.example.com/msp/admincerts
# cp ./fabric-ca-client/crypto-config/peerOrganizations/org2.example.com/users/Admin@org2.example.com/msp/signcerts/cert.pem ./fabric-ca-client/crypto-config/peerOrganizations/org2.example.com/msp/admincerts
3.生成peer0.org2.example.com的MSP
生成peer0.org2.example.com的MSP的步骤如下。
(1)注册peer0.org2.example.com
# fabric-ca-client register --id.name peer0.org2.example.com --id.type peer --id.affiliation "com.example.org2" --id.attrs '"role=peer",ecert=true' --id.secret=123456 --csr.cn=peer0.org2.example.com --csr.hosts=['peer0.org2.example.com'] -M ./crypto-config/peerOrganizations/org2.example.com/msp -u http://admin3:adminpw3@localhost:7057 --home ./fabric-ca-client
(2)登记peer0.org2.example.com
# fabric-ca-client enroll -u http://peer0.org2.example.com:123456@localhost:7057 --csr.cn=peer0.org2.example.com --csr.hosts=['peer0.org2.example.com'] -M ./crypto-config/peerOrganizations/org2.example.com/peers/peer0.org2.example.com/msp --home ./fabric-ca-client
(3)生成MSP
# mkdir ./fabric-ca-client/crypto-config/peerOrganizations/org2.example.com/peers/peer0.org2.example.com/msp/admincerts
# cp ./fabric-ca-client/crypto-config/peerOrganizations/org2.example.com/users/Admin@org2.example.com/msp/signcerts/cert.pem ./fabric-ca-client/crypto-config/peerOrganizations/org2.example.com/peers/peer0.org2.example.com/msp/admincerts
4.生成peer1.org2.example.com的MSP
生成peer1.org2.example.com的MSP的步骤如下。
(1)注册peer1.org2.example.com
fabric-ca-client identity modify user1 --json '{"secret": "123456", "affiliation":com.example.org2 ".", "attrs": [{"name": "hf.Regisrar.Roles", "value": "peer,client"},{"name": "hf.Revoker", "value": "true"}]}'
#
fabric-ca-client register --id.name peer1.org2.example.com --id.type peer --id.affiliation "com.example.org2" --id.attrs '"role=peer",ecert=true' --id.secret=123456 --csr.cn=peer1.org2.example.com --csr.hosts=['peer1.org2.example.com'] -M ./crypto-config/peerOrganizations/org2.example.com/msp -u http://admin3:adminpw3@localhost:7057 --home ./fabric-ca-client
(2)登记peer1.org2.example.com
#
fabric-ca-client enroll -u http://peer1.org2.example.com:123456@localhost:7057 --csr.cn=peer1.org2.example.com --csr.hosts=['peer1.org2.example.com'] -M ./crypto-config/peerOrganizations/org2.example.com/peers/peer1.org2.example.com/msp --home ./fabric-ca-client
(3)生成MSP
# mkdir ./fabric-ca-client/crypto-config/peerOrganizations/org2.example.com/peers/peer1.org2.example.com/msp/admincerts
# cp ./fabric-ca-client/crypto-config/peerOrganizations/org2.example.com/users/Admin@org2.example.com/msp/signcerts/cert.pem ./fabric-ca-client/crypto-config/peerOrganizations/org2.example.com/peers/peer1.org2.example.com/msp/admincerts
9.6.7 IntermediaCAtls3生成证书
IntermediaCAtls3生成证书步骤如下。
1.生成org2.example.com的TLS
生成org2.example.com的TLS的步骤如下。
(1)登记org2.example.com
# fabric-ca-client enroll --csr.cn=org2.example.com --csr.hosts=['org2.example.com'] -M ./crypto-config/peerOrganizations/org2.example.com/tlstmp -u http://admin3:adminpw3@localhost:8057 --home ./fabric-ca-client
(2)添加联盟成员
# fabric-ca-client affiliation list -M ./crypto-config/peerOrganizations/org2.example.com/tlstmp -u http://admin3:adminpw3@localhost:8057 --home ./fabric-ca-client
#
fabric-ca-client affiliation remove --force org1 -M ./crypto-config/peerOrganizations/org2.example.com/tlstmp -u http://admin3:adminpw3@localhost:8057 --home ./fabric-ca-client
# fabric-ca-client affiliation remove --force org2 -M ./crypto-config/peerOrganizations/org2.example.com/tlstmp -u http://admin3:adminpw3@localhost:8057 --home ./fabric-ca-client
#
fabric-ca-client affiliation add com -M ./crypto-config/peerOrganizations/org2.example.com/tlstmp -u http://admin3:adminpw3@localhost:8057 --home ./fabric-ca-client
#
fabric-ca-client affiliation add com.example -M ./crypto-config/peerOrganizations/org2.example.com/tlstmp -u http://admin3:adminpw3@localhost:8057 --home ./fabric-ca-client
# fabric-ca-client affiliation add com.example.org2 -M ./crypto-config/peerOrganizations/org2.example.com/tlstmp -u http://admin3:adminpw3@localhost:8057 --home ./fabric-ca-client
2.生成Admin@example.com的TLS
生成Admin@example.com的TLS的步骤如下。
(1)注册Admin@example.com
#
fabric-ca-client register --id.name Admin@org2.example.com --id.type client --id.affiliation "com.example.org2" --id.attrs '"hf.Registrar.Roles=client,orderer,peer,user","hf.Registrar.DelegateRoles=client,orderer,peer,user",hf.Registrar.Attributes=*,hf.GenCRL=true,hf.Revoker=true,hf.AffiliationMgr=true,hf.IntermediateCA=true,role=admin:ecert' --id.secret=123456 --csr.cn=org2.example.com --csr.hosts=['org2.example.com'] -M ./crypto-config/peerOrganizations/org2.example.com/tlstmp -u http://admin3:adminpw3@localhost:8057 --home ./fabric-ca-client
(2)登记Admin@example.com
#
fabric-ca-client enroll -d --enrollment.profile tls -u http://Admin@org2.example.com:123456@localhost:8057 --csr.cn=org2.example.com --csr.hosts=['org2.example.com'] -M ./crypto-config/peerOrganizations/org2.example.com/users/Admin@org2.example.com/tlstmp --home ./fabric-ca-client
(3)生成TLS
# mkdir ./fabric-ca-client/crypto-config/peerOrganizations/org2.example.com/users/Admin@org2.example.com/tls
#
cp ./intermediacatls3/ca-chain.pem ./fabric-ca-client/crypto-config/peerOrganizations/org2.example.com/users/Admin@org2.example.com/tls/ca.crt
# cp ./fabric-ca-client/crypto-config/peerOrganizations/org2.example.com/users/Admin@org2.example.com/tlstmp/signcerts/cert.pem ./fabric-ca-client/crypto-config/peerOrganizations/org2.example.com/users/Admin@org2.example.com/tls/client.crt
# cp ./fabric-ca-client/crypto-config/peerOrganizations/org2.example.com/users/Admin@org2.example.com/tlstmp/keystore/2ba445474949a3be710f2af40b7586c7d56e8d517f914209b79ebac6b41470e6_sk ./fabric-ca-client/crypto-config/peerOrganizations/org2.example.com/users/Admin@org2.example.com/tls/client.key
# rm -rf ./fabric-ca-client/crypto-config/peerOrganizations/org2.example.com/users/Admin@org2.example.com/tlstmp
3.生成peer0.org2.example.com的TLS
生成peer0.org2.example.com的TLS的步骤如下。
(1)注册peer0.org2.example.com
(密码错了)
fabric-ca-client identity remove peer0.org2.example.com --id.type peer --id.affiliation "com.example.org2" --id.attrs '"role=peer",ecert=true' --id.secret=123456 --csr.cn=peer0.org2.example.com --csr.hosts=['peer0.org2.example.com'] -M ./crypto-config/peerOrganizations/org2.example.com/tlstmp -u http://admin3:adminpw3@localhost:8057 --home ./fabric-ca-client
# fabric-ca-client register --id.name peer0.org2.example.com --id.type peer --id.affiliation "com.example.org2" --id.attrs '"role=peer",ecert=true' --id.secret=123456 --csr.cn=peer0.org2.example.com --csr.hosts=['peer0.org2.example.com'] -M ./crypto-config/peerOrganizations/org2.example.com/tlstmp -u http://admin3:adminpw3@localhost:8057 --home ./fabric-ca-client
(2)登记peer0.org2.example.com
# fabric-ca-client enroll -d --enrollment.profile tls -u http://peer0.org2.example.com:123456@localhost:8057 --csr.cn=peer0.org2.example.com --csr.hosts=['peer0.org2. example.com'] -M ./crypto-config/peerOrganizations/org2.example.com/peers/peer0.org2.example.com/tlstmp --home ./fabric-ca-client
fabric-ca-client enroll -d --enrollment.profile tls -u http://peer0.org2.example.com:123456@localhost:8056 --csr.cn=peer0.org2.example.com --csr.hosts=['peer0.org2.example. com'] -M ./crypto-config/peerOrganizations/org2.example.com/peers/peer0.org2.example.com/tlstmp --home ./fabric-ca-client
(3)生成TLS
# mkdir ./fabric-ca-client/crypto-config/peerOrganizations/org2.example.com/peers/peer0.org2.example.com/tls
#
cp ./intermediacatls3/ca-chain.pem ./fabric-ca-client/crypto-config/peerOrganizations/org2.example.com/peers/peer0.org2.example.com/tls/ca.crt
#
cp ./fabric-ca-client/crypto-config/peerOrganizations/org2.example.com/peers/peer0.org2.example.com/tlstmp/signcerts/cert.pem ./fabric-ca-client/crypto-config/peerOrganizations/org2.example.com/peers/peer0.org2.example.com/tls/server.crt
# cp ./fabric-ca-client/crypto-config/peerOrganizations/org2.example.com/peers/peer0.org2.example.com/tlstmp/keystore/59f219ec15c6052ce3973cb9a6665a3e39dcf6b5b01bec04d632b2f00c1bb5fe_sk ./fabric-ca-client/crypto-config/peerOrganizations/org2.example.com/peers/peer0.org2.example.com/tls/server.key
# rm -rf ./fabric-ca-client/crypto-config/peerOrganizations/org2.example.com/peers/peer0.org2.example.com/tlstmp
4.生成peer1.org2.example.com的TLS
生成peer1.org2.example.com的TLS的步骤如下。
(1)注册peer1.org2.example.com
#
fabric-ca-client register --id.name peer1.org2.example.com --id.type peer --id.affiliation "com.example.org2" --id.attrs '"role=peer",ecert=true' --id.secret=123456 --csr.cn=peer1.org2.example.com --csr.hosts=['peer1.org2.example.com'] -M ./crypto-config/peerOrganizations/org2.example.com/tlstmp -u http://admin3:adminpw3@localhost:8057 --home ./fabric-ca-client
(2)登记peer1.org2.example.com
# fabric-ca-client enroll -d --enrollment.profile tls -u http://peer1.org2.example.com:123456@localhost:8057 --csr.cn=peer1.org2.example.com --csr.hosts=['peer1.org2.example.com'] -M ./crypto-config/peerOrganizations/org2.example.com/peers/peer1.org2.example.com/tlstmp --home ./fabric-ca-client
(3)生成TLS
# mkdir ./fabric-ca-client/crypto-config/peerOrganizations/org2.example.com/peers/peer1.org2.example.com/tls
# cp ./intermediacatls3/ca-chain.pem ./fabric-ca-client/crypto-config/peerOrganizations/org2.example.com/peers/peer1.org2.example.com/tls/ca.crt
#
cp ./fabric-ca-client/crypto-config/peerOrganizations/org2.example.com/peers/peer1.org2.example.com/tlstmp/signcerts/cert.pem ./fabric-ca-client/crypto-config/peerOrganizations/org2.example.com/peers/peer1.org2.example.com/tls/server.crt
#
cp ./fabric-ca-client/crypto-config/peerOrganizations/org2.example.com/peers/peer1.org2.example.com/tlstmp/keystore/1dccdf94a27c6cbc41e3f236b77e2d774cafec08c6a36721a69522c75dfd289c_sk ./fabric-ca-client/crypto-config/peerOrganizations/org2.example.com/peers/peer1.org2.example.com/tls/server.key
rm -rf ./fabric-ca-client/crypto-config/peerOrganizations/org2.example.com/peers/peer1.org2.example.com/tlstmp
# rm -rf ./fabric-ca-client/crypto-config/peerOrganizations/org2.example.com/tlstmp
9.6.8 验证CA证书
用Fabric CA生成的证书替换第8章 Fabric Kafka生产环境部署中使用cryptogen生成的证书,复制./fabric-ca-client/crypto-config目录到kafkapeer目录下(删除原先的crypto-config目录),然后生成创世区块和通道配置文件,后续步骤将下面的代码
ORDERER_CA=/opt/gopath/src/github.com/hyperledger/fabric/peer/crypto/ordererOrganizations/example.com/orderers/orderer0.example.com/msp/tlscacerts/tlsca.example.com-cert.pem
修改为
ORDERER_CA=/opt/gopath/src/github.com/hyperledger/fabric/peer/crypto/
ordererOrganizations/example.com/orderers/orderer0.example.com/msp/tlsintermediatecerts/t ls-localhost-8055.pem
除此以外,其他步骤不变。
9.7 本章小结
前面章节在环境部署时,系统都是通过cryptogen工具根据crypto-config.yaml配置情况生成证书及公私钥文件的,但是生产环境必须要有一个中心证书机构,用来统一管理和维护证书,实现各实体的身份注册和登记、发放登录证书、发布交易证书及证书的更新和撤销等功能。
本章简要介绍了Fabric CA基础概念及操作命令,然后通过第8章Fabric Kafka生产环境部署的案例,用Fabric CA替换cryptogen工具,手把手地演示了使用Fabric CA生成MSP和TLS所需的证书文件,最后通过验证,保证生成的证书可用。


 1102
1102

 被折叠的 条评论
为什么被折叠?
被折叠的 条评论
为什么被折叠?
 到【灌水乐园】发言


