


Mybatis

概述
Mybatis是对jdbc 的封装,为了简化JDBc 的开发,是一个工具(框架)
框架
工具(一堆工具的合集)\半成品软件
官网
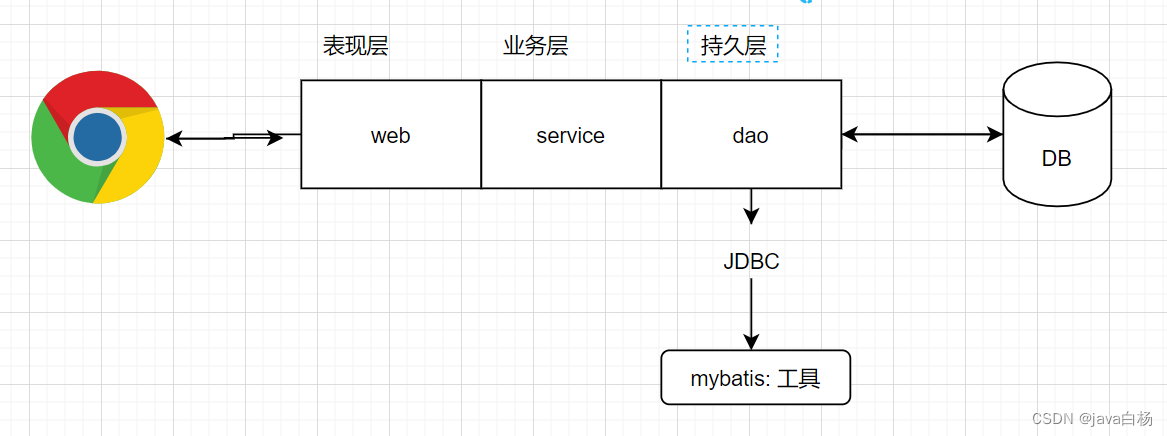
三层架构
Mybatis入门
-
数据库准备
-
新建项目(模块)
-
导入坐标
-
logback.xml
编码:
-
配置文件
mybatis-config.xml
UserMapper.xml
-
代码
实体类
编写代码查询
pom.xml
  <properties>
        <maven.compiler.source>8</maven.compiler.source>
        <maven.compiler.target>8</maven.compiler.target>
    </properties>

    <dependencies>
        <!--mybatis 依赖-->
        <dependency>
            <groupId>org.mybatis</groupId>
            <artifactId>mybatis</artifactId>
            <version>3.5.5</version>
        </dependency>


        <!--mysql 驱动-->
        <dependency>
            <groupId>mysql</groupId>
            <artifactId>mysql-connector-java</artifactId>
            <version>5.1.46</version>
            <scope>runtime</scope>
        </dependency>

        <!--junit 单元测试-->
        <dependency>
            <groupId>junit</groupId>
            <artifactId>junit</artifactId>
            <version>4.13</version>
            <scope>test</scope>
        </dependency>
        <!-- 添加slf4j日志api -->
        <dependency>
            <groupId>org.slf4j</groupId>
            <artifactId>slf4j-api</artifactId>
            <version>1.7.20</version>
        </dependency>
        <!-- 添加logback-classic依赖 -->
        <dependency>
            <groupId>ch.qos.logback</groupId>
            <artifactId>logback-classic</artifactId>
            <version>1.2.3</version>
        </dependency>
        <!-- 添加logback-core依赖 -->
        <dependency>
            <groupId>ch.qos.logback</groupId>
            <artifactId>logback-core</artifactId>
            <version>1.2.3</version>
        </dependency>
    </dependencies>
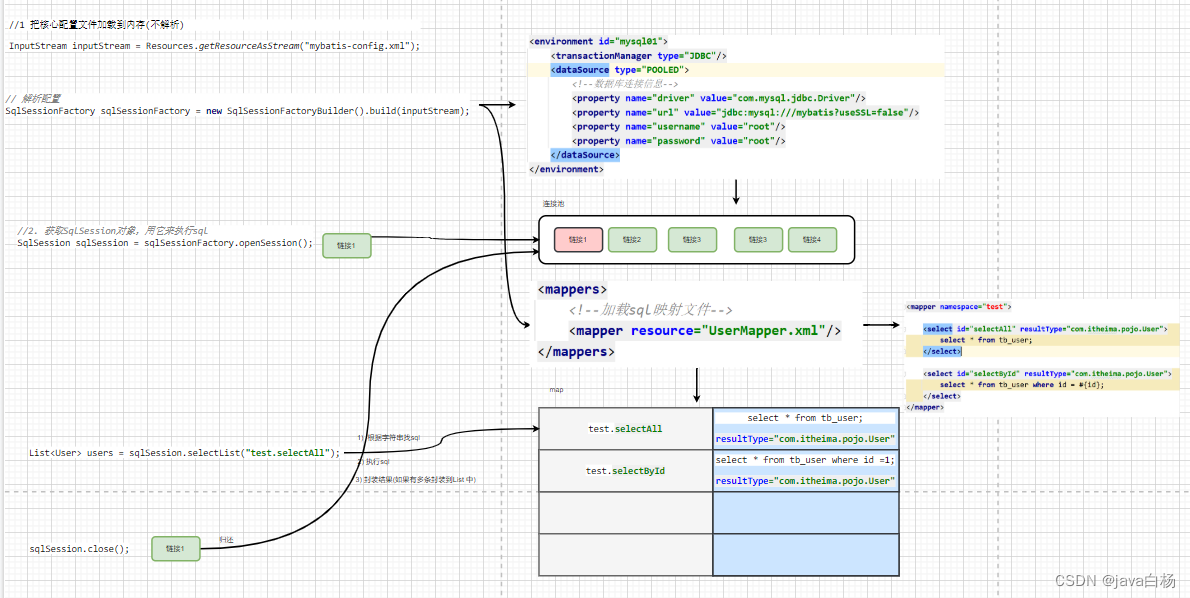
mybatis-config.xml
<?xml version="1.0" encoding="UTF-8" ?>
<!DOCTYPE configuration
        PUBLIC "-//mybatis.org//DTD Config 3.0//EN"
        "http://mybatis.org/dtd/mybatis-3-config.dtd">

<configuration>
    <!--
    environments:配置数据库连接环境信息。可以配置多个environment,通过default属性切换不同的environment
    -->
    <environments default="development">

        <environment id="development">
            <transactionManager type="JDBC"/>
            <dataSource type="POOLED">
                <!--数据库连接信息-->
                <property name="driver" value="com.mysql.jdbc.Driver"/>
                <property name="url" value="jdbc:mysql:///mybatis?useSSL=false"/>
                <property name="username" value="root"/>
                <property name="password" value="root"/>
            </dataSource>
        </environment>
    </environments>
    <mappers>
        <!--加载sql映射文件-->
        <mapper resource="UserMapper.xml"/>
    </mappers>
</configuration>
UserMapper.xml
<?xml version="1.0" encoding="UTF-8" ?>
<!DOCTYPE mapper
        PUBLIC "-//mybatis.org//DTD Mapper 3.0//EN"
        "http://mybatis.org/dtd/mybatis-3-mapper.dtd">

<!--
    namespace:名称空间
-->
<mapper namespace="test">

    <select id="selectAll" resultType="com.itheima.pojo.User">
        select * from tb_user;
    </select>

    <select id="selectById" resultType="com.itheima.pojo.User">
        select * from tb_user where id = #{id};
    </select>
</mapper>
Mybatis入门步骤
public static void main(String[] args) throws IOException {

        //1. 加载mybatis的核心配置文件,获取 SqlSessionFactory
        String resource = "mybatis-config.xml";
        InputStream inputStream = Resources.getResourceAsStream(resource);

        SqlSessionFactory sqlSessionFactory = new SqlSessionFactoryBuilder().build(inputStream);
        //2. 获取SqlSession对象,用它来执行sql
        SqlSession sqlSession = sqlSessionFactory.openSession();
        //3. 执行sql
        List<User> users = sqlSession.selectList("test.selectAll");
        System.out.println(users);
        //4. 释放资源
        sqlSession.close();
    }
Mybatis原理
接口开发
XXXXMapper.xml 注意事项
-
Mapper.xml 的 namespace 必须和接口的名称保持一致
-
Mapper.xml 的id 必须和 接口的方法名称保持一致
-
返回值resultType=“com.itheima.pojo.User” 必须和返回值类型一致(泛型类型一致)
-
请求参数类型必须课方法参数一致
-
为了方便加载: 配置文件名和接口的名称一致,并且编译后在同一个文件夹
<mappers> <!--Mapper代理方式--> <package name="com.xxx.mapper"/> </mappers> -
接口中的方法不允许重载
注意
在resources 文件夹创建 多级文件夹问题: 必须用斜杠 : 例如 com\xxx\mapper
核心配置文件
-
起别名
默认 TypeAliasRegistry 有别名
-
可以使用 typeAliases 自定义别名(不区分大小写)
-
environments 配置数据库链接
-
mappers 加载 xml 映射文件
插件 MybatisX
帮助开发

Lombok 插件
简化实体类的Get,Set,toString…方法
  <dependency>
            <groupId>org.projectlombok</groupId>
            <artifactId>lombok</artifactId>
            <version>1.18.20</version>
  </dependency>

@Data // set,get,tostring
@AllArgsConstructor // 全参数构造
@NoArgsConstructor // 无参数构造
XXXMapper.xml
sql 片段
方便代码的编写,重复的sql 语句 (片段)只写一次即可
	<!-- 抽取 -->
   <sql id="sql2">
        id,bbrand_name,company_name,ordered
    </sql>
	<!-- 使用 -->
    <select id="selectAll" resultMap="brandResultMap" >
        select <include refid="sql2"/>  from tb_brand;
    </select>
     <insert id="insert"  >
        insert into tb_brand  (<include refid="sql2"/>) values (.....)
    </insert>
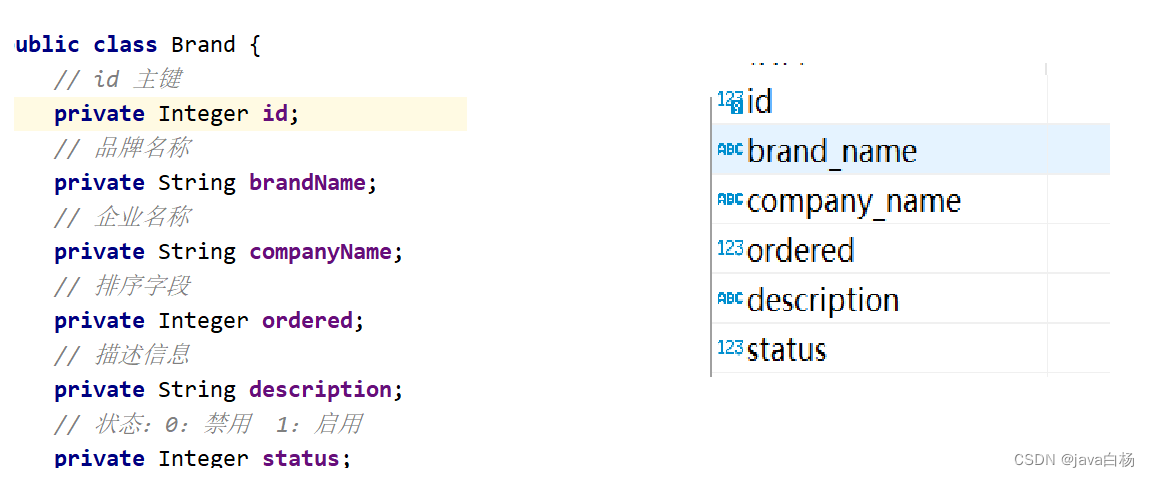
字段不一致问题
java 实体类属性和数据库字段名称不一致
解决方法1
起别名
  <select id="selectAll" resultMap="brandResultMap" >
        select id, brand_name as brandName, company_name as companyName, ordered, description, status from tb_brand
    </select>
缺点
可读性差,可维护性差
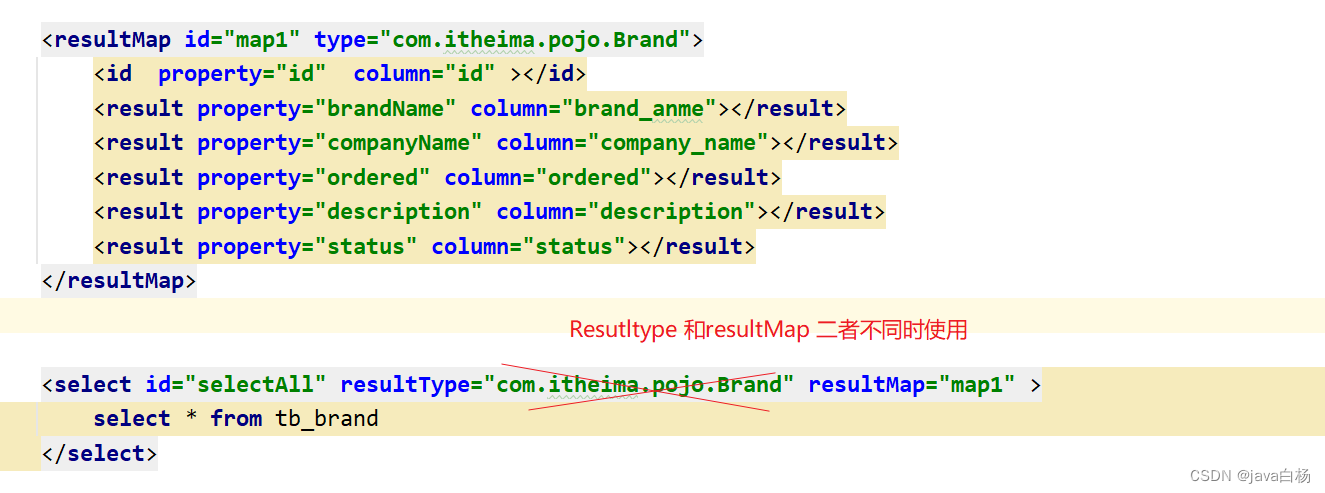
解决方案2
使用resultMap
 <resultMap id="map1" type="com.itheima.pojo.Brand">
        <id  property="id"  column="id" ></id>
        <result property="brandName" column="brand_anme"></result>
        <result property="companyName" column="company_name"></result>
        <result property="ordered" column="ordered"></result>
        <result property="description" column="description"></result>
        <result property="status" column="status"></result>
    </resultMap>
    <select id="selectAll"  resultMap="map1" >
        select * from tb_brand
    </select>
特殊字符处理
< < 小于
> > 大于
<![CDATA[
xxxx
]]>
占位符#{},${} 区别
<select id="selectById1"  resultMap="brandResultMap">
        select *
        from tb_brand where id = #{id};
    </select>
#{}
执行SQL时,会将 #{} 占位符替换为?,将来自动设置参数值。底层使用的是 PreparedStatement (开启预编译后效率高)
${}
拼接SQL。底层使用的是 Statement,会存在SQL注入问题。
参数问题
- 当参数有一个时 #{任意}
- 当传递多个参数时
当参数是一个对象时 #{必须和参数对象的属性名保持一致}
当参数是一个map 集合时 #{必须和map 的key 保持一致}
传递多个参数使用@Param 注解
public Brand selectById4(@Param(“id”) int id,@Param(“brandName”) String brandName);
动态sql
:判断中的key 写法 和 #{} 一样
自动删除第一个无效的 连接符号,但是不会增加
单条件查询
   <select id="selectByCondition1" resultMap="brandResultMap">
        select *
        from tb_brand
        /* where 1 = 1*/
        <where>

            <if test="status != null">
                and status = #{status}
            </if>

            <if test="companyName != null and companyName != '' ">
                and company_name like #{companyName}
            </if>

            <if test="brandName != null and brandName != '' ">
                and brand_name like #{brandName}
            </if>
        </where>
    </select>
 <select id="selectByConditionSingle" resultMap="brandResultMap">
        select *
        from tb_brand
        <where>
            <choose><!--相当于switch-->
                <when test="status != null"><!--相当于case-->
                    status = #{status}
                </when>
                <when test="companyName != null and companyName != '' "><!--相当于case-->
                    company_name like #{companyName}
                </when>
                <when test="brandName != null and brandName != ''"><!--相当于case-->
                    brand_name like #{brandName}
                </when>
            </choose>
        </where>
    </select>
insert
 <!-- 返回主键-->
<insert id="insert" useGeneratedKeys="true" keyProperty="id" >
        insert into tb_brand (id,brand_name) values (#{id},#{brandName})
 </insert>
useGeneratedKeys
是否返回主键,默认为flase,只针对insert语句生效;
keyProperty
实体类的属性,返回的名称;
update
<update id="update"  >
       update tb_brand
           <set>
                <if test="companyName!=null">
                    company_name=#{companyName} ,
                </if>
                <if test="brandName!=null">
                     brand_name=#{brandName},
                </if>
           </set>
            where id =#{id}
    </update>
set
去除最后一个无效的“,”号
delete
 <delete id="delete">
        delete from tb_brand where id in
        <foreach collection="ids"  item="id" open="(" separator="," close=")">
                #{id}
        </foreach>
    </delete>
foreach
循环遍历
collection
循环遍历谁
item
循环便利的名称
open
遍历前加什么
separator
遍历每个数据加什么
close
遍历最后加什么
参数原理
POJO类型
Map集合 直接使用
其他类型
都会用map 封装,map 的key 建议使用 @Param注解 指定
MyBatis 参数封装
		* 单个参数:
            1. POJO类型:直接使用,属性名 和 参数占位符名称 一致

            2. Map集合:直接使用,键名 和 参数占位符名称 一致

            3. Collection:封装为Map集合,可以使用@Param注解,替换Map集合中默认的arg键名
                map.put("arg0",collection集合);
                map.put("collection",collection集合);
            4. List:封装为Map集合,可以使用@Param注解,替换Map集合中默认的arg键名
                map.put("arg0",list集合);
                map.put("collection",list集合);
                map.put("list",list集合);
            5. Array:封装为Map集合,可以使用@Param注解,替换Map集合中默认的arg键名
                map.put("arg0",数组);
                map.put("array",数组);
            6. 其他类型:直接使用
        * 多个参数:封装为Map集合,可以使用@Param注解,替换Map集合中默认的arg键名
            map.put("arg0",参数值1)
            map.put("param1",参数值1)
            map.put("param2",参数值2)
            map.put("agr1",参数值2)
            ---------------@Param("username")
            map.put("username",参数值1)
            map.put("param1",参数值1)
            map.put("param2",参数值2)
            map.put("agr1",参数值2)
注解开发
-
@Select(“select * from tb_brand”)
@ResultMap(“brandMap”)
-
@Insert
-
@Update
-
@Delete
同一个方法不允许使用注解和xml 都存在
简单的sql 采用注解,复杂的建议使用 xml


 2722
2722


 被折叠的 条评论
为什么被折叠?
被折叠的 条评论
为什么被折叠?
 到【灌水乐园】发言


