


一、ansible简介
批量管理服务器的工具
使用Python语言编写的
基于ssh管理,所以不需要在被管端安装任何软件
ansible在管理远程主机的时候,主要是通过各种模块进行操作的
二、ansible的优点
1.部署简单,只需在主控端部署Ansible环境,被控端无需做任何操作;
2.默认使用SSH协议对设备进行管理;
3.有大量常规运维操作模块,可实现日常绝大部分操作;
4.配置简单、功能强大、扩展性强;
5.支持API及自定义模块,可通过Python轻松扩展;
6.通过Playbooks来定制强大的配置、状态管理;
7.轻量级,无需在客户端安装agent,更新时,只需在操作机上进行一次更新即可;
8.提供一个功能强大、操作性强的Web管理界面和REST API接口——AWX平台。
9.幂等性:一个任务执行1遍和执行n遍效果一样,不因重复执行带来意外情况
三、源码安装ansible
3.1源码安装地址
Index of /ansible,下载这个源码安装包
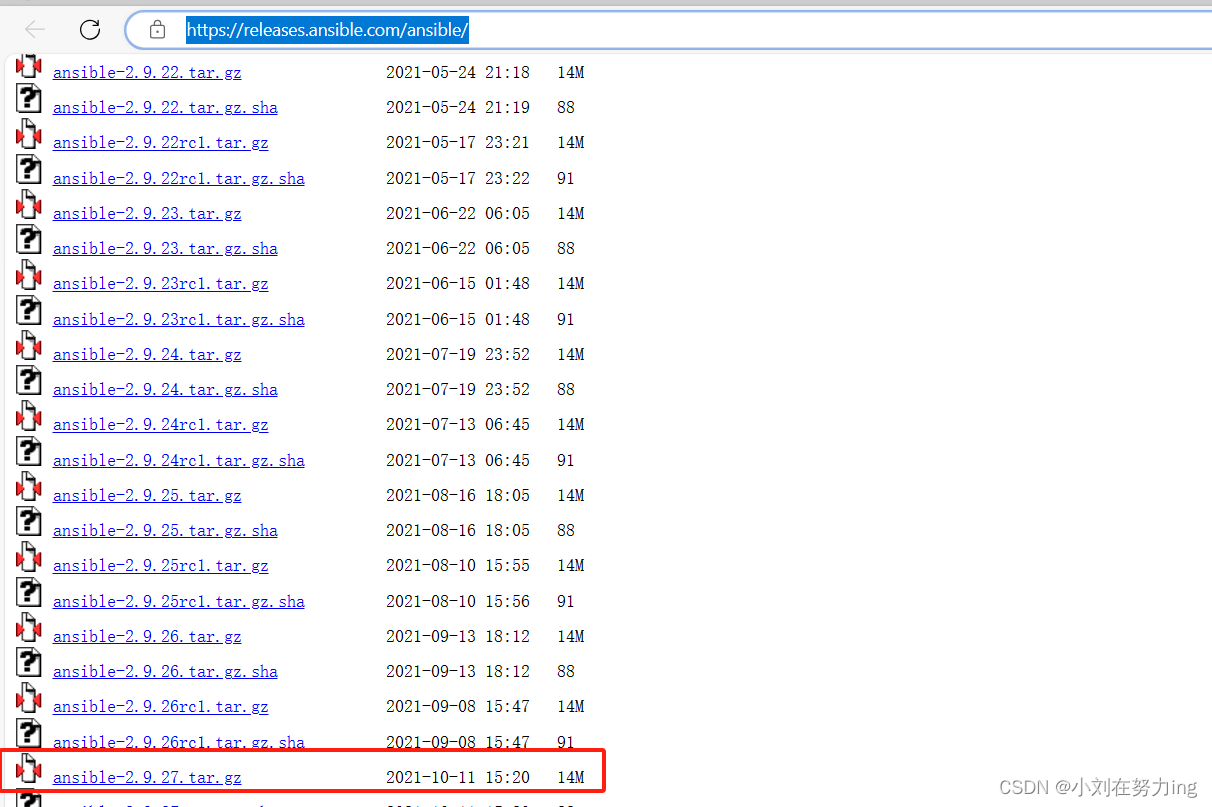
3.2上传到服务器并解压
![]()
tar -xf ansible-2.9.26.tar.gz
cd ansible-2.9.26
#前提需要python编译器
python3 setup.py install
#安装pip包管理器
yum install python3-pip3.3Ansible 后出现了依赖问题,无法找到 cryptography 包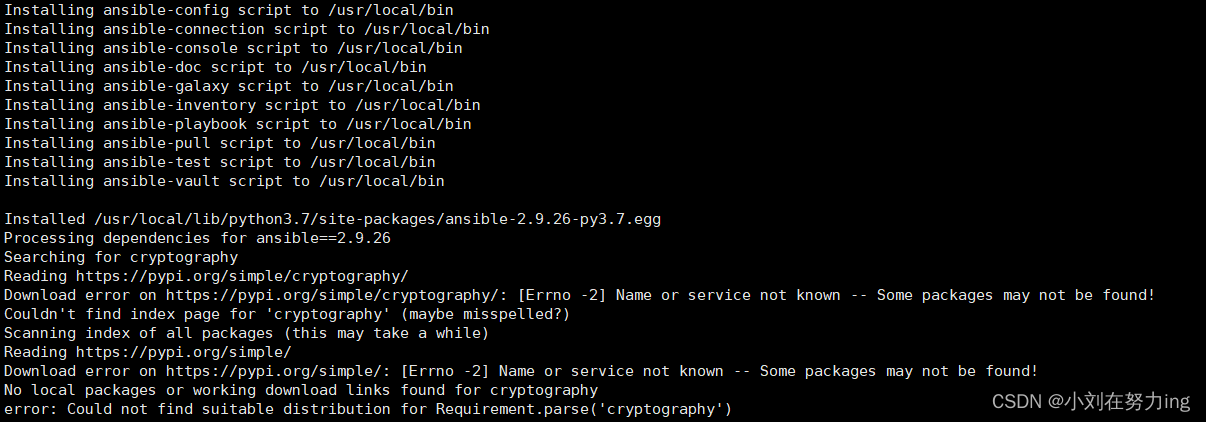
python3 -m pip install -i https://mirrors.aliyun.com/pypi/simple/ cryptography3.4错误提示说在安装或更新软件包时可能会遇到依赖冲突、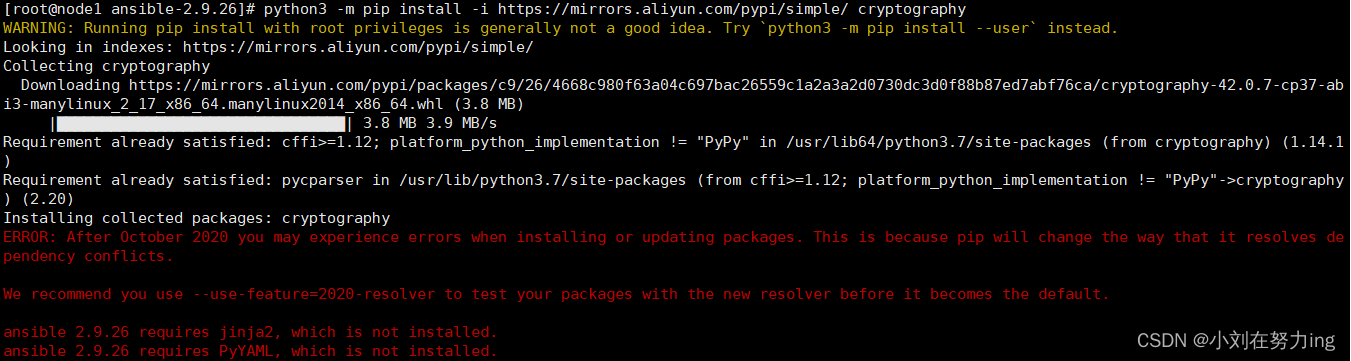
#避免冲突

python3 -m pip install --use-feature=2020-resolver -i https://mirrors.aliyun.com/pypi/simple/ cryptography
3.5由于pip较新,不能使用--use-feature
mkdir ansible && cd ansible
vi hosts
vi ansible.cfg
#更新pip
[root@master ansible-2.9.26]# python3 -m pip install --upgrade pip
#去掉--use-feature=2020-resolver
[root@master ansible-2.9.26]# python3 -m pip install -i https://mirrors.aliyun.com/pypi/simple/ cryptography3.7测试是否可以使用
3.8创建配置文件
[root@master ~]# mkdir ansible && cd ansible
具体配置可以参考下面ansible.cfg、hosts
四、ansible工作模式
ansible分为两种工作模式:
adhoc临时命令(点对点模式):ansi就是在命令行上执行管理命令,单个命令
playbook剧本(剧本模式):把管理任务用特定格式写到文件中,脚本内多个命令
上述两种模式可类比于一个是执行单个shell命令,一个是shell脚本。
五、ansible配置介绍
5.1、ansible.cfg配置文件
inventory :管理的主机清单文件路径
library:ansible的模块存放的目录
remote_tmp:上述工作原理中提到的将脚本发送至对端的临时目录
local_tmp:上述工作原理中提到本地生成脚本存放的临时目录
forks:并发连接数,默认为5
sudo_user :命令执行用户
remote_port :访问管理主机的端口
host_key_checking:设置是否检查SSH主机的密钥,默认为false
timeout :ssh连接被管理主机的超时时间
log_path:ansilbe日志文件路径
[root@control ansible]# vim ansible.cfg    # 文件名必须是ansible.cfg

[defaults]
inventory = hosts    # 管理的主机,配置在当前目录的hosts文件中,hosts名是自定义的。=号两边空格可有可无。
5.2、hosts配置文件
hosts配置文件是ansible管理的主机列表文件,里面记载着管理主机的ip、端口等信息
其有两种方式:
一是单个主机名或主机ip记录
二是将某一类主机分组记录。
环境准备
主机名	IP地址	角色
node1	192.168.88.11	被控制节点(test)
node2	192.168.88.12	被控制节点(proxy)
node3	192.168.88.13	被控制节点(web1)
control	192.168.88.253	控制节点(manager)


# 配置名称解析
[root@control ~]# echo -e "192.168.88.253\tcontrol" >> /etc/hosts

[root@control ~]# for i in {1..3}
> do
> echo -e "192.168.88.1$i\tnode$i" >> /etc/hosts
> done


[root@control ~]# tail -6 /etc/hosts
192.168.88.253	control
192.168.88.11	node1
192.168.88.12	node2
192.168.88.13	node3

[root@control ~]# ssh-keygen
Generating public/private rsa key pair.
Enter file in which to save the key (/root/.ssh/id_rsa):
Enter passphrase (empty for no passphrase):
Enter same passphrase again:
Your identification has been saved in /root/.ssh/id_rsa.
Your public key has been saved in /root/.ssh/id_rsa.pub.
The key fingerprint is:
SHA256:TccoKqVO55hXxN/aOzqs3sjqr/1kzHtM0ZbkSh5b/DE root@master
The key's randomart image is:
+---[RSA 2048]----+
|                 |
|       .   o  .  |
|      . + o o= . |
|     o o = o+ BE |
|    + o S oo.B .o|
|   o * . o o=   .|
|    + o  .*o.    |
|     . o =o.+.   |
|     .+=Bo=+..   |
+----[SHA256]-----+


[root@control ~]# ssh-copy-id control

[root@control ~]# ssh-copy-id node1
# 创建主机清单文件 写在[]里的是组名,[ ]下面的是组内的主机名,
类似大组里面分小组
[root@control ansible]# vim hosts

[test]
node1

[proxy]
node2

[webservers]node[3:4] # node3和node4的简化写法,表示从3到4


[database]

node5

[cluster:children]

webservers

database

# cluster是组名,自定义的;:children是固定写法,表示下面的组名是cluster的子组。
六、ansible-doc 模块
此模块是类似于字典,可以快速翻看命令和剧本如何使用,有较多的案例
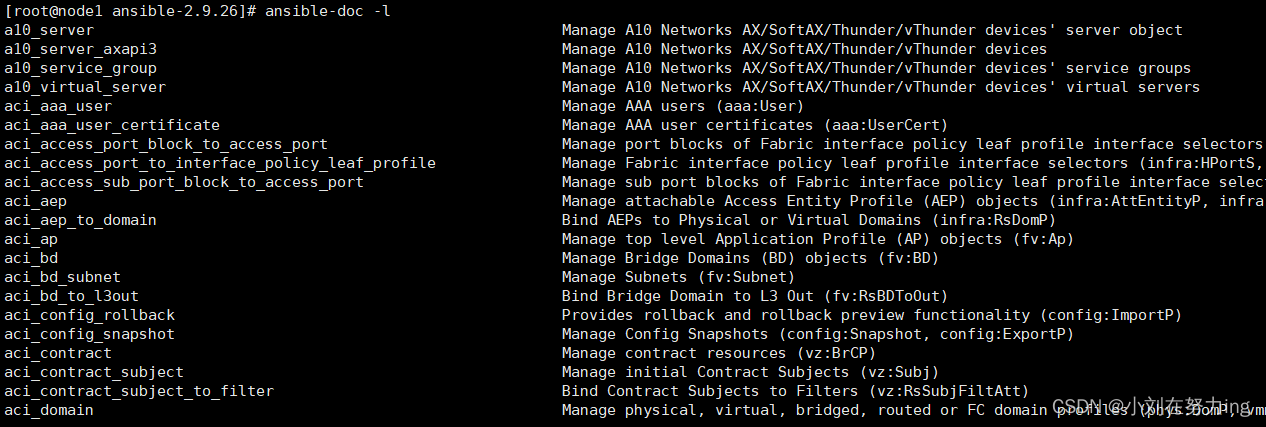
ansible-doc -l :列出所有模块

ansible-doc -s <模块名> :查看模块的参数信息


ansible --version :查看ansible版本

ansible -a :调用模块的参数

ansilbe -c :测试命令执行结果,不实际执行

ansible -v :输出详细详细;-vv:输出更详细的信息

ansible -m :指定调用的模块名称

ansible -k :提示输入ssh的秘密,而不是基于ssh认证

ansible -u :指定执行命令的用户

ansilbe -i :指定访问的主机列表文件

ansilbe -f :指定并发进程数
[root@control ansible]# ansible-doc -l | wc -l        # 列出ansible的所有模块数量
2834


[root@control ansible]# ansible-doc -l   # 列出ansible的所有模块


[root@control ansible]# ansible-doc -l | grep yum  # 查看与yum相关的模块
# 查看yum模块的使用说明


[root@control ansible]# ansible-doc yum   # 查看yum模块的使用说明,主要查看下方的EXAMPLE示例
Linux命令相关性
6.1 ping 模块
ping模块检查目标主机联通性
[root@control ansible]# ansible all -m ping  //ping模块测试到远程主机的连通性
node2 | SUCCESS => {
    "ansible_facts": {
        "discovered_interpreter_python": "/usr/bin/python3"
    },
    "changed": false,
    "ping": "pong"
}
6.2 command 模块
如果不指定子命令,默认:command模块
可以直接在远程主机上执行命令,并将结果返回本主机。不支持特殊字符
command不支持某些shell特性,如管道、重定向,&后台进程。
[root@control ansible]# ansible all -a "mkdir /tmp/demo"
 # 在所有被管主机上创建目录/tmp/demo

#先切换到/data/ 目录,再执行“ls”命令
[root@localhost ~]$ ansible test -m command -a 'chdir=/data/ ls'

#如果/data/aaa.jpg存在,则不执行“ls”命令
[root@localhost ~]$ ansible test -m command -a 'creates=/data/aaa.jpg ls'

#如果/data/aaa.jpg存在,则执行“cat /data/a”命令
[root@localhost ~]$ ansible test -m command -a 'removes=/data/aaa.jpg cat /data/a'
6.3 shell 模块
shell模块可以在远程主机上调用shell解释器运行命令,支持shell的各种功能
Shell模块没有幂等性,yum模块包含幂等性。
与command模块类似,但是支持shell特性,如管道、重定向
[root@localhost ~]$ ansible test -m shell -a 'cat /etc/passwd |grep "keer"'
192.168.37.122 | SUCCESS | rc=0 >>
keer:x:10001:1000:keer:/home/keer:/bin/sh

192.168.37.133 | SUCCESS | rc=0 >>
keer:x:10001:10001::/home/keer:/bin/sh
6.4 script 模块
用于在远程主机上执行脚本
[root@control ansible]# vim test.sh   # 在控制端创建脚本即可
#!/bin/bash
yum install -y httpd
systemctl start httpd

[root@control ansible]# ansible test  -m script -a "test.sh"   # 在test组的主机上执行脚本,执行后删除
文件文本相关性
6.5 copy 模块
用于将文件从控制端拷贝到被控端
常用选项:
src:源。控制端的文件路径
dest:目标。被控制端的文件路径
content:内容。需要写到文件中的内容
[root@control ansible]# echo "AAA" > a3.txt
[root@control ansible]# ansible test -m copy -a "src=a3.txt dest=/root/"  # 将a3.txt拷贝到test主机的/root/

[# 在目标主机上创建/tmp/mytest.txt,内容是Hello World
root@control ansible]# ansible test -m copy -a "content='Hello World' dest=/tmp/mytest.txt"
6.6 file 模块
可以创建文件、目录、链接等,还可以修改权限、属性等
常用的选项:
path:指定文件路径
owner:设置文件所有者
group:设置文件所属组
mode:设置权限
state:状态。touch表示创建文件,directory表示创建目录,link表示创建软链接,absent表示删除
src:source的简写,源
dest:destination的简写,目标
[root@control ansible]# ansible test -m file -a "path=/tmp/file.txt state=touch"   # touch是指如果文件不存在,则创建
# 在test主机上创建/tmp/file.txt

[root@control ansible]# ansible test -m file -a "path=/tmp/demo state=directory"
# 在test主机上创建/tmp/demo目录

[root@control ansible]# ansible test -m file -a "path=/tmp/file.txt owner=sshd group=adm mode='0777'"
[root@control ansible]# ansible test -a "ls -l /tmp/file.txt"
# 将test主机上/tmp/file.txt的属主改为sshd,属组改为adm,权限改为0777

[root@control ansible]# ansible test -m file -a "path=/tmp/file.txt state=absent"    # absent英文缺席的、不存在的
# 删除test主机上/tmp/file.txt

[root@control ansible]# ansible test -m file -a "path=/tmp/demo state=absent"
# 删除test主机上/tmp/demo

[root@control ansible]# ansible test -m file -a "src=/etc/hosts dest=/tmp/hosts.txt state=link"
# 在test主机上创建/etc/hosts的软链接,目标是/tmp/hosts.txt
6.7 fetch 模块
该模块用于从远程某主机获取(复制)文件到本地。
fetch是下载,只能下载文件。
常用选项:
src:源 被控制端的文件路径
dest:目标 控制端的文件路径
# 将test主机上的/etc/hostname下载到本地用户的家目录下
[root@control ansible]# ansible test -m fetch -a "src=/etc/hostname dest=~/"

[root@control ansible]# ls ~/node1/etc/   # node1是test组中的主机hostname
6.8 lineinfile 模块
用于对远程受控节点的文件编辑模块,用于保存或替换目标文件中有某一行内容
常用选项:
path:待修改的文件路径
line:写入文件的一行内容
regexp:正则表达式,查找文件中的内容
[root@control ansible]# ansible test -m lineinfile -a "path=/etc/issue line='Hello World'"
# test组中的主机,/etc/issue中一定要有一行Hello World。如果该行不存在,则默认添加到文件结尾

[root@control ansible]# ansible test -m lineinfile -a "path=/etc/issue  regexp='Hello'   line='chi le ma'"
# test组中的主机,把/etc/issue中有Hello的行,替换成chi le ma,没找到就添加新行。
6.9 replace 模块
lineinfile会替换一行,replace可以替换关键词
常用选项:
path:待修改的文件路径
replace:将正则表达式查到的内容,替换成replace的内容
regexp:正则表达式,用于查找文件中的内容
[root@control ansible]# ansible test -m replace -a "path=/etc/issue regexp='chi' replace='he'"

#把test组中主机上/etc/issue文件中的chi,替换成he
6.10 unarchive 模块
将ansible主机上的压缩包在本地解压缩后传到远程主机上,或者将远程主机上的某个压缩包解压缩到指定路径下
[root@localhost ~]$ ansible pms -m unarchive -a 'src=/srv/tomcat8/apache-tomcat-8.0.29.tar.gz dest=/usr/local copy=no mode=0755'

常用选项:
	creates:一个文件名,当它已经存在时,这个步骤将不会被运行。
	copy:默认为yes,拷贝的文件从ansible主机复制到远程主机,no在远程主机上寻找src源文件解压
	src:tar源路径,可以是ansible主机上的路径,也可以是远程主机上的路径,如果是远程主机上的路径,则需设置copy=no
	dest:远程主机上的目标绝对路径
	mode:设置解压缩后的文件权限
	exec:列出需要排除的目录和文件
	remote_src:设置remote_src=yes为解包目标上已经存在的档案。对于Windows目标,改用win_unzip模块。
	owner:解压后文件或目录的属主
	group:解压后的目录或文件的属组


#解压ansible管理机上的压缩文件到远程主机并设置权限
[root@localhost ~]$ ansible all -m unarchive -a "src=/tmp/install/zabbix-3.0.4.tar.gz dest=/tmp/ mode=755 copy=yes"

#在远程主机上解压文件并设置权限
[root@localhost ~]$ ansible all -m unarchive -a 'src=/srv/tomcat8/apache-tomcat-8.0.29.tar.gz dest=/usr/local copy=no mode=755'
计划任务
6.11计划任务cron 模块
该模块适用于管理cron计划任务的。其使用的语法跟我们的crontab文件中的语法一致
[root@localhost ~]$ ansible web -m cron -a 'name="ntp update every 5 min" minute=*/5 job="/sbin/ntpdate 172.17.0.1 &> /dev/null"'

常用选项:
	name:     #定时任务描述
	job:      #指明运行的命令是什么,可以写shell命令
	cron_file:      # 自定义cron_file的文件名,使用相对路径则在/etc/cron.d中。
	user:           # 以哪个用户的身份执行

	minute:         # 分(0-59, *, */N),不写时,默认为*
	hour:          # 时(0-23, *, */N),不写时,默认为*
	day:           # 日(1-31, *, */N),不写时,默认为*
	month:          # 月(1-12, *, */N),不写时,默认为*
	weekday:        # 周(0-6 for Sunday-Saturday, *),不写时,默认为*

	special_time #特殊的时间范围,参数: reboot(重启时),annually(每年),monthly(每月),weekly(每周),daily(每天),hourly(每小时)
	state #指定状态
		present表示添加定时任务,也是默认设置
		absent表示删除定时任务


#创建计划任务:每周1,3,5,每分钟打印warning,任务名称:test
[root@localhost ~]$ ansible all -m cron -a 'minute=* weekday=1,3,5 job="/usr/bin/wall  warning" name=test'

#注释禁用cronname=test的计划任务:也可以用yes/no
[root@localhost ~]$ ansible all -m cron -a 'disabled=true job="/usr/bin/wall  warning" name=test'

#给cronname=test的计划任务去掉注释:也可以用yes/no
[root@localhost ~]$ ansible all -m cron -a 'disabled=false job="/usr/bin/wall  warning" name=test'

#删除计划任务:
[root@localhost ~]$ ansible all -m cron -a 'job="/usr/bin/wall warning" name=test state=absent'

#查看计划任务:
[root@localhost ~]$ ansible all -m shell -a 'crontab -l'

#增加定时任务
[root@localhost ~]$ vim add_cron.yaml
---
- hosts: sktest
  remote_user: root
  gather_facts: False
  tasks:
   - name: copy file
     copy: src=/etc/ansible/test.sh dest=/home/ mode=755
   - name: add cron #每2小时执行一次
     cron: name='test' hour=*/2 job='bash /home/test.sh'
   - name: zhushi cron #取消注释 disabled=false
     cron: name='test' hour=*/2 job='bash /home/test.sh' disabled=true
安装包管理相关性
6.12 yum 模块
用于rpm软件包管理,如安装、升级、卸载
常用选项:
name:包名
state:状态。present表示安装,如果已安装则忽略;latest表示安装或升级到最新版本;absent表示卸载。
[root@control ansible]# ansible test -m yum -a "name=tar state=present"
# 在test组中的主机上安装tar

[root@control ansible]# ansible test -m yum -a "name=wget,net-tools"
# 在test组中的主机上安装wget、net-tools

[root@control ansible]# ansible test -m yum -a "name=wget state=absent"
# 在test组中的主机上卸载wget
6.13 yum_repository模块
用于远程配置yum
常用选项:
file: 指定文件名
其他选项,请与文件内容对照
####centos

# 在test组中的主机上,配置yum
[root@control ansible]# ansible test -m yum_repository -a "file=myrepo name=myApp description='My App' baseurl=ftp://192.168.88.240/rhel8/AppStream gpgcheck=no enabled=yes"

[root@node1 ~]# cat /etc/yum.repos.d/myrepo.repo
[myApp]
name = My App
baseurl = ftp://192.168.88.240/rhel8/AppStream
gpgcheck = 0
enabled = 1


####红帽
[root@control ansible]# ansible test -m yum_repository -a "file=myrepo name=BaseOS description='Base OS' baseurl=ftp://192.168.88.240/rhel8/BaseOS gpgcheck=no enabled=yes"

[root@node1 ~]# cat /etc/yum.repos.d/myrepo.repo
[myApp]
baseurl = ftp://192.168.88.240/rhel8/AppStream
enabled = 1
gpgcheck = 0
name = My App

[BaseOS]
baseurl = ftp://192.168.88.240/rhel8/BaseOS
enabled = 1
gpgcheck = 0
name = Base OS
创建阿里云epel源
[root@localhost ~]$ ansible all -m yum_repository -a 'name=aliepel baseurl=https://mirrors.aliyun.com/epel/7/x86_64/ enabled=yes gpgcheck=yes gpgcakey=https://mirrors.aliyun.com/epel/RPM-GPG-KEY-EPEL-7 state=present file=AlicloudEpel'
6.14 apt 模块
Apt是Ubuntu/Debian的包管理工具,如安装、升级、卸载
[root@localhost ~]$ ansible web-nodes -m apt -a 'name=foo update_cache=yes'

常用选项:
	deb:                #用于安装远程机器上的.deb后缀的软件包(optional)
	install_recommends:    #这个参数可以控制远程电脑上是否只是下载软件包,还是下载后安装,默认参数为true,设置为false的时候只下载软件包,不安装
	update_cache: #当这个参数为yes的时候等于apt-get update(optional)
	name:          #apt要下载的软件包名字,支持name=git=1.6 这种制定版本的模式
	state:         #状态(present,absent,latest),表示是安装还是卸载. 其中present、installed、latest 表示安装, absent 、removed表示卸载删除; present默认状态, laster表示安装最新版本.


#在安装foo软件包前更新然后安装foo
[root@localhost ~]$ ansible web-nodes -m apt -a 'name=foo update_cache=yes'

#移除foo软件包
[root@localhost ~]$ ansible web-nodes -m apt -a 'name=foo state=absent'

#安装foo软件包
[root@localhost ~]$ ansible web-nodes -m apt -a 'name=foo state=present'

#安装foo 1.0软件包
[root@localhost ~]$ ansible web-nodes -m apt -a 'name=foo=1.00 state=present'

#安装nginx最新的名字为squeeze-backport发布包,并且安装前执行更新
[root@localhost ~]$ ansible web-nodes -m apt -a 'name=nginx state=latest default_release=squeeze-backports update_cache=yes'

#只下载openjdk-6-jdk最新的软件包,不安装
[root@localhost ~]$ ansible web-nodes -m apt -a 'name=openjdk-6-jdk state=latest install_recommends=no'

#安装所有软件包到最新版本
[root@localhost ~]$ ansible web-nodes -m apt -a 'upgrade=dist'

#更新apt-get的list
[root@localhost ~]$ ansible web-nodes -m apt -a 'update_cache=yes'

#3600秒后停止update_cache
[root@localhost ~]$ ansible web-nodes -m apt -a 'update_cache=yes cache_valid_time=3600'

#安装远程节点上的/tmp/mypackage.deb软件包
[root@localhost ~]$ ansible web-nodes -m apt -a 'deb=/tmp/mypackage.deb'
服务相关性
6.15 service 模块
用于控制服务。启动、关闭、重启、开机自启。
常用选项:
name:控制的服务名
state:started表示启动;stopped表示关闭;restarted表示重启
enabled:yes表示设置开机自启;no表示设置开机不要自启。
[root@control ansible]# ansible test -m yum -a "name=httpd state=latest"
# 在test主机上安装httpd

[root@control ansible]# ansible test -m service -a "name=httpd state=started enabled=yes"
#在test主机上启动httpd,并设置它开机自启
用户和权限相关性
6.16 user 模块
实现linux用户管理
常用选项:
name:待创建的用户名
uid:用户ID
group:设置主组
groups:设置附加组
home:设置家目录
password:设置用户密码
state:状态。present表示创建,它是默认选项。absent表示删除
remove:删除家目录、邮箱等。值为yes或true都可以。
# 在test组中的主机上,创建tom用户
[root@control ansible]# ansible test -m user -a "name=tom"

# 在test组中的主机上,创建jerry用户。设置其uid为1010,主组是adm,附加组是daemon和root,家目录是/home/jerry
[root@control ansible]# ansible test -m user -a "name=jerry uid=1010 group=adm groups=daemon,root home=/home/jerry"

# 设置tom的密码是123456
# {{}}是固定格式,表示执行命令。password_hash是函数,sha512是加密算法,则password_hash函数将会把123通过sha512加密变成tom的密码
[root@control ansible]# ansible test -m user -a "name=tom password={{ '123' | password_hash('sha512') }}   "

# 删除tom用户,不删除家目录
[root@control ansible]# ansible test -m user -a "name=tom state=absent"

# 删除jerry用户,同时删除家目录
[root@control ansible]# ansible test -m user -a "name=jerry state=absent remove=yes"
6.17 group 模块
组管理:创建、删除
常用选项:
name:待创建的组名
gid:组的ID号
state:present表示创建,它是默认选项。absent表示删除
# 在test组中的主机上创建名为devops的组
[root@control ansible]# ansible test -m group -a "name=devops"

# 在test组中的主机上删除名为devops的组
[root@control ansible]# ansible test -m group -a "name=devops state=absent"
硬盘存储挂载相关
分区--格式化--挂载
6.18 lvg卷组
[root@node1 ~]# lsblk    # vdb被分出来了两个分区
NAME   MAJ:MIN RM  SIZE RO TYPE MOUNTPOINT
sr0     11:0    1 1024M  0 rom
vda    253:0    0   30G  0 disk
-vda1 253:1    0   20G  0 part /
vdb    253:16   0   20G  0 disk
-vdb1 253:17   0    5G  0 part
-vdb2 253:18   0   15G  0 part
vdc    253:32   0   20G  0 disk

[root@control ansible]# ansible test -m lvg -a "vg=myvg pvs=/dev/vdb1"
# 在test组中的主机上创建名为myvg的卷组,该卷组由/dev/vdb1组成

[root@node1 ~]# vgs     # 在node1上查看卷组
  VG   #PV #LV #SN Attr   VSize  VFree
  myvg   1   0   0 wz--n- <5.00g <5.00g

[root@control ansible]# ansible test -m lvg -a "vg=myvg pvs=/dev/vdb1,/dev/vdb2"
# 扩容卷组。卷组由PV构成,只要向卷组中加入新的PV,即可实现扩容

[root@node1 ~]# vgs  # 在node1上查看卷组
  VG   #PV #LV #SN Attr   VSize  VFree
  myvg   2   0   0 wz--n- 19.99g 19.99g
6.19 lvol 模块
创建、删除逻辑卷,修改逻辑卷大小
常用选项:
vg:指定在哪个卷组上创建逻辑卷
lv:创建的逻辑卷名。lv:logical volume
size:逻辑卷的大小,不写单位,以M为单位
state=absent force=yes 删除逻辑卷
[root@control ansible]# ansible test -m lvol -a "vg=myvg lv=mylv size=2G"
# 在test组中的主机上创建名为mylv的逻辑卷,大小为2GB

[root@node1 ~]# lvs  # 在node1上查看逻辑卷
 LV   VG   Attr       LSize Pool Origin Data%  Meta%  Move Log Cpy%Sync Convert
 mylv myvg -wi-a----- 2.00g

[root@control ansible]# ansible test -m lvol -a "vg=myvg lv=mylv size=4G"
# mylv扩容至4GB

[root@node1 ~]# lvs  # 在node1上查看逻辑卷
  LV   VG   Attr       LSize Pool Origin Data%  Meta%  Move Log Cpy%Sync Convert
  mylv myvg -wi-a----- 4.00g
6.20 filesystem 模块
用于格式化,即创建文件系统
常用选项:
fstype:指定文件系统类型
dev:指定要格式化的设备,可以是分区,可以是逻辑卷
[root@control ansible]# ansible test -m filesystem -a "fstype=xfs dev=/dev/myvg/mylv"
#  在test组中的主机上,把/dev/myvg/mylv格式化为xfs

[root@node1 ~]# blkid /dev/myvg/mylv   # 在node1上查看格式化结果
/dev/myvg/mylv: UUID="46c0af72-e517-4b15-9e53-ec72fbe1d96e" TYPE="xfs"
6.21 mount 模块
用于挂载文件系统
常用选项:
path:挂载点。如果挂载点不存在,自动创建。
src:待挂载的设备
fstype:文件系统类型
state:mounted,表示永久挂载 absent 卸载
# 在test组中的主机上,把/dev/myvg/mylv永久挂载到/data
[root@control ansible]# ansible test -m mount -a "path=/data src=/dev/myvg/mylv state=mounted fstype=xfs"


[root@node1 ~]# tail -1 /etc/fstab     # 在node1上查看
/dev/myvg/mylv /data xfs defaults 0 0
[root@node1 ~]# df -h /data/
Filesystem             Size  Used Avail Use% Mounted on
/dev/mapper/myvg-mylv  4.0G   61M  4.0G   2% /data


[root@control ansible]# ansible test -m mount -a "path=/data state=absent"
# 在test组中的主机上,卸载/dev/myvg/mylv

[root@control ansible]# ansible test -m lvol -a "lv=mylv state=absent vg=myvg force=yes"    # force是强制
# 在test组中的主机上,强制删除/dev/myvg/mylv

[root@control ansible]# ansible test -m lvg -a "vg=myvg state=absent"
#在test组中的主机上,删除myvg卷组
6.22 setup 模块
此模块是ansible的facts变量
facts翻译过来就是事实。
facts变量是ansible自带的预定义变量,用于描述远程主机的系统和软硬件信息。
facts变量通过setup模块获得。
# 通过setup模块查看所有facts变量
[root@control ansible]# ansible test -m setup


# 查看所有的IPV4地址,filter是过滤的意思
[root@control ansible]# ansible test -m setup -a "filter=ansible_all_ipv4_addresses"


# 查看可用内存
[root@control ansible]# ansible test -m setup -a "filter=ansible_memfree_mb"
常用的facts变量
ansible_all_ipv4_addresses:所有的IPV4地址
ansible_bios_version:BIOS版本信息
ansible_memtotal_mb:总内存大小
ansible_hostname:主机名
(ansible还有很多模块,这里只讲解了一部分)


 7万+
7万+

 被折叠的 条评论
为什么被折叠?
被折叠的 条评论
为什么被折叠?
 到【灌水乐园】发言


