


本文章将持续更新在jQuery学习中遇到的知识点、问题及相关事件,帮助在复习时快速建起全局认知。
一、基础认知
1、简介
(1)jQuery 是一个 JavaScript 函数库。
(2)jQuery 是一个轻量级的"写的少,做的多"的 JavaScript 库。
(3) jQuery 库包含以下功能:
- html 的元素选取
- html的元素操作
- html dom遍历和修改
- js特效和动画效果
- css操作
- html事件操作
- ajax异步请求方式
*提示: 除此之外,jQuery 还提供了大量的插件。
2、理念
写的少做的多
3、步骤
(1)引入jQuery
<script src="../jquery-3.4.1.js"></script>
(2)在入口函数内写demo
<!DOCTYPE html>
<html lang="en">

<head>
    <meta charset="UTF-8">
    <meta http-equiv="X-UA-Compatible" content="IE=edge">
    <meta name="viewport" content="width=device-width, initial-scale=1.0">
    <title>Document</title>
    <script src="../jquery-3.4.1.js"></script>
</head>

<body>
    <button id="hide">隐藏</button>

    <script>
        // jQuery:
        //  $是一个全局对象,代表了jQuery, 意味着$ = jQuery
        // 入口函数全写:
        // $(document).ready(function(){
        //     jQuery代码
        // })

        $(function () {//jQuery的入口函数(简写)
            $('#hide').bind('click', function () {
                alert('你单击按钮')
            })
        })

        // // 底层方式
        // var btn=document.querySelector('#hide')
        // btn.addEventListener('click',function(){
        //     alert('你单击按钮')
        // })
    </script>
</body>

</html>
4、基本选择器
(1)ID选择器:#id属性值
(2)类选择器:.属性值
(3)标签选择器:标签名
5、基本过滤选择器
(1):first:选择第一个
(2):last:选择最后一个
(3):not(selector):不是某一个属性的元素
(4):even:索引为偶数
(5):odd:索引为基数
(6):eq(index):索引等于index的元素
(7):qt(index):索引大于index的元素
(8):lt(index):索引小于index的元素
<!DOCTYPE html>
<html lang="en">

<head>
    <meta charset="UTF-8">
    <meta http-equiv="X-UA-Compatible" content="IE=edge">
    <meta name="viewport" content="width=device-width, initial-scale=1.0">
    <title>Document</title>
    <script src="../jquery-3.4.1.js"></script>
</head>

<body>
    <button id="hide">隐藏</button>
    <br><br>
    <p id="p1">jQuery学习</p>
    <br><br>
    <p class="pt">html学习</p>
    <p class="pt">Css学习</p>
    <br><br>
    <div>红楼梦</div>
    <div>三国演义</div>
    <div>水浒传</div>
    <div>西游记</div>

    <script>
        // jQuery:
        //  $是一个全局对象,代表了jQuery, 意味着$ = jQuery
        // 入口函数全写:
        // $(document).ready(function(){
        //     jQuery代码
        // })

        $(function () {//jQuery的入口函数(简写)
            $('#hide').bind('click', function () {
                alert('你单击按钮')
            })

            // 修改元素为P1的元素的颜色
            $('#p1').css('backgroundColor','red')

            // 修改class为pt的文本颜色
            $('.pt').css('color','blue')

            // 将所有p标签的文本大小设置为25px
            $('p').css('fontSize','25px')

            // 将第一个p标签的背景色改为深绿色
            $('p:first').css('backgroundColor','lightpink')

            // 将最后一个p标签的背景颜色改为浅绿色
            $('p:last').css('backgroundColor','lightgreen')

            // 将class属性不是pt的元素的字号变小
            $('p:not(.pt)').css('fontSize','18px')

            // 索引为偶数的元素
            $('div:even').css('color','red')

            // 索引为奇数的元素
            $('div:odd').css('color','pink')

            // 索引为2的div的字号像素为20px
            $('div:eq(2)').css('fontSize','20px')
        })

        // // 底层方式
        // var btn=document.querySelector('#hide')
        // btn.addEventListener('click',function(){
        //     alert('你单击按钮')
        // })
    </script>
</body>

</html>
6、属性选择器
(1)[attribute]:拥有给定属性的元素
(2)[attribute=value]:选取指定属性的值为value的元素
(3)[attribute!=value]:选取属性值不等于value的元素
(4)[attribute^=value]:选择属性值为value开始的元素
(5)[attribute$=value]:选择属性值为value结尾的元素
(6)[attribute*=value]:选择属性值中含有value的元素
<!DOCTYPE html>
<html lang="en">
<head>
<meta charset="UTF-8">
<meta http-equiv="X-UA-Compatible" content="IE=edge">
<meta name="viewport" content="width=device-width, initial-scale=1.0">
<title>Document</title>
<script type="text/javascript" src="../jquery-3.4.1.js"></script>
</head>
<body>
用户名:<input type="text" name="userName">
<br><br>
密 码:<input type="password" name="" id="">
<br><br>
年 龄:<input type="number" name="agenumber" id="" max="120" min="0">
<br><br>
地 址:<input type="text" name="address" id="">
<br><br>
电话号码:<input type="tel" name="userPhone" id="">
<br><br>
QQ号码:<input type="text" name="qqnumber" id="">
<script>
$(function(){
// 将具有max的属性的文本设为红色
$('input[max]').css('color','red')
// 将name属性值为username的input的文本设置为蓝色
$('input[name=userName]').css('color','blue')
// 将除了用户名栏设置成粉色
$('input[name!=userName]').css('color','pink')
// 将name值为user开头的元素字号变为25
$('input[name^=user]').css('fontSize','25px')
// 将以phone结尾的元素字号变为38px
$('input[name$=number]').css('fontSize','38px')
// 将type属性值中含有word的文本颜色设置为yellow
$('input[type*=word]').css('color','yellow')
})
</script>
</body>
</html>
二、jQuery中操作元素的属性
1、读取属性值
语法:attr(属性名)
let t=$('#p1').attr('name')
2、修改属性的值
(1)修改单个属性值
语法:attr('key','value')
$('img').attr('src','../img/002.JPG')
(2)设置多个属性值
语法:attr({属性名:属性值,属性名:属性值})
*键值对不要带双引号,容易被误解为常量
$('img').attr({'src':'../img/002.JPG','width':'100px','height':'100px'})
(3)函数设置值
语法:attr(key,fn)
在函数中设置属性的值,key需要用括号括起来。
$('img').attr('src',function(){
                    return '../img/002.JPG'
                })
(4)删除属性
语法:removeAttr(属性名)
$('img').removeAttr('src','../img/002.JPG')
3、实操(一)
<!DOCTYPE html>
<html lang="en">
<head>
    <meta charset="UTF-8">
    <meta http-equiv="X-UA-Compatible" content="IE=edge">
    <meta name="viewport" content="width=device-width, initial-scale=1.0">
    <title>Document</title>
    <script src="../jquery-3.4.1.js"></script>
</head>
<body>
    <p id="p1" name="pt">大唐芙蓉园</p>
    <button id="btn">显示图片</button>
    <button id="del">删除图片</button>

    <br><br>
    <img src="" alt="" srcset="">

    <script>
        $(function(){
            //获取id为p1的元素为name的属性值
            let t=$('#p1').attr('name')
            console.log(t)

            // 显示图片
            $('#btn').bind('click',function(){
                //$('img').attr({'src':'../img/002.JPG','width':'100px','height':'100px'})
                $('img').attr('src',function(){
                    return '../img/002.JPG'
                })
            })
            // 删除图片
            $('#del').bind('click',function(){
                $('img').removeAttr('src','../img/002.JPG')
            })
        })
    </script>
</body>
</html>
- 初始页面

- 显示图片

- 删除图片

三、jQUery操作元素的样式
1、通过class属性修改
(1)给元素添加指定的类名(class属性值)
语法:addClass(类名)
$('#sp').addClass('ok')//给span增加了一个class属性,值为OK
(2)删除元素的class属性
语法:removeClass(类名)
$('#sp').removeClass('ok')//避免持续写入导致类名错误
2、通过CSS样式修改
(1)获取CSS样式属性值
语法:css('属性名')
let k=$('p').css('color')//获取p标签的color值
(2)设置单个CSS样式
语法:css(key,value)
参数key是属性名,参数value是属性值,每个都要单独带括号
$('#p2').css('color','blue')
(3)设置多个CSS样式
语法:css({key:value,key:value,key:value})
$('#p2').css({'color':'blue','fontSize':'20px'})
(4)实操(二)
<!DOCTYPE html>
<html lang="en">
<head>
    <meta charset="UTF-8">
    <meta http-equiv="X-UA-Compatible" content="IE=edge">
    <meta name="viewport" content="width=device-width, initial-scale=1.0">
    <title>Document</title>
    <script src="../jquery-3.4.1.js"></script>
</head>
<body>
    <p style="color: red;" id="p1">前端学习</p>
    <p id="p2">设置样式</p>
    <script>
        $(function(){
            // let k=$('p').css('color')//获取p标签的color值
            // console.log(k)

            // 设置样式属性
            $('#p2').css({'color':'blue','fontSize':'20px'})

            //
            let g=$('#p1').html()//获取p标签的color值
            console.log(g)
        })
    </script>
</body>
</html>
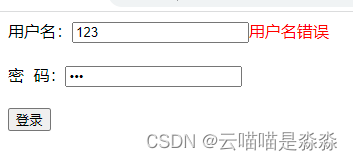
- 错误密码:
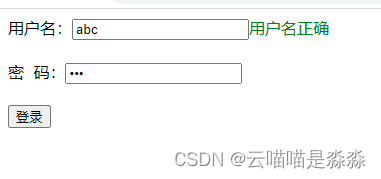
- 正确密码:
3、获取宽度和高度
(1)获取宽度
语法:width()
(2)设置宽度
语法:width(value)
(3)获取高度
语法:height()
(4)设置高度
语法:height(value)
4、操作标签的HTML代码
也就是通过html修改一个元素的内容
(1)获取值
语法:html()
let g=$('#p1').html()//获取p标签的color值
console.log(g)
(2)设置值
语法:html(value)
$('#sp').html('用户名错误')
5、操作input标签的值
(1)获取值
语法:属性.val()
$('input[type=text').val()
(2)设置值
语法:属性名.val(属性值)
$('input[type=text').val('更改文本')
(3)实操(三)
<!DOCTYPE html>
<html lang="en">
<head>
    <meta charset="UTF-8">
    <meta http-equiv="X-UA-Compatible" content="IE=edge">
    <meta name="viewport" content="width=device-width, initial-scale=1.0">
    <title>Document</title>
    <script src="../jquery-3.4.1.js"></script>
</head>
<body>
    用户名:<input type="text" name="" id="" value="12345">
    <input type="button" value="确定">

    <script>
        $(function(){
            $('input[type=button]').bind('click',function(){
                // alert($('input[type=text').val())
                $('input[type=text').val('更改文本')
            })
        })
    </script>
</body>
</html>
- 点击按钮之前:

- 点击按钮之后:

四、jQuery事件处理
与JavaScript基本一致,但增加了一些增强和扩展,使得代码更加简洁强壮。
1、页面载入事件
(1)在JavaScript中
语法:window.onload()
(2)在jQuery中
语法:
完整写法:
$(document).ready(function(){demo})
简写:
$(function(){ demo})
2、给元素绑定事件
(1)直接绑定事件
语法:bind(type,[data],fn)
type:表示事件类型,必须有
data:可选参数,传递给事件对象的额外数据,一般不用
fn:是一个回调函数
$('div').bind('mouseout',function(){
                $(this).css('backgroundColor','red')
            })
(2)事件名绑定
语法:元素对象.事件名(function(){ demo })
常用事件:
$('div').mouseout(function(){
                $(this).css('backgroundColor','red')
            })
3、反绑定
意义:取消绑定的事件
语法:unbind([type],[data])
type:事件类型,可选的
data:可选参数,传递给事件对象的额外数据
(1)取消所有绑定的事件
语法:unbind()
$('div').unbind()
(2)取消指定的事件
语法:unbind(type)
$('div').unbind('mouseout')
4、实操(四)
<!DOCTYPE html>
<html lang="en">
<head>
<meta charset="UTF-8">
<meta http-equiv="X-UA-Compatible" content="IE=edge">
<meta name="viewport" content="width=device-width, initial-scale=1.0">
<title>Document</title>
<script src="../jquery-3.4.1.js"></script>
</head>
<body>
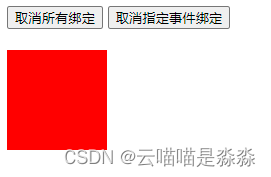
<button id="all">取消所有绑定</button>
<button id="one">取消指定事件绑定</button>
<br><br>
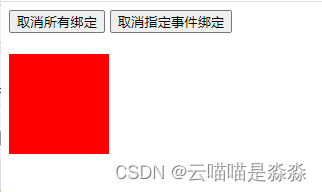
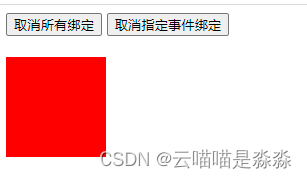
<div style="background-color: red;width:100px;height:100px;"></div>
<script>
$(function(){
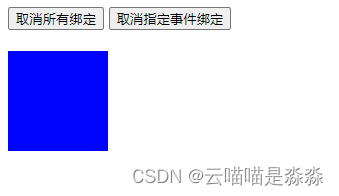
$('div').bind('mouseover',function(){
$(this).css('backgroundColor','blue')
})
$('div').bind('mouseout',function(){
$(this).css('backgroundColor','red')
})
// 取消绑定在div上的所有事件
$('#all').bind('click',function(){
$('div').unbind()
})
// 取消绑定在div上的一个事件
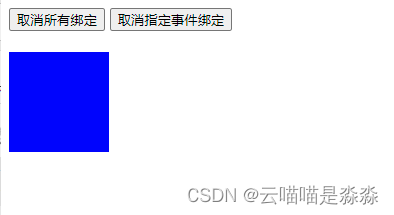
$('#one').bind('click',function(){
$('div').unbind('mouseout')
})
})
</script>
</body>
</html>
- 初始界面:
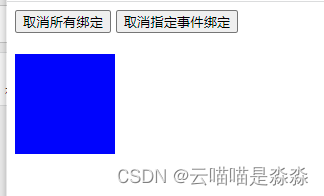
- 单击“取消所有绑定”:
- 单击“取消指定事件绑定”:

5、一次性绑定
意义:绑定的时间只能执行一次
语法:one(type,[data],fn)
 $('button').one('click',function(){
                alert('一次性绑定')
            }
6、模拟鼠标悬停
语法:hover(over,out)
over:是一个函数,当鼠标进入时执行
out:是一个函数,鼠标离开时执行
- 写法一:
$('img').hover(function(){
                $(this).attr('src','../img/1.png')
            },function(){})
$('img').hover(function(){},function(){
                $(this).attr('src','../img/002.JPG')
            })
- 写法二:
function over(){
                $('img').attr('src','../img/1.png')
            }
            function out(){
                $('img').attr('src','../img/002.JPG')
            }
            $('img').hover(over,out)
7、实操(五)
<!DOCTYPE html>
<html lang="en">
<head>
<meta charset="UTF-8">
<meta http-equiv="X-UA-Compatible" content="IE=edge">
<meta name="viewport" content="width=device-width, initial-scale=1.0">
<title>Document</title>
<script src="../jquery-3.4.1.js"></script>
</head>
<body>
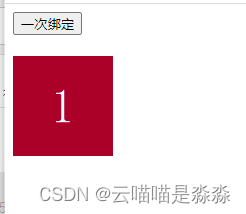
<button>一次绑定</button>
<br><br>
<img src="../img/002.jpg" alt="" style="width: 100px;height:100px;">
<script>
$(function(){
$('button').one('click',function(){
alert('一次性绑定')
})
// $('img').hover(function(){
// $(this).attr('src','../img/1.png')
// },function(){})
// $('img').hover(function(){},function(){
// $(this).attr('src','../img/002.JPG')
// })
// 写法二:
function over(){
$('img').attr('src','../img/1.png')
}
function out(){
$('img').attr('src','../img/002.JPG')
}
$('img').hover(over,out)
})
</script>
</body>
</html>
- 初始页面

- 一次性绑定


- 鼠标悬停

五、jQuery的动画
1、元素的隐藏和显示
(1)隐藏
语法:hide(speed,[callback])
speed:一个参数,隐藏对象所用时间
callback:可选参数,当对象隐藏后执行该参数
$('img').hide(2000)
(2)显示
语法:show(speed,[callback])
speed:一个参数,显示对象所用时间
callback:可选参数,当对象显示后执行该参数
$('img').show(4000)
(3)交替
语法:toggle(speed,[callback])
意义:如果隐藏就显示,如果显示就隐藏
speed:表示速度,可以是数字也可以是表示数字的字符串(‘slow’,‘normal’,‘fast’)
callback:可选参数,当事件执行后执行该参数
$('#toggle').bind('click',function(){
                $('img').toggle('normal')
            }
(4)实操(六)
<!DOCTYPE html>
<html lang="en">
<head>
<meta charset="UTF-8">
<meta http-equiv="X-UA-Compatible" content="IE=edge">
<meta name="viewport" content="width=device-width, initial-scale=1.0">
<title>Document</title>
<script src="../jquery-3.4.1.js"></script>
</head>
<body>
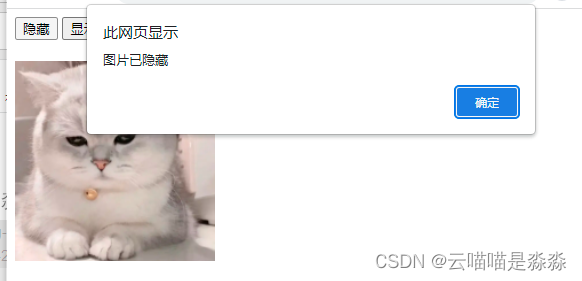
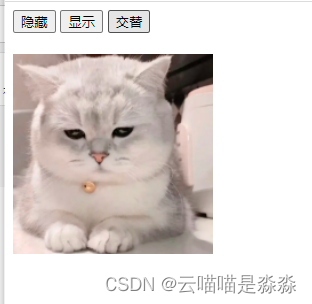
<button id="hide">隐藏</button>
<button id="show">显示</button>
<button id='toggle'>交替</button>
<br><br>
<img src="../img/002.JPG" alt="" style="width: 200px;height:200px">
<script>
$(function(){
// 隐藏
$('#hide').click(function(){
$('img').hide(2000)//参数是时间,单位是毫秒,默认是600
alert('图片已隐藏')
})
// 显示
$('#show').click(function(){
$('img').show(4000)
alert('图片已显现')
})
// 交替
$('#toggle').bind('click',function(){
$('img').toggle('normal')
})
})
</script>
</body>
</html>
- 初始页面:

- 隐藏
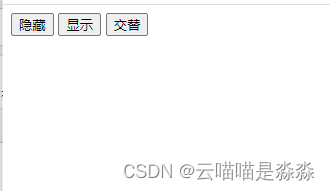
-
显示
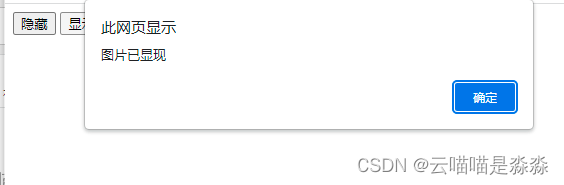

-
交替

2、收缩与展开
(1)收缩
语法:slideUp(speed,[callback])
$('img').slideUp(2000)
(2)展开
语法:slideDown(speed,[callback])
$('img').slideDown()
(3)交替
语法:slideToggle(speed,[callback])
$('img').slideToggle('fast')
3、淡入淡出
本质上通过改变对象的透明度来实现动画。
此处建议点击链接复习《用CSS3实现滤镜——常见九种效果》
(1)淡入
语法:fadeIn(speed,[callback])
$('img').fadeIn(2000)
(2)淡出
语法:fadeOut(speed,[callback])
$('img').fadeOut()
(3)透明度固定
意义:表示对象的透明度,范围在【0~1】,可以指定对象不透明程度的函数
语法:fadeTo(speed,opacity,[callback])
$('img').fadeTo('slow',0.5)
(4)透明度的交替
语法:fadeToggle(speed,[callback])
$('img').fadeToggle(4000)
(5)实操(七)
<!DOCTYPE html>
<html lang="en">
<head>
<meta charset="UTF-8">
<meta http-equiv="X-UA-Compatible" content="IE=edge">
<meta name="viewport" content="width=device-width, initial-scale=1.0">
<title>Document</title>
<script src="../jquery-3.4.1.js"></script>
</head>
<body>
<button id="up">收缩</button>
<button id="down">展开</button>
<button id="toggle_1">交替</button>
<br><br>
<button id="out">淡出</button>
<button id="in">淡入</button>
<button id="to">指定透明度</button>
<button id="toggle_2">交替</button>
<br><br>
<img src="../img/6.png" alt="" style="width: 200px;height:150px;">
<script>
$(function(){
$('#up').bind('click',function(){
$('img').slideUp(2000)
})
$('#down').bind('click',function(){
$('img').slideDown()
})
$('#toggle_1').bind('click',function(){
$('img').slideToggle('fast')
})
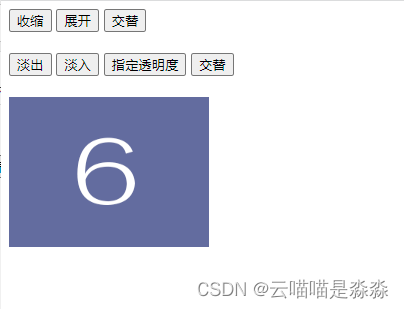
$('#in').bind('click',function(){
$('img').fadeIn(2000)
})
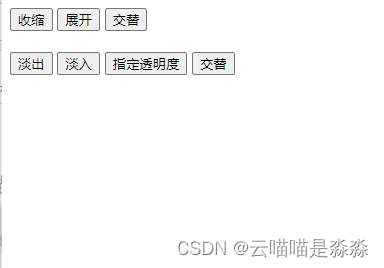
$('#out').bind('click',function(){
$('img').fadeOut()
})
$('#to').bind('click',function(){
$('img').fadeTo('slow',0.5)
})
$('#toggle_2').bind('click',function(){
$('img').fadeToggle(4000)
})
})
</script>
</body>
</html>
- 初始页面
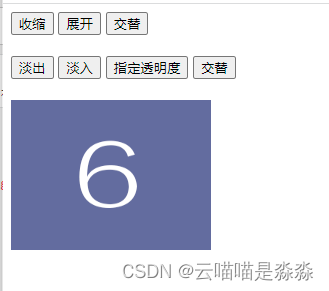
- 收缩
- 展开
- 收缩展开交替
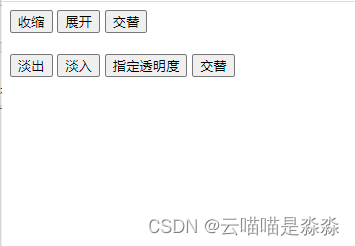
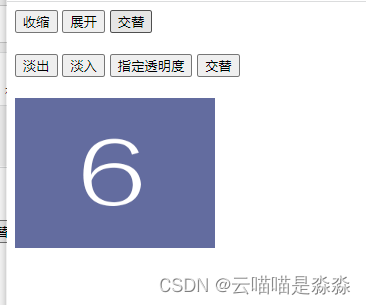
- 淡出
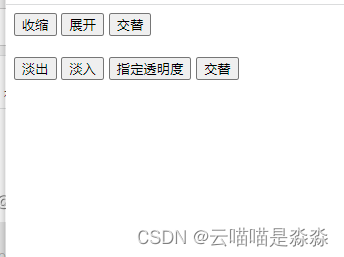
- 淡入

-
透明度固定
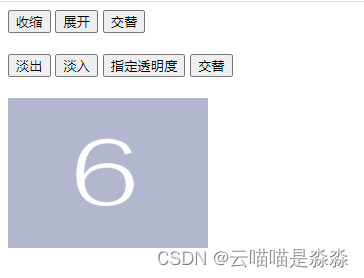
-
淡入淡出交替
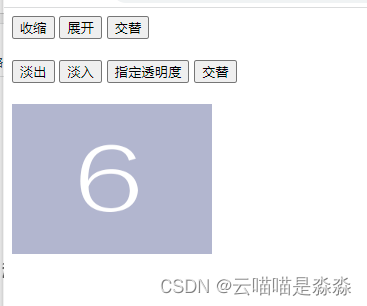
这里可以轻松看出,在代码运行过程中,已运行的程序不会被撤销,如果之前已经指定了透明度,那之后的显示中透明度就会直接被固定,包括之后点击“淡入”也将是一样的结果。


 412
412


 被折叠的 条评论
为什么被折叠?
被折叠的 条评论
为什么被折叠?
 到【灌水乐园】发言


