


如何使用Jupyter Notebook
在数据分析过程中,你会发现当处理一些大型数据时,处理数据的过程可能需要花费大部分时间,代码中预设的数据查询条件如果不够完整,一次运行结束后变量会销毁,无法再自定义查询或筛选某些特定数据,你可能需要再次运行,这很麻烦~~~
不过,如果你使用jypyter notebook,数据保留在内存中,随时执行新查询无需重新加载数据,可视化结果方便。
Jupyter Notebook 本质上是 IPython 的图形化用户页面,由 IPython 团队研发。而 Jupyterlab 是同一团队在 Jupyter Notebook 上的改进。
Windows环境
安装Jupyter
官方地址:https://docs.jupyter.org/en/latest/install.html
当前环境:
anaconda:24.9.2
python:3.12.7
使用 Anaconda 和 conda 安装 Jupyter:
1、安装Anaconda
下载地址:https://repo.anaconda.com/miniconda/Miniconda3-latest-Windows-x86_64.exe
不想指定安装路径,直接傻瓜式安装即可,注意勾选上 add PATH
2、创建虚拟环境:
conda create --name jpy python=3.12
3、激活虚拟环境
conda activate jpy
4、打开Anaconda Prompt命令行工具:

5、查看当前conda环境源:conda config --show channels
channels:
  - defaults
  - https://repo.anaconda.com/pkgs/main
  - https://repo.anaconda.com/pkgs/r
  - https://repo.anaconda.com/pkgs/msys2
分别执行以下命令:
conda config --add channels https://mirrors.tuna.tsinghua.edu.cn/anaconda/pkgs/free/
conda config --add channels http://mirrors.tuna.tsinghua.edu.cn/anaconda/pkgs/main/
conda config --add channels http://mirrors.tuna.tsinghua.edu.cn/anaconda/cloud/fastai/
conda config --set show_channel_urls yes
查看新添加的源是否添加成功:conda config --show channels
channels:
  - http://mirrors.tuna.tsinghua.edu.cn/anaconda/cloud/fastai/
  - http://mirrors.tuna.tsinghua.edu.cn/anaconda/pkgs/main/
  - https://mirrors.tuna.tsinghua.edu.cn/anaconda/pkgs/free/
  - defaults
  - https://repo.anaconda.com/pkgs/main
  - https://repo.anaconda.com/pkgs/r
  - https://repo.anaconda.com/pkgs/msys2
6、安装jupyter:conda install jupyter
(base) C:\Users\admin>jupyter --version
Selected Jupyter core packages...
IPython          : not installed
ipykernel        : not installed
ipywidgets       : not installed
jupyter_client   : not installed
jupyter_core     : 5.7.2
jupyter_server   : 2.14.1
jupyterlab       : not installed
nbclient         : not installed
nbconvert        : 7.16.4
nbformat         : 5.10.4
notebook         : 7.2.2
qtconsole        : 5.5.1
traitlets        : 5.14.3
7、启动jupyter notebook:jupyter notebook
如果遇到:ModuleNotFoundError: No module named ‘dateutil’
执行:conda install python-dateutil

使用Jyputer Notebook
jupyter根目录,New可以创建ipykernel、终端、文件等,Upload可以进行文件上传。

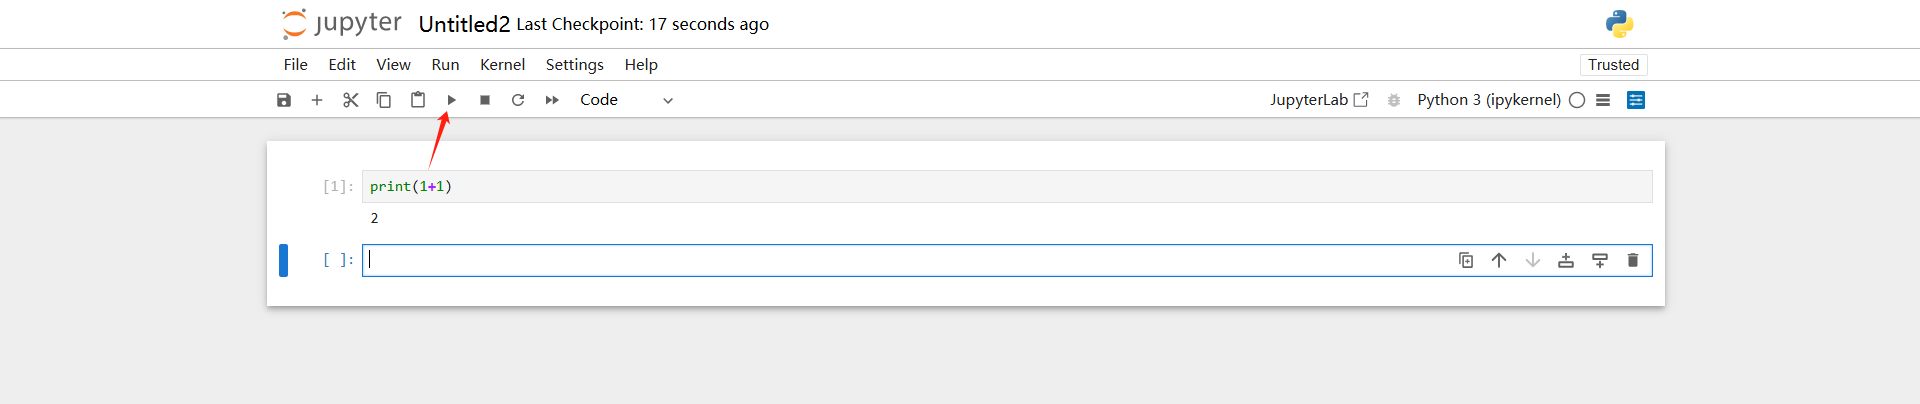
1、新建cell,运行
输入完成之后,点击上方按钮运行,即可得出结果
2、运行py文件
可以上传本地py文件至jupyter环境根目录,也可以创建py文件,编辑好代码进行保存
使用%run魔法命令

Linux环境
安装JupyterLab
使用 venv 创建一个虚拟环境
# 创建虚拟环境
python3 -m venv /home/test/venvs/jupyter_env
# 激活虚拟环境
source home/test/venvs/jupyter_env/bin/activate
# 安装JupyterLab(包含Jupyter)
pip install --upgrade pip
pip install jupyterlab
# 退出虚拟环境
deactivate
jupyterlab汉化(需要重新启动)
# 安装汉化包
pip install jupyterlab-language-pack-zh-CN
# 导出环境变量
export JUPYTERLAB_LANG=zh-CN
启动jupyterlab(注意服务器如开启防火墙则会限制访问)
# 使用任意一个启动
jupyter lab --ip=0.0.0.0 --port=8888 --no-browser --allow-root
jupyter notebook --ip=0.0.0.0 --port=8888 --no-browser

使用JupyterLab
jupyterlab主界面,使用方法同上。


 2665
2665

 被折叠的 条评论
为什么被折叠?
被折叠的 条评论
为什么被折叠?
 到【灌水乐园】发言


