


需求:el-table的多选列,有些单子默认禁止勾选,鼠标悬浮到该业务单需要有提示框;而且有些业务单为联动单,即勾选了其中一个默认也要把另外的联动单勾选上,取消勾选也是同理。实现的效果图如下所示: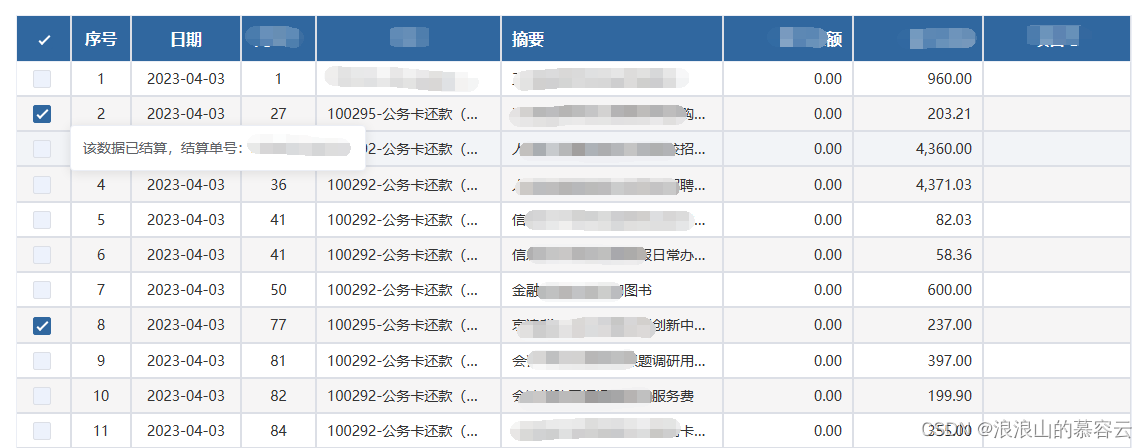
思路:1)多选框出悬浮提示:本来想用el-table自带的show-overflow-tooltip属性,但对于type为selection的多选列无效,然后想投机取巧使用旁边列的show-overflow-tooltip属性,再通过样式定位偏移到多选列上,结果也不行❗最后是单独写了一个弹窗,通过cell-mouse-enter和cell-mouse-leave事件来控制弹窗显隐实现;2)联动勾选使用的是toggleRowSelection,这样页面效果可以实现,但是多选列绑定的勾选数组是有问题的,需要手动push或者splice❗
渲染代码如下:
<div class="wrapper" style="position: relative;">
    <el-table
            ref="multipleTable"
            v-loading="loading"
            :data="tableData_1"
            class="common"
            @select="selectSingle"
            @cell-mouse-enter="cellMoveEnter"
            @cell-mouse-leave="cellMoveLeave"
            border stripe
        >
        <el-table-column
                :selectable="selectable"
                type="selection"
                align="center"
                width="55">
        </el-table-column>
        <el-table-column
                type="index"
                label="序号"
                width="60"
                align="center"
                >
        </el-table-column>
        <el-table-column
                prop="n3"
                label="日期"
                :show-overflow-tooltip="true"
                align="center"
        >
        </el-table-column>
        <el-table-column
                prop="n4"
                align="center"
        >
        </el-table-column>
        <el-table-column
                prop="n1"
                align="center"
                min-width="100"
        >
        </el-table-column>
        <el-table-column
                prop="n5"
                label="摘要"
                align="left"
                min-width="120"
        >
        </el-table-column>
        <el-table-column
                prop="n6"
                align="right"
        >
        </el-table-column>
        <el-table-column
                prop="n7"
                align="right"
        >
        </el-table-column>
    </el-table>
    <div :style="{'position':'absolute', 'top':popTop, 'left':'54px'}">
        <el-popover
                visible-arrow="true"
                placement="bottom"
                trigger="manual"
                width="270"
                v-model="popShow">
            <p>该数据已结算,结算单号:{{hoverRow._prop.BatchId}}</p>
        </el-popover>
    </div>
</div>
逻辑代码如下:
1、悬浮框提示
// 定义数据
data() {
    return {
        loading:true,
        tableData_1: [],            // 表格数据
        popShow:false,              // 悬浮弹窗
        popTop:0,                   // 悬浮高度
        hoverRow:{                  // 当前悬浮业务单
            _prop:{
                BatchId:'',
            }
        },
    }
},
// 禁选悬浮提示 cellMoveEnter (row, column, cell, event) { if (column.type === "selection") { if(row._prop && row._prop.BatchId){ this.popShow = true; // 利用offsetTop算出悬浮框的偏移高度 this.popTop = (event.target.offsetTop + 40) + 'px'; this.hoverRow = row; } else { this.popShow = false; } } else { this.popShow = false; } }, // 悬浮消失 cellMoveLeave(){ this.popShow = false; },
2、联动勾选
// 默认全选
selectAll() {
    this.toggleSelection(this.tableData_1);
},
toggleSelection(rows) {
    if (rows) {
        rows.forEach(row => {
            if(row._prop && row._prop.BatchId){
                // 默认不勾选
                this.$refs.multipleTable.toggleRowSelection(row, false);
            } else {
                this.$refs.multipleTable.toggleRowSelection(row);
            }
        });
    } else {
        this.$refs.multipleTable.clearSelection();
    }
},

// 设置禁选
selectable(row,index){
    if(row._prop && row._prop.BatchId){
        return false;
    } else {
        return true;
    }
},

// 如果同一单号默认选择【联动单】
selectSingle(selection, row){
    let tempSelected = selection;
    // 判断勾选还是取消勾选
    let selected = selection.length && selection.indexOf(row) !== -1;
    this.tableData_1.forEach(table=>{
        if(row.khh == table.khh){
            if(selected){
                this.$refs.multipleTable.toggleRowSelection(table, true);
                // 手动把联动勾选单加入
                if(!selection.includes(table)){
                    tempSelected.push(table);
                }
            } else {
                this.$refs.multipleTable.toggleRowSelection(table, false);
                // 手动删除
                for(let i=0; i<tempSelected.length;i++){
                    if(tempSelected[i] == table){
                        tempSelected.splice(i,1);
                    }
                }
            }
        }
    });
},
至此大功告成😉!


 585
585


 被折叠的 条评论
为什么被折叠?
被折叠的 条评论
为什么被折叠?
 到【灌水乐园】发言


