


-
reactive 对象直接替换丢失响应式
如果想替换,使用object.assignconst obj = reactive ({ a:2 }) obj = {c: 1} ❌ object.assign(obj, {c: 1}) ✅
-
reactive 解构失效
传统解构 会失效,需要使用
toRefsconst obj = reactive ({ a : 1 }) const { a } = obj // ❌ a 不再是响应式,而是一个新的地址保存了一个a的值 const { a } = toRefs(obj) // ✅ 这个a 就是响应式的,且和reactive 里的 a 是同一个内存地址toRef是解构响应式对象的 单个数据const obj = reactive ({ a : 1, b : 2 }) const b = toRef(obj, 'b')toRef从响应式数据解构单个
toRefs从响应式数据解构所有
-
reactive 中的 ref 会自动拆包
const obj = reactive({
	a: 1,
	b: ref(2)
})
obj.a = 1
obj.b.value  ❌ 报错
obj.b = 2  ✅ 不需要 .value ,会自动拆包
-
computed 计算属性修改
默认是只读的
但通过
get和set,可对计算属性的依赖源,间接修改const firstName = ref('John') const lastName = ref('Doe') // 定义可写的计算属性 const fullName = computed({ get() { return `${firstName.value} ${lastName.value}` }, set(newValue) { const [first, last] = newValue.split(' ') firstName.value = first // 对上方源数据修改 lastName.value = last || '' // 对上方源数据修改 } })
-
监视ref 的基本类型 数据。
const a = ref(0) const stopWatch = watch(a, () => {}) // 不需要 a.value stopWatch() // 停止监视 -
监视 ref 的对象类型 数据。
默认 监视的是整个对象的地址,而不是里面的数据const obj = ref({ a: 1, b: 2 }) watch(obj, () => {}) // 修改obj.a = 10, 回调不会执行、 watch(obj, () => {}, {deep: true} ) // 修改obj.a = 10, 回调会执行 -
监视 reactive 对象 ,默认开启深度监听
-
监视 reactive 对象的某个属性
const obj = reactive({ a: 1, b: 2, c: { ca: 'xx', cb: 'xxx' } }) 1. 监视的属性为 基本类型 watch(obj.a, () => {}) // ❌ 报错,vue不支持这个写法 watch(() => obj.a, () => {}) // ✅ vue规定要放在一个函数里返回 2. 监视的属性为 对象类型 watch(obj.c, () => {}) // ✅ 可以,但不推荐 watch(() => obj.c, () => {}) // ✅ vue官方推荐写法 -
监视 多个数据
watch([ ()=obj.a, ()=>obj.b ], () => {} )
理解为watch 的自动化, 不需要手动指定监视源,用到的自动监视, 执行回调
js watchEffect(() =>{ if(obj.a > 10) { fetch() } })
一种 将路由参数(如 params 或 query)解耦,直接作为组件的 props 传递的机制。
这种设计可以让组件不依赖 $route 对象
- 布尔模式
将路由的 params 自动映射为组件的 props(仅适用于 params)。// 路由配置 { path: '/user/:id/:age', component: User, props: true // 自动将 `:id` 映射为组件的props 的 `id` } // 组件 defineProps([id, age]) - 函数模式
动态生成 props,可组合 params、query 或路由上下文// 路由配置 { path: '/search', component: Search, props: (route) => ({ keyword: route.query.q, // 从 query 中获取 q page: parseInt(route.query.page) || 1 // 转换数据类型 }) } // 组件 defineProps([keyword, page])
-
创建
import { defineStore } from 'pinia'; // 选项式写法 export const useUserStore = defineStore('user', { // State 定义 state: () => ({ name: 'John', age: 25, }), }); -
组件中使用
<script setup> import { useUserStore } from '@/stores/user' const userStore = useUserStore() </script> <template> <div> <p>Count: {{ userStore.name }}</p> <p>Double: {{ userStore.age }}</p> </div> </template> -
修改pinia 数据
-
组件中直接修改 State(适合简单场景)
// 获取 Store 实例 const userStore = useUserStore() // 直接修改单个属性 userStore.name = 'Alice' // 直接修改嵌套对象属性 userStore.profile.age = 25 -
通过
Actions间接 修改(推荐,适合复杂逻辑)import { defineStore } from 'pinia'; export const useUserStore = defineStore('user', { // State 定义 state: () => ({ name: 'John', age: 25, isAdmin: false, }), // Actions 定义 actions: { updateName(newName) { // dosomething this.name = newName; // 直接修改 state }, }, // Getters (可选) getters: { isAdult: (state) => state.age >= 18, } }); -
$patch批量修改
通过 $patch 方法一次性修改多个状态,减少渲染次数// 对象形式(直接覆盖) userStore.$patch({ name: 'Charlie', age: 30 }) // 函数形式(依赖当前状态) userStore.$patch((state) => { state.items.push({ id: 100 }) state.hasChanged = true })
-
-
storeToRefs解构 pinia
直接解构会失去响应性:const { name, age } = userStore; // ❌ 非响应式使用 storeToRefs 保持响应性
import { storeToRefs } from 'pinia' const userStore = useUserStore() const { name, age } = storeToRefs(userStore); // ✅ 保持响应式 // 在模板中使用 <template> <div>{{ name }}</div> </template> -
$subscribe: 订阅 State 变化// 组件中 userStore.$subscribe((mutation, state) => { console.log('State changed:', mutation.type, state); });
本质:是语法糖,属性绑定 + 事件监听 的组合。
它自动将组件的值(通过 props)和值的更新(通过 emit 事件)结合起来。
vue2
<input v-model="message">
本质
<input
  :value="message"
  @input="message = $event"
>
$event
对于原生事件(input, click),就是dom事件对象
对于自定义事件,就是emit 传递的数据
vue3 的改进:
-
Vue2 中使用
value和input事件 -
Vue3 中使用
modelValue 属性和update:modelValue 事件<CustomInput v-model="message" />等价于
<CustomInput :modelValue="message" @update:modelValue="message = $event" /> </script> -
支持多个 v-model
可以同时绑定多个双向数据<UserForm v-model="count" v-model:name="userName" // 自定义参数 name v-model:age="userAge" // 自定义参数 age />组件内部需要做两件事:
- 通过 props 接收父组件传递的值(如 modelValue,name,age )
- 通过 emit 触发更新事件(如 update:modelValue, update:title, update:age )
<script setup>
const props = defineProps(['modelValue', 'name', 'age']);
const emit = defineEmits(['update:modelValue' , 'update:title','update:age']);

// modelValue 为 v-model
// name       为 v-model:name
// age        为 v-model:age

const handleInput = (e) => {
  emit('update:modelValue', e.target.value);
  emit('update:title', e.target.value);
  emit('update:age', e.target.value);
};
浅层响应式(仅追踪 .value 变化)
// shallowRef 示例(浅层响应式)
const shallow = shallowRef({ count: 1 })

shallow.value.count++ // 不会触发更新 ❌
shallow.value = { count: 2 } // 触发更新 ✅
浅层响应式(仅顶层属性响应式)
// shallowReactive 示例(浅层响应式)
const shallow = shallowReactive({
  nested: { count: 1 }
})

shallow.nested.count++ // 不会触发更新 ❌
shallow.nested = { count: 2 } // 触发更新 ✅
深度递归(所有嵌套属性变为只读)
const original = reactive({
  user: {
    name: 'Alice',
    permissions: ['read', 'write']
  }
})

const protectedData = readonly(original)

protectedData.user.name = 'Bob' // ❌ 报错
protectedData.user = {}         // ❌ 报错
仅限制顶层属性只读(嵌套对象任可修改)
const original = reactive({
  config: {
    theme: 'dark',
    fontSize: 14
  }
})

const semiProtected = shallowReadonly(original)

// 顶层修改被禁止
semiProtected.config = {} // ❌ 报错

// 嵌套属性允许修改
semiProtected.config.theme = 'light' // ✅ 允许修改(但会触发响应式更新)
从响应式代理对象中提取 原始对象
const obj = { count: 0 }
const reactiveObj = reactive(obj)

console.log(reactiveObj === obj)          // false
console.log(toRaw(reactiveObj) === obj)    // true ✅

// 直接修改原始对象不会触发响应式更新
const raw = toRaw(reactiveObj)
raw.count++ // 不会触发组件重新渲染 ❌
显式标记对象永不转换为响应式
// 性能敏感的大数据表格

const bigData = markRaw({
  rows: Array.from({ length: 10000 }, (_, i) => ({
    id: i,
    content: `Row ${i}`
  }))
})

// 在响应式对象中 安全引用
const tableState = reactive({
  dataSource: bigData,
  pagination: { page: 1 }
})
自定义响应式引用,允许开发者完全控制依赖追踪和更新触发机制
⚠️ 注意: 必须手动调用 track() 和 trigger()
import { customRef } from 'vue'

const myRef = customRef((track, trigger) => ({
  get() {
    track()  // 标记依赖收集
    return xxx //  值
  },
  set(newValue) {
    // 处理新值
    trigger() // 触发更新
  }
}))
典型场景: ref 防抖输入
<script setup>
import { customRef } from 'vue'

function useDebouncedRef(value, delay = 200) {
  let timeoutId
  return customRef((track, trigger) => ({
    get() {
      track()
      return value
    },
    set(newValue) {
      clearTimeout(timeoutId)
      timeoutId = setTimeout(() => {
        value = newValue
        trigger()
      }, delay)
    }
  }))
}

const text = useDebouncedRef('', 300)
</script>

<template>
  <input v-model="text" placeholder="输入内容防抖300ms">
</template>
-
defineAsyncComponent : 定义异步组件
优点:
- 异步组件会被打包工具(Webpack/Vite)自动分割为独立文件
- import() 会触发更彻底的 Tree Shaking, 且只在需要时加载组件代码(如路由切换时)
基本用法:
import { defineAsyncComponent } from 'vue'

// 方式1:直接传入加载函数
const AsyncComp = defineAsyncComponent(() =>
  import('./components/HeavyComponent.vue')
)

// 方式2:配置对象形式
const AsyncCompWithOptions = defineAsyncComponent({
  loader: () => import('./DialogComponent.vue'),
  delay: 200, // 延迟显示 loading
  timeout: 3000, // 超时时间(毫秒)
  suspensible: false // 是否由 Suspense 控制
})
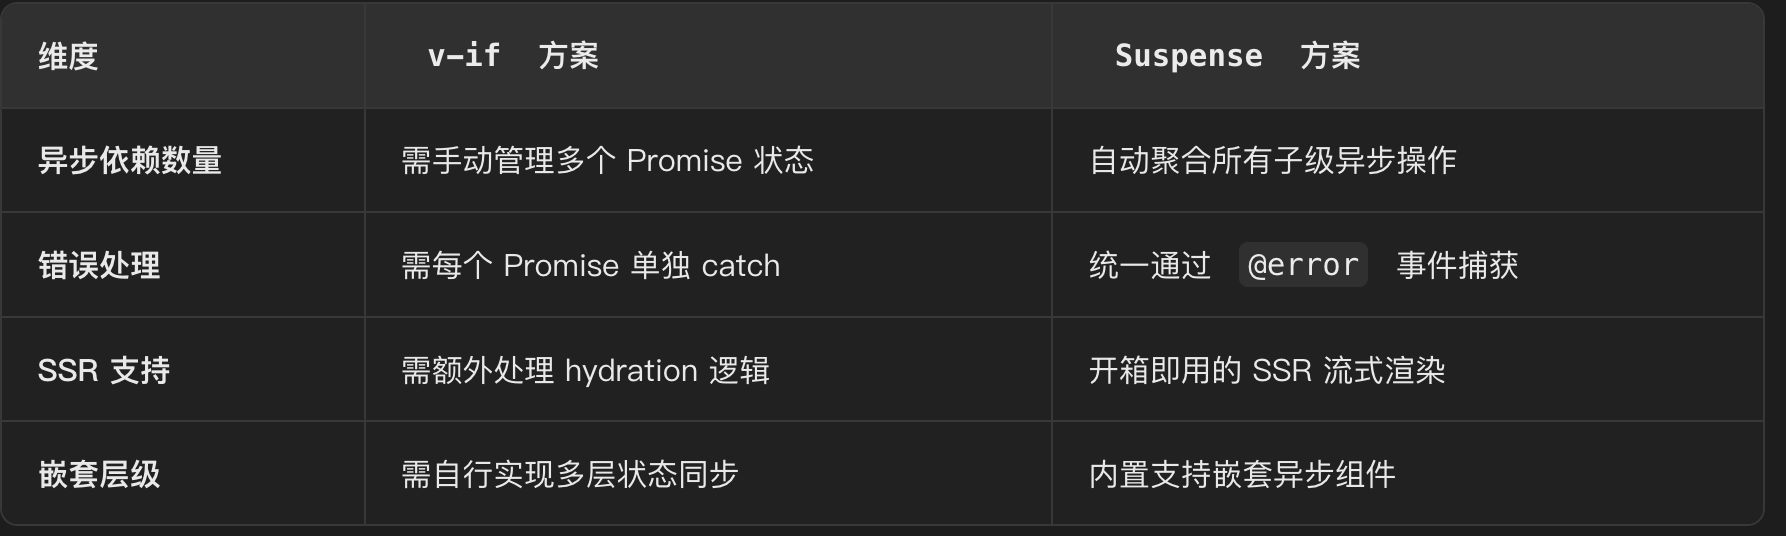
一个用于自动管理异步组件加载状态和异步数据依赖的内置组件
旨在简化 异步操作的交互体验设计
-
基础使用
- 定义异步组件
// ChildComponent.vue(普通组件) <template> <div>{{ data }}</div> </template> <script setup> // 模拟异步数据获取 const { data } = await fetch('/api/data').then(res => res.json()) </script>- 在父组件中使用 Suspense
<template> <Suspense> <!-- 默认插槽:显示异步组件 --> <template #default> <ChildComponent /> </template> <!-- 后备插槽:加载状态 --> <template #fallback> <div class="loading">加载中...</div> </template> </Suspense> </template> <script setup> import { defineAsyncComponent } from 'vue' const ChildComponent = defineAsyncComponent(() => import('./ChildComponent.vue') ) </script> -
与 Vue Router 集成
- 路由级 Suspense 配置
// router.js const routes = [ { path: '/dashboard', component: () => import('./views/Dashboard.vue'), meta: { suspense: true, // 启用 Suspense timeout: 5000 // 自定义超时 } } ]- 全局 Suspense 包装
<!-- App.vue --> <template> <RouterView v-slot="{ Component, route }"> <Suspense v-if="route.meta.suspense" :timeout="route.meta.timeout" > <component :is="Component" /> <template #fallback> <RouteLoading :route-name="route.name" /> </template> </Suspense> <component v-else :is="Component" /> </RouterView> </template> -
分阶段加载
主内容优先加载<template> <!-- 第一优先级:核心内容 --> <Suspense> <template #default> <ArticleContent /> <!-- 文章主体 --> </template> <template #fallback> <ContentSkeleton /> <!-- 主内容骨架屏 --> </template> </Suspense> <!-- 第二优先级:相关推荐 --> <Suspense v-if="mainContentLoaded"> <template #default> <Recommendations /> <!-- 延迟加载 --> </template> <template #fallback> <MiniLoader /> <!-- 小尺寸加载提示 --> </template> </Suspense> </template> <script setup> import { ref } from 'vue' const mainContentLoaded = ref(false) // 第一级内容 加载完成后,触发次要加载 const handleMainLoad = () => { mainContentLoaded.value = true } </script>


 5535
5535

 被折叠的 条评论
为什么被折叠?
被折叠的 条评论
为什么被折叠?
 到【灌水乐园】发言


