


一、docker
- 安装docker
yum install docker -y - 启动docker
service docker restart - 开机自启动
systemctl enable docker - 配置全局docker快捷方式(无需再使用sudo)
# 查看状态
sudo service docker status
# ec2-user为当前账户登录名
sudo usermod -a -G docker ec2-user
# 这句不用加sudo
newgrp docker
- 安装docker-compose
# 下载docker-compose包并移动至/usr/local/bin/
sudo curl -L https://github.com/docker/compose/releases/latest/download/docker-compose-$(uname -s)-$(uname -m) -o /usr/local/bin/docker-compose
# 执行权限
sudo chmod +x /usr/local/bin/docker-compose
# 软链
sudo ln -s /usr/local/bin/docker-compose /usr/bin/docker-compose
二、mysql
##、当yum安装失败时
##、配置mysql yum库并安装
- 下载mysql5.7的yum源
wget https://dev.mysql.com/get/mysql57-community-release-el6-11.noarch.rpm - 安装mysql5.7的yum源
yum localinstall mysql57-community-release-el6-11.noarch.rpm - 查看yum是不是多了两个仓库,mysql-community-source.repo,mysql-community.repo

- 移除原先安装的mysql服务
yum remove mysql55 mysql55-common mysql55-libs mysql55-server - 开始安装
yum install mysql-community-server -y 或 yum install mysql-server -y
5*如果出现GPG check FAILED,追加参数–nogpgcheck绕过GPG验证

- 启动sql服务
service mysqld restart - 另一系统命令查看启动状态
systemctl status mysqld - 获取mysql默认密码
如用mysql -uroot -p是无需密码的,因为mysql会默认读取提供的密码
cat /var/log/mysqld.log | grep "A temporary password"

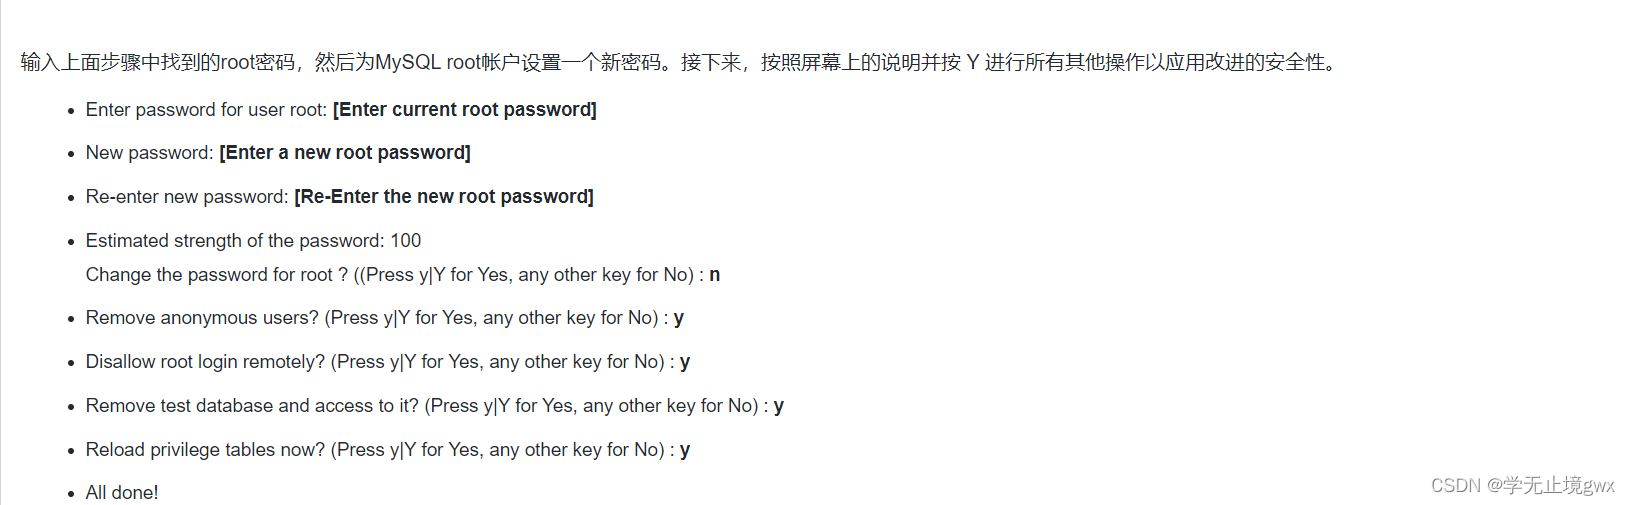
- 修改mysql密码
mysql_secure_installation
- 再提供一个修改默认密码方式(9、10二选一):进入数据库update变更并重启服务
mysql>update mysql.user set authentication_string=password("yourpassword") where user="root" and Host="localhost”;
mysql>flush privileges;
mysql>quit;
service mysqld restart
- 进入数据库
mysql -u root -p

三、nginx
yum install -y nginx
四、redis
yum install -y redis6
五、conda
- 安装
wget https://repo.anaconda.com/archive/Anaconda3-5.3.0-Linux-x86_64.sh
sh Anaconda3-5.3.0-Linux-x86_64.sh
# 按场景一直回车Enter|yes
- 查看
cd /home/$hostname/是不是有anaconda3文件夹,记录此路径并追加到~/.bashrc - 环境变量
vim ~/.bashrc,文件末尾添加export PATH=$PATH:/home/$hostname/anaconda3/bin - 生效
source ~/.bashrc
六、sshguard
- 配置epel源
curl -o /etc/yum.repos.d/epel.repo http://mirrors.aliyun.com/repo/epel-7.repo - 配置Centos-7源
curl -o /etc/yum.repos.d/CentOS-Base.repo https://mirrors.aliyun.com/repo/Centos-7.repo - 查看目录
ls /etc/yum.repos.d/下是不是多了两个repo仓库epel.repo、CentOS-Base.repo - 安装
yum install sshguard -y - 准备sshguard启动配置文件
cp /usr/share/doc/sshguard-2.4.2/examples/sshguard.conf.sample /etc/sshguard.conf - 编辑修改配置文件
vim /etc/sshguard.conf
BACKEND="/usr/libexec/sshguard/sshg-fw-firewalld"  # 需要安装防火墙firewalld
FILES="/var/log/secure"                            # touch创建文件secure
BLACKLIST_FILE=90:/etc/sshguard.blacklist
WHITELIST_FILE=/etc/sshguard.whitelist
- 自启动服务
systemctl enable sshguard - 启动
systemctl start sshguard并查看状态systemctl status sshguard


 7309
7309


 被折叠的 条评论
为什么被折叠?
被折叠的 条评论
为什么被折叠?
 到【灌水乐园】发言


