


使用goctl model 生成MongoDB操作模板
goctl model 为go-zero下的工具模块中的组件之一,目前支持MongoDB进行model层代码生成。官网有对MySQL的使用方法,但是没有对MongoDB的使用进行讲解,那么我下面介绍goctl model对MongoDB的使用方法。
下面是各个参数的含义,主要用的是 -e -dir -t
-e表示的是生成一个简单的增删改查接口,-dir是生成文档放在的目录
-t是生成文件的前缀名称
-c是带缓存的
Usage:
  goctl model mongo [flags]

Flags:
      --branch string   The branch of the remote repo, it does work with --remote
  -c, --cache           Generate code with cache [optional]
  -d, --dir string      The target dir
  -e, --easy            Generate code with auto generated CollectionName for easy declare [optional]
  -h, --help            help for mongo
      --home string     The goctl home path of the template, --home and --remote cannot be set at the same time, if they are, --remote has higher priority
      --remote string   The remote git repo of the template, --home and --remote cannot be set at the same time, if they are, --remote has higher priority
                        The git repo directory must be consistent with the https://github.com/zeromicro/go-zero-template directory structure
      --style string    The file naming format, see [https://github.com/zeromicro/go-zero/tree/master/tools/goctl/config/readme.md]
  -t, --type strings    Specified model type name
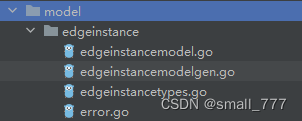
1、这是我自己生成的命令:goctl model mongo -e -dir ./model/edgeinstance -t edgeinstance 生成了这几个文件:
2、重点:记得先把EdgeinstanceCollectionName 名字改成自己的MongoDB的表名,这个名字在edgeinstancemodelgen.go文件头部
const EdgeinstanceCollectionName = "edgeinstance"
3、现在就可以进行开发了,但是你会发现他提供的crud根本不够用,所以需要自己定义新的curd。
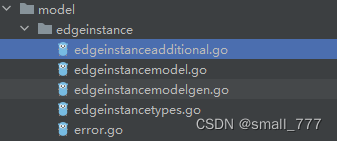
这时候不能直接在edgeinstancemodelgen.go文件里面定义新的方法,因为这个文件是不能修改的,重新生成会丢失代码。
只能增加多一个文件,我命名为edgeinstancemodeladditional.go,里面就可以写你的方法代码了。
最后记得在edgeinstancemodel.go文件里面的接口中加多你新增的接口
EdgeinstanceModel interface {
		edgeinstanceModel
		edgeInstanceModelAdditional
	}
这是我的一部分的业务代码
package model

import (
	"context"
	"github.com/zeromicro/go-zero/core/stores/mon"
	"go.mongodb.org/mongo-driver/bson"
	"go.mongodb.org/mongo-driver/bson/primitive"
)

type edgeInstanceModelAdditional interface {
	ExistByName(ctx context.Context, name string) (bool, error)
	ExistById(ctx context.Context, id string) (bool, error)
	ExistByIdAndName(ctx context.Context, id, name string) (bool, error)
	UpdateById(ctx context.Context, ei *Edgeinstance) error
	SearchInstance(ctx context.Context, name string, state bool) ([]Edgeinstance, error)
}

func (m *defaultEdgeinstanceModel) ExistByName(ctx context.Context, name string) (bool, error) {

}

func (m *defaultEdgeinstanceModel) ExistById(ctx context.Context, id string) (bool, error) {

}

func (m *defaultEdgeinstanceModel) ExistByIdAndName(ctx context.Context, id, name string) (bool, error) {

}

func (m *defaultEdgeinstanceModel) UpdateById(ctx context.Context, ei *Edgeinstance) error {

}

func (m *defaultEdgeinstanceModel) SearchInstance(ctx context.Context, name string, state bool) ([]Edgeinstance, error) {

}
4、初始化MongoDB客户端的方法:
MongoDB: model.NewEdgeinstanceModel(c.Mongo.Url, c.Mongo.Db)
注意url是MongoDB的连接url,格式百度搜索一下。
5、调用自己写的方法
instances, err := l.svcCtx.MongoDB.SearchInstance(l.ctx, in.Name, in.State)


 963
963


 被折叠的 条评论
为什么被折叠?
被折叠的 条评论
为什么被折叠?
 到【灌水乐园】发言


