


文章目录
开始
还原App.vue为如下,以下操作都在App.vue
<script setup>

</script>

<template>

</template>

<style scoped>

</style>
运行项目
yarn dev
浏览器打开http://localhost:5173/

为一片空白,则为下面的教程做准备
数据双向绑定
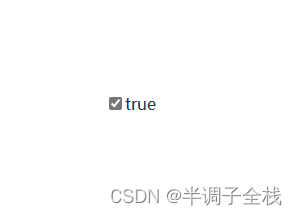
基础绑定checkbox
- 完整代码
<script setup>
import { ref,computed } from 'vue';

const checked = ref(false)

</script>

<template>
  <input type="checkbox" id="checkbox" v-model="checked" />
  <label for="checkbox">{{ checked }}</label>
</template>

<style scoped>
input{
  font-size: 20px;
}
</style>
- 显示
1.
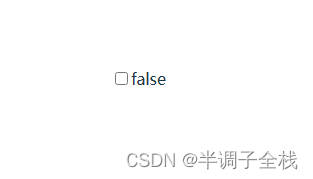
2.
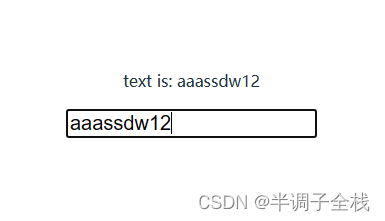
基础绑定input
- 完整代码
<script setup>
import { ref,computed } from 'vue';

const text = ref('')

</script>

<template>
  <p>text is: {{ text }}</p>
  <input v-model="text" placeholder="修改" />
</template>

<style scoped>
input{
  font-size: 20px;
}
</style>
- 显示
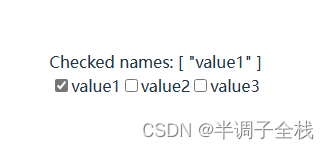
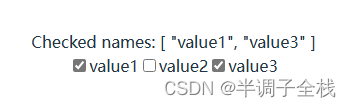
基础绑定复选框
- 完整代码
<script setup>
import { ref,computed } from 'vue';

const checkedNames = ref([])

</script>

<template>
  <div>Checked names: {{ checkedNames }}</div>

  <input type="checkbox" id="value1" value="value1" v-model="checkedNames">
  <label for="value3">value1</label>

  <input type="checkbox" id="value2" value="value2" v-model="checkedNames">
  <label for="value2">value2</label>

  <input type="checkbox" id="value3" value="value3" v-model="checkedNames">
  <label for="value3">value3</label>
</template>

<style scoped>
input{
  font-size: 20px;
}
</style>
- 显示
1.
2.
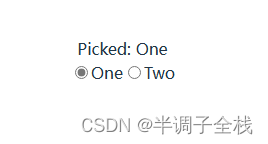
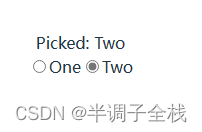
基础绑定radio
- 完整代码
<script setup>
import { ref,computed } from 'vue';

const picked = ref("One")

</script>

<template>
  <div>Picked: {{ picked }}</div>

  <input type="radio" id="one" value="One" v-model="picked" />
  <label for="one">One</label>

  <input type="radio" id="two" value="Two" v-model="picked" />
  <label for="two">Two</label>

</template>

<style scoped>
input{
  font-size: 20px;
}
</style>
- 显示
1.
2.
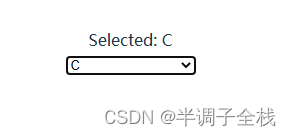
基础绑定select-option
- 完整代码
<script setup>
import { ref,computed } from 'vue';

const selected = ref("A")

</script>

<template>
  <div>Selected: {{ selected }}</div>

  <select v-model="selected">
    <option disabled value="">Please select one</option>
    <option value="A">A</option>
    <option value="B">B</option>
    <option value="C">C</option>
  </select>

</template>

<style scoped>
input{
  font-size: 20px;
}
</style>
- 显示
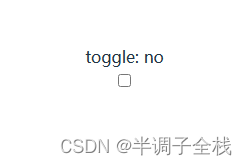
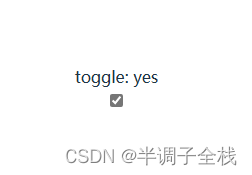
true-value和false-value
- 完整代码
<script setup>
import { ref,computed } from 'vue';

const toggle = ref('')

</script>

<template>
  <div>toggle: {{ toggle }}</div>
  <input
    type="checkbox"
    v-model="toggle"
    true-value="yes"
    false-value="no" />

</template>

<style scoped>
input{
  font-size: 20px;
}
</style>
- 显示
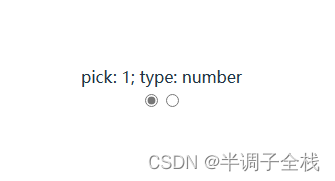
数字类型
- 完整代码
<script setup>
import { ref,computed } from 'vue';

const pick = ref('')

</script>

<template>
  <div>pick: {{ pick }}; type: {{ typeof pick }}</div>
  <input type="radio" v-model="pick" :value="1" />
  <input type="radio" v-model="pick" :value="2" />


</template>

<style scoped>
input{
  font-size: 20px;
}
</style>
- 显示
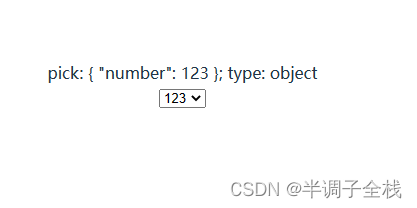
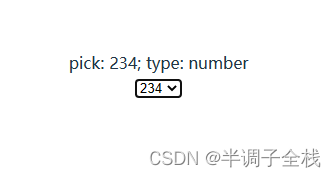
混合类型
- 完整代码
<script setup>
import { ref,computed } from 'vue';

const pick = ref('')

</script>

<template>
  <div>pick: {{ pick }}; type: {{ typeof pick }}</div>
  <select v-model="pick">
    <option :value="{ number: 123 }">123</option>
    <option :value="234">234</option>
  </select>
</template>

<style scoped>
input{
  font-size: 20px;
}
</style>
- 显示


 777
777


 被折叠的 条评论
为什么被折叠?
被折叠的 条评论
为什么被折叠?
 到【灌水乐园】发言


