


1、uniapp 拦截器 uni.addInterceptor(STRING,OBJECT)
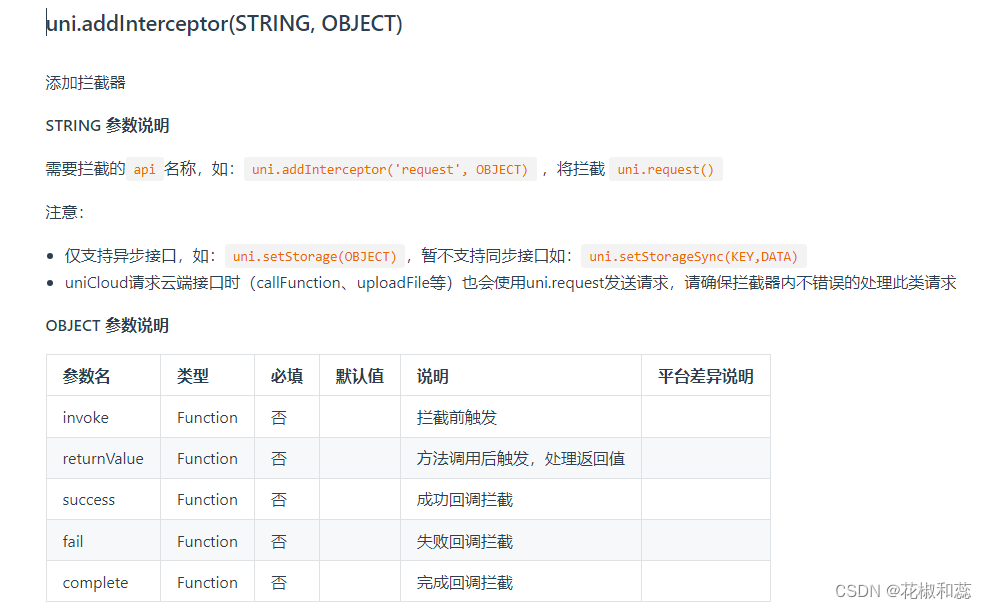
拦截器中包括基础地址、超时时间、添加请求头标识、添加token
utils文件夹下新建http.ts
拦截uploadFile文件上传,rquest请求接口
cosnt baseUrl = 'xxxx'

// 添加拦截器
const httpInterceptor = {
    //拦截前触发
    invoke(options:UniApp.RequestOptions) {
        //非http开头需拼接地址
        if (!options.url.startWith('http')) {
            options.url = baseUrl + options.url
        }
        // 请求超时,默认60s
        options.timeout = 10000
        //添加小程序端请求头标识,header默认是对象格式
        options.header = {
            ...options.header,
           'source-client':'miniapp'
        }
        //添加toke请求头标识
        const token = uni.getStorageSync("token")
        options.header.Authorization = token

    }
}
uni.addInterceptor('request', httpInterceptor)
uni.addInterceptor('uploadFile', httpInterceptor)

//定义接口,指定泛型
interface Data<T> {
    code: String,
    msg: string,
    result:T
}

//请求函数
export const http= <T> (options: UniApp.RequestOptions) => {
    //返回Peomise对象
    return new Promise<Data<T>>((resolve, reject) => {
        uni.request({
            ...options,
            //请求成功
            success(res) {
                if (res.statusCode >= 200 && res.statusCode < 300) {
                    //获取数据成功,调用resolve
                resolve(res.data as Data<T>)//类型断言为更准确的类型

                } else if (res.statusCode == 401) {
                   // 401错误,token失效,清除本地存储中的token,跳转到登录页,调用reject
                    uni.removeStorage({
                        key: 'token',
                        success: function (res) {
                            console.log('成功删除 token');
                            uni.navagateTo({
                                url: '/pages/login/login'
                            })
                            reject(res)
                        },
                    })
                } else {
                    //通用错误,根据后端错误信息轻提示,调用reject
                    uni.showToast({
                        icon: 'none',
                        title:(res.data as Data<T>).msg||'请求错误'
                    })
                    reject(res)
                }
            },
            fail(err) {
                //网络错误,调用reject
                    uni.showToast({
                        icon: 'none',
                        title:'网络错误'
                    })
                    reject(err)
             }

        })
    })
}
在页面中使用
import {http} from '@/utils/http'

<script setup>
import { ref, onMounted} from "vue";
import {http} from '@/utils/http'

onMounted(()=>{
  getData()
})

const getData = async ()=>{
  const res = await http<number[]>({
    method:'GET',
    url:'xxx/xxx',
    header:{}
  })
  console.log('获取数据成功',res.result)
}
</script>
23年10月17日更新:
还有一种比较简单的方式,如下:
utils文件夹下新建http.ts
cosnt baseUrl = 'xxxx'
interface Options {
  url: string;
  data?: any;
  header?: any;
  method?: string;
  complete?: (response: any) => void;
}
interface ResponseData {
  code: number;
  msg: string;
}
export default {
  request(options: Options = {}): Promise<any> {
    return new Promise((resolve, reject) => {
      let url = options.url;
      if (!(url.indexOf("http://") !== -1 || url.indexOf("https://") !== -1)) {
        options.url =  'http://' + baseUrl + "/app/"+ url;
      }
      options.header.token = uni.getStorageSync("token");
      options.complete = (response) => {
        if (response.statusCode == 200 || response.statusCode == 0) {
          if (response.data.code == 401 || response.data.code == 420) {
            uni.navigateTo({
              url: "/pages/login/login",
            });
          }
          if (response.data.code == 500) {
            uni.showToast({
              title: response.data.msg,
              icon: "none",
              duration: 2000,
            });
          }
          resolve(response.data);
        } else {
          uni.showToast({
            title: "请求异常",
            icon: "none",
          });
        }
      };
      uni.request(options);
    });
  },

  post(url: string, data: any = {}, header: any = {}): Promise<any> {
    let options: Options = {
      url: url,
      data: data,
      header: header,
      method: "POST",
    };

    return this.request(options);
  },

  get(url: string, data: any = {}, header: any = {}): Promise<any> {
    let options: Options = {
      url: url,
      data: data,
      header: header,
    };

    return this.request(options);
  },
};
在main.ts中
import request from "./utils/request.ts";
export function createApp() {
	const app = createSSRApp(App)
	app.config.globalProperties.$Api = request;
	return {
		app
	}
}
在页面中使用
<script setup>
	import {
	reactive。
		getCurrentInstance
	} from "vue";
	import {
		onShow
	} from "@dcloudio/uni-app";
	onShow(() => {
		getBalckdata()
	})
	const instance = getCurrentInstance();
	const {
		$Api
	} = instance.appContext.config.globalProperties;

	let blackList = ref([])
	function getBalckdata() {
		$Api.get('user/xxx', {
			page: 1
		}).then(res => {
			if (res && res.code == 0) {
				blackList.value = reactive(res.result.data)
			}
		})
	}
</script>


 669
669


 被折叠的 条评论
为什么被折叠?
被折叠的 条评论
为什么被折叠?
 到【灌水乐园】发言


