


vuex入门篇,彻底搞懂vuex
文章目录
前言
在工作中使用vuex,可能知道怎么用,但是没有仔细研究过,之前出过一篇【vuex存储保存数据、使用数据,超详细解说】,其实也没有把vuex说的很透彻,学习的过程就是先会用,能先应付开发,然后再抽出时间,慢慢搞懂它。
一、vuex是什么?
专门在vue中实现集中式状态(状态也可以理解为数据)管理的一个vue插件,对vue应用中多个组件的共享状态进行集中式的管理(包含读和写),也是一种组件间的通信方式,且适用于任意组件间通信
vuex官方文档请戳这里
二、什么情况下应该使用 Vuex?
1、多个组件共享状态:
当多个组件需要共享同一状态数据时,可以使用 Vuex 来集中管理这些状态,而不是将状态数据传递给各个组件或使用事件总线来进行通信。
假设有A、B、C、D四个组件,当使用事件总线进行通信,从A向B、C、D三个组件传递数据obj对象
A组件传递  $bus.$emit('getData',obj)
B、C、D组件接收  $bus.$on('getData',(res)=>{console.log(res)})
然后B、C、D组件需要改变数据并传回A组件
B、C、D组件传递 $bus.$emit('updGetData',obj)
A组件接收     $bus.$on('updGetData',(res)=>{console.log(res)})
这样就完成了对A组件obj对象的读和写,其实事件总线完全可以实现等同于vuex的效果,为什么在多个组件的情况下更推荐使用vuex,因为组件一多,每个组件都在写$ emit和$ on,代码难以阅读,维护也很麻烦。这里举例用了四个组件,也有可能是四十个组件都要对A组件的obj进行读和写,工作量也会加大。
2、较复杂的数据流:
当应用的数据流相对复杂,包括多个组件之间的嵌套关系、跨组件的状态变更等情况时,Vuex 提供了清晰的数据流向和一致的状态管理方式,有助于管理和维护复杂的数据流。
3、大型单页应用(SPA):
在构建大型单页应用时,通常会遇到许多组件需要共享状态、响应用户操作并更新状态等情况,这时使用 Vuex 可以更好地组织和管理应用的状态。
三、Vuex工作原理
vuex有三个重要的组成部分:Actions、Mutations、State
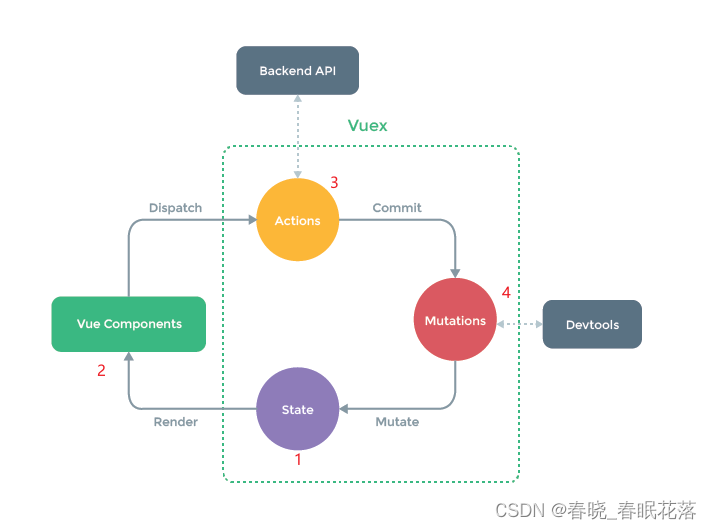
图是从官网直接截过来用的,按官网的图解读:
步骤1、把数据交给vuex保管,其实就是交给vuex中的state保管数据,state是一个对象,用来保存数据
步骤2、Vue Components就是vue组件,从组件中触发dispatch(dispatch是一个api,提供了一种与 Vuex store 交互的公共接口),dispatch同时也是个函数,携带两个参数,参数一:方法名,参数二:值;dispatch触发 store 中的 actions,并且传递参数给 actions。
步骤3、在actions的函数中,调用commit,commit也是个函数,携带两个参数,参数一:方法名,参数二:值;在mutation中接收
步骤4、mutation中不需要调用mutate,只需直接处理数据,底层会自动调用mutate,处理过的数据交给state,vuex会重新渲染Vue Components
真正开发的时候,actions并不是真正一定要走的那一步。
actions 是用来处理异步逻辑(调用ajax发送请求)和复杂操作的对象。它类似于 mutations,但是它不直接修改状态,而是通过触发 mutations 来间接地修改状态,从而实现更加可控和可维护的状态管理
如果不涉及调用ajax发送请求和复杂的操作,完全可以省去这一步
步骤一 、 数据交给vuex中的state保管数据
步骤二、 vue组件中触发commit,在mutation中接收
步骤三、 mutation处理数据,处理过的数据交给state,vuex会重新渲染Vue Components
官网的图有一个点没有体现出来,组成vuex重要的三个部分,需要通过store(仓库)管理。
四、Vuex环境
2022年2月7日,vue3成为了默认版本,vuex也更新到了4版本。
如果直接执行npm i vuex ,安装的是vuex4
vuex的4版本,只能在vue3中使用,在vue2中要使用vuex的3版本,所以安装vuex的时候要指定下版本
npm i vuex@3
main.js中引入
import Vuex from 'vuex'
import store from './store'
Vue.use(vuex)

new Vue({
  router,
  store,
  render: (h) => h(App),
}).$mount("#app");
src目录下新建store文件夹,新建index.js
//引入vuex
import Vuex from 'vuex'
const actions = {}
const mutations = {}
const state = {}

//写法一:
//创建store
//const store = new Vuex.store({
//actions:actions,//对象的key与保存value的变量重名,触发简写模式
//mutations:mutations,//对象的key与保存value的变量重名,触发简写模式
//state:state//对象的key与保存value的变量重名,触发简写模式
//actions,//简写模式
//mutations,//简写模式
//state//简写模式
//})
//暴露store
//export default store

//写法二:
//创建并暴露store
export default new Vuex.store({
actions,
mutations,
state
})
当配置到这一步的时候,控制台报错:
在创建store实例之前,必须调用Vue.use(Vuex)
[vuex] must call Vue.use(Vuex) before creating a store instance
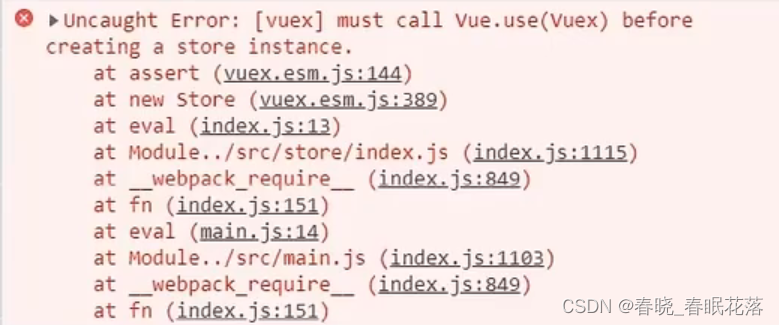
上面的示例代码其实是特意这样写的,为了解释为什么项目中不在main.js中直接引入vuex并使用vuex,一般项目中想要全局使用插件,都是在main,.js中直接引入并使用
在main.js中,执行import store from “./store”;会把store文件夹中的index.js中的代码全执行完,而index.js中创建了store实例,所以是先创建了实例,然后才调用的Vue.use(Vuex);
很明显这个顺序不对
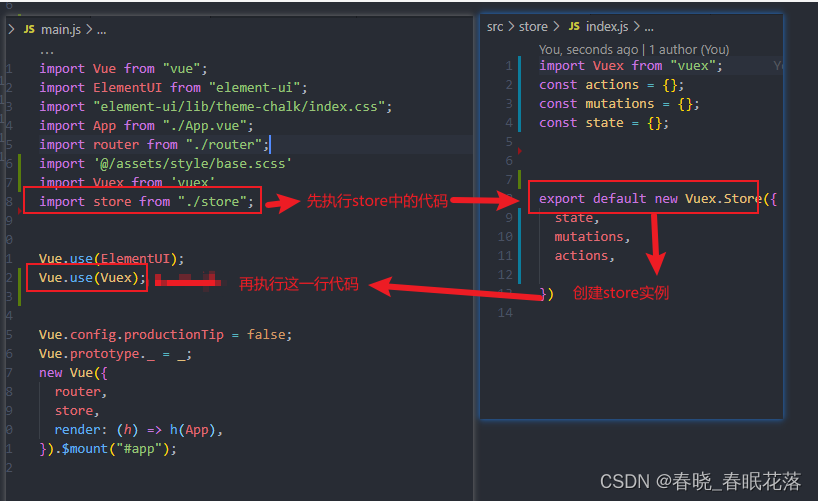
即使如下更换位置,还是先执行import store from “./store”;这是因为在执行代码时,JavaScript 会先处理 import 语句,这意味着它会先加载并执行被 import 引入的模块(文件),然后才会执行接下来的代码
Vue.use(Vuex);

import store from "./store";
所以项目中的写法是:
在main.js中:
import store from './store'

new Vue({
  router,
  store,
  render: (h) => h(App),
}).$mount("#app");
在store/index.js中
import Vuex from "vuex";
import Vue from "vue";

const actions = {};
const mutations = {};
const state = {};

//将Vue.use(Vuex)放在index.js中,才能控制在创建实例前,先调用Vue.use(Vuex);
Vue.use(Vuex);

export default new Vuex.Store({
  state,
  mutations,
  actions,

})
五、Vuex简单案例及开发者工具
Vuex简单案例
a组件定义初始值
  <el-button @click="add">add</el-button>
  <span>{{$store.state.sum}}</span>
export default {
  name: "a",
  components: {

  },
  data() {
    return {
 num:1
};
  },
  computed: {},
  created() {},
  methods: {
this.$store.dispatch('add',this.num)

},
};
store/index.js中:
import Vuex from "vuex";
import Vue from "vue";
const actions = {
add(context,value) {
context.commit('ADD',value)
}
};
const mutations = {
ADD(state,value) {
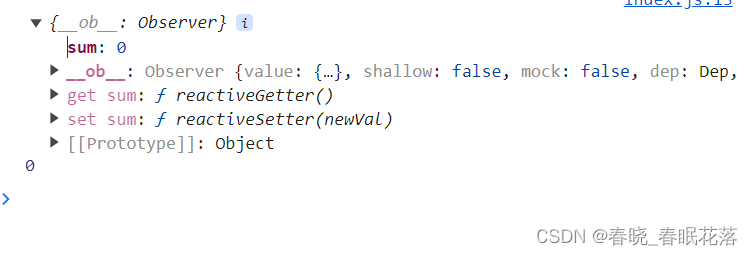
console.log(state, value);
state.sum+= value
}
};
const state = {
sum:0
};
Vue.use(Vuex);
export default new Vuex.Store({
state,
mutations,
actions
})
actions的第一个参数context(上下文),包含了一些有用方法和属性的对象;第二个参数就是传过来的值
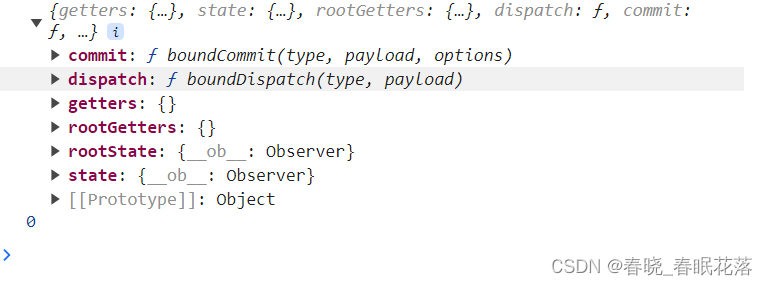
mutations的第一个参数就是state对象
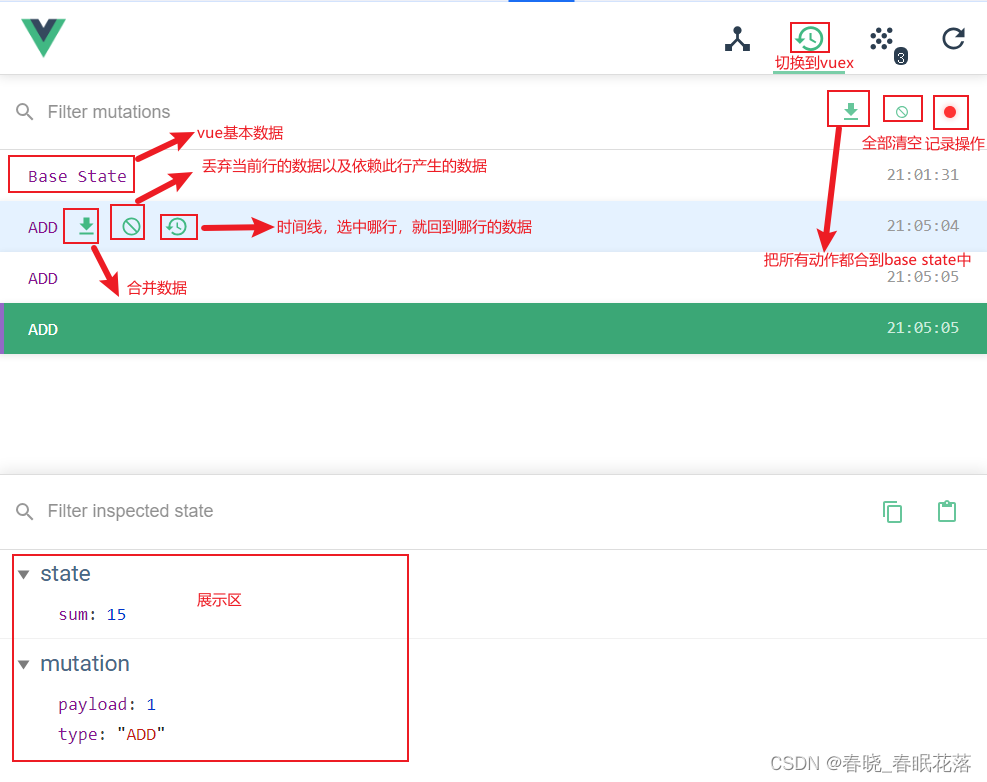
开发者工具
vuex和vue共用同一个开发者工具
六、getters配置项
getters配置项不是Vuex的必须项,与普通的 Vue 计算属性类似(计算属性不能跨组件使用,只能在当前组件中使用)。当使用getters 时,它们会根据所依赖的 state 自动更新
store/index.js中:
import Vuex from "vuex";
import Vue from "vue";

const actions = {
  add(context,value) {
    context.commit('ADD',value)
  }

};
const mutations = {
  ADD(state,value) {
    console.log(state, value);
    state.sum+= value
  }

};
const getters = {
  totalAmount(state) {
    return state.sum * state.qty
  }
}
const state = {
  sum: 1,
  qty:5
};


Vue.use(Vuex);

export default new Vuex.Store({
  state,
  mutations,
  actions,
  getters

})
a组件中
 <span>总数:</span>
 <span>{{$store.getters.totalAmount}}</span>
七、mapState与mapGetters
在vue组件的模板区中
 <span>{{$store.getters.totalAmounts}}</span>
   <span>{{$store.state.sums}}</span>
这样写不够简化,可以借助计算属性
   <span>{{sums}}</span>
   <span>{{totalAmounts}}</span>

  computed: {
    sums(){
      return this.$store.state.sum
    },
    totalAmounts(){
      return this.$store.getters.totalAmount
    },
  },
在开发者工具中可以看到计算属性
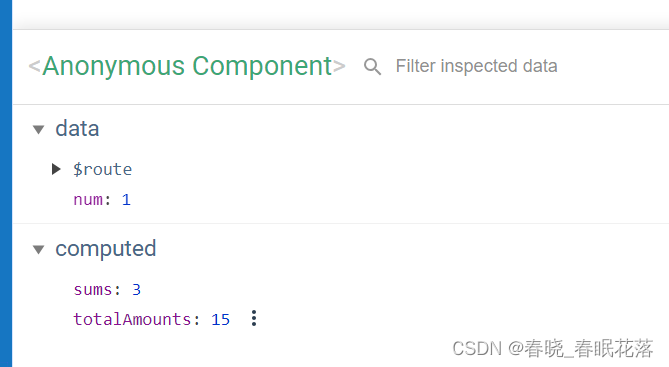
计算属性可以实现简化,但是如果数据很多的情况下,重复写相同的代码非常繁琐,
computed中的代码还可以简化,这就要说到mapState 和 mapGetters 。
mapState 和 mapGetters 是 Vuex 提供的辅助函数,使用 mapState 和 mapGetters辅助函数将 state和 getters映射到组件中的computed中
mapState 函数可以帮助我们将 Vuex store 中的 state 映射到组件的计算属性中。它接收一个数组或对象作为参数,数组中的每一项都是 state 的属性名,或者对象中的 key-value 对应 state 的属性名和计算属性的名称。它会返回一个包含了计算属性的对象。
mapGetters函数可以帮助我们将 Vuex store 中的getters映射到组件的计算属性中,它接收一个数组或对象作为参数,与mapState 的用法相似。
1、在a组件中引入,第一种对象写法
import {mapState,mapGetters} from 'vuex
 computed: {
 //借助mapState生成计算属性,从state中取数据
 ...mapState({sums:'sum'}),//对象写法
 ...mapGetters({totalAmounts:'totalAmount'})
 },
2、在a组件中引入,第二种数组写法,注意:函数名和定义的数据变量名相同
   <span>{{sum}}</span>
   <span>{{totalAmount}}</span>

  computed: {
   // sum(){
     // return this.$store.state.sum
   // },
   // totalAmount(){
   //   return this.$store.getters.totalAmount
   // },
   ...mapState(['sum']),
   ...mapGetters(['totalAmount'])
  },
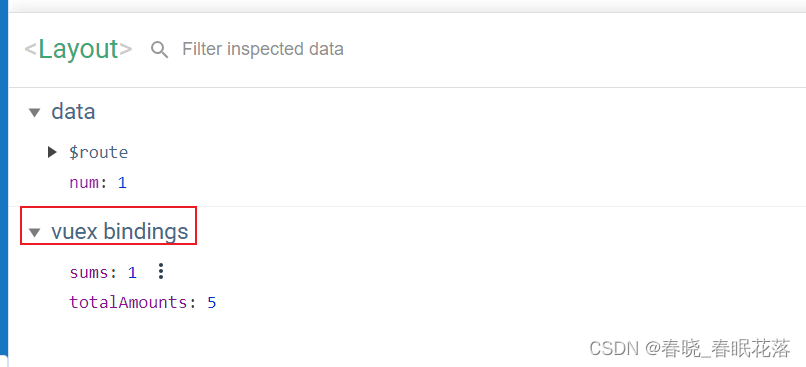
开发者工具中不再是计算属性了,而是vuex绑定
八、mapActions与mapMutations
mapActions与mapMutations同mapState 和 mapGetters,也是vuex提供的辅助函数,使用 mapActions 和 mapMutations 辅助函数将 actions 和 mutations 映射到组件中的方法中
1、没有使用mapActions与mapMutations的示例
      <el-button @click="add">add</el-button>
      <el-button @click="reduce">reduce</el-button>
      <el-button @click="addnew">addnew</el-button>
      <el-button @click="reduceNew">reduceNew</el-button>
      <span>{{ sum }}</span>
      <span>{{ totalAmount }}</span>

      data() {
        return {
          num: 1,
        };
     },
       methods: {
    // ...mapMutations({addnew:'ADD',reduceNew:'REDUCE'})
    add() {
      this.$store.dispatch("add", this.num);
    },
    reduce() {
      this.$store.dispatch("reduce", this.num);
    },
    addnew() {
      this.$store.commit("ADD", this.num);
    },
    reduceNew() {
      this.$store.commit("REDUCE", this.num);
    },
  },
import Vuex from "vuex";
import Vue from "vue";

const actions = {
  add(context, value) {
    context.commit("ADD", value);
  },
  reduce(context, value) {
    context.commit("REDUCE", value);
  },
};
const mutations = {
  ADD(state, value) {
    console.log(state, value);
    state.sum += value;
  },
  REDUCE(state, value) {
    console.log(state, value);
    state.sum -= value;
  },
};
const getters = {
  totalAmount(state) {
    return state.sum * state.qty
  }
}
const state = {
  sum: 1,
  qty:5
};


Vue.use(Vuex);

export default new Vuex.Store({
  state,
  mutations,
  actions,
  getters

})
2、使用mapActions与mapMutations的示例
有个很容易踩坑的地方
    <el-button @click="add">add</el-button>
      <el-button @click="reduce">reduce</el-button>
      <el-button @click="addnew">addnew</el-button>
      <el-button @click="reduceNew">reduceNew</el-button>
      <span>{{ sum }}</span>
      <span>{{ totalAmount }}</span>

      data() {
        return {
          num: 1,
        };
     },
       methods: {
     ...mapMutations({addnew:'ADD',reduceNew:'REDUCE'}),
     ...mapActions({add:'add',reduce:'reduce'})
  },
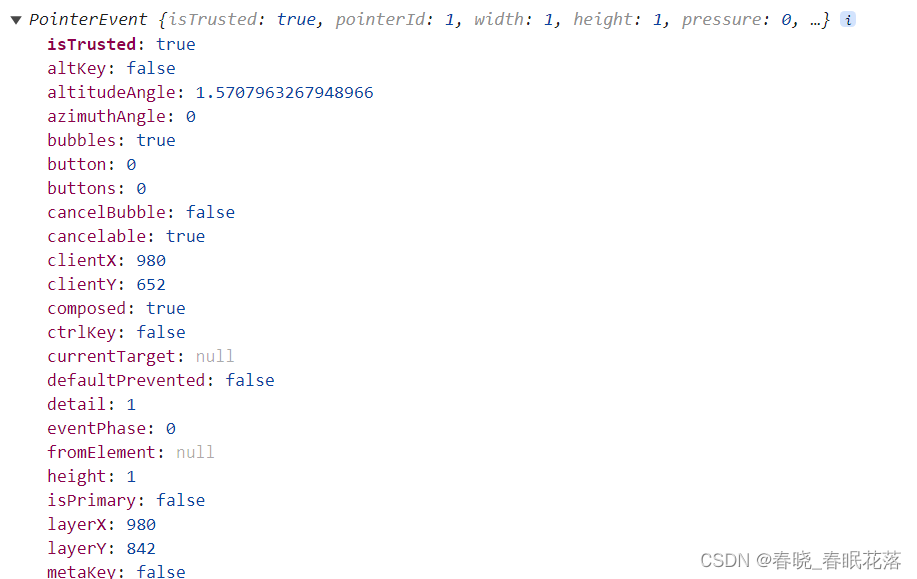
这样写的时候,页面上展示的是[object pointerEvent] ,计算结果是NAN
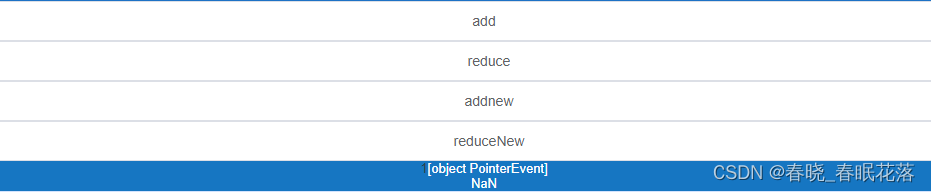
mutations中打印value,得到的是一个鼠标事件对象
这是因为我们自己写add事件的时候,this.num是我们手动加的参数
add() {
      this.$store.dispatch("add", this.num);
    },
而…mapActions({add:‘add’}) 的写法其实是下面这样的效果
add(value) {
      this.$store.dispatch("add", value);
    },
在 Vue 中,如果在模板中使用了@click绑定了一个方法,当点击按钮时,即使没有显式传入参数,Vue 仍然会将事件对象作为参数传递给相应的方法,所以打印value,得到的是一个鼠标事件对象。数字和鼠标事件相加,得到的就是[object pointerEvent]
正确的写法是在点击事件中传参:
      <el-button @click="add(num)">add</el-button>
      <el-button @click="reduce(num)">reduce</el-button>
      <el-button @click="addnew(num)">addnew</el-button>
      <el-button @click="reduceNew(num)">reduceNew</el-button>

      <span>{{ sum }}</span>
      <span>{{ totalAmount }}</span>
       data() {
        return {
          num: 1,
        };
     },
     import { mapActions, mapMutations} from "vuex";

       methods: {
     ...mapMutations({addnew:'ADD',reduceNew:'REDUCE'}),//对象写法
     ...mapActions({add:'add',reduce:'reduce'}),//对象写法
	// ...mapMutations(['ADD','REDUCE']),//数组写法
    // ...mapActions(['add','reduce']),//数组写法
九、vuex模块化
vuex的模块化,可以说项目中用到的非常多。
通过模块化,可以将 Vuex store 分割成多个小的模块,每个模块关注自己的状态和行为,提高代码的可维护性和可扩展性
比如user模块关注的是和用户相关的,theme模块关注主题,permission模块关注权限等…
第一种写法:
import Vuex from "vuex";
import Vue from "vue";
Vue.use(Vuex);

const countStore = {
  namespaced: true, //命名空间要开启
  actions: {
    add(context, value) {
      context.commit("ADD", value);
    },
    reduce(context, value) {
      context.commit("REDUCE", value);
    },
  },
  mutations: {
    ADD(state, value) {
      state.sum += value;
    },
    REDUCE(state, value) {
      state.sum -= value;
    },
  },
  getters: {
    totalAmount(state) {
      return state.sum * state.qty;
    },
  },
  state: {
    sum: 1,
    qty: 5,
  },
};
const userStore = {
  namespaced: true, //命名空间要开启
  actions: {
    adduser(context, value) {
      context.commit("ADDUSER", value);
    },
    reduceuser(context, value) {
      context.commit("REDUCEUSER", value);
    },
  },
  mutations: {
    ADDUSER(state, value) {
      state.userList.push(value);
    },
    REDUCEUSER(state, value) {
      state.userList.splice(value, 1);
    },
  },
  getters: {
    fullname(state) {
      return state.frontName + "-" + state.lastName;
    },
  },
  state: {
    userList: [],
    frontName: "",
    lastName:'',
  },
};


export default new Vuex.Store({
  modules: {
    countStore,
    userStore,
  },
});
组件中使用:
     <el-button @click="add(num)">add</el-button>
      <el-button @click="reduce(num)">reduce</el-button>
      <el-button @click="addnew(num)">addnew</el-button>
      <el-button @click="reduceNew(num)">reduceNew</el-button>
      <el-button @click="addnewuser(num)">addnewuser</el-button>
      <el-button @click="reduceNewuser(num)">reduceNewuser</el-button>
      <span>{{ sum }}</span>
      <span>{{ totalAmount }}</span>

import { mapActions, mapGetters, mapMutations, mapState } from "vuex";


computed: {

    ...mapState('countStore',['sum','qty']),
    ...mapState('userStore',['userList','lastName','firstName']),
    ...mapGetters('countStore',['totalAmounts']),
    ...mapGetters('userStore',['fullname']),
  },
methods: {
…mapMutations(‘countStore’,{addnew:‘ADD’,reduceNew:‘REDUCE’}),
…mapMutations(‘userStore’,{addnewuser:‘ADDUSER’,reduceNewuser:‘REDUCEUSER’}),
…mapActions(‘countStore’,{add:‘add’,reduce:‘reduce’}),
…mapActions(‘userStore’,{adduser:‘adduser’,reduceuser:‘reduceuser’})
},
第二种写法
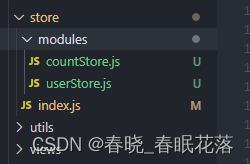
新建modules文件夹
新建countStore.js,userStore.js
1、countStore.js
export default  {
  namespaced: true, //命名空间要开启
  actions: {
    //
    add(context, value) {
      context.commit("ADD", value);
    },
    reduce(context, value) {
      context.commit("REDUCE", value);
    },
  },
  mutations: {
    ADD(state, value) {
      state.sum += value;
    },
    REDUCE(state, value) {
      state.sum -= value;
    },
  },
  getters: {
    totalAmount(state) {
      return state.sum * state.qty;
    },
  },
  state: {
    sum: 1,
    qty: 5,
  },
};
2、userStore.js
export default {
  namespaced: true, //命名空间要开启
  actions: {
    //
    adduser(context, value) {
      context.commit("ADDUSER", value);
    },
    reduceuser(context, value) {
      context.commit("REDUCEUSER", value);
    },
  },
  mutations: {
    ADDUSER(state, value) {
      state.userList.push(value);
    },
    REDUCEUSER(state, value) {
      state.userList.splice(value, 1);
    },
  },
  getters: {
    fullname(state) {
      return state.frontName + "-" + state.lastName;
    },
  },
  state: {
    userList: [],
    firstName: "",
    lastName: "",
  },
};
3、store/index.js
import Vuex from "vuex";
import Vue from "vue";
Vue.use(Vuex);
import countStore from './modules/countStore'
import userStore from './modules/userStore'
export default new Vuex.Store({
  modules: {
    countStore,
    userStore,
  },
});
总结
本文不包含总结,共12553字数,共740行。年前开始写的,前后消磨了快一周才写完。
新年里写的文章,所以祝看到此文的伙伴们,新的一年 :一元复始,万象更新!!


 922
922


 被折叠的 条评论
为什么被折叠?
被折叠的 条评论
为什么被折叠?
 到【灌水乐园】发言


