


Linux中的基础配置操作
1.安装好mysql
[root@localhost ~]#yum install mariadb -y
[root@localhost ~]# yum install mariadb-server mariadb -y
2.启动服务
  [root@localhost lianxi]# systemctl start mariadb
     #使用yum安装的可以使用此类的方法,其他的方法要进行文件配置
3.查看mysql是否启动
 [root@localhost lianxi]# ps -ef |grep maria
	 mysql      2003   1839  0 20:29 ?        00:00:00 /usr/libexec/mysqld --basedir=/usr --datadir=/var/lib/mysql --plugin-dir=/usr/lib64/mysql/plugin --log-error=/var/log/mariadb/mariadb.log --pid-file=/var/run/mariadb/mariadb.pid --socket=/var/lib/mysql/mysql.sock
	 root       2040   1615  0 20:31 pts/0    00:00:00 grep --color=auto maria
4.表示服务已经启动
[root@localhost ~]# lsof -i:3306
COMMAND  PID  USER   FD   TYPE DEVICE SIZE/OFF NODE NAME
mysqld  2003 mysql   14u  IPv4  23879      0t0  TCP *:mysql (LISTEN)
[root@localhost ~]#
5.在服务端给mysql的root用户设定密码123456
[root@localhost ~]# mysqladmin -u root password 123456
6.连接到mysql,填写刚才设定的密码
[root@localhost ~]# mysql -u root -p
Enter password:
Welcome to the MariaDB monitor.  Commands end with ; or \g.
Your MariaDB connection id is 3
Server version: 5.5.68-MariaDB MariaDB Server

Copyright (c) 2000, 2018, Oracle, MariaDB Corporation Ab and others.

Type 'help;' or '\h' for help. Type '\c' to clear the current input statement.

MariaDB [(none)]>
7.基本操作
  MariaDB [(none)]> show databases;  #查看有哪些数据库
	+--------------------+
	| Database           |
	+--------------------+
	| information_schema |
	| mysql              |
	| performance_schema |
	| test               |
	+--------------------+
	4 rows in set (0.00 sec)

MariaDB [(none)]> use mysql   #使用mysql数据库
	Reading table information for completion of table and column names
	You can turn off this feature to get a quicker startup with -A

Database changed
MariaDB [mysql]> show tables;    #查看数据库有哪些表

MariaDB [mysql]> select * from user \G;  #查看当前user表里的内容


  MariaDB [mysql]> update user set Host="%" where User="root" and Host = "localhost";

  MariaDB [(none)]> grant all on *.* to sc@'%' identified by '123456';
    Query OK, 0 rows affected (0.00 sec)


   #创建数据库,出现OK表示成功
   MariaDB [mysql]> create database wym;
Query OK, 1 row affected (0.00 sec)

MariaDB [mysql]> show databases;
	+--------------------+
	| Database           |
	+--------------------+
	| information_schema |
	| mysql              |
	| performance_schema |
	| test               |
	| wym                |
	+--------------------+
	5 rows in set (0.00 sec)
    MariaDB [mysql]> use wym;  #使用另一个数据库
	Database changed
	MariaDB [wym]>


   创建表格userinfo
    MariaDB [wym]> create table userinfo(
    ->     uesrname varchar(128),
    ->     userage int
    -> )charset=utf8;
	Query OK, 0 rows affected (0.00 sec)

MariaDB [wym]> show tables;
	+---------------+
	| Tables_in_wym |
	+---------------+
	| userinfo      |
	+---------------+
	1 row in set (0.00 sec)

MariaDB [wym]> insert into userinfo(uesrname, userage) values("wym1", 12);
	Query OK, 1 row affected (0.00 sec)

   显示表中内容
    MariaDB [wym]> select * from userinfo;
	+----------+---------+
	| uesrname | userage |
	+----------+---------+
	| wym1     |      12 |
	| wym2     |      13 |
	+----------+---------+
	2 rows in set (0.00 sec)

MariaDB [wym]>
8.设置权限
MariaDB [(none)]> grant all on *.* to wym@'%' identified by '123456';  #给这个用户设置权限
Query OK, 0 rows affected (0.00 sec)
[root@localhost ~]# lsof -i:3306  #检查mysql是否启动
COMMAND  PID  USER   FD   TYPE DEVICE SIZE/OFF NODE NAME
mysqld  4147 mysql   14u  IPv4  58687      0t0  TCP *:mysql (LISTEN)
MariaDB [(none)]> flush privileges;  #刷新权限
Query OK, 0 rows affected (0.00 sec)
[root@localhost ~]# mysql -u wym -p   #使用该用户进行登录
Enter password:
ERROR 1045 (28000): Access denied for user 'wym'@'localhost' (using password: YES)  #出现yes表示登录成功
[root@localhost ~]#  iptables -F   #清除所有规则来暂时停止防火墙(doge)
Python中进行的操作
import pymysql
#连接数据库
db = pymysql.connect(
host = "192.168.28.128", #mysql主机ip
user = "wym", #用户名
passwd = "123456", #密码
database = "wym" #数据库
)
#使用cursor()方法创建一个游标对象
cursor = db.cursor()
#使用execute执行sql语句
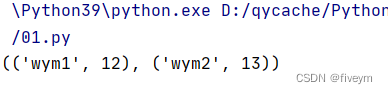
cursor.execute("select * from userinfo");
data = cursor.fetchall()
print(data)
出现下列图片表示拿取数据库中的内容成功


 4万+
4万+


 被折叠的 条评论
为什么被折叠?
被折叠的 条评论
为什么被折叠?
 到【灌水乐园】发言


