


负责接收一段代码,把代码扔到我们的队列当中、每一次我们去运行一段代码
运行结束之后、把我们的结果返回给我们的服务器
先把依赖复制过来、我们需要动态的把用户传过来的Java代码编译然后执行
需要加入依赖joor-java-8、用Java的代码的写法举例子
未来自己实现的时候可以换成任意语言、在这个线程里面是有一堆的bot代码等待执行
然后我们会有一个队列、每次我们从队列中取出一个bot代码来执行
执行的时候用的是一个Java的包会方便的去帮我们动态编译一段Java代码
未来可以在云端把他换成一个docker、你在云端自动启动一个docker容器
给docker设置一个内存上限200M再去docker中动态执行一段Java代码用timeout
去限制某一个程序的执行时间、这样又安全又可以支持其他语言
所以这里我们用Java一个包来动态执行一段Java代码
开一个线程用我们的joor去动态执行一段代码
实现Service和Controller
实现完service之后
去实现我们的controller、怎么将SpringBoot和docker关联?
SpringBoot里面可以直接执行shell命令
注意要用127.0.0.1因为我们的config里写的是127.0.0.1
前端加入选择框
每一步的传递都需要加上额外的参数
botid、前端先加上一个框
中间加上一个复选框、需要动态的获得我们的bot列表
这样我们的bot就传过来了、我们需要把bot的信息传回到前端
把前面每一个通信都加上BotId
前面通信的时候每一次通信都是没有加botid的
userid、我们需要把前面每一个通信都加上botid 对应service层也要加上
发的时候收的时候都需要传我们的id
判断人或者机器+编码
在创建完地图执行nextstep的时候
判断一下当前的玩家是人还是代码、如果是代码的话就需要像我们的微服务发送一
段代码、然后让她自动去算、如果是人来操作的话就要等待用户的输入
所以这里需要判断一下如果player的botid=-1的话表示是由人来操作
编码的时候我们随意编只要把我们的编码编成字符串就可以
第一段传的是地图信息、中间用#号隔开
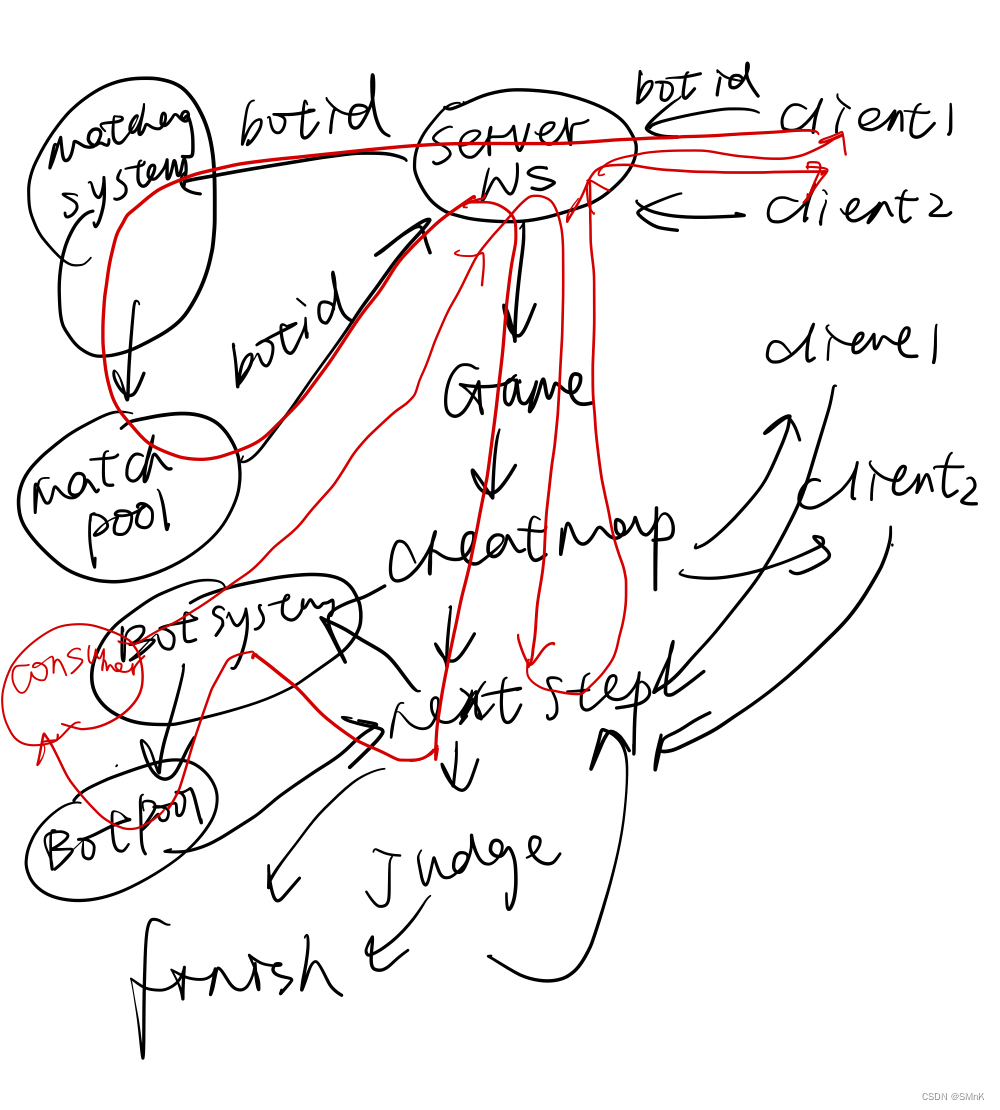
消费者生产者模型
微服务可以不断的去接收用户的一个输入
当接收的代码比较多的时候、我们应该把他们所有接收到的代码放到一个队列里面
我们每接收到一个任务、消费者是一个单独的线程
苦力不断是完成任务,每来一个任务检测队列是否为空如果队列不空,从对头拿出
代码执行、执行完之后再去检查
consume里面开一个新的线程
consume里面开一个新的线程
如果被awit阻塞住后就会被唤醒、然后执行
实现一下consume操作、需要在consume里面开一个新的线程
这样我们就可以从前端动态的传一份代码过来传完之后动态的编译一遍
编译完之后我们就可以动态的调用它编译后的结果
代码执行,此项目只支持java代码的执行,用的是joor java 8实现
可扩展为docker实现,设置内存上限,时间,用命令可执行所有语言代码,并具备一定安全性,因为docker与运行环境隔绝
让BotRunning System获得到前端选择的Bot
新建Bot执行微服务项目
右键backendcloud->新建->模块
导包
改pom
<dependencies>
        <dependency>
            <groupId>org.springframework.boot</groupId>
            <artifactId>spring-boot-starter-web</artifactId>
        </dependency>

        <dependency>
            <groupId>org.springframework.boot</groupId>
            <artifactId>spring-boot-starter-test</artifactId>
            <scope>test</scope>
        </dependency>

        <!-- https://mvnrepository.com/artifact/org.springframework.boot/spring-boot-starter-security -->
        <dependency>
            <groupId>org.springframework.boot</groupId>
            <artifactId>spring-boot-starter-security</artifactId>
            <version>2.7.1</version>
        </dependency>

        <!-- https://mvnrepository.com/artifact/org.projectlombok/lombok -->
        <dependency>
            <groupId>org.projectlombok</groupId>
            <artifactId>lombok</artifactId>
            <version>1.18.24</version>
            <scope>provided</scope>
        </dependency>

        <!-- https://mvnrepository.com/artifact/org.jooq/joor-java-8 -->
        <dependency>
            <groupId>org.jooq</groupId>
            <artifactId>joor-java-8</artifactId>
            <version>0.9.14</version>
        </dependency>
    </dependencies>
。
BotRunningSystem接收前端选择的botId
文件结构
botrunningsystem
config
RestTemplateConfig.java
SecurityConfig.java
controller
BotRunningController.java
service
impl
BotRunningServiceImpl.java
BotRunningService.java
BotRunningSystemApplication.java
将BotRunningSystem/Main.java 更名为 BotRunningSystemApplication.java
@SpringBootApplication
public class BotRunningSystemApplication {
    public static void main(String[] args) {
        SpringApplication.run(BotRunningSystemApplication.class, args);
    }
}
接口
public interface BotRunningService {

    String addBot(Integer userId, String botCode, String input);
}
接口实现
@Service
public class BotRunningServiceImpl implements BotRunningService {

    @Override
    public String addBot(Integer userId, String botCode, String input) {
        System.out.println("add bot: " + userId + " " + botCode + " " + input);
        return "add bot success";
    }
}
控制器
@RestController
public class BotRunningController {
    @Autowired
    private BotRunningService botRunningService;

    @PostMapping("/bot/add/")
    public String addBot(@RequestParam MultiValueMap<String, String> data) {
        Integer userID = Integer.parseInt(Objects.requireNonNull(data.getFirst("user_id")));
        String botCode = data.getFirst("bot_code");
        String input = data.getFirst("input");
        return botRunningService.addBot(userID, botCode, input);
    }
}
权限控制(网关)
@Configuration
@EnableWebSecurity
public class SecurityConfig extends WebSecurityConfigurerAdapter {
    @Override
    protected void configure(HttpSecurity http) throws Exception {
        http.csrf().disable()
                .sessionManagement().sessionCreationPolicy(SessionCreationPolicy.STATELESS)
                .and()
                .authorizeRequests()
                .antMatchers("/bot/add/").hasIpAddress("127.0.0.1")
                .antMatchers(HttpMethod.OPTIONS).permitAll()
                .anyRequest().authenticated();
    }
}
服务间发送消息的RestTemplate
@Configuration
public class RestTemplateConfig {

    @Bean
    public RestTemplate getRestTemplate() {
        return new RestTemplate();
    }
}
端口配置
在resources新建文件
Application.properties

server.port=3002
前端选择Bot
匹配界面
添加选择操作方式
MatchGround.vue

<template>
    <div class="matchground">
        <div class="row">
            <div class="col-4">
                ...
            </div>
            <div class="col-4">
                <div class="user-select-bot">
                    <select class="form-select" aria-label="Default select example" v-model="select_bot">
                        <option value="-1" selected>亲自出马</option>
                        <option v-for="bot in bots" :key="bot.id" :value="bot.id">{{ bot.title }}</option>
                    </select>
                </div>
            </div>
            <div class="col-4">
                ...
            </div>
            <div class="col-12" style="text-align: center; padding-top: 15vh;">
                ...
            </div>
        </div>
    </div>
</template>

<script>
import { ref } from 'vue';
import { useStore } from 'vuex';
import $ from 'jquery';

export default {
    setup() {
        ...

        let bots = ref([]);
        let select_bot = ref("-1");

        const click_match_btn = () => {
            if(match_btn_info.value === "开始匹配") {
                match_btn_info.value = "取消";
                store.state.pk.socket.send(JSON.stringify({
                    event: "start-matching",
                    bot_id: select_bot.value,
                }));
            }

            ...
        };

        const refresh_bots = () => {
            $.ajax({
                url: "http://127.0.0.1:3000/user/bot/getlist/",
                type: "get",
                headers: {
                    'Authorization': "Bearer " + store.state.user.token,
                },
                success(resp) {
                    bots.value = resp;
                }
            })
        };
        refresh_bots();
        return {
            ...

            bots,
            select_bot,
        }
    }
}
</script>

<style scoped>
...

div.user-select-bot {
    padding-top: 20vh;
}
div.user-select-bot > select {
    width: 60%;
    margin: 0 auto;
}
</style>
后端接收bot
BackEnd接收Bot
WebSocketServer接收到匹配请求,将bot传给匹配服务
@Component
// url链接:ws://127.0.0.1:3000/websocket/**
@ServerEndpoint("/websocket/{token}")  // 注意不要以'/'结尾
public class WebSocketServer {
    ...

    private void startMatching(Integer botId) {
        System.out.println("start matching!");
        MultiValueMap<String, String> data = new LinkedMultiValueMap<>();
        data.add("user_id", this.user.getId().toString());
        data.add("rating", this.user.getRating().toString());
        data.add("bot_id", botId.toString());
        restTemplate.postForObject(addPlayerUrl, data, String.class);
    }

    ...

    @OnMessage
    public void onMessage(String message, Session session) {
        ...

        if("start-matching".equals(event)) {
            startMatching(data.getInteger("bot_id"));
        }

        ...
    }

    ...
}
Matching System接收Bot
Matching System接收到backend传的botId,将bot传给BotRunningSystem服务
控制器
@RestController
public class MatchingController {
    @Autowired
    private MatchingService matchingService;

    // 参数不能使用普通map,MultiValueMap和普通map的区别时,这个是一个键对应多个值
    @PostMapping("/player/add/")
    public String addPlayer(@RequestParam MultiValueMap<String, String> data) {
        ...

        Integer botId = Integer.parseInt(Objects.requireNonNull(data.getFirst("bot_id")));
        return matchingService.addPlayer(userId, rating, botId);
    }

    ...
}
接口
public interface MatchingService {

    String addPlayer(Integer userId, Integer rating, Integer botId);

    ...
}
接口实现
@Service
public class MatchingServiceImpl implements MatchingService {
    public static final MatchingPool matchingPool = new MatchingPool();

    @Override
    public String addPlayer(Integer userId, Integer rating, Integer botId) {
        System.out.println("Add Player: " + userId + " " + rating + " " + botId);
        matchingPool.addPlayer(userId, rating, botId);
        return "add player success";
    }

    ...
}
匹配池
// 匹配池是多线程的
@Component
public class MatchingPool extends Thread {
    ...

    public void addPlayer(Integer userId, Integer rating, Integer botId) {
        // 在多个线程(匹配线程遍历players时,主线程调用方法时)会操作players变量,因此加锁
        lock.lock();
        try {
            players.add(new Player(userId, rating, botId, 0));
        } finally {
            lock.unlock();
        }
    }

    ...
}
匹配池的Player
@Data
@AllArgsConstructor
@NoArgsConstructor
public class Player {
    private Integer userId;
    private Integer rating;
    private Integer botId;
    private Integer waitingTime;
}
匹配池返回结果加上botId
// 匹配池是多线程的
@Component
public class MatchingPool extends Thread {
    ...

    private void sendResult(Player a, Player b) {   // 返回匹配结果
        System.out.println("send result: " + a + " " + b);
        MultiValueMap<String, String> data = new LinkedMultiValueMap<>();
        data.add("a_id", a.getUserId().toString());
        data.add("a_bot_id", a.getBotId().toString());
        data.add("b_id", b.getUserId().toString());
        data.add("b_bot_id", b.getBotId().toString());
        restTemplate.postForObject(startGameUrl, data, String.class);
    }

    ...
}
BackEnd接收匹配成功返回的botId
StartGameController.java
@RestController
public class StartGameController {
    ...

    @PostMapping("/pk/start/game/")
    public String startGame(@RequestParam MultiValueMap<String, String> data) {
        Integer aId = Integer.parseInt(Objects.requireNonNull(data.getFirst("a_id")));
        Integer aBotId = Integer.parseInt(Objects.requireNonNull(data.getFirst("a_bot_id")));
        Integer bId = Integer.parseInt(Objects.requireNonNull(data.getFirst("b_id")));
        Integer bBotId = Integer.parseInt(Objects.requireNonNull(data.getFirst("b_bot_id")));
        return startGameService.startGame(aId, aBotId, bId, bBotId);
    }
}
StartGameService.java
public interface StartGameService {

    String startGame(Integer aId, Integer aBotId, Integer bId, Integer bBotId);
}
StartGameServiceImpl.java
@Service
public class StartGameServiceImpl implements StartGameService {

    @Override
    public String startGame(Integer aId, Integer aBotId, Integer bId, Integer bBotId) {
        System.out.println("start gameL: " + aId + " " + bId);
        WebSocketServer.startGame(aId, aBotId, bId, bBotId);
        return "start game success";
    }
}
WebSocketServer.java
@Component
// url链接:ws://127.0.0.1:3000/websocket/**
@ServerEndpoint("/websocket/{token}")  // 注意不要以'/'结尾
public class WebSocketServer {
    ...

    public static BotMapper botMapper;

    ...

    @Autowired
    public void setBotMapper(BotMapper botMapper) {
        WebSocketServer.botMapper = botMapper;
    }

    ...

    public static void startGame(Integer aId, Integer aBotId, Integer bId, Integer bBotId) {
        User a = userMapper.selectById(aId), b = userMapper.selectById(bId);
        Bot botA = botMapper.selectById(aBotId), botB = botMapper.selectById(bBotId);

        Game game = new Game(
                13,
                14,
                20,
                a.getId(),
                botA,
                b.getId(),
                botB);

        ...
    }

    ...

}
Player.java
@Data
@AllArgsConstructor
@NoArgsConstructor
public class Player {
    private Integer id;
    private Integer botId;  // -1表示亲自出马,否则表示用AI打
    private String botCode;

    ...
}
WebSocketServer.java
将RestTemplate变成public,若是代码输入则屏蔽人的输入
@Component
// url链接:ws://127.0.0.1:3000/websocket/**
@ServerEndpoint("/websocket/{token}")  // 注意不要以'/'结尾
public class WebSocketServer {
    ...

    public static RestTemplate restTemplate;

    private void move(int direction) {
        if(game.getPlayerA().getId().equals(user.getId())) {
            if(game.getPlayerA().getBotId().equals(-1))     // 亲自出马则接收输入
                game.setNextStepA(direction);
        } else if(game.getPlayerB().getId().equals(user.getId())) {
            if(game.getPlayerB().getBotId().equals(-1))
                game.setNextStepB(direction);
        }
    }

    ...
}
Game.java
public class Game extends Thread {
    ...

    private static final String addBotUrl = "http://127.0.0.1:3002/bot/add/";


    public Game(
            Integer rows,
            Integer cols,
            Integer inner_walls_count,
            Integer idA,
            Bot botA,
            Integer idB,
            Bot botB
    ) {
        this.rows = rows;
        this.cols = cols;
        this.inner_walls_count = inner_walls_count;
        this.g = new int[rows][cols];

        Integer botIdA = -1, botIdB = -1;
        String botCodeA = "", botCodeB = "";

        if(botA != null) {
            botIdA = botA.getId();
            botCodeA = botA.getContent();
        }
        if(botB != null) {
            botIdB= botB.getId();
            botCodeB = botB.getContent();
        }

        playerA = new Player(idA, botIdA, botCodeA, rows - 2, 1, new ArrayList<>());
        playerB = new Player(idB, botIdB, botCodeB, 1, cols - 2, new ArrayList<>());
    }


    private String getInput(Player player) {    // 将当前局面信息编码成字符串
        // 地图#my.sx#my.sy#my操作#you.sx#you.sy#you操作
        Player me, you;
        if(playerA.getId().equals(player.getId())) {
            me = playerA;
            you = playerB;
        } else {
            me = playerB;
            you = playerA;
        }

        return getMapString() + "#" +
                me.getSx() + "#" +
                me.getSy() + "#(" +
                me.getStepsString() + ")#" +    // 加()是为了预防操作序列为空
                you.getSx() + "#" +
                you.getSy() + "#(" +
                you.getStepsString() + ")";
    }

    private void sendBotCode(Player player) {
        if(player.getBotId().equals(-1)) return;
        MultiValueMap<String, String> data = new LinkedMultiValueMap<>();
        data.add("user_id", player.getId().toString());
        data.add("bot_code", player.getBotCode());
        data.add("input", getInput(player));
        WebSocketServer.restTemplate.postForObject(addBotUrl, data, String.class);
    }

    // 接收玩家的下一步操作
    private boolean nextStep() {
        // 每秒五步操作,因此第一步操作是在200ms后判断是否接收到输入。
        try {
            Thread.sleep(200);
        } catch (InterruptedException e) {
            throw new RuntimeException(e);
        }

        sendBotCode(playerA);
        sendBotCode(playerB);

        ...
    }

    ...

}
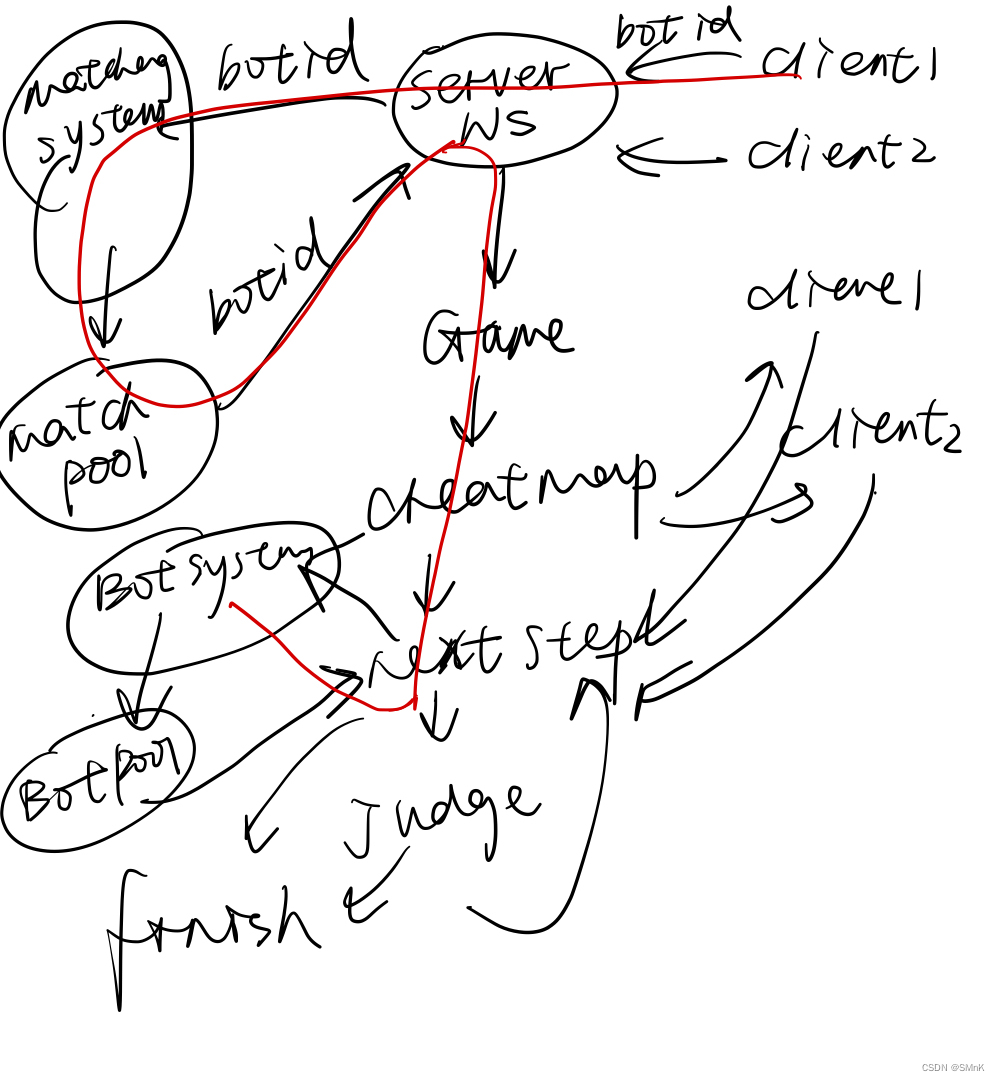
BotRunning System的实现
思路:
评测器是一个经典的生产者消费者模型,此服务生产者会将任务放进一个队列中,
消费者是单独的一个线程,当有任务就会从队头立即执行;并且关键问题是评测
器的执行代码不能单纯的用sleep 1s去判断是否有任务,这样很影响评测体验,
因此需要用到Condition Variable,当有任务执行,无任务等待。
文件结构
matchingsystem
service
impl
utils
Bot.java
BotPool.java
Consumer.java
utils
Bot.java
BotInterface.java
Bot的实现
@Data
@AllArgsConstructor
@NoArgsConstructor
public class Bot {
    Integer userId;
    String botCode;
    String input;
}
BotPoll的实现
虽然队列没用消息队列,但是因为我们写了条件变量与锁的操作,所以等价于消息队列
public class BotPool extends Thread {
    // 以下的锁和条件变量加不加static都可以,因为BotPool只有一个
    private final ReentrantLock lock = new ReentrantLock();
    private final Condition condition = lock.newCondition();
    private final Queue<Bot> bots = new LinkedList<>();

    public void addBot(Integer userId, String botCode, String input) {
        lock.lock();
        try {
            bots.add(new Bot(userId, botCode, input));
            condition.signalAll();
        } finally {
            lock.unlock();
        }
    }

    private void consume(Bot bot) {

    }

    @Override
    public void run() {
        while(true) {
            lock.lock();
            if(bots.isEmpty()) {
                try {
                    // 若执行了await会自动释放锁
                    condition.await();
                } catch (InterruptedException e) {
                    e.printStackTrace();
                    lock.unlock();
                    break;
                }
            } else {
                Bot bot = bots.remove();
                lock.unlock();
                // 耗时操作,因此要在释放锁之后执行
                consume(bot);
            }
        }
    }
BotRunningServiceImpl.java
加任务
@Service
public class BotRunningServiceImpl implements BotRunningService {
    public static final BotPool botPool = new BotPool();

    @Override
    public String addBot(Integer userId, String botCode, String input) {
        System.out.println("add bot: " + userId + " " + botCode + " " + input);
        botPool.addBot(userId, botCode, input);
        return "add bot success";
    }
}
BotPool线程的启动
@SpringBootApplication
public class BotRunningSystemApplication {
    public static void main(String[] args) {
        BotRunningServiceImpl.botPool.start();
        SpringApplication.run(BotRunningSystemApplication.class, args);
    }
}
BotInterface.java
用户写Bot实现的接口
BotInterface.java


public interface BotInterface {
    Integer nextMove(String input);
}
Bot.java
public class Bot implements BotInterface {

    @Override
    public Integer nextMove(String input) {
        return 0;   // 向上走
    }
}
Consumer的实现
public class Consumer extends Thread {
    private Bot bot;

    public void startTimeout(long timeout, Bot  bot) {
        this.bot = bot;
        this.start();

        // 在 程序运行结束后 或 程序在指定timeout时间后还未执行完毕 直接中断代码执行
        try {
            this.join(timeout);
            this.interrupt();
        } catch (InterruptedException e) {
            e.printStackTrace();
        } finally {
            this.interrupt();
        }
    }

    private String addUid(String code, String uid) {    // 在code中的Bot类名后添加uid
        int k = code.indexOf(" implements BotInterface");
        return code.substring(0, k) + uid + code.substring(k);
    }

    @Override
    public void run() {
        UUID uuid = UUID.randomUUID();
        String uid = uuid.toString().substring(0, 8);
        BotInterface botInterface = Reflect.compile(
                "com.kob.botrunningsystem.utils.Bot" + uid,
                addUid(bot.getBotCode(), uid)
        ).create().get();

        Integer direction = botInterface.nextMove(bot.getInput());
        System.out.println("move-direction: " + bot.getUserId() + " " + direction);
    }
}
调用Consumer
public class BotPool extends Thread {
    ...

    private void consume(Bot bot) {
        Consumer consumer = new Consumer();
        consumer.startTimeout(2000, bot);
    }

    ...
}
前端Bug的修改
在游戏结束后,点到其他页面再点回pk页面,结果没有消失
PkIndexView.vue

<template>
    ...
</template>

<script>
...

export default {
    ...

    setup() {
        const store = useStore();
        const socketUrl = `ws://127.0.0.1:3000/websocket/${store.state.user.token}/`;

        store.commit("updateLoser", 'none');

        ...
    }
}
</script>

<style scoped>

</style>
将Bot执行结果传给前端
BackEnd接收Bot代码的结果
文件结构
backend
controller
pk
ReceiveBotMoveController.java
service
impl
pk
ReceiveBotMoveServiceImpl.java
pk
ReceiveBotMoveService.java
接口
public interface ReceiveBotMoveService {

    String receiveBotMove(Integer userId, Integer direction);
}
WebSocketServer操作类
将game改为public
...

@Component
// url链接:ws://127.0.0.1:3000/websocket/**
@ServerEndpoint("/websocket/{token}")  // 注意不要以'/'结尾
public class WebSocketServer {
    ...

    public Game game = null;

    ...
}
接口实现
@Service
public class ReceiveBotMoveServiceImpl implements ReceiveBotMoveService {

    @Override
    public String receiveBotMove(Integer userId, Integer direction) {
        System.out.println("receive bot move: " + userId + " " + direction + " ");
        if(WebSocketServer.users.get(userId) != null) {
            Game game = WebSocketServer.users.get(userId).game;
            if(game != null) {
                if(game.getPlayerA().getId().equals(userId)) {
                    game.setNextStepA(direction);
                } else if(game.getPlayerB().getId().equals(userId)) {
                    game.setNextStepB(direction);
                }
            }
        }
        return "receive bot move success";
    }
}
控制器
@RestController
public class ReceiveBotMoveController {
    @Autowired
    private ReceiveBotMoveService receiveBotMoveService;

    @PostMapping("/pk/receive/bot/move/")
    public String receiveBotMove(@RequestParam MultiValueMap<String, String> data) {
        Integer userId = Integer.parseInt(Objects.requireNonNull(data.getFirst("user_id")));
        Integer direction = Integer.parseInt(Objects.requireNonNull(data.getFirst("direction")));
        return receiveBotMoveService.receiveBotMove(userId, direction);
    }
}
权限控制(网关)
放行接口
@Configuration
@EnableWebSecurity
public class SecurityConfig extends WebSecurityConfigurerAdapter {
    ...

    @Override
    protected void configure(HttpSecurity http) throws Exception {
        http.csrf().disable()
                .sessionManagement().sessionCreationPolicy(SessionCreationPolicy.STATELESS)
                .and()
                .authorizeRequests()
                // 放行这两个接口
                .antMatchers("/user/account/token/", "/user/account/register/", "/getKaptcha").permitAll()
                .antMatchers("/pk/start/game/", "/pk/receive/bot/move/").hasIpAddress("127.0.0.1")
                .antMatchers(HttpMethod.OPTIONS).permitAll()
                .anyRequest().authenticated();

        http.addFilterBefore(jwtAuthenticationTokenFilter, UsernamePasswordAuthenticationFilter.class);
    }

    ...
}
BotRunningSystem返回Bot执行结果
Consumer.java
package com.kill9.botsystem.service.impl.utils;

import com.kill9.botsystem.utils.BotInterface;
import org.joor.Reflect;
import org.springframework.beans.factory.annotation.Autowired;
import org.springframework.stereotype.Component;
import org.springframework.util.LinkedMultiValueMap;
import org.springframework.util.MultiValueMap;
import org.springframework.web.client.RestTemplate;

import java.util.UUID;

@Component
public class Consumer extends Thread{

    private Bot bot;

    private static RestTemplate restTemplate;
    private final static String receiveBotMoveUrl = "http://127.0.0.1:3000/pk/receive/bot/move";

    @Autowired
    public void setRestTemplate(RestTemplate restTemplate){
        Consumer.restTemplate = restTemplate;
    }
    public void startTimeOut(long timeout,Bot bot) {
        this.bot = bot;
        //开一个新的线程去执行run
        this.start();

        //当前线程继续执行join ,等待时间超过timeout
        try{
            this.join(timeout);
        }catch (InterruptedException e){
            e.printStackTrace();
        }finally {
            this.interrupt();//中断当前线程
        }
    }

    private String addUid(String code,String uid){
        //在code中的Bot类名 后添加Uid
        int k = code.indexOf(" implements com.kill9.botsystem.utils.BotInterface");
        return code.substring(0,k)+uid+code.substring(k);
    }
    @Override
    public void run() {
        //动态编译一个代码  如果类重名的话,只会编译一次 ,为了能够让类名不一样 + uuid
        UUID uuid = UUID.randomUUID();
        //前8位
        String uid = uuid.toString().substring(0,8);
        BotInterface botInterface = Reflect.compile(
                "com.kill9.botsystem.utils.Bot"+uid,
                addUid(bot.getBotCode(), uid)
        ).create().get();
        Integer direction = botInterface.nextMove(bot.getInput());
        System.out.println("move-d:" + bot.getUserId() + " "+ direction);
        MultiValueMap<String ,String > data = new LinkedMultiValueMap<>();
        data.add("user_id",bot.getUserId().toString());
        data.add("direction",direction.toString());
        //结果返回给backend服务器
        restTemplate.postForObject(receiveBotMoveUrl,data,String.class);
    }
}
厉害的bot代码:
public class Bot implements BotInterface {

    static class Cell {
        public int x, y;
        public Cell(int x, int y) {
            this.x = x;
            this.y = y;
        }
    }

    // 检查当前回合,蛇的长度是否会增加
    private boolean check_tail_increasing(int step) {
        if(step <= 10) return true;
        return step % 3 == 1;
    }

    public List<Cell> getCells(int sx, int sy, String steps) {
        steps = steps.substring(1, steps.length() - 1);
        List<Cell> res = new ArrayList<>();

        int[] dx = {-1, 0, 1, 0}, dy = {0, 1, 0, -1};
        int x = sx, y = sy;
        int step = 0;
        res.add(new Cell(x, y));
        for(int i = 0; i < steps.length(); i++) {
            int d = steps.charAt(i) - '0';
            x += dx[d];
            y += dy[d];
            res.add(new Cell(x, y));
            if(!check_tail_increasing(++step)) {
                res.remove(0);
            }
        }
        return res;
    }

    @Override
    public Integer nextMove(String input) {
        // 地图#my.sx#my.sy#(my操作)#you.sx#you.sy#(you操作)
        String[] strs = input.split("#");
        int[][] g = new int[13][14];
        for(int i = 0, k = 0; i < 13; i++) {
            for(int j = 0; j < 14; j++, k++) {
                if(strs[0].charAt(k) == '1') {
                    g[i][j] = 1;
                }
            }
        }

        int aSx = Integer.parseInt(strs[1]), aSy = Integer.parseInt(strs[2]);
        int bSx = Integer.parseInt(strs[4]), bSy = Integer.parseInt(strs[5]);

        List<Cell> aCells = getCells(aSx, aSy, strs[3]);
        List<Cell> bCells = getCells(bSx, bSy, strs[6]);

        for(Cell c : aCells) g[c.x][c.y] = 1;
        for(Cell c : bCells) g[c.x][c.y] = 1;

        int[] dx = {-1, 0, 1, 0}, dy = {0, 1, 0, -1};
        for(int i = 0; i < 4; i++) {
            int x = aCells.get(aCells.size() - 1).x + dx[i];
            int y = aCells.get(aCells.size() - 1).y + dy[i];
            if(x >= 0 && x < 13 && y >= 0 && y < 14 && g[x][y] == 0) {
                return i;
            }
        }
        return 0;
    }
}


 637
637


 被折叠的 条评论
为什么被折叠?
被折叠的 条评论
为什么被折叠?
 到【灌水乐园】发言


