


一、设计目标
1)完成类微信的门户页面框架设计,APP最少必须包含4个tab页面,框架设计需要使用fragment,activity。
2)进行页面切换时,顶部title和中间页面同步改变,底部被选择的图标高亮显示。
二、功能说明
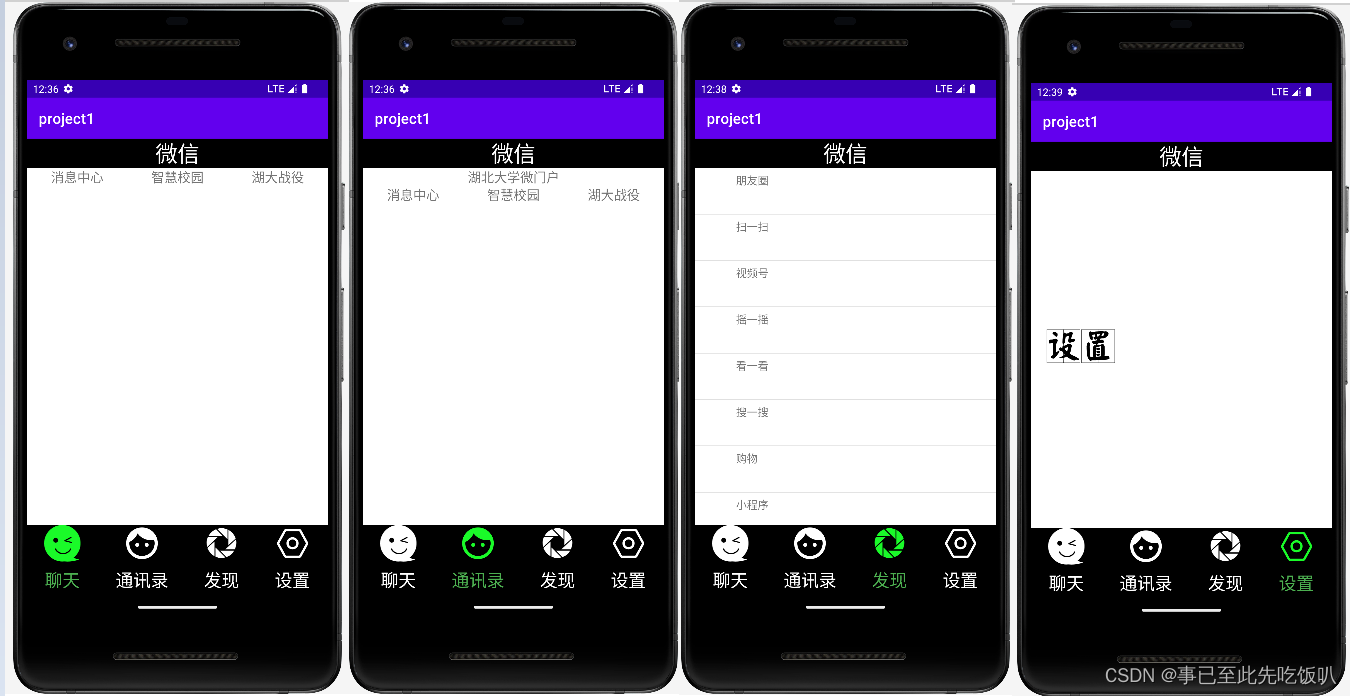
1)点击底部按钮,可实现“聊天”“通讯录”“发现”“设置”4个页面切换操作
2)在聊天页面,可显示“湖北大学微门户”“消息通知”“湖大战役”等文本信息
3)在通讯录页面,可显示“消息通知”“湖大战役”等文本信息
4)在发现页面,可滚动显示“扫一扫”“朋友圈”“看一看”“购物”等文本信息
5)在设置页面,可显示带有“设置”字样的图片
三、代码解析
1.顶部代码
在LinearLayout中添加TextView,将LinearLayout设置为horizontal,TextView的gravity设置为center,text设置为“微信”
<?xml version="1.0" encoding="utf-8"?>
<LinearLayout xmlns:android="http://schemas.android.com/apk/res/android"
    xmlns:tools="http://schemas.android.com/tools"
    android:layout_width="match_parent"
    android:layout_height="wrap_content">

    <TextView
        android:id="@+id/textView"
        android:layout_width="match_parent"
        android:layout_height="wrap_content"
        android:background="@color/black"
        android:gravity="center"
        android:text="微信"
        android:textColor="@color/white"
        android:textSize="30sp" />
</LinearLayout>
2.底部代码
设置最外层的LinearLayout为horizontal
<LinearLayout
    xmlns:android="http://schemas.android.com/apk/res/android"
    xmlns:app="http://schemas.android.com/apk/res-auto"
    android:layout_width="match_parent"
    android:layout_height="100dp"
    android:gravity="center">
以聊天按钮为例,设置内层的LinearLayout为vertical,添加TextView和ImageView,并修改text内容为“聊天”,ImageView中添加相应图片。
<LinearLayout
        android:id="@+id/chat"
        android:layout_width="wrap_content"
        android:layout_height="match_parent"
        android:layout_weight="1"
        android:background="@color/black"
        android:orientation="vertical">

        <ImageView
            android:id="@+id/imageView1"
            android:layout_width="match_parent"
            android:layout_height="wrap_content"
            android:layout_weight="1"
            app:srcCompat="@drawable/chat" />

        <TextView
            android:id="@+id/textView1"
            android:layout_width="match_parent"
            android:layout_height="wrap_content"
            android:layout_weight="1"
            android:gravity="center"
            android:text="聊天"
            android:textColor="@color/white"
            android:textSize="24sp" />
    </LinearLayout>
3.基本布局代码
将最外层LinearLayout布局设置为vertical,用include将top和bottom加入到该xml视图中
<?xml version="1.0" encoding="utf-8"?>
<LinearLayout
    xmlns:android="http://schemas.android.com/apk/res/android"
    xmlns:app="http://schemas.android.com/apk/res-auto"
    xmlns:tools="http://schemas.android.com/tools"
    android:layout_width="match_parent"
    android:layout_height="match_parent"
    android:orientation="vertical"
    tools:context=".MainActivity">
    <include layout="@layout/top"></include>
    <FrameLayout
        android:id="@+id/frame_content"
        android:layout_width="match_parent"
        android:layout_height="match_parent"
        android:layout_weight="1">
        <LinearLayout
            android:layout_width="match_parent"
            android:layout_height="match_parent"
            android:orientation="vertical" >
        </LinearLayout>
    </FrameLayout>
    <include layout="@layout/bottom"></include>
</LinearLayout>
4.中部布局代码
(1)fragment_liaotian.xml
添加LinearLayout,在LinearLayout下添加TextView,并设置相应的文本内容、字号等。
<?xml version="1.0" encoding="utf-8"?>
<LinearLayout xmlns:android="http://schemas.android.com/apk/res/android"
    xmlns:tools="http://schemas.android.com/tools"
    xmlns:app="http://schemas.android.com/apk/res-auto"
    android:layout_width="match_parent"
    android:layout_height="match_parent"
    tools:context=".weixin_liaotian"
    android:orientation="vertical"
    >
    <LinearLayout
        android:layout_width="match_parent"
        android:layout_height="wrap_content"
        android:weightSum="3">
        <TextView
            android:layout_width="5dp"
            android:layout_height="match_parent"
            android:layout_weight="1"
            android:gravity="center"
            android:text="消息中心"
            android:textSize="18sp" />
        <TextView
            android:layout_width="5dp"
            android:layout_height="match_parent"
            android:layout_weight="1"
            android:gravity="center"
            android:text="智慧校园"
            android:textSize="18sp" />
        <TextView
            android:layout_width="5dp"
            android:layout_height="match_parent"
            android:layout_weight="1"
            android:gravity="center"
            android:text="湖大战役"
            android:textSize="18sp" />
    </LinearLayout>
</LinearLayout>
(2)fragment_lianxiren.xml
添加LinearLayout,在LinearLayout下添加TextView,并设置相应的文本内容、字号等。
<?xml version="1.0" encoding="utf-8"?>
<LinearLayout xmlns:android="http://schemas.android.com/apk/res/android"
    xmlns:tools="http://schemas.android.com/tools"
    xmlns:app="http://schemas.android.com/apk/res-auto"
    android:layout_width="match_parent"
    android:layout_height="match_parent"
    tools:context=".weixin_liaotian"
    android:orientation="vertical"
    >
    <TextView
        android:id="@+id/tv_title"
        android:layout_width="match_parent"
        android:layout_height="wrap_content"
        android:layout_gravity="center_vertical"
        android:gravity="center"
        android:text="湖北大学微门户"
        android:textSize="18sp" />
    <LinearLayout
        android:layout_width="match_parent"
        android:layout_height="wrap_content"
        android:orientation="horizontal"
        android:weightSum="3">
        <TextView
            android:layout_width="0dp"
            android:layout_height="match_parent"
            android:layout_weight="1"
            android:gravity="center"
            android:text="消息中心"
            android:textSize="18sp"  />
        <TextView
            android:layout_width="0dp"
            android:layout_height="match_parent"
            android:layout_weight="1"
            android:gravity="center"
            android:text="智慧校园"
            android:textSize="18sp" />
        <TextView
            android:layout_width="0dp"
            android:layout_height="match_parent"
            android:layout_weight="1"
            android:gravity="center"
            android:text="湖大战役"
            android:textSize="18sp" />
    </LinearLayout>
</LinearLayout>
(3)fragment_faxian.xml
添加recyclerview,定义一个内部类对recycleview进行配置。实现“扫一扫”“看一看”等选项的滚动功能
<?xml version="1.0" encoding="utf-8"?>
<LinearLayout xmlns:android="http://schemas.android.com/apk/res/android"
    xmlns:tools="http://schemas.android.com/tools"
    xmlns:app="http://schemas.android.com/apk/res-auto"
    android:layout_width="match_parent"
    android:layout_height="match_parent"
    tools:context=".weixin_liaotian">
    <androidx.recyclerview.widget.RecyclerView
        android:id="@+id/collect_recyclerView"
        android:layout_width="match_parent"
        android:layout_height="match_parent" />
</LinearLayout>
(4)fragment_shezhi.xml
添加recyclerview,定义一个内部类对recycleview进行配置。实现图片显示滚动功能
<?xml version="1.0" encoding="utf-8"?>
<LinearLayout xmlns:android="http://schemas.android.com/apk/res/android"
    xmlns:tools="http://schemas.android.com/tools"
    xmlns:app="http://schemas.android.com/apk/res-auto"
    android:layout_width="match_parent"
    android:layout_height="match_parent"
    tools:context=".weixin_liaotian">
    <androidx.recyclerview.widget.RecyclerView
        android:id="@+id/recyclerview_circle_friend"
        android:layout_width="match_parent"
        android:layout_height="match_parent"
        android:overScrollMode="never"
        android:scrollbars="none"/>
</LinearLayout>
5.MainActivity.java
(1)onCreate函数
在onCreate函数中将View、Fragment和Event初始化,并将将第一个图标设为选中状态,从而实现activity的初始化。
protected void onCreate(Bundle savedInstanceState) {
        super.onCreate(savedInstanceState);
        requestWindowFeature(Window.FEATURE_NO_TITLE );
        setContentView(R.layout.activity_main);
        setContentView(R.layout.activity_main);
        //initData();
        initView();
        initFragment();
        initEvent();
        selectFragment(0);
        //将第一个图标设为选中状态
        imageView_first.setImageResource(R.drawable.chat);
        textView_first.setTextColor(getResources().getColor(R.color.select));
        setListener();
    }
(2)onClick函数
每次点击时调用onClick函数,将选中的图标及文本点亮。点击事件发生后,首先将所有的ImageView和TextView设置为未选中,再根据传进来view的id选择所点击的菜单对应的图层片段,将该菜单的点击状态置为点击状态。
public void onClick(View view) {
        //每次点击之后,将所有的ImageView和TextView设置为未选中
        restartButton();
        switch(view.getId())
        {
            case R.id.chat:
                //选择所点击的菜单对应的图层片段
                selectFragment(0);
                //将该菜单的点击状态置为点击态
                imageView_first.setImageResource(R.drawable.chat_green);
                textView_first.setTextColor(getResources().getColor(R.color.select));
                break;
            case R.id.contacts:
                selectFragment(1);
                imageView_second.setImageResource(R.drawable.contacts_green);
                textView_second.setTextColor(getResources().getColor(R.color.select));
                break;
            case R.id.circle_friend:
                selectFragment(2);
                imageView_third.setImageResource(R.drawable.circle_people_green);
                textView_third.setTextColor(getResources().getColor(R.color.select));
                break;
            case R.id.settings:
                selectFragment(3);
                imageView_fourth.setImageResource(R.drawable.settings_green);
                textView_fourth.setTextColor(getResources().getColor(R.color.select));
                break;
            default:
                break;
        }
    }
(3)restartButton函数
restartButton函数通过设置图标及文本的状态,将所有图标及文本设置为未点击
private void restartButton() {
        //设置为未点击状态
        //第一片段
        imageView_first.setImageResource(R.drawable.chat);
        textView_first.setTextColor(getResources().getColor(R.color.white));
        //第二片段
        imageView_second.setImageResource(R.drawable.contacts);
        textView_second.setTextColor(getResources().getColor(R.color.white));
        //第三片段
        imageView_third.setImageResource(R.drawable.circle_people);
        textView_third.setTextColor(getResources().getColor(R.color.white));
        //第四片段
        imageView_fourth.setImageResource(R.drawable.settings);
        textView_fourth.setTextColor(getResources().getColor(R.color.white));
    }
(4)initFragment函数
initFragment函数初始化中间模块,通过调用add()方法,传入fragment参数,将fragment添加到一个容器 container 里。
private void initFragment(){
        fragmentManager=getSupportFragmentManager();
        FragmentTransaction transaction=fragmentManager.beginTransaction();
        transaction.add(R.id.frame_content,fragment_first);
        transaction.add(R.id.frame_content,fragment_second);
        transaction.add(R.id.frame_content,fragment_third);
        transaction.add(R.id.frame_content,fragment_fourth);
        //提交事务
        transaction.commit();
    }
(5)initView函数
initView函数调用findViewById()方法, 通过传递控件ID参数,返回控件的View类型,将相应的view初始化。
private  void initView(){
        linear_first=findViewById(R.id.chat);
        linear_second=findViewById(R.id.contacts);
        linear_third=findViewById(R.id.circle_friend);
        linear_fourth=findViewById(R.id.settings);

        imageView_first=findViewById(R.id.imageView1);
        imageView_second=findViewById(R.id.imageView2);
        imageView_third=findViewById(R.id.imageView3);
        imageView_fourth=findViewById(R.id.imageView4);

        textView_first=findViewById(R.id.textView1);
        textView_second=findViewById(R.id.textView2);
        textView_third=findViewById(R.id.textView3);
        textView_fourth=findViewById(R.id.textView4);
    }
(6)initEvent函数
initEvent函数设置事件处理的监听器。通过调用setOnClickListener()方法,传入this参数,当点击按钮时会调用onClick方法。
private void initEvent(){
        linear_first.setOnClickListener(this);
        linear_second.setOnClickListener(this);
        linear_third.setOnClickListener(this);
        linear_fourth.setOnClickListener(this);
    }
(7)hideView函数
在进行页面切换时,先隐藏所有fragment。此处调用FragmentTransaction类中的hide()方法,通过传入fragment参数将其隐藏。
private void hideView(FragmentTransaction transaction){
        transaction.hide(fragment_first);
        transaction.hide(fragment_second);
        transaction.hide(fragment_third);
        transaction.hide(fragment_fourth);
    }
(8)selectFragment函数
每次点击时调用selectFragment函数,实现页面切换显示。点击事件发生后,首先将所有的fragment设置为隐藏状态,再根据传进来的编号参数,调用FragmentTransaction类中的show()方法,将对应的fragment显示,从而实现事务的转换。
private void selectFragment(int i){
        FragmentTransaction transaction=fragmentManager.beginTransaction();
        //调用隐藏所有图层函数
        hideView(transaction);
        switch (i){
            case 0:
                transaction.show(fragment_first);
                break;
            case 1:
                transaction.show(fragment_second);
                break;
            case 2:
                transaction.show(fragment_third);
                break;
            case 3:
                transaction.show(fragment_fourth);
                break;
            default:
                break;
        }
        //提交转换事务
        transaction.commit();
    }
}
四、运行展示
(1)四个界面截图展示
(2)页面切换动画

五、源码仓库地址
Gitee
总结
本次博客记录了简单微信门户界面的主要设计过程,是我的第一个AS程序。虽然界面较为简陋,但是我接触到了许多新的概念,例如线性布局,此外,我还学习到了一些控件的使用,例如ImageView、TextView、recyclerview。在设计思路方面,我学习了切换界面的设计方式,即先将页面或标签全部隐藏,再将选中的内容显示出来。
总之,本次作业让我对安卓项目的结构和内容以及开发思路都有了更深刻的认识,为今后的AS项目开发打下了坚实的基础。


 被折叠的 条评论
为什么被折叠?
被折叠的 条评论
为什么被折叠?
 到【灌水乐园】发言


