


一、总结pg和mysql的优劣势。
MySQL和PostgreSQL(简称PG)都是流行的关系型数据库管理系统(RDBMS),它们在许多方面有着不同的优劣势。以下是对它们的优劣势的总结:

MySQL的优势:

性能:MySQL以其高效的查询性能而闻名,适用于高并发的应用程序。
简单易用:MySQL具有较为简单的安装和配置过程,易于上手和管理。
社区支持:MySQL有一个庞大的用户社区,提供了丰富的文档、教程和支持资源。
可扩展性:MySQL能够在处理大量数据时持续提供可靠的性能,并能通过水平和垂直扩展来满足不同规模的应用需求。
广泛应用:由于其普及度高,很多应用程序和工具都对MySQL提供了良好的支持和集成。
PostgreSQL的优势:

功能强大:PostgreSQL具有广泛的功能集,包括复杂的数据类型、触发器、存储过程、地理空间和全文搜索等功能。
可靠性:PostgreSQL以其强大的数据完整性和可靠性而著称,支持事务和ACID(原子性、一致性、隔离性和持久性)属性,适用于对数据完整性要求较高的应用场景。
扩展性和可定制性:PostgreSQL提供了丰富的扩展机制,可以通过插件来实现更多的功能,并能够根据具体需求进行自定义开发。
完整的SQL支持:PostgreSQL支持最新的SQL标准,并提供了更多高级的查询和优化功能。
开源社区支持:PostgreSQL是一个开源项目,拥有活跃的社区,提供了广泛的帮助和支持。
总体而言,MySQL适用于需要高性能和简单部署的应用程序,而PostgreSQL适用于复杂的数据模型和对数据完整性和可靠性有更高要求的应用程序。选择适合的数据库管理系统取决于实际需求、数据量和应用场景。
二、总结pg二进制安装和编译安装。
1、二进制安装(Rocky8)
1、下载二进制包
[root@pgsql ~]# sudo dnf install -y https://download.postgresql.org/pub/repos/yum/reporpms/EL-8-x86_64/pgdg-redhat-repo-latest.noarch.rpm
[root@pgsql ~]# sudo dnf -qy module disable postgresql
2、在线安装postgresql服务
[root@pgsql ~]# sudo dnf install -y postgresql14-server
3、初始化数据库
[root@pgsql ~]# sudo /usr/pgsql-14/bin/postgresql-14-setup initdb
4、设置自启动数据库
[root@pgsql ~]# sudo systemctl enable postgresql-14
5、启动数据库
[root@pgsql ~]# sudo systemctl start postgresql-14
2、编译安装
#安装相关依赖
[root@pgsql postgresql-14.2]#
yum -y install gcc make readline-devel zlib-devel

#编译安装
./configure --prefix=/apps/pgsql
make -j 2 world
make install-world

#创建pgsql账号密码
useradd -s /bin/bash -m -d /home/postgres postgres
echo -e '123456\n123456' |passwd postgres

[root@pgsql postgresql-14.2]# useradd -s /bin/bash -m -d /home/postgres postgres
[root@pgsql postgresql-14.2]# echo -e '123456\n123456' |passwd postgres
Changing password for user postgres.
New password: BAD PASSWORD: The password is shorter than 8 characters
Retype new password: passwd: all authentication tokens updated successfully.

#创建数据目录并授权
mkdir -pv /pgsql/data/
chown -R postgres.postgres /pgsql/data/

#切换账号
su - postgres

#设置环境变量
[root@pgsql ~]# vim /etc/profile.d/pgslq.sh

#!/bin/bash
#
#********************************************************************
#Author:            dingbaohang
#QQ:                904748581
#Date:              2023-07-18
#FileName:         /etc/profile.d/pgslq.sh
#URL:               www.dingbh.top
#Description:      The test script
#Copyright (C):     2023 All rights reserved
#********************************************************************
export PGHOME=/apps/pgsql
export PATH=$PGHOME/bin/:$PATH
export PGDATA=/pgsql/data
export PGUSER=postgres
export MANPATH=/apps/pgsql/share/man:$MANPATH

#生效环境变量
. /etc/profile.d/pgslq.sh

#初始化数据库
initdb -D /pgsql/data

#启动数据库并生成日志
pg_ctl -l logfile start


#创建开机自启动服务:方法1
cp /usr/local/src/postgresql-14.2/contrib/start-scripts/linux /etc/init.d/postgresql
chmod +x /etc/init.d/postgresql

#修改启动文件
/etc/init.d/postgresql
# Installation prefix
prefix=/apps/pgsql

# Data directory
PGDATA="/pgsql/data"

#设置开机自启动
[root@pgsql ~]# vim /etc/rc.local

#生效配置
[root@pgsql ~]# systemctl daemon-reload

#设置自启动
[root@pgsql ~]# systemctl enable --now postgresql.service
2、设置开机启动
#ubuntu设置开机启动
#!/bin/bash
#/etc/init.d/postgresql start
su - postgres -c "/apps/pgsql/bin/pg_ctl -l logfile start"

#设置启动service文件,方法二:
[root@pgsql ~]# vim /lib/systemd/system/postgresql.service
[Unit]                                                                                                        Description=PostgreSQL database server
After=network.target

[Service]
User=postgres
Group=postgres

ExecStart=/apps/pgsql/bin/postmaster -D /pgsql/data/
ExecReload=/bin/kill -HUP

[Install]
WantedBy=multi-user.target

#查看service文件
[root@pgsql ~]# ll /lib/systemd/system/postgresql.service
-rw-r--r-- 1 root root 389 Jul 18 22:54 /lib/systemd/system/postgresql.service
三、总结pg服务管理相关命令 pg_ctl 和pgsql命令选项及示例和不同系统的初始化操作
1、pg_ctl服务管理命令
①、开启服务
#开启服务
pg_ctl start [-w] [-t seconds] [-s] [-D datadir] [-l filename] [-o options] [-p
path] [-c]
#参数说明如下。
start #启动数据库实例
-w #等待启动完成
-t #等待启动完成的等待秒数,默认为60秒
-s #只打印错误和警告信息,不打印提示性信息
-D datadir#指定数据库实例的数据目录
-l #服务器日志输出附加在“filename”文件上,如果该文件不存在则创建它
-o options #声明要直接传递给postgres 的选项,具体可见postgres命令的帮助
-p path #指定postgres可执行文件的位置。默认情况下postgres可执行文件来自和pg_ctl相同的目录,
不必使用该选项。除非要进行一些不同寻常的操作,或者产生了postgres执行文件找不到的错误
-c #提高服务器的软限制(ulimit -c),尝试允许数据库实例在有异常时产生一个coredump文件,以便于问
题定位和故障分析
②、停止服务
#停止服务
pg_ctl stop [-w] [-t seconds] [-s] [-D datadir] [-m s[mart] l f[ast] | i
[mmediate] ]
#参数说明如下。
-W #不等待数据库停下来,命令就返回。
-m #指定停止的模式。前面已叙述过停止的几种模式了。
#其它未说明的参数,其含义与启动数据库命令中的参数相同。
③、重启服务
#重启服务
pg_ctl restart [-w] [-t seconds][-s] [-D datadir] [-c] [-m s[mart] | f[ast] |
i[mmediate] ] [-o "options ]
#此命令中的参数与启动或停止命令中的参数含义相同
④、加载配置
#加载配置
#修改配置文件 postgresql.conf后,让修改生效的方法有两种
#方法一:在操作系统使用下面命令
pg_ctl reload [-s] [-D datadir]
#方法二:在 psql 中使用如下命令
postgres=# select pg_reload_conf();
#注意:加载配置操作只针对一些配置的修改生效,有些配置需要重新启动服务才能生效
2、 pg_ctl 命令管理 PostgreSQL
pg_ctl 是一个实用的命令行工具,有以下常见功能:
初始化 PostgreSQL 数据库实例
启动、终止或重启 PostgreSQL 数据库服务。
查看 PostgreSQL数据库服务的状态
让数据库实例重新读取配置文件。允许给一个指定的PostgreSQL进程发送信号
控制 standby 服务器为可读写
在 Windows平台下允许为数据库实例注册或取消一个系统服务
pc_ctl 命令格式
[root@pgsql ~]# psql --help
psql is the PostgreSQL interactive terminal.

Usage:
  psql [OPTION]... [DBNAME [USERNAME]]

General options:
  -c, --command=COMMAND    run only single command (SQL or internal) and exit
  -d, --dbname=DBNAME      database name to connect to (default: "postgres")
  -f, --file=FILENAME      execute commands from file, then exit
  -l, --list               list available databases, then exit
  -v, --set=, --variable=NAME=VALUE
                           set psql variable NAME to VALUE
                           (e.g., -v ON_ERROR_STOP=1)
  -V, --version            output version information, then exit
  -X, --no-psqlrc          do not read startup file (~/.psqlrc)
  -1 ("one"), --single-transaction
                           execute as a single transaction (if non-interactive)
  -?, --help[=options]     show this help, then exit
      --help=commands      list backslash commands, then exit
      --help=variables     list special variables, then exit

 pg_ctl kill       SIGNALNAME PID
3、初始化实例
#先切换用户
su - postgres
#初始化数据库
initdb [DATADIR]
pg_ctl init[db] [-s] [-D DATADIR] [-o options]
#pg_ctl命令调用initdb命令创建了一个新的PostgreSQL 数据库实例,参数说明如下。
-s #只打印错误和警告信息,不打印提示性信息。
-D DATADIR #指定数据库实例的数据目录。如果没有指定DATADIR,使用环境变量PGDATA指定的路径
-o options #为直接传递给initdb命令的参数
范例: 创建新的数据库实例数据
[root@pgsql ~]#chown postgres: /pgsql/
[root@pgsql ~]# ls -dl /pgsql/
drwxr-xr-x 5 postgres postgres 45 Aug  3 17:32 /pgsql/
[root@pgsql ~]# su - postgres
Last login: Thu Aug 10 23:26:54 CST 2023 on pts/4
[postgres@pgsql ~]$ pg_ctl init -D /pgsql/data2
The files belonging to this database system will be owned by user "postgres".
This user must also own the server process.

The database cluster will be initialized with locale "en_US.UTF-8".
The default database encoding has accordingly been set to "UTF8".
The default text search configuration will be set to "english".

Data page checksums are disabled.

creating directory /pgsql/data2 ... ok
creating subdirectories ... ok
selecting dynamic shared memory implementation ... posix
selecting default max_connections ... 100
selecting default shared_buffers ... 128MB
selecting default time zone ... Asia/Shanghai
creating configuration files ... ok
running bootstrap script ... ok
performing post-bootstrap initialization ... ok
syncing data to disk ... ok

initdb: warning: enabling "trust" authentication for local connections
You can change this by editing pg_hba.conf or using the option -A, or
--auth-local and --auth-host, the next time you run initdb.

Success. You can now start the database server using:

    /apps/pgsql/bin/pg_ctl -D /pgsql/data2 -l logfile start

[postgres@pgsql ~]$ ls /pgsql/data2
base    pg_commit_ts  pg_hba.conf    pg_logical    pg_notify    pg_serial     pg_stat      pg_subtrans  pg_twophase  pg_wal   postgresql.auto.conf
global  pg_dynshmem   pg_ident.conf  pg_multixact  pg_replslot  pg_snapshots  pg_stat_tmp  pg_tblspc    PG_VERSION   pg_xact  postgresql.conf

#查看服务状态

[postgres@pgsql ~]$ pg_ctl status -D /pgsql/data2
pg_ctl: no server running

[postgres@pgsql ~]$ pg_ctl start -D /pgsql/data2
waiting for server to start....2023-08-11 01:25:50.185 CST [4620] LOG:  starting PostgreSQL 14.2 on x86_64-pc-linux-gnu, compiled by gcc (GCC) 8.5.0 20210514 (Red Hat 8.5.0-18), 64-bit
2023-08-11 01:25:50.185 CST [4620] LOG:  listening on IPv6 address "::1", port 5432
2023-08-11 01:25:50.185 CST [4620] LOG:  listening on IPv4 address "127.0.0.1", port 5432
2023-08-11 01:25:50.187 CST [4620] LOG:  listening on Unix socket "/tmp/.s.PGSQL.5432"
2023-08-11 01:25:50.189 CST [4621] LOG:  database system was shut down at 2023-08-11 01:22:56 CST
2023-08-11 01:25:50.191 CST [4620] LOG:  database system is ready to accept connections
 done
server started

[postgres@pgsql ~]$ pg_ctl status -D /pgsql/data2
pg_ctl: server is running (PID: 4620)
/apps/pgsql/bin/postgres "-D" "/pgsql/data2"
四、总结pg数据库结构组织
PostgreSQL和MySQL相似,也采用典型的C/S模型。
PostgreSQL体系结构分两部分
实例 instance
磁盘存储
实例 instance 包括
进程
内存存储结构
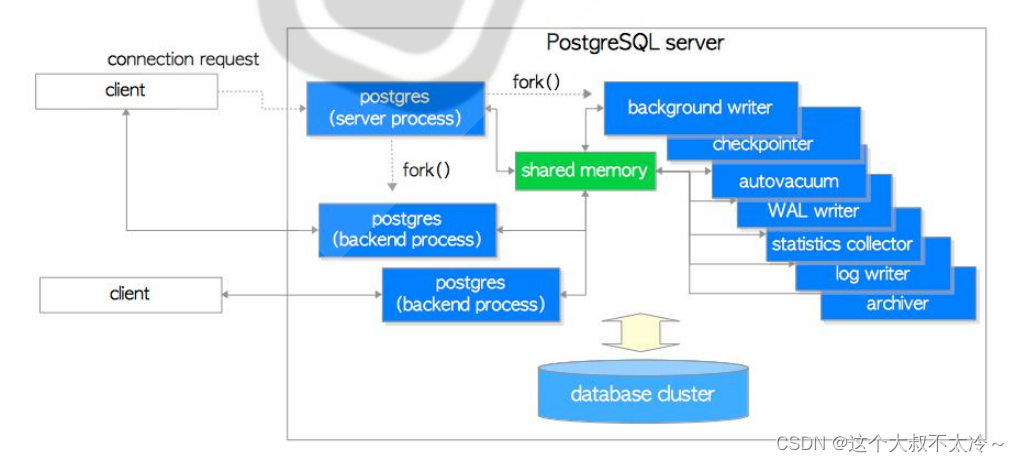
1、进程
PostgreSQL是进程架构模型,MySQL是线程架构模型。
Postmaster 主进程
1、它是整个数据库实例的主控制进程,负责启动和关闭该数据库实例。
2、实际上,使用pg ctl来启动数据库时,pg_ctl也是通过运行postgres来启动数据库的,只是它做
了一些包装,更容易启动数据库。
3、它是第一个PostgreSQL进程,此主进程还会fork出其他子进程,并管理它们。
4、当用户和PostgreSQL建立连接时,首先是和Postmaster进程建立连接。首先,客户端会发出
身份验证的信息给Postmaster进程,Postmaster进程根据消息中的信息进行身份验证判断,
如果验证通过,它会fork出一个会话子进程为这个连接服务。
5、当某个服务进程出现错误的时候,Postmaster主进程会自动完成系统的恢复。恢复过程中会
停掉所有的服务进程,然后进行数据库数据的一致性恢复,等恢复完成后,数据库又可以接受新
的连接。
6、验证功能是通过配置文件pg_hba.conf和用户验证模块来提供。
7、postmaster 程序是指向postgres的软链接

[postgres@pgsql pgsql]$ ll /apps/pgsql/bin/postmaster
lrwxrwxrwx 1 root root 8 Jul 18 18:56 /apps/pgsql/bin/postmaster -> postgres


BgWriter 后台写进程
1、为了提高插入、删除和更新数据的性能,当往数据库中插入或者更新数据时,并不会马上把数
据持久化到数据文件中,而是先写入Buffer中
2、该辅助进程可以周期性的把内存中的脏数据刷新到磁盘中

WalWriter 预写式日志进程
1、WAL是write ahead log的缩写,WAL log旧版中称为xlog,相当于MySQL中Redo log
2、预写式日志是在修改数据之前,必须把这些修改操作记录到磁盘中,这样后面更新实际数据
时,就不需要实时的把数据持久化到文件中了。即使机器突然宕机或者数据库异常退出, 导
致一部分内存中的脏数据没有及时的刷新到文件中,在数据库重启后,通过读取WAL日志,
并把最后一部分WAL日志重新执行一遍,就能恢复到宕机时的状态了
3、WAL日志保存在pg_wal目录(早期版本为pg_xlog) 下。每个xlog 文件默认是16MB,为了满足恢
复要求,在pg_wal目录下会产生多个WAL日志,这样就可保证在宕机后,未持久化的数据都
可以通过WAL日志来恢复,那些不需要的WAL日志将会被自动覆盖

Checkpointer 检查点进程
1、检查点(Checkpoints)是事务序列中的点,保证在该点之前的所有日志信息都更新到数据文件
中。
2、在检查点时,所有脏数据页都冲刷到磁盘并且向日志文件中写入一条特殊的检查点记录。在发
生崩溃的时候,恢复器就知道应该从日志中的哪个点(称做 redo 记录)开始做 REDO 操作,
因为在该记录前的对数据文件的任何修改都已经在磁盘上了。在完成检查点处理之后,任何在
redo记录之前写的日志段都不再需要,因此可以循环使用或者删除。在进行 WAL 归档的时
候,这些日志在循环利用或者删除之前应该必须先归档保存
3、检查点进程 (CKPT) 在特定时间自动执行一个检查点,通过向数据库写入进程 (BgWriter) 传递消
息来启动检查点请求

AutoVacuum 自动清理进程
1、执行delete操作时,旧的数据并不会立即被删除,在更新数据时,也不会在旧的数据上做更
新,而是新生成一行数据。旧的数据只是被标识为删除状态,在没有并发的其他事务读到这些
旧数据时,它们才会被清除掉
2、autovacuum lanucher 负责回收垃圾数据的master进程,如果开启了autovacuum的话,那么
postmaster会fork这个进程
3、autovacuum worker 负责回收垃圾数据的worker进程,是lanucher进程fork出来的

PgStat 统计数据收集进程
1、此进程主要做数据的统计收集工作
2、收集的信息主要用于查询优化时的代价估算。统计的数据包括对一个表或索引进行的插入、删
除、更新操作,磁盘块读写的次数以及行的读次数等。
3、系统表pg_statistic中存储了PgStat收集的各类统计信息

PgArch 归档进程
1、默认没有此进程,开启归档功能后才会启动archiver进程
2、WAL日志文件会被循环使用,也就是说WAL日志会被覆盖,利用PgArch进程会在覆盖前把WAL
日志备份出来,类似于binlog,可用于备份功能
3、PostgreSQL 从8.X版本开始提供了PITR ( Point-In-Time-Recovery)技术,即就是在对数据厍
进行过一次全量备份后,该技术将备份时间点后面的WAL日志通过归档进行备份,将来可以
使用数据库的全量备份再加上后面产生的WAL 日志,即可把数据库向前恢复到全量备份后的
任意一个时间点的状态

SysLogger 系统日志进程
1、默认没有此进程,配置文件 postgresql.conf 设置参数logging_collect设置为“on”时,主进程才
会启动SysLogger辅助进程
2、它从Postmaster主进程、所有的服务进程以及其他辅助进程收集所有的stderr输出,并将这
些输出写入到日志文件中

startup 启动进程
1、用于数据库恢复的进程


Session 会话进程
1、每一个用户发起连接后,一旦验证成功,postmaster进程就会fork—个新的子进程负责连接此
用户。
通常表现为进程形式: postgres postgres [local] idle
查看进程
[postgres@pgsql ~]$ ps auxf |grep ^postgres
postgres    4463  0.0  0.1 226296  5416 pts/1    S    01:21   0:00  |               \_ -bash
postgres    4660  0.0  0.1 232780  4272 pts/1    S+   01:46   0:00  |                   \_ psql
postgres    4537  0.0  0.1 226212  5376 pts/5    S    01:22   0:00                  \_ -bash
postgres    4740  0.0  0.1 257764  4244 pts/5    R+   02:02   0:00                      \_ ps auxf
postgres    4741  0.0  0.0 221940  1088 pts/5    S+   02:02   0:00                      \_ grep --color=auto ^postgres
postgres    4620  0.0  0.4 382560 17572 ?        Ss   01:25   0:00 /apps/pgsql/bin/postgres -D /pgsql/data2
postgres    4622  0.0  0.1 382672  6080 ?        Ss   01:25   0:00  \_ postgres: checkpointer
postgres    4623  0.0  0.1 382560  4764 ?        Ss   01:25   0:00  \_ postgres: background writer
postgres    4624  0.0  0.2 382560  7776 ?        Ss   01:25   0:00  \_ postgres: walwriter
postgres    4625  0.0  0.1 383124  5608 ?        Ss   01:25   0:00  \_ postgres: autovacuum launcher
postgres    4626  0.0  0.0 237200  2596 ?        Ss   01:25   0:00  \_ postgres: stats collector
postgres    4627  0.0  0.1 382988  5424 ?        Ss   01:25   0:00  \_ postgres: logical replication launcher
postgres    4661  0.0  0.2 383488 10432 ?        Ss   01:46   0:00  \_ postgres: postgres postgres [local] idle


#开启归档日志后进程,archiver默认关闭
[root@pgsql ~]# vim /pgsql/data2/postgresql.conf
wal_level = replica
archive_mode = on

[postgres@pgsql ~]$ pg_ctl restart -D /pgsql/data2
waiting for server to shut down.... done
server stopped
waiting for server to start....2023-08-11 02:08:25.015 CST [4847] LOG:  starting PostgreSQL 14.2 on x86_64-pc-linux-gnu, compiled by gcc (GCC) 8.5.0 20210514 (Red Hat 8.5.0-18), 64-bit
2023-08-11 02:08:25.015 CST [4847] LOG:  listening on IPv6 address "::1", port 5432
2023-08-11 02:08:25.015 CST [4847] LOG:  listening on IPv4 address "127.0.0.1", port 5432
2023-08-11 02:08:25.017 CST [4847] LOG:  listening on Unix socket "/tmp/.s.PGSQL.5432"
2023-08-11 02:08:25.019 CST [4848] LOG:  database system was shut down at 2023-08-11 02:08:24 CST
2023-08-11 02:08:25.022 CST [4847] LOG:  database system is ready to accept connections
 done
server started
[postgres@pgsql ~]$ ps auxf |grep ^postgres
postgres    4463  0.0  0.1 226296  5416 pts/1    S    01:21   0:00  |               \_ -bash
postgres    4660  0.0  0.1 232780  4272 pts/1    S+   01:46   0:00  |                   \_ psql
postgres    4537  0.0  0.1 226212  5400 pts/5    S    01:22   0:00  |               \_ -bash
postgres    4859  0.0  0.1 257764  4300 pts/5    R+   02:08   0:00  |                   \_ ps auxf
postgres    4860  0.0  0.0 221940  1180 pts/5    S+   02:08   0:00  |                   \_ grep --color=auto ^postgres
postgres    4847  0.0  0.4 382560 17536 ?        Ss   02:08   0:00 /apps/pgsql/bin/postgres -D /pgsql/data2
postgres    4849  0.0  0.0 382560  2628 ?        Ss   02:08   0:00  \_ postgres: checkpointer
postgres    4850  0.0  0.0 382560  2628 ?        Ss   02:08   0:00  \_ postgres: background writer
postgres    4851  0.0  0.2 382560  7836 ?        Ss   02:08   0:00  \_ postgres: walwriter
postgres    4852  0.0  0.1 383124  5716 ?        Ss   02:08   0:00  \_ postgres: autovacuum launcher
postgres    4853  0.0  0.0 382560  2628 ?        Ss   02:08   0:00  \_ postgres: archiver
postgres    4854  0.0  0.0 237200  2760 ?        Ss   02:08   0:00  \_ postgres: stats collector
postgres    4855  0.0  0.1 382988  5464 ?        Ss   02:08   0:00  \_ postgres: logical replication launcher
五、实现pg远程连接。输入密码和无密码登陆
#主机添加远程认账权限
[root@pgsql ~]# vim /pgsql/data/pg_hba.conf

92 # IPv6 local connections:
 93 host    all             all             ::1/128                 trust
 94 host    all             all              0.0.0.0/0              md5

#client连接
[postgres@postgers ~]$ apt -y install postgresql
[postgres@postgers ~]$ psql -h 192.168.188.88 postgres
六、总结库,模式,表的添加和删除操作。表数据的CURD。同时总结相关信息查看语句。
1、总结库,模式,表的添加和删除操作
#创建数据库
postgres=# create database testdb;
CREATE DATABASE
#切换数据库testdb
postgres=# \c testdb;
You are now connected to database "testdb" as user "postgres".

#切换数据库
postgres=# \c testdb
You are now connected to database "testdb" as user "postgres".

#创建模式
postgres=# create schema schema_mage;
CREATE SCHEMA

#查看模式
postgres=# \dn
    List of schemas
    Name     |  Owner
-------------+----------
 public      | postgres
 schema_mage | postgres
(2 rows)

#删除模式
postgres=# drop schema schema_mage ;
DROP SCHEMA

#创建表
testdb=# create table tb1(id serial primary key,name text);
CREATE TABLE
#创建数据
testdb=# insert into tb1(name) select (md5(random()::text)) from generate_series (2,10);
INSERT 0 9

testdb=# create table tb2(id serial primary key,name text);
CREATE TABLE
testdb=# insert into tb2(name) select (md5(random()::text)) from generate_series (2,10);
INSERT 0 9

#查看表内容
testdb=# select * from tb1;
 id |               name
----+----------------------------------
  1 | e63cf7cba0cc397de638ba1d1b9f51c2
  2 | a7dd1dabb91657a68643633b92752777
  3 | 84a74c6f735a14ffc6324a22e93e5913
  4 | f8710e7a9fc245f567dccffe5b82a096
  5 | c1ebc2581942618bbad6ec7f5131c95d
  6 | 19d4fc4c81bbb679389c98eb5fc7c6c4
  7 | fdcd6825e6e35ca0e218dc7da0f1f689
  8 | eadeacd462dce74dc178ac23e90b0cef
  9 | 9c9bc16fcf7b0967c70e91d76efccd5e
(9 rows)

#\dt相当与show tables;
testdb=# \dt tb1;
        List of relations
 Schema | Name | Type  |  Owner
--------+------+-------+----------
 public | tb1  | table | postgres
(1 row)
#创建并复制表结构
testdb=# create table tb2 (like tb1);
CREATE TABLE

#\dt查看表结构,相当于show tables
testdb=# \dt tb2;
        List of relations
 Schema | Name | Type  |  Owner
--------+------+-------+----------
 public | tb2  | table | postgres
(1 row)
#查看tb2表内容
testdb=# select * from tb2;
 id | name
----+------
(0 rows)
#查看所有表信息
testdb=# \dt
 public | tb1  | table | postgres
 public | tb2  | table | postgres
#表详情
testdb=# \dt+
 public | tb1  | table | postgres | permanent   | heap          | 16 kB |
 public | tb2  | table | postgres | permanent   | heap          | 16 kB |

 #查看表结构
 testdb=# \d tb1;
 id     | integer |           | not null | nextval('tb1_id_seq'::regclass)
 name   | text    |           |          |

#查看表id及对应文件
testdb=# select * from pg_stat_all_tables where relname='tb1';
-[ RECORD 1 ]-------+-------
relid               | 16394
schemaname          | public
relname             | tb1
seq_scan            | 2
seq_tup_read        | 9
idx_scan            | 0
idx_tup_fetch       | 0
n_tup_ins           | 9
n_tup_upd           | 0
n_tup_del           | 0
n_tup_hot_upd       | 0
n_live_tup          | 9
n_dead_tup          | 0
n_mod_since_analyze | 9
n_ins_since_vacuum  | 9
last_vacuum         |
last_autovacuum     |
last_analyze        |
last_autoanalyze    |
vacuum_count        | 0
autovacuum_count    | 0
analyze_count       | 0
autoanalyze_count   | 0

testdb=# drop table tb1;
DROP TABLE
testdb=# select * from pg_stat_all_tables where relname='tb1';
(0 rows)

[root@postgers 16392]# ls
112        13583      16393  2579      2606_fsm  2613      2651  2669      2689      2830      2995      3381      3501      3601      3764_vm  4157  549
113        13584      16394  2600      2606_vm   2615      2652  2670      2690      2831      2996      3394      3502      3601_fsm  3766     4158  6102
1247       13584_fsm  16398  2600_fsm  2607      2615_fsm  2653  2673      2691      2832      3079      3394_fsm  3503      3601_vm   3767     4159  6104
1247_fsm   13584_vm   16399  2600_vm   2607_fsm  2615_vm   2654  2673_fsm  2692      2833      3079_fsm  3394_vm   3534      3602      3997     4160  6106
1247_vm    13587      16400  2601      2607_vm   2616      2655  2674      2693      2834      3079_vm   3395      3541      3602_fsm  4143     4163  6110
1249       13588      16402  2601_fsm  2608      2616_fsm  2656  2674_fsm  2696      2835      3080      3429      3541_fsm  3602_vm   4144     4164  6111
1249_fsm   13589      16403  2601_vm   2608_fsm  2616_vm   2657  2675      2699      2836      3081      3430      3541_vm   3603      4145     4165  6112
1249_vm    13589_fsm  16407  2602      2608_vm   2617      2658  2678      2701      2836_fsm  3085      3431      3542      3603_fsm  4146     4166  6113
1255       13589_vm   16408  2602_fsm  2609      2617_fsm  2659  2679      2702      2836_vm   3118      3433      3574      3603_vm   4147     4167  6117
1255_fsm   13592      16409  2602_vm   2609_fsm  2617_vm   2660  2680      2703      2837      3119      3439      3575      3604      4148     4168  6175
1255_vm    13593      174    2603      2609_vm   2618      2661  2681      2704      2838      3164      3440      3576      3605      4149     4169  6176
1259       13594      175    2603_fsm  2610      2618_fsm  2662  2682      2753      2838_fsm  3256      3455      3596      3606      4150     4170  826
1259_fsm   13594_fsm  2187   2603_vm   2610_fsm  2618_vm   2663  2683      2753_fsm  2838_vm   3257      3456      3597      3607      4151     4171  827
1259_vm    13594_vm   2224   2604      2610_vm   2619      2664  2684      2753_vm   2839      3258      3456_fsm  3598      3608      4152     4172  828
13579      13597      2228   2605      2611      2619_fsm  2665  2685      2754      2840      3350      3456_vm   3599      3609      4153     4173  pg_filenode.map
13579_fsm  13598      2328   2605_fsm  2612      2619_vm   2666  2686      2755      2840_fsm  3351      3466      3600      3712      4154     4174  pg_internal.init
13579_vm   1417       2336   2605_vm   2612_fsm  2620      2667  2687      2756      2840_vm   3379      3467      3600_fsm  3764      4155     5002  PG_VERSION
13582      1418       2337   2606      2612_vm   2650      2668  2688      2757      2841      3380      3468      3600_vm   3764_fsm  4156     548

#确认磁盘文件是否存在
[root@postgers 16392]# find -name 16394

#以列展示,相当与 /G;
testdb=# \x
Expanded display is on.

#查看指定表对应的文件
testdb=# select * from pg_relation_filepath('tb2');
-[ RECORD 1 ]--------+-----------------
pg_relation_filepath | base/16392/16403


#查看当前库所有表的统计信息
[root@postgers ~]# su - postgres
[postgres@postgers ~]$ psql
psql (14.8 (Ubuntu 14.8-0ubuntu0.22.04.1))
Type "help" for help.

postgres=# \l
                                  List of databases
   Name    |  Owner   | Encoding |   Collate   |    Ctype    |   Access privileges
-----------+----------+----------+-------------+-------------+-----------------------
 postgres  | postgres | UTF8     | en_US.UTF-8 | en_US.UTF-8 |
 template0 | postgres | UTF8     | en_US.UTF-8 | en_US.UTF-8 | =c/postgres          +
           |          |          |             |             | postgres=CTc/postgres
 template1 | postgres | UTF8     | en_US.UTF-8 | en_US.UTF-8 | =c/postgres          +
           |          |          |             |             | postgres=CTc/postgres
 testdb    | postgres | UTF8     | en_US.UTF-8 | en_US.UTF-8 |
(4 rows)

Did not find any relations.
postgres=# \c testdb
You are now connected to database "testdb" as user "postgres".
testdb=# \dt
        List of relations
 Schema | Name | Type  |  Owner
--------+------+-------+----------
 public | tb1  | table | postgres
 public | tb2  | table | postgres
(2 rows)

testdb=# select * from pg_stat_all_tables where relname='tb1';
testdb=# \x
Expanded display is on.
testdb=# select * from pg_stat_all_tables where relname='tb1';
-[ RECORD 1 ]-------+-------
relid               | 16413
schemaname          | public
relname             | tb1
seq_scan            | 0
seq_tup_read        | 0
idx_scan            |
idx_tup_fetch       |
n_tup_ins           | 1
n_tup_upd           | 0
n_tup_del           | 0
n_tup_hot_upd       | 0
n_live_tup          | 1
n_dead_tup          | 0
n_mod_since_analyze | 1
n_ins_since_vacuum  | 1
last_vacuum         |
last_autovacuum     |
last_analyze        |
last_autoanalyze    |
vacuum_count        | 0
autovacuum_count    | 0
analyze_count       | 0
autoanalyze_count   | 0

testdb=# select * from pg_stat_all_tables where relname='tb2';
-[ RECORD 1 ]-------+-------
relid               | 16403
schemaname          | public
relname             | tb2
seq_scan            | 1
seq_tup_read        | 0
idx_scan            | 0
idx_tup_fetch       | 0
n_tup_ins           | 9
n_tup_upd           | 0
n_tup_del           | 0
n_tup_hot_upd       | 0
n_live_tup          | 9
n_dead_tup          | 0
n_mod_since_analyze | 9
n_ins_since_vacuum  | 9
last_vacuum         |
last_autovacuum     |
last_analyze        |
last_autoanalyze    |
vacuum_count        | 0
autovacuum_count    | 0
analyze_count       | 0
autoanalyze_count   | 0

#查看表relid
testdb=# select relid from pg_stat_all_tables where relname='tb1';
-[ RECORD 1 ]
relid | 16413

testdb=# select relid from pg_stat_all_tables where relname='tb2';
-[ RECORD 1 ]
relid | 16403

#查看数据库的名
testdb=# select oid,datname from pg_database where datname='testdb';
-[ RECORD 1 ]---
oid     | 16392
datname | testdb

#对应磁盘文件
[root@postgers ]# ls /var/lib/postgresql/14/main/base/
1  13760  13761  16392
2、表数据的CURD
SQL的CRUD, insert,update,delect,select四条语句
#查看数据类型
testdb=# select typname from pg_type;

                typname
----------------------------------------
 bool
 bytea
 char
 name
 int8
 int2
 int2vector
 int4
 regproc
 text
 oid
 tid
 xid
 cid
 oidvector
 pg_type
 pg_attribute
 pg_proc
 pg_class
 json
 xml

实例:

testdb=# create table tb3(id serial,name varchar(10));
CREATE TABLE

testdb=# \d
             List of relations
 Schema |    Name    |   Type   |  Owner
--------+------------+----------+----------
 public | tb1        | table    | postgres
 public | tb1_id_seq | sequence | postgres
 public | tb2        | table    | postgres
 public | tb2_id_seq | sequence | postgres
 public | tb3        | table    | postgres
 public | tb3_id_seq | sequence | postgres
(6 rows)

查看当前数据库中所以表,相当于show tables;
testdb=# \dt;
        List of relations
 Schema | Name | Type  |  Owner
--------+------+-------+----------
 public | tb1  | table | postgres
 public | tb2  | table | postgres
 public | tb3  | table | postgres
(3 rows)

#查看tb3表结构,相当于desc tb3;
testdb=# \dt tb3;
        List of relations
 Schema | Name | Type  |  Owner
--------+------+-------+----------
 public | tb3  | table | postgres
(1 row)

#插入数据
testdb=# insert into tb3 (name)values('ding');
INSERT 0 1
testdb=# insert into tb3 (name)values('bao');
INSERT 0 1

testdb=# select * from tb3;
 id | name
----+------
  1 | shi
  2 | bao
(2 rows)


#update一条数据
testdb=# update tb3 set name='shi' where id=1;
UPDATE 1
testdb=# update tb3 set name='hang' where id=2;
UPDATE 1

testdb=# select * from tb3;
 id | name
----+------
  1 | shi
  2 | hang
(2 rows)

#delete表数据
testdb=# delete from tb3 where id=3;
DELETE 1
testdb=# select * from tb3;
 id | name
----+------
  1 | shi
(1 row)

#清空表
testdb=# truncate table tb3;  //table可省略truncate tb3 ,与mysql不同点
TRUNCATE TABLE
testdb=# select * from tb3;
 id | name
----+------
(0 rows)


实例:
testdb=# select generate_series(3,6);
 generate_series
-----------------
               3
               4
               5
               6
(4 rows)


#插入100000条记录时间3758.300 ms
testdb=# create table tb3(id serial primary key,name text);
CREATE TABLE

testdb=# insert into tb3(name) select (md5(random()::text)) from generate_series (1,1000000);
INSERT 0 1000000

testdb=# \timing on
Timing is on.

testdb=# insert into tb3(name) select (md5(random()::text)) from generate_series (1,1000000);
INSERT 0 1000000
Time: 3758.300 ms (00:03.758)
3、索引管理
#创建表
testdb=# create table tb1(id int,info text,crt_time timestamp);
CREATE TABLE
Time: 8.054 ms

#插入数据
testdb=# insert into tb1 select generate_series (1,1000000),(md5(random()::text)),clock_timestamp();
INSERT 0 1000000
Time: 1968.414 ms (00:01.968)
testdb=# selc

#查看表内容
testdb=# select * from tb1;

   id    |               info               |          crt_time
---------+----------------------------------+----------------------------
       1 | 359211e93d725c42c94a1c769130157b | 2023-07-23 02:50:18.560665
       2 | 443154fb6e327aef2f0680c2aaa9222b | 2023-07-23 02:50:18.560935
       3 | 2b13957f3f845c76f2f35f9adf070fed | 2023-07-23 02:50:18.560939
       4 | 60b217d1ba9648095d9059290c90c72c | 2023-07-23 02:50:18.56094
       5 | c40eef29b287a5e64e2c6325c6740064 | 2023-07-23 02:50:18.560942
       6 | 304a3bffa76172e8747b3aeaa01f7176 | 2023-07-23 02:50:18.560943
       7 | 9904065cca9d747c7d723575a02f70dd | 2023-07-23 02:50:18.560945
       8 | d82e3b7a376dbf5cf59c3dab726618d2 | 2023-07-23 02:50:18.560946
       9 | 7f8871da63b11dd33ec16b00c270f771 | 2023-07-23 02:50:18.560948
      10 | 19a590e956919231646f6a559bb5a25c | 2023-07-23 02:50:18.560949
      11 | 1223c6114e14eb44626662c6085666a9 | 2023-07-23 02:50:18.56095
      12 | 6af0efec96a10d8443eaa96e4d928814 | 2023-07-23 02:50:18.560952
      13 | 971ed122b7965250529c1a346e58b57e | 2023-07-23 02:50:18.560953
      14 | a6d06dcecb4c85f5c761cd0952944fa8 | 2023-07-23 02:50:18.560955
      15 | 796261191e4ab122a4e33280990cc25b | 2023-07-23 02:50:18.560956
      16 | 835d5ac05c6ee8a1d4fe6e196864cff2 | 2023-07-23 02:50:18.560958
      17 | 1a0b5c641c07ef633b96d595ddf41eb1 | 2023-07-23 02:50:18.560959
      18 | ab0a99c8c702141d4ea40e3fd8e5777e | 2023-07-23 02:50:18.56096
      19 | 0b89ce2eac322922da1a464b6a76916e | 2023-07-23 02:50:18.560962
      20 | 29f25dc9af38006b1b86f2b0b1677e2c | 2023-07-23 02:50:18.560963
      21 | f03b3d3915d9a4a65a3b2c390553d99a | 2023-07-23 02:50:18.560965
      22 | a0d130632a451420ff51a55761ccab06 | 2023-07-23 02:50:18.560966
      23 | 44e82f8cc6d5c5e0651d1bb823c57e4a | 2023-07-23 02:50:18.560968
      24 | 1a33db7857beec0c31dac6cd5e37b78a | 2023-07-23 02:50:18.560969
      25 | 5eb293b03c8a364c8ade47563bdf7345 | 2023-07-23 02:50:18.56097
      26 | 76dc61ef40c42e784ea2c7a71babdbdc | 2023-07-23 02:50:18.560972
      27 | d1e71b9eafde16a8e0c8049bcbcd88bc | 2023-07-23 02:50:18.560973
      28 | aa870c4a51413d03c27bee95cb73e003 | 2023-07-23 02:50:18.560975
      29 | f145dd8ba68d582ee3009e1f54e3a5e9 | 2023-07-23 02:50:18.560976
      30 | ba39359ab53d60e41a41573f21d4e9b5 | 2023-07-23 02:50:18.560978
      31 | f01f45654ca7429334b40215cd147767 | 2023-07-23 02:50:18.560979
      32 | 1118a1370c032f99ad4c1c9124d03fef | 2023-07-23 02:50:18.560981
      33 | 431dc362c7bf32234ae43c6b1f1c552f | 2023-07-23 02:50:18.560982
      34 | c331e2d170c643402440a0fdd8f6fe33 | 2023-07-23 02:50:18.560983
:

#创建索引
testdb=# create index  idx_tb1 on tb1(id);
CREATE INDEX
Time: 282.265 ms
testdb=# \d tb1;
                           Table "public.tb1"
  Column  |            Type             | Collation | Nullable | Default
----------+-----------------------------+-----------+----------+---------
 id       | integer                     |           |          |
 info     | text                        |           |          |
 crt_time | timestamp without time zone |           |          |
Indexes:
    "idx_tb1" btree (id)


#查询条件是否为索引列
testdb=# explain analyze select * from tb1 where id=9999;
                                                  QUERY PLAN
--------------------------------------------------------------------------------------------------------------
 Index Scan using idx_tb1 on tb1  (cost=0.42..8.44 rows=1 width=45) (actual time=0.034..0.035 rows=1 loops=1)
   Index Cond: (id = 9999)
 Planning Time: 0.173 ms
 Execution Time: 0.048 ms
(4 rows)

Time: 0.874 ms

#全盘扫描
testdb=# explain analyze select * from tb1 where info= 'ab0a99c8c702141d4ea40e3fd8e5777e';
                                                    QUERY PLAN
-------------------------------------------------------------------------------------------------------------------
 Gather  (cost=1000.00..15554.43 rows=1 width=45) (actual time=0.330..41.140 rows=1 loops=1)
   Workers Planned: 2
   Workers Launched: 2
   ->  Parallel Seq Scan on tb1  (cost=0.00..14554.33 rows=1 width=45) (actual time=21.906..34.424 rows=0 loops=3)
         Filter: (info = 'ab0a99c8c702141d4ea40e3fd8e5777e'::text)
         Rows Removed by Filter: 333333
 Planning Time: 0.063 ms
 Execution Time: 41.162 ms
(8 rows)

Time: 41.701 ms

#关闭索引,使用全盘扫描
testdb=# set enable_indexscan =off;
SET
Time: 0.838 ms
testdb=# explain analyze select * from tb1 where id=9999;
                                                   QUERY PLAN
----------------------------------------------------------------------------------------------------------------
 Bitmap Heap Scan on tb1  (cost=4.43..8.45 rows=1 width=45) (actual time=0.042..0.042 rows=1 loops=1)
   Recheck Cond: (id = 9999)
   Heap Blocks: exact=1
   ->  Bitmap Index Scan on idx_tb1  (cost=0.00..4.43 rows=1 width=0) (actual time=0.013..0.014 rows=1 loops=1)
         Index Cond: (id = 9999)
 Planning Time: 0.108 ms
 Execution Time: 0.062 ms
(7 rows)

Time: 0.625 ms
#开启索引
testdb=# set enable_indexscan =on;
SET
Time: 0.328 ms

#删除索引
testdb=# drop index idx_tb1;
DROP INDEX
Time: 4.781 ms
4、表空间
#列出所有表空间
testdb=# \db
       List of tablespaces
    Name    |  Owner   | Location
------------+----------+----------
 pg_default | postgres |
 pg_global  | postgres |
(2 rows)

testdb=# \db+
                                  List of tablespaces
    Name    |  Owner   | Location | Access privileges | Options |  Size  | Description
------------+----------+----------+-------------------+---------+--------+-------------
 pg_default | postgres |          |                   |         | 137 MB |
 pg_global  | postgres |          |                   |         | 560 kB |
(2 rows)

#复制表到文件中

#创建表空间
[postgres@pgsql ~]$ pwd
/home/postgres
[postgres@pgsql ~]$ mkdir ts1
[postgres@pgsql ~]$ ll
total 4
-rw------- 1 postgres postgres 2178 Jul 19 02:36 logfile
drwxrwxr-x 2 postgres postgres    6 Jul 21 16:09 ts1

#创建表空间
testdb=# create tablespace ts1 location '/home/postgres/ts1/';
CREATE TABLESPACE
Time: 4.111 ms


testdb=# select * from pg_relation_filepath('tb4');
            pg_relation_filepath
---------------------------------------------
 pg_tblspc/16414/PG_14_202107181/16397/16415
(1 row)

Time: 0.206 ms

#判断是否与上述路径一致
[postgres@pgsql ~]$ ll /pgsql/data/pg_tblspc/16414/PG_14_202107181/16397/16415
-rw------- 1 postgres postgres 0 Jul 21 16:23 /pgsql/data/pg_tblspc/16414/PG_14_202107181/16397/16415

#删除表空间
testdb=# drop table tb4 ;
DROP TABLE
Time: 1.102 ms

#删除表空间一定为空,若不为空则需删除存在表
testdb=# drop tablespace ts1 ;
DROP TABLESPACE
Time: 6.180 ms
七、总结pg的用户和角色管理。
#查看所有用户
hellodb=# \du
                                   List of roles
 Role name |                         Attributes                         | Member of
-----------+------------------------------------------------------------+-----------
 postgres  | Superuser, Create role, Create DB, Replication, Bypass RLS | {}

#查看当前用户
hellodb=# select user;
   user
----------
 postgres
(1 row)

hellodb=# select current_user;
 current_user
--------------
 postgres
(1 row)

#显示表、视图、序列的权限分配情况
hellodb=# \z
                              Access privileges
 Schema |   Name   | Type  | Access privileges | Column privileges | Policies
--------+----------+-------+-------------------+-------------------+----------
 public | classes  | table |                   |                   |
 public | coc      | table |                   |                   |
 public | courses  | table |                   |                   |
 public | scores   | table |                   |                   |
 public | students | table |                   |                   |
 public | teachers | table |                   |                   |
 public | toc      | table |                   |                   |
(7 rows)

hellodb=# \z students ;
                              Access privileges
 Schema |   Name   | Type  | Access privileges | Column privileges | Policies
--------+----------+-------+-------------------+-------------------+----------
 public | students | table |                   |                   |
(1 row)

\z: extra argument ";" ignored

#与\z功能相同
hellodb=# \dp;
                              Access privileges
 Schema |   Name   | Type  | Access privileges | Column privileges | Policies
--------+----------+-------+-------------------+-------------------+----------
 public | classes  | table |                   |                   |
 public | coc      | table |                   |                   |
 public | courses  | table |                   |                   |
 public | scores   | table |                   |                   |
 public | students | table |                   |                   |
 public | teachers | table |                   |                   |
 public | toc      | table |                   |                   |
(7 rows)
八、添加mage用户,magedu模式,准备zabbix库,配置mage用户的默认模式magedu,要求mage用户给zabbix库有所有权限。
1、创建mage账号
postgres=# create user mage with password '123456';
CREATE ROLE
2、创建schema模式magedu
postgres=# create schema magedu;
CREATE SCHEMA
3、创建zabbix库
postgres=# create database zabbix;
CREATE DATABASE
4、创建magedu模式并配置mage默认模式为magedu
zabbix=# create schema magedu;
CREATE SCHEMA
zabbix=# alter schema magedu owner to  mage ;
ALTER SCHEMA

zabbix=# \dn
  List of schemas
  Name  |  Owner
--------+----------
 magedu | mage
 public | postgres
(2 rows)
5、授权mage用户给数据库zabbix所有权限
postgres=# grant CREATE on DATABASE zabbix to mage ;
GRANT

zabbix=# \l+ zabbix
                                               List of databases
  Name  | Owner | Encoding |   Collate   |    Ctype    | Access privileges |  Size   | Tablespace | Description
--------+-------+----------+-------------+-------------+-------------------+---------+------------+-------------
 zabbix | mage  | UTF8     | en_US.UTF-8 | en_US.UTF-8 | =Tc/mage         +| 8561 kB | pg_default |
        |       |          |             |             | mage=CTc/mage     |         |            |
(1 row)
九、总结pgsql的进程结构,说明进程间如何协同工作的。
1、主要进程
1、postmaster 主进程
2、bgwriter 后台写进程
3、walwriter 预写式日志
4、checkpointer 检查点操作
5、autovacuum 自动清理进程
6、pgarch 归档进程  #相当于mysql的二进制文件
7、pgstat 统计数据收集进程
8、syslogger 系统日志进程
9、startup 启动进程
10、session 会话进程


[root@pgsql ~]# ps auxf | grep ^postgres
postgres   29546  0.0  0.4 382560 17640 ?        Ss   Jul21   0:01 /apps/pgsql/bin/postgres -D /pgsql/data
postgres   29548  0.0  2.6 382676 99660 ?        Ss   Jul21   0:00  \_ postgres: checkpointer
postgres   29549  0.0  0.1 382668  6896 ?        Ss   Jul21   0:00  \_ postgres: background writer
postgres   29550  0.0  0.2 382560  8076 ?        Ss   Jul21   0:00  \_ postgres: walwriter
postgres   29551  0.0  0.1 383236  6600 ?        Ss   Jul21   0:01  \_ postgres: autovacuum launcher
postgres   29552  0.0  0.1 237584  4920 ?        Ss   Jul21   0:03  \_ postgres: stats collector
postgres   29553  0.0  0.1 383108  5420 ?        Ss   Jul21   0:00  \_ postgres: logical replication launcher
postgres   35581  0.0  0.2 383492  8368 ?        Ss   04:44   0:00  \_ postgres: postgres postgres 192.168.188.20(45530) idle
2、进程的相互协同
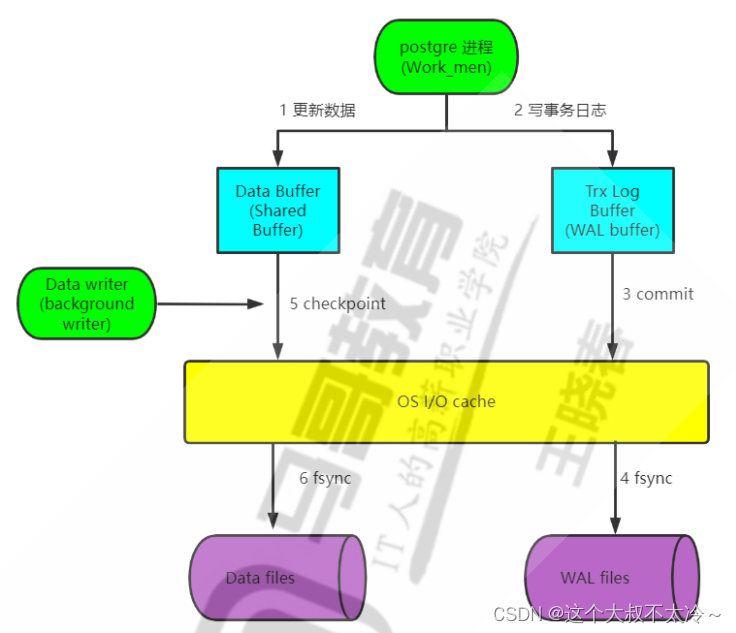
数据更新过程
1、先将数据库文件中的更改的数据加载至内存
2、在内存更新数据
3、将日志写入内存WAL的缓存区
4、将日志提交,将日志写入操作系统cache
5、同步日志到磁盘
6、后台写数据库的更新后的数据到操作系统cache
7、写完数据后,更新检查点checkpoint


进程间的协同工作取决于消息传递和通信机制。主进程通过进程间通信(Inter-Process Communication,IPC)机制与后台进程进行通信,如共享内存、信号、套接字等。前端进程通过客户端-服务器模型与主进程通信,通过连接套接字进行交互。

主进程负责将客户端请求分派给合适的后台进程来执行。后台进程执行任务后将结果返回给主进程,主进程再将结果发送给对应的前端进程,最终将结果返回给客户端。

通过这种进程间协同工作的方式,PostgreSQL实现了客户端与后台进程之间的并发处理、任务分配和结果返回,以实现高性能、可靠的数据库服务。
十、总结pgsql的数据目录中结构,说明每个文件的作用,并可以配上一些示例说明文件的作用。
1、数据库的目录结构

数据库数据存放在环境变量PGDATA指向数据目录。这个目录是在安装时指定的,所以在安装时需要指
定一个合适的目录作为数据目录的根目录,而且,每一个数据库实例都要有一个对应的目录。目录的初
始化是使用initdb来完成的。
初始化完成后,PGDATA数据目录下就会生成三个配置文件
postgresql.conf #数据库实例的主配置文件,基本上所有的配置参数都在此文件中。
pg_hba.conf #认证配置文件,配置了允许哪些IP的主机访问数据库,认证的方法是什么等信息。
pg_ident.conf #认证方式ident的用户映射文件。


此外在PGDATA目录下还会生成如下一些子目录
base #默认表空间的目录,每个数据库都对应一个base目录下的子目录,每个表和索引对应一个独立文件
global #这个目录对应pg_global表空间,存放实例中的共享对象
pg_clog #存储事务提交状态数据
pg_bba.conf #数据库访问控制文件
pg_log #数据库系统日志目录,在查询一些系统错误时就可查看此目录下日志文件。(根据配置定义,可能没
有这个目录)
pg_xact #提交日志commit log的目录,pg 9之前叫pg_clog
pg_multixact #共享行锁的事务状态数据
pg_notify #异步消息相关的状态数据pg_serial #串行隔离级别的事务状态数据
pg_snapshots #存储执行了事务snapshot导出的状态数据pg_stat_tmp #统计信息的临时文件
pg_subtrans #子事务状态数据
pg_stat #统计信息的存储目录。关闭服务时,将pg_stat_tmp目录中的内容移动至此目录实现保存
pg_stat_tmp #统计信息的临时存储目录。开启数据库时存放统计信息
pg_tblsp #存储了指向各个用户自建表空间实际目录的链接文件
pg_twophase#使用两阶段提交功能时分布式事务的存储目录
pg_wal #WAL日志的目录,早期版一本目录为pg_xlog
PG_VERSION #数据库版本
postmaster.opts #记录数据库启动时的命令行选项
postmaster.pid #数据库启动的主进程信息文件,包括PID,SPGDATA目录,数据库启动时间,监听端口,
socket文件路径,临听地址,共享内存的地址信息(ipsc可查看),主进程状态
2、包含的主要文件
[root@pgsql ~]# ls /pgsql/data/ -l
total 68
drwx------ 7 postgres postgres    71 Aug 10 18:26 base
drwx------ 2 postgres postgres  4096 Aug 10 18:26 global
drwx------ 2 postgres postgres     6 Aug 10 18:15 pg_commit_ts
drwx------ 2 postgres postgres     6 Aug 10 18:15 pg_dynshmem
-rw------- 1 postgres postgres  4857 Aug 10 18:26 pg_hba.conf
-rw------- 1 postgres postgres  1636 Aug 10 18:15 pg_ident.conf
drwx------ 4 postgres postgres    68 Aug 10 18:31 pg_logical
drwx------ 4 postgres postgres    36 Aug 10 18:15 pg_multixact
drwx------ 2 postgres postgres     6 Aug 10 18:15 pg_notify
drwx------ 2 postgres postgres     6 Aug 10 18:26 pg_replslot
drwx------ 2 postgres postgres     6 Aug 10 18:15 pg_serial
drwx------ 2 postgres postgres     6 Aug 10 18:15 pg_snapshots
drwx------ 2 postgres postgres     6 Aug 10 18:25 pg_stat
drwx------ 2 postgres postgres    84 Aug 10 21:13 pg_stat_tmp
drwx------ 2 postgres postgres    18 Aug 10 18:15 pg_subtrans
drwx------ 2 postgres postgres     6 Aug 10 18:15 pg_tblspc
drwx------ 2 postgres postgres     6 Aug 10 18:15 pg_twophase
-rw------- 1 postgres postgres     3 Aug 10 18:15 PG_VERSION
drwx------ 3 postgres postgres  4096 Aug 10 18:36 pg_wal
drwx------ 2 postgres postgres    18 Aug 10 18:15 pg_xact
-rw------- 1 postgres postgres    88 Aug 10 18:15 postgresql.auto.conf
-rw------- 1 postgres postgres 28826 Aug 10 18:23 postgresql.conf
-rw------- 1 postgres postgres    25 Aug 10 18:25 postmaster.opts
-rw------- 1 postgres postgres    77 Aug 10 18:25 postmaster.pid
3、包含的目录及文件作用
1、base/:该目录包含了数据库的每个表和索引的实际数据文件。
base/:该目录包含了数据库的每个表和索引的实际数据文件。每个数据库都有一个对应的子目录。

示例:base/16384/目录中存储了ID为16384的数据库的表和索引数据文件。
[root@pgsql ~]# ls /pgsql/data/base/ -l
total 48
drwx------ 2 postgres postgres 8192 Aug 10 18:15 1
drwx------ 2 postgres postgres 8192 Aug 10 18:15 13974
drwx------ 2 postgres postgres 8192 Aug 10 18:26 13975
drwx------ 2 postgres postgres 8192 Aug 10 18:28 16384
drwx------ 2 postgres postgres    6 Aug 10 18:26 pgsql_tmp
2、pg_wal/:这是Write-Ahead Log (WAL) 文件的位置。WAL是PostgreSQL中的事务日志,用于保证数据的持久性和一致性。
[root@pgsql ~]# ls /pgsql/data/pg_wal/ -l
total 98308
-rw------- 1 postgres postgres      338 Aug 10 18:26 000000010000000000000002.00000028.backup
-rw------- 1 postgres postgres 16777216 Aug 10 18:36 000000010000000000000007
-rw------- 1 postgres postgres 16777216 Aug 10 18:26 000000010000000000000008
-rw------- 1 postgres postgres 16777216 Aug 10 18:28 000000010000000000000009
-rw------- 1 postgres postgres 16777216 Aug 10 18:28 00000001000000000000000A
-rw------- 1 postgres postgres 16777216 Aug 10 18:28 00000001000000000000000B
-rw------- 1 postgres postgres 16777216 Aug 10 18:28 00000001000000000000000C
drwx------ 2 postgres postgres       59 Aug 10 18:36 archive_status

#查看内容
[root@pgsql ~]# pg_waldump /pgsql/data/pg_wal/000000010000000000000007
3、global/:该目录包含全局数据,例如系统表和共享簇的元数据。
[root@pgsql ~]# ls /pgsql/data/global/ -l
total 564
-rw------- 1 postgres postgres  8192 Aug 10 18:15 1213
-rw------- 1 postgres postgres 24576 Aug 10 18:15 1213_fsm
-rw------- 1 postgres postgres  8192 Aug 10 18:15 1213_vm
-rw------- 1 postgres postgres  8192 Aug 10 18:15 1214
-rw------- 1 postgres postgres 24576 Aug 10 18:15 1214_fsm
-rw------- 1 postgres postgres  8192 Aug 10 18:15 1214_vm
-rw------- 1 postgres postgres 16384 Aug 10 18:15 1232
-rw------- 1 postgres postgres 16384 Aug 10 18:15 1233
-rw------- 1 postgres postgres  8192 Aug 10 18:15 1260
-rw------- 1 postgres postgres 24576 Aug 10 18:15 1260_fsm
-rw------- 1 postgres postgres  8192 Aug 10 18:15 1260_vm
-rw------- 1 postgres postgres  8192 Aug 10 18:15 1261
-rw------- 1 postgres postgres 24576 Aug 10 18:15 1261_fsm
-rw------- 1 postgres postgres  8192 Aug 10 18:15 1261_vm
-rw------- 1 postgres postgres  8192 Aug 10 18:22 1262
-rw------- 1 postgres postgres 24576 Aug 10 18:15 1262_fsm
-rw------- 1 postgres postgres  8192 Aug 10 18:15 1262_vm
-rw------- 1 postgres postgres  8192 Aug 10 18:15 2396
-rw------- 1 postgres postgres 24576 Aug 10 18:15 2396_fsm
-rw------- 1 postgres postgres  8192 Aug 10 18:15 2396_vm
-rw------- 1 postgres postgres 16384 Aug 10 18:15 2397
-rw------- 1 postgres postgres 16384 Aug 10 18:17 2671
-rw------- 1 postgres postgres 16384 Aug 10 18:17 2672
-rw------- 1 postgres postgres 16384 Aug 10 18:15 2676
-rw------- 1 postgres postgres 16384 Aug 10 18:15 2677
-rw------- 1 postgres postgres 16384 Aug 10 18:15 2694
-rw------- 1 postgres postgres 16384 Aug 10 18:15 2695
-rw------- 1 postgres postgres 16384 Aug 10 18:15 2697
-rw------- 1 postgres postgres 16384 Aug 10 18:15 2698
-rw------- 1 postgres postgres     0 Aug 10 18:15 2846
-rw------- 1 postgres postgres  8192 Aug 10 18:15 2847
-rw------- 1 postgres postgres     0 Aug 10 18:15 2964
-rw------- 1 postgres postgres  8192 Aug 10 18:15 2965
-rw------- 1 postgres postgres     0 Aug 10 18:15 2966
-rw------- 1 postgres postgres  8192 Aug 10 18:15 2967
-rw------- 1 postgres postgres     0 Aug 10 18:15 3592
-rw------- 1 postgres postgres  8192 Aug 10 18:15 3593
-rw------- 1 postgres postgres     0 Aug 10 18:15 4060
-rw------- 1 postgres postgres  8192 Aug 10 18:15 4061
-rw------- 1 postgres postgres     0 Aug 10 18:15 4175
-rw------- 1 postgres postgres  8192 Aug 10 18:15 4176
-rw------- 1 postgres postgres     0 Aug 10 18:15 4177
-rw------- 1 postgres postgres  8192 Aug 10 18:15 4178
-rw------- 1 postgres postgres     0 Aug 10 18:15 4181
-rw------- 1 postgres postgres  8192 Aug 10 18:15 4182
-rw------- 1 postgres postgres     0 Aug 10 18:15 4183
-rw------- 1 postgres postgres  8192 Aug 10 18:15 4184
-rw------- 1 postgres postgres     0 Aug 10 18:15 4185
-rw------- 1 postgres postgres  8192 Aug 10 18:15 4186
-rw------- 1 postgres postgres     0 Aug 10 18:15 6000
-rw------- 1 postgres postgres  8192 Aug 10 18:15 6001
-rw------- 1 postgres postgres  8192 Aug 10 18:15 6002
-rw------- 1 postgres postgres     0 Aug 10 18:15 6100
-rw------- 1 postgres postgres  8192 Aug 10 18:15 6114
-rw------- 1 postgres postgres  8192 Aug 10 18:15 6115
-rw------- 1 postgres postgres  8192 Aug 10 18:36 pg_control
-rw------- 1 postgres postgres   512 Aug 10 18:15 pg_filenode.map
-rw------- 1 postgres postgres 23840 Aug 10 18:26 pg_internal.init、
5、pg_stat/:该目录包含了统计信息文件,记录了数据库活动和性能统计数据。
6、pg_multixact/:该目录存储多事务ID(MultiXact)文件,用于维护并发事务的状态。
[root@pgsql ~]# ls /pgsql/data/pg_multixact/ -l
total 0
drwx------ 2 postgres postgres 18 Aug 10 18:15 members
drwx------ 2 postgres postgres 18 Aug 10 18:15 offsets
7、pg_notify/:该目录包含了通知(Notification)文件,允许进程之间进行事件通信。
[root@pgsql ~]# ls /pgsql/data/pg_notify/ -l
total 0
8、postgresql.conf:数据库实例的主配置文件,基本上所有配置参数都在这个文件中。
[root@pgsql ~]# sed -nr '/^[a-z]/p' /pgsql/data/postgresql.conf
max_connections = 100			# (change requires restart)
shared_buffers = 128MB			# min 128kB
dynamic_shared_memory_type = posix	# the default is the first option
max_wal_size = 1GB
min_wal_size = 80MB
archive_mode = on		# enables archiving; off, on, or always
archive_command = 'test ! -f /archivedir/%f && cp %p /archivedir/%f'		# command to use to archive a logfile segment
recovery_target = 'immediate'		# 'immediate' to end recovery as soon as a
log_timezone = 'Asia/Shanghai'
datestyle = 'iso, mdy'
timezone = 'Asia/Shanghai'
lc_messages = 'en_US.UTF-8'			# locale for system error message
lc_monetary = 'en_US.UTF-8'			# locale for monetary formatting
lc_numeric = 'en_US.UTF-8'			# locale for number formatting
lc_time = 'en_US.UTF-8'				# locale for time formatting
default_text_search_config = 'pg_catalog.english'
9、pg_stat_tmp/:这个目录用于存储临时统计数据文件。
10、pg_hba.conf#身份验证配置文件,配置访问数据库的IP主机、身份验证方法和其他信息。
[root@pgsql ~]# sed -nr '/^[a-z]/p' /pgsql/data/pg_hba.conf
local   all             all                                     trust
host    all             all             127.0.0.1/32            trust
host    all             all             ::1/128                 trust

local   replication     all                                     trust
host    replication     all             0.0.0.0/0               md5
host    replication     all             127.0.0.1/32            trust
host    replication     all             ::1/128                 trust
11、pg_ident.conf#身份验证模式索引的用户映射文件。
十一、尝试将pgsql新版本的运行日志存储到数据库。
1、修改配置文件打开运行日志
#配置中添加以下两行
[root@pgsql ~]# vim /pgsql/data/postgresql.conf

log_destination = 'csvlog'
logging_collector = on

[root@pgsql ~]# su - postgres
Last login: Thu Aug 10 20:14:27 CST 2023 on pts/3
[postgres@pgsql ~]$ pg_ctl restart
waiting for server to shut down.... done
server stopped
waiting for server to start....2023-08-10 23:27:04.395 CST [3829] LOG:  redirecting log output to logging collector process
2023-08-10 23:27:04.395 CST [3829] HINT:  Future log output will appear in directory "log".
 done
server started

#将log导入表中
postgres=# copy pg_log from '/pgsql/data/log/postgresql-2023-08-11_022917.csv' with csv;
2、查看日志目录
[postgres@pgsql ~]$ ls /pgsql/data/log/ -l
total 8
-rw------- 1 postgres postgres 1270 Aug 10 23:27 postgresql-2023-08-10_232704.csv
-rw------- 1 postgres postgres  166 Aug 10 23:27 postgresql-2023-08-10_232704.log
十二、图文并茂总结LSN和WAL日志相关概念
1、概念
LSN(Log Sequence Number):
LSN是一个递增的数字,用于标识事务日志中的每个记录。它可以用来表示日志文件中的特定位置或特定事务的提交顺序。LSN有助于数据库引擎跟踪和管理事务的持久性。

WAL(Write-Ahead Logging):
WAL是一种持久性的日志记录机制,它确保在对数据库进行任何实际修改之前,相关的日志记录已经被持久化到硬盘上。
2、LSN 和 Online WAL 文件命名格式
LSN: Log Sequence Number 用于记录WAL文件当前的位置,这是WAL日志唯一的、全局的标识。
WAL 日志中写入是有顺序的,所以必须得记录WAL日志的写入顺序。而LSN就是负责给每条产生的WAL
日志记录唯一的编号
WAL 日志LSN编号规则: 高32位/低32位

WAL 文件名称为16进制的24个字符组成,每8个字符一组
每组的意义如下:
00000001 00000000 00000001
时间线     逻辑id   物理id
其中前8位:00000001表示timeline
中间8位:00000000表示logid,即LSN高32位
最后8位:00000001表示logseg,即LSN低32位/(2**24)的值,即低32位中最高8位,16进制的高2位
范例
#查看当前LSN
postgres=# select pg_current_wal_lsn();
 pg_current_wal_lsn
--------------------
 0/1718660
(1 row)

#查看当前LSN对应的WAL日志文件
postgres=# select pg_walfile_name(pg_current_wal_lsn());
     pg_walfile_name
--------------------------
 000000010000000000000001
(1 row)
3、查看 LSN和WAL 文件对应关系
#查看当前事务ID
postgres=# select txid_current();
-[ RECORD 1 ]+----
txid_current | 610
#查看当前LSN号
postgres=# select pg_current_wal_lsn();
-[ RECORD 1 ]------+-----------
pg_current_wal_lsn | 0/610001C0
#查看当前LSN对应的WAL日志文件
#WAL日志文件中的最后8位的logseg前6位始终是0,最后两位是LSN的低32位的前两位。如上例中logseg最
后两位是61,LSN低32位的前两位也是61。
postgres=# select pg_walfile_name(pg_current_wal_lsn());
-[ RECORD 1 ]---+-------------------------
pg_walfile_name | 000000010000000000000061
#查看当前WAL日志偏移量
#LSN在WAL日志文件中的偏移量即LSN低32位中后24位对应的十进制值。如上面0001C0对应十进制即下面的
448
postgres=# select pg_walfile_NAME_OFFSET(pg_current_wal_lsn());
-[ RECORD 1 ]----------+-------------------------------
pg_walfile_name_offset | (000000010000000000000061,448)
#按时间排序显示WAL文件名
postgres=#select * from pg_ls_waldir() order by modification asc;
           name           |   size   |     modification
--------------------------+----------+------------------------
000000010000000000000023 | 16777216 | 2021-01-11 04:05:35+00
000000010000000000000025 | 16777216 | 2021-01-11 04:06:00+00
000000010000000000000024 | 16777216 | 2021-01-11 04:06:00+00
000000010000000000000026 | 16777216 | 2021-01-11 06:17:53+00
000000010000000000000022 | 16777216 | 2021-01-11 06:19:36+00
 (5 rows)
4、切换WAL日志
#默认WAL文件达到16M,自动切换另一个WAL
postgres=# select pg_switch_wal();
 pg_switch_wal
---------------
 0/2000078
(1 row)

postgres=# select pg_current_wal_lsn();
 pg_current_wal_lsn
--------------------
 0/3000060
(1 row)

#PG10版本前用下面命令
postgres=# select pg_switch_xlog();
5、查看 WAL 文件内容
命令pg_waldump可以查看WAL日志的具体内容
注意; pg_waldump执行结果中tx:后面的数字是txid,即事务ID,WAL中同一个事务的记录此值是相同的

[postgres@pgsql ~]$ pg_waldump /pgsql/data2/pg_wal/000000010000000000000002
rmgr: Standby     len (rec/tot):     50/    50, tx:          0, lsn: 0/02000028, prev 0/017187A8, desc: RUNNING_XACTS nextXid 735 latestCompletedXid 734 oldestRunningXid 735
rmgr: XLOG        len (rec/tot):     24/    24, tx:          0, lsn: 0/02000060, prev 0/02000028, desc: SWITCH
6、创建恢复点
#事先创建恢复点,将来可用它进行还原,相当于快照
postgres=# select pg_create_restore_point( 'test-restore-point');
 pg_create_restore_point
-------------------------
 0/30001B0
(1 row)
十三、实现WAL日志多种类型的备份,及数据还原。
1、归档 WAL 日志
[root@pgsql ~]# vim /pgsql/data2/postgresql.conf
wal_level = replica
archive_mode = on

#上面的命令中“archive_mode = on”表示打开归档备份
#参数archive_command的配置值是一个Unix的cp命令
#命令中的 %p表示在线WAL日志文件的全路径名称
#%f表示不包括路径的WAL日志文件名。

#显示日志详细等级
postgres=# show wal_level;
 wal_level
-----------
 replica
(1 row)

#查看二进制文件
postgres=# select * from pg_ls_waldir() order by modification asc;
           name           |   size   |      modification
--------------------------+----------+------------------------
 000000010000000000000001 | 16777216 | 2023-08-11 03:00:26+08
 000000010000000000000002 | 16777216 | 2023-08-11 03:00:55+08
 000000010000000000000003 | 16777216 | 2023-08-11 03:09:25+08
(3 rows)

postgres=# select pg_current_wal_lsn();
 pg_current_wal_lsn
--------------------
 0/30002D0
(1 row)

postgres=# select pg_walfile_name(pg_current_wal_lsn());
     pg_walfile_name
--------------------------
 000000010000000000000003
(1 row)

#开启日志归档
[root@pgsql ~]# mkdir /archivedir/
[root@pgsql ~]# chown -R postgres. /archivedir/
[root@pgsql ~]# ll -d /archivedir
drwxr-xr-x 2 postgres postgres 6 Aug  2 19:17 /archivedir
[root@pgsql ~]# vim /pgsql/data2/postgresql.conf

wal_level = replica  #此为默认值可以不做修改
archive_mode = on
archive_command = '[ ! -f /archivedir/%f ] && cp %p /archivedir/%f'

[postgres@pgsql ~]$ pg_ctl restart -D /pgsql/data2

#插入数据
postgres=# create database testdb;
CREATE DATABASE
postgres=# create table t1(id int);
CREATE TABLE
postgres=# insert into t1 values (generate_series(1,100000));
INSERT 0 100000
postgres=# select ctid,* from t1;
   ctid    |   id
-----------+--------
 (0,1)     |      1
 (0,2)     |      2
 (0,3)     |      3
 (0,4)     |      4
 (0,5)     |      5
 (0,6)     |      6
 (0,7)     |      7
 (0,8)     |      8
 (0,9)     |      9
 (0,10)    |     10
 (0,11)    |     11
 (0,12)    |     12
 (0,13)    |     13
 (0,14)    |     14
 (0,15)    |     15
 (0,16)    |     16
 (0,17)    |     17
 (0,18)    |     18
 (0,19)    |     19
 (0,20)    |     20
 (0,21)    |     21
 (0,22)    |     22
 (0,23)    |     23
 (0,24)    |     24
 (0,25)    |     25
 (0,26)    |     26
 (0,27)    |     27
 (0,28)    |     28
 (0,29)    |     29
 (0,30)    |     30
 (0,31)    |     31
 (0,32)    |     32
 (0,33)    |     33
 (0,34)    |     34
--More--
#说明:ctid表示数据所在的数据块的编号及位移
#比如(0,1) 表示第0个块中的第一条记录,块从0开始编号,记录从1开始编号

#触发检查点
checkpoint
#切换日志,即使当前日志文件不再使用,而切换使用下一个日志文件,如果开启归档,会自动触发对当前日志文
件的归档

postgres=# select pg_walfile_name(pg_current_wal_lsn());
     pg_walfile_name
--------------------------
 000000010000000000000003
(1 row)

postgres=# select pg_switch_wal();
 pg_switch_wal
---------------
 0/3640A38
(1 row)

#检查归档
/archivedir/
├── 000000010000000000000001
├── 000000010000000000000002
├── 000000010000000000000003
├── 000000010000000000000004
├── 000000010000000000000005
├── 000000010000000000000006
├── 000000010000000000000007
└── 000000010000000000000008

0 directories, 8 files
2、实现远程归档
#修改配置文件实现远程复制
[root@pgsql ~]# vim /pgsql/data/postgresql.conf

archive_command = 'scp %p postgres@192.168.188.20:/archivedir/%f'               # command to use to archive a logfile segment

[root@postgers /]# mkdir /archivedir/
[root@postgers /]# chown postgres. archivedir/
[root@postgers ~]# ls -d /archivedir/ -l
drwxr-xr-x 2 postgres postgres 4096 Aug  3 14:46 /archivedir/

#.88主机插入记录并验证
[postgres@pgsql ~]$ psql < for_loop.sql
You are now connected to database "hellodb" as user "postgres".
ERROR:  relation "emp" already exists
CREATE FUNCTION
 for_loop
----------

(1 row)

  count
---------
 4000000
(1 row)

#.20主机
[root@postgers ~]# ls /archivedir/ -l
total 81920
-rw------- 1 postgres postgres 16777216 Aug  3 14:42 00000001000000000000002A
-rw------- 1 postgres postgres 16777216 Aug  3 14:46 00000001000000000000002B
-rw------- 1 postgres postgres 16777216 Aug  3 14:46 00000001000000000000002C
-rw------- 1 postgres postgres 16777216 Aug  3 14:46 00000001000000000000002D
-rw------- 1 postgres postgres 16777216 Aug  3 14:46 00000001000000000000002E
3、数据还原
1、故障模拟
#创建备份目录,必须为空
 [root@postgers ~]# mkdir -p /pgsql/backup/

#备份
[root@postgers ~]# pg_basebackup -D /pgsql/backup/ -Ft -Pv -Upostgres -h192.168.188.88 -p5432 -R
Password:
pg_basebackup: initiating base backup, waiting for checkpoint to complete
pg_basebackup: checkpoint completed
pg_basebackup: write-ahead log start point: 0/51000028 on timeline 1
pg_basebackup: starting background WAL receiver
pg_basebackup: created temporary replication slot "pg_basebackup_17919"
584929/584929 kB (100%), 1/1 tablespace
pg_basebackup: write-ahead log end point: 0/51000138
pg_basebackup: waiting for background process to finish streaming ...
pg_basebackup: syncing data to disk ...
pg_basebackup: renaming backup_manifest.tmp to backup_manifest
pg_basebackup: base backup completed

[root@postgers ~]# ll /pgsql/backup/
total 601772
drwxr-xr-x 2 root root      4096 Aug 10 03:00 ./
drwxr-xr-x 3 root root      4096 Aug 10 02:50 ../
-rw------- 1 root root    447163 Aug 10 03:00 backup_manifest
-rw------- 1 root root 598968832 Aug 10 03:00 base.tar
-rw------- 1 root root  16778752 Aug 10 03:00 pg_wal.tar

[root@postgers ~]# file /pgsql/backup/*     */备注点啥
/pgsql/backup/backup_manifest: JSON data
/pgsql/backup/base.tar:        POSIX tar archive
/pgsql/backup/pg_wal.tar:      POSIX tar archive

#插入数据
hellodb=# insert INTO teachers values (10,'action',48,'F');
INSERT 0 1

hellodb=# select pg_walfile_name(pg_current_wal_lsn());
     pg_walfile_name
--------------------------
 000000010000000000000054
(1 row)

#模拟数据库删除
hellodb=# \c db1
You are now connected to database "db1" as user "postgres".
db1=# drop database hellodb;
DROP DATABASE


#发现故障,停止用户访问,查看当前日志
hellodb=# select pg_walfile_name(pg_current_wal_lsn());
     pg_walfile_name
--------------------------
 000000010000000000000054
(1 row)

#查看当前事务
db1=# select txid_current();
 txid_current
--------------
          968
(1 row)


2、故障还原:
#pg服务器上切换日志

db1=# select pg_switch_wal();
 pg_switch_wal
---------------
 0/54001B50
(1 row)

db1=# select pg_walfile_name(pg_current_wal_lsn());
     pg_walfile_name
--------------------------
 000000010000000000000055
(1 row)

#要在还原的服务器停止服务,准备还原
[root@pgsql ~]# su - postgres
Last login: Thu Aug  3 14:59:36 CST 2023 on pts/4
[postgres@pgsql ~]$ pg_ctl stop -D $PGDATA
waiting for server to shut down.... done
server stopped
[postgres@pgsql ~]$ rm -rf /pgsql/data/*         */啥都行

#数据还原,修改配置文件/pgsql/data/postgresql.conf

[root@pgsql ~]# vim /pgsql/data/postgresql.conf

259 restore_command = 'cp /archivedir/%f %p'        # command to use to restore an archived logfile segment

278 recovery_target_xid = '967' # the transaction ID up to which recovery will proceed


#重启数据库服务
[postgres@pgsql ~]$ pg_ctl restart
waiting for server to shut down.... done
server stopped
waiting for server to start....2023-08-03 17:47:56.989 CST [23001] LOG:  redirecting log output to logging collector process
2023-08-03 17:47:56.989 CST [23001] HINT:  Future log output will appear in directory "log".
 done
server started

#验证结果
postgres=# \c hellodb
You are now connected to database "hellodb" as user "postgres".
hellodb=# select * from teachers ;
 tid |     name      | age | gender
-----+---------------+-----+--------
   1 | Song Jiang    |  45 | M
   2 | Zhang Sanfeng |  94 | M
   3 | Miejue Shitai |  77 | F
   4 | Lin Chaoying  |  93 | F
   5 | d             |  25 | F
   7 | p             |  33 | M
  11 | c             |  30 | M
   8 | pan           |  18 | M
   6 | S             |  50 | M
  10 | action        |  48 | F
(9 rows)


#恢复到正常模式
postgres=# select pg_wal_replay_resume();
 pg_wal_replay_resume
----------------------

(1 row)

#验证数据是否还原
hellodb=# insert into teachers values(10,'end',8,'M');
INSERT 0 1
hellodb=# select * from teachers ;
 tid |     name      | age | gender
-----+---------------+-----+--------
   1 | Song Jiang    |  45 | M
   2 | Zhang Sanfeng |  94 | M
   3 | Miejue Shitai |  77 | F
   4 | Lin Chaoying  |  93 | F
   5 | d             |  25 | F
   7 | p             |  33 | M
  11 | c             |  30 | M
   8 | pan           |  18 | M
   6 | S             |  50 | M
  10 | end           |   8 | M
(10 rows)
十四、实现WAL日志完成主从流复制,要求在从节点上进行crontab数据备份,同时手工让主节点宕机,让从节点切换为主节点,并添加新的从节点。
十五、总结日志记录的内容包含什么
1、日志记录的内容包括:
日志记录的内容包括:
历史事件:时间,地点,人物,事件
日志级别:事件的关键性程度,Loglevel
2、sysklogd 系统日志服务
CentOS 5 之前版本采用的日志管理系统服务
klogd: linux kernel 记录内核日志
syslogd: system application 记录应用日志
事件记录格式:
日期时间 主机 进程[pid]: 事件内容
 C/S架构:通过TCP或UDP协议的服务完成日志记录传送,将分布在不同主机的日志实现集中管理

rsyslog是CentOS 6 以后版本的系统管理服务.它提供了高性能,出色的安全性和模块化设计。 尽管
rsyslog最初是常规的syslogd,但已发展成为一种瑞士军刀式的记录工具,能够接受来自各种来源的输
入,并将其转换,然后输出到不同的目的地。
当应用有限的处理时,RSYSLOG每秒可以将超过一百万的消息传递到本地目的地。 即使在远程的目的地
和更精细的处理中,性能通常也被认为是“惊人的”。
3、rsyslog特性
rsyslog 特性
多线程
UDP, TCP, SSL, TLS, RELP
MySQL, PGSQL, Oracle实现日志存储
强大的过滤器,可实现过滤记录日志信息中任意部分
自定义输出格式
适用于企业级中继链
十六、总结日志分类, 优先级别。图文并茂解释应用如何将日志发到rsyslog,并写到目标。
1、facility:设施,从功能或程序上对日志进行归类
#内置分类
auth, authpriv, cron, daemon,ftp,kern, lpr, mail, news, security(auth),
user, uucp, syslog
#自定义的分类
local0-local7
2、Priority 优先级别,从低到高排序
debug,info, notice, warn(warning), err(error), crit(critical), alert,
emerg(panic)
十七、总结rsyslog配置文件格式
/etc/rsyslog.conf 配置文件格式:由三部分组成
MODULES:相关模块配置
GLOBAL DIRECTIVES:全局配置
RULES:日志记录相关的规则配置
RULES配置格式:
facility.priority; facility.priority… target
facility格式:
* #所有的facility
facility1,facility2,facility3,... #指定的facility列表
priority格式:
*: 所有级别
none:没有级别,即不记录
PRIORITY:指定级别(含)以上的所有级别
=PRIORITY:仅记录指定级别的日志信息
target格式:
文件路径:通常在/var/log/,文件路径前的-表示异步写入
用户:将日志事件通知给指定的用户,* 表示登录的所有用户
日志服务器:@host,把日志送往至指定的远程UDP日志服务器 @@host 将日志发送到远程TCP日志服务器
管道: | COMMAND,转发给其它命令处理
通常的日志文件的格式:
日志文件有很多,如: /var/log/messages,cron,secure等,基本格式都是类似的。格式如下
事件产生的日期时间 主机 进程(pid):事件内容
范例:日志文件格式
[root@Rocky8 ~]#tail -f /var/log/messages
Aug 15 10:46:09 Rocky8 systemd[1607]: Reached target Timers.
Aug 15 10:46:09 Rocky8 systemd[1607]: Starting D-Bus User Message Bus Socket.
Aug 15 10:46:09 Rocky8 systemd[1607]: Reached target Paths.
Aug 15 10:46:09 Rocky8 systemd[1607]: Listening on D-Bus User Message Bus Socket.
Aug 15 10:46:09 Rocky8 systemd[1607]: Reached target Sockets.
Aug 15 10:46:09 Rocky8 systemd[1607]: Reached target Basic System.
Aug 15 10:46:09 Rocky8 systemd[1607]: Reached target Default.
Aug 15 10:46:09 Rocky8 systemd[1607]: Startup finished in 38ms.
Aug 15 10:46:09 Rocky8 systemd[1]: Started User Manager for UID 0.
Aug 15 10:46:09 Rocky8 systemd[1]: Started Session 1 of user root.
Aug 15 10:46:29 Rocky8 systemd-logind[1031]: New session 3 of user root.
Aug 15 10:46:29 Rocky8 systemd[1]: Started Session 3 of user root.
...

[root@Rocky8 ~]#tail -f /var/log/secure
Aug 15 10:09:03 Rocky8 sshd[1008]: Server listening on :: port 22.
Aug 15 10:09:03 Rocky8 polkitd[990]: Loading rules from directory /etc/polkit-1/rules.d
Aug 15 10:09:03 Rocky8 polkitd[990]: Loading rules from directory /usr/share/polkit-1/rules.d
Aug 15 10:09:03 Rocky8 polkitd[990]: Finished loading, compiling and executing 3 rules
Aug 15 10:09:03 Rocky8 polkitd[990]: Acquired the name org.freedesktop.PolicyKit1 on the system bus
Aug 15 10:46:09 Rocky8 sshd[1603]: Accepted password for root from 192.168.188.99 port 61162 ssh2
Aug 15 10:46:09 Rocky8 systemd[1607]: pam_unix(systemd-user:session): session opened for user root by (uid=0)
Aug 15 10:46:09 Rocky8 sshd[1603]: pam_unix(sshd:session): session opened for user root by (uid=0)
Aug 15 10:46:29 Rocky8 sshd[1653]: Accepted password for root from 192.168.188.99 port 61171 ssh2
Aug 15 10:46:29 Rocky8 sshd[1653]: pam_unix(sshd:session): session opened for user root by (uid=0)
十八、完成功能,sshd应用将日志写到rsyslog的local6分类,过滤所有级别,写入到/var/log/ssh.log。
1、范例:将ssh服务的日志记录至自定义的local的日志设备
①修改sshd服务的配置
[root@syslog-server ~]#vim /etc/ssh/sshd_config

35 # Logging
 36 #SyslogFacility AUTH
 37 #SyslogFacility AUTHPRIV
 38 SyslogFacility LOCAL6
 39 #LogLevel INFO


[root@syslog-server ~]#systemctl restart sshd.service
②修改rsyslog的配置文件
[root@syslog-server ~]# Vim /etc/rsyslog.conf

Local6.*     /var/log/sshd.log

[root@syslog-server ~]# systemctl restart rsyslog.service
③#测试
Ssh登录后,查看/var/log/sshd.log有记录
[root@syslog-servercd ~]#vim /var/log/sshd.log

  1 Aug 15 15:17:49 Rocky8 sshd[5727]: Received signal 15; terminating.
  2 Aug 15 15:17:49 Rocky8 sshd[5899]: Server listening on 0.0.0.0 port 22.
  3 Aug 15 15:17:49 Rocky8 sshd[5899]: Server listening on :: port 22.
  4 Aug 15 15:19:26 Rocky8 sshd[5912]: Accepted password for root from 192.168.188.20 port 41996 ssh2
  5 Aug 15 15:19:51 Rocky8 sshd[5914]: Received disconnect from 192.168.188.20 port 41996:11: disconnected by user
  6 Aug 15 15:19:51 Rocky8 sshd[5914]: Disconnected from user root 192.168.188.20 port 41996
  7 Aug 15 16:06:35 syslog-server sshd[5899]: Received signal 15; terminating.
  8 Aug 15 16:06:35 syslog-server sshd[6299]: Server listening on 0.0.0.0 port 22.
  9 Aug 15 16:06:35 syslog-server sshd[6299]: Server listening on :: port 22.
 10 Aug 15 16:07:35 syslog-server sshd[6299]: Received signal 15; terminating.
 11 Aug 15 16:07:35 syslog-server sshd[6299]: Received signal 15; terminating.
 12 Aug 15 16:07:35 syslog-server sshd[6341]: Server listening on 0.0.0.0 port 22.
 13 Aug 15 16:07:35 syslog-server sshd[6341]: Server listening on 0.0.0.0 port 22.
 14 Aug 15 16:07:35 syslog-server sshd[6341]: Server listening on :: port 22.
 15 Aug 15 16:07:35 syslog-server sshd[6341]: Server listening on :: port 22.
 16 Aug 15 16:09:14 syslog-server sshd[6341]: Received signal 15; terminating.
 17 Aug 15 16:09:14 syslog-server sshd[6402]: Server listening on 0.0.0.0 port 22.
 18 Aug 15 16:09:14 syslog-server sshd[6402]: Server listening on :: port 22.
 19 Aug 15 16:10:22 syslog-server sshd[6402]: Received signal 15; terminating.
 20 Aug 15 16:10:22 syslog-server sshd[6454]: Server listening on 0.0.0.0 port 22.
 21 Aug 15 16:10:22 syslog-server sshd[6454]: Server listening on :: port 22.
 22 Aug 15 08:26:50 postgers sshd[2336]: Accepted password for root from 192.168.188.82 port 52538 ssh2
 23 Aug 15 08:26:50 postgers sshd[2336]: Accepted password for root from 192.168.188.82 port 52538 ssh2
 24 Aug 15 08:30:05 postgers sshd[2422]: Accepted password for root from 192.168.188.88 port 42528 ssh2
 25 Aug 15 08:30:05 postgers sshd[2422]: Accepted password for root from 192.168.188.88 port 42528 ssh2

#logger测试
logger -p local2.info "hello sshd"
tail /var/log/sshd.log有记录
十九、完成功能,将3个主机(要求主机名为ip)的ssh日志,通过rsyslog服务将ssh日志写入到集中的主机上的rsyslog服务,写入到/var/log/all-ssh.log文件
#准备
rsyslog-server :192.168.188.82
ubuntu-client1:192.168.188.20
client2:192.168.188.88
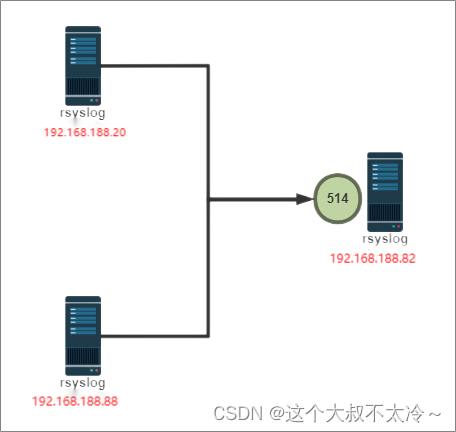
1、syslog-server配置
#CentOS 8 启用网络日志功能
[root@syslog-server ~]# Vim /etc/rsyslog.conf

//tcp端口
   module(load="imtcp")      //自带模块,取消注释即可
   input(type="imtcp" port="514")
   local6.*            /var/log/sshd.log

//udp端口
  module(load="imudp") # needs to be done just once
  input(type="imudp" port="514")

[root@syslog-server ~]#systemctl restart rsyslog.service

#修改ssh配置文件
[root@syslog-server ~]#vim /etc/ssh/sshd_config

SyslogFacility LOCAL6

[root@syslog-server ~]#systemctl restart sshd.service
2、客户端配置
#修改rsyslog配置
[root@postgers ~]# vim /etc/rsyslog.d/test.conf

local6.*       /var/log/sshd.log
local6.*       @@192.168.188.82:514   #tcp端口
local6.*       @192.168.188.82:514    #udp端口

[root@postgers ~]# systemctl restart rsyslog.service

#修改ssh配置文件
[root@postgers ~]# vim /etc/ssh/sshd_config

SyslogFacility LOCAL6

[root@postgers ~]# systemctl restart sshd.service
3、测试
[root@syslog-servercd ~]#vim /var/log/sshd.log

  1 Aug 15 15:17:49 Rocky8 sshd[5727]: Received signal 15; terminating.
  2 Aug 15 15:17:49 Rocky8 sshd[5899]: Server listening on 0.0.0.0 port 22.
  3 Aug 15 15:17:49 Rocky8 sshd[5899]: Server listening on :: port 22.
  4 Aug 15 15:19:26 Rocky8 sshd[5912]: Accepted password for root from 192.168.188.20 port 41996 ssh2
  5 Aug 15 15:19:51 Rocky8 sshd[5914]: Received disconnect from 192.168.188.20 port 41996:11: disconnected by user
  6 Aug 15 15:19:51 Rocky8 sshd[5914]: Disconnected from user root 192.168.188.20 port 41996
  7 Aug 15 16:06:35 syslog-server sshd[5899]: Received signal 15; terminating.
  8 Aug 15 16:06:35 syslog-server sshd[6299]: Server listening on 0.0.0.0 port 22.
  9 Aug 15 16:06:35 syslog-server sshd[6299]: Server listening on :: port 22.
 10 Aug 15 16:07:35 syslog-server sshd[6299]: Received signal 15; terminating.
 11 Aug 15 16:07:35 syslog-server sshd[6299]: Received signal 15; terminating.
 12 Aug 15 16:07:35 syslog-server sshd[6341]: Server listening on 0.0.0.0 port 22.
 13 Aug 15 16:07:35 syslog-server sshd[6341]: Server listening on 0.0.0.0 port 22.
 14 Aug 15 16:07:35 syslog-server sshd[6341]: Server listening on :: port 22.
 15 Aug 15 16:07:35 syslog-server sshd[6341]: Server listening on :: port 22.
 16 Aug 15 16:09:14 syslog-server sshd[6341]: Received signal 15; terminating.
 17 Aug 15 16:09:14 syslog-server sshd[6402]: Server listening on 0.0.0.0 port 22.
 18 Aug 15 16:09:14 syslog-server sshd[6402]: Server listening on :: port 22.
 19 Aug 15 16:10:22 syslog-server sshd[6402]: Received signal 15; terminating.
 20 Aug 15 16:10:22 syslog-server sshd[6454]: Server listening on 0.0.0.0 port 22.
 21 Aug 15 16:10:22 syslog-server sshd[6454]: Server listening on :: port 22.
 22 Aug 15 08:26:50 postgers sshd[2336]: Accepted password for root from 192.168.188.82 port 52538 ssh2
 23 Aug 15 08:26:50 postgers sshd[2336]: Accepted password for root from 192.168.188.82 port 52538 ssh2
 24 Aug 15 08:30:05 postgers sshd[2422]: Accepted password for root from 192.168.188.88 port 42528 ssh2
 25 Aug 15 08:30:05 postgers sshd[2422]: Accepted password for root from 192.168.188.88 port 42528 ssh2
 26 Aug 15 08:33:19 postgers sshd[2336]: Received disconnect from 192.168.188.82 port 52538:11: disconnected by user
 27 Aug 15 08:33:19 postgers sshd[2336]: Received disconnect from 192.168.188.82 port 52538:11: disconnected by user
 28 Aug 15 08:33:19 postgers sshd[2336]: Disconnected from user root 192.168.188.82 port 52538
 29 Aug 15 08:33:19 postgers sshd[2336]: Disconnected from user root 192.168.188.82 port 52538
 30 Aug 15 17:08:06 syslog-server sshd[6575]: Failed password for root from 192.168.188.20 port 53130 ssh2
 31 Aug 15 17:08:12 syslog-server sshd[6575]: Failed password for root from 192.168.188.20 port 53130 ssh2
 32 Aug 15 17:08:17 syslog-server sshd[6575]: Failed password for root from 192.168.188.20 port 53130 ssh2
 33 Aug 15 17:08:18 syslog-server sshd[6575]: Connection closed by authenticating user root 192.168.188.20 port 53130 [preauth]
 34 Aug 15 17:11:03 syslog-server sshd[6585]: Failed password for root from 192.168.188.20 port 53232 ssh2
 35 Aug 15 17:11:04 syslog-server sshd[6585]: Failed password for root from 192.168.188.20 port 53232 ssh2
 36 Aug 15 17:11:06 syslog-server sshd[6585]: Failed password for root from 192.168.188.20 port 53232 ssh2
"/var/log/sshd.log" 62L, 5929C
范例1:找到失败登录的IP
[root@syslog-server log]#awk '/Failed password/{print $(NF-3)}' /var/log/sshd.log
192.168.188.20
192.168.188.20
192.168.188.20
192.168.188.20
192.168.188.20
192.168.188.20
192.168.188.88
192.168.188.88
192.168.188.88
范例2:找出失败登录次数最多的前10个IP
[root@centos8 ~]#lastb -f btmp-test1 | awk '{print $3}'|sort | uniq -c|sort -
nr|head
8374 112.64.33.38
7041 221.125.235.4
6502 183.247.184.220
5970 203.190.163.125
5297 202.89.0.27
3062 119.163.122.32
2961 124.126.248.6
2921 92.222.1.40
2896 112.65.170.186
1955 118.97.213.118
[root@centos8 ~]#lastb -f btmp-test2 | awk '{ip[$3]++}END{for(i in ip){print
ip[i],i}}'|sort -nr|head
86294 58.218.92.37
43148 58.218.92.26
18036 112.85.42.201
10501 111.26.195.101
10501 111.231.235.49
10501 111.204.186.207
10501 111.11.29.199
10499 118.26.23.225
6288 42.7.26.142
4236 58.218.92.30
二十、总结/var/log/目录下常用日志文件作用。
/var/log/secure:系统安全日志,文本格式,应周期性分析
/var/log/btmp:当前系统上,用户的失败尝试登录相关的日志信息,二进制格式,lastb命令进行
查看
/var/log/wtmp:当前系统上,用户正常登录系统的相关日志信息,二进制格式,last命令可以查看
/var/log/lastlog:每一个用户最近一次的登录信息,二进制格式,lastlog命令可以查看
/var/log/dmesg:CentOS7 之前版本系统引导过程中的日志信息,文本格式,开机后的硬件变化
将不再记录,也可以通过专用命令dmesg查看,可持续记录硬件变化的情况
/var/log/boot.log 系统服务启动的相关信息,文本格式
/var/log/messages :系统中大部分的信息
/var/log/anaconda : anaconda的日志
二十一、总结journalctl命令的选项及示例
CentOS 7 以后版,利用Systemd 统一管理所有 Unit 的启动日志。带来的好处就是,可以只用
journalctl一个命令,查看所有日志(内核日志和应用日志)。
日志的配置文件:
/etc/systemd/journald.conf
journalctl****命令格式
journalctl [OPTIONS...] [MATCHES...]
选项说明:
--no-full, --full, -l
如果字段内容超长则以省略号(...)截断以适应列宽。
默认显示完整的字段内容(超长的部分换行显示或者被分页工具截断)。
老旧的 -l/--full 选项 仅用于撤销已有的 --no-full 选项,除此之外没有其他用处。
-a, --all
完整显示所有字段内容, 即使其中包含不可打印字符或者字段内容超长。
-f, --follow
只显示最新的日志项,并且不断显示新生成的日志项。 此选项隐含了 -n 选项。
-e, --pager-end
在分页工具内立即跳转到日志的尾部。 此选项隐含了 -n1000
以确保分页工具不必缓存太多的日志行。 不过这个隐含的行数可以被明确设置的 -n
选项覆盖。 注意,此选项仅可用于 less(1) 分页器。
-n, --lines=
限制显示最新的日志行数。 --pager-end 与 --follow 隐含了此选项。
此选项的参数:若为正整数则表示最大行数; 若为 "all" 则表示不限制行数;
若不设参数则表示默认值10行。
--no-tail
显示所有日志行, 也就是用于撤销已有的 --lines= 选项(即使与 -f 连用)。
-r, --reverse
反转日志行的输出顺序, 也就是最先显示最新的日志。
-o, --output=
控制日志的输出格式。 可以使用如下选项:
short
这是默认值, 其输出格式与传统的 syslog[1] 文件的格式相似, 每条日志一行。
short-iso
与 short 类似,只是将时间戳字段以 ISO 8601 格式显示。
short-precise
与 short 类似,只是将时间戳字段的秒数精确到微秒级别。
short-monotonic
与 short 类似,只是将时间戳字段的零值从内核启动时开始计算。
short-unix
与 short 类似,只是将时间戳字段显示为从"UNIX时间原点"(1970-1-1 00:00:00
UTC)以来的秒数。 精确到微秒级别。
verbose
以结构化的格式显示每条日志的所有字段。
export
将日志序列化为二进制字节流(大部分依然是文本) 以适用于备份与网络传输(详见
Journal Export Format[2] 文档)。
json
将日志项按照JSON数据结构格式化, 每条日志一行(详见 Journal JSON Format[3]
文档)。
json-pretty
将日志项按照JSON数据结构格式化, 但是每个字段一行, 以便于人类阅读。
json-sse
将日志项按照JSON数据结构格式化,每条日志一行,但是用大括号包围, 以适应
Server-Sent Events[4] 的要求。
cat
仅显示日志的实际内容, 而不显示与此日志相关的任何元数据(包括时间戳)。
--utc
以世界统一时间(UTC)表示时间
--no-hostname
不显示来源于本机的日志消息的主机名字段。 此选项仅对 short
系列输出格式(见上文)有效。
-x, --catalog
在日志的输出中增加一些解释性的短文本, 以帮助进一步说明日志的含义、
问题的解决方案、支持论坛、 开发文档、以及其他任何内容。
并非所有日志都有这些额外的帮助文本, 详见 Message Catalog Developer
Documentation[5] 文档。
注意,如果要将日志输出用于bug报告, 请不要使用此选项。
-q, --quiet
当以普通用户身份运行时, 不显示任何警告信息与提示信息。 例如:"-- Logs begin at
...", "-- Reboot --"
-m, --merge
混合显示包括远程日志在内的所有可见日志。
-b [ID][±offset], --boot=[ID][±offset]
显示特定于某次启动的日志, 这相当于添加了一个 "_BOOT_ID=" 匹配条件。
如果参数为空(也就是 ID 与 ±offset 都未指定), 则表示仅显示本次启动的日志。
如果省略了 ID , 那么当 ±offset 是正数的时候, 将从日志头开始正向查找,
否则(也就是为负数或零)将从日志尾开始反响查找。 举例来说, "-b
1"表示按时间顺序排列最早的那次启动, "-b 2"则表示在时间上第二早的那次启动; "-b
-0"表示最后一次启动, "-b -1"表示在时间上第二近的那次启动, 以此类推。 如果
±offset 也省略了, 那么相当于"-b -0", 除非本次启动不是最后一次启动(例如用
--directory 指定了另外一台主机上的日志目录)。
如果指定了32字符的 ID , 那么表示以此 ID 所代表的那次启动为基准
计算偏移量(±offset), 计算方法同上。 换句话说, 省略 ID 表示以本次启动为基准
计算偏移量(±offset)。
--list-boots
列出每次启动的 序号(也就是相对于本次启动的偏移量)、32字符的ID、
第一条日志的时间戳、最后一条日志的时间戳。
-k, --dmesg
仅显示内核日志。隐含了 -b 选项以及 "_TRANSPORT=kernel" 匹配项。
-t, --identifier=SYSLOG_IDENTIFIER
仅显示 syslog[1] 识别符为 SYSLOG_IDENTIFIER 的日志项。
可以多次使用该选项以指定多个识别符。
-u, --unit=UNIT|PATTERN
仅显示属于特定单元的日志。 也就是单元名称正好等于 UNIT 或者符合 PATTERN
模式的单元。 这相当于添加了一个 "_SYSTEMD_UNIT=UNIT" 匹配项(对于 UNIT 来说),
或一组匹配项(对于 PATTERN 来说)。
可以多次使用此选项以添加多个并列的匹配条件(相当于用"OR"逻辑连接)。
--user-unit=
仅显示属于特定用户会话单元的日志。 相当于同时添加了 "_SYSTEMD_USER_UNIT=" 与
"_UID=" 两个匹配条件。
可以多次使用此选项以添加多个并列的匹配条件(相当于用"OR"逻辑连接)。
-p, --priority=
根据日志等级(包括等级范围)过滤输出结果。 日志等级数字与其名称之间的对应关系如下
(参见 syslog(3)): "emerg" (0), "alert" (1), "crit" (2), "err" (3),
"warning" (4), "notice" (5), "info" (6), "debug" (7) 。
若设为一个单独的数字或日志等级名称, 则表示仅显示小于或等于此等级的日志
(也就是重要程度等于或高于此等级的日志)。 若使用 FROM..TO.. 设置一个范围,
则表示仅显示指定的等级范围内(含两端)的日志。 此选项相当于添加了 "PRIORITY="
匹配条件。
-c, --cursor=
从指定的游标(cursor)开始显示日志。
[提示]每条日志都有一个"__CURSOR"字段,类似于该条日志的指纹。
--after-cursor=
从指定的游标(cursor)之后开始显示日志。 如果使用了 --show-cursor 选项,
则也会显示游标本身。
--show-cursor
在最后一条日志之后显示游标, 类似下面这样,以"--"开头:
-- cursor: s=0639...
游标的具体格式是私有的(也就是没有公开的规范), 并且会变化。
-S, --since=, -U, --until=
显示晚于指定时间(--since=)的日志、显示早于指定时间(--until=)的日志。
参数的格式类似 "2012-10-30 18:17:16" 这样。 如果省略了"时:分:秒"部分,
则相当于设为 "00:00:00" 。 如果仅省略了"秒"的部分则相当于设为 ":00" 。
如果省略了"年-月-日"部分, 则相当于设为当前日期。 除了"年-月-日 时:分:秒"格式,
参数还可以进行如下设置: (1)设为 "yesterday", "today", "tomorrow"
以表示那一天的零点(00:00:00)。 (2)设为 "now" 以表示当前时间。
(3)可以在"年-月-日 时:分:秒"前加上 "-"(前移) 或 "+"(后移)
前缀以表示相对于当前时间的偏移。 关于时间与日期的详细规范, 参见
systemd.time(7)
-F, --field=
显示所有日志中某个字段的所有可能值。 [译者注]类似于SQL语句:"SELECT DISTINCT
某字段 FROM 全部日志"
-N, --fields
输出所有日志字段的名称
--system, --user
仅显示系统服务与内核的日志(--system)、 仅显示当前用户的日志(--user)。
如果两个选项都未指定,则显示当前用户的所有可见日志。
-M, --machine=
显示来自于正在运行的、特定名称的本地容器的日志。 参数必须是一个本地容器的名称。
-D DIR, --directory=DIR
仅显示来自于特定目录中的日志, 而不是默认的运行时和系统日志目录中的日志。
--file=GLOB
GLOB 是一个可以包含"?"与"*"的文件路径匹配模式。 表示仅显示来自与指定的 GLOB
模式匹配的文件中的日志, 而不是默认的运行时和系统日志目录中的日志。
可以多次使用此选项以指定多个匹配模式(多个模式之间用"OR"逻辑连接)。
--root=ROOT
在对日志进行操作时, 将 ROOT 视为系统的根目录。 例如 --update-catalog 将会创建
ROOT/var/lib/systemd/catalog/database
--new-id128
此选项并不用于显示日志内容, 而是用于重新生成一个标识日志分类的 128-bit ID 。
此选项的目的在于 帮助开发者生成易于辨别的日志消息, 以方便调试。
--header
此选项并不用于显示日志内容, 而是用于显示日志文件内部的头信息(类似于元数据)。
--disk-usage
此选项并不用于显示日志内容,
而是用于显示所有日志文件(归档文件与活动文件)的磁盘占用总量。
--vacuum-size=, --vacuum-time=, --vacuum-files=
这些选项并不用于显示日志内容,
而是用于清理日志归档文件(并不清理活动的日志文件), 以释放磁盘空间。
--vacuum-size= 可用于限制归档文件的最大磁盘使用量 (可以使用 "K", "M", "G", "T"
后缀); --vacuum-time= 可用于清除指定时间之前的归档 (可以使用 "s", "m", "h",
"days", "weeks", "months", "years" 后缀); --vacuum-files=
可用于限制日志归档文件的最大数量。 注意,--vacuum-size= 对 --disk-usage
的输出仅有间接效果, 因为 --disk-usage 输出的是归档日志与活动日志的总量。
同样,--vacuum-files= 也未必一定会减少日志文件的总数,
因为它同样仅作用于归档文件而不会删除活动的日志文件。
此三个选项可以同时使用,以同时从三个维度去限制归档文件。
若将某选项设为零,则表示取消此选项的限制。
--list-catalog [128-bit-ID...]
简要列出日志分类信息, 其中包括对分类信息的简要描述。
如果明确指定了分类ID(128-bit-ID), 那么仅显示指定的分类。
--dump-catalog [128-bit-ID...]
详细列出日志分类信息 (格式与 .catalog 文件相同)。
如果明确指定了分类ID(128-bit-ID), 那么仅显示指定的分类。
--update-catalog
更新日志分类索引二进制文件。
每当安装、删除、更新了分类文件,都需要执行一次此动作。
--setup-keys
此选项并不用于显示日志内容, 而是用于生成一个新的FSS(Forward Secure
Sealing)密钥对。 此密钥对包含一个"sealing key"与一个"verification key"。
"sealing key"保存在本地日志目录中, 而"verification key"则必须保存在其他地方。
详见 journald.conf(5) 中的 Seal= 选项。
--force
与 --setup-keys 连用, 表示即使已经配置了FSS(Forward Secure Sealing)密钥对,
也要强制重新生成。
--interval=
与 --setup-keys 连用,指定"sealing key"的变化间隔。
较短的时间间隔会导致占用更多的CPU资源, 但是能够减少未检测的日志变化时间。
默认值是 15min
--verify
检查日志文件的内在一致性。 如果日志文件在生成时开启了FSS特性, 并且使用
--verify-key= 指定了FSS的"verification key",
那么,同时还将验证日志文件的真实性。
--verify-key=
与 --verify 选项连用, 指定FSS的"verification key"
--sync
要求日志守护进程将所有未写入磁盘的日志数据刷写到磁盘上,
并且一直阻塞到刷写操作实际完成之后才返回。 因此该命令可以保证当它返回的时候,
所有在调用此命令的时间点之前的日志, 已经全部安全的刷写到了磁盘中。
--flush
要求日志守护进程 将 /run/log/journal 中的日志数据 刷写到 /var/log/journal 中
(如果持久存储设备当前可用的话)。 此操作会一直阻塞到操作完成之后才会返回,
因此可以确保在该命令返回时, 数据转移确实已经完成。
注意,此命令仅执行一个单独的、一次性的转移动作, 若没有数据需要转移,
则此命令什么也不做, 并且也会返回一个表示操作已正确完成的返回值。
--rotate
要求日志守护进程滚动日志文件。 此命令会一直阻塞到滚动完成之后才会返回。
-h, --help
显示简短的帮助信息并退出。
--version
显示简短的版本信息并退出。
--no-pager
不将程序的输出内容管道(pipe)给分页程序
二十二、完成将多个主机(要求主机名为ip)的nginx日志集中写入到mysql表中
设置nginx转储
cat /etc/logrotate.d/nginx
/var/log/nginx/*.log {
daily
rotate 100
missingok
compress
delaycompress
notifempty
create 644 ngnix nginx
postrotate
if [ -f /app/nginx/logs/nginx.pid ]; then
kill -USR1 `cat /app/nginx/logs/nginx.pid`
fi
endscript
}
二十三、尝试使用logrotate服务切割nginx日志,每天切割一次,要求大于不超过3M, 保存90天的日志, 旧日志以时间为后缀,要求压缩。
实例:对指定日志手动执行日志转储
[root@rsyslog-mysql ~]# dd if=/dev/zero of=/var/log/test1.log bs=2M count=1;
1+0 records in
1+0 records out
2097152 bytes (2.1 MB, 2.0 MiB) copied, 0.00145751 s, 1.4 GB/s
[root@rsyslog-mysql ~]# dd if=/dev/zero of=/var/log/test2.log bs=2M count=1;
1+0 records in
1+0 records out
2097152 bytes (2.1 MB, 2.0 MiB) copied, 0.00139551 s, 1.5 GB/s
[root@rsyslog-mysql ~]# ll /var/log/test*
-rw-r--r-- 1 root root 2097152 Aug 16 17:16 /var/log/test1.log
-rw-r--r-- 1 root root 2097152 Aug 16 17:17 /var/log/test2.log

[root@rsyslog-mysql ~]# vim /etc/logrotate.d/test1
[root@rsyslog-mysql ~]# cat /etc/logrotate.d/test1
/var/log/test1.log {
daily
rotate 5
compress
delaycompress
missingok
size 1M
notifempty
create 640 bin nobody
postrotate
echo `date +%F_%T` >> /data/test1.log
endscript
}


[root@rsyslog-mysql ~]# vim /etc/logrotate.d/test2
[root@rsyslog-mysql ~]# cat /etc/logrotate.d/test2
/var/log/test2.log {
daily
rotate 5
compress
delaycompress
missingok
size 1M
notifempty
create 644 root root
postrotate
echo `date +%F_%T` >> /data/test2.log
endscript
}

[root@rsyslog-mysql ~]# ls /etc/cron.daily/
logrotate
#对所有日志进行手动转储
[root@rsyslog-mysql ~]# logrotate /etc/logrotate.conf
[root@rsyslog-mysql ~]# ls /var/log/test*
/var/log/test1.log  /var/log/test1.log-20230816  /var/log/test2.log /var/log/test2.log-20230816


#对test1.log日志进行手动转储
[root@rsyslog-mysql ~]# dd if=/dev/zero of=/var/log/test1.log bs=2M count=1;
1+0 records in
1+0 records out
2097152 bytes (2.1 MB, 2.0 MiB) copied, 0.00155069 s, 1.4 GB/s
[root@rsyslog-mysql ~]# logrotate /etc/logrotate.d/test1
[root@rsyslog-mysql ~]# ls /var/log/test* -l
-rw-r----- 1 bin  nobody       0 Aug 16 17:27 /var/log/test1.log
-rw-r----- 1 bin  nobody 2097152 Aug 16 17:27 /var/log/test1.log.1
-rw-r--r-- 1 root root   2097152 Aug 16 17:16 /var/log/test1.log-20230816
-rw-r----- 1 bin  nobody    2067 Aug 16 17:26 /var/log/test1.log.2.gz
-rw-r--r-- 1 root root         0 Aug 16 17:23 /var/log/test2.log
-rw-r--r-- 1 root root   2097152 Aug 16 17:17 /var/log/test2.log-20230816


 6806
6806

 被折叠的 条评论
为什么被折叠?
被折叠的 条评论
为什么被折叠?
 到【灌水乐园】发言


